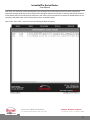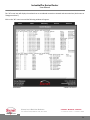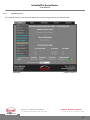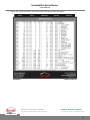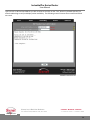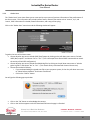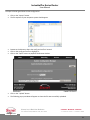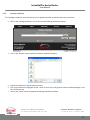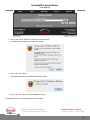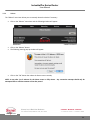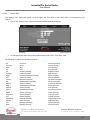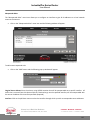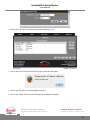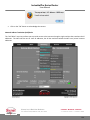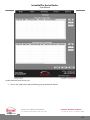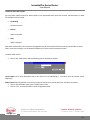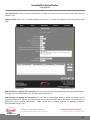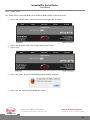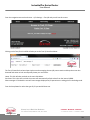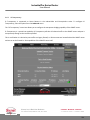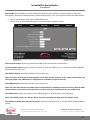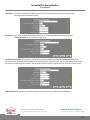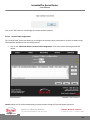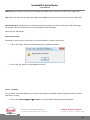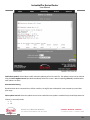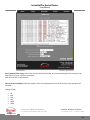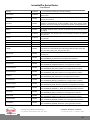
1
RAM TM 6000 Series Router IndustrialProTM Series Router and IP/V R-Series Router Software User Guide Version 1.09 Software Version 3.12 October 16, 2012 www.sixnet.com sixnet.com 1 RAM6000 and IndustrialProTM Series Router User Manual Table of Contents 1 ACCESSING THE GRAPHICAL MANAGEMENT INTERFACE .................................................................................................. 4 1.1 CONNECT PC TO SIXNET ROUTER .................................................................................................................................................. 4 1.2 SETUP PC IP ADDRESS ................................................................................................................................................................... 5 1.2.1 Open the Control Panel ........................................................................................................................................................ 5 1.2.2 Access Network and Internet Settings .................................................................................................................................. 7 1.2.3 Access Network Connection Settings ................................................................................................................................... 9 1.2.4 Access Local Area Connection ........................................................................................................................................... 10 1.2.5 Open Properties ................................................................................................................................................................. 11 1.2.6 Access Internet Protocol Properties .................................................................................................................................. 12 1.3 ACCESS SIXNET WEBSERVER ....................................................................................................................................................... 16 1.3.1 Sixnet Router Login Instructions ........................................................................................................................................ 18 1.3.2 SSH, TELNET, Serial RS232 Connections to Sixnet Routers ............................................................................................. 19 2 CELLULAR CONNECTIONS ....................................................................................................................................................... 19 2.1 CELLULAR CARD CONFIGURATION .............................................................................................................................................. 19 2.1.1 Cellular Carrier Selection.................................................................................................................................................. 20 2.1.2 Set the User Name, Password, and APN ............................................................................................................................ 21 2.1.3 Enter Provisioning Information (if applicable).................................................................................................................. 21 2.2 VERIFY CELLULAR CONNECTIVITY .............................................................................................................................................. 24 2.2.1 Cellular Connectivity Troubleshooting .............................................................................................................................. 25 2.2.2 Cellular Reception ............................................................................................................................................................. 25 2.3 VERIFYING IP CONNECTIVITY ...................................................................................................................................................... 26 2.3.1 Minimal Reception ............................................................................................................................................................. 28 2.3.2 Authentication Issues ......................................................................................................................................................... 29 2.3.3 Sixnet Technical Support.................................................................................................................................................... 30 3 GATEWAY ADMINISTRATION UTILITY ................................................................................................................................... 31 3.1 GATEWAY ADMINISTRATION UTILITY (GAU) INTRODUCTION .................................................................................................... 31 3.1.1 Organization ....................................................................................................................................................................... 31 3.1.2 Status .................................................................................................................................................................................. 32 3.1.3 Admin ................................................................................................................................................................................. 33 3.1.4 Networking ......................................................................................................................................................................... 34 3.1.5 Services .............................................................................................................................................................................. 35 3.2 STATUS TAB ................................................................................................................................................................................. 37 3.2.1 ARP Cache ......................................................................................................................................................................... 38 3.2.2 Feature Codes .................................................................................................................................................................... 39 3.2.3 Firewall Rules .................................................................................................................................................................... 40 3.2.4 Interface Information ......................................................................................................................................................... 41 3.2.5 Routing Information ........................................................................................................................................................... 45 3.2.6 Socket Statuses ................................................................................................................................................................... 50 3.2.7 System Processes................................................................................................................................................................ 54 3.2.8 System Services .................................................................................................................................................................. 56 3.2.9 System Information ............................................................................................................................................................ 58 3.2.10 Syslog ............................................................................................................................................................................. 60 3.2.11 CSQ History ................................................................................................................................................................... 62 3.2.12 Update History .............................................................................................................................................................. 63 3.2.13 Diagnostic Tools ............................................................................................................................................................ 64 3.3 ADMIN TAB .................................................................................................................................................................................. 76 3.3.1 Access Settings ................................................................................................................................................................... 77 3.3.2 Certificate Manager ........................................................................................................................................................... 79 Sixnet, Inc, A Red Lion Business 331 Ushers Road, Ballston Lake, NY 12019 www.sixnet.com CONNECT. MONITOR. CONTROL. T +1 518 877 5173 F +1 518 877 8346 Version XXX © 2010. Sixnet. All Rights Reserved. 2 2 RAM6000 and IndustrialProTM Series Router User Manual 3.3.3 Factory Defaults ................................................................................................................................................................ 80 3.3.4 Firmware Update ............................................................................................................................................................... 82 3.3.5 Gather Configs ................................................................................................................................................................... 84 3.3.6 Gather Stats ....................................................................................................................................................................... 87 3.3.7 System Configuration Manager ......................................................................................................................................... 90 3.3.8 Package Installation .......................................................................................................................................................... 97 3.3.9 Reboot ................................................................................................................................................................................ 99 3.3.10 System Time ................................................................................................................................................................. 100 3.4 NETWORKING TAB ..................................................................................................................................................................... 103 3.4.1 Cellular Connection ......................................................................................................................................................... 103 3.4.2 DNS Settings .................................................................................................................................................................... 117 3.4.3 Network Interfaces ........................................................................................................................................................... 118 3.4.4 Firewall ............................................................................................................................................................................ 125 3.4.5 PPP Dial Backup ............................................................................................................................................................. 152 3.4.6 PPP over Ethernet ........................................................................................................................................................... 155 3.4.7 Static Routes..................................................................................................................................................................... 157 3.4.8 TCP Global Settings .......................................................................................................................................................... 161 3.4.9 Tunnel (VPN) Settings ....................................................................................................................................................... 162 3.5 SERVICES TAB ....................................................................................................................................................................... 181 3.5.1 DHCP Services ................................................................................................................................................................ 181 3.5.2 Dynamic DNS ................................................................................................................................................................... 187 3.5.3 SN Proxy .......................................................................................................................................................................... 189 3.5.4 SixView Manager ............................................................................................................................................................. 191 3.5.5 SSH Server ....................................................................................................................................................................... 194 3.5.6 SSL Connections .............................................................................................................................................................. 196 3.5.7 Client Configuration .............................................................................................................Error! Bookmark not defined. 3.5.8 System Logging ................................................................................................................................................................ 208 3.5.9 TELNET Server ................................................................................................................................................................ 209 3.5.10 Ping Alive .......................................................................................................................................................................... 210 3.5.11 SNMP Agent ...................................................................................................................................................................... 212 3.5.12 Modbus ...................................................................................................................................Error! Bookmark not defined. 3.5.13 I/O Settings ........................................................................................................................................................................ 231 3.5.14 DNP3 ................................................................................................................................................................................. 236 3.6 ADVANCED TAB .................................................................................................................................................................... 246 3.6.1 IP Fallback....................................................................................................................................................................... 246 3.6.2 IP Transparency ....................................................................................................................Error! Bookmark not defined. 3.6.3 Out-Of-Band Management ....................................................................................................Error! Bookmark not defined. 3.6.4 Virtual Routing Redundancy Protocol (VRRP) .....................................................................Error! Bookmark not defined. 3.6.5 Expert Mode ..........................................................................................................................Error! Bookmark not defined. 3.6.6 Gwlnx ....................................................................................................................................Error! Bookmark not defined. 3.6.6.1 Serial IP ........................................................................................................................................................................... 271 3.6.6.2 Connect Table Configuration ...........................................................................................Error! Bookmark not defined. 3.6.6.3 Install Application ............................................................................................................Error! Bookmark not defined. 3.6.6.4 Install Configuration ........................................................................................................Error! Bookmark not defined. 3.6.6.5 Manage Configurations ....................................................................................................Error! Bookmark not defined. 3.6.6.6 IP Destination ...................................................................................................................Error! Bookmark not defined. 3.6.6.7 CLI Status .........................................................................................................................Error! Bookmark not defined. 3.6.6.8 Gwlnx Status .....................................................................................................................Error! Bookmark not defined. 3.6.6.9 Gwlnx Logfile .............................................................................................................................................................. 295 3.6.6.10 Transniff Filter .................................................................................................................Error! Bookmark not defined. 5 SOFTWARE LICENSING TERMS AND CONDITIONS .......................................................................................................... 302 FCC COMPLIANCE STATEMENT ......................................................................................................................................................... 302 INFORMATION TO THE USER ............................................................................................................................................................... 302 Sixnet, Inc, A Red Lion Business 331 Ushers Road, Ballston Lake, NY 12019 www.sixnet.com CONNECT. MONITOR. CONTROL. T +1 518 877 5173 F +1 518 877 8346 Version XXX © 2010. Sixnet. All Rights Reserved. 3 3 RAM6000 and IndustrialProTM Series Router User Manual 6 WARRANTY .................................................................................................................................................................................. 303 7 APPENDICES ................................................................................................................................................................................. 304 1 Accessing the Graphical Management Interface 1.1 Connect PC to Sixnet Router Connect a CAT-5 or CAT-6 Ethernet cable between the local PC and the Sixnet router’s Ethernet Port(s) Sixnet, Inc, A Red Lion Business 331 Ushers Road, Ballston Lake, NY 12019 www.sixnet.com CONNECT. MONITOR. CONTROL. T +1 518 877 5173 F +1 518 877 8346 Version XXX © 2010. Sixnet. All Rights Reserved. 4 4 RAM6000 and IndustrialProTM Series Router User Manual NOTE: If the Ethernet port’s Green light is lit, this indicates that the connection is running at 100Mb speed. If the Ethernet port’s Green light is not lit, this indicates that the connection is running at 10Mb speed. The Yellow light indicates the “link” status of the connection. Yellow steady = Link established. Yellow flickering = Data packets are being transferred. 1.2 Setup PC IP Address 1.2.1 Open the Control Panel Click on Start and browse the “Control Panel” menu item XP Sixnet, Inc, A Red Lion Business 331 Ushers Road, Ballston Lake, NY 12019 www.sixnet.com CONNECT. MONITOR. CONTROL. T +1 518 877 5173 F +1 518 877 8346 Version XXX © 2010. Sixnet. All Rights Reserved. 5 5 RAM6000 and IndustrialProTM Series Router User Manual Vista/Windows 7 The control panels should look similar to the following: XP Sixnet, Inc, A Red Lion Business 331 Ushers Road, Ballston Lake, NY 12019 www.sixnet.com CONNECT. MONITOR. CONTROL. T +1 518 877 5173 F +1 518 877 8346 Version XXX © 2010. Sixnet. All Rights Reserved. 6 6 RAM6000 and IndustrialProTM Series Router User Manual Vista/Windows 7 1.2.2 Access Network and Internet Settings Sixnet, Inc, A Red Lion Business 331 Ushers Road, Ballston Lake, NY 12019 www.sixnet.com CONNECT. MONITOR. CONTROL. T +1 518 877 5173 F +1 518 877 8346 Version XXX © 2010. Sixnet. All Rights Reserved. 7 7 RAM6000 and IndustrialProTM Series Router User Manual Click on the link to access network and Internet settings o XP – “Network and Internet Connections” o Vista/Windows 7 – “Network and Internet” The displays should be similar to the following: XP Vista/Windows 7 Sixnet, Inc, A Red Lion Business 331 Ushers Road, Ballston Lake, NY 12019 www.sixnet.com CONNECT. MONITOR. CONTROL. T +1 518 877 5173 F +1 518 877 8346 Version XXX © 2010. Sixnet. All Rights Reserved. 8 8 RAM6000 and IndustrialProTM Series Router User Manual 1.2.3 Access Network Connection Settings Click on the link to access network connection settings o XP – “Network Connections” o Vista/Windows 7 – “Network and Sharing Center” The display should look similar to the following: XP Vista/Windows 7 Sixnet, Inc, A Red Lion Business 331 Ushers Road, Ballston Lake, NY 12019 www.sixnet.com CONNECT. MONITOR. CONTROL. T +1 518 877 5173 F +1 518 877 8346 Version XXX © 2010. Sixnet. All Rights Reserved. 9 9 RAM6000 and IndustrialProTM Series Router User Manual 1.2.4 Access Local Area Connection Click on the link to access the local area connection o XP – “Local Area Connection” icon o Vista/Windows 7 – “View Status” next to Local Area Connection The display should look similar to the following: XP Sixnet, Inc, A Red Lion Business 331 Ushers Road, Ballston Lake, NY 12019 www.sixnet.com Vista/Windows 7 CONNECT. MONITOR. CONTROL. T +1 518 877 5173 F +1 518 877 8346 Version XXX © 2010. Sixnet. All Rights Reserved. 10 10 RAM6000 and IndustrialProTM Series Router User Manual 1.2.5 Open Properties Click on the “Properties” button (Vista/Windows 7 will display a popup window asking to confirm the operation) Click on the “Continue” button The display should look similar to the following: XP Sixnet, Inc, A Red Lion Business 331 Ushers Road, Ballston Lake, NY 12019 www.sixnet.com Vista/Windows 7 CONNECT. MONITOR. CONTROL. T +1 518 877 5173 F +1 518 877 8346 Version XXX © 2010. Sixnet. All Rights Reserved. 11 11 RAM6000 and IndustrialProTM Series Router User Manual 1.2.6 Access Internet Protocol Properties Click on the Internet Protocol item to highlight o XP – “Internet Protocol (TCP/IP)” o Vista/Windows 7 – “Internet Protocol Version 4 (TCP/IPv4)” Click on the “Properties” button The display should look similar to the following: XP Vista/Windows 7 Sixnet, Inc, A Red Lion Business 331 Ushers Road, Ballston Lake, NY 12019 www.sixnet.com CONNECT. MONITOR. CONTROL. T +1 518 877 5173 F +1 518 877 8346 Version XXX © 2010. Sixnet. All Rights Reserved. 12 12 IP/V R-Series Router User Manual METHOD 1: PC to (WAN /ETH0 on R3000/M1000/A2000 Series), (Ethernet on SN-6000) Select “Use the following IP address” and fill in the blank fields with the information below: IP address: Subnet mask: Default gateway: Preferred DNS: 192.168.0.2 255.255.255.0 192.168.0.1 192.168.0.1 Click “OK” The previous screen will appear Click “OK” www.sixnet.com 13 IndustrialPro Series Router User Manual METHOD 2: PC to LAN (ETH1) (R3000 Series only) Select “Use the following IP address” and fill in the blank fields with the information below: IP address: Subnet mask: Default gateway: Preferred DNS: 192.168.1.2 255.255.255.0 192.168.1.1 192.168.1.1 Click “OK” The previous screen will appear Click “OK” Sixnet, Inc, A Red Lion Business 331 Ushers Road, Ballston Lake, NY 12019 www.sixnet.com CONNECT. MONITOR. CONTROL. T +1 518 877 5173 F +1 518 877 8346 Version XXX © 2010. Sixnet. All Rights Reserved. 14 14 IndustrialPro Series Router User Manual Verify that you are connected to the Sixnet router. Open a Command Prompt window on your laptop o XP Start Run, type in cmd and <Enter> o Vista/Windows 7 – Start Search window just above the Start, type in cmd, wait for Vista/Windows 7 to locate the program, click on the cmd program it finds Verify connectivity to the router by running a “ping” to the IP Address of the Ethernet port you are connected to. METHOD 1: PC to (WAN /ETH0 on R3000/M1000/A2000 Series), (Ethernet on SN-6000) Type in ping 192.168.0.1<ENTER> The display should look similar to the following: Sixnet, Inc, A Red Lion Business 331 Ushers Road, Ballston Lake, NY 12019 www.sixnet.com CONNECT. MONITOR. CONTROL. T +1 518 877 5173 F +1 518 877 8346 Version XXX © 2010. Sixnet. All Rights Reserved. 15 15 IndustrialPro Series Router User Manual METHOD 2: PC to ETH1 (LAN) (R3000 Series only) Type in ping 192.168.1.1<ENTER> The display should look similar to the following: This shows the connection is up and functioning. 1.3 Access Sixnet Webserver Open a web browser and enter the following in the address bar: Sixnet, Inc, A Red Lion Business 331 Ushers Road, Ballston Lake, NY 12019 www.sixnet.com CONNECT. MONITOR. CONTROL. T +1 518 877 5173 F +1 518 877 8346 Version XXX © 2010. Sixnet. All Rights Reserved. 16 16 IndustrialPro Series Router User Manual METHOD 1 (WAN/eth0): METHOD 2 (LAN/eth1): http://192.168.0.1:10000/ http://192.168.1.1:10000/ You will receive a login pop-up screen. XP Vista/Windows 7 Sixnet, Inc, A Red Lion Business 331 Ushers Road, Ballston Lake, NY 12019 www.sixnet.com CONNECT. MONITOR. CONTROL. T +1 518 877 5173 F +1 518 877 8346 Version XXX © 2010. Sixnet. All Rights Reserved. 17 17 IndustrialPro Series Router User Manual 1.3.1 Sixnet Router Login Instructions User Name enter: admin (lowercase letters) For Password enter: six digit serial number of router (lowercase letters) Upon successfully logging in you will be presented with the following screen: NOTE: The following information can be used for all series of routers, even if screen shots indicate other models. Some models may have reduced options. At this point, you are connected to the Sixnet router and can configure it to meet your needs. Sixnet, Inc, A Red Lion Business 331 Ushers Road, Ballston Lake, NY 12019 www.sixnet.com CONNECT. MONITOR. CONTROL. T +1 518 877 5173 F +1 518 877 8346 Version XXX © 2010. Sixnet. All Rights Reserved. 18 18 IndustrialPro Series Router User Manual If the ppp0 interface does not show an IP address, this could indicate that the cellular air card (R3100/R1100) or internal SIM/Module has not been properly activated. Low or invalid signal strength may also contribute to the issue. Please contact your service provider to ensure proper activation. You may need to enter provisioning information in the NetworkingCellularProvisioning screen. Consult Section 2.1 in this document for more information. 1.3.2 SSH, TELNET, Serial RS232 Connections to Sixnet Routers For alternative connections to the Sixnet router, please contact Sixnet Technical Support Group for additional related documentation. 2 Cellular Connections 2.1 Cellular Card Configuration Cellular connectivity can be obtained through the use of an internal (embedded) RF Module, or on the R-series with the USB option you may insert a USB Aircard / dongle. Your Sixnet router is able to detect many USB cellular cards, but some must still be configured manually. If you are using a GPRS, EDGE, or HSDPA card that requires the use of a userid, password, and APN, configure your card manually, as covered in the next section. If you are using one of the newer 1xRTT/1xEVDO/1xEVDO rev A, USB based cards, your Sixnet router has probably automatically detected, configured, and activated your cellular connection for you, so you can skip this section and proceed to the next section to verify your cellular connectivity. External Aircards from vendors other than Sierra Wireless and Novatel, may need to be activated in a laptop first. This does not apply to SIM based Aircards. A list of supported external Aircards can be found at: http://sixnet.com/content/aircard-86.cfm Embedded modules for CDMA (Sprint / Verizon) should activate automatically over the air once they are powered on and connected to an antenna. This of course is after you contact your carrier and have an account enabled and connected to the embedded module by providing the ESN / MEID number from the module to your carrier. This is how the carrier will tie your account to the internal Cellular Modem. For some CDMA based 1xRTT internal modules and Sprint Data-Link connections, additional configuration must be set in the Provisioning screen, detailed later. Navigate through the GAU menus Networking Cellular Connection Configuration screen shown below: Sixnet, Inc, A Red Lion Business 331 Ushers Road, Ballston Lake, NY 12019 www.sixnet.com CONNECT. MONITOR. CONTROL. T +1 518 877 5173 F +1 518 877 8346 Version XXX © 2010. Sixnet. All Rights Reserved. 19 19 IndustrialPro Series Router User Manual GSM based carriers, such as AT&T, Bell Mobility and Telus will require a SIM card be inserted into the unit and an APN code to be entered to confirm you are the verified user of that SIM. Be sure to only insert and remove the SIM card while the unit is powered off. You can verify your cellular connectivity by viewing the Home Status page of the GAU screen and observe if the Cellular Interface status shows an IP Address. On the Home screen you should see: Interface, Activation, Connection, IP Address and Signal Strength. If you do not see an IP Address get populated for the PPP interface you may have an issue with your settings or your account has not been correctly activated. 2.1.1 Cellular Carrier Selection Select “Yes” to enable the interface to become active after the new settings are applied and upon subsequent system start-up. Optionally, you may select the cellular carrier you are using from the drop-down menu. Currently this will not change operation, and may be auto-detected. Generic CDMA and Generic GSM will allow options to cover all known carriers. Select the name of the provider of your cellular wireless data plan from the drop-down list provided. (if needed): Sixnet, Inc, A Red Lion Business 331 Ushers Road, Ballston Lake, NY 12019 www.sixnet.com CONNECT. MONITOR. CONTROL. T +1 518 877 5173 F +1 518 877 8346 Version XXX © 2010. Sixnet. All Rights Reserved. 20 20 IndustrialPro Series Router User Manual 2.1.2 Set the User Name, Password, and APN If you are using a GPRS, Edge, or HSDPA based card, enter the User Name, Password, and APN that was provided by your cellular carrier. This information should have been packaged with your SIM chip. If you do not have this information please contact your carrier’s account representative or the carrier’s support department before proceeding. Click the “Apply” button to save and activate the configuration. NOTE: The User Name, Password, and APN can be case sensitive. Be certain that you use the exact information as provided by your carrier. 2.1.3 Enter Provisioning Information (if applicable) For Sprint/CDMA installations using the R3200/A2200/M1200 series, or for Sprint Data link support, additional information may be required. Navigate to Networking Cellular Provisioning. Sixnet, Inc, A Red Lion Business 331 Ushers Road, Ballston Lake, NY 12019 www.sixnet.com CONNECT. MONITOR. CONTROL. T +1 518 877 5173 F +1 518 877 8346 Version XXX © 2010. Sixnet. All Rights Reserved. 21 21 IndustrialPro Series Router User Manual Enter your ESN (also show at the top) in HEX format. Choose your provisioning type (Select Vision IP Only for standard activation). Enter your SPC Unlock code, MDN, and MSID. Click Apply. For non-OMA capable devices, you should also click the “Force Provisioning Now” button. For installations using the R3200/A2200/M1200 series, a reboot may be required which will happen automatically if necessary. (R-Series) Observe the RSSI status lights on the front of the router. Within a minute, you will see the lights blinking in an upward fashion. This indicates that activation is taking place. (R-Series) Once activation is successful, the lights will return to a signal strength indication. Lights will flicker slightly every 2 seconds while attempting a tower connection. Once the signal lights remain steady, a connection to the cellular network has been achieved at the signal strength indicated. (SN-Series) When the WAN light is on steady, a ppp connection to the tower has been achieved. For more information, consult the “Provisioning Section” detailed under the “Networking Cellular Provisioning screen” section in Part III. Sixnet, Inc, A Red Lion Business 331 Ushers Road, Ballston Lake, NY 12019 www.sixnet.com CONNECT. MONITOR. CONTROL. T +1 518 877 5173 F +1 518 877 8346 Version XXX © 2010. Sixnet. All Rights Reserved. 22 22 IndustrialPro Series Router User Manual For Sprint OMA (automatic activation provisioning) capable devices, the screen should appear: Simply select OMA in the dropdown option and click apply. This will already be the default operation of OMA capable devices. When a connection is refused by the tower, the unit will automatically attempt automatic provisioning at regular intervals. You may click “Force Provisioning” to cause an immediate OMA attempt. Your PRL will also be automatically updated to the latest version every 3 months. To initiate an immediate PRL Update, you may click the Force PRL Update button (R-3300/SN-6600), or follow these instructions on R-3000/R-1000/A-2000 series units: Using a paper clip, press the multi-function button on the rear of the unit near the CONSOLE port. Hold for 5 seconds, until the front RSSI lights all flash. Once the LEDs go out, press the reset button 5 times until you see this pattern. Wait for the pattern to flash the “binary 5” pattern in confirmation. The PRL Update will take place over the air providing you have an adequate connection established. Sixnet, Inc, A Red Lion Business 331 Ushers Road, Ballston Lake, NY 12019 www.sixnet.com CONNECT. MONITOR. CONTROL. T +1 518 877 5173 F +1 518 877 8346 Version XXX © 2010. Sixnet. All Rights Reserved. 23 23 IndustrialPro Series Router User Manual 2.2 Verify Cellular Connectivity Browse to the Status screen that appears: As shown, the router is receiving good signal from the cellular network, it is connected, and has been issued an IP address. At this point, if you previously verified that your air card worked properly in your PC/laptop (R3100), or verified that the SIM is activated (R3300/SN6800), and have been accessing the GAU to configure your Sixnet gateway via its browser, you should be able to access the Internet. Open a browser on the PC/Laptop, and attempt to browse the Internet. Sixnet, Inc, A Red Lion Business 331 Ushers Road, Ballston Lake, NY 12019 www.sixnet.com CONNECT. MONITOR. CONTROL. T +1 518 877 5173 F +1 518 877 8346 Version XXX © 2010. Sixnet. All Rights Reserved. 24 24 IndustrialPro Series Router User Manual NOTE: Depending on the provisioning of your card, particularly in corporate applications in which the Sixnet router is providing cellular backup connectivity to wired circuits, your card may be restricted from Internet access. If this is the case, you may want to instead test to insure that you are able to access your corporate network. If you have any question as to your configuration, please check with your network administrator. If you were able to successfully access the Internet, or your corporate network, then congratulations, your Sixnet router is up and running and you have successfully completed the Quick Start. You may skip the troubleshooting section. 2.2.1 Cellular Connectivity Troubleshooting NOTE: If you were unable to access the Internet, or your corporate network, the section that follows will help you to determine the cause of your difficulties. If you are reading this section, you have followed all previous instructions and your Sixnet router is not communicating. This section will provide additional information to isolate the cause of difficulties. 2.2.2 Cellular Reception Before we get into specifics regarding how to identify and address specific problems that can be encountered, it is important that we spend a moment talking about cellular signal reception, and appropriate expectations. All of the major cellular carriers expend significant sums insuring that we have excellent signal coverage within their coverage areas. However, they have no control over the environments in which we attempt to place or use our cellular devices. The principles behind cellular data reception are similar to cellular phone reception. Therefore, our environment has the potential to significantly impact our ability to receive a good quality cellular signal. You should be aware that it is possible to stand in the parking lot of a building and have perfect reception, but walk just 10 feet inside a concrete and steel building and have absolutely no reception at all. The important thing to understand is that in many, many instances it is not the cellular network that causes reception problems, but the environment in which we place our cellular devices. Important Note about Cellular Antennas For this reason, Sixnet strongly recommends the use of external antennas when implementing cellular data. It is often the key to a successful implementation. Consult your Sixnet representative if you have questions about the appropriate use of external antennas. Sixnet, Inc, A Red Lion Business 331 Ushers Road, Ballston Lake, NY 12019 www.sixnet.com CONNECT. MONITOR. CONTROL. T +1 518 877 5173 F +1 518 877 8346 Version XXX © 2010. Sixnet. All Rights Reserved. 25 25 IndustrialPro Series Router User Manual 2.3 Verifying IP Connectivity First, check to make sure that your card is connecting to the cellular network and obtaining an IP address. Navigate to the GAU screen shown below: If your screen looks similar to the one shown above, you are having signal reception difficulties. As you will notice, the card is neither connected to the cellular network, nor has it been able to obtain an IP address from the network. You can further verify this condition by examining the LED signal meter: (R3000/M1000/A2000 units) Observe the signal meter in the middle of the front panel of the device as shown in the picture below: Sixnet, Inc, A Red Lion Business 331 Ushers Road, Ballston Lake, NY 12019 www.sixnet.com CONNECT. MONITOR. CONTROL. T +1 518 877 5173 F +1 518 877 8346 Version XXX © 2010. Sixnet. All Rights Reserved. 26 26 IndustrialPro Series Router User Manual If the top and bottom LEDs are flashing, the device is not receiving sufficient signal from the cellular towers in order to be able to connect to the network. Typically, 2-3 LEDs of reception are a minimum requirement for a sustainable connection. If it is displaying bars of signal that flash every 2 seconds, then signal is available to the tower, but a cellular connection has not been established. (SN6000 units) Observe the Signal LED as shown: Signal Sixnet, Inc, A Red Lion Business 331 Ushers Road, Ballston Lake, NY 12019 www.sixnet.com CONNECT. MONITOR. CONTROL. T +1 518 877 5173 F +1 518 877 8346 Version XXX © 2010. Sixnet. All Rights Reserved. 27 27 IndustrialPro Series Router User Manual OFF No signal available or signal strength is below -100 dBm ON Excellent signal strength = greater than -69 dBm Signal Fast: Every 300ms = -79 to -70 dBm FLASH Medium: Every 600ms = -89 to -80 dBm Slow: Every 1200ms = -99 to -90 dBm 2.3.1 Minimal Reception On occasion, you can find yourself in a situation where you have just enough signal to be able to communicate with the cellular tower and obtain an IP address, but not enough reception to be able to sustain a viable connection. If your cellular card is using dynamically assigned IP addresses, you can determine if you are in a situation like this by watching the “Cellular Interface” field in the screen below: Sixnet, Inc, A Red Lion Business 331 Ushers Road, Ballston Lake, NY 12019 www.sixnet.com CONNECT. MONITOR. CONTROL. T +1 518 877 5173 F +1 518 877 8346 Version XXX © 2010. Sixnet. All Rights Reserved. 28 28 IndustrialPro Series Router User Manual If you refresh this screen every few minutes and notice that the “IP Address” is changing frequently, it is possible that your router is connecting to the network and obtaining and IP address, and then the connection to the cellular network is being dropped. When the connection is re-established the device is then issued a different IP address. 2.3.2 Authentication Issues If you are using a GPRS/EDGE/HSDPA card, and have at least three LEDs of signal on the front panel signal meter, your radio connection to the network may be just fine. The problem may lie in logging onto the cellular network. Return to the screen shown below: Re-verify your userid, password, and APN information. Be sure to pay close attention: all three of these items can be case-sensitive and must be entered exactly in order to properly log into the cellular network. Don’t forget to click “Apply” if you make any changes. Sixnet, Inc, A Red Lion Business 331 Ushers Road, Ballston Lake, NY 12019 www.sixnet.com CONNECT. MONITOR. CONTROL. T +1 518 877 5173 F +1 518 877 8346 Version XXX © 2010. Sixnet. All Rights Reserved. 29 29 IndustrialPro Series Router User Manual 2.3.3 Sixnet Technical Support If you have followed all of the instructions up to this point, have satisfied yourself that you are not having an authentication problem, are convinced that you have sufficient reception, and your router is still not communicating, then please call Sixnet Technical Support at 1-877-432-9908. Live support is available from 8:00 a.m. - 4:30 p.m. CST. If you call after hours, please provide the agent will your contact information and a detailed description of your problem and we will respond to you the following day (or Monday if you phone after 4:30 pm. Friday). We will be happy to assist you in getting your router operational. When submitting a support question, it is most helpful to have a GatherStats from the unit in question. Please obtain one from the Admin GatherStats screen. Choose the Download Option, and save the resulting file to your PC. You may attach it to an email to [email protected] describing your issue. Sixnet, Inc, A Red Lion Business 331 Ushers Road, Ballston Lake, NY 12019 www.sixnet.com CONNECT. MONITOR. CONTROL. T +1 518 877 5173 F +1 518 877 8346 Version XXX © 2010. Sixnet. All Rights Reserved. 30 30 IndustrialPro Series Router User Manual 3 Gateway Administration Utility 3.1 Gateway Administration Utility (GAU) Introduction 3.1.1 Organization The Sixnet Gateway Administration Utility (GAU) is comprised of five major sections: Status Admin Networking Services Advanced By clicking the tabs along the top of the interface each of the major sections may be accessed, as shown below: Sixnet, Inc, A Red Lion Business 331 Ushers Road, Ballston Lake, NY 12019 www.sixnet.com CONNECT. MONITOR. CONTROL. T +1 518 877 5173 F +1 518 877 8346 Version XXX © 2010. Sixnet. All Rights Reserved. 31 31 IndustrialPro Series Router User Manual 3.1.2 Status The Status Tab is where you will find information on the actual system. The Status Tab is organized into twelve (12) sections: Arp Cache: Shows connected network systems Feature Codes: Gives a list of the features running on this system Firewall Rules: Displays IPTABLES readout of system Interface Information: System Interface information o Summary: Brief summary of the interface status o Details: Detailed information on the interfaces o Multicast: Displays the interface multicast information Routing Information: Routing information o Policy Routing Table: Displays policies used for routing o Standard Routing Table: Displays routing table information Socket Statuses: Active Internet Connections o TCP Only: Internet connections with established connections o All: Internet connections to include TCP, UDP, and Unix connections System Processes: Displays list of all running processes System Services: Displays list of services and current status: on or off System Information: Displays information on Filesystem utilization and Memory Usage Syslog: Displays current syslog information with options to change and search the syslog information Update History: Displays list of updates to the system Diagnostic Tools: Connectivity testing tools o Ping: Allows you to “ping” an external domain or IP Address o Socket Test: Allows you to “telnet” to desire destination IP and Port address and display the result of socket connection. o Speed Test: Allows you to “test” the bandwidth and latency of an activated unit’s cellular connection. o Ping: Allows you to “ping” an external domain or IP Address Sixnet, Inc, A Red Lion Business 331 Ushers Road, Ballston Lake, NY 12019 www.sixnet.com CONNECT. MONITOR. CONTROL. T +1 518 877 5173 F +1 518 877 8346 Version XXX © 2010. Sixnet. All Rights Reserved. 32 32 IndustrialPro Series Router User Manual 3.1.3 Admin The Admin Tab is where you can configure how the Sixnet router is accessed, update the firmware, reset the system to default, set the system time, and reboot the Sixnet router remotely. The Admin Tab is organized into ten (10) sections: Access Settings: Changes access from HTTP to HTTPS and changes the password used to login Certificate Manager: Manage the SSL certificates used by the system Factory Defaults: Restore system to factory defaults WARNING: This action will delete all custom configurations placed on the system. Extreme care should be exercised to prevent inadvertent use of this process. Firmware Update: Used to upgrade the Sixnet firmware of the system Gather Configs: Used to obtain the configuration files to export Gather Stats: Used to obtain a “snapshot” of the running processes of the system Manage System Configuration: Used to Export or Import the GAU Master Configuration File Package Installation: Used to install system patches and updates Reboot: Used to reboot the system remotely NOTE: This action will disconnect your login session while the system restarts. You will need to login to the Sixnet router after 3 – 5 minutes to allow for reboot. System Time: Used to change the Time Zone, date, and configure use of a NTP client. Sixnet, Inc, A Red Lion Business 331 Ushers Road, Ballston Lake, NY 12019 www.sixnet.com CONNECT. MONITOR. CONTROL. T +1 518 877 5173 F +1 518 877 8346 Version XXX © 2010. Sixnet. All Rights Reserved. 33 33 IndustrialPro Series Router User Manual 3.1.4 Networking The Networking Tab is where you can configure anything associated with networking the Sixnet router to the Internet and local interfaces. The Networking Tab is organized into nine (9) sections: Cellular Connection: o Configuration: Used to configure the air card / SIM on the unit o Provisioning: Used to setup the service type on some, not all, air cards DNS Settings: Used to configure DNS request to an external server Ethernet Interfaces: o eth0: Used to configure IP Address/Network for Ethernet 0 interface o eth1: Used to configure IP Address/Network for Ethernet 1 interface o usb: Used to configure IP Address/Network for Usb interface, If available on the unit Firewall: organized into eight (8) sub-sections: o General Settings: Used to configure common access services to the Sixnet router and configure how the interfaces are interpreted o DMZ Host Rules: Used to configure rules to route through a DMZ o Filter Rules: Used to strictly define routes between interfaces o Host Redirect Rules: Used to redirect specific ports to alternate ports through the Sixnet router o Masquerade Rules: Used to define networks to be considered as internal entities o NAT Rules: Used to define rules for Network Address Translation between interfaces on the Sixnet router o Service Access Rules: Used to define specific port/port range allowed into the Sixnet router through the firewall o Subnet Blacklist Rules: Used to define specific networks that are strictly denied access to the Sixnet router o Subnet Whitelist Rules: Used to define specific networks that are allowed access to the Sixnet router PPP Dial Backup: Used to configure the capability of dialing out to an ISP for connectivity on units containing the 56K modem PPP over Ethernet: Used to configure to use the connection of a ADSL setup Static Routes: Used to configure static routes for the Sixnet router TCP Keep Alives: Used to configure the timeout for Keep Alives Tunnel (VPN) Settings: o GRE Tunnels: Used to configure a Generic Routing Encapsulation Tunnel with a head-end server o IP to IP Tunnels: Used to configure IP to IP Tunnels o IPSEC: Configuration: Used to configure the Phase I and Phase II of an IPSEC Tunnel Status: Used to display the current status of an established IPSEC Tunnel Sixnet, Inc, A Red Lion Business 331 Ushers Road, Ballston Lake, NY 12019 www.sixnet.com CONNECT. MONITOR. CONTROL. T +1 518 877 5173 F +1 518 877 8346 Version XXX © 2010. Sixnet. All Rights Reserved. 34 34 IndustrialPro Series Router User Manual 3.1.5 Services The Services Tab is where you can configure the various service offerings of the Sixnet router. These services include DHCP Server, Dynamic DNS, SSH, SSL, and TELNET. The Services Tab is organized into seven (11) sections: 3.1.6 DHCP Server: Used to configure one of the internal Ethernet interfaces to be a DHCP server and hand out IP Addresses to systems connected to the Sixnet router Dynamic DNS: Used to configure a dynamic DNS if a DDNS service, such as dyndns.org, is utilized SixView Manager: Used to configure how the Sixnet router communicates with a Gateway Management Utility server SSH Server: Used to enable/disable SSH access to the Sixnet router SSL Connections: o SSL Client: Used to configure the Sixnet router to act as an SSL client o SSL Server: Used to configure the Sixnet router to act as an SSL server System Logging: Used to configure remote system logging to a remote system TELNET Server: Used to enable/disable TELNET server Ping Alive: Used as a diagnostic tool for verifying connectivity between two hosts on a network SNMP Agent: Used to allow users to query the unit for information via SNMP ModBus: Used to allow acting as an I/O concentrator for MODBUS devices, if the IndustrialPro has been upgraded to RAM Advanced The Advanced Tab is where you can configure the advanced features of the Sixnet router, which includes IP Fallback, IP Transparency, Out-of-Band Management, VRRP, Expert Mode and GWLNX (Protocol Conversion). You have the capability of accessing some of the system files within the Expert Mode section. The Advanced Tab is organized into seven (6) sections: IP Fallback: Used to configure the Sixnet router for failover between interfaces, for example, Primary route on DSL/Cable, and secondary on Cellular IP Transparency: Used to configure the IP Transparency the will pass the IP Address of the air card to the device connected to the Sixnet router on one of the Ethernet interfaces Out-of-Band Mgt: Used to configure the capability of remotely administrating a third-party device connected via a serial cable on the Sixnet router VRRP: Used to configure the Sixnet router to share an IP Address and act as a failover for a third-party router using Virtual Routing Redundancy Protocol Sixnet, Inc, A Red Lion Business 331 Ushers Road, Ballston Lake, NY 12019 www.sixnet.com CONNECT. MONITOR. CONTROL. T +1 518 877 5173 F +1 518 877 8346 Version XXX © 2010. Sixnet. All Rights Reserved. 35 35 IndustrialPro Series Router User Manual Expert Mode: Used to alter specific system files on the Sixnet router WARNING: Do not use this method of configuration unless directed to do so by a support engineer from Sixnet. If you do not fully understand how to make the changes and what effect those changes will have on the Sixnet router, please contact a Sixnet technician. Gwlnx: Used to configure the Protocol Conversion capability of the Sixnet router. Protocol Conversion is a process used to convert legacy protocols to communicate over TCP/IP. Sixnet, Inc, A Red Lion Business 331 Ushers Road, Ballston Lake, NY 12019 www.sixnet.com CONNECT. MONITOR. CONTROL. T +1 518 877 5173 F +1 518 877 8346 Version XXX © 2010. Sixnet. All Rights Reserved. 36 36 IndustrialPro Series Router User Manual 3.2 Status Tab The Status Tab allows you to review the state of the router functions, such as network connections, interfaces, system processes, services running, and system information. It also allows review of the syslog, update history, and under diagnostic tools, permits testing the connectivity through the use of ‘ping’ and ‘traceroute’. Home: The Home option will always return the user to the “Home Screen” pictured above that shows a system info summary. Sixnet, Inc, A Red Lion Business 331 Ushers Road, Ballston Lake, NY 12019 www.sixnet.com CONNECT. MONITOR. CONTROL. T +1 518 877 5173 F +1 518 877 8346 Version XXX © 2010. Sixnet. All Rights Reserved. 37 37 IndustrialPro Series Router User Manual 3.2.1 ARP Cache The “ARP cache” is a table which stores mappings between Data Link Layer (OSI Layer 2) addresses and Network Layer (OSI Layer 3) addresses. This important information shows what connections are established to the router. Click on the “Arp Cache” menu item and the following window will appear: Sixnet, Inc, A Red Lion Business 331 Ushers Road, Ballston Lake, NY 12019 www.sixnet.com CONNECT. MONITOR. CONTROL. T +1 518 877 5173 F +1 518 877 8346 Version XXX © 2010. Sixnet. All Rights Reserved. 38 38 IndustrialPro Series Router User Manual 3.2.2 Feature Codes The “Feature Codes” menu item will display the basic hardware configuration of the Sixnet router. Sixnet, Inc, A Red Lion Business 331 Ushers Road, Ballston Lake, NY 12019 www.sixnet.com CONNECT. MONITOR. CONTROL. T +1 518 877 5173 F +1 518 877 8346 Version XXX © 2010. Sixnet. All Rights Reserved. 39 39 IndustrialPro Series Router User Manual 3.2.3 Firewall Rules The “Firewall Rules” menu item displays a complete listing of the rules used within the firewall for the Sixnet router. If you are familiar with Linux and IPTABLES, then this will of great use to you. You can scroll through the list of rules to review the entire IPTABLES listing. This is valuable information allows you to track down what is being allowed and what is being denied access to and through the Sixnet router. Sixnet, Inc, A Red Lion Business 331 Ushers Road, Ballston Lake, NY 12019 www.sixnet.com CONNECT. MONITOR. CONTROL. T +1 518 877 5173 F +1 518 877 8346 Version XXX © 2010. Sixnet. All Rights Reserved. 40 40 IndustrialPro Series Router User Manual 3.2.4 Interface Information The “Interface Information” menu item is sub sectioned into three sections; Summary, Details, and Multicast. Sixnet, Inc, A Red Lion Business 331 Ushers Road, Ballston Lake, NY 12019 www.sixnet.com CONNECT. MONITOR. CONTROL. T +1 518 877 5173 F +1 518 877 8346 Version XXX © 2010. Sixnet. All Rights Reserved. 41 41 IndustrialPro Series Router User Manual The “Summary” item will display a brief description of the interfaces of the Sixnet router. The “Details” menu item will display a more system specific description of the interfaces on the Sixnet router. Sixnet, Inc, A Red Lion Business 331 Ushers Road, Ballston Lake, NY 12019 www.sixnet.com CONNECT. MONITOR. CONTROL. T +1 518 877 5173 F +1 518 877 8346 Version XXX © 2010. Sixnet. All Rights Reserved. 42 42 IndustrialPro Series Router User Manual The “Multicast” menu item displays the current multicast settings for the interfaces. Sixnet, Inc, A Red Lion Business 331 Ushers Road, Ballston Lake, NY 12019 www.sixnet.com CONNECT. MONITOR. CONTROL. T +1 518 877 5173 F +1 518 877 8346 Version XXX © 2010. Sixnet. All Rights Reserved. 43 43 IndustrialPro Series Router User Manual Click on the “Multicast” menu item and the following window will appear: Sixnet, Inc, A Red Lion Business 331 Ushers Road, Ballston Lake, NY 12019 www.sixnet.com CONNECT. MONITOR. CONTROL. T +1 518 877 5173 F +1 518 877 8346 Version XXX © 2010. Sixnet. All Rights Reserved. 44 44 IndustrialPro Series Router User Manual 3.2.5 Routing Information The “Routing Information” is sub-sectioned into Policy Routing Table, and Standard Routing Table sections. Sixnet, Inc, A Red Lion Business 331 Ushers Road, Ballston Lake, NY 12019 www.sixnet.com CONNECT. MONITOR. CONTROL. T +1 518 877 5173 F +1 518 877 8346 Version XXX © 2010. Sixnet. All Rights Reserved. 45 45 IndustrialPro Series Router User Manual The “Policy Routing Table” menu item displays information on the policy rules, the route tables for each individual interface, and the general routes for the Sixnet router. Sixnet, Inc, A Red Lion Business 331 Ushers Road, Ballston Lake, NY 12019 www.sixnet.com CONNECT. MONITOR. CONTROL. T +1 518 877 5173 F +1 518 877 8346 Version XXX © 2010. Sixnet. All Rights Reserved. 46 46 IndustrialPro Series Router User Manual Click on the “Policy Routing Table” menu item and the following window will appear: Sixnet, Inc, A Red Lion Business 331 Ushers Road, Ballston Lake, NY 12019 www.sixnet.com CONNECT. MONITOR. CONTROL. T +1 518 877 5173 F +1 518 877 8346 Version XXX © 2010. Sixnet. All Rights Reserved. 47 47 IndustrialPro Series Router User Manual The “Standard Routing Table” will display the current routes for the Sixnet router and the static routes that have been configured for the router. Sixnet, Inc, A Red Lion Business 331 Ushers Road, Ballston Lake, NY 12019 www.sixnet.com CONNECT. MONITOR. CONTROL. T +1 518 877 5173 F +1 518 877 8346 Version XXX © 2010. Sixnet. All Rights Reserved. 48 48 IndustrialPro Series Router User Manual Click on the “Standard Routing Table” menu item and the following window will appear: Sixnet, Inc, A Red Lion Business 331 Ushers Road, Ballston Lake, NY 12019 www.sixnet.com CONNECT. MONITOR. CONTROL. T +1 518 877 5173 F +1 518 877 8346 Version XXX © 2010. Sixnet. All Rights Reserved. 49 49 IndustrialPro Series Router User Manual 3.2.6 Socket Statuses Sockets are end-points to communication over the Internet. Much like PBX phone systems, where the IP address is the phone number and the port is the extension. Every paired (connected) socket has a source IP/port and a destination IP/port. The “Socket Statuses” are sub-sectioned into TCP Only, Conn Track and All. Sixnet, Inc, A Red Lion Business 331 Ushers Road, Ballston Lake, NY 12019 www.sixnet.com CONNECT. MONITOR. CONTROL. T +1 518 877 5173 F +1 518 877 8346 Version XXX © 2010. Sixnet. All Rights Reserved. 50 50 IndustrialPro Series Router User Manual The “TCP Only” menu item will display the sockets that are connection-oriented (also known as “stream sockets.”) Click on the “TCP Only” menu item and the following window will appear: Sixnet, Inc, A Red Lion Business 331 Ushers Road, Ballston Lake, NY 12019 www.sixnet.com CONNECT. MONITOR. CONTROL. T +1 518 877 5173 F +1 518 877 8346 Version XXX © 2010. Sixnet. All Rights Reserved. 51 51 IndustrialPro Series Router User Manual Conn Track is a connection tracker that displays more thorough information about the current socket connections. Connection tracking allows the kernel to keep track of all logical network connections or sessions, and thereby relate all of the packets which may make up that connection. NAT relies on this information to translate all related packets in the same way, and iptables can use this information to act as a stateful firewall. Click on the “Conn Track ” menu item and the following window will appear: Sixnet, Inc, A Red Lion Business 331 Ushers Road, Ballston Lake, NY 12019 www.sixnet.com CONNECT. MONITOR. CONTROL. T +1 518 877 5173 F +1 518 877 8346 Version XXX © 2010. Sixnet. All Rights Reserved. 52 52 IndustrialPro Series Router User Manual The “All” menu item will display the sockets that are considered connection-oriented and connectionless (also known as “datagram sockets”). Click on the “All” menu item and the following window will appear: Sixnet, Inc, A Red Lion Business 331 Ushers Road, Ballston Lake, NY 12019 www.sixnet.com CONNECT. MONITOR. CONTROL. T +1 518 877 5173 F +1 518 877 8346 Version XXX © 2010. Sixnet. All Rights Reserved. 53 53 IndustrialPro Series Router User Manual 3.2.7 System Processes The “System Processes” menu item will display the current running processes on the Sixnet router: Sixnet, Inc, A Red Lion Business 331 Ushers Road, Ballston Lake, NY 12019 www.sixnet.com CONNECT. MONITOR. CONTROL. T +1 518 877 5173 F +1 518 877 8346 Version XXX © 2010. Sixnet. All Rights Reserved. 54 54 IndustrialPro Series Router User Manual Click on the “System Processes” menu item and the following window will appear: Sixnet, Inc, A Red Lion Business 331 Ushers Road, Ballston Lake, NY 12019 www.sixnet.com CONNECT. MONITOR. CONTROL. T +1 518 877 5173 F +1 518 877 8346 Version XXX © 2010. Sixnet. All Rights Reserved. 55 55 IndustrialPro Series Router User Manual 3.2.8 System Services The “System Services” menu item will display the status of the services available on the Sixnet router. Sixnet, Inc, A Red Lion Business 331 Ushers Road, Ballston Lake, NY 12019 www.sixnet.com CONNECT. MONITOR. CONTROL. T +1 518 877 5173 F +1 518 877 8346 Version XXX © 2010. Sixnet. All Rights Reserved. 56 56 IndustrialPro Series Router User Manual The columns represent the ‘runlevel’ of the service; your main concern is the column 3: shown in the table. Any service with “on” in column 3 will automatically restart if the unit is restarted in any way, for example by a reboot or an interruption in power. Click on the “System Services” menu item and the following window will appear: Sixnet, Inc, A Red Lion Business 331 Ushers Road, Ballston Lake, NY 12019 www.sixnet.com CONNECT. MONITOR. CONTROL. T +1 518 877 5173 F +1 518 877 8346 Version XXX © 2010. Sixnet. All Rights Reserved. 57 57 IndustrialPro Series Router User Manual 3.2.9 System Information The “System Information” menu item will display the current usage of the file system in both the directory size and the memory utilization. Sixnet, Inc, A Red Lion Business 331 Ushers Road, Ballston Lake, NY 12019 www.sixnet.com CONNECT. MONITOR. CONTROL. T +1 518 877 5173 F +1 518 877 8346 Version XXX © 2010. Sixnet. All Rights Reserved. 58 58 IndustrialPro Series Router User Manual Click on the “System Information” menu item and the following window will appear: Sixnet, Inc, A Red Lion Business 331 Ushers Road, Ballston Lake, NY 12019 www.sixnet.com CONNECT. MONITOR. CONTROL. T +1 518 877 5173 F +1 518 877 8346 Version XXX © 2010. Sixnet. All Rights Reserved. 59 59 IndustrialPro Series Router User Manual 3.2.10 Syslog The “Syslog” menu item will display the current entries into the syslog of the Sixnet router. Sixnet, Inc, A Red Lion Business 331 Ushers Road, Ballston Lake, NY 12019 www.sixnet.com CONNECT. MONITOR. CONTROL. T +1 518 877 5173 F +1 518 877 8346 Version XXX © 2010. Sixnet. All Rights Reserved. 60 60 IndustrialPro Series Router User Manual Click on the “Syslog” menu item and the following window will appear: This screen is configurable to allow searches using a string filter. Enter a filter string in the space provided, only lines containing the filter value(s) will be displayed via a 'grep' style filter mechanism. Note: the filter value is case sensitive. You have the option of selecting the number of lines to display, enable the auto update function and set the frequency of the updates interval. Sixnet, Inc, A Red Lion Business 331 Ushers Road, Ballston Lake, NY 12019 www.sixnet.com CONNECT. MONITOR. CONTROL. T +1 518 877 5173 F +1 518 877 8346 Version XXX © 2010. Sixnet. All Rights Reserved. 61 61 IndustrialPro Series Router User Manual 3.2.11 CSQ History CSQ stands for Cellular Signal Quality. The “CSQ History” menu item will display a listing of recent cellular signal quality. It will include Module model number, IMEI, MDN as well as the date / time, CSQ, ECIO and Channel information. Click on CSQ History and the following screen will appear: Sixnet, Inc, A Red Lion Business 331 Ushers Road, Ballston Lake, NY 12019 www.sixnet.com CONNECT. MONITOR. CONTROL. T +1 518 877 5173 F +1 518 877 8346 Version XXX © 2010. Sixnet. All Rights Reserved. 62 62 IndustrialPro Series Router User Manual 3.2.12 Update History The “Update History” menu item will display a listing of any software updates that have been loaded onto the Sixnet router. Sixnet, Inc, A Red Lion Business 331 Ushers Road, Ballston Lake, NY 12019 www.sixnet.com CONNECT. MONITOR. CONTROL. T +1 518 877 5173 F +1 518 877 8346 Version XXX © 2010. Sixnet. All Rights Reserved. 63 63 IndustrialPro Series Router User Manual 3.2.13 Diagnostic Tools The “Diagnostic Tools” menu item is sub sectioned into Ping, Socket Test, Speed Test and Traceroute. These are useful in troubleshooting connectivity of the Sixnet router to the Internet or the network the router is connected to. Sixnet, Inc, A Red Lion Business 331 Ushers Road, Ballston Lake, NY 12019 www.sixnet.com CONNECT. MONITOR. CONTROL. T +1 518 877 5173 F +1 518 877 8346 Version XXX © 2010. Sixnet. All Rights Reserved. 64 64 IndustrialPro Series Router User Manual The “Ping” menu item allows you to input an address either as an IP Address or a URL for testing the destination availability. Click on the “Ping” menu item and the following window will appear: Sixnet, Inc, A Red Lion Business 331 Ushers Road, Ballston Lake, NY 12019 www.sixnet.com CONNECT. MONITOR. CONTROL. T +1 518 877 5173 F +1 518 877 8346 Version XXX © 2010. Sixnet. All Rights Reserved. 65 65 IndustrialPro Series Router User Manual Type in the IP Address or URL you wish to ping and click on the “Ping” button to use any interface that the router determines as having the route to the designated address. It is recommended to start with a locally accessible IP address to confirm communication to an interface's local subnet. Then proceed to addresses on distant networks. Your local default gateway is a good test, and this IP can be found in your routing table. A commonly available internet server available to test against is 4.2.2.2. The Source Interface offers the option of using different interfaces to send the ping through. This is useful if you have a VPN Tunnel in place. Testing the connection through the VPN Tunnel is required to verify connectivity through the tunnel. Choose the interface that the VPN Tunnel has listed for the Local Subnet end-point, i.e. if the Left Subnet is 10.100.100.0/24 and eth1 has 10.100.100.1 as its IP Address, then choose Source Interface: eth1. Specify a host IP Address at the head-end to ping through the tunnel. Click on the “Ping” button to see the result. The “Socket Test” menu item will allows you to “telnet” to desire destination IP and Port address to verify the socket availability. Sixnet, Inc, A Red Lion Business 331 Ushers Road, Ballston Lake, NY 12019 www.sixnet.com CONNECT. MONITOR. CONTROL. T +1 518 877 5173 F +1 518 877 8346 Version XXX © 2010. Sixnet. All Rights Reserved. 66 66 IndustrialPro Series Router User Manual Click on the “Socket Test” menu item and the following window will appear: Sixnet, Inc, A Red Lion Business 331 Ushers Road, Ballston Lake, NY 12019 www.sixnet.com CONNECT. MONITOR. CONTROL. T +1 518 877 5173 F +1 518 877 8346 Version XXX © 2010. Sixnet. All Rights Reserved. 67 67 IndustrialPro Series Router User Manual Type in the IP or URL and Port Address you wish to telnet to and click on the “Test” button to proceed with the TCP socket handshaking to verify and display socket availability. The following screens illustrate the successful and failed test result. Sixnet, Inc, A Red Lion Business 331 Ushers Road, Ballston Lake, NY 12019 www.sixnet.com CONNECT. MONITOR. CONTROL. T +1 518 877 5173 F +1 518 877 8346 Version XXX © 2010. Sixnet. All Rights Reserved. 68 68 IndustrialPro Series Router User Manual Sixnet, Inc, A Red Lion Business 331 Ushers Road, Ballston Lake, NY 12019 www.sixnet.com CONNECT. MONITOR. CONTROL. T +1 518 877 5173 F +1 518 877 8346 Version XXX © 2010. Sixnet. All Rights Reserved. 69 69 IndustrialPro Series Router User Manual The “Speed Test” menu item will allows you to test the bandwidth and latency of a unit’s cellular connection. Note: Only for testing units with an activated cellular connection. Sixnet, Inc, A Red Lion Business 331 Ushers Road, Ballston Lake, NY 12019 www.sixnet.com CONNECT. MONITOR. CONTROL. T +1 518 877 5173 F +1 518 877 8346 Version XXX © 2010. Sixnet. All Rights Reserved. 70 70 IndustrialPro Series Router User Manual Click on “Speed Test” option, the following screen will appear. Click the “Start” button, which will begin the speed test. Depending on the bandwidth of the connection under test, this can take up to 30 minutes. When finished, the speed test will generate report of the latency and bandwidth results for this test. These results will vary widely based on cellular technology (2G vs 3G vs 4G) and signal strength. Below is the similar speed test result. Sixnet, Inc, A Red Lion Business 331 Ushers Road, Ballston Lake, NY 12019 www.sixnet.com CONNECT. MONITOR. CONTROL. T +1 518 877 5173 F +1 518 877 8346 Version XXX © 2010. Sixnet. All Rights Reserved. 71 71 IndustrialPro Series Router User Manual Sixnet, Inc, A Red Lion Business 331 Ushers Road, Ballston Lake, NY 12019 www.sixnet.com CONNECT. MONITOR. CONTROL. T +1 518 877 5173 F +1 518 877 8346 Version XXX © 2010. Sixnet. All Rights Reserved. 72 72 IndustrialPro Series Router User Manual The “Traceroute” menu item will allows you to watch the route traverse the Internet to the specified IP Address or URL. Click on the “Traceroute” menu item and the following window will appear: Sixnet, Inc, A Red Lion Business 331 Ushers Road, Ballston Lake, NY 12019 www.sixnet.com CONNECT. MONITOR. CONTROL. T +1 518 877 5173 F +1 518 877 8346 Version XXX © 2010. Sixnet. All Rights Reserved. 73 73 IndustrialPro Series Router User Manual Type in the IP Address or URL you wish to trace and click on the “Trace” button to use any interface that the router determines as having the route to the designated address. It is recommended to start with a locally accessible IP address to confirm communication to an interface's local subnet. Then proceed to addresses on distant networks. Your local default gateway is a good test, and this IP can be found in your routing table. A commonly available internet server available to test against is 4.2.2.2. Sixnet, Inc, A Red Lion Business 331 Ushers Road, Ballston Lake, NY 12019 www.sixnet.com CONNECT. MONITOR. CONTROL. T +1 518 877 5173 F +1 518 877 8346 Version XXX © 2010. Sixnet. All Rights Reserved. 74 74 IndustrialPro Series Router User Manual The Source Interface offers the option of using different interfaces to send the trace through. This is useful should you have a VPN Tunnel in place and testing the connection through the VPN Tunnel is required to verify connectivity through the tunnel. Choose the interface that the VPN Tunnel has listed for the Local Subnet end-point, i.e. if the Left Subnet is 10.100.100.0/24 and eth1 has 10.100.100.1 as its IP Address, then choose Source Interface: eth1. Specify a host IP Address at the head-end to ping through the tunnel. Click on the “Trace” button to see the result. Sixnet, Inc, A Red Lion Business 331 Ushers Road, Ballston Lake, NY 12019 www.sixnet.com CONNECT. MONITOR. CONTROL. T +1 518 877 5173 F +1 518 877 8346 Version XXX © 2010. Sixnet. All Rights Reserved. 75 75 IndustrialPro Series Router User Manual 3.3 Admin Tab The Admin Tab is where the administration of the Sixnet router takes place. From here you can configure how the unit is accessed, manage SSL/IPSEC certificates, restore the unit to factory defaults, update the firmware, gather the configurations to send to support for analysis, gather a report on the functions of the router to send to support for analysis, install system patches (packages), remotely reboot the router, and configure the system time. Sixnet, Inc, A Red Lion Business 331 Ushers Road, Ballston Lake, NY 12019 www.sixnet.com CONNECT. MONITOR. CONTROL. T +1 518 877 5173 F +1 518 877 8346 Version XXX © 2010. Sixnet. All Rights Reserved. 76 76 IndustrialPro Series Router User Manual 3.3.1 Access Settings The “Access Settings” menu item allows you to change how the unit’s GUI interface is accessed, either by HTTP or HTTPS. You can also change the password used to access the GUI interface. Click on the “Access Settings” menu item and the following window will appear: To change the access method: Click on the pull down menu next to “Select Web Access Method” and select the method by which you would like to access the Gateway Administration Utility. You do not need to enter the password in order to change the access method. Note: The HTTP method can result in better performance and faster page load times; however, it is less secure than the HTTPS method, which uses data encryption to provide a secure connection. If you are not changing the password, click on the “Apply” button for changes to take effect. To change the password: Enter the new password in the “Enter New Password” field. Note: For a secure password, choose one that is at least six characters long, which is not a common word and comprised of a mixture of upper and lower case characters and numbers. Sixnet, Inc, A Red Lion Business 331 Ushers Road, Ballston Lake, NY 12019 www.sixnet.com CONNECT. MONITOR. CONTROL. T +1 518 877 5173 F +1 518 877 8346 Version XXX © 2010. Sixnet. All Rights Reserved. 77 77 IndustrialPro Series Router User Manual Re-enter the new password in the “Confirm New Password” field. Click on the “Apply” button for the changes to take effect. Enter the current password in the “Enter Current Password” field. Sixnet, Inc, A Red Lion Business 331 Ushers Road, Ballston Lake, NY 12019 www.sixnet.com CONNECT. MONITOR. CONTROL. T +1 518 877 5173 F +1 518 877 8346 Version XXX © 2010. Sixnet. All Rights Reserved. 78 78 IndustrialPro Series Router User Manual 3.3.2 Certificate Manager The “Certificate Manager” gives you the option of adding a certificate, deleting a certificate, or editing a current certificate. Click on the “Certificate Manager” menu item and the following window will appear: To add a certificate: Click on the “Add” button and the following pop-up window will appear Enter a descriptive name to be associated with the Certificate File to be uploaded. This name will be used later in fields where selection of a certificate is required. The descriptive name can contain only upper and/or lower case letters, and digits. Sixnet, Inc, A Red Lion Business 331 Ushers Road, Ballston Lake, NY 12019 www.sixnet.com CONNECT. MONITOR. CONTROL. T +1 518 877 5173 F +1 518 877 8346 Version XXX © 2010. Sixnet. All Rights Reserved. 79 79 IndustrialPro Series Router User Manual Select the type of certificate that you will be uploading. Each certificate is stored in a unique repository, depending on the service that will be using it. The certificate file name can contain only upper and/or lower case letters, digits, '-', '_' and must end with .ca, .csr, .crt, .key, or .pem. Possible Choices include: IPsec Cert: This will specify a certificate to be used to authenticate a VPN connection. A server and client certificate will be required. IPsec Key: An RSA key must be provided for any client certificate uploaded. If this is signed with a password, that will need to be entered in the IPSec as well. IPsec CA: This specifies a Certificate Authority. Please include a CA valid for each signed certificate. SSL: This certificate will be available for SSL Connections as a Server Certificate, or a Client Certificate. SSLVPN: This certificate will be available for SSL VPN tunnels. Once you have entered a value into the Certificate Name field, the Browse button will be enabled and can be clicked to select a file from your local system for upload. When a valid file name is selected, the Upload button is enabled and can be clicked to upload the selected file to the device. The certificate file name can contain only upper and/or lower case letters, digits, '-', '_' and must end with .ca, .csr, .crt, .key, or .pem. NOTE: SSL type certificates must include the key and cert portions, and the key must not be password encrypted. Click on the file and click “OK”. Click on the “OK” button, then click on the “Apply” button for changes to take effect. 3.3.3 Factory Defaults The “Factory Defaults” menu item allows you to restore the configuration back to factory default settings. Click on the “Factory Default” menu item and the following window will appear: To restore the Sixnet router to factory default settings click on the “Restore” button. You will see the following warning message: Sixnet, Inc, A Red Lion Business 331 Ushers Road, Ballston Lake, NY 12019 www.sixnet.com CONNECT. MONITOR. CONTROL. T +1 518 877 5173 F +1 518 877 8346 Version XXX © 2010. Sixnet. All Rights Reserved. 80 80 IndustrialPro Series Router User Manual Click on the “OK” button to acknowledge the warning The Sixnet router is now reset back to default factory configuration settings. Sixnet, Inc, A Red Lion Business 331 Ushers Road, Ballston Lake, NY 12019 www.sixnet.com CONNECT. MONITOR. CONTROL. T +1 518 877 5173 F +1 518 877 8346 Version XXX © 2010. Sixnet. All Rights Reserved. 81 81 IndustrialPro Series Router User Manual 3.3.4 Firmware Update The “Firmware Update” menu item allows you to upgrade the firmware of the Sixnet router to the latest version to take advantage of advanced features. Click on the “Firmware Update” menu item and the following window will appear: To upgrade the firmware of the Sixnet router: Check the “Preserve Current Configuration” box to cause the device to save its current configuration and restore it after the firmware image is installed. Select the firmware image file type from the drop down list. Note: For SN-BT model devices, you need to select the “Boot File System” type and “Browse” to open “boot” file image first and click on “Upload” button for uploading the boot file. Then once this step is completed, select “Root File System” type and “Browse” to open “root” file image and click on “Upload” button for uploading the root file. For D-series model devices such as (R3100, R3300, R1100, etc), you need to select “Bin File System” type and “Browse” to open “bin” file image and click on “Upload” button for uploading the bin file. Click on the “Upload” button. You will see the following warning pop-up: Sixnet, Inc, A Red Lion Business 331 Ushers Road, Ballston Lake, NY 12019 www.sixnet.com CONNECT. MONITOR. CONTROL. T +1 518 877 5173 F +1 518 877 8346 Version XXX © 2010. Sixnet. All Rights Reserved. 82 82 IndustrialPro Series Router User Manual Click on the “OK” button to acknowledge the warning NOTE: This procedure could take anywhere from 6 to 10 minutes to complete. WARNING: It is extremely important that the power to the unit is not interrupted as this could cause the unit to become corrupt and require shipment back to the factory to correct. Sixnet, Inc, A Red Lion Business 331 Ushers Road, Ballston Lake, NY 12019 www.sixnet.com CONNECT. MONITOR. CONTROL. T +1 518 877 5173 F +1 518 877 8346 Version XXX © 2010. Sixnet. All Rights Reserved. 83 83 IndustrialPro Series Router User Manual 3.3.5 Gather Configs The “Gather Configs” menu item allows you to zip up the configuration files of the Sixnet router in order to send them to the Sixnet support personnel for review. Click on the “Gather Configs” menu item and the following window will appear: To gather the configurations of the Sixnet router: Choose whether you want to include all of the Sixnet files by clicking on the pull down menu next to “Include all Sixnet files?” and choose “No” or “Yes”. (These files are located in the /etc/Sixnet/ directory) Choose whether you want to include the GWLNX files by clicking on the pull down menu next to “Include gwlnx files?” and choose “No” or “Yes”. (These are the files that control Protocol Conversion) Choose whether you want to include the network files by clicking on the pull down menu next to “Include all network files?” and choose “No” or “Yes”. (These files include the Ethernet interfaces, and GRE interfaces) Choose the method of delivery: o If you are downloading the zipped config file to your computer system, click on the pull down menu next to “Select Delivery Method:” and choose “Download” o Click on the “Gather” button You will get the following pop-up window: Click on the “OK” button to acknowledge the content. Sixnet, Inc, A Red Lion Business 331 Ushers Road, Ballston Lake, NY 12019 www.sixnet.com CONNECT. MONITOR. CONTROL. T +1 518 877 5173 F +1 518 877 8346 Version XXX © 2010. Sixnet. All Rights Reserved. 84 84 IndustrialPro Series Router User Manual Click on the link that appears under the Download field once the page is refreshed. o The download pop-up window will appear, click “OK” to save the file to your computer system o If you are uploading the zipped config file to the Sixnet FTP site or to a site of your choosing, click on the pull-down menu next to “Select Delivery Method:” and choose “FTP” The display will change to reflect additional options for FTP’ing the file to either the Sixnet FTP site or to a site of your choosing. Sixnet, Inc, A Red Lion Business 331 Ushers Road, Ballston Lake, NY 12019 www.sixnet.com CONNECT. MONITOR. CONTROL. T +1 518 877 5173 F +1 518 877 8346 Version XXX © 2010. Sixnet. All Rights Reserved. 85 85 IndustrialPro Series Router User Manual o o o If you are utilizing the Sixnet FTP site, enter a project name (such as a company name) to designate the file on the FTP site Click on the “Gather” button If you want to input your own FTP site, click on the pull down menu next to the “Designation:” field and choose “User defined FTP site” The display will change to reflect the options available for selecting your FTP site. o o Enter the IP Address or URL to the FTP site of your choosing. Click on the “Gather” button. Sixnet, Inc, A Red Lion Business 331 Ushers Road, Ballston Lake, NY 12019 www.sixnet.com CONNECT. MONITOR. CONTROL. T +1 518 877 5173 F +1 518 877 8346 Version XXX © 2010. Sixnet. All Rights Reserved. 86 86 IndustrialPro Series Router User Manual 3.3.6 Gather Stats The “Gather Stats” menu item allows you to create and zip up a report of pertinent information of the performance of the Sixnet router. This information will include interface status, network information such as ‘netstat’, ‘arp’, and ‘routes’, IPSEC information if included, firewall information, and a copy of the syslog. Click on the “Gather Stats” menu item and the following window will appear: To gather the stats of the Sixnet router: Choose whether you want to include IPSEC (Barf) output by clicking on the pull-down menu next to “Include IPSEC (Barf) output?” and choose “No” or “Yes”. (This is the output from several IPSEC commands that reveals the activity of the IPSEC configuration) Choose whether you want to include the GWLNX log files by clicking on the pull down menu next to “Include gwlnx log files?” and choose “No” or “Yes”. (This reveals activity associated with Protocol Conversion) Choose the method of delivery: o If you are downloading the zipped stats file to your computer system, click on the pull down menu next to “Select Delivery Method:” and choose “Download” o Click on the “Gather” button You will get the following pop-up window: Click on the “OK” button to acknowledge the content. Click on the link that appears under the Download field once the page is refreshed. Sixnet, Inc, A Red Lion Business 331 Ushers Road, Ballston Lake, NY 12019 www.sixnet.com CONNECT. MONITOR. CONTROL. T +1 518 877 5173 F +1 518 877 8346 Version XXX © 2010. Sixnet. All Rights Reserved. 87 87 IndustrialPro Series Router User Manual o o o The download pop-up window will appear. Click “OK” to save the file to your computer system. If you are uploading the zipped stats file to the Sixnet FTP site or to a site of your choosing, click on the pull down menu next to “Select Delivery Method:” and choose “FTP”. The display will change to reflect additional options for FTP’ing the file to either the Sixnet FTP site or to a site of your choosing. o o o If you are utilizing the Sixnet FTP site, enter a project name (such as a company name) to designate the file on the FTP site. Click on the “Gather” button. If you want to input your own FTP site, click on the pull down menu next to the “Designation:” field and choose “User defined FTP site”. Sixnet, Inc, A Red Lion Business 331 Ushers Road, Ballston Lake, NY 12019 www.sixnet.com CONNECT. MONITOR. CONTROL. T +1 518 877 5173 F +1 518 877 8346 Version XXX © 2010. Sixnet. All Rights Reserved. 88 88 IndustrialPro Series Router User Manual The display will change to reflect the options available for selecting your FTP site. o o Enter the IP Address or URL to the FTP site of your choosing. Click on the “Gather” button. Sixnet, Inc, A Red Lion Business 331 Ushers Road, Ballston Lake, NY 12019 www.sixnet.com CONNECT. MONITOR. CONTROL. T +1 518 877 5173 F +1 518 877 8346 Version XXX © 2010. Sixnet. All Rights Reserved. 89 89 IndustrialPro Series Router User Manual 3.3.7 Manage System Configuration The “Manage System Configuration” menu item allows you to save a copy of the current system configuration, i.e., Export. This is useful when a confirmed good configuration is operational. A backup can be exported for use should the configuration become corrupt or re-configured in error. / Sixnet, Inc, A Red Lion Business 331 Ushers Road, Ballston Lake, NY 12019 www.sixnet.com CONNECT. MONITOR. CONTROL. T +1 518 877 5173 F +1 518 877 8346 Version XXX © 2010. Sixnet. All Rights Reserved. 90 90 IndustrialPro Series Router User Manual Click on the “Manage System Configuration” menu item and the following window will appear: To save a copy of the Sixnet router configuration: Click on the “Export” button. You will get a pop-up window asking you to save to disk. Click on the “OK” button and save the config.xml.txt file to your computer system. NOTE: Please note the directory where the file was saved in order to retrieve it when needed to put the file back onto the Sixnet router. Sixnet, Inc, A Red Lion Business 331 Ushers Road, Ballston Lake, NY 12019 www.sixnet.com CONNECT. MONITOR. CONTROL. T +1 518 877 5173 F +1 518 877 8346 Version XXX © 2010. Sixnet. All Rights Reserved. 91 91 IndustrialPro Series Router User Manual To Import a known good Sixnet router configuration: Click on the “Import” button. The file explorer of your computer system should appear. Browse to the directory where the config.xml.txt file is located. Click on the config.xml.txt file to highlight it. Click on the “Open” button to populate the Browse window. Click on the “Upload” button. The following pop-up window will appear to show the file was successfully uploaded: Sixnet, Inc, A Red Lion Business 331 Ushers Road, Ballston Lake, NY 12019 www.sixnet.com CONNECT. MONITOR. CONTROL. T +1 518 877 5173 F +1 518 877 8346 Version XXX © 2010. Sixnet. All Rights Reserved. 92 92 IndustrialPro Series Router User Manual Click on the “OK” button to acknowledge the content. The “Import” button is now available. Click on the “Import” button to reload the system configuration file. Note: If you want to save the new configuration without immediately applying it, simply check the box provided next to “Import” button. Sixnet, Inc, A Red Lion Business 331 Ushers Road, Ballston Lake, NY 12019 www.sixnet.com CONNECT. MONITOR. CONTROL. T +1 518 877 5173 F +1 518 877 8346 Version XXX © 2010. Sixnet. All Rights Reserved. 93 93 IndustrialPro Series Router User Manual The following warning pop-up window will appear: Click on the “OK” button to acknowledge the content. A new window will open below the “Upload” and “Import” buttons: Sixnet, Inc, A Red Lion Business 331 Ushers Road, Ballston Lake, NY 12019 www.sixnet.com CONNECT. MONITOR. CONTROL. T +1 518 877 5173 F +1 518 877 8346 Version XXX © 2010. Sixnet. All Rights Reserved. 94 94 IndustrialPro Series Router User Manual Once completed, a list of changes will appear in the message window and a pop-up window will appear to request a reboot: Click on the “OK” button. The next pop-up window will inform you that the actions you are taking will reboot the device and will ask you to confirm your actions. Sixnet, Inc, A Red Lion Business 331 Ushers Road, Ballston Lake, NY 12019 www.sixnet.com CONNECT. MONITOR. CONTROL. T +1 518 877 5173 F +1 518 877 8346 Version XXX © 2010. Sixnet. All Rights Reserved. 95 95 IndustrialPro Series Router User Manual Click on the “OK” button and the Sixnet router will reboot. Double check the unit when it comes back online to ensure the configs are as they should be. Sixnet, Inc, A Red Lion Business 331 Ushers Road, Ballston Lake, NY 12019 www.sixnet.com CONNECT. MONITOR. CONTROL. T +1 518 877 5173 F +1 518 877 8346 Version XXX © 2010. Sixnet. All Rights Reserved. 96 96 IndustrialPro Series Router User Manual 3.3.8 Package Installation The “Package Installation” menu item allows you to upload and install any patches that come from Sixnet. Click on the “Package Installation” menu item and the following window will appear: Click on the “Browse” button and the File Explorer window will appear: Browse to the directory that the patch is located. Click on the filename to highlight the file. Note: Be sure to use only genuine Sixnet provided packages in the form of filename.zip Click on the “Open” button to populate the Package Installation window. Sixnet, Inc, A Red Lion Business 331 Ushers Road, Ballston Lake, NY 12019 www.sixnet.com CONNECT. MONITOR. CONTROL. T +1 518 877 5173 F +1 518 877 8346 Version XXX © 2010. Sixnet. All Rights Reserved. 97 97 IndustrialPro Series Router User Manual Click on the “Install” button to upload and install the patch. The following warning pop-up window will appear: Click on the “OK” button. The following Operation Succeeded window will appear: Click on the “OK” button to acknowledge the content. The package has been successfully uploaded and installed. Sixnet, Inc, A Red Lion Business 331 Ushers Road, Ballston Lake, NY 12019 www.sixnet.com CONNECT. MONITOR. CONTROL. T +1 518 877 5173 F +1 518 877 8346 Version XXX © 2010. Sixnet. All Rights Reserved. 98 98 IndustrialPro Series Router User Manual 3.3.9 Reboot The “Reboot” menu item allows you to remotely reboot the device if necessary. Click on the “Reboot” menu item and the following window will appear: Click on the “Reboot” button. The following warning pop-up window will appear: Click on the “OK” button the reboot the Sixnet router remotely. NOTE: It may take 3 to 5 minutes for the Sixnet router to fully reboot. Any connection attempt should only be attempted after a sufficient amount of time has passed. Sixnet, Inc, A Red Lion Business 331 Ushers Road, Ballston Lake, NY 12019 www.sixnet.com CONNECT. MONITOR. CONTROL. T +1 518 877 5173 F +1 518 877 8346 Version XXX © 2010. Sixnet. All Rights Reserved. 99 99 IndustrialPro Series Router User Manual 3.3.10 System Time The “System Time” menu item allows you to configure the Time Zone on the Sixnet router to correspond to your location. Click on the “System Time” menu item and the following window will appear: To change the Time Zone click on the pull down menu next on the “Time Zone:” field. The following is a full list of available Time Zones: CET CST6CDT Cuba EET EST EST5EDT Egypt Eire Factory GB GB-Eire GMT GMT+0 GMT-0 GMT0 Greenwich HST Hongkong Iceland Iran Israel Universal W-SU WET Zulu Atlantic (Canada) Central (Canada) East-Saskatchewan (Canada) Eastern (Canada) Mountain (Canada) Newfoundland (Canada) Pacific (Canada) Saskatchewan (Canada) Yukon (Canada) Amsterdam (Europe) Andorra (Europe) Athens (Europe) Belfast (Europe) Belgrade (Europe) Berlin (Europe) Bratislava (Europe) Brussels (Europe) Sixnet, Inc, A Red Lion Business 331 Ushers Road, Ballston Lake, NY 12019 www.sixnet.com Moscow (Europe) Nicosia (Europe) Oslo (Europe) Paris (Europe) Prague (Europe) Riga (Europe) Rome (Europe) Samara (Europe) San Marino (Europe) Sarajevo (Europe) Simferopol (Europe) Skopje (Europe) Sofia (Europe) Stockholm (Europe) Tallinn (Europe) Tirane (Europe) Tiraspol (Europe) Uzhgorod (Europe) Vaduz (Europe) Vatican (Europe) Vienna (Europe) CONNECT. MONITOR. CONTROL. T +1 518 877 5173 F +1 518 877 8346 Version XXX © 2010. Sixnet. All Rights Reserved. 100 100 IndustrialPro Series Router User Manual Jamaica Japan Kwajalein Libya MET MST MST7MDT NZ NZ-CHAT Navajo PRC PST8PDT Poland Portugal ROK Singapore Turkey UCT UTC Bucharest (Europe) Budapest (Europe) Chisinau (Europe) Copenhagen (Europe) Dublin (Europe) Gibraltar (Europe) Helsinki (Europe) Istanbul (Europe) Kaliningrad (Europe) Kiev (Europe) Lisbon (Europe) Ljubljana (Europe) London (Europe) Luxembourg (Europe) Madrid (Europe) Malta (Europe) Mariehamn (Europe) Minsk (Europe) Monaco (Europe) Vilnius (Europe) Warsaw (Europe) Zagreb (Europe) Zaporozhye (Europe) Zurich (Europe) Alaska (US) Aleutian (US) Arizona (US) Central (US) East-Indiana (US) Eastern (US) Hawaii (US) Indiana-Starke (US) Michigan (US) Mountain (US) Pacific (US) Samoa (US) Scroll down and up until you locate the Time Zone you need. Click on the selected Time Zone to populate the “Time Zone:” field. To configure the date and time for your Sixnet router there are three options: Option 1: Manual Configuration Click on the individual fields and make changes to suit. Click on the “Apply” button. NOTE: The Hour field is on the 24-hour time clock, range 00 – 24. This page verifies the Month, Day, Year, Hour, Minute, and Seconds conform to expected inputs. For example, month range from 01 – 12, days range from 01 – 31 (checks for limit according to month; i.e., Jan has 31 days, Feb has 28 or 29 depending on year, etc.). Option 2: Use Local System Time Configuration Click on the “Use Local System Time” button. Click on the “Apply” button. Sixnet, Inc, A Red Lion Business 331 Ushers Road, Ballston Lake, NY 12019 www.sixnet.com CONNECT. MONITOR. CONTROL. T +1 518 877 5173 F +1 518 877 8346 Version XXX © 2010. Sixnet. All Rights Reserved. 101 101 IndustrialPro Series Router User Manual Option 3: Sync to NTP Server Click on the pull down menu next to the “Sync to NTP Server?” Click on “Yes”and the following window will appear: Type in the IP Address or URL or the NTP Server location. Choose the Update frequency from the pull down menu: Hourly, Daily, or Weekly. Click on the “Apply” button. Sixnet, Inc, A Red Lion Business 331 Ushers Road, Ballston Lake, NY 12019 www.sixnet.com CONNECT. MONITOR. CONTROL. T +1 518 877 5173 F +1 518 877 8346 Version XXX © 2010. Sixnet. All Rights Reserved. 102 102 IndustrialPro Series Router User Manual 3.4 Networking Tab The Networking Tab allows you to configure aspects of the Sixnet router that affect the networking functionality of the unit. From here you can configure the cellular connection (should the air card/SIM not be recognized at power-up), provision certain functionality on specific air cards, configure DNS, Ethernet Interfaces, Firewall, PPP Dial Backup on units available with dial capabilities, PPPoE, Static Routes, TCP Keep-Alives, and VPN Tunnel configuration. 3.4.1 Cellular Connection The “Cellular Connection” menu item is sub-sectioned into Configuration and Provisioning. This allows you to configure the cellular air card/SIM on the Sixnet router. NOTE: The Sixnet router’s firmware will recognize supported air cards and will use the appropriate drivers. If the air card is on the GSM network and requires the use of a username, password, and APN, then you will need to verify the information and input the data on the “Configuration” page. NOTE: The “Provisioning” page is currently only available for air cards supplied by Nortel. Configuration The “Configuration” menu item allows you to make configuration changes to the air card/SIM on the Sixnet router. Click on the “Configuration” menu item and the following window will appear: Sixnet, Inc, A Red Lion Business 331 Ushers Road, Ballston Lake, NY 12019 www.sixnet.com CONNECT. MONITOR. CONTROL. T +1 518 877 5173 F +1 518 877 8346 Version XXX © 2010. Sixnet. All Rights Reserved. 103 103 IndustrialPro Series Router User Manual If the identity of the air card is acquired by the firmware these fields will be populated and no further action is required. NOTE: In some instances the inserted air card will be recognized but display a different carrier. This is simply a matter of multiple carriers using the same model and make of air card. GSM type air cards: Most GSM type air cards require the use of a username, password, and APN to authenticate to the carrier network. Click on the “Configuration” menu item and the following window will appear: Sixnet, Inc, A Red Lion Business 331 Ushers Road, Ballston Lake, NY 12019 www.sixnet.com CONNECT. MONITOR. CONTROL. T +1 518 877 5173 F +1 518 877 8346 Version XXX © 2010. Sixnet. All Rights Reserved. 104 104 IndustrialPro Series Router User Manual You will notice that two new fields, “Select APN Context:” and “Enter APN:” The “Select APN Context:” field has four options, 1 – 4, these are for future implementations of carrier supplied predefined authentication parameters for SIMs installed in R3300 routers. The “Enter APN:” field is for entering the Access Point Name (APN) of the external Internet network that is accessible using a GSM air card. To enter the username, password, and APN needed for GSM air cards: Click on the “Enter User Name:” field and type in the username provided by the carrier. Click on the “Enter Password:” field and type in the password provided by the carrier. Click on the “Confirm Password:” field and re-type the password provided by the carrier. Click on the “Enter APN:” field and type in the APN provided by the carrier. It should look similar to the following: Sixnet, Inc, A Red Lion Business 331 Ushers Road, Ballston Lake, NY 12019 www.sixnet.com CONNECT. MONITOR. CONTROL. T +1 518 877 5173 F +1 518 877 8346 Version XXX © 2010. Sixnet. All Rights Reserved. 105 105 IndustrialPro Series Router User Manual Click on the “Apply” button. Verify that you have Internet access by browsing from the computer system connected to the Sixnet router to the Internet. There are also Advanced Options available if needed. WARNING: These options should not be used unless directed to do so by Sixnet support staff. Click on the pull down next to the “View/Change Advanced Options?” Click on the “Yes” and the following will be added to the display: Sixnet, Inc, A Red Lion Business 331 Ushers Road, Ballston Lake, NY 12019 www.sixnet.com CONNECT. MONITOR. CONTROL. T +1 518 877 5173 F +1 518 877 8346 Version XXX © 2010. Sixnet. All Rights Reserved. 106 106 IndustrialPro Series Router User Manual Sixnet, Inc, A Red Lion Business 331 Ushers Road, Ballston Lake, NY 12019 www.sixnet.com CONNECT. MONITOR. CONTROL. T +1 518 877 5173 F +1 518 877 8346 Version XXX © 2010. Sixnet. All Rights Reserved. 107 107 IndustrialPro Series Router User Manual You now see the following options available: Enter Dial String field: The Dial String field is where you would input the string of characters the air card/SIM uses to dial into the carrier’s network. NOTE: This will be automatically filled in if the air card/SIM is recognized by the Sixnet router. To enter the Dial String: Click on the field next to “Enter Dial String:” Type in the string of characters issued by the carrier. Cellular Network Speed: There are three choices for the setting; Auto, High, and Low. Click on the drop down menu next to the “Cellular Network Speed:” Select either Auto, High, or Low and click on your selection to populate field. Connection Behavior: The Choose Connection Behavior allows you to change how the air card/SIM stays connected to the tower. There are two choices: Persistent and On-Demand. Persistent: In Persistent mode, the unit will always attempt to maintain a cellular connection with the carrier's network. This is the default setting. On-Demand: In On-Demand mode, the connection to the cellular network will only be attempted when packets are destined to leave the wireless interface. In addition, after a period of Idle Time, the connection will terminate. To change the connection behavior to On-Demand: Click on the drop down menu at the “Choose Connection Behavior:” field Click on the “On-Demand” selection You will see an additional field appear on the screen: Dial-on-demand Idle Time: Allows you to enter the number of seconds the connection may be allowed to remain "idle" (no data transmitted or received) before closing the connection. This will allow a DoD connection to automatically reset once idle, so that any network usage is limited. This is useful for an environment where constant usage of the POTS line is not desired. Recommended time is 300 seconds (5 minutes). This is defaulted to 600 seconds. Cellular MTU: Enter the MTU size you desire to use. In computer networking, the Maximum Transmission Unit (MTU) of a communications protocol of a layer is the size (in bytes) of the largest protocol data unit that the layer can pass onwards. MTU parameters usually appear in association with a communications interface (NIC, serial port, etc.). Standards (Ethernet, for example) can fix the size of an MTU; or Sixnet, Inc, A Red Lion Business 331 Ushers Road, Ballston Lake, NY 12019 www.sixnet.com CONNECT. MONITOR. CONTROL. T +1 518 877 5173 F +1 518 877 8346 Version XXX © 2010. Sixnet. All Rights Reserved. 108 108 IndustrialPro Series Router User Manual systems (such as point-to-point serial links) may decide MTU at connect time. A larger MTU brings greater efficiency because each packet carries more user data while protocol overheads, such as headers or underlying per-packet delays, remain fixed; the resulting higher efficiency means a slight improvement in bulk protocol throughput. A larger MTU also means processing of fewer packets for the same amount of data. In some systems, per-packet-processing can be a critical performance limitation. However, this gain is not without some downside. Large packets can occupy a slow link for some time, causing greater delays to following packets and increasing lag and minimum latency. For example, a 1500-byte packet, the largest allowed by Ethernet at the network layer (and hence over most of the Internet), ties up a 14.4k modem for about one second. Recommended Setting: 1500 Maximum Receive Idle Time: The “Maximum Receive Idle Time:” Enter the number of seconds the connection may be allowed to remain "idle" or "unresponsive" (no data received) before closing the connection. If packets are leaving the interface, but no return packet is received for the specified time, then the connection is reset. This can be useful for detecting an unresponsive situation where the network is down, the modem is in an unknown state, or other low level error may have occurred. Recommended times are 0 seconds (to turn off) or 150 seconds (2.5 minutes). This is defaulted to 150 seconds. To change the value: Click on the box for “Maximum Receive Idle Time:” Input the time to fit your needs. Use Default Route: This field allows you to choose to have the default route for the Sixnet router to be the cellular connection when it is connected, or to designate an Ethernet port as the default route. The default setting is “Yes”. To change the setting: Click on the drop down menu at the “Use Default Route?” field Click on the “No” selection. Sixnet, Inc, A Red Lion Business 331 Ushers Road, Ballston Lake, NY 12019 www.sixnet.com CONNECT. MONITOR. CONTROL. T +1 518 877 5173 F +1 518 877 8346 Version XXX © 2010. Sixnet. All Rights Reserved. 109 109 IndustrialPro Series Router User Manual Use Peer DNS This field allows you to choose whether the Sixnet router accepts DNS information from the peer device to which it is connected, or uses DNS servers designated on the “DNS Settings” page (listed in the next section). The default setting is “Yes”. To change the settings: Click on the pull down menu at the “Use Peer DNS?” field Click on the “No” selection. Enable Dial Holdoff The “Dial Holdoff” behavior will restrict your connection to three (3) failed connection attempts, before entering an idle state for a duration of time specified by the Dial Holdoff Timeout parameter. The default setting is “No”. To change the settings: Click on the pull down menu at the “Enable Dial Holdoff?” field Click on the “Yes” selection; a new field will appear: These are the holdoff timer settings. To change the settings: Click on the pull down menu at the “Select Dial Holdoff Timeout:” field. Click on the selection you want; Choices are 15 Minutes, 30 Minutes, 45 Minutes, and 60 Minutes Once you have the “Cellular Connection” configured as you want: Click on the “Apply” button to accept the changes. Sixnet, Inc, A Red Lion Business 331 Ushers Road, Ballston Lake, NY 12019 www.sixnet.com CONNECT. MONITOR. CONTROL. T +1 518 877 5173 F +1 518 877 8346 Version XXX © 2010. Sixnet. All Rights Reserved. 110 110 IndustrialPro Series Router User Manual Provisioning The “Provisioning” menu item allows you to activate a limited number of cellular air cards for a limited number of carriers. Sixnet, Inc, A Red Lion Business 331 Ushers Road, Ballston Lake, NY 12019 www.sixnet.com CONNECT. MONITOR. CONTROL. T +1 518 877 5173 F +1 518 877 8346 Version XXX © 2010. Sixnet. All Rights Reserved. 111 111 IndustrialPro Series Router User Manual Click on the “Provisioning” menu item. If the cellular air card/SIM is not recognized as a supported card, then you the following warning pop-up window will appear: Click on the “OK” button to acknowledge the content. Then you will see the following display: Under the Networking tab highlight “Cellular Connection” and choose the “Configuration” option. Sixnet, Inc, A Red Lion Business 331 Ushers Road, Ballston Lake, NY 12019 www.sixnet.com CONNECT. MONITOR. CONTROL. T +1 518 877 5173 F +1 518 877 8346 Version XXX © 2010. Sixnet. All Rights Reserved. 112 112 IndustrialPro Series Router User Manual Instructions for “Cellular Connection” configuration are located in the previous section beneath the “Configuration” heading. Once you have the “Cellular Connection” configured as you want, return to the “Provisioning” screen. Sixnet, Inc, A Red Lion Business 331 Ushers Road, Ballston Lake, NY 12019 www.sixnet.com CONNECT. MONITOR. CONTROL. T +1 518 877 5173 F +1 518 877 8346 Version XXX © 2010. Sixnet. All Rights Reserved. 113 113 IndustrialPro Series Router User Manual If the cellular air card/SIM is recognized as a supported card that can be provisioned with the Sixnet router then the following window will appear with the information about the air card/SIM displayed in the upper window: Select which type of Provisioning you will be using. There are six (6) different types of provisioning: OMA-DM (Automatic Activation Provisioning) Vision IP only Static IP only Static, Vision alternate Datalink only Datalink, Vision alternate Sixnet, Inc, A Red Lion Business 331 Ushers Road, Ballston Lake, NY 12019 www.sixnet.com CONNECT. MONITOR. CONTROL. T +1 518 877 5173 F +1 518 877 8346 Version XXX © 2010. Sixnet. All Rights Reserved. 114 114 IndustrialPro Series Router User Manual Provisioning for Vision IP only/Static IP only If you are you using Vision IP only or Static IP only provisioning you will enter the following information: Enter the SPC Unlock code provided by your cellular carrier at time of activation. The Mobile IP mode should always be set to “Mobile IP preferred” Set the Sync system time to cellular network time to “Yes” Enter the ESN # which can be found in the upper window next to “Detected ESN” Enter the MDN# provided by your cellular carrier Enter the MSID # provided by your cellular carrier When all of your information is correctly entered, click “Apply” For more information regarding a specific field, refer to the yellow “Help” button to the right side of the screen. Sixnet, Inc, A Red Lion Business 331 Ushers Road, Ballston Lake, NY 12019 www.sixnet.com CONNECT. MONITOR. CONTROL. T +1 518 877 5173 F +1 518 877 8346 Version XXX © 2010. Sixnet. All Rights Reserved. 115 115 IndustrialPro Series Router User Manual Provisioning for Static, Vision alternate If you are using Static, Vision alternate provisioning, there are two more required fields than there are for Vision/Static only provisioning. The “Set PPP Error threshold” field and “Set Vision timeout” field should automatically be defaulted to the numbers below: Set PPP Error threshold: 10 Set Vision timeout: 1440 When all of your information is correct click “Apply” Provisioning for Datalink only or Datalink, Vision alternate If you are provisioning for Datalink only or Datalink, Vision alternate, enter the following information: Enter the SPC Unlock code provided by your cellular carrier at time of activation The Mobile IP mode should always be set to “Mobile IP preferred” You will set Sync system time to cellular network time to “Yes” Enter the ESN # which can be found in the upper window next to “Detected ESN” Enter the MDN# provided by your cellular carrier Enter the MSID # provided by your cellular carrier Enter the NAI User Name provided by your cellular carrier Enter the AAA Password provided by your cellular carrier HA Password provided by your cellular carrier Home IP Address provided by your cellular carrier Primary HA IP Address provided by your cellular carrier Secondary HA IP Address provided by your cellular carrier When all of your information is correctly entered, click “Apply” Sixnet, Inc, A Red Lion Business 331 Ushers Road, Ballston Lake, NY 12019 www.sixnet.com CONNECT. MONITOR. CONTROL. T +1 518 877 5173 F +1 518 877 8346 Version XXX © 2010. Sixnet. All Rights Reserved. 116 116 IndustrialPro Series Router User Manual 3.4.2 DNS Settings The Domain Name Server Settings screen is broken down into two components. The top section pertains to the DNS resolver configuration and the bottom section pertains to the host configuration. Click on the “DNS Settings” menu item and the following window will appear: The Primary, Alternate #1, and Alternate #2 DNS server fields are already filled in; they are the current servers in use by the Sixnet router. Search Domain: Enter the local domain name(s) to be searched, separated by spaces. These domains are used as the default local domains when performing DNS queries. Example: local.net domain.com Primary DNS Server: Enter the IP Address of the Primary DNS Server you want to use. (Required) Note: This setting may be overridden if a network interface is set to obtain its configuration information from its peer (either via PPP or DHCP). Alternate DNS Servers #1: In the event that a DNS query is submitted to the Primary DNS Server and a response is not received (possibly because the host is down), the Sixnet router will forward the query to the Alternate DNS servers #1, if they are specified. Note: This setting may be overridden if a network interface is set to obtain its configuration information from its peer (either via PPP or DHCP). Alternate DNS Servers #2: In the event that a DNS query is submitted to the Primary DNS Server and Alternate DNS Server #1 and a response is not received (possibly because the host is down), the Sixnet router will forward the query to the Alternate DNS servers #2, if they are specified. Note: This setting may be overridden if a network interface is set to obtain its configuration information from its peer (either via PPP or DHCP). Sixnet, Inc, A Red Lion Business 331 Ushers Road, Ballston Lake, NY 12019 www.sixnet.com CONNECT. MONITOR. CONTROL. T +1 518 877 5173 F +1 518 877 8346 Version XXX © 2010. Sixnet. All Rights Reserved. 117 117 IndustrialPro Series Router User Manual Static Host Entries: Static Host Entries may be added for local hosts, allowing the Sixnet router to resolve local host names to IP addresses if requested. 3.4.3 Network Interfaces The “Ethernet Interfaces” menu item allows the administrator to configure the Ethernet ports of Sixnet routers to meet their needs. The R3100/R3300 has two Ethernet ports available on the device, the “WAN”/‘eth0’ port and the “LAN”/‘eth1’ port, while the SN series products have “eth0” and “USB” ports. These ports are ‘auto-sensing’, allowing for greater flexibility. The configuration of the Ethernet ports are the same, therefore this document will only cover the configuration of “WAN”/‘eth0’. Please refer to this section when configuring “LAN”/‘eth1’. Ethernet Interface “WAN”/’eth0’ Sixnet, Inc, A Red Lion Business 331 Ushers Road, Ballston Lake, NY 12019 www.sixnet.com CONNECT. MONITOR. CONTROL. T +1 518 877 5173 F +1 518 877 8346 Version XXX © 2010. Sixnet. All Rights Reserved. 118 118 IndustrialPro Series Router User Manual Click on the “eth0” menu item and the following window will appear: Enable This Interface: This field determines whether or not the specified Ethernet port is enabled or disabled, allowing the administrator to disable the port if necessary. Note 1: When the Save button is clicked, the interface will not be immediately activated or deactivated, but will be after the device is rebooted. This allows for other configuration changes to be made to the device which can be committed at a later time. When the Apply button is clicked, the current settings will be saved and the interface will immediately be either deactivated or activated. Sixnet, Inc, A Red Lion Business 331 Ushers Road, Ballston Lake, NY 12019 www.sixnet.com CONNECT. MONITOR. CONTROL. T +1 518 877 5173 F +1 518 877 8346 Version XXX © 2010. Sixnet. All Rights Reserved. 119 119 IndustrialPro Series Router User Manual If the interface was already active, then it will be deactivated and reactivated using the configured settings just saved. If you were connected to the GAU via this interface, an attempt will be made to re-connect to it using the new settings, when possible. Note 2: Applying new settings to the interface may result in disconnection, requiring reconnection using alternate methods. Incomplete or incorrect network settings could render the device incommunicable and may require being able to connect either to the device directly or via the network to which it is attached. Interface Speed/Duplex: This configuration parameter controls the speed and duplex behavior of the Ethernet port. Valid selections are: Auto Detect: The Ethernet port will attempt to automatically determine both the speed and the duplex settings of the device to which it is connected. Some devices to which Sixnet routers are connected do not always perform proper speed and duplex negotiation. In the event that throughput and performance difficulties are encountered, it is recommended that speed and duplex of both the Sixnet router, and the device to which it is connected, have the speed and duplex configuration explicitly specified. 10Mbps/Half: If selected, the interface will communicate at 10 million bits per second and half duplex, meaning that one side will communicate while the other one listens. 100Mbps/Half: If selected, the interface will communicate at 100 million bits per second and half duplex. 100Mbps/Full: If selected, the interface will communicate at 100 million bits per second and full duplex, meaning the both sides may transmit and receive simultaneously. Obtain Network Addresses via DHCP: This field determines how an IP address will be assigned to the specified Ethernet interface. If ‘No’ is selected, the interface will have a ‘Static’ IP Address, the IP address will be manually specified. The IP Address, Subnet Mask, and Default Gateway fields will be visible so that the administrator may enter the appropriate information. If ‘Yes’ is selected, the interface will have a ‘Dynamic’ IP Address, the router will employ its onboard DHCP client to issue a request for an IP address to the network in order to obtain an IP address, netmask and remote gateway and, optionally, use the remote gateway as the default route. In this configuration the IP Address, Subnet Mask, and Default Gateway fields will disappear and be unavailable to the administrator. IP Address: This field specifies the IP address to be assigned to the Ethernet port when a ‘Static’ IP address configuration is selected. This field will not be visible or accessible when a ‘Dynamic’ IP address configuration is selected, as the DHCP server will provide the Sixnet router with the IP address that it should use. The IP address identifies a device on a TCP/IP network. Every device on a network must have a unique address. The range of valid addresses for a given network is determined by the value of the Netmask. Some addresses are reserved for special uses such as network and broadcast. For example, if a netmask is 255.255.255.0 and the IP address assigned to the device is 192.168.1.3, then the range of valid addresses is 192.168.1.1 through 192.168.1.254 as 192.168.1.0 is the value reserved for the network and 192.168.1.255 is the value reserved for the broadcast address. Subnet Mask: This field specifies the subnet mask to be assigned to the Ethernet port when a ‘Static’ IP address configuration is selected. This field is only available when Obtain Network Addresses via DHCP has been set to No. (Required) Sixnet, Inc, A Red Lion Business 331 Ushers Road, Ballston Lake, NY 12019 www.sixnet.com CONNECT. MONITOR. CONTROL. T +1 518 877 5173 F +1 518 877 8346 Version XXX © 2010. Sixnet. All Rights Reserved. 120 120 IndustrialPro Series Router User Manual Default Gateway: This field specifies IP address of the default gateway to be assigned to the Ethernet port when a ‘Static’ IP address configuration is selected. This field will not be visible or accessible when a ‘Dynamic’ IP address configuration is selected, as the DHCP server will provide the Sixnet router with the default gateway that it should use. If specified, the Default Gateway will tell the Sixnet router the IP address of a router to which the Sixnet router should forward all traffic for which it does not already know a specific route. In the cases where the Sixnet router includes the use of a cellular modem, the cellular network will provide this information to the Sixnet router, and traffic will be default routed to the cellular network. Therefore, an additional default gateway should not be configured. If a default gateway is specified and a cellular interface is activated, the cellular interface will automatically become the default route. Use Interface as Default Route: If this option is set to ‘yes’, the Sixnet router will forward any packets for which it does not have a route out through this interface. This parameter should not be specified if the Sixnet router will be using a cellular card, as the cellular interface will become the default gateway when it connects to the cellular carrier. NOTE: Should a cellular interface be activated subsequent to an Ethernet interface having already been specified as the default route, the cellular interface will override the Ethernet default route. If this is not done, it will be impossible to route traffic over the cellular interface when it is activated. Enter Maximum Transmission Unit (MTU): In computer networking, the Maximum Transmission Unit (MTU) of a communications protocol of a layer is the size (in bytes) of the largest protocol data unit that the layer can pass onwards. MTU parameters usually appear in association with a communications interface (NIC, serial port, etc.). Standards (Ethernet, for example) can fix the size of an MTU; or systems (such as point-to-point serial links) may decide MTU at connect time. A larger MTU brings greater efficiency because each packet carries more user data while protocol overheads, such as headers or underlying per-packet delays, remain fixed; the resulting higher efficiency means a slight improvement in bulk protocol throughput. A larger MTU also means processing of fewer packets for the same amount of data. In some systems, per-packet-processing can be a critical performance limitation. However, this gain is not without some downside. Large packets can occupy a slow link for some time, causing greater delays to following packets and increasing lag and minimum latency. For example, a 1500-byte packet, the largest allowed by Ethernet at the network layer (and hence over most of the Internet), ties up a 14.4k modem for about one second. Recommended Setting: 1500 Interface Aliases (Sub Interfaces) Sub interfacing is essentially the segmenting of a single wire, or port, into multiple IP networks. Instead of subnetting and routing, you can create a sub interface and then set it up as you would a standard Ethernet interface. To configure a sub interface: Click on the “Add” button and the following pop-up window will appear: Sixnet, Inc, A Red Lion Business 331 Ushers Road, Ballston Lake, NY 12019 www.sixnet.com CONNECT. MONITOR. CONTROL. T +1 518 877 5173 F +1 518 877 8346 Version XXX © 2010. Sixnet. All Rights Reserved. 121 121 IndustrialPro Series Router User Manual Enter Sub interface number: Enter the desired Sub interface number in the file provided. The valid range is 0-99, and each aliased interface must be uniquely numbered. The final sub interface name will then be in the form ethx:y where x is the root interface number and y is the sub-interface number. Enter IP Address: This field specifies the IP Address of the sub interface. Enter Netmask: This field specifies the netmask to be assigned to the sub interface. Click on the “OK” button once the inputs are completed. This will populate the Ethernet screen. Once you are finished, click “Save” and then “Apply” The “usb Interfaces” menu item allows the administrator to configure the usb port of Sixnet routers to meet their needs. The default address is set for 192.168.111.1 with subnet mask of 255.255.255.0. Sixnet, Inc, A Red Lion Business 331 Ushers Road, Ballston Lake, NY 12019 www.sixnet.com CONNECT. MONITOR. CONTROL. T +1 518 877 5173 F +1 518 877 8346 Version XXX © 2010. Sixnet. All Rights Reserved. 122 122 IndustrialPro Series Router User Manual Sixnet, Inc, A Red Lion Business 331 Ushers Road, Ballston Lake, NY 12019 www.sixnet.com CONNECT. MONITOR. CONTROL. T +1 518 877 5173 F +1 518 877 8346 Version XXX © 2010. Sixnet. All Rights Reserved. 123 123 IndustrialPro Series Router User Manual Click on the “usb’ menu item and the following window will appear: Select “Yes” to enable the USB interface. Enter the desired interface IP Address and Subnet Mask into their designated field. (Required) The IP address identifies a device on a TCP/IP network. Every device on a network must have a unique address. The range of valid addresses for a given network is determined by the value of the Netmask. Some addresses are reserved for special uses such as network and broadcast. For example, if a netmask is 255.255.255.0 and the IP address assigned to the device is 192.168.1.3, then the range of valid addresses is 192.168.1.1 through 192.168.1.254 as 192.168.1.0 is the value reserved for the network and 192.168.1.255 is the value reserved for the broadcast address. Click on “Save” button for changes to be saved without activation the interface. Click on “Apply” button for changes to be saved and activate this interface. Switch Control Sixnet, Inc, A Red Lion Business 331 Ushers Road, Ballston Lake, NY 12019 www.sixnet.com CONNECT. MONITOR. CONTROL. T +1 518 877 5173 F +1 518 877 8346 Version XXX © 2010. Sixnet. All Rights Reserved. 124 124 IndustrialPro Series Router User Manual This mode is only available on RAM-6x21 - 5 port equipped hardware. The purpose of the Switch Control function is to create a WAN/LAN separation similar to what is seen on the R series router. This gives the user the ability to create a divided network with additional capabilities. Switch Control Settings Split LAN Enable: This will alter the switch port allocations. When disabled, all switch ports 1-5 will be treated as a single LAN. This will be configurable as eth0 and will default to being a firewall trusted/internal interface. When enabled, port 5 will be divided out as a WAN port, eth0 (firewalled as external/untrusted). Ports 1-4 will be an internally trusted LAN. WARNING: When switching modes, your firewall interface tables will be rebuilt and may need any custom changes reapplied. In addition, a USER INITIATED reboot is required to complete the mode switch. WARNING! When enabling switch mode, current Ethernet settings (eth0) will apply only to the single WAN port. On the front of the unit, this may be shown as <Port 5> under the power connector. The remaining four ports will be configured as a LAN (eth1). Please check your Ethernet connections to make sure that the new settings will not conflict with previous network configurations. You may need to revisit your Untrusted/Trusted interface lists in the Firewall→General Settings, as these will revert to new defaults (eth0 will be firewalled as Untrusted!). After an Apply is performed and you check firewall/ethernet configurations, a reboot is REQUIRED to complete this process. 3.4.4 Firewall The “Firewall” menu item allows you to configure every aspect of the firewall on the Sixnet router. It is organized into nine (9) sub-sections: Sixnet, Inc, A Red Lion Business 331 Ushers Road, Ballston Lake, NY 12019 www.sixnet.com CONNECT. MONITOR. CONTROL. T +1 518 877 5173 F +1 518 877 8346 Version XXX © 2010. Sixnet. All Rights Reserved. 125 125 IndustrialPro Series Router User Manual General Settings DMZ Host Rules Filter Rules Host Redirect Rules Masquerade Rules NAT Rules Service Access Rules Subnet Blacklist Rules Subnet Whitelist Rules General Settings (Firewall) The “General Settings” allows you to configure common access services to the Sixnet router and configure how the interfaces are interpreted. Click on the “General Settings” menu item and the following window will appear: Sixnet, Inc, A Red Lion Business 331 Ushers Road, Ballston Lake, NY 12019 www.sixnet.com CONNECT. MONITOR. CONTROL. T +1 518 877 5173 F +1 518 877 8346 Version XXX © 2010. Sixnet. All Rights Reserved. 126 126 IndustrialPro Series Router User Manual Enable Firewall? Determines whether the firewall is enabled or disabled. Default is “Yes”. *Note: Disabling the Firewall will compromise not only security, but many router functions of the unit. Allow PING? To allow ICMP echo responses from external devices through untrusted interfaces on this unit, select “Yes”, otherwise select “No”. Allow SSH? To allow external devices to connect to the SSH Server, via port 22, through untrusted interfaces on this unit, select “Yes”, otherwise select “No”. *Note: Setting this option to Yes does not enable the SSH server, it just allows it to be accessible via the firewall when it is enabled. The SSH Server may be enabled via the Services→SSH Server screen. Sixnet, Inc, A Red Lion Business 331 Ushers Road, Ballston Lake, NY 12019 www.sixnet.com CONNECT. MONITOR. CONTROL. T +1 518 877 5173 F +1 518 877 8346 Version XXX © 2010. Sixnet. All Rights Reserved. 127 127 IndustrialPro Series Router User Manual If the SSH Server is configured to use a port other than 22, a rule specifically for the alternate port will need to be added via the Networking→Firewall→Service Access Rules screen. Allow Telnet? To allow external devices to connect to the TELNET Server, via port 23, through untrusted interfaces on this unit, select “Yes”, otherwise select “No”. *Note: Setting this option to Yes does not enable the TELNET Server, it just allows it to be accessible via the firewall when it is enabled. The TELNET Server may be enabled via the Services→TELNET Server screen. Allow Modbus? To allow external devices to connect to the MODBUS Server, via port 502, through untrusted interfaces on this unit, select “Yes”, otherwise select “No”. Allow Web Interface Access? To allow external devices to connect to the Gateway Administration Utility (GAU), through untrusted interfaces on this unit, select “Yes”, otherwise select “No”. Allow SNMP Agent Access? To allow external devices to connect to the SNMP Agent, via port 161, through untrusted interfaces on this unit, select “Yes”, otherwise select “No”. Note: To restrict access for above services via a configured Whitelist, click the checkbox marked “Use Whitelist” next to their corresponding service option and then select a Whitelist name from the list of names available in the dropdown list box provided. Whitelists may be viewed/defined via the NetworkingFirewallSubnet Whitelist Rules screen. Allow IPSEC? Specify whether to allow ESP data, as well as UDP port 500 to communicate with external devices through Untrusted interfaces. Default is “Yes”. *Note: This is necessary if you are planning to configure any IPSEC tunnels originating from the Sixnet router. Allow NAT-Traversal? Specify whether to allow data on UDP port 4500 on un-trusted interface. Note: This is necessary if you are planning to run any IPSEC tunnels through our device. This would support a unit behind a trusted interface to make an IPSEC connection to a host beyond an untrusted interface. Trusted Interface: Identifies the trusted (internal) Interface. Traffic from this interface will be permitted outbound. Default is “WAN/eth0”. Click on the “Add” button for Trusted Interface and the following pop-up window will appear: Sixnet, Inc, A Red Lion Business 331 Ushers Road, Ballston Lake, NY 12019 www.sixnet.com CONNECT. MONITOR. CONTROL. T +1 518 877 5173 F +1 518 877 8346 Version XXX © 2010. Sixnet. All Rights Reserved. 128 128 IndustrialPro Series Router User Manual Interface: Choose an interface from the drop-down lists provided. You may add any number of interfaces, up to as many exist on the device. Each selection must be unique. Trusted interfaces will not block traffic to/from devices connected to that interface. Click on the “OK” button to populate the Trusted Interface screen. Untrusted Interface: Identifies the Primary Untrusted (external) Interface. Default is “ppp0”. Click on the “Add” button for Untrusted Interface and the following pop-up window will appear: Interface: Choose an interface from the drop-down lists provided. You may add any number of interfaces, up to as many exist on the device. Each selection must be unique. Untrusted interfaces will block all incoming traffic from devices connected to this interface. Click on the “OK” button to populate the Untrusted Interface screen. Click on the “Save” button and the following pop-up window will appear: Click on the “OK” button to acknowledge the content. Click on the “Apply” button and the following pop-up window will appear: Click on the “OK” button to acknowledge the content. Sixnet, Inc, A Red Lion Business 331 Ushers Road, Ballston Lake, NY 12019 www.sixnet.com CONNECT. MONITOR. CONTROL. T +1 518 877 5173 F +1 518 877 8346 Version XXX © 2010. Sixnet. All Rights Reserved. 129 129 IndustrialPro Series Router User Manual DMZ Host Rules (Firewall) “DMZ Host Rules” are used to configure rules to route through a Demilitarized Zone (DMZ). Click on the “DMZ Host Rules” menu item and the following window will appear: To add a DMZ host rule: Click on the “Add” button and the following pop-up window will appear: Select Interface: Click on the pull down menu to choose an interface that will be forwarded to a DMZ Host. All incoming packets (TCP/UDP/ICMP/etc) will be forwarded to the DMZ Host specified. DMZ Host Address: Enter the IP address of the DMZ Host. This IP address will receive all packets destined for the interface specified. (Required) NOTE: Host Redirect and Service Access rules will apply first, and may prevent certain ports from reaching the DMZ Host. Source subnets via whitelist: Select a whitelist name from the list of names available in the drop-down list box provided. Whitelists may be viewed/defined via the NetworkingFirewallSubnet Whitelist Rules screen. Sixnet, Inc, A Red Lion Business 331 Ushers Road, Ballston Lake, NY 12019 www.sixnet.com CONNECT. MONITOR. CONTROL. T +1 518 877 5173 F +1 518 877 8346 Version XXX © 2010. Sixnet. All Rights Reserved. 130 130 IndustrialPro Series Router User Manual Click on the “OK” button to populate the DMZ Host Rules screen. Click on the “Save” button and the following pop-up window will appear: Click on the “OK” button to acknowledge the content. Click on the “Apply” button and the following pop-up window will appear: Click on the “OK” button to acknowledge the content. Sixnet, Inc, A Red Lion Business 331 Ushers Road, Ballston Lake, NY 12019 www.sixnet.com CONNECT. MONITOR. CONTROL. T +1 518 877 5173 F +1 518 877 8346 Version XXX © 2010. Sixnet. All Rights Reserved. 131 131 IndustrialPro Series Router User Manual Filter Rules (Firewall) The “Filter Rules” menu item allows you to configure routes from a small range of IP Addresses or all IP Addresses through one or more interfaces to a designated IP Address located behind the Sixnet router. Click on the “Filter Rules” menu item and the following window will appear: To add a filter rule: Click on the “Add” button and the following pop-up window will appear: Inbound Interface: Click on the pull down menu to choose an interface associated with the Source Address/Subnet. Source subnets via whitelist: Select a whitelist name from the list of names available in the drop-down list box provided. Whitelists may be viewed/defined via the NetworkingFirewallSubnet Whitelist Rules screen. Sixnet, Inc, A Red Lion Business 331 Ushers Road, Ballston Lake, NY 12019 www.sixnet.com CONNECT. MONITOR. CONTROL. T +1 518 877 5173 F +1 518 877 8346 Version XXX © 2010. Sixnet. All Rights Reserved. 132 132 IndustrialPro Series Router User Manual Outbound Interface: Select the interface associated with the Destination Address/Subnet. Destination Address/Subnet: Enter the network to which the firewall will allow access from the Outbound Interface. Click on the “OK” button to populate the Filter Rules screen. Click on the “Save” button and the following pop-up window will appear: Click on the “OK” button to acknowledge the content. Sixnet, Inc, A Red Lion Business 331 Ushers Road, Ballston Lake, NY 12019 www.sixnet.com CONNECT. MONITOR. CONTROL. T +1 518 877 5173 F +1 518 877 8346 Version XXX © 2010. Sixnet. All Rights Reserved. 133 133 IndustrialPro Series Router User Manual Click on the “Apply” button and the following pop-up window will appear: Click on the “OK” button to acknowledge the content. Host Redirect (Port Forwarding) Rules The “Host Redirect Rules” menu item allows you to configure port forwarding rules that permit ports on external, untrusted interfaces to be passed to ports on internal hosts on the same or different ports. Click on the “Host Redirect Rules” menu item and the following window will appear: To add a new host redirect rule: Click on the “Add” button and the following pop-up window will appear: Sixnet, Inc, A Red Lion Business 331 Ushers Road, Ballston Lake, NY 12019 www.sixnet.com CONNECT. MONITOR. CONTROL. T +1 518 877 5173 F +1 518 877 8346 Version XXX © 2010. Sixnet. All Rights Reserved. 134 134 IndustrialPro Series Router User Manual Original Destination Port: Enter the port that an external device will try to connect to. This is the port that will be open on the specified interface. (Required) Select Interface: Click on the pull down menu to select the interface on which to open the specified port. Incoming connections will be allowed. New Destination IP Address: Enter the IP Address that the incoming connection will be redirected to. This can be an IP address within or beyond this device. (Required) New Destination Port: Enter the port that the incoming connection will be redirected to. This may be the same port number or a different port number as the Original Destination Port. (Required) Select Protocol: Choose the protocol type for this port's data. Options are TCP and UDP. Source subnets via whitelist: Select a whitelist name from the list of names available in the drop-down list box provided. Whitelists may be viewed/defined via the Networking→Firewall→Subnet Whitelist Rules screen. Sixnet, Inc, A Red Lion Business 331 Ushers Road, Ballston Lake, NY 12019 www.sixnet.com CONNECT. MONITOR. CONTROL. T +1 518 877 5173 F +1 518 877 8346 Version XXX © 2010. Sixnet. All Rights Reserved. 135 135 IndustrialPro Series Router User Manual Click on the “OK” button to populate the Host Redirect Rule screen Click on the “Save” button and the following pop-up window will appear: Click on the “OK” button to acknowledge the content Click on the “Apply” button and the following pop-up window will appear: Click on the “OK” button to acknowledge the content Sixnet, Inc, A Red Lion Business 331 Ushers Road, Ballston Lake, NY 12019 www.sixnet.com CONNECT. MONITOR. CONTROL. T +1 518 877 5173 F +1 518 877 8346 Version XXX © 2010. Sixnet. All Rights Reserved. 136 136 IndustrialPro Series Router User Manual Masquerade Rules The “Masquerade Rules” menu item allows you to configure an interface to give all IP Addresses on a local network access to the Internet. Click on the “Masquerade Rules” menu item and the following window will appear: To add a new masquerade rule: Click on the “Add” button and the following pop-up window will appear: Original Source Subnet: Enter the subnet, using IP/CIDR notation that will be masqueraded out a specific interface. All traffic that is sourced from this subnet and that is destined to go out the specified interface, will be masqueraded with the source IP address of the interface specified. (Required) Interface: Click on the pull down menu to select the interface through which you wish to masquerade source addresses. Sixnet, Inc, A Red Lion Business 331 Ushers Road, Ballston Lake, NY 12019 www.sixnet.com CONNECT. MONITOR. CONTROL. T +1 518 877 5173 F +1 518 877 8346 Version XXX © 2010. Sixnet. All Rights Reserved. 137 137 IndustrialPro Series Router User Manual Click on the “OK” button to populate the Masquerade Rules screen Click on the “Save” button and the following pop-up window will appear: Click on the “OK” button to acknowledge the content. Click on the “Apply” button and the following pop-up window will appear: Sixnet, Inc, A Red Lion Business 331 Ushers Road, Ballston Lake, NY 12019 www.sixnet.com CONNECT. MONITOR. CONTROL. T +1 518 877 5173 F +1 518 877 8346 Version XXX © 2010. Sixnet. All Rights Reserved. 138 138 IndustrialPro Series Router User Manual Click on the “OK” button to acknowledge the content Network Address Translation (NAT) Rules The “NAT Rules” menu item allows you to provide access to the Internet through a single machine that translates the IP addresses. The NAT itself has one or more IP addresses, but all the machines behind the NAT have ‘private’ Internet addresses. Sixnet, Inc, A Red Lion Business 331 Ushers Road, Ballston Lake, NY 12019 www.sixnet.com CONNECT. MONITOR. CONTROL. T +1 518 877 5173 F +1 518 877 8346 Version XXX © 2010. Sixnet. All Rights Reserved. 139 139 IndustrialPro Series Router User Manual One-To-One NAT will perform a complete forwarding of all ports on the Original Destination IP to a new IP address entered in New Destination. Because the Original Destination need not be configured on this router, an interface is not required to setup. One-To-One NAT Range will perform a complete forwarding of all ports for the range of starting/ending Original Destination IP's to a range of starting/ending New Destination IP addresses entered in New Destination Address Start and New Destination Address End fields. Both fields can be any valid IP. Neither need to be already present/configured/owned on a local interface of this device. (Required) NOTE: Host Redirect and Service Access rules will apply first, and may prevent certain ports from reaching the New Destination. Ports 1-19 are excluded. Click on the “NAT Rules” menu item and the following window will appear: Sixnet, Inc, A Red Lion Business 331 Ushers Road, Ballston Lake, NY 12019 www.sixnet.com CONNECT. MONITOR. CONTROL. T +1 518 877 5173 F +1 518 877 8346 Version XXX © 2010. Sixnet. All Rights Reserved. 140 140 IndustrialPro Series Router User Manual To add a new NAT (One-To-One) rule: Click on the “Add” button and the following pop-up window will appear: Sixnet, Inc, A Red Lion Business 331 Ushers Road, Ballston Lake, NY 12019 www.sixnet.com CONNECT. MONITOR. CONTROL. T +1 518 877 5173 F +1 518 877 8346 Version XXX © 2010. Sixnet. All Rights Reserved. 141 141 IndustrialPro Series Router User Manual Original Destination Address: One-To-One NAT will perform a complete forwarding of all ports on the Original Destination IP to a new IP address entered in New Destination. Both fields can be any valid IP. Neither need to be already present/configured/owned on a local interface of this device. (Required) New Destination Address: One-To-One NAT will perform a complete forwarding of all ports on the Original Destination IP to a new IP address entered in New Destination. Both fields can be any valid IP. Neither need to be already present/configured/owned on a local interface of this device. (Required) Select Protocol: Choose the protocol type for this port's data. Options are TCP, UDP, All. Source network via whitelist: Select a whitelist name from the list of names available in the drop-down list box provided. Whitelists may be viewed/defined via the NetworkingFirewallSubnet Whitelist Rules screen. Click on the “OK” button to populate the NAT Rules screen Sixnet, Inc, A Red Lion Business 331 Ushers Road, Ballston Lake, NY 12019 www.sixnet.com CONNECT. MONITOR. CONTROL. T +1 518 877 5173 F +1 518 877 8346 Version XXX © 2010. Sixnet. All Rights Reserved. 142 142 IndustrialPro Series Router User Manual Click on the “Save” button and the following pop-up window will appear: Click on the “OK” button to acknowledge the content Click on the “Apply” button and the following pop-up window will appear: Sixnet, Inc, A Red Lion Business 331 Ushers Road, Ballston Lake, NY 12019 www.sixnet.com CONNECT. MONITOR. CONTROL. T +1 518 877 5173 F +1 518 877 8346 Version XXX © 2010. Sixnet. All Rights Reserved. 143 143 IndustrialPro Series Router User Manual Click on the “OK” button to acknowledge the content To add a new NAT (One-To-One) rule: Click on the “Add” button and the following pop-up window will appear: Original Destination Address Start: This field is used to hold the starting address of the range being transformed by NAT, the IP's seen by a remote host. This address may be owned by an interface on this device, or an unowned/fake range with a corresponding route (static or default). Original Destination Address End: This field is used to hold the ending address range being transformed by NAT, the IP's seen by a remote host. This address may be owned by an interface on this device, or an unowned/fake range with a corresponding route (static or default). New Destination Address Start: This field is used to hold the starting range of real LAN IP of the destination device behind this router. New Destination Address End: This field is used to hold the ending range of real LAN IP of the destination device behind this router. Select Protocol: Choose the protocol type for this port's data. Options are TCP, UDP, All. (Required) Source network via Whitelist: Select a whitelist name from the list of names available in the drop-down list box provided. Sixnet, Inc, A Red Lion Business 331 Ushers Road, Ballston Lake, NY 12019 www.sixnet.com CONNECT. MONITOR. CONTROL. T +1 518 877 5173 F +1 518 877 8346 Version XXX © 2010. Sixnet. All Rights Reserved. 144 144 IndustrialPro Series Router User Manual Whitelists may be viewed/defined via the Networking→Firewall→Subnet Whitelist Rules screen. Service Access Rules (Port Allow) The “Service Access Rules” menu item allows you to define what ports, either as a single port or a range of ports that is authorized access through the firewall on the Sixnet router. Click on the “Service Access Rules” menu item and the following window will appear: To add a new Service Access Rule: Click on the “Add” button and the following pop-up appears: Starting Port: Enter the starting TCP or UDP port number for this rule. (Required) NOTE: If adding only one port, enter it here. Sixnet, Inc, A Red Lion Business 331 Ushers Road, Ballston Lake, NY 12019 www.sixnet.com CONNECT. MONITOR. CONTROL. T +1 518 877 5173 F +1 518 877 8346 Version XXX © 2010. Sixnet. All Rights Reserved. 145 145 IndustrialPro Series Router User Manual Ending Port: Enter the ending TCP or UDP port number for this rule. NOTE: If adding only one port, please omit this entry. Interface: Select the interface on which this port will be opened. Incoming connections to this interface will be allowed into the device. Note: For connections destined to a device beyond this unit, use Host Redirect, NAT or DMZ rules instead. Select Protocol: Choose the protocol for the type of data you want to allow. Options are TCP or UDP. Source network via whitelist: Select a whitelist name from the list of names available in the drop-down list box provided. Whitelists may be viewed/defined via the NetworkingFirewallSubnet Whitelist Rules screen. Click on the “OK” button to populate the Service Access Rules screen Sixnet, Inc, A Red Lion Business 331 Ushers Road, Ballston Lake, NY 12019 www.sixnet.com CONNECT. MONITOR. CONTROL. T +1 518 877 5173 F +1 518 877 8346 Version XXX © 2010. Sixnet. All Rights Reserved. 146 146 IndustrialPro Series Router User Manual Click on the “Save” button and the following pop-up window will appear: Click on the “OK” button to acknowledge the content. Click on the “Apply” button and the following pop-up window will appear: Click on the “OK” button to acknowledge the content Subnet Blacklist Rules Sixnet, Inc, A Red Lion Business 331 Ushers Road, Ballston Lake, NY 12019 www.sixnet.com CONNECT. MONITOR. CONTROL. T +1 518 877 5173 F +1 518 877 8346 Version XXX © 2010. Sixnet. All Rights Reserved. 147 147 IndustrialPro Series Router User Manual The “Subnet Blacklist Rules” menu item allows you to define a single IP Address or an entire network that you do not want to allow access into the network behind the Sixnet router. Click on the “Subnet Blacklist Rules” menu item and the following window will appear: To add a new item to the list: Click on the “Add” button and the following pop-up window will appear: Enter Subnet To Blacklist: Enter the network to be banned from making any incoming connections, using IP/CIDR notation. To allow data from any source, enter 0.0.0.0/0. To specify a single host, use x.x.x.x/32, where x.x.x.x is the host's IP address. This will override any other section's rules (Allow/Redirect/DMZ/NAT/etc). Sixnet, Inc, A Red Lion Business 331 Ushers Road, Ballston Lake, NY 12019 www.sixnet.com CONNECT. MONITOR. CONTROL. T +1 518 877 5173 F +1 518 877 8346 Version XXX © 2010. Sixnet. All Rights Reserved. 148 148 IndustrialPro Series Router User Manual Click on the “OK” button to populate the Subnet Blacklist Rules screen Click on the “Save” button and the following pop-up window will appear: Click on the “OK” button to acknowledge the content. Click on the “Apply” button and the following pop-up window will appear: Click on the “OK” button to acknowledge the content. Sixnet, Inc, A Red Lion Business 331 Ushers Road, Ballston Lake, NY 12019 www.sixnet.com CONNECT. MONITOR. CONTROL. T +1 518 877 5173 F +1 518 877 8346 Version XXX © 2010. Sixnet. All Rights Reserved. 149 149 IndustrialPro Series Router User Manual Subnet Whitelist Rules The “Subnet Whitelist Rules” menu item allows you to define a single IP Address or an entire network that you want to allow access into the network behind the Sixnet router. Click on the “Subnet Whitelist Rules” menu item and the following window will appear: General behavior setting controls whether or not the whitelist rules apply to packets originating from the Gateway device. There are two choices: Only to Whitelisted IPs No Restrictions (default) Sixnet, Inc, A Red Lion Business 331 Ushers Road, Ballston Lake, NY 12019 www.sixnet.com CONNECT. MONITOR. CONTROL. T +1 518 877 5173 F +1 518 877 8346 Version XXX © 2010. Sixnet. All Rights Reserved. 150 150 IndustrialPro Series Router User Manual When “Only to Whitelist IPs” is selected, packets destined for subnets outside those allowed by the selected whitelist will be suppressed by the firewall. When “No Restrictions” is selected, the device may send a packet to any subnet and the whitelist rules apply only to packets received. Click on the “Add” button and the following pop-up window will appear: Enter Whitelist Name: Enter a name for the whitelist in the space provided. If the name of an existing whitelist is entered, then you are in effect adding another member to the list of subnets defined by that whitelist group. After you click the OK button, you will see the entry added to the group in the (stored) display area under the Current Whitelist Groups heading. This whitelist name will become available for selection in the other Firewall Rules sections where a whitelist can be selected. Bellow screen will demonstrate an entry for Network1 with the 192.168.10.0/0 network address. NOTE: The first whitelist entry, the 'default' entry may not be deleted nor have its name changed, but its subnet value may be changed. Additional entries may be added, edited and deleted as needed. Sixnet, Inc, A Red Lion Business 331 Ushers Road, Ballston Lake, NY 12019 www.sixnet.com CONNECT. MONITOR. CONTROL. T +1 518 877 5173 F +1 518 877 8346 Version XXX © 2010. Sixnet. All Rights Reserved. 151 151 IndustrialPro Series Router User Manual Click on the “Apply” button and the following pop-up window will appear: Click on the “OK” button to acknowledge the content. 3.4.5 PPP Dial Backup The “PPP Dial Backup” menu item allows you to configure the capability of an alternate connection by dialing into an ISDN should the primary route get interrupted. Sixnet, Inc, A Red Lion Business 331 Ushers Road, Ballston Lake, NY 12019 www.sixnet.com CONNECT. MONITOR. CONTROL. T +1 518 877 5173 F +1 518 877 8346 Version XXX © 2010. Sixnet. All Rights Reserved. 152 152 IndustrialPro Series Router User Manual Click on the “PPP Dial Backup” menu item and the following window will appear: Click on the pull down menu at the “Enable PPP Dial Backup?” field. Click on “Yes” and the display will expand to reveal the configuration fields. Port: Select the ttyS port on which the modem is attached. For an external modem connected to a serial port, use the port name as labeled on the router. For an internal modem, a common setting is ttyS3. Enter Dial String: Enter the phone number of the peer/ISP to dial. Enter User Name: Enter the name issued by you ISP used for authenticating the local system to the peer. Enter Password: Enter the password issued by your ISP to use for authenticating with the peer. Confirm Password: Re-enter the password issued by your ISP to use for authenticating with the peer. Sixnet, Inc, A Red Lion Business 331 Ushers Road, Ballston Lake, NY 12019 www.sixnet.com CONNECT. MONITOR. CONTROL. T +1 518 877 5173 F +1 518 877 8346 Version XXX © 2010. Sixnet. All Rights Reserved. 153 153 IndustrialPro Series Router User Manual Choose Connection Behavior: In Persistent mode, the router will always attempt to maintain a constant connection to the POTS network. In On-Demand mode, the connection to the POTS network will only be attempted when packets are destined to leave the modem's PPP interface. In addition, after a period of Idle Time, the connection will terminate. On-Demand is commonly chosen for an environment using an Ethernet connection as a primary interface, while IP Fallback is used to bring up this dialup connection as a backup. Persistent - When this link is intended as a Primary network connection. On-Demand - When this link is intended as a Fallback network connection. Dial-on-Demand (DoD) Idle Timeout: Enter the number of seconds the connection may be allowed to remain "idle" (no data transmitted or received) before closing the connection. This will allow a DoD connection to automatically reset once idle, so that any network usage is limited. Recommended setting is 300 seconds (5 minutes). This is useful for an environment where constant usage of the POTS line is not desired. Use Default Route? Yes - When this link is intended as a Primary network connection. No - When this link is intended as a Fallback network connection. Advance Setup? Select “Yes” to modify modem control, the modem speaker, and enter modem initialization string. The display will expand to reveal the Advance Setup options. Maximum Receive Idle Time: Enter the number of seconds the connection may be allowed to remain "Idle" or "Unresponsive" (no data received) before closing the connection. If packets are leaving the interface, but no return packet is received for the specified time, then the connection is reset. This can be useful for detecting an unresponsive situation where the network is down, the modem is in an unknown state, or another low level error may have occurred. Default is 150 seconds; however, you can use 0 to turn this function off. Sixnet, Inc, A Red Lion Business 331 Ushers Road, Ballston Lake, NY 12019 www.sixnet.com CONNECT. MONITOR. CONTROL. T +1 518 877 5173 F +1 518 877 8346 Version XXX © 2010. Sixnet. All Rights Reserved. 154 154 IndustrialPro Series Router User Manual NOTE: If the normal usage of the device regularly has packets leaving the unit with no expected response, then premature disconnections may result. Outgoing UDP packets with no expected response may be normal operation, yet will trigger this disconnection and reset. Modem? Select “Yes” to use the modem control lines CD (Carrier Detect) and DTR (Data Terminal Ready). RTS/CTS? Select “Yes” to set hardware flow control using RTS and CTS signals. Modem Speaker On? Yes - For testing and proof of concept phase to audibly verify connection attempts. No - For silent production mode. Enter Custom AT command: Enter the modem initialization string. Please consult your modem AT Command documentation for unique initialization that may be required. Enter only a single initialization string. Click on the “Apply” button and the following pop-up window will appear: Click on the “OK” button to acknowledge the content. 3.4.6 PPP over Ethernet The “PPP over Ethernet” menu item allows you to configure a connection by being able to connect to a DSL or cable modem. Click on the “PPP over Ethernet” menu item and the following window will appear Sixnet, Inc, A Red Lion Business 331 Ushers Road, Ballston Lake, NY 12019 www.sixnet.com CONNECT. MONITOR. CONTROL. T +1 518 877 5173 F +1 518 877 8346 Version XXX © 2010. Sixnet. All Rights Reserved. 155 155 IndustrialPro Series Router User Manual Click on the pull down menu at the “Enable PPP0E?” field. Click on the “Yes” and the display will expand to reveal the fields for configuring the PPP over Ethernet. Select Interface: Select the name of the Ethernet interface to which the “PPP over Ethernet” service should bind by choosing one of the options available in the provided drop-down list. Choose ‘eth0’ or ‘eth1’. Enter User Name: Enter the user name to be used with the PPPoE interface in the space provided. It is typically in the form [email protected]. Enter Password: Enter the password to be used with the PPPoE interface in the space provided. Confirm Password: Re-enter the password to be used with the PPPoE interface in the space provided. Select DNS Method: Select the method by which DNS Server information should be obtained. Sixnet, Inc, A Red Lion Business 331 Ushers Road, Ballston Lake, NY 12019 www.sixnet.com CONNECT. MONITOR. CONTROL. T +1 518 877 5173 F +1 518 877 8346 Version XXX © 2010. Sixnet. All Rights Reserved. 156 156 IndustrialPro Series Router User Manual # Use Unit Default - Do not obtain DNS information from PPPoE Server. Use settings from NetworkingDNS Settings instead. # Use Peer DNS - DNS information should be obtained from the peer host once connected. # Use Custom DNS - DNS information is entered manually in the fields which appear below: Enter the IP Addresses of the Primary and Secondary DNS servers to be used Use Default Route? Select “Yes” to use this interface as the default route. Dial on Demand? Select “Yes” to enable 'Dial-on-Demand'. Click on the “Apply” button and the following pop-up window will appear: Click on the “OK” button to acknowledge the content. 3.4.7 Static Routes The “Static Routes” menu item allows you to configure a route to a network through an interface manually. Click on the “Static Routes” menu item and the following window will appear: Sixnet, Inc, A Red Lion Business 331 Ushers Road, Ballston Lake, NY 12019 www.sixnet.com CONNECT. MONITOR. CONTROL. T +1 518 877 5173 F +1 518 877 8346 Version XXX © 2010. Sixnet. All Rights Reserved. 157 157 IndustrialPro Series Router User Manual To add a static route on the Sixnet router: Click on the “Add” button and the following pop-up window will appear: Interface: Select the interface to which the route should apply by selecting one of the available established options. Use as “Any” route? Select whether or not this route should be used as an "any" route by selecting Yes or No from the provided drop-down list. When set to Yes, the route will take effect when a network change event (up/down) occurs on any interface. For example, if the configured interface is eth0, and the ppp0 interface becomes active, then the route will be reapplied to eth0. When set to No, the route will take effect only when a network change occurs on the configured interface. For example, if the configured interface is eth1, then the route will be assigned only when eth1 has a network change to an active state. Sixnet, Inc, A Red Lion Business 331 Ushers Road, Ballston Lake, NY 12019 www.sixnet.com CONNECT. MONITOR. CONTROL. T +1 518 877 5173 F +1 518 877 8346 Version XXX © 2010. Sixnet. All Rights Reserved. 158 158 IndustrialPro Series Router User Manual Select Route Type: Select the type of route to be created by choosing one of the available options from the provided drop-down list. Choices include: Host to create a route to a specific device. This will require setting the Target IP Address and Gateway parameters. Network to create a route to a remote network. This will require setting the Network IP Address, Netmask and Gateway parameters. Host Configuration (Static Route) Enter Target IP Address: Enter the IP Address of the destination host to which the route should be created. Enter Gateway: Enter the IP Address of the gateway for the specified host or network. A gateway is a device (typically a router) used to gain access to another network. For example, if a device is attached to a LAN whose network address is 192.168.1.0 with a netmask of 255.255.255.0, then it can communicate directly with any other device on that network with a range of addresses of 192.168.1.1 through 192.168.1.254 (with 192.168.1.255 reserved for broadcast). An address outside of that range is on a different network which would need to accessed indirectly through a router and that router would be the gateway to the network on which the remote target device resides, so to communicate with it would mean sending and receiving via the gateway device. The address must be one within the valid range for the network on which the designated interface resides. Enter Metric: Enter a value for the route metric in this field. Recommended value is ‘0’. Click on the “OK” button to populate the Static Routes screen Sixnet, Inc, A Red Lion Business 331 Ushers Road, Ballston Lake, NY 12019 www.sixnet.com CONNECT. MONITOR. CONTROL. T +1 518 877 5173 F +1 518 877 8346 Version XXX © 2010. Sixnet. All Rights Reserved. 159 159 IndustrialPro Series Router User Manual Click on the “Save” button and the following pop-up window will appear: Click on the “OK” button to acknowledge the content Click on the “Apply” button and the following warning pop-up will appear: Click on the “OK” button to acknowledge the content. Click on the “OK” button and the following pop-up window will appear: Sixnet, Inc, A Red Lion Business 331 Ushers Road, Ballston Lake, NY 12019 www.sixnet.com CONNECT. MONITOR. CONTROL. T +1 518 877 5173 F +1 518 877 8346 Version XXX © 2010. Sixnet. All Rights Reserved. 160 160 IndustrialPro Series Router User Manual Click on the “OK” button to acknowledge the content. 3.4.8 TCP Global Settings Click on the TCP Global Settings menu item and the following window will appear: Connection Tracking: [SYN] Tx Timeout: Specifies the timeout value, in seconds, for SYN packets for connection tracking. 65 is the generally recommended default which differs from the system default of 120. 30-120 is the recommended tuning range for IP ATMs. TCP Keep Alives: Enter Timeout: Specifies the amount of time, in seconds, that a TCP connection can remain in an idle state before sending Keep-Alive Probes to verify that the remote end of the socket is still available. 10 - 30 for Ethernet connections where data usage is not an issue. 60 - 300 for Cellular connections where total data usage must be considered. Sixnet, Inc, A Red Lion Business 331 Ushers Road, Ballston Lake, NY 12019 www.sixnet.com CONNECT. MONITOR. CONTROL. T +1 518 877 5173 F +1 518 877 8346 Version XXX © 2010. Sixnet. All Rights Reserved. 161 161 IndustrialPro Series Router User Manual Enter Maximum Probe Attempts: Specifies the acceptable number of failed probes that will be sent to the remote end of a TCP socket before determining the connection to be failed, and disconnecting. Recommended values are 3 – 6. MTU: Enable Path MTU (PMTU) Discovery: Enable / Disable Path MTU Discovery. This might be useful if a private cellular network is restricting MTU sizes along the network path and causing packet drops. Click on the “Apply” button and the following pop-up window will appear: Click on the “OK” button to acknowledge the content. 3.4.9 Tunnel (VPN) Settings The “Tunnel (VPN) Settings” menu item is organized into three sub sections; GRE, IP in IP, and IPSEC. GRE Tunnels (Generic Routing Encapsulation) The “GRE Tunnels” menu item allows you to configure a GRE Tunnel. GRE is a tunneling protocol that was originally developed by Cisco; it can do a few more things than IP-in-IP tunneling. For example, you can also transport multicast traffic and IPv6 through a GRE tunnel. Click on the “GRE Tunnels” menu item and the following window will appear: Sixnet, Inc, A Red Lion Business 331 Ushers Road, Ballston Lake, NY 12019 www.sixnet.com CONNECT. MONITOR. CONTROL. T +1 518 877 5173 F +1 518 877 8346 Version XXX © 2010. Sixnet. All Rights Reserved. 162 162 IndustrialPro Series Router User Manual To add a GRE Tunnel: Click on the “Add” button and the following pop-up window will appear: Tunnel Name: Choose the name of the interface for the GRE Tunnel. Range “gre1” to “gre9”. Enable Tunnel? Click “Yes” to enable the tunnel and expand the display to reveal the configuration fields. Sixnet, Inc, A Red Lion Business 331 Ushers Road, Ballston Lake, NY 12019 www.sixnet.com CONNECT. MONITOR. CONTROL. T +1 518 877 5173 F +1 518 877 8346 Version XXX © 2010. Sixnet. All Rights Reserved. 163 163 IndustrialPro Series Router User Manual Local IP Address: Set the fixed local address for tunneled packets. (Optional) Note: If supplied, the Local IP Address must be an address on another interface of this host. If not supplied, tunneled packets can be received from any interface. Local Subnet: Set the local, private GRE network/mask. Remote IP Address: Set the IP Address of the remote endpoint for this tunnel. Remote Subnet: Set the remote, private GRE network/mask. Inbound Key: Specify a key for use with keyed GRE. Key is either a number or an IP address. The Inbound Key is used for input only. (Optional) Outbound Key: Specify a key for use with keyed GRE. Key is either a number or an IP address. The Outbound Key is used for output only. (Optional) Time-To-Live: Set a fixed Time-To-Live for tunneled packets. (Optional) Note: Values over 64 may cause connection failures. Use Multicast? Select “Yes” to enable Multicast for the tunnel. Use ARP? Select “Yes” to enable ARP for the tunnel. Sixnet, Inc, A Red Lion Business 331 Ushers Road, Ballston Lake, NY 12019 www.sixnet.com CONNECT. MONITOR. CONTROL. T +1 518 877 5173 F +1 518 877 8346 Version XXX © 2010. Sixnet. All Rights Reserved. 164 164 IndustrialPro Series Router User Manual Start Tunnel at boot? Select “Yes” to allow the interface to become active at system start. Click on the “OK” button to populate the GRE Tunnels screen. Sixnet, Inc, A Red Lion Business 331 Ushers Road, Ballston Lake, NY 12019 www.sixnet.com CONNECT. MONITOR. CONTROL. T +1 518 877 5173 F +1 518 877 8346 Version XXX © 2010. Sixnet. All Rights Reserved. 165 165 IndustrialPro Series Router User Manual Click on the “Save” button and the following pop-up window will appear: Click on the “OK” button to acknowledge the content. Click on the “Apply” button and the following pop-up window will appear: Click on the “OK” button to acknowledge the content. IP in IP Tunnels The “IP in IP Tunnels” menu item allows you to configure a simple IP Tunnel. IP in IP Tunnels essentially encapsulates an IP packet into another packet with the same protocol as the transport protocol. Click on the “IP in IP Tunnels” menu item and the following window will appear: Sixnet, Inc, A Red Lion Business 331 Ushers Road, Ballston Lake, NY 12019 www.sixnet.com CONNECT. MONITOR. CONTROL. T +1 518 877 5173 F +1 518 877 8346 Version XXX © 2010. Sixnet. All Rights Reserved. 166 166 IndustrialPro Series Router User Manual To add an IP in IP Tunnel: Click on the “Add” button and the following pop-up window will appear: Tunnel ID: Enter a unique numerical identifier in this field. It will be used for naming the tunnel interface which will appear in the interface list as tunl1, tunl2, etc. depending on the IDs provided. Enable Tunnel? Select “Yes” to enable the tunnel now. This will expand the display to reveal the configuration fields. Sixnet, Inc, A Red Lion Business 331 Ushers Road, Ballston Lake, NY 12019 www.sixnet.com CONNECT. MONITOR. CONTROL. T +1 518 877 5173 F +1 518 877 8346 Version XXX © 2010. Sixnet. All Rights Reserved. 167 167 IndustrialPro Series Router User Manual Local IP Address: Set the fixed local address for tunneled packets. Note: If supplied, the Local IP Address must be an address on another interface of this host. If not supplied, tunneled packets can be received from any interface. Local Subnet: Set the local, private IPIP network/mask. Remote IP Address: Set the IP Address of the remote endpoint for this tunnel. Remote Subnet: Set the remote, private IPIP network/mask. Time-To-Live: Set a fixed Time-To-Live for tunneled packets. Recommended setting is 64. Start Tunnel at boot? Select “Yes” to allow the interface to become active at system start. Click on the “Save” button and the following pop-up window will appear Click on the “OK” button to acknowledge the content Click on the “Apply” button and the following pop-up window will appear: Sixnet, Inc, A Red Lion Business 331 Ushers Road, Ballston Lake, NY 12019 www.sixnet.com CONNECT. MONITOR. CONTROL. T +1 518 877 5173 F +1 518 877 8346 Version XXX © 2010. Sixnet. All Rights Reserved. 168 168 IndustrialPro Series Router User Manual Click on the “OK” button to acknowledge the content IPSEC The “IPSEC” menu item is organized into two sub sections, Configuration and Status. IPSEC Configuration The “Configuration” menu item allows you to configure an IPSEC Tunnel to establish secured communications between two or more networks across the Internet. Click on the “Configuration” menu item and the following window will appear: Sixnet, Inc, A Red Lion Business 331 Ushers Road, Ballston Lake, NY 12019 www.sixnet.com CONNECT. MONITOR. CONTROL. T +1 518 877 5173 F +1 518 877 8346 Version XXX © 2010. Sixnet. All Rights Reserved. 169 169 IndustrialPro Series Router User Manual Click on the pull down menu at the “Enable IPSEC?” field Click on “Yes” and the display will expand to reveal the following screen: Enable NAT Traversal: NAT Traversal makes it possible to communicate with networks that are located behind routers connected to the Internet. Select “Yes” if all tunnels will use NAT Traversal, and select “No” otherwise. Coordinate IPSec with wireless PPP: Coordinate IPSec with wireless PPPoE: Sixnet, Inc, A Red Lion Business 331 Ushers Road, Ballston Lake, NY 12019 www.sixnet.com CONNECT. MONITOR. CONTROL. T +1 518 877 5173 F +1 518 877 8346 Version XXX © 2010. Sixnet. All Rights Reserved. 170 170 IndustrialPro Series Router User Manual Coordinate IPSec Dial-up PPP: You may select specific actions for above options to be performed either upon PPP connect, PPP disconnect, or both. The available actions include: Do Nothing Perform no action. Restart IPSEC is restarted. Stop IPSEC is stopped. With these combinations, the connection management may be fine-tuned so that the tunnel(s) may be able to restart faster, rather than having to rely on Dead Peer detection or other timeout mechanisms alone. To add an IPSEC tunnel: Click on the “Add” button and the following pop-up window will appear: Tunnel Name: Enter some descriptive text in this field as an aid identifying it. The value must not contain spaces. (Required) Enable Tunnel? Specify whether you want this tunnel to connect to its remote peer now, and after any reboot. Click on the pull down menu at the “Enable Tunnel” field Click on “Yes” to reveal the IPSEC Tunnel configuration fields Sixnet, Inc, A Red Lion Business 331 Ushers Road, Ballston Lake, NY 12019 www.sixnet.com CONNECT. MONITOR. CONTROL. T +1 518 877 5173 F +1 518 877 8346 Version XXX © 2010. Sixnet. All Rights Reserved. 171 171 IndustrialPro Series Router User Manual Sixnet, Inc, A Red Lion Business 331 Ushers Road, Ballston Lake, NY 12019 www.sixnet.com CONNECT. MONITOR. CONTROL. T +1 518 877 5173 F +1 518 877 8346 Version XXX © 2010. Sixnet. All Rights Reserved. 172 172 IndustrialPro Series Router User Manual Tunnel Name: Enter some descriptive text in this field as an aid in identifying it. The value must not contain spaces. Enable Tunnel?: Specify whether you want this tunnel to connect to its remote peer now, and after any reboot. Tunnel Type: Tunnel Type controls the initial mode of the tunnel at startup. The options given to IPSec will be: Client: auto=start Server: auto=add Dynamic: auto=route For more information, please consult an IPSec user guide on aspects of these specific modes. Tunnel Negotiation Mode: Your Sixnet router defaults to “Main” mode ISAKMP negotiation. When using dynamic, or DHCP issued IP addresses (for example with cellular cards), some remote devices may require the use of Aggressive Mode ISAKMP Negotiation. Should you encounter this situation, you can perform aggressive mode ISAKMP negotiation by changing this parameter from “Main” to “Aggressive ISAKMP”. NOTE: Aggressive Mode ISAKMP negotiation is considered less secure than Main Mode. Therefore, you would be well advised to only use Aggressive Mode negotiation if the remote device requires it. Otherwise, it is preferable to use Main mode where ever possible. Phase 1 Encryption (IKE): Specifies the Phase 1, Internet Key Exchange (IKE) cryptographic algorithm to be used. Possible options are “AES”, “AES256” or “3DES”. Phase 1 Authentication: Select the type of authentication you want to use for phase 1 (IKE). Possible options are “MD5” or “SHA1”. Phase 1 DH Group: Select the DH Group you want to use for phase 1 (IKE) by choosing one of the values from the dropdown list provided. Options include: None/Auto Group 1 - 768 bits Group 2 - 1024 bits Group 5 - 1536 bits Group 14 - 2048 bits This option selects the encryption level of the Diffie-Hellman keys, and these are Group 1 (768 bits), Group 2 (1024 bits), Group 5 (1536 bits) or Group 14 (2048 bits). Longer keys imply better security but at a cost of longer negotiation/set-up time during the initial connection establishment. These settings must match on both ends of the connection. Sixnet, Inc, A Red Lion Business 331 Ushers Road, Ballston Lake, NY 12019 www.sixnet.com CONNECT. MONITOR. CONTROL. T +1 518 877 5173 F +1 518 877 8346 Version XXX © 2010. Sixnet. All Rights Reserved. 173 173 IndustrialPro Series Router User Manual A value of None/Auto means that no DH Group will be selected for this end of the tunnel and it will adopt the settings of its peer during connection initiation. Phase 1 ISAKMP Time (minutes): Select how long, in minutes, the keying channel of a connection (ISAKMP SA) should last before being renegotiated. Pre-shared Key: Specify the key to be exchanged for encryption negotiation during phase 1 (IKE). Key must not contain a double-quote character. (Required) Note: The Pre-Shared Key must match on both ends of the tunnel in order to work. Local Peer ID: Specify how the left participant should be identified for authentication. Can be an IP address or a fullyqualified domain name preceded by @ (which is used as a literal string and not resolved). Remote Peer ID: Specify how the right participant should be identified for authentication. Can be an IP address or a fully-qualified domain name preceded by @ (which is used as a literal string and not resolved). Phase 2 Auth Type (ESP): Specifies the Phase 2, Whether authentication should be done as part of ESP encryption, or separately using the AH (none) protocol. Phase 2 Encryption: Select the ESP encryption algorithm to be used for the connection. Possible options are “AES”, “AES256” or “3DES”. Phase 2 Authentication: Select the ESP authentication algorithm to be used for the connection. Possible options are “MD5” or “SHA1”. Phase 2 ISAKMP Time (minutes): Select how long, in minutes, a particular instance of a connection (a set of encryption/authentication keys for user packets) should last, from successful negotiation to expiration. Use Perfect Forward Secrecy? Specifies whether or not the tunnel will use Perfect Forward Secrecy when negotiating cryptography parameters with the remote device. NOTE: This parameter must be set the same on the devices on both sides of the tunnel in order for a Security Association (SA) to be established. This is one of the first things that should be checked when tunnel negotiation difficulties are encountered. Dead Peer Detection Action: This feature can help detect when a remote end-point is no longer communicating properly. Once an error is detected, the "Hold" state will only renegotiate the tunnel after new traffic destined for the tunnel is detected. The "Restart" state will attempt to immediately reestablish the connection to the concentrator. For this reason, "Restart" may use more bandwidth and may not be the ideal choice for a limited data plan. However, if a host at the central site needs to initiate connections down to a local device through the tunnel, "Restart" may be necessary so that the tunnel is always up and waiting for new data from the concentrator. DPD Interval (seconds): Set the delay (in seconds) between Dead Peer Detection keepalives that are sent for this connection. Unlimited Data Plans: 30-60 seconds Limited Data Plans: 1800 sec. (30 minutes) Sixnet, Inc, A Red Lion Business 331 Ushers Road, Ballston Lake, NY 12019 www.sixnet.com CONNECT. MONITOR. CONTROL. T +1 518 877 5173 F +1 518 877 8346 Version XXX © 2010. Sixnet. All Rights Reserved. 174 174 IndustrialPro Series Router User Manual NOTE: A low value will rapidly discover a broken tunnel; however, a great deal of bandwidth will be used. This is not ideal for a limited data plan such as a cellular telemetry plan. DPD Timeout (seconds): Set the length of time (in seconds) that the connection should remain active without hearing either a poll from our peer, or a reply. After this period has elapsed with no response and no traffic, the peer will be considered "dead", and remove the SA. Recommended setting is 30 – 60 seconds. Local Public IP Address: This parameter typically only needs to be specified when the Sixnet router is configured to use more than one external, untrusted interface. This parameter specifies the IP address of the left participant's publicnetwork interface. For example, if the Sixnet router has an external cellular interface (ppp0), and an external Ethernet interface that is connected to a cable or DSL modem, and you need to bind the tunnel’s crypto endpoint to the Ethernet interface, you would specify the IP address of the appropriate Ethernet interface here. Note: If this value is omitted, it will be filled in automatically with the local address of the default-route interface (as determined at IPSEC startup time). If this parameter is not needed it should be left blank. Local Source IP: Specify the Local IP Address to source when transmitting. The IP address for this host to use when transmitting a packet to the other side of this link. Relevant only locally, the other end need not agree. This option is used to make the gateway itself use its internal IP, which is part of the leftsubnet, to communicate to the rightsubnet or right. Otherwise, it will use its nearest IP address, which is its public IP address. This option is mostly used when defining subnet-subnet connections, so that the gateways can talk to each other and the subnet at the other end, without the need to build additional host-subnet, subnet-host and host-host tunnels. Local Gateway IP Address: Specify the next-hop gateway IP address for the left participant's connection to the public network. Note: If no value is provided, the tunnel will use the right participant as its next-hop. Local Private Subnet(s): Specify the private subnet(s) behind the left participant, expressed in CIDR format (xxx.xxx.xxx.xxx/nn) as network/netmask. More than one can be specified by using “;” to separate each entry. Remote Public IP Address: Specify the IP address of the right participant's public-network interface. This field is required, if “Client” is selected as Tunnel Type. If "Server" or "Dynamic" is selected as Tunnel Type, and this field is blank, then the value of "%any" will be used in configuration file. Remote Gateway IP Address: Specify the next-hop gateway IP address for the right participant's connection to the public network. Note: If no value is provided, the tunnel will use the left participant as its next-hop. Remote Private Subnet(s): Specify the private subnet(s) behind the right participant, expressed in CIDR format (xx.xxx.xxx.xxx/nn) as network/netmask. More than one can be specified by using ';' to separate each entry. Sixnet, Inc, A Red Lion Business 331 Ushers Road, Ballston Lake, NY 12019 www.sixnet.com CONNECT. MONITOR. CONTROL. T +1 518 877 5173 F +1 518 877 8346 Version XXX © 2010. Sixnet. All Rights Reserved. 175 175 IndustrialPro Series Router User Manual The full display with common parameters included is shown below: Sixnet, Inc, A Red Lion Business 331 Ushers Road, Ballston Lake, NY 12019 www.sixnet.com CONNECT. MONITOR. CONTROL. T +1 518 877 5173 F +1 518 877 8346 Version XXX © 2010. Sixnet. All Rights Reserved. 176 176 IndustrialPro Series Router User Manual Sixnet, Inc, A Red Lion Business 331 Ushers Road, Ballston Lake, NY 12019 www.sixnet.com CONNECT. MONITOR. CONTROL. T +1 518 877 5173 F +1 518 877 8346 Version XXX © 2010. Sixnet. All Rights Reserved. 177 177 IndustrialPro Series Router User Manual Click on the “OK” button to populate the IPSEC screen Click on the “Save” button and the following pop-up window will appear: Click on the “OK” button to acknowledge the content Click on the “Apply” button and the following pop-up window will appear: Click on the “OK” button to acknowledge the content Sixnet, Inc, A Red Lion Business 331 Ushers Road, Ballston Lake, NY 12019 www.sixnet.com CONNECT. MONITOR. CONTROL. T +1 518 877 5173 F +1 518 877 8346 Version XXX © 2010. Sixnet. All Rights Reserved. 178 178 IndustrialPro Series Router User Manual IPSEC Status The “IPSEC Status” menu item allows you to display the current connection status of the VPN Tunnel by name and subnet. Click on the “Status” menu item and the following window will appear: Click on the “Refresh” button to rerun the status program at anytime. This is helpful when attempting to troubleshoot a VPN connection. Sixnet, Inc, A Red Lion Business 331 Ushers Road, Ballston Lake, NY 12019 www.sixnet.com CONNECT. MONITOR. CONTROL. T +1 518 877 5173 F +1 518 877 8346 Version XXX © 2010. Sixnet. All Rights Reserved. 179 179 IndustrialPro Series Router User Manual Sixnet, Inc, A Red Lion Business 331 Ushers Road, Ballston Lake, NY 12019 www.sixnet.com CONNECT. MONITOR. CONTROL. T +1 518 877 5173 F +1 518 877 8346 Version XXX © 2010. Sixnet. All Rights Reserved. 180 180 IndustrialPro Series Router User Manual 3.5 Services Tab The Services Tab is where you can configure the various service offerings of the Sixnet router. These services include DHCP Server, DHCP Relay, Dynamic DNS, SixView Manager, GPS Server, SSH Server, SSL Client/Server, System Logging, TELNET Server, Ping Alive, SNMP Agent and Modbus Services. 3.5.1 DHCP Services Used to configure one of the internal Ethernet interfaces to be a DHCP server and hand out IP Addresses to systems connected to the Sixnet router. DHCP Services are divided into DHCP Server and DHCP Relay subsections. Click on the “DHCP Server” menu item and the following window will appear: Sixnet, Inc, A Red Lion Business 331 Ushers Road, Ballston Lake, NY 12019 www.sixnet.com CONNECT. MONITOR. CONTROL. T +1 518 877 5173 F +1 518 877 8346 Version XXX © 2010. Sixnet. All Rights Reserved. 181 181 IndustrialPro Series Router User Manual Sixnet, Inc, A Red Lion Business 331 Ushers Road, Ballston Lake, NY 12019 www.sixnet.com CONNECT. MONITOR. CONTROL. T +1 518 877 5173 F +1 518 877 8346 Version XXX © 2010. Sixnet. All Rights Reserved. 182 182 IndustrialPro Series Router User Manual Global Settings: Enter Domain name: Enter the Domain Name that will be passed to DHCP Clients. Use Sixnet Standard DNS Settings? Choosing “Yes” will automatically use the DNS Servers obtained by this unit's internet connection and/or entries specified in NetworkingDNS Settings. This is the preferred method of operation. Choosing “No” will allow you to issue custom DNS servers to connected DHCP Clients. This will not affect any DNS Servers used by this unit for local domain resolution. Enter Default Lease Time (seconds): Specify the amount of time, in seconds, that the DHCP Server will allow clients to maintain their leases. Default “14400” (4 hours). Enter Maximum Lease Time (seconds): Specify the amount of time, in seconds, that the DHCP Server will allow clients to maintain their leases. Default “86400” (24 hours). Enter Minimum Lease Time (seconds): Specify the amount of time, in seconds, that the DHCP Server will allow clients to maintain their leases. Default “3600” (1 hour). DHCP Servers: The DHCP Servers section allows you to configure one of the Ethernet ports to be a DHCP server and issue IP Addresses to systems connected to that network segment. Since both the ‘eth0’ and ‘eth1’ are configured in the same manner, we will only cover the configuration of ‘eth0’. NOTE: If the interface is not enabled, or has been set to obtain its addressing parameters via DHCP, this option will be forced to "No', and disabled until the interface is both enabled and set to use a static IP address. Click on the pull down menu at the “Enable DHCP for eth0?” Click on “Yes” and the display will expand to reveal the configuration fields Enable Default Gateway for eth0?: Description: Provide Default Gateway IP Address to DHCP Client. Sixnet, Inc, A Red Lion Business 331 Ushers Road, Ballston Lake, NY 12019 www.sixnet.com CONNECT. MONITOR. CONTROL. T +1 518 877 5173 F +1 518 877 8346 Version XXX © 2010. Sixnet. All Rights Reserved. 183 183 IndustrialPro Series Router User Manual Recommended Setting: No: If you wish to only gain access to this device's web interface and have another connection from your PC out to the internet. Yes: If you wish to gain access to the internet through this device. Enter Starting Address: Enter the Starting IP Address of a range you want the DHCP Server to provide for clients. Enter Ending Address: Enter the Ending IP Address of a range you want the DHCP Server to provide for clients. WARNING: Care should be used to ensure that there is no conflict with any pre-existing devices on that subnet which may have been already configured to use statically assigned IP addresses. View DHCP Leases: Check this box to display the current DHCP leases logged on the unit. Distribute DHCP Leases Based on MAC Address: To assign IP to a device based on MAC address so that device obtains the same IP each time it requests a new IP from the DHCP server click Add to enter the MAC and IP information for that specific client. Sixnet, Inc, A Red Lion Business 331 Ushers Road, Ballston Lake, NY 12019 www.sixnet.com CONNECT. MONITOR. CONTROL. T +1 518 877 5173 F +1 518 877 8346 Version XXX © 2010. Sixnet. All Rights Reserved. 184 184 IndustrialPro Series Router User Manual Enter Client MAC Address: Description: Enter the Client's computer or device MAC address. Client MAC Address: The Media Access Control (MAC) address is a unique number assigned by the manufacturer to any Ethernet networking device, such as a network adapter, that allows the network to identify it at the hardware level. For all practical purposes, this number is usually permanent. Unlike IP addresses, which can change every time a computer logs on to the network, the MAC address of a device stays the same, making it a valuable hardware identifier for the network. When entering the MAC address information, type the 12-digit MAC address in the following format: xx:xx:xx:xx:xx:xx including the hyphens. Enter Client IP Address: Description: Enter the IP address for which you wish to assign to a client's computer or device MAC address. Client IP Address: An address valid for the subnet for which the interface is configured. Care should be used to ensure that there is no conflict with any pre-existing devices on that subnet which may have been already configured to use statically assigned IP addresses. Recommended Setting This address should have been provided by your Network Administrator. Click on the “Save” button and the following pop-up window will appear: Click on the “OK” button to acknowledge the content Click on the “Apply” button and the following pop-up window will appear: Click on the “OK” button to acknowledge the content Sixnet, Inc, A Red Lion Business 331 Ushers Road, Ballston Lake, NY 12019 www.sixnet.com CONNECT. MONITOR. CONTROL. T +1 518 877 5173 F +1 518 877 8346 Version XXX © 2010. Sixnet. All Rights Reserved. 185 185 IndustrialPro Series Router User Manual DHCP Relay Click on DHCP Relay and the following screen will appear: DHCP Relay will enable a service that will allow you to connect a local interface with a remote DHCP Server. Enable DHCP Relay?: Select Yes to enable the DHCP Relay, or No to disable it. The service will start once the Apply button is clicked. If the Save button is clicked, the service will not be started until after the device is rebooted and then only if the Start at boot time option has been also set to Yes. Start at Boot?: Select Yes to enable the DHCP Relay at boot time, or No for manual control. If the DHCP Relay service is required to be operational at all times, then set to Yes. If another process, such as VRRP, is going to dynamically enable/disable DHCP Relay service as needed, then set to No. Adding the Interface: Click on the Add button and the following pop-up will appear. Sixnet, Inc, A Red Lion Business 331 Ushers Road, Ballston Lake, NY 12019 www.sixnet.com CONNECT. MONITOR. CONTROL. T +1 518 877 5173 F +1 518 877 8346 Version XXX © 2010. Sixnet. All Rights Reserved. 186 186 IndustrialPro Series Router User Manual Select the interface you would like to receive its IP from the remote DHCP server from the drop down menu and click OK. Adding the Remote DHCP Server: Click on the Add button and the following pop-up will appear. Enter the IP Address or Fully Qualified Domain Name of all remote DHCP Servers available. It is the responsibility of the remote DHCP Server to coordinate the issuing of DHCP addresses. 3.5.2 Dynamic DNS The “Dynamic DNS” menu item allows you to configure a dynamic DNS name for the Sixnet router that does not have a static public IP Address and you are subscribed to a service providing Dynamic DNS, such as DYNDNS.ORG. Click on the “Dynamic DNS” menu item and the following window will appear: Click on the pull down menu at the “Enable Dynamic DNS” and the display will expand to reveal the configuration fields shown below: Sixnet, Inc, A Red Lion Business 331 Ushers Road, Ballston Lake, NY 12019 www.sixnet.com CONNECT. MONITOR. CONTROL. T +1 518 877 5173 F +1 518 877 8346 Version XXX © 2010. Sixnet. All Rights Reserved. 187 187 IndustrialPro Series Router User Manual Select Service Type: Select the desired Dynamic DNS Service from the list provided. Enter User Name: Enter the User Name used to access your Dynamic DNS service in this field. Enter Password: Enter the Password used to access your Dynamic DNS Service in this field. Confirm Password: Re-enter the Password used to access your Dynamic DNS Service in this field. Select Interface: Specify the interface you want to access via Dynamic DNS. Changes made to the interface configuration after enabling Dynamic DNS will result in updates being sent to your Dynamic DNS service provider. Host Name: Enter the host name and domain you wish to be assigned by the Dynamic DNS service. Server Name/Address: Enter the host name or IP Address (along with port number, if needed) user to access the Dynamic DNS Server. Example: members.dyndns.com:80. NOTE: A recommended value is automatically displayed when you select a Service provider. If you require a value other than the recommended value, your Network Administrator or Dynamic DNS Service Provider should be able to provide the appropriate value, which can be entered manually. Server Request Path: Enter the Request URI required to connect to the Dynamic DNS Service in this field. NOTE: A recommended value is provided automatically when a Service type is selected. If you require a value other than the recommended value, your Network Administrator or Dynamic DNS Service Provider should be able to provide the appropriate value, which can be entered manually. Click on the “Save” button and the following pop-up window will appear: Sixnet, Inc, A Red Lion Business 331 Ushers Road, Ballston Lake, NY 12019 www.sixnet.com CONNECT. MONITOR. CONTROL. T +1 518 877 5173 F +1 518 877 8346 Version XXX © 2010. Sixnet. All Rights Reserved. 188 188 IndustrialPro Series Router User Manual Click on the “OK” button to acknowledge the content Click on the “Apply” button and the following pop-up window will appear: Click on the “OK” button to acknowledge the content 3.5.3 SN Proxy SN Proxy is a web relay proxy service used to gain access to devices that are behind our Sixnet router providing additional security and access control to devices that may not offer such functionality. A Proxy based service provides a more robust connection than just using a port forward rule, including the ability to add an additional user log in for authentication, encryption via SSL as well as isolation via Access Control Lists. To begin using SN Proxy: Click on Services → SN Proxy Settings and the following window will appear: Enable SN Proxy Settings: Enables or disables the SN Proxy feature. Sixnet, Inc, A Red Lion Business 331 Ushers Road, Ballston Lake, NY 12019 www.sixnet.com CONNECT. MONITOR. CONTROL. T +1 518 877 5173 F +1 518 877 8346 Version XXX © 2010. Sixnet. All Rights Reserved. 189 189 IndustrialPro Series Router User Manual When you click yes to enable the feature the following window will appear: Use HTTPS/SSL Encryption: Specify whether you want to enable the SSL engine. Use HTTP login: Specify whether you want to enable HTTP login. *Note: If you enable the HTTP login, you will be required to enter the username and password. Listen Port: Enter the port number the SNProxy listens for requests on. Host IP: Enter the proxy server host IP address that will be accepting this connection request. Host Port: Enter the proxy server host port number. Click Save to store the settings for the next reboot, or click Apply for the settings to take effect immediately. Sixnet, Inc, A Red Lion Business 331 Ushers Road, Ballston Lake, NY 12019 www.sixnet.com CONNECT. MONITOR. CONTROL. T +1 518 877 5173 F +1 518 877 8346 Version XXX © 2010. Sixnet. All Rights Reserved. 190 190 IndustrialPro Series Router User Manual 3.5.4 SixView Manager The “SixView Manager” menu item allows you to configure various aspects of the SixView Manager Client to communicate with a SixView Manager hosted at Sixnet or at your location. Click on the “SixView Manager” menu item and the following window will appear: SixView Manager Server Primary Address: Enter the IP Address or host name of your SixView Manager primary server. NOTE: When changing the Primary Address to your own private SixView Manager server, you may want to consider setting the Secondary Address to the Sixnet SixView Manager test server (www.mygmu.com) for trial and initial production rollouts. This will enable Sixnet support staff to monitor the progress and better assist in diagnosing potential problems. SixView Manager Server Secondary Address: Enter the IP Address or host name of your SixView Manager secondary server. Sixnet, Inc, A Red Lion Business 331 Ushers Road, Ballston Lake, NY 12019 www.sixnet.com CONNECT. MONITOR. CONTROL. T +1 518 877 5173 F +1 518 877 8346 Version XXX © 2010. Sixnet. All Rights Reserved. 191 191 IndustrialPro Series Router User Manual NOTE: When changing the Primary Address to your own private SixView Manager server, you may want to consider setting the Secondary Address to the Sixnet SixView Manager test server (www.mygmu.com) for trial and initial production rollouts. This will enable Sixnet support staff to monitor the progress and better assist in diagnosing potential problems. Select Primary/Alternate Connection Mode: Select the desired Connection Mode from the provided drop-down. Primary Only The SixView Manager client only connects to the Primary Server. Secondary Only The SixView Manager client only connects to the Secondary Server. Both The SixView Manager client connects to the Primary and Secondary Servers. Secondary when Primary unavailable The SixView Manager client preferentially connects to the Primary, using the Secondary as a backup. NOTE: "Secondary when Primary unavailable" or "Both" are the preferred methods in configurations supporting dual SixView Manager servers. Enter Access Interval (minutes): Enter the number of minutes the SixView Manager Client process should wait before connecting to the SixView Manager server. NOTE: While lower values can result in more timely status reports with the SixView Manager Server, it comes at an expense of increased data traffic, which may be an issue when the connection utilizes a cellular modem with a service plan where cost is based on bandwidth usage. A value of 220 is suggested for Cellular carriers that use an inactivity timeout of four hours. Enter Error Interval (minutes): Enter the number of minutes the SixView Manager Client should wait before reattempting a previously failed check-in attempt. Select Access Method: Select the desired Access Method from the provided drop-down. Unencrypted (http) Encrypted (https) Faster, but less secure. Slower, but more secure. NOTE: The encrypted method adds significant overhead which may be a consideration when using a cellular modem connection. For example, if an ipsec_restart is an option, then when selected, will be run whenever the fallback logic selects and activates this interface. Enter SixView Manager Server Port #: If the SixView Manager Server has been configured to accept connections on a port other than its standard default, that custom port number should be entered in this field. The administrator of the SixView Manager Server will be able to provide you with the necessary information to properly set this parameter. Default 18080 for http, 18081 for https. Select Interface: Select the name of the interface to which the SixView Manager Client will bind for communications with the SixView Manager Server. Sixnet, Inc, A Red Lion Business 331 Ushers Road, Ballston Lake, NY 12019 www.sixnet.com CONNECT. MONITOR. CONTROL. T +1 518 877 5173 F +1 518 877 8346 Version XXX © 2010. Sixnet. All Rights Reserved. 192 192 IndustrialPro Series Router User Manual NOTE: This option will only be necessary if the SixView Manager Client is required to communicate through a configured IPSEC, GRE or IPIP tunnel. Enter Rapid Check-in Interval: Enables device to send Cell modem RF status information at very short intervals. This feature is only supported by SixView Manager Servers running 1.22 or later version server software. NOTE: Each Rapid RF check-in will produce about 1300 bytes of data. Setting this value to 15 seconds will generate about 7.4MB of data a day (224.6MB every 30 days). This amount is addition to any other data the unit might be transmitting/receiving. Enter 0 if you are not using this feature on a Sixnet SixView Manage server. Sixnet, Inc, A Red Lion Business 331 Ushers Road, Ballston Lake, NY 12019 www.sixnet.com CONNECT. MONITOR. CONTROL. T +1 518 877 5173 F +1 518 877 8346 Version XXX © 2010. Sixnet. All Rights Reserved. 193 193 IndustrialPro Series Router User Manual Disable SixView Manager Client Click on the pull down menu at the “Enable SixView Manager Access” Click on “No” and the display will retract Click on the “Apply” button and the following pop-up window will appear: Click on the “OK” button to acknowledge the content 3.5.5 SSH Server The “SSH Server” menu item allows you to configure whether the Sixnet router will communicate with the network via Secure Shell (SSH). Click on the “SSH Server” menu item and the following window will appear: Sixnet, Inc, A Red Lion Business 331 Ushers Road, Ballston Lake, NY 12019 www.sixnet.com CONNECT. MONITOR. CONTROL. T +1 518 877 5173 F +1 518 877 8346 Version XXX © 2010. Sixnet. All Rights Reserved. 194 194 IndustrialPro Series Router User Manual Click on the pull down at the “Enable SSH Server?” and the display will expand to reveal the configuration fields shown below: Configure Advanced SSH Parameters? Select “Yes” to configure advanced options for the SSH Server. Listening IP Address For SSH: Specifies the local IP Address on which the SSH server will accept connections. NOTE: Specifying a value of 0.0.0.0 allows the SSH server to accept connections on any interface. Firewall rules must be present, however to allow SSH connection on untrusted interfaces. Listening IP Port For SSH: Specifies the local IP port on which the SSH server will accept connections. Sixnet, Inc, A Red Lion Business 331 Ushers Road, Ballston Lake, NY 12019 www.sixnet.com CONNECT. MONITOR. CONTROL. T +1 518 877 5173 F +1 518 877 8346 Version XXX © 2010. Sixnet. All Rights Reserved. 195 195 IndustrialPro Series Router User Manual NOTE: Specifying a value other than 22 will require proper firewall rules in order to allow connections to the given port. SSH Protocol Version: Specifies the protocol version for SSH Server to use. NOTE: Security flaws have been found in SSH protocol version 1. For that reason, we recommend using protocol version 2 where possible. Login Grace Time (in seconds): Specifies the amount of time, in seconds, after which the SSH server will disconnect, if the user has not successfully logged in. Recommended value is 30. Maximum Concurrent Connections: Specifies the maximum number of concurrent unauthenticated connections to the SSH server. Additional connections will be dropped until authentication succeeds, or the Login Grace Time expires for a connection. Recommended value is 10. Allow Root Login? Specifies whether root can log in directly to the SSH server. Recommended setting is “No”. Click on the “Apply” button and the following pop-up window will appear: Click on the “OK” button to acknowledge the content 3.5.6 SSL Connections The “SSL Connections” menu item allows you to configure the Sixnet router to either act as a Secure Socket Layer (SSL) Client to receive certificates or as an SSL Server to issue certificates. The SSL Connections tab is sub sectioned into the SSL Client, and the SSL Server. SSL Client The “SSL Client” menu item allows you to configure the Sixnet router to be a SSL client and receive a certificate of authorization from an SSL server to authenticate connections for secure communications. Click on the “SSL Client” menu item and the following window will appear: Sixnet, Inc, A Red Lion Business 331 Ushers Road, Ballston Lake, NY 12019 www.sixnet.com CONNECT. MONITOR. CONTROL. T +1 518 877 5173 F +1 518 877 8346 Version XXX © 2010. Sixnet. All Rights Reserved. 196 196 IndustrialPro Series Router User Manual Click on the pull down menu at the “Enable SSL?” Click on “Yes” and the display will expand to reveal the configuration fields Activity Log Level: This controls the logging level for SSL Connection activity. Recommended setting is “Summary” for a production, and “Full” for test environment. Wait for Connection (sec.): Time (in seconds) allowed after sending SYN packets, to wait for SYN-ACK. Default is ‘20’. Sixnet, Inc, A Red Lion Business 331 Ushers Road, Ballston Lake, NY 12019 www.sixnet.com CONNECT. MONITOR. CONTROL. T +1 518 877 5173 F +1 518 877 8346 Version XXX © 2010. Sixnet. All Rights Reserved. 197 197 IndustrialPro Series Router User Manual Idle Timeout (min.): Time (in minutes) allowed for no traffic over an SSL connection, before closing down the link. Default is ‘720’. Advance Setup? Select “Yes” to modify advanced SSL options. The display will expand to reveal the advance setup fields. Bind Interface for accepting TCP Connections: This will restrict the unencrypted listening socket to allow connections coming into the specified interface only. Recommended setting is “Any”. Bind Interface for outgoing SSL Connections: This will restrict the encrypted socket to initiate connections out the specified interface only. Specifying an interface here may conflict with policy routing, however it may be required in a GRE/VPN or other tunneled environment. Please consult with a network architect for additional assistance. Recommended setting is “Any”. Sixnet, Inc, A Red Lion Business 331 Ushers Road, Ballston Lake, NY 12019 www.sixnet.com CONNECT. MONITOR. CONTROL. T +1 518 877 5173 F +1 518 877 8346 Version XXX © 2010. Sixnet. All Rights Reserved. 198 198 IndustrialPro Series Router User Manual Ciphers: This field is a list of openssl ciphers supported. Please consult support staff before attempting to change. Reference Google: "openssl cipher list" for more information. Recommended setting is “RC4-MD5:RC4-SHA:SSLv3”. Certificate: Specifying a certificate in client mode will use this certificate chain as a client side certificate chain. Using client side certs is optional. The certificates must be in PEM format, with an unencrypted key (not password protected when generated). Use AdminCertificate Manager to install/update certs. Keep-Alive Behavior: This option enables TCP Keep-alives on the underlying sockets. The following options are supported: None: Keep-alives not used. All: Keep-alives enabled for all sockets. Accept: Keep-alives enabled for listening server socket side connections only. This applies to the clear text server for Client mode sockets, or the SSL Encrypted server for Server mode sockets. Remote: Keep-alives enabled for client initiated sockets. Local: Keep-alives enabled for client connections bound to a local IP address. You may need to adjust the master Keep-alive timer via Networking→TCP Global Settings. NOTE: Enabling TCP Keep-alives may, dramatically, increase the total amount of traffic for the affected socket(s) depending on the master interval, probe and timeout settings, which should be considered for connections using a wireless (cellular) connection with respect to total data usage for the subscripted plan. Add SSL Client Interface Click on the “Add” button and the following pop-up window will appear: Label: Enter a unique name to describe this connection. TCP Listening IP: Enter the IP to listen on for incoming connections. If not using static IP addresses, it is recommended to use the Advanced Setup option "Bind Interface for accepting TCP Connections" instead. Sixnet, Inc, A Red Lion Business 331 Ushers Road, Ballston Lake, NY 12019 www.sixnet.com CONNECT. MONITOR. CONTROL. T +1 518 877 5173 F +1 518 877 8346 Version XXX © 2010. Sixnet. All Rights Reserved. 199 199 IndustrialPro Series Router User Manual Leave blank (0.0.0.0) to allow connections from any interface. Use 127.0.0.1 for internal connection use only (gwlnx Protocol Converter). TCP Listening Port: Enter the listening port for this connection. Please note that this port must be allowed in the Firewall access rules for any external/untrusted interface. It may be helpful to review the results of StatusSocket StatusesTCP Only to confirm that your choice of listening port is not already in use. (Ports under "Local Address" with a state of "LISTEN" are in use.) SSL Destination IP: Enter the IP or Domain Name of the SSL server to which you would like to connect. SSL Destination Port: Enter the Port number of the SSL server to which you would like to connect. Click on the “OK” button to populate the SSL Client screen. Sixnet, Inc, A Red Lion Business 331 Ushers Road, Ballston Lake, NY 12019 www.sixnet.com CONNECT. MONITOR. CONTROL. T +1 518 877 5173 F +1 518 877 8346 Version XXX © 2010. Sixnet. All Rights Reserved. 200 200 IndustrialPro Series Router User Manual Click on the “Apply” button and the following pop-up window will appear: Click on the “OK” button to acknowledge the content Sixnet, Inc, A Red Lion Business 331 Ushers Road, Ballston Lake, NY 12019 www.sixnet.com CONNECT. MONITOR. CONTROL. T +1 518 877 5173 F +1 518 877 8346 Version XXX © 2010. Sixnet. All Rights Reserved. 201 201 IndustrialPro Series Router User Manual SSL Server The “SSL Server” menu item allows you to configure the Sixnet router to issue SSL certificates to requesting SSL clients. Click on the “SSL Server” menu item and the following window will appear: Click on the pull down menu at the “Enable SSL?” Click on “Yes” and the display will expand to reveal the configuration fields. Sixnet, Inc, A Red Lion Business 331 Ushers Road, Ballston Lake, NY 12019 www.sixnet.com CONNECT. MONITOR. CONTROL. T +1 518 877 5173 F +1 518 877 8346 Version XXX © 2010. Sixnet. All Rights Reserved. 202 202 IndustrialPro Series Router User Manual Activity Log Level: This controls the logging level for SSL Connection activity. Recommended setting is “Summary” for a production, and “Full” for test environment. Wait for Connection (sec.): Time (in seconds) allowed after sending SYN packets, to wait for SYN-ACK. Default is ‘20’. Idle Timeout (min.): Time (in minutes) allowed for no traffic over an SSL connection, before closing down the link. Default is ‘720’. Certificate: A server certificate must be provided. This will be used to encrypt communication with all clients. The certificates must be in PEM format, with an unencrypted key (not password protected when generated). Self signed certificates are highly recommended. Use AdminCertificate Manager to install/update certs. Advance Setup? Select “Yes” to modify advanced SSL options. The display will expand to reveal the advance setup fields. Sixnet, Inc, A Red Lion Business 331 Ushers Road, Ballston Lake, NY 12019 www.sixnet.com CONNECT. MONITOR. CONTROL. T +1 518 877 5173 F +1 518 877 8346 Version XXX © 2010. Sixnet. All Rights Reserved. 203 203 IndustrialPro Series Router User Manual Bind Interface for accepting TCP Connections: This will restrict the unencrypted listening socket to allow connections coming into the specified interface only. Recommended setting is “Any”. Bind Interface for outgoing SSL Connections: This will restrict the encrypted socket to initiate connections out the specified interface only. Specifying an interface here may conflict with policy routing, however it may be required in a GRE/VPN or other tunneled environment. Please consult with a network architect for additional assistance. Recommended setting is “Any”. Ciphers: This field is a list of openssl ciphers supported. Please consult support staff before attempting to change. Reference Google: "openssl cipher list" for more information. Recommended setting is “RC4-MD5:RC4-SHA:SSLv3”. Sixnet, Inc, A Red Lion Business 331 Ushers Road, Ballston Lake, NY 12019 www.sixnet.com CONNECT. MONITOR. CONTROL. T +1 518 877 5173 F +1 518 877 8346 Version XXX © 2010. Sixnet. All Rights Reserved. 204 204 IndustrialPro Series Router User Manual Keep-Alive Behavior: This option enables TCP Keep-alives on the underlying sockets. The following options are supported: None: Keep-alives not used. All: Keep-alives enabled for all sockets. Accept: Keep-alives enabled for listening server socket side connections only. This applies to the clear text server for Client mode sockets, or the SSL Encrypted server for Server mode sockets. Remote: Keep-alives enabled for client initiated sockets. Local: Keep-alives enabled for client connections bound to a local IP address. You may need to adjust the master Keep-alive timer via NetworkingTCP Keep-alives. NOTE: Enabling TCP Keep-alives may, dramatically, increase the total amount of traffic for the affected socket(s) depending on the master interval, probe and timeout settings, which should be considered for connections using a wireless (cellular) connection with respect to total data usage for the subscripted plan. Sixnet, Inc, A Red Lion Business 331 Ushers Road, Ballston Lake, NY 12019 www.sixnet.com CONNECT. MONITOR. CONTROL. T +1 518 877 5173 F +1 518 877 8346 Version XXX © 2010. Sixnet. All Rights Reserved. 205 205 IndustrialPro Series Router User Manual Server Configuration Click on the “Add” button and the following pop-up window will appear: Label: Enter a unique name to describe this connection. SSL Listening IP: Enter the IP to listen on for incoming SSL connections. If not using static IP addresses, it is recommended to use the Advanced Setup option "Bind Interface for accepting TCP Connections" instead. Leave blank (0.0.0.0) to allow connections from any interface. SSL Listening Port: Enter the listening port for SSL connections. Please note that this port must be allowed in the Firewall access rules for any external/untrusted interface. NOTE: It may be helpful to review the results of StatusSocket StatusesTCP Only to confirm that your choice of listening port is not already in use. (Ports under "Local Address" with a state of "LISTEN" are in use.) TCP Destination IP: Enter the IP or Domain Name of the standard TCP server to which you would like to connect. Use 127.0.0.1 for internal connection use only (gwlnx Protocol Converter, or OOB Encryption Setup) TCP Destination Port: Enter the Port number of the standard TCP server to which you would like to connect. TCP Source Bind IP: Enter the IP to bind to for outgoing TCP connections. If not using static IP addresses, it is recommended to use the Advanced option "Bind Interface for outgoing TCP Connections". Leave blank for normal operation (no binding). Click on the “OK” button to populate the SSL Server screen Sixnet, Inc, A Red Lion Business 331 Ushers Road, Ballston Lake, NY 12019 www.sixnet.com CONNECT. MONITOR. CONTROL. T +1 518 877 5173 F +1 518 877 8346 Version XXX © 2010. Sixnet. All Rights Reserved. 206 206 IndustrialPro Series Router User Manual Click on the “Apply” button and the following pop-up window will appear: Click on the “OK” button to acknowledge the content Sixnet, Inc, A Red Lion Business 331 Ushers Road, Ballston Lake, NY 12019 www.sixnet.com CONNECT. MONITOR. CONTROL. T +1 518 877 5173 F +1 518 877 8346 Version XXX © 2010. Sixnet. All Rights Reserved. 207 207 IndustrialPro Series Router User Manual 3.5.7 System Logging The “System Logging” menu item allows you to configure the Sixnet router to send the system logs to a different syslog server designated by IP Address or URL. Click on the “System Logging” menu item and the following window will appear: Click on the pull down menu for “Forward syslog to remote host?” and choose “Yes” to reveal the system logging configuration fields IP Address / Name of remote host: Enter the IP address of the remote syslog server to which you want to forward messages. Click on the “Apply” button and the following pop-up window will appear: Click on the “OK” button to acknowledge the content Sixnet, Inc, A Red Lion Business 331 Ushers Road, Ballston Lake, NY 12019 www.sixnet.com CONNECT. MONITOR. CONTROL. T +1 518 877 5173 F +1 518 877 8346 Version XXX © 2010. Sixnet. All Rights Reserved. 208 208 IndustrialPro Series Router User Manual 3.5.8 TELNET Server The “TELNET Server” menu item allows you to enable or disable TELNET on the Sixnet router. Click on the “TELNET Server” menu item and the following window will appear: Click on the pull down menu at the “Enable TELNET Server?” field Click on “Yes” Click on the “Apply” button and the following pop-up window will appear: Click on the “OK” button to acknowledge the content Sixnet, Inc, A Red Lion Business 331 Ushers Road, Ballston Lake, NY 12019 www.sixnet.com CONNECT. MONITOR. CONTROL. T +1 518 877 5173 F +1 518 877 8346 Version XXX © 2010. Sixnet. All Rights Reserved. 209 209 IndustrialPro Series Router User Manual 3.5.9 Ping Alive Ping is a diagnostic tool used for verifying connectivity between two hosts on a network. It sends Internet Control Message Protocol (ICMP) echo request packets to a remote IP address and watches for ICMP responses. Click on “Ping Alive” tab as shown below to enable Ping Alive option. Click on “Ping Alive” tab as shown above to enable Ping Alive option Select “Yes” to “Enable Ping Alive?” option and the following window will appear: Sixnet, Inc, A Red Lion Business 331 Ushers Road, Ballston Lake, NY 12019 www.sixnet.com CONNECT. MONITOR. CONTROL. T +1 518 877 5173 F +1 518 877 8346 Version XXX © 2010. Sixnet. All Rights Reserved. 210 210 IndustrialPro Series Router User Manual Test Interval (in minutes): Enter the time interval (in minutes) to which the ping packets would be sent. Recommended setting is 50. Test Packets to Send: Specify the number of ping packets to send out to test connectivity. The minimum is 1, maximum is 10. Allowable Packet Loss: Specify the number of lost packets that are acceptable before the link is considered unavailable. Note: The value must be less than the number of test packets set via Test Packets to Send. Host Address: Enter the IP Address of the destination host to which the ping packet would be sent. Default setting is “1.0.0.1”. Source Interface: Select the name of the interface to which the service will bind for communications tests. Recommended setting is “None”. Source IP Address: Enter the IP address to use as a source for communications tests. Note: This will be the source IP address of the PING packets, but does not necessarily reflect the interface from which packets will traverse the unit. Failure Command Script: Choose the name of the command script to be executed when the PING test fails. For example, if “Reboot” is an option, then when selected, the wireless interface will be restarted. Note: Recommended setting is “None” for standard operation with no special behaviors. The “Reboot” is useful when using the wireless (cellular) interface. Click “Apply” button for the changes to take effect and the following window will appear: Sixnet, Inc, A Red Lion Business 331 Ushers Road, Ballston Lake, NY 12019 www.sixnet.com CONNECT. MONITOR. CONTROL. T +1 518 877 5173 F +1 518 877 8346 Version XXX © 2010. Sixnet. All Rights Reserved. 211 211 IndustrialPro Series Router User Manual Click on the “OK” button to acknowledge the content. 3.5.10 SNMP Agent SNMP, Simple Network Management Protocol, is a standard way of querying networking devices to obtain statuses, updates, alerts and behaviors. To retrieve SNMP data from the Sixnet device you must have a SNMP manager or Server at the head end. The Sixnet Router will only act as an SNMP client, providing data it is polled for. It will not act as a manager to poll other devices. The SNMP Agent allows you to query the unit for information via SNMP using what is called a MIB, Management Information Base. Standard MIB-II queries are supported, as well as a custom JBMELECTRONICS MIB. A great deal of useful information about the unit, including cellular signal strength, interface status, etc. can be queried. When configuring firewalls to allow SNMP traffic be sure to allow access to port 161 so that the device may return its results. This is the industry standard port # for SNMP traffic. You may obtain the JBMELECTRONICS.MIB by contacting Sixnet support. A complete listing of the OIDs found in the JBMELECTRONICS.MIB can be found in Appendix at the end of this manual. * The community string is “public” (Do not enter the quotes). Sixnet, Inc, A Red Lion Business 331 Ushers Road, Ballston Lake, NY 12019 www.sixnet.com CONNECT. MONITOR. CONTROL. T +1 518 877 5173 F +1 518 877 8346 Version XXX © 2010. Sixnet. All Rights Reserved. 212 212 IndustrialPro Series Router User Manual Click on the “SNMP Agent” menu item and the following window will appear: Select “Yes” to “Enable SNMP Agent?” option and the following window will appear: Sixnet, Inc, A Red Lion Business 331 Ushers Road, Ballston Lake, NY 12019 www.sixnet.com CONNECT. MONITOR. CONTROL. T +1 518 877 5173 F +1 518 877 8346 Version XXX © 2010. Sixnet. All Rights Reserved. 213 213 IndustrialPro Series Router User Manual Community String for SNMP Agent Access: Specify the community string to use for authentication between the SNMP Agent and Manager. Alpha-numeric strings are supported. Note: The community string must match on both ends of the connection in order to work. Our default community string for the JBMELECTRONICS MIB is “public”. Allow Serial Number OID: Select Yes to allow users and management systems to retrieve the unit serial number from the SNMP Agent. If No is selected, a query of the serial number OID will return "UNKNOWN". Click “Apply” button for the changes to take effect and the following window will appear: Click on the “OK” button to acknowledge the content. You should now see your MIB Manager be able to poll and display data collected from the Sixnet device. If you are behind a firewall you will need to configure it to allow external SNMP connections to the IP address of the device on port 161. Sixnet, Inc, A Red Lion Business 331 Ushers Road, Ballston Lake, NY 12019 www.sixnet.com CONNECT. MONITOR. CONTROL. T +1 518 877 5173 F +1 518 877 8346 Version XXX © 2010. Sixnet. All Rights Reserved. 214 214 IndustrialPro Series Router User Manual 3.5.11 Modbus This option is only supported if the IndustrialPro router has been upgraded to IndustrialPro RAM. The IndustrialPro RAM firmware MODBUS application allows it to act as a MODBUS Master acting as an I/O concentrator for MODBUS devices. I/O for these devices can be read or written using MODBUS I/O transfers with the IndustrialPro acting as a MODBUS master. I/O data is stored in a local I/O database. *This feature is not available on the R-Series Enterprise Routers. The IndustrialPro RAM will support: I/O transfers using MODBUS Slave Station Status Forwarding of MODBUS messages Developing of third party applications using our SDK based on ELDK4.2 and the SIXNET IODB API. Additionally, the IndustrialPro will act as a MODBUS slave. This allows MODBUS masters to request or update I/O points in the IndustrialPro’s I/O database. Modbus Configuration: User interfaces will be provided to configure I/O transfers, the MODBUS forwarding table and serial interfaces. MODBUS configuration data will be stored in an XML based file named modbus.xml. This file will contain the following sections: serials: xml section to define the parameters used for serial ports. localStation: xml section to define the local station number and name remoteStations: defines remote stations and the I/O transfers associated with them regAllocation: defines the number of registers for each I/O type. forwards: defines the list of remote stations to forward MODBUS requests. There are two methods to configure these sections. CLI: The command line interface for the cellular modbus gateway (IndustrialPro) provides a Cisco-style telnet command line interface. It writes an XML configuration file, which is used to drive the backend daemons. GUI Interface: This method is a WEB based interface which is the focus of this documentation. The user interfaces will have the ability to: Configure/Display remote stations Configure/Display I/O transfers Sixnet, Inc, A Red Lion Business 331 Ushers Road, Ballston Lake, NY 12019 www.sixnet.com CONNECT. MONITOR. CONTROL. T +1 518 877 5173 F +1 518 877 8346 Version XXX © 2010. Sixnet. All Rights Reserved. 215 215 IndustrialPro Series Router User Manual Configure/Display MODBUS forward stations Configure/Display local station information such as station name and station number Configure/Display serial ports Configure/Display MODBUS registers allocation Local / Remote Station: Click on the “Local / Remote Station” menu item and the following window will appear: Sixnet, Inc, A Red Lion Business 331 Ushers Road, Ballston Lake, NY 12019 www.sixnet.com CONNECT. MONITOR. CONTROL. T +1 518 877 5173 F +1 518 877 8346 Version XXX © 2010. Sixnet. All Rights Reserved. 216 216 IndustrialPro Series Router User Manual Select “Yes” to “Enable Modbus Interface?” option and the following window will appear: Sixnet, Inc, A Red Lion Business 331 Ushers Road, Ballston Lake, NY 12019 www.sixnet.com CONNECT. MONITOR. CONTROL. T +1 518 877 5173 F +1 518 877 8346 Version XXX © 2010. Sixnet. All Rights Reserved. 217 217 IndustrialPro Series Router User Manual Station Name: Enter the name of the local station. The station name must be less than or equal to 32 characters. Station Number: Enter the local station number. The station number must be in range of 1 – 247. Local Port: Enter the local port number. The port must be within the range of 1 – 65535 and the recommended default port is set to 502. Click on the “Add” button to configure the remote station parameters and the following pop-up window will appear: Station Name: Enter the name of the remote station. The remote station name must be less than or equal to 32 characters. All the defined remote station names will be populated in the I/O Transfer screen as a selection for assigning I/O transfer for selected remote station name. Station Number: Enter the remote station number. The station number must be in range of 1 – 247. Remote IP Address: Enter the remote station IP address in a valid IPv4 unicast address format, or may be blank if I/O transfers to this remote station only use the serial port. Remote IP Port: Enter a valid IP port number (1-65535) that the remote station listens on for MODBUS requests. Message Timeout (ms): Enter the Timeout period, in milliseconds, to wait for an I/O transfer to complete. The valid range is 10ms – 60000ms. Message Retries: Enter the number of times to retry an I/O transfer before giving up. If a station status bit is provided, it would be marked off line when this occurs. The recommended value is 3. Station Online Address: Discrete input address is used as a station status indicator. If provided, it is set to True when any I/O transfer to a remote station complete successfully, and false otherwise. Enter the Address of a local discrete input or blank if not used. Sixnet, Inc, A Red Lion Business 331 Ushers Road, Ballston Lake, NY 12019 www.sixnet.com CONNECT. MONITOR. CONTROL. T +1 518 877 5173 F +1 518 877 8346 Version XXX © 2010. Sixnet. All Rights Reserved. 218 218 IndustrialPro Series Router User Manual Click on the “OK” button to populate the Remote Station Table screen. If more than one remote station is needed, click and repeat the ‘Add” button. Click on the “Save” button to save the remote station configuration in the modbus.xml file. I/O Transfer: Sixnet, Inc, A Red Lion Business 331 Ushers Road, Ballston Lake, NY 12019 www.sixnet.com CONNECT. MONITOR. CONTROL. T +1 518 877 5173 F +1 518 877 8346 Version XXX © 2010. Sixnet. All Rights Reserved. 219 219 IndustrialPro Series Router User Manual Click on the “I/O Transfer” menu item and the following window will appear: Register Allocation: This page is displaying the default values for Analog In, Analog Out, Discrete In, Discrete Out, Float In, Float Out, Long In and Long Out. The range of Modbus slave addresses are displayed based on default register allocation. You can change the registers allocation values to your required register values and the range of Modbus slave addresses will be changed based on the new values. By default, we support 8192 DI registers, 8192 DO registers, 10000 AI registers, 10000 AO registers, 3000 LI registers, 3000 LO registers, 3000 FI registers and 3000 FO registers. Sixnet, Inc, A Red Lion Business 331 Ushers Road, Ballston Lake, NY 12019 www.sixnet.com CONNECT. MONITOR. CONTROL. T +1 518 877 5173 F +1 518 877 8346 Version XXX © 2010. Sixnet. All Rights Reserved. 220 220 IndustrialPro Series Router User Manual Click on the “Add” button to configure the I/O Transfer for the remote station and the following pop-up window will appear: Station Name: Name of the remote station for this I/O transfer. This option lists the name of all the remote stations that you have already defined and configured in remote station table entry. Select the remote station name that you want for this I/O transfer. Protocol: Modbus is currently the only supported protocol used for I/O transfers. Send Mode: Rapid Fire and Wait for Reply are the only modes used to send an I/O transfer. Port: The port that the I/O request is being sent across. The supported ports are ttyS1, UDP and TCP. If UDP or TCP port is used, the remote station selected for this I/O transfer should have its IP address defined. Command Type: The commands used for I/O transfers are: READ: Used for reading MODBUS registers from the remote station. WRITE: Write MODBUS output registers to the remote station. WRITE_SINGLE: Write a single MODBUS discrete or analog output register to the remote station. Note: Only an option when writing a single discrete output or single analog output. Local Type: I/O type on the local station. See Table2 – I/O Types and Limits. Local Address: First address of the local I/O used for the I/O transfer. Valid values are 0 through number of registers configured for specified I/O type. Remote Type: I/O type on the remote station. See Table 2, 3, 4, 5 – I/O Types and Limits. Sixnet, Inc, A Red Lion Business 331 Ushers Road, Ballston Lake, NY 12019 www.sixnet.com CONNECT. MONITOR. CONTROL. T +1 518 877 5173 F +1 518 877 8346 Version XXX © 2010. Sixnet. All Rights Reserved. 221 221 IndustrialPro Series Router User Manual Remote Address: First register address for the remote I/O used for the I/O transfer. Valid values are 1 – 65536. Number of Registers: Number of registers requested in the I/O transfer. This must be 1, if the WRITE_SINGLE command is selected. See Table 2, 3, 4, 5 – I/O Types and Limits. Enter Update Interval (ms): Time interval, in milliseconds, for the I/O transfer. Scan Enable Type: I/O Type used for controlling an I/O transfer using either a discrete input or discrete output register. Valid options are DI or DO or Blank if not used. Scan Enable Address: The address of the discrete register used to control an I/O transfer. Valid values are 0 through number of registers configured for specified I/O type. Blank if not used. Click on the “OK” button to populate the I/O transfer Table screen. If more than one I/O transfer for remote station is needed, click and repeat the ‘Add” button. Click on the “Save” button to save the I/O transfer configuration in the modbus.xml file. Table 1 – I/O Types and Limits for read commands I/O TYPE Number of regs supported in I/O transfer Discrete Input DI 2000 Discrete Output DO 2000 Analog Input AI 125 Analog Output AO 125 Float Input FI 62 Float Output FO 62 Long Input LI 62 Long Output LO 62 Table 2 – I/O Types and limits for write commands I/O TYPE Number of regs supported in I/O transfer Discrete Input DI 1968 Discrete Output DO 1968 Analog Input AI 123 Analog Output AO 123 Sixnet, Inc, A Red Lion Business 331 Ushers Road, Ballston Lake, NY 12019 www.sixnet.com CONNECT. MONITOR. CONTROL. T +1 518 877 5173 F +1 518 877 8346 Version XXX © 2010. Sixnet. All Rights Reserved. 222 222 IndustrialPro Series Router User Manual Float Input FI 61 Float Output FO 61 Long Input LI 61 Long Output LO 61 Table 3 – Valid Type Combinations for READ I/O Xfers Local Type Valid Remote Type DI DI | DO DO DI | DO AI AI | AO AO AI | AO FI FI | FO FO FI | FO LI LI | LO LO LI | LO Table 4 – Valid Type Combinations for WRITE I/O Xfers Local Type Valid Remote Type DI DO DO DO AI AO AO AO FI FO FI FO LI LO LO LO Sixnet, Inc, A Red Lion Business 331 Ushers Road, Ballston Lake, NY 12019 www.sixnet.com CONNECT. MONITOR. CONTROL. T +1 518 877 5173 F +1 518 877 8346 Version XXX © 2010. Sixnet. All Rights Reserved. 223 223 IndustrialPro Series Router User Manual Forwarding: Click on the “Forwarding” menu item and the following window will appear: Sixnet, Inc, A Red Lion Business 331 Ushers Road, Ballston Lake, NY 12019 www.sixnet.com CONNECT. MONITOR. CONTROL. T +1 518 877 5173 F +1 518 877 8346 Version XXX © 2010. Sixnet. All Rights Reserved. 224 224 IndustrialPro Series Router User Manual Click on the “Add” button to configure the Forwarding and the following pop-up window will appear: Station Number: Station number to be forwarded. Valid values are 1 – 247. Forward Station Number: If supplied, replaces the station number in the request with this value. Valid values are 1 -247. Type: Select the forwarding method. Valid options are TCP, UDP and Serial. Address: Valid IP address, if the selected type is TCP or UDP, or the Serial device name if the selected type is Serial. Port: IP port number to forward the request to on the remote station. The default port is 502. Click on the “OK” button to populate the Forwarding Table screen. If more than one forward is needed, click and repeat the ‘Add” button. Sixnet, Inc, A Red Lion Business 331 Ushers Road, Ballston Lake, NY 12019 www.sixnet.com CONNECT. MONITOR. CONTROL. T +1 518 877 5173 F +1 518 877 8346 Version XXX © 2010. Sixnet. All Rights Reserved. 225 225 IndustrialPro Series Router User Manual Click on the “Save” button to save the Forwarding configuration in the modbus.xml file. Serial: Click on the “Serial” menu item and the following window will appear: Sixnet, Inc, A Red Lion Business 331 Ushers Road, Ballston Lake, NY 12019 www.sixnet.com CONNECT. MONITOR. CONTROL. T +1 518 877 5173 F +1 518 877 8346 Version XXX © 2010. Sixnet. All Rights Reserved. 226 226 IndustrialPro Series Router User Manual Click on the “Add” button and the following pop-up window will appear: Device Name: Name of the serial device. Baud rate: Baud rate for serial device. Supported baud rates are: 300, 600, 1200, 2400, 9600, 19200 and 38400. Sixnet, Inc, A Red Lion Business 331 Ushers Road, Ballston Lake, NY 12019 www.sixnet.com CONNECT. MONITOR. CONTROL. T +1 518 877 5173 F +1 518 877 8346 Version XXX © 2010. Sixnet. All Rights Reserved. 227 227 IndustrialPro Series Router User Manual Data bits: Number of data bits. Supported data bits are: 7 and 8. Parity: Parity for serial device. Supported parities are: none, even, odd, mark and odd. Flow control: Flow control for serial device. Supported flow controls are: none, hardware, xon/xoff, half duplex, full duplex. Stop bits: Stop bits for serial device. Supported stop bits are: 1 and 2. Protocol: Protocol being used on serial device. Supported protocols are: modbusMasterAscii, modbusMasterRtu, modbusSlaveAscii, modbusSlaveRtu, modbusMasterRtuFwd and modbusMasterAsciiFwd. Float Word Order: Controls the swapping of words within floats. Ignored if using Daniel mode. This is needed for configuring the serial slave application. Supported orders are: LSW and MSW. Long Word Order: Controls the swapping of words within longs. Ignored if using Daniel mode. This is needed for configuring the serial slave application. Supported orders are: LSW and MSW. Enable Daniel Mode: Used Daniel mode extensions when dealing with longs and floats. This is needed for configuring the serial slave application. Click on the “OK” button to populate the Serial Table screen. Click on the “Save” button to save the Serial configuration in the modbus.xml file. Sixnet, Inc, A Red Lion Business 331 Ushers Road, Ballston Lake, NY 12019 www.sixnet.com CONNECT. MONITOR. CONTROL. T +1 518 877 5173 F +1 518 877 8346 Version XXX © 2010. Sixnet. All Rights Reserved. 228 228 IndustrialPro Series Router User Manual Display Config File: Click on the “Display Config File” menu item and the following window will appear: Sixnet, Inc, A Red Lion Business 331 Ushers Road, Ballston Lake, NY 12019 www.sixnet.com CONNECT. MONITOR. CONTROL. T +1 518 877 5173 F +1 518 877 8346 Version XXX © 2010. Sixnet. All Rights Reserved. 229 229 IndustrialPro Series Router User Manual Click on the “Refresh” button to display the contents of the “modbus.xml” file. Click on the “Download” button to send the “modbus.xml” file to your PC. You can Edit and Save the “modbus.xml” file under AdvancedExpert ModeConfigure Sub-systems menu item, and then click on “(Re)Start” button to restart the Modbus service. Sixnet, Inc, A Red Lion Business 331 Ushers Road, Ballston Lake, NY 12019 www.sixnet.com CONNECT. MONITOR. CONTROL. T +1 518 877 5173 F +1 518 877 8346 Version XXX © 2010. Sixnet. All Rights Reserved. 230 230 IndustrialPro Series Router User Manual 3.5.12 I/O Settings Test I/O: Test I/O is used to verify the functionality of I/O states in gateways, RTUs and I/O modules. Sixnet, Inc, A Red Lion Business 331 Ushers Road, Ballston Lake, NY 12019 www.sixnet.com CONNECT. MONITOR. CONTROL. T +1 518 877 5173 F +1 518 877 8346 Version XXX © 2010. Sixnet. All Rights Reserved. 231 231 IndustrialPro Series Router User Manual From the navigationmenu select Services -> I/O Settings -> Test I/O and you will see this screen: Clicking on the Test I/O Link in RED will take you to the Test I/O interface below: The Test I/O interface has been kept simple to make managing the test I/O process easier and keep the screen less cluttered and easier to look at and quickly locate your test values. Home: This link will take you back to the main GAU Menu. Scan Rate: This is the time in which the screen will automatically refresh values from the internal I/ODB. Show messages: If checked the user will see messages displayed as I/O operations are taking place in the background. From the Drop Down list select the type of I/O you would like to test. Sixnet, Inc, A Red Lion Business 331 Ushers Road, Ballston Lake, NY 12019 www.sixnet.com CONNECT. MONITOR. CONTROL. T +1 518 877 5173 F +1 518 877 8346 Version XXX © 2010. Sixnet. All Rights Reserved. 232 232 IndustrialPro Series Router User Manual Valid I/O types are: Analog In Discrete In Long In Float In Analog Out Discrete Out Long Out Float Out Once you select the type of I/O you will be testing enter your Start Address, Register Count and Columns then click the “Add to Test I/O” button. You will see the following screen update: The messages log shows that we have “Added I/O Range AI[0:7] to Test I/O” and now we see each register that can be edited and monitored for the Analog inputs. You may enter values here and observe your IODB data from another device / location to see those values get updated, or you may initiate a change from another device/input and observe the changes presented here on your Test I/O interface. Sixnet, Inc, A Red Lion Business 331 Ushers Road, Ballston Lake, NY 12019 www.sixnet.com CONNECT. MONITOR. CONTROL. T +1 518 877 5173 F +1 518 877 8346 Version XXX © 2010. Sixnet. All Rights Reserved. 233 233 IndustrialPro Series Router User Manual Click on the “I/O CTRL” menu item and the following window will appear: From the drop down menu select Yes to enable this interface and the following window will appear: Digital Input Address: Enter the address of internal IODB database for Digital Input I/O control. Valid Values: 1 through 65535 as defined for specified I/O type. Digital Input Counter: Counts the transitions (number of changes in digital state) on Digital Input. Sixnet, Inc, A Red Lion Business 331 Ushers Road, Ballston Lake, NY 12019 www.sixnet.com CONNECT. MONITOR. CONTROL. T +1 518 877 5173 F +1 518 877 8346 Version XXX © 2010. Sixnet. All Rights Reserved. 234 234 IndustrialPro Series Router User Manual Digital Output Address: Enter the address of internal IODB database for Digital Output I/O control. Valid Values: 1 through 65535 as defined for specified I/O type. Analog Input Address: Enter the address of internal IODB database for Analog Input I/O control. Valid Values: 1 through value of defined registers configured for specified I/O type. The address ranges are displayed on I/O Transfer screen under 'Display Of Modbus Default Slave Addresses' based on configured local register allocation for specified I/O type. Update Interval (ms.): Enter update interval, in milliseconds, for updating the internal IODB database with value of supported IO/CTRL. Recommended Value: 500ms or higher. Enable Auto update?: Select Yes to enable automatic updating of the I/O ports value. Manual updating is disabled while auto update is in effect. Recommended Setting: Yes Select update interval: Select the update interval to be used when auto update is enabled from one of the choices in the drop-down list provided. Choices (in seconds) include: 3 5 10 15 *Be advised that when connected via a Cellular interface, the data collected will count towards your total data plan usage. Sixnet, Inc, A Red Lion Business 331 Ushers Road, Ballston Lake, NY 12019 www.sixnet.com CONNECT. MONITOR. CONTROL. T +1 518 877 5173 F +1 518 877 8346 Version XXX © 2010. Sixnet. All Rights Reserved. 235 235 IndustrialPro Series Router User Manual 3.5.13 DNP3 DNP3 functionality will be available in SN Firmware Version 3.13! DNP3 (Distributed Network Protocol) is a set of communications protocols used between components in process automation systems. Its main use is in utilities such as electric and water companies. Usage in other industries is not common. It was developed for communications between various types of data acquisition and control equipment. Sixnet, Inc, A Red Lion Business 331 Ushers Road, Ballston Lake, NY 12019 www.sixnet.com CONNECT. MONITOR. CONTROL. T +1 518 877 5173 F +1 518 877 8346 Version XXX © 2010. Sixnet. All Rights Reserved. 236 236 IndustrialPro Series Router User Manual DNP3 Station and General Configuration: Define Station Properties: Station Name: Enter the station name that will identify this unit as an RTU Station. Sixnet, Inc, A Red Lion Business 331 Ushers Road, Ballston Lake, NY 12019 www.sixnet.com CONNECT. MONITOR. CONTROL. T +1 518 877 5173 F +1 518 877 8346 Version XXX © 2010. Sixnet. All Rights Reserved. 237 237 IndustrialPro Series Router User Manual Station Number: Enter the number that will be used by other DNP3 devices to address this RTU Station. Primary IP Address: Enter a valid IP Address that will be used by other DNP3 devices to connect to this RTU. Secondary IP Address: Enter a valid IP Address that will be used by other DNP3 devices to connect to this RTU in the case the primary address fails to connect. Define General Properties: Compatibility Mode: This RTU supports both Level 2 or Level 2+ mode. Check the box for the mode your network is utilizing. On new event when Event Queue is full: Select whether to discard oldest or newest message when log is full. Enable Unsolicited Responses: Select if the DNP Slave should send unsolicited messages to the DNP Master. If this selection is checked, then the user should also configure the following: 1- The address of the station to which DNP Slave will send unsolicited messages in the DNP Address to Send Unsolicited Messages field. 2- The amount of time in milliseconds any events will be allowed to remain in the event queue before being reported in the Event Report Queue Timeout field. Minimum value: 1,000 ms (1 second), maximum value: 3,600,000 ms (1 hour). 3- The minimum number of events in the event queue required to trigger the generation of an unsolicited event report message in the Event Report Queue Threshold field. 4- The maximum number of events to send in every unsolicited message. Note: When planning on using unsolicited responses, there must be at least one DNP object configured to generate events on any of the three DNP event classes, or else no events will be generated and thus no unsolicited responses will be generated by the station. Event Detection Rate: Select box to automatically set the detection rate Max. time events in queue after disconnect (TCP Server only): Click to enable. Enable Real Time Data Trace: The DNP V3.00 Slave Driver can be configured to generate real time traces of every Master-Slave DNP V3.00 transaction for diagnosis and debugging purposes. The real time communication data traces can be enabled/disabled at any time from the DNP configuration Add-On and its ASCII output can be redirected either to a text file within the file system for later upload, to a dumb terminal attached to an unassigned serial port of the station, or even to a remote Telnet terminal session over the TCP/IP network by entering the corresponding /dev/ttyp (/dev/ttyp0 to /dev/ttyp3) telnet device. Time Synchronization: The station can be configured to request Time Synchronization from the DNP V3.00 Master. Requests can be configured to be made at intervals of once per minute, once per hour, once per day or never. Click Save to save your configuration and move on to the next tab, Physical Link Layer. Navigation buttons across the bottom of the DNP3 screen match the selections made from the drop down tab menu. Sixnet, Inc, A Red Lion Business 331 Ushers Road, Ballston Lake, NY 12019 www.sixnet.com CONNECT. MONITOR. CONTROL. T +1 518 877 5173 F +1 518 877 8346 Version XXX © 2010. Sixnet. All Rights Reserved. 238 238 IndustrialPro Series Router User Manual Physical Link Layer Mode of Operation: The DNP V3.00 Slave Driver implementation supports RS-232 and RS-485 (two and four wires) over serial port communications as well as TCP/IP and UDP/IP over LAN/WAN communications. When the user selects the Serial Mode, the TCP/UDP section is disabled. The same happens to the Serial section if the Mode of Operation selected is TCP or UDP. Click Save to store your configuration and move on to the next tab, Data Link and Application Layer. Sixnet, Inc, A Red Lion Business 331 Ushers Road, Ballston Lake, NY 12019 www.sixnet.com CONNECT. MONITOR. CONTROL. T +1 518 877 5173 F +1 518 877 8346 Version XXX © 2010. Sixnet. All Rights Reserved. 239 239 IndustrialPro Series Router User Manual Data Link and Application Layer Data Link Layer This Station DNP Address: DNP address for the slave. This value can be set by the user or automatically assigned by the Add-On. If the checkbox Same As station Number is selected, then the DNP Address will be equal to the Station Number. Enter Station DNP Address: Enter the address for this Station if not being automatically assigned. Sixnet, Inc, A Red Lion Business 331 Ushers Road, Ballston Lake, NY 12019 www.sixnet.com CONNECT. MONITOR. CONTROL. T +1 518 877 5173 F +1 518 877 8346 Version XXX © 2010. Sixnet. All Rights Reserved. 240 240 IndustrialPro Series Router User Manual Min Response Delay (ms): This is the time delay in milliseconds (from 0 to 65535 mSec) before sending the response from the slave. Enable Self Address: The DNP V3.00 Slave Driver can be configured to send its own DNP Address when a DNP Master asks for it. When this box is checked, if a message is sent with the Self Address (65532) in the destination address field, the will respond with its unique individual address. This feature simplifies the commissioning, troubleshooting and maintenance of devices with an unknown address. If this feature is not enabled, the station will ignore the messages sent to the Self Address. Enable Data Link Confirmation: The DNP V3.00 Slave Driver can be configured to retry unconfirmed data link primary frames. The number of retries the driver sends and the retry timeout are configurable. This service is disabled unless Data Link Confirmation checkbox is selected. - The number of Retries is configurable between 0 (Data Link Retries disabled) and 255. - The Retry Timeout is configurable between 0 (Data Link Retries disabled) and 5000ms Note: The Driver's Data Link Layer will attempt to retry (will resend) an unconfirmed data link primary frame when the confirmation has not been received within the configured timeout. If the confirmation fails to arrive after the configured number of retries, the communications link is considered failed and a reset sequence is required before a new primary frame could be sent. Define Application Layer Properties Application Layer Enable Application Link Confirmation: The DNP V3.00 Slave Driver can be configured to retry unconfirmed application link primary frames. The number of retries the driver sends and the retry timeout are configurable. This service is disabled unless Application Link Confirmations checkbox is selected. - The number of Retries is configurable between 0 (Application Link Retries disabled) and 255. - The Retry Timeout is configurable between 0 (Application Link Retries disabled) and 5000ms Use different SEQ numbers for CONFIRM and RESPONSE: Check to enable Click Save to store your configuration and move on to the next tab, Object Mapping. Sixnet, Inc, A Red Lion Business 331 Ushers Road, Ballston Lake, NY 12019 www.sixnet.com CONNECT. MONITOR. CONTROL. T +1 518 877 5173 F +1 518 877 8346 Version XXX © 2010. Sixnet. All Rights Reserved. 241 241 IndustrialPro Series Router User Manual DNP3 Object Mapping Configuration Define DNP Object Mapping Map I/O Button: When clicking on this button a new window appears. This new window is used to configure and map every DNP point to a specific I/O. Sixnet, Inc, A Red Lion Business 331 Ushers Road, Ballston Lake, NY 12019 www.sixnet.com CONNECT. MONITOR. CONTROL. T +1 518 877 5173 F +1 518 877 8346 Version XXX © 2010. Sixnet. All Rights Reserved. 242 242 IndustrialPro Series Router User Manual Important Note: Each type of I/O must have its corresponding Object Mapping Window opened at least once, or else the I/O won't be mapped. Be Sure to click on Save on each I/O Mapping to store your configuration before moving to the next object. Once all of your I/O objects have been mapped move on to the next tab, Default Variation. Sixnet, Inc, A Red Lion Business 331 Ushers Road, Ballston Lake, NY 12019 www.sixnet.com CONNECT. MONITOR. CONTROL. T +1 518 877 5173 F +1 518 877 8346 Version XXX © 2010. Sixnet. All Rights Reserved. 243 243 IndustrialPro Series Router User Manual DNP3 Default Variation Configuration Binary Objects 1: Binary Input: Combo Box that shows the different choices for Object 1 (Binary Input) that the user can select as a default variation. 2: Binary Input Change: Combo Box that shows the different choices for Object 2 (Binary Input Change Events) that the user can select as a default variation. Sixnet, Inc, A Red Lion Business 331 Ushers Road, Ballston Lake, NY 12019 www.sixnet.com CONNECT. MONITOR. CONTROL. T +1 518 877 5173 F +1 518 877 8346 Version XXX © 2010. Sixnet. All Rights Reserved. 244 244 IndustrialPro Series Router User Manual 10: Binary Output Status: Combo Box that shows the different choices for Object 10 (Binary Output) that the user can select as a default variation. Analog Objects 30: Analog Input: Combo Box that shows the different choices for Object 30 (Analog Input) that the user can select as a default variation. 31: Frozen Analog Input: Combo Box that shows the different choices for Object 31 (Frozen Analog Input) that the user can select as a default variation (only on Level 2+). 32: Analog Change Event: Combo Box that shows the different choices for Object 32 (Analog Input Change Events) that the user can select as a default variation. 33: Frozen Analog Event: Combo Box that shows the different choices for Object 33 (Frozen Analog Input Change Event) that the user can select as a default variation (only on Level 2+). 40: Analog Output Status: Combo Box that shows the different choices for Object 40 (Analog Output) that the user can select as a default variation. Binary Counter Objects 20: Binary Counter: Combo Box that shows the different choices for Object 20 (Binary Counters) that the user can select as a default variation. 21: Frozen Counter: Combo Box that shows the different choices for Object 21 (Frozen Binary Counters) that the user can select as a default variation. 22: Binary Counter Change: Combo Box that shows the different choices for Object 22 (Binary Counters Change Events) that the user can select as a default variation. 23: Frozen Counter Change: Combo Box that shows the different choices for Object 23 (Frozen Binary Counters Change Event) that the user can select as a default variation (only on Level 2+). Click on Save to preserve your configuration before moving on to any other pages. Sixnet, Inc, A Red Lion Business 331 Ushers Road, Ballston Lake, NY 12019 www.sixnet.com CONNECT. MONITOR. CONTROL. T +1 518 877 5173 F +1 518 877 8346 Version XXX © 2010. Sixnet. All Rights Reserved. 245 245 IndustrialPro Series Router User Manual 3.6 Advanced Tab The Advanced Tab is where you can configure the magic of the Sixnet router, which includes IP Fallback, IP Transparency, Out-of-Band Management, VRRP, Expert Mode and Gwlnx (Protocol Translation). 3.6.1 IP Fallback IP Fallback is supported in Sixnet Routers in the IndustrialPro and EnterprisePro series. To configure IP Fallback, select the option from the Advanced menu The “IP Fallback” menu item allows you to configure the Sixnet router to failover between two interfaces, ex. Primary route on DSL/Cable on eth0, and secondary on Cellular if the primary loses Internet connection. Sixnet, Inc, A Red Lion Business 331 Ushers Road, Ballston Lake, NY 12019 www.sixnet.com CONNECT. MONITOR. CONTROL. T +1 518 877 5173 F +1 518 877 8346 Version XXX © 2010. Sixnet. All Rights Reserved. 246 246 IndustrialPro Series Router User Manual Click on the “IP Fallback” menu item and the following window will appear: Click on the pull-down at the “Enable IP Fallback?” field Click on “Yes” and the display will expand to reveal the IP Fallback configuration fields: Sixnet, Inc, A Red Lion Business 331 Ushers Road, Ballston Lake, NY 12019 www.sixnet.com CONNECT. MONITOR. CONTROL. T +1 518 877 5173 F +1 518 877 8346 Version XXX © 2010. Sixnet. All Rights Reserved. 247 247 IndustrialPro Series Router User Manual Select Primary Interface: Specify your desired primary interface for IP Fallback behavior. Select Primary External Command Script: Choose the name of the command script to be executed when the associated interface becomes active. For example, if an ipsec_restart is an option, then when selected, will be run whenever the fallback logic selects and activates this interface. Recommended setting is “None” for standard operation with no special behaviors. “ipsec_restart” is useful when using an IPSEC VPN tunnel. Select Secondary Interface: Select the secondary interface to be used for IP Fallback. Selecting "vrrp" will coordinate with the VRRP process, so that when the primary interface is determined to be unavailable, VRRP will stop broadcasting availability. Select Secondary External Command Script: Choose the name of the command script to be executed when the associated interface becomes active. For example, if an “ipsec_restart” is an option, then when selected, will be run whenever the fallback logic selects and activates this interface. Recommended setting is “None” for standard operation with no special behaviors. “ipsec_restart” is useful when using an IPSEC VPN tunnel. Enter Primary Test IP Address: Specify the IP address of a host with which the IP Fallback service will communicate to test connectivity. Value must be a pingable address, and not a domain name. The best choice would be an address that represents end-to-end connectivity. Enter Request Interval (in seconds): Specify the time, in seconds, to wait between connectivity tests. The minimum is 10; maximum is 600. This value should be 30 or higher for PPP connections. Sixnet, Inc, A Red Lion Business 331 Ushers Road, Ballston Lake, NY 12019 www.sixnet.com CONNECT. MONITOR. CONTROL. T +1 518 877 5173 F +1 518 877 8346 Version XXX © 2010. Sixnet. All Rights Reserved. 248 248 IndustrialPro Series Router User Manual Test Packets to Send: Specify the number of 0 byte ping packets to send out to test connectivity. The minimum is 2; maximum is 30. Recommended value is 5 – 10. Allowable Test Packet Loss: Specify the number of lost packets that are acceptable before the IP Fallback service will consider the link unavailable, and switch to its secondary. The value must be less than the number of test packets set via Test Packets to Send. Select a debugging level: Specify a debug level for logging purposes. This is recommended only when existing configurations do not function as expected, and when directed to change by Technical Support personnel. Click on the “Save” button and the following pop-up window will appear: Click on the “OK” button to acknowledge the content Click on the “Apply” button and the following pop-up window will appear: Click on the “OK” button to acknowledge the content Sixnet, Inc, A Red Lion Business 331 Ushers Road, Ballston Lake, NY 12019 www.sixnet.com CONNECT. MONITOR. CONTROL. T +1 518 877 5173 F +1 518 877 8346 Version XXX © 2010. Sixnet. All Rights Reserved. 249 249 IndustrialPro Series Router User Manual 3.6.2 IP Transparency IP Transparency is supported on Sixnet Routers in the IndustrialPro and EnterprisePro series. To configure IP Transparency, select the option from the Advanced menu. The “IP Transparency” menu item allows you to configure the transparent bridging capability of the SIXNET router. IP Transparency is a special use capability. IP Transparency will take all inbound traffic to the SIXNET router and pass it transparently through to the interface specified. This is useful when it is desired to pass traffic to a legacy firewall, or VPN concentrator located behind the SIXNET router and not to use the firewall or VPN capabilities of the SIXNET router itself. Sixnet, Inc, A Red Lion Business 331 Ushers Road, Ballston Lake, NY 12019 www.sixnet.com CONNECT. MONITOR. CONTROL. T +1 518 877 5173 F +1 518 877 8346 Version XXX © 2010. Sixnet. All Rights Reserved. 250 250 IndustrialPro Series Router User Manual Click on the “IP Transparency” menu item and the following window will appear: Click on the pull-down at the “Enable IP Transparency?” field Click on “Yes” and a pop-up window will appear: Click on the “OK” button to acknowledge the content Sixnet, Inc, A Red Lion Business 331 Ushers Road, Ballston Lake, NY 12019 www.sixnet.com CONNECT. MONITOR. CONTROL. T +1 518 877 5173 F +1 518 877 8346 Version XXX © 2010. Sixnet. All Rights Reserved. 251 251 IndustrialPro Series Router User Manual The expanded display will appear, revealing the IP Transparency configuration field: Select Internal Interface: Select the interface to be designated the "internal" interface by making the appropriate choice from the provided list. The wireless IP will be issued out of this interface. Interface Speed/Duplex: Select the Speed and Duplex to be used for the physical interface. Recommended setting is “Auto-Detect”. The following options are available: Auto Detect 10Mbps/Half 100Mbps/Hall 100Mbps/Full - Use the 'best negotiated' speed and duplex (default) Force the interface to 10 Mbps and half-duplex Force the interface to 100 Mbps and half-duplex Force the interface to 100 Mbps and full-duplex Sixnet, Inc, A Red Lion Business 331 Ushers Road, Ballston Lake, NY 12019 www.sixnet.com CONNECT. MONITOR. CONTROL. T +1 518 877 5173 F +1 518 877 8346 Version XXX © 2010. Sixnet. All Rights Reserved. 252 252 IndustrialPro Series Router User Manual Note: An incorrect 'forced' setting will result in communication failure for this interface. Enable DHCP Server? Select “Yes” to allow the DHCP Server(s) to be enabled while IP Transparency is in effect. DHCP Subnet Type: A calculated subnet will be based on the actual IP address received from the wireless network. This option is more compatible with a wide variety of routers, but will mask out nearby IP addresses. This may make other IP’s within the host network unreachable. Point-to-Point will use a /32 subnet, but is not compatible with some routers. Recommended setting is “Calculated”. DHCP Lease Time: Choose the time for DHCP Leases when issuing the Transparent IP. Recommended setting is “4 Hours”. Allow TELNET access to this device? Select “Yes” to allow Telnet access to this device. Incoming connections on the specified port will be directed internally to port 23, instead of to the device behind the specified Internal Interface. NOTE: For this option to function properly, the Telnet Server must be enabled on port 23 via the Services tab. Selecting “Yes”: Will expand the display to include the port field for this parameter. Enter TELNET Port: Enter the IP Port number to be used for Telnet access when Telnet access has been enabled. The port chosen will be redirected locally. Connections on this port number will not reach the device behind the specified Internal Interface. Recommended setting is “2023 - All Telnet traffic will be redirected locally to port 23 automatically. This behavior is built-in and not configurable. Incoming connections on port 23 will reach the device behind the specified Internal Interface”. NOTE: The Telnet Server settings need not be altered to support the specification of a port other than 23 here. Allow SSH access to this device? Select “Yes” to allow SSH access to this device. Incoming connections on the specified port will be directed internally to port 22, instead of to the device behind the specified Internal Interface. NOTE: For this option to function properly, the SSH Server must be enabled on port 22 via the Services tab. Selecting “Yes”: Will expand the display to include the port field for this parameter. Enter SSH Port: Enter the IP Port number to be used for SSH access when SSH access has been enabled. The port chosen will be redirected locally. Connections on this port number will not reach the device behind the specified Internal Interface. Recommended setting is “2022 - All SSH traffic will be redirected locally to port 22 automatically. This Sixnet, Inc, A Red Lion Business 331 Ushers Road, Ballston Lake, NY 12019 www.sixnet.com CONNECT. MONITOR. CONTROL. T +1 518 877 5173 F +1 518 877 8346 Version XXX © 2010. Sixnet. All Rights Reserved. 253 253 IndustrialPro Series Router User Manual behavior is built-in and not configurable. Incoming connections on port 22 will reach the device behind the specified Internal Interface”. NOTE: The SSH Server settings need not be altered to support the specification of a port other than 22 here. Allow access to Gateway Administration Utility? Select “Yes” to allow access (for incoming TCP Port 10000 connections) to the GAU on this device. Selecting “No” will allow the connection through to the router behind the selected interface. Recommended setting is “Yes”. Enter GAU Port: Enter the IP Port number to be used for GAU access when GAU access has been enabled. The port chosen will be redirected locally. Connections on this port number will not reach the device behind the specified Internal Interface. Recommended setting is “10000 - All GAU traffic will be redirected locally to port 10000 automatically. This behavior is built-in and not configurable”. Allow access by SixView Manager? Select “Yes” to allow access (for incoming TCP Port 7785 connections) to trigger the SIXNET router for remote check-in by the SixView Manager server. Selecting “No” will allow the connection through to the device behind the selected interface. Recommended setting is “Yes”. Enter MAC Filter: Enter a valid MAC address using the following format: nn:nn:nn:nn:nn:nn, where nn is a number in hexadecimal form (0-9, a-f, A-F) to enable a MAC filter for use with IP Transparency. A MAC filter allows only packets whose MAC address matches the filter value to be passed thru the Gateway device. NOTE: Leaving this field empty effectively disables MAC filtering. Enable Out-Of-Band port re-direct? Select “Yes” to allow an Out-of-Band port to be redirected locally to this router. When enabled, the OOB Ports specified in the AdvancedOut-of-Band Mgt section will be automatically allowed. Recommended setting is “Yes” When also configuring Out-of-Band Mgt on this unit. Enable port re-directing? Select “Yes” to allow redirecting of ports to a router beyond the Gateway device (the one being configured). Example: A device beyond the Gateway device is running a WEB server on Port 80, but an upstream router is blocking Port 80. Redirecting traffic to another port, say 8080, will allow communication with the server. This would be setup as our External port 8080 redirected to an Internal Port 80, Protocol TCP. When this feature is enabled, a new field will appear containing a table into which multiple entries can be entered. Each entry will include the External and Internal Port numbers and a traffic type (TCP or UDP). Sixnet, Inc, A Red Lion Business 331 Ushers Road, Ballston Lake, NY 12019 www.sixnet.com CONNECT. MONITOR. CONTROL. T +1 518 877 5173 F +1 518 877 8346 Version XXX © 2010. Sixnet. All Rights Reserved. 254 254 IndustrialPro Series Router User Manual Sixnet, Inc, A Red Lion Business 331 Ushers Road, Ballston Lake, NY 12019 www.sixnet.com CONNECT. MONITOR. CONTROL. T +1 518 877 5173 F +1 518 877 8346 Version XXX © 2010. Sixnet. All Rights Reserved. 255 255 IndustrialPro Series Router User Manual Click on the “Add” button to add a port re-direction and the following pop-up window will appear: External Port #: Enter the IP Port number to be used as the External Port for redirection. This is the port that incoming connections are destined to, on the wireless interface. Internal Port #: Enter the IP Port number to be used as the Internal Port for redirection. This is the port that incoming connections are transformed to, in order to reach a listening process (on this same port) on the device behind the specified Internal Interface. Protocol: Select either TCP or UDP as the protocol for which to apply the redirection from the drop down list provided. Click on the “OK” button to populate the Port Re-directs screen Sixnet, Inc, A Red Lion Business 331 Ushers Road, Ballston Lake, NY 12019 www.sixnet.com CONNECT. MONITOR. CONTROL. T +1 518 877 5173 F +1 518 877 8346 Version XXX © 2010. Sixnet. All Rights Reserved. 256 256 IndustrialPro Series Router User Manual Enable traffic restrictions? Select “Yes” to restrict traffic to a device beyond the Gateway device (the one being configured). When this feature is enabled, new fields will appear to allow selection of the restriction mode and a table into which multiple entries can be entered. Each entry will specify the network IP address range to which the restrictions will be applied. Select method of traffic restriction: This field is enabled when Traffic Restrictions have been enabled. Select the restriction mode from the list provided. None - No filtering is performed. Only - Allow connections to/from the associated subnet list only. (Inbound and Outbound Restrictions) In - Allow new incoming connections from the associated subnet list only, but allow any originating connections from the host behind the SIXNET router. (Inbound Restriction) outbound Click on the “Add” button to add a subnet restriction and the following pop-up window will appear: Sixnet, Inc, A Red Lion Business 331 Ushers Road, Ballston Lake, NY 12019 www.sixnet.com CONNECT. MONITOR. CONTROL. T +1 518 877 5173 F +1 518 877 8346 Version XXX © 2010. Sixnet. All Rights Reserved. 257 257 IndustrialPro Series Router User Manual Enter Subnet: Enter subnet range for which to restrict traffic in the CIDR form nnn.nnn.nnn.nnn/xx, where nnn is the IP Address and xx is the subnet in Network Bits format. Click on the “OK” button to populate the Traffic Restrictions screen Click on the “Save” button and the following pop-up window will appear: Click on the “OK” button to acknowledge the content Click on the “Apply” button and the following pop-up window will appear: Click on the “OK” button to acknowledge the content Sixnet, Inc, A Red Lion Business 331 Ushers Road, Ballston Lake, NY 12019 www.sixnet.com CONNECT. MONITOR. CONTROL. T +1 518 877 5173 F +1 518 877 8346 Version XXX © 2010. Sixnet. All Rights Reserved. 258 258 IndustrialPro Series Router User Manual 3.6.3 Out-of-Band Management Sixnet Cellular Routers in the IndustrialPro and EnterprisePro series support out of band management via the Advanced menu. The “Out-Of-Band Mgt” menu item allows you to configure the capability of remotely administrating a third-party device connected via a serial cable on the Sixnet router. NOTE: Please refer to the third-party device user manual and/or technical support to determine what type of connection is required to connect with the Sixnet router from the RS232 serial port. Sixnet, Inc, A Red Lion Business 331 Ushers Road, Ballston Lake, NY 12019 www.sixnet.com CONNECT. MONITOR. CONTROL. T +1 518 877 5173 F +1 518 877 8346 Version XXX © 2010. Sixnet. All Rights Reserved. 259 259 IndustrialPro Series Router User Manual Click on the “Out-of-Band Mgt” menu item and the following window will appear: Click on the “Add” button to add an instance for OOB Management and the following pop-up window will appear: Select Interface: Select the interface to be used via the provided drop-down. NOTE: For Speed, Bits, Parity, and Stop Bits, consult the configuration of the remote device being attached; this setting must be compatible. Select Speed: Select the desired interface speed to be used via the provided drop-down. Select Bits / Char: Select the word length (bits per character) to be used via the provided drop-down. Select Parity: Select the parity to be used via the provided drop-down. Select # of Stop Bits / Char: Select the number of stop bits to be used via the provided drop-down. Sixnet, Inc, A Red Lion Business 331 Ushers Road, Ballston Lake, NY 12019 www.sixnet.com CONNECT. MONITOR. CONTROL. T +1 518 877 5173 F +1 518 877 8346 Version XXX © 2010. Sixnet. All Rights Reserved. 260 260 IndustrialPro Series Router User Manual Enter Port #: Enter a valid port number (1-65535) to be used for the connection. Recommended setting is “Take care to choose a port number not already used by other system services. Consult Status→Socket Statuses→TCP Only for a list of ports currently in use. Please note that a Firewall Allow rule will need to be added for remote access (Networking→Firewall→Service Access Rules)”. Use CISCO APH? Select “Yes” to enable the CISCO APH, or “No” to prevent its use. Recommended setting is “Yes” When connecting to a Cisco console port. Local Binding? Select “Yes” to enable Local Binding. NOTE: Local binding will prevent remote access to this port. You will be required to Telnet/SSH to the unit's command line, and then telnet to the OOB port locally (telnet localhost <OOB_port>). TELNET Server Mode: This option controls how some options negotiations will be performed with a TELNET client. Recommended setting is “Basic + drop LF & NUL” is a commonly utilized setting. The following options are available: Disabled - No TELNET options negotiation is performed. Basic - Common TELNET options negotiation is performed. Basic + drop LF - Linefeed characters (x'0A) are dropped. Basic + drop LF & NUL (Cisco Preferred) - LF and NUL (x'00) characters are dropped. Basic + drop LF & NUL/HIGH - LF, NUL and any characters > x'7F are dropped. Basic + drop CR - Carriage return characters (x'0D) are dropped. Basic + drop CR & NUL - CR and NUL (x'00) characters are dropped. Basic + drop CR & NUL/HIGH - CR, NUL (x’00) and any characters > x'7F are dropped. NOTE: Selecting the right value for your particular situation may require some experimentation. The Basic Telnet Server will enable some telnet negotiation options with common Telnet Clients, which may provide a better user experience. If you are having problems with odd echoed characters, or other interactive problems, please enable this option. If you are having problems with login not accepting your password, or pressing “Enter” seems to behave as if two Enter keys have been pressed, try one of the "Drop" options. Click on the “OK” button to populate the Out-Of-Band Management screen Sixnet, Inc, A Red Lion Business 331 Ushers Road, Ballston Lake, NY 12019 www.sixnet.com CONNECT. MONITOR. CONTROL. T +1 518 877 5173 F +1 518 877 8346 Version XXX © 2010. Sixnet. All Rights Reserved. 261 261 IndustrialPro Series Router User Manual Click on the “Apply” button and the following pop-up window will appear: Click on the “OK” button to acknowledge the content Sixnet, Inc, A Red Lion Business 331 Ushers Road, Ballston Lake, NY 12019 www.sixnet.com CONNECT. MONITOR. CONTROL. T +1 518 877 5173 F +1 518 877 8346 Version XXX © 2010. Sixnet. All Rights Reserved. 262 262 IndustrialPro Series Router User Manual 3.6.4 Virtual Routing Redundancy Protocol (VRRP) VRRP is supported in Sixnet Routers in the IndustrialPro and EnterprisePro series. To configure VRRP, select the option from the Advanced menu. The “VRRP” menu item allows you to configure the capability of providing redundancy capabilities to each other as well as other third party devices. Click on the “VRRP” menu item and the following window will appear: Sixnet, Inc, A Red Lion Business 331 Ushers Road, Ballston Lake, NY 12019 www.sixnet.com CONNECT. MONITOR. CONTROL. T +1 518 877 5173 F +1 518 877 8346 Version XXX © 2010. Sixnet. All Rights Reserved. 263 263 IndustrialPro Series Router User Manual Enable VRRP? Specify whether you want to enable the VRRP service on this device. The service will be started after clicking Apply, and on each subsequent boot. Recommended setting is “Yes” if you intend to setup other VRRP partners. Click on the pull down menu at the “Enable VRRP?” field Click on “Yes” and the display will expand to reveal the VRRP configuration fields Select Internal Interface: Specify the interface the VRRP service should use for communication. Use Virtual MAC Address? Specify whether you want to allow the VRRP service to handle virtual MAC addresses. Recommended setting is “Yes”. Enter VRRP IP Address: Specify the IP address of the virtual server. NOTE: This value must not be currently assigned to any other network interface on the subnet. Furthermore, this value must match in any VRRP partner's configuration for redundancy to operate correctly. Enter VRRP Group ID: Specify the ID number of the virtual server. NOTE: This value must match in any VRRP partner's configuration for redundancy to operate correctly. Multiple VRRP Virtual interfaces can operate on the same subnet, so long as each set of redundant partners uses a different ID. Enter VRRP Priority: Specify the priority to use in VRRP negotiations. Valid values are 1-255. (Required) NOTE: If the SIXNET router is the “Master” device, the priority should be set higher than the “Backup” device. Enter VRRP Peer Notification Interval (in seconds): Specify the amount of time, in seconds, between VRRP broadcast packets. Sixnet, Inc, A Red Lion Business 331 Ushers Road, Ballston Lake, NY 12019 www.sixnet.com CONNECT. MONITOR. CONTROL. T +1 518 877 5173 F +1 518 877 8346 Version XXX © 2010. Sixnet. All Rights Reserved. 264 264 IndustrialPro Series Router User Manual Click on the “OK” button to populate the VRRP configuration table screen Click on the “Save” button and the following pop-up window will appear: Click on the “OK” button to acknowledge the content Click on the “Apply” button and the following pop-up window will appear: Click on the “OK” button to acknowledge the content Sixnet, Inc, A Red Lion Business 331 Ushers Road, Ballston Lake, NY 12019 www.sixnet.com CONNECT. MONITOR. CONTROL. T +1 518 877 5173 F +1 518 877 8346 Version XXX © 2010. Sixnet. All Rights Reserved. 265 265 IndustrialPro Series Router User Manual 3.6.5 Expert Mode The “Expert Mode” menu item allows you to edit the configuration files of a Sixnet IndustrialPro/EnterprisePro router directly. This option provides the ability to perform advanced configuration capabilities for complex configurations. The Gateway Administration Utility (GAU) is XML-based and writes the configuration to a XML-based configuration file and then generates the necessary system configuration files. Therefore, it is not recommended that you perform configuration activities using this facility unless instructed to do so by Sixnet Technical Support. WARNING: Should you choose to edit the configuration files directly, we encourage you to contact Sixnet Technical Support. Once you have manually edited a configuration file without the use of the GAU, you should refrain from any further configurations to that subsystem through the GAU, as it will overwrite any changes you may have made. 3.6.5.1 Configure Sub-systems The “Configure Sub-systems” menu item allows you to edit the main configuration files of the Sixnet router. Again, it is not recommended that you perform configuration activities using this facility unless instructed to do so by Sixnet Technical Support. Sixnet, Inc, A Red Lion Business 331 Ushers Road, Ballston Lake, NY 12019 www.sixnet.com CONNECT. MONITOR. CONTROL. T +1 518 877 5173 F +1 518 877 8346 Version XXX © 2010. Sixnet. All Rights Reserved. 266 266 IndustrialPro Series Router User Manual Click on the “Configure Sub-systems” menu item and the following window will appear: The following is a list of the sub-system files that are available for editing: BGP Daemon DHCP Leases DNS Masquerade Firewall (iptables) GPS Mode IGMP Proxy Daemon CHAP Secrets DHCP Relay( IP Sec) DNP3 Sxdnpdrv Config FTP Server IP Fallback Interface eth0 Sixnet, Inc, A Red Lion Business 331 Ushers Road, Ballston Lake, NY 12019 www.sixnet.com DHCP Server DHCP Relay Firewall (JBMWall) GPS Control IP sysctl Interface eth1 CONNECT. MONITOR. CONTROL. T +1 518 877 5173 F +1 518 877 8346 Version XXX © 2010. Sixnet. All Rights Reserved. 267 267 IndustrialPro Series Router User Manual IPRoute2 ematch IPRoute2 realms IPSEC Configuration Init Modbus Config NTP Daemon Open VPN (server) PAP Secrets PPP Options PPPDial-IPSec Ping Alive Conf 1 SDK SN Proxy Daemon SSL Tunnels (client) System Logging VRRP Daemon Instance 2 Zyxel Configuration IPRoute2 dsfield IPRoute2 scopes IPSEC Secrets Lighttpd Conf Mrouted (multicast) Out-of-Band Open VPN Authpass PPP IP-DOWN PPPoE PPPoE-IPSec Ping Alive Conf 2 SMCroute Daemon (Multicast) SSH (Client) Configuration SSL Tunnels (server) System Start-up Wireless Provisioning IPRoute2 protos IPRoute2 tables GWLNX Control Lighttpd User Modprobe.conf Open VPN (client) OSPF Daemon PPP IP-UP PPP-IPSec PIM Daemon (Multicast) RIP Daemon (v2) SNMP Daemon SSH (Server) Configuration Static Routes VRRP Daemon Zebra Your choice will load the given sub-system’s configuration file into the text box for editing. Sixnet, Inc, A Red Lion Business 331 Ushers Road, Ballston Lake, NY 12019 www.sixnet.com CONNECT. MONITOR. CONTROL. T +1 518 877 5173 F +1 518 877 8346 Version XXX © 2010. Sixnet. All Rights Reserved. 268 268 IndustrialPro Series Router User Manual The following controls (buttons) are available: 3.6.5.2 Cancel - Reload the file in to the text box, removing all unsaved changes. Default - Load a default file in to the text box for editing. All changes to the default file will be reflected in the “real” (rather than the default) configuration file. Save - Save the contents of the text box in to the "real" sub-system configuration file. Stop - Stop the component sub-system service if it is currently running. (Re)Start - Start the component sub-system service, or re-start it if it is currently running. Predefined Interface Names The “Predefined Interface Names” menu item allows you to create a named interface for use in applications such as OpenVPN that require a logical interface, i.e. tun0 that the Sixnet router does not know about. Using the Predefined Interface Name will place the name of the interface into the pull-down menus of interface selections to be used by the system. Sixnet, Inc, A Red Lion Business 331 Ushers Road, Ballston Lake, NY 12019 www.sixnet.com CONNECT. MONITOR. CONTROL. T +1 518 877 5173 F +1 518 877 8346 Version XXX © 2010. Sixnet. All Rights Reserved. 269 269 IndustrialPro Series Router User Manual Click on the “Predefined Interface Names” menu item and the following window will appear: Click on the “Add” button to add a named interface and the following pop-up window will appear: Enter (logical) Interface Name: Enter the name of the interface to be used for the logical interface. For example: tun0, gre4, ppp100, etc. Sixnet, Inc, A Red Lion Business 331 Ushers Road, Ballston Lake, NY 12019 www.sixnet.com CONNECT. MONITOR. CONTROL. T +1 518 877 5173 F +1 518 877 8346 Version XXX © 2010. Sixnet. All Rights Reserved. 270 270 IndustrialPro Series Router User Manual Click on the “OK” button to populate the Predefined (logical) Interface Names screen Click on the “Save” button and the following pop-up window will appear: Click on the “OK” button to acknowledge the content 3.6.6 3.6.6.1 GWLNX Serial IP Sixnet Cellular Routers in the IndustrialPro and EnterprisePro series support Serial IP via the AdvancedGwlnxSerial IP configuration menu screen. The “Serial IP” menu item allows you to configure serial communication such as POS device, serial data logging, or serial transmitter via serial cable on the Sixnet router and third party UDP or TCP/IP Client/Server application. Sixnet, Inc, A Red Lion Business 331 Ushers Road, Ballston Lake, NY 12019 www.sixnet.com CONNECT. MONITOR. CONTROL. T +1 518 877 5173 F +1 518 877 8346 Version XXX © 2010. Sixnet. All Rights Reserved. 271 271 IndustrialPro Series Router User Manual NOTE: Please refer to the third-party device user manual and/or technical support to determine what type of connection is required to connect with the Sixnet router from the RS232 serial port. Sixnet, Inc, A Red Lion Business 331 Ushers Road, Ballston Lake, NY 12019 www.sixnet.com CONNECT. MONITOR. CONTROL. T +1 518 877 5173 F +1 518 877 8346 Version XXX © 2010. Sixnet. All Rights Reserved. 272 272 IndustrialPro Series Router User Manual Click on the “GwlnxSerial IP” menu item and the following window will appear: Enter Configuration Description: Enter a description to describe this connection. Sixnet, Inc, A Red Lion Business 331 Ushers Road, Ballston Lake, NY 12019 www.sixnet.com CONNECT. MONITOR. CONTROL. T +1 518 877 5173 F +1 518 877 8346 Version XXX © 2010. Sixnet. All Rights Reserved. 273 273 IndustrialPro Series Router User Manual Serial Port Configuration Line Speed: Select the desired interface speed to be used via the provided drop-down. Independent Activation: This option determines if the Serial Port of the device will accept data before the remote side is active. At least one of the two sides in the configuration must be set for Independent Activation. If neither side is set, then the device will not accept data. This function provides integrity for the device by preventing data from being accepted until it can be delivered successfully. Recommended Setting: Yes: For standard usage. No: For serial to TCP Server configuration to insure there is a TCP Server socket available before marking the serial port active. Word Length: Select the word length (bits per character) to be used via the provided drop-down. Parity: Select the parity to be used via the provided drop-down. Stop Bit: Select the number of stop bits to be used via the provided drop-down. Connect Mode: If this option is set to No, the device will expect to receive AT Commands in order to go to active state. Some DTE (Data Terminal Equipment) devices required to go active if they provide DTR (Data Terminal Ready) signal. Recommended Setting: Yes, if DTR is the connect signal. Dial IP: This option appears only, if the Connect Mode is set to “AT Command” and then if the Dial IP option is set to “Yes”, the IndustrialPro router expects to receive AT commands to initialize the serial port, and also expects to receive ATDT<IP/Port> in one of the following formats as a destination IP/Port address for connectivity to the host processing server. Recommended Setting: No ATDT192.168.0.1,5000 ATDT192.168.0.1[5000] ATDT1921680000015000 ATDTdns.com,5000 Disable Sending Ring: This option appears only, if the Connect Mode is set to AT Command. This option eliminates the serial port from sending the RING and CONNECT message out the serial port once the server connection is available. Recommended Setting: No, if you want the RING to go out serial port, and Yes otherwise. Ignore DTR: This option needs to be set to Yes, if the serial port is connected to a DTE device that only provides 3 wires (Transmit, Receive, and Ground) for communication or the DTE device could drop DTR signal while sending AT commands. Recommended Setting: Yes, if a 3 wire connection is expected. Connection Type: Select the connection type you desire from the drop-down list. Sixnet, Inc, A Red Lion Business 331 Ushers Road, Ballston Lake, NY 12019 www.sixnet.com CONNECT. MONITOR. CONTROL. T +1 518 877 5173 F +1 518 877 8346 Version XXX © 2010. Sixnet. All Rights Reserved. 274 274 IndustrialPro Series Router User Manual Modem Emulator: Provides direct connection between the device serial port and the DTE terminal via straight RS232 cable. Via Modem: This option is only used, if the device provides TELCO/BPX or RJ11 To Terminal port for communication. Recommended Setting: Modem Emulator for direct connection Use Timer Only: This option needs to be set to Yes in order to use the Inter Character Timeout value configured on this device. Recommended Setting: Yes Inter Character Timeout (ms.): When the timer expires on the serial port, the device will forward the message received to the remote device. This option is used when there is no consistent character to signal the end of a received message. This timer will be reset to the configured value on each received character. Recommended Setting: 5 milliseconds at 9600 baud. Maximum Buffer Size: This option allow you to set the maximum buffer size to be used for receiving serial data before forwarding to the remote device. A value of ZERO will allocate 8192 bytes of buffer by default and the data could be sent to the remote application based on TCP stack window size. Recommended Setting: 292, For DNP3 type connections and 0, otherwise. Enable Hardware Flow Control: Select Yes to set hardware flow control using RTS and CTS signals. Recommended Setting: No - if dealing with 3 wire port (Transmit, Receive, and Ground pins). Yes - if dealing with a port that has all signal pins present. Number Of Missed Polls Allowed: This option allows you to set the maximum number of missed RTU polls before reinitializing all the internal memory and buffer conditions. If a packet is transmitted out the serial port and no response packet is received, this is counted as a missed poll and data content is not evaluated. Recommended Setting: 0, To disable this action and any other value is upon your environment requirements. TCP/UDP Port Configuration Socket Type: Select the Socket Type you desire to have for Serial IP communication from the drop-down list. Recommended Setting: Socket Type you desire to have for this communication. UDP: If this option is selected, the device will act as a UDP (Connectionless) and listening on the configured Listening IP Port for connection from the client. Sixnet, Inc, A Red Lion Business 331 Ushers Road, Ballston Lake, NY 12019 www.sixnet.com CONNECT. MONITOR. CONTROL. T +1 518 877 5173 F +1 518 877 8346 Version XXX © 2010. Sixnet. All Rights Reserved. 275 275 IndustrialPro Series Router User Manual TCP Client: If this option is selected, the device will act as a TCP Client and connects to the host processor once the serial port becomes active. TCP Server: If this option is selected, the device will act as a TCP Server and listening on the configured Listening IP Port for connection from the client. TCP Client/Server 2Way: If this option is selected, the device will listen on configured Listening IP Port for client connection to communicate with serial device and once the client is disconnected, and the serial device connected to the ttyS1 port needs to report its status, the device will connect to the host destination to report the device's status. UDP Broadcaster: If this option is selected, the device will support up to 5 UDP broadcast addresses. Sixnet, Inc, A Red Lion Business 331 Ushers Road, Ballston Lake, NY 12019 www.sixnet.com CONNECT. MONITOR. CONTROL. T +1 518 877 5173 F +1 518 877 8346 Version XXX © 2010. Sixnet. All Rights Reserved. 276 276 IndustrialPro Series Router User Manual TCP Client BroadCaster: If this option is selected, the device will support 10 TCP Client broadcast socket using IP Destination configuration for connectivity. TCP Client BroadCaster Traffic Activator: If this option is selected, the device will support 10 TCP Client broadcast socket using IP Destination configuration for connectivity and would connect only if the serial data is available to broadcast. For the Broadcaster socket types you must click on “Click Here to Configure IP Destination Screen” to configure the host processor IP/Port addresses. See screen shot below for necessary information. Sixnet, Inc, A Red Lion Business 331 Ushers Road, Ballston Lake, NY 12019 www.sixnet.com CONNECT. MONITOR. CONTROL. T +1 518 877 5173 F +1 518 877 8346 Version XXX © 2010. Sixnet. All Rights Reserved. 277 277 IndustrialPro Series Router User Manual TCP/UDP Independent Activation: This option determines if the TCP/IP port of the device will accept data before the remote side (Serial Port) is active. At least one of the two sides in the configuration must be set for Independent Activation. If neither side is set, then the device will not accept data. This function provides integrity for the device by preventing data from being accepted until it can be delivered successfully. A TCP Server set to Yes, will listen even if the serial side is not considered connected. If set to No, it will not listen for a connection until the serial side is considered connected. A TCP Client set to Yes will always attempt to connect to the configured destination IP, even if the serial side is not connected or active. If set to No, it will attempt a connection only when the serial side is first considered connected. Recommended Setting: Yes for Servers, No for Clients Peer IP Address: Enter the peer IP Address into this field. This is Required for UDP communication. This specifies the Peer IP address and if set to 0.0.0.0 any remote IP can send UDP packets to our peer port, and return packets will be sent back to the IP of the last host that sent us a message. Packets cannot be sent until one is received first (to learn the remote peer's IP). If set to a specific IP, then packets will be sent to this IP only. Recommended Setting: <0.0.0.0> to allow any IP to send packets to the peer port number. Peer IP Port: Enter the peer Port number into this field. This is Required for UDP communication. Recommended Setting: Consult your network administrator for UDP application destination port number. Client IP Port: Enter the client IP port number into this field. This is Required if the peer ip address is set to a specific IP, then packets will be sent to specific IP at this client IP port number only. Recommended Setting: <0.0.0.0> to allow any IP to send packets to the peer port number. TCP Headers: Select the TCP/IP Header Type (Message Length Field) required for TCP/IP communication from the dropdown list. None: If this option is selected, the device will not add or remove any bytes as the length field from the data packets received or transmitted. Sixnet, Inc, A Red Lion Business 331 Ushers Road, Ballston Lake, NY 12019 www.sixnet.com CONNECT. MONITOR. CONTROL. T +1 518 877 5173 F +1 518 877 8346 Version XXX © 2010. Sixnet. All Rights Reserved. 278 278 IndustrialPro Series Router User Manual Standard: If this option is selected, the device will add 2 bytes of binary exclusive network order to all transmitted TCP packets, and will remove the 2 bytes from the received TCP packets. Extended: If this option is selected, the device will add 4 bytes of binary exclusive network order to all transmitted TCP packets, and will remove the 4 bytes from the received TCP packets. Extended header normally is used as an indicator First, Mid, and Last when dealing with the large TCP messages and possibility of TCP/IP packet fragmentation. Recommended Setting: None, if TCP headers are not used. Host IP Address: Enter the host destination IP Address into this field. This is Required if the device is acting as a TCP/IP Client. Recommended Setting: Consult your network administrator. Host IP Port: Enter the host destination Port Address into this field. This is Required if the device is acting as a TCP/IP Client. Recommended Setting: Consult your network administrator. Client Source Port: Enter the Source Port Address into this field. This is Required if the device is acting as a TCP/IP client and using specific source port for TCP socket connection. Recommended Setting: Leave blank to use dynamic source port from TCP stack for socket connection. Allow Peer To Re-attach While Connected: Select whether or not to allow TCP peer to re-attach to our server while the socket is connected. If enabled, a new connection attempt from the same peer will be accepted, and the previous TCP connection will be closed. This can be useful to re-establish a connection if the link is not closed gracefully. Recommended Setting: No, do not allow, if there is an active socket connection. Listening IP Address: Enter the listening IP Address into this field. This is Required if the device is acting as a TCP/IP Server. If set to 0.0.0.0 any remote client can connect to our listening port, and if set to a specific IP, only client with configured specific IP can connect to our listening port. Recommended Setting: <0.0.0.0> to allow any client to connect to the listening port. Listening IP Port: Enter the listening Port number into this field. This is Required if the device is acting as a TCP/IP Server. Recommended Setting: Consult your network administrator for client application destination port number. Note: Take care to choose a port number not already used by other system services. Consult StatusSocket StatusesTCP Only for a list of ports currently in use. Please note that a Firewall Allow rule will need to be added for remote access (NetworkingFirewallService Access Rules). Click on the “Apply” button and the following pop-up window will appear: Sixnet, Inc, A Red Lion Business 331 Ushers Road, Ballston Lake, NY 12019 www.sixnet.com CONNECT. MONITOR. CONTROL. T +1 518 877 5173 F +1 518 877 8346 Version XXX © 2010. Sixnet. All Rights Reserved. 279 279 IndustrialPro Series Router User Manual Click on the “OK” button to acknowledge the content has been updated. 3.6.6.2 Connect Table Configuration The “Connect Table” menu item allows you to configure the communication ports behavior via Serial or Modem using Dialed Number Identification Service (DNIS) method. Click on the “Advanced->Gwlnx->Connect Table Configuration” menu item and the following window will appear: Generic: Please use the recommended setting unless directed to change by Technical Support personnel. Sixnet, Inc, A Red Lion Business 331 Ushers Road, Ballston Lake, NY 12019 www.sixnet.com CONNECT. MONITOR. CONTROL. T +1 518 877 5173 F +1 518 877 8346 Version XXX © 2010. Sixnet. All Rights Reserved. 280 280 IndustrialPro Series Router User Manual Recommended Setting: No File Mode: Please use the recommended setting unless directed to change by Technical Support personnel. Recommended Setting: DTMF Click on the “Add” button and the following pop-up window will appear: Label: Enter the Lookup Key associated with this entry. This is commonly a phone number, or a portion of a phone number for partial matches of incoming calls. (i.e. "18" will match 1-800-xxx-xxxx, 1-888, 1-866 and similar numbers.) A value of "default" will designate this entry as the option to use if no other entry matches. If no "default" label exists, the first entry in the list will be the default and match any incoming number received. For a Dial/Ring-Out mode, this field should match the phone number entered in the Com Port Manager configuration for Gwlnx. It should also match the Gwlnx TCP Server port number, if using a dynamic TCP Listening port. Sixnet, Inc, A Red Lion Business 331 Ushers Road, Ballston Lake, NY 12019 www.sixnet.com CONNECT. MONITOR. CONTROL. T +1 518 877 5173 F +1 518 877 8346 Version XXX © 2010. Sixnet. All Rights Reserved. 281 281 IndustrialPro Series Router User Manual Recommended Setting: 1001 for this mode. AT Command Description: The best choice is often determined by previous testing with a particular model/brand of connecting device. The first three "Direct" options are the most commonly used. If choosing a User Defined option, enter the full AT command. AT Command: Direct 1200 Bell212 = AT&Q6+MS=B212 Direct 1200 V22 = AT&Q6+MS=V22 Direct 2400 V22bis = AT&Q6+MS=V22B Direct2 1200 Bell212 = AT\N0+MS=B212 Direct2 1200 V22 = AT\N0+MS=V22 Direct2 2400 V22bis = AT\N0+MS=V22B ErrorC 1200 Bell212 = AT\N3+MS=B212 ErrorC 1200 V22 = AT\N3+MS=V22 ErrorC 2400 V22bis = AT\N3+MS=V22B Recommended Setting: Direct 1200 Bell212 = AT&Q6+MS=B212 Answer/Dial Mode: For incoming calls, choose "ANSWER_2WAY_RAW". For outbound (Ring Out / Ring Down) mode, choose "DIAL". The other options should only be used if instructed to do so by a support technician. Recommended Setting: ANSWER_2WAY_RAW Message Mode: This will choose between enabling the local Visa protocol engine or allowing Passthru/Transparent mode. Transparent: Allow raw communication between the Dial port and the TCP Connection. Visa: Enable local Visa I engine. This will process one transaction, and issue an EOT after the transaction response has been sent to the dial device. Visa2: Enable local Visa II engine. After a transaction is complete, an ENQ will be issued to query the next transaction in sequence. If there is no response to the ENQ, then an EOT is issued. Recommended Setting: Transparent Timer: Timer usage in supported Message Mode. Transparent Mode: This is the inter-character delay (in milliseconds) used on the serial side to determine when a remote device is finished transmitting. A low value may generate a faster response, but can send many TCP packets and Sixnet, Inc, A Red Lion Business 331 Ushers Road, Ballston Lake, NY 12019 www.sixnet.com CONNECT. MONITOR. CONTROL. T +1 518 877 5173 F +1 518 877 8346 Version XXX © 2010. Sixnet. All Rights Reserved. 282 282 IndustrialPro Series Router User Manual 'fragment' the serial data packets. A higher value will collect a larger amount of data into a single TCP packet, and will generally keep packet boundaries more intact. Visa Mode: Unused Recommended Setting: 150 - Transactions 10 - Some Streaming Protocols (ATM Management Protocols) Data Mode: The following data mode is supported. 8N1 - Data will be treated as full 8 bits valid. If the serial device is transmitting 7E1, then 7E1 formatted data will be transmitted to the TCP side. 7E1 - Process Data as if in 7E1 format. If the serial device is transmitting 7E1, then appropriate parity will be stripped/added so that communication on the TCP side will be in 8N1. Recommended Settings: Transparent Mode: As needed for various serial devices and TCP hosts. Visa Mode: Leave this setting at 8N1. Automatic 7E1 detection is used. Spoof ENQ: ENQ behavior in supported Message Mode. Transparent Mode: This will enable an ENQ packet to be sent to the serial device to initiate a transaction. Up to 5 ENQ's will be sent while wait Visa Mode: Unused. The Visa engine will automatically issue ENQ's as needed, according to the Gwlnx config file. Recommended Setting: No No Rx Before Tx: Discarding data before transmitting in supported Message Mode. Transparent Mode: This will discard any data received from the serial side, prior to transmitting some data to the remote serial device. This can be useful to discard initial line noise remnants from modem connections before an ENQ is issued (or other start-data message types from a TCP host). Visa Mode: Unused. This is automatically enabled in the Visa engine, as it awaits a STX. Recommended Setting: No Sixnet, Inc, A Red Lion Business 331 Ushers Road, Ballston Lake, NY 12019 www.sixnet.com CONNECT. MONITOR. CONTROL. T +1 518 877 5173 F +1 518 877 8346 Version XXX © 2010. Sixnet. All Rights Reserved. 283 283 IndustrialPro Series Router User Manual Disable Ack: Acknowledgement behavior in supported Message Mode. Transparent Mode: Unused. Visa Mode: Once a message is received from the serial device (ATM/POS) and the LRC is valid, this will disable sending an ACK. Certain ATM/POS devices will fail if sent an ACK, and rather used the response message from the TCP host as an implied ACK. Certain ATM/POS devices require an ACK before receiving the response message from the TCP host. Recommended Setting: No Pass Through Ack: Passing Acknowledgement in supported Message Mode. Transparent Mode: Unused. Visa Mode: When an ACK is received from an ATM/POS device, pass that up to the host processor. Recommended Setting: No, unless using a SmartConnect device at the host processing side. Enter Address 1: For coordination with SSL Connections, use 127.0.0.1. When using ANSWER mode, this is a Client Primary IP address that GWLNX application uses to connect to the Host Processing Server. When using DIAL mode, this field is not used. Enter Port 1: This is a Client Primary Port address that GWLNX uses to connect to the Host Server Port. For coordination with SSL Connections, this field should match the "TCP Listening Port" configured in Services->SSL Connections->SSL Client, to reach the specified remote SSL Host Server. When using DIAL mode, and Gwlnx is configured for Dynamic TCP Server Listener Port, this field will specify the TCP Port to listen on. Recommended Setting: Recommended value for this mode is 1000. Enter Address 2: This is a Client First Alternative IP address that GWLNX uses to connect to the Host Server. (Not Required) Enter Port 2: This is a Client First Alternative Port address that GWLNX uses to connect to the Host Server Port. (Not Required) Sixnet, Inc, A Red Lion Business 331 Ushers Road, Ballston Lake, NY 12019 www.sixnet.com CONNECT. MONITOR. CONTROL. T +1 518 877 5173 F +1 518 877 8346 Version XXX © 2010. Sixnet. All Rights Reserved. 284 284 IndustrialPro Series Router User Manual Enter Address 2: This is a Client Second Alternative IP address that GWLNX uses to connect to the Host Server. (Not Required) Enter Port 2: This is a Client Second Alternative Port address that GWLNX uses to connect to the Host Server Port. (Not Required) Host Message Format: Following are the host message format in supported Message Mode. Transparent Mode: Unused. Visa Mode: This describes the format expected by the TCP host processor of Visa transactions. Visa Messages from the ATM/POS device will conform to: STX - Payload - ETX - LRC After Visa processing and validation, the format sent to the host will be: Default: Use the current settings in the Gwlnx configuration. Payload Only: Strip Visa header/trailers. Send only the Payload. Payload-ETX: Strip the Visa header and LRC block check. STX-Payload-ETX: Strip only the LRC block check. STX-Payload-ETX-LRC: Send the fully formatted Visa message. Recommended Setting: Default Header Type: The TCP connection to a host may require length headers. This will optionally be prepended to the data received from the serial side, for either Transparent or Visa Mode. Default: Use current Gwlnx configuration None: Use no headers JBM Standard: Use JBM Standard Headers. This will prepend a Two Byte Length (2BL) Header to the data, indicating the number of bytes in the message, not including the header bytes. Messages from the host must also have the 2BL header to be received properly. Sixnet, Inc, A Red Lion Business 331 Ushers Road, Ballston Lake, NY 12019 www.sixnet.com CONNECT. MONITOR. CONTROL. T +1 518 877 5173 F +1 518 877 8346 Version XXX © 2010. Sixnet. All Rights Reserved. 285 285 IndustrialPro Series Router User Manual Example: With Host Message Format set to STX-Payload-ETX, and JBMSTD Headers used, the TCP message sent to the Host will be: XX XX STX Payload ETX Where XX XX would be the length of the payload data, plus 2 (STX and ETX bytes). If Payload was 296 bytes, then the 2BL would be 01 2A (in Hex). Recommended Setting: Default Allow Early Connect: Only adjust this option if directed by a support technician. Recommended Setting: Yes Click on the “Apply” button and the following pop-up window will appear: Click on the “OK” button to acknowledge the content 3.6.6.3 Install Application The “Install Application” menu item allows you to install the new Gwlnx application on Sixnet IndustrialPro or R-Series router devices. Click on the “AdvancedGwlnxInstall Application” menu item and the following window will appear: Sixnet, Inc, A Red Lion Business 331 Ushers Road, Ballston Lake, NY 12019 www.sixnet.com CONNECT. MONITOR. CONTROL. T +1 518 877 5173 F +1 518 877 8346 Version XXX © 2010. Sixnet. All Rights Reserved. 286 286 IndustrialPro Series Router User Manual Select Gwlnx Application File: Click the Browse button to select a 'gwlnx' zip file that is provided by WSBU Development Group Support staff to upload from your local system. (Required) Recommended Setting Do not upload new files unless directed by WSBU Development Group Support staff. Click on the “Install” button and the following pop-up window will appear: Click on the “OK” button to acknowledge the content 3.6.6.4 Install Configuration The “Install Configuration” menu item allows you to install the new Gwlnx configuration on Sixnet IndustrialPro or RSeries router devices. Sixnet, Inc, A Red Lion Business 331 Ushers Road, Ballston Lake, NY 12019 www.sixnet.com CONNECT. MONITOR. CONTROL. T +1 518 877 5173 F +1 518 877 8346 Version XXX © 2010. Sixnet. All Rights Reserved. 287 287 IndustrialPro Series Router User Manual Click on the “AdvancedGwlnxInstall Configuration” menu item and the following window will appear: Select Gwlnx Configuration File: Click the Browse button to select a 'gwlnx' configuration file that is provided by WSBU Development Group Support staff to upload from your local system. (Required) Recommended Setting Do not upload new configuration files unless directed by WSBU Development Group Support staff. Click on the “Install” button and the following pop-up window will appear: Click on the “OK” button to acknowledge the content Sixnet, Inc, A Red Lion Business 331 Ushers Road, Ballston Lake, NY 12019 www.sixnet.com CONNECT. MONITOR. CONTROL. T +1 518 877 5173 F +1 518 877 8346 Version XXX © 2010. Sixnet. All Rights Reserved. 288 288 IndustrialPro Series Router User Manual 3.6.6.5 Manage Configuratons The “Manage Configurations” menu item allows you to install or delete Gwlnx configuration files that already reside on Sixnet IndustrialPro or R-Series router devices. Click on the “AdvancedGwlnxManage Configurations” menu item and the following window will appear: Select Gwlnx Configuration File: Select a 'gwlnx' configuration file on the remote unit to install or to delete. (Required) Warning: Deleting the “unit.cfg” or “unit.xml” file may result the 'gwlnx' application from not running on the next restart. Recommended Setting Do not install or delete files unless directed by WSBU Development Group Support staff. Click on the “Install” or “Delete” button and one of the following pop-up window will appear: Sixnet, Inc, A Red Lion Business 331 Ushers Road, Ballston Lake, NY 12019 www.sixnet.com CONNECT. MONITOR. CONTROL. T +1 518 877 5173 F +1 518 877 8346 Version XXX © 2010. Sixnet. All Rights Reserved. 289 289 IndustrialPro Series Router User Manual 3.6.6.6 Click on the “OK” button to acknowledge the content IP Destination The “IP Destination” menu item allows you to configure the host processor (Server) IP/Port addresses that Gwlnx application uses for TCP/IP communication protocol. Click on the “AdvancedGwlnxIP Destination” menu item and the following window will appear: Sixnet, Inc, A Red Lion Business 331 Ushers Road, Ballston Lake, NY 12019 www.sixnet.com CONNECT. MONITOR. CONTROL. T +1 518 877 5173 F +1 518 877 8346 Version XXX © 2010. Sixnet. All Rights Reserved. 290 290 IndustrialPro Series Router User Manual Address 1: Enter the client primary IP address that GWLNX uses to connect to the host server. (Required) Port 1: Enter the client primary port address that GWLNX uses to connect to the Host server port. (Required) Connect Timeout 1 - Specify the time in seconds to attempt a connection to this TCP destination, before declaring it unreachable. After the specified time, the next destination will be attempted. Valid range is 2-250 seconds. Recommended Setting 10 seconds. A value less than 10 seconds is not recommended for a wireless environment. Address 2: Enter the client first alternative IP address that GWLNX uses to connect to the host server. (Required) Port 2: Enter the client first alternative port address that GWLNX uses to connect to the host server port. (Required) Connect Timeout 2 - Specify the time in seconds to attempt a connection to this TCP destination, before declaring it unreachable. After the specified time, the next destination will be attempted. Valid range is 2-250 seconds. Recommended Setting 10 seconds. A value less than 10 seconds is not recommended for a wireless environment. Sixnet, Inc, A Red Lion Business 331 Ushers Road, Ballston Lake, NY 12019 www.sixnet.com CONNECT. MONITOR. CONTROL. T +1 518 877 5173 F +1 518 877 8346 Version XXX © 2010. Sixnet. All Rights Reserved. 291 291 IndustrialPro Series Router User Manual Address 3: Enter the client first alternative IP address that GWLNX uses to connect to the host server. (Required) Port 3: Enter the client first alternative port address that GWLNX uses to connect to the host server port. (Required) Connect Timeout 3 - Specify the time in seconds to attempt a connection to this TCP destination, before declaring it unreachable. After the specified time, the next destination will be attempted. Valid range is 2-250 seconds. Recommended Setting 10 seconds. A value less than 10 seconds is not recommended for a wireless environment. Click on the “Apply” button and the following pop-up window will appear: Click on the “OK” button to acknowledge the content 3.6.6.7 CLI Status The “CLI Status” menu item allows you to view the status of the ports defined in Gwlnx configuration file if the Gwlnx application is running. Click on the “AdvancedGwlnxCLI Status” menu item and the following window will appear: Sixnet, Inc, A Red Lion Business 331 Ushers Road, Ballston Lake, NY 12019 www.sixnet.com CONNECT. MONITOR. CONTROL. T +1 518 877 5173 F +1 518 877 8346 Version XXX © 2010. Sixnet. All Rights Reserved. 292 292 IndustrialPro Series Router User Manual Enable Auto update?: Select Yes to enable automatic updating of the CLI status file. The update interval can be selected using the Select Update Interval provided immediately below this control. Manual updating (Refresh) is disabled while auto update is in effect. Recommended Setting Be advised that when connected via a Cellular interface, the log file data collected will count towards your total data plan usage. Select update interval: Select the update interval to be used when auto update is enabled from provided drop down list. Choices (in seconds) include: 5 15 Sixnet, Inc, A Red Lion Business 331 Ushers Road, Ballston Lake, NY 12019 www.sixnet.com CONNECT. MONITOR. CONTROL. T +1 518 877 5173 F +1 518 877 8346 Version XXX © 2010. Sixnet. All Rights Reserved. 293 293 IndustrialPro Series Router User Manual 30 60 Recommended Setting Be advised that when connected via a cellular interface, the log file data collected will count towards your total data plan usage. 3.6.6.8 GWLNX Status The “Gwlnx Status” menu item allows you to view the Gwlnx process ID and ability to restart the application by selecting the process ID from the provided drop down list. The Refresh button will refresh the process ID, if the Gwlnx application has been restarted. Click on the “AdvancedGwlnxGwlnx Status” menu item and the following window will appear: Click on the “Restart” button and the following pop-up window will appear: Sixnet, Inc, A Red Lion Business 331 Ushers Road, Ballston Lake, NY 12019 www.sixnet.com CONNECT. MONITOR. CONTROL. T +1 518 877 5173 F +1 518 877 8346 Version XXX © 2010. Sixnet. All Rights Reserved. 294 294 IndustrialPro Series Router User Manual 3.6.6.9 Click on the “OK” button to acknowledge the content GWLNX Logfile The “Gwlnx Logfile” menu item allows you to view the logfile generated by Gwlnx at startup which provides the state of each port controller defined in the Gwlnx configuration file and logs the Send/Receive traffics for each configured port controller. Click on the “AdvancedGwlnxGwlnx Logfile” menu item and the following window will appear: Sixnet, Inc, A Red Lion Business 331 Ushers Road, Ballston Lake, NY 12019 www.sixnet.com CONNECT. MONITOR. CONTROL. T +1 518 877 5173 F +1 518 877 8346 Version XXX © 2010. Sixnet. All Rights Reserved. 295 295 IndustrialPro Series Router User Manual Enter (optional) filter string: Enter a filter string in the space provided, only lines containing the filter value(s) will be displayed via a “grep” style filter mechanism. Note that the filter is case sensitive. Select # of lines to display: Select the number of lines to be displayed from one of the choices in the drop-down list provided. Choices include: 50 100 250 500 1000 2000 Sixnet, Inc, A Red Lion Business 331 Ushers Road, Ballston Lake, NY 12019 www.sixnet.com CONNECT. MONITOR. CONTROL. T +1 518 877 5173 F +1 518 877 8346 Version XXX © 2010. Sixnet. All Rights Reserved. 296 296 IndustrialPro Series Router User Manual Recommended Setting Be advised that when connected via a Cellular interface, the log file data collected will count towards your total data plan usage. Enable Auto update?: Select Yes to enable automatic updating of the log file display, the update interval can be selected using the Select Update Interval provided immediately below this control. Manual updating is disabled while auto update is in effect. The current filter and maximum lines to be displayed will be used. Recommended Setting Be advised that when connected via a Cellular interface, the log file data collected will count towards your total data plan usage. Select update interval: Select the update interval to be used when auto update is enabled from provided drop down list. Choices (in seconds) include: 5 15 30 60 Recommended Setting Be advised that when connected via a cellular interface, the log file data collected will count towards your total data plan usage. Download: Click on “Download” button to send the entire Gwlnx logfile “logfile.txt” to your PC download directory. Refresh: Click on “Refresh” button to view the latest items being logged. 3.6.6.10 Transniff Filter The “Transniff Filter” is only available on the R-series Enterprise Routers. This menu item allows you to set the filter values in similar format as the TCPDUMP filter for capturing traffic being seen by configured device on the Ethernet port. Note: This configuration screen is for devices that capture traffic between the ATM and transaction processing server for DVR text insertion. Please contact WSBU Development Group Support staff for configuring this item. Click on the “AdvancedGwlnxTransniff Filter” menu item and the following window will appear: Sixnet, Inc, A Red Lion Business 331 Ushers Road, Ballston Lake, NY 12019 www.sixnet.com CONNECT. MONITOR. CONTROL. T +1 518 877 5173 F +1 518 877 8346 Version XXX © 2010. Sixnet. All Rights Reserved. 297 297 IndustrialPro Series Router User Manual Enable Transniff IP ATM: Description: Select Yes to enable the Transniff IP ATM Interface. Recommended Setting: Yes, if you are using this Interface. DVR Connectivity: Description: This option allows you to select this device connectivity to your DVR. Select TCP/IP if connecting to DVR via Ethernet port, and select Serial if connecting to DVR via TTYS1 port. These settings will need to match the DVR being connected for them to communicate properly. If TCP/IP is selected you are required to enter the HOST IP address and HOST port. If Serial is selected speed, length, parity and stop bit of the HOST are required. Transniff Interface Port: Description: This option allow you to select which Ethernet port to sniff for the ATM Request/Reply transaction packets. Select eth0 if using WAN port and select eth1 if using LAN port. Recommended Setting: eth0 (Standard port). Sixnet, Inc, A Red Lion Business 331 Ushers Road, Ballston Lake, NY 12019 www.sixnet.com CONNECT. MONITOR. CONTROL. T +1 518 877 5173 F +1 518 877 8346 Version XXX © 2010. Sixnet. All Rights Reserved. 298 298 IndustrialPro Series Router User Manual Filter Configuration: This menu item allows you to set the filter values in similar format as the TCPDUMP filter for capturing traffic being seen by configured device on the Ethernet port. Note: This configuration screen is for devices that capture traffic between the ATM and transaction processing server for DVR text insertion. Please contact WSBU Development Group Support staff for configuring this item. Click on the “Add” button and the following pop-up window will appear: IP Address (ATM): Enter the IP address of the ATM that you would want to sniff from the network traffic. (Not Required) TCP Port: Enter the destination port address that the ATM connects to for processing transactions which will be used as a filter to sniff network traffic. (Required) Click on the “OK” button to populate the Filter Settings screen. Click on the “Apply” button and the following pop-up window will appear: Click on the “OK” button to acknowledge the content Sixnet, Inc, A Red Lion Business 331 Ushers Road, Ballston Lake, NY 12019 www.sixnet.com CONNECT. MONITOR. CONTROL. T +1 518 877 5173 F +1 518 877 8346 Version XXX © 2010. Sixnet. All Rights Reserved. 299 299 IndustrialPro Series Router User Manual 4 Sixnet Technical Support If you have followed all of the instructions up to this point and are not having an authentication problem, are convinced that you have sufficient reception, and your router is still not communicating, please contact Sixnet Technical Support at 1-800-432-9908. We will be happy to help you get your Sixnet router up and running. Hardware Status LED's Green - Power Connection Status (Power) Power: ON Power being received by the JBM router OFF Power not being received by the JBM router Green - Connection Status (Link) Ethernet Ports: ON JBM router is connected to a network device at 100 Mb OFF JBM router is connected to a network device at 10 Mb Yellow - Link & Data Transmit/Receive Activity Status ON - Steady Ethernet port has a Link established with the network device ON-OFF-ON JBM router is transmitting and receiving data packets (Flickering) Green - Data Receive Activity Status (RXD) TTYS1 (DTE): Serial Port ON-OFF-ON JBM router is receiving data packets (Flickering) Green - Data Transmit Activity Status (TXD) ON-OFF-ON JBM router is transmitting data packets (Flickering) Sixnet, Inc, A Red Lion Business 331 Ushers Road, Ballston Lake, NY 12019 www.sixnet.com CONNECT. MONITOR. CONTROL. T +1 518 877 5173 F +1 518 877 8346 Version XXX © 2010. Sixnet. All Rights Reserved. 300 300 IndustrialPro Series Router User Manual 3.6.6.1.1 SPECIFICATIONS Baud Rate: 110-115,200 bps Interface: One Female DB-9, RS-232C DCE Mbps: 10/100BaseT Interface: Female RJ-45 connectors RS-232 Port: Baud Rate: 110-115,200 bps (Async) Interface: (Optional) One Male DB-9, RS-232C DTE Operating System: Linux 2.6 Kernel Console Port: Ethernet Ports: Console Port: CLI Access through async connection IP Protocol SNMP, HTTP/S, Telnet, SSH Management: Power: 12V DC (External) 120 VAC 60Hz or 120-240 VAC 50/60Hz Size: 7.75” W x 1.5” H x 6.75” L Weight: 2 pounds Physical: Processor: PowerPC RISC Memory: 64 MB RAM, 32MB Flash Warranty: 1 Year Parts and Labor Sixnet, Inc, A Red Lion Business 331 Ushers Road, Ballston Lake, NY 12019 www.sixnet.com CONNECT. MONITOR. CONTROL. T +1 518 877 5173 F +1 518 877 8346 Version XXX © 2010. Sixnet. All Rights Reserved. 301 301 IndustrialPro Series Router User Manual 5 Software Licensing Terms and Conditions Software supplied with each Sixnet product remains the exclusive property of Sixnet. Sixnet grants with each unit a perpetual license to use this software with the express limitation that the software may not be copied or used in any other product for any purpose. It may not be reverse engineered, or used for any other purpose other than in and with the computer hardware sold by Sixnet. FCC Compliance Statement This equipment has been tested and found to comply with the limits for a Class A digital device, pursuant to part 15 of the FCC rules. These limits are designed to provide reasonable protection against harmful interference when the equipment is operated in a commercial environment. This equipment generates uses and can radiate radio frequency energy; and if not installed and used in accordance with the instructions, may cause harmful interference to radio communications. Operation of this equipment in a residential area is likely to cause harmful interference to radio communications, in which case the user will be required to correct the interference at their own expense. Warning: Changes or modifications to this unit not expressly approved by the party responsible for compliance could void the user’s authority to operate the equipment. Information to the User If this equipment causes interference to radio or television reception, which can be determined by turning the equipment off and on, the user is encouraged to try to correct the interference by one or more of the following measures: In order to meet FCC emissions limits, this equipment must be used only with cables that comply with IEEE 802.3 If necessary, the user should consult the dealer or an experienced radio/television technician for additional suggestions. The user may find the following booklet prepared by the Federal Communications Commission helpful: “How to Identify and Resolve Radio-TV Interference Problems”. This booklet is available from: U.S. Government Printing Office Washington, DC 20402 Stock No. 004-000-00345-4 Canadian Compliance Statement This Class A digital apparatus meets all requirements of the Canadian Interference-Causing Equipment Regulations. Cet appareil numérique de la classe A respecte toutes les exigences du Règlement sur le matérial brouilleur du Canada. Sixnet, Inc, A Red Lion Business 331 Ushers Road, Ballston Lake, NY 12019 www.sixnet.com CONNECT. MONITOR. CONTROL. T +1 518 877 5173 F +1 518 877 8346 Version XXX © 2010. Sixnet. All Rights Reserved. 302 302 IndustrialPro Series Router User Manual 6 Warranty Sixnet provides a limited hardware warranty for the router, which consists of the following: This warranty is effective for one year from the delivery date of the router to the purchaser. The purchaser is responsible for returning the defective unit to our factory, freight prepaid. If the router is under warranty, we will repair it at our cost and return it, freight prepaid, via UPS ground service. If the router is not covered by the warranty, we will notify you of the repair charges. We will not repair the router without your permission. Repairs are guaranteed for 90 days or the remainder of the warranty, whichever is longer. Buyer's remedies for breach of warranty shall be limited to repair or replacement subject to adjustment as stated herein, or full or partial adjustment to purchase price. Sixnet routers are provided with the following warranty: 1. Hardware maintenance and repair is available on a return to factory basis. 2. Configuration assistance is included for the first 60 days after the initial contact to Sixnet Technical support. After this initial period, configuration assistance will continue to be available on a chargeable basis. 3. Software support does not provide for custom code. Custom changes are available as a chargeable option. 4. The warranty only covers items with a serial number. Cables and adapters are not covered. Extended Warranty Program Sixnet offers an extended warranty for the router. This program extends the original warranty on a yearly basis. In addition to extending the original warranty, the emergency replacement program is included for the cost of freight only. The extension must be purchased before the original warranty expires. Please contact Sixnet for further information Except for the express warranty set forth herein, Sixnet grants no warranties, either express or implied, of merchantability and fitness. The stated express warranty is in lieu of all liabilities or obligations of Sixnet for damages including but not limited to consequential damages occurring out of or in connection with the delivery, use or performance of Sixnet products. Sixnet, Inc, A Red Lion Business 331 Ushers Road, Ballston Lake, NY 12019 www.sixnet.com CONNECT. MONITOR. CONTROL. T +1 518 877 5173 F +1 518 877 8346 Version XXX © 2010. Sixnet. All Rights Reserved. 303 303 IndustrialPro Series Router User Manual 7 Appendices Appendix A: Refers to: 3.5.10 SNMP Agent: JBMELECTRONICS.MIB contents The following MIBs are cellular specific. It is to be noted that all of the following can be retrieved on the SN firmware version of Sixnet's routers, the A, M, and R Series routers are dependent on the cellular module/aircard installed/inserted into the router. Some manufacturers allow for more information to be retrieved from the module/aircard than others. STRING unitDescription Router Model Name STRING unitSerialNumber Serial Number of Router STRING unitFirmwareVersion Firmware Version Number of Router mdn STRING minIMEI STRING nai STRING sipUser INTEGER sid INTEGER nid INTEGER Mobile Directory Number, the actual phone number of the device. Mobile Indentification Number, the number given to a service plan provided by the carrier. International Mobile Equipment Indentity, number used by the GSM network to indentify valid devices. Network Access Indentifier, a standard way of indentifying users who request access to a network. Session Initiation Protocol, used to establish sessions between multiple parties in a location-independent manner. Typically voice sessions. System ID, a unique 5-digit number assigned to each carrier by the FCC. Network ID, used to divide SIDs into smaller areas. Sixnet, Inc, A Red Lion Business 331 Ushers Road, Ballston Lake, NY 12019 www.sixnet.com CONNECT. MONITOR. CONTROL. T +1 518 877 5173 F +1 518 877 8346 Version XXX © 2010. Sixnet. All Rights Reserved. 304 304 IndustrialPro Series Router User Manual Preferred Roaming List, a list of information that resides in the memory of the module/aircard. It lists the radio frequencies the module/aircard can use in various geographic areas. prl INTEGER The part of the list for each area is ordered by the bands the module/aircard should try to use first. Therefore it's a kind of priority list for which towers the module/aircard should use. The PRL helps determine which home-network towers to use, and also which towers belonging to other networks to use in roaming situations (areas where the home network has no coverage.) When roaming, the PRL may instruct the module/aircard to use the network with the best roaming rate for the carrier, rather than the one with the strongest signal at the moment. activated INTEGER Since a PRL tells the module/aircard "where" to search for a signal, as carrier networks change over time, an updated PRL may be required for a module/aircard to "see" all of the coverage that it should, both with the home network and for roaming. Determines if the module/aircard is authorized onto the carrier's network. Values are Unknown(-1), No(0), Yes(1). Open Mobile Alliance for Device Management (OMA DM), designed for management of small mobile devices such as mobile phones, PDAs and palm top computers. The device management is intended to support the following typical uses: Provisioning – Configuration of the device (including first time use), enabling and disabling features omaSupported INTEGER Configuration of Device – Allow changes to settings and parameters of the device Software Upgrades – Provide for new software and/or bug fixes to be loaded on the device, including applications and system software. Fault Management – Report errors from the device, query about status of device currentMipProfile INTEGER Values are Unknown(-1), No(0), Yes (1) Mobile IP Profile, Sixnet, Inc, A Red Lion Business 331 Ushers Road, Ballston Lake, NY 12019 www.sixnet.com CONNECT. MONITOR. CONTROL. T +1 518 877 5173 F +1 518 877 8346 Version XXX © 2010. Sixnet. All Rights Reserved. 305 305 IndustrialPro Series Router User Manual esn STRING pesn STRING meid STRING vendor modelName fwVersion hwVersion carrier lowRssi STRING STRING STRING STRING STRING INTEGER lowEcio INTEGER highRssi INTEGER highEcio INTEGER currentRssi INTEGER currentEcio INTEGER svcType STRING Electronic Serial Number, is a permanent identification number used to recognize mobile devices accessing particular telecommunications networks. The ESN is assigned and embedded into a wireless communications device by the device's manufacturer. Pseudo ESN, a reserved ESN manufacturer code 128, which allow legacy equipment to recognize MEIDs. Mobile Equipment Identifier, 56 bits long, and like ESN's, identify the manufacturer of a mobile device as well as the serial number assigned to the device by that manufacturer. Manufacturer of the module/aircard. The vendor-provided model name of the module/aircard. Firmware Version of the module/aircard. Hardware Version of the module/aircard. Service provider for cellular network. Low Speed Received Signal Strength Indication Ec/Io is a ratio of good to bad energy, representing the cell towers “cleanness” in its signal to you. In other words - signal to noise ratio. High Speed Received Signal Strength Indication Ec/Io is a ratio of good to bad energy, representing the cell towers “cleanness” in its signal to you. In other words - signal to noise ratio. Current Received Signal Strength Indication Ec/Io is a ratio of good to bad energy, representing the cell towers “cleanness” in its signal to you. In other words - signal to noise ratio. GSM, which stands for Global System for Mobile communications, reigns as the world’s most widely used cell phone technology. CDMA, or Code Division Multiple Access,uses a “spread-spectrum” technique whereby electromagnetic energy is spread to allow for a signal with a wider bandwidth. This allows multiple people on multiple cell phones to be “multiplexed” over the same channel to share a bandwidth of frequencies. currentChannel INTEGER cdmaType STRING hdrType STRING cdmaRoaming STRING hdrRoaming STRING Channels are used to different frequency range network to operate on the same frequency in the same area that do not interfere with each other. None, Analog, Digital - High Data Rate type, normally Digital Unknown, None, Rev0, RevA - The CDMA/EV-DO sub type Home, Roaming, Roaming - unknown. Roaming type indicator insoide or outside the providers home network. None, Roaming - SIDS Guaranteed, Roaming - SIDS Not Guaranteed. EV-DO Roaming state. Sixnet, Inc, A Red Lion Business 331 Ushers Road, Ballston Lake, NY 12019 www.sixnet.com CONNECT. MONITOR. CONTROL. T +1 518 877 5173 F +1 518 877 8346 Version XXX © 2010. Sixnet. All Rights Reserved. 306 306 IndustrialPro Series Router User Manual roaming INTEGER currentState INTEGER speedPref STRING roamPref STRING devName STRING ifName STRING txCount INTEGER rxCount INTEGER gprsState rxLevel servingCell STRING STRING STRING rrcState STRING gsmChannel STRING psState STRING mode STRING temperature STRING simContextApn0 STRING simContextApn1 STRING simStatus STRING serviceDomain STRING availServiceType STRING wCdmaL1State STRING mmccState STRING gmmPsState STRING wCdmaChannel STRING wCdmaBand STRING 0, 1. 0 currently not roaming, 1 currently roaming. Connecting, Dormant, Connected, Disconnected, Error, CallIncoming. Current Modem State. Automatic, CDMAonly, EVDOonly. What speed preference the modem is currently set to lock to. HomeOnly, HomePreferred - AUTO, RoamOnly, Aonly, Bonly, AutoA, AutoB, unknown. The current setting for the modem's network roaming preference. The device name as presented by the operating system. The cellular interface name, if known, as presented by the operating system (e.g. ppp0). Current Wireless PPP TX byte count since connection has been up, updated every 30 mins Current Wireless PPP RX byte count since connection has been up, updated every 30 mins The "state" of the GSM connection: idle, ready, standby The signal level seen at the receiver measured in -dBm The Current Cell on which the device is camped. Radio Resources Control State (also called Packet Data Transfer state): idle, CELL_DCH, CELL_FACH, CELL_PCH, and URA_PCH Indicates which GSM channel or band of frequencies the device is currently connected to. Pulls CELLMODEM_PS_STATE from /var/log/wireless.cardstats Pulls CELLMODEM_MODE from /var/log/wireless.cardstats Pulls CELLMODEM_TEMPERATURE from /var/log/wireless.cardstats Pulls CELLMODEM_SIM_CONT_APN0 from /var/log/wireless.cardstats Pulls CELLMODEM_SIM_CONT_APN1 from /var/log/wireless.cardstats Pulls CELLMODEM_SIM_STATUS from /var/log/wireless.cardstats Pulls CELLMODEM_SERVICE_DOMAIN from /var/log/wireless.cardstats Pulls CELLMODEM_AVAIL_SERVICE_TYPE from /var/log/wireless.cardstats Pulls CELLMODEM_WCDMA_L1_STATE from /var/log/wireless.cardstats Pulls CELLMODEM_MM_CS_STATE from /var/log/wireless.cardstats Pulls CELLMODEM_GMM_PS_STATE from /var/log/wireless.cardstats Pulls CELLMODEM_WCDMA_CHANNEL from /var/log/wireless.cardstats Pulls CELLMODEM_WCDMA_BAND from /var/log/wireless.cardstats Sixnet, Inc, A Red Lion Business 331 Ushers Road, Ballston Lake, NY 12019 www.sixnet.com CONNECT. MONITOR. CONTROL. T +1 518 877 5173 F +1 518 877 8346 Version XXX © 2010. Sixnet. All Rights Reserved. 307 307 IndustrialPro Series Router User Manual systemMode powerOnTime lowSpeedCsq highSpeedCsq band imei simId STRING STRING STRING STRING STRING STRING STRING Pulls CELLMODEM_SYSTEM_MODE from /var/log/wireless.cardstats Pulls CELLMODEM_POWERON_TIME from /var/log/wireless.cardstats Pulls CELLMODEM_LOWSPEED_CSQ from /var/log/wireless.cardstats Pulls CELLMODEM_HIGHSPEED_CSQ from /var/log/wireless.cardstats Pulls CELLMODEM_BAND from /var/log/wireless.cardstats Pulls CELLMODEM_IMEI from /var/log/wireless.cardstats Pulls CELLMODEM_SIM_ID from /var/log/wireless.cardstats Sixnet, Inc, A Red Lion Business 331 Ushers Road, Ballston Lake, NY 12019 www.sixnet.com CONNECT. MONITOR. CONTROL. T +1 518 877 5173 F +1 518 877 8346 Version XXX © 2010. Sixnet. All Rights Reserved. 308 308