1
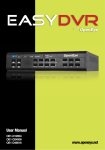
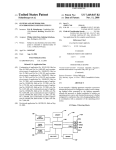
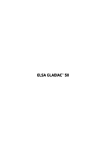
COPYRIGHT
Information contained herein is subject to change without prior notice.
Any contents and information in this manual may not be reproduced or
transmitted in any form either electronically or mechanically without the express
written consent of KRS Electronics Co., Ltd.
Ⓒ 2007 KRS Electronics All Rights Reserved.
Trademarks
Cydle is brand of GPS navigation engine S/W created by KRS Electronics.
Intended or not intended use of Cydle logo, name or image would be restricted
by international patent law and agreement.
All brand and product names are trademarks or registered trademarks of their
respective companies.
Version
Manual – ENG1.01
O/S
Engine
Map
4” In-Car Navigation System
Table of Contents
1, Precaution & Safety information
2. General Information
3. Main Menu
3.1. Main Menu Screen
3.2. Button Description
4. Navigation
5. DVD Player
5.1. Starting DVD Player
5.2. Touch Screen Menu
5.3. Button Description
5.4. File Management
5.5. Color Configuration
6. Radio
6.1. Starting Radio
6.2. Button Description
7. AV-IN
7.1. Starting AV-In mode
7.2. AV-IN Buttons
8. Utility
8.1. Calculator
8.1.1. Starting Calculator
8.1.2. Button Description
8.2. Calendar
8.2.1. Starting Calendar
8.2.2. Button Description
Page 1
4” In-Car Navigation System
Table of Contents
9. Setting
9.1. Sound Control
9.2. Display
9.3. Date & Time
9.4. RDS & Radio
9.5. System Information
9.6. Calibration
9.7. Update Mode
10. Device Specification
Page 2
4” In-Car Navigation System
Greeting
Thank you for purchasing Cydle.
Cydle is up to date GPS navigation engine with integrated multimedia functions.
Powered with newest technology, you can simply enjoy your driving
and many joyful features in your vehicle.
Find more help in the web site.
Do you need technical help or upgrade Navigation Software?
Simply visit Cydle web site at www.cydle.com
or you can contact our customer service center.
Cydle Customer Service Center
US Toll free number :
Operation hour Monday ~ Friday (
:
~
:
)
Read carefully before Use
When navigating, carefully compare information displayed to all available navigation
sources, including information from street signs, visual sightings, and maps. For safety,
always resolve any discrepancies before continuing navigation.
IMPORTANT
Cydle will/does not have any responsibility to compensate for any accident which
occurred by driver's carelessness, or ignorance of local traffic condition.
Driver must always operate vehicle in a safe manner.
Page 3
4” In-Car Navigation System
Precautions and Safety Information
1. Precautions and Safety Information
For your own safety, do not operate the controls of the product while driving.
The calculated route is for reference only. It is the user’s responsibility to
follow the traffic signs and local regulations along the roads.
Always fully aware of all driving condition and do not become
distracted by the unit while driving. Stop your vehicle in a safe place before attempting any
operation.
Your device may be a tempting target for a theft.
To avoid theft, remove front unit and keep in safe place when leaving your vehicle.
The voice guide and route may be different from the actual road condition. Always pay full
attention to recognize actual road condition and drive in a safe manner.
Do not set the volume too high which may lead you lack of notice any condition of outside
vehicle.
Disassembling or any attempt to fix the device may cause a great danger.
Cydle strongly recommend to contact technical help from customer
service center or website when not working promptly.
Other wireless devices in the vehicle might interfere with the reception of
satellite signals and cause the reception to be unstable.
Page 4
4” In-Car Navigation System
General Information & Features
2. General Information & Features
GPS Navigation
- Accurate map data source of North America with roads, freeways, highways, rivers, lakes,
Point of interests, and all respected terrestrial data.
- Up to dated navigation engine powered by Cydle and IGO.
- Lightning fast route calculation.
- Various searching options
-Address
-Intersection
- POI (Point of Interest)
- Favorites
- Recent Record
- Etc
-2D/3D view angles provide joyful and comfortable guidance
-Day/Night mode for realistic display
DVD Player
Radio
AV in
Calendar
Calculator
Page 5
4” In-Car Navigation System
Main Menu
3. Main Menu
3.1. Main Menu Screen
Cydle starts by displaying the Main menu.
This is the root of the screen hierarchy, and you can simply access to all features by
tapping on touch screen buttons.
3.2. Button Description
BUTTON
FEATURE
BUTTON
FEATURE
Start GPS Navigation
AV-IN Display Mode
Start DVD Player
Enter Utility Menu
Start Radio
Enter Setting
Page 6
4” In-Car Navigation System
Navigation
4. Navigation
To start GPS Navigation, tap on [NAVIGATION] button from main menu screen.
A: Battery Status
B: No GPS Signal Mark
E
F
G
A
B
C
I
D
J
B : Time of traveling
A : Current Speed
D : Back to Navigation Menu
C : Current Time
F : GPS Signal Mark
E : View of the Map
I : Your Current Position
G : Speaker On
J :Tap this area to see more functions
For more information about map and navigation, see the Navigation User Manual.
Page 7
4” In-Car Navigation System
DVD Player
5.DVD Player
5.1. Starting DVD Player
To start DVD Player, tap on [DVD PLAYER] button from main menu screen.
5.2. Touch Screen Menu
You will not see any buttons while DVD is played.
Buttons will appear when you tap on LCD screen.
NOTE
1.DVD Player will automatically start when you insert DVD disc.
2.’SOUND ONLY’ mode will appear if the vehicle is moving for driver’s safety.
3.Supportive file format : AVI (Dvix)
4.DVD Player will not only play video, but also picture and music files as well.
Page 8
4” In-Car Navigation System
DVD Player
5.3. Button Description
Function of buttons are described in the following.
Start Voice guide only while DVD mode
Start Navigation
Read/Play files in USB memory
Play files from Disc
Read/Play files in main SD slot**
Color Setting
Hide Touch screen buttons
Quit DVD Player
Play previous/Next file in current selected storage
Pause/Play
Stop
Navigate by using arrows and press
to enter or start selected.
5.4. File Management
DVD mode plays files in a)Disc b) USB c)SD card in main SD slot.
Tap on screen button to choose storage wish to play in DVD Player.
**IMPORTANT**
SD card inserted into front part of your device will not be played by DVD player.
Only SD card in main SD slots will be accessed by DVD player.
**NOTE**
Picture and Music files in SD card inserted in main SD slot will be also played by DVD
player.
Page 9
4” In-Car Navigation System
DVD Player
5.5. Color Configuration
You can set color preference by tapping
button from screen buttons.
Change setting for Saturation
Change setting for Brightness
Change setting for Contrast
Change setting for Sharpness
Change setting for Hue
Reset to default setting
Exit Color configuration menu
Page 10
4” In-Car Navigation System
DVD Player
5.6. No Disk Warning
No Disc Warning will be displayed when disc, SD card, or USB is not detected.
Please insert any media storage of three type mentioned above to play.
5.7. Drive Warning
DVD Player will not display screen while vehicle is moving for driver’s safety.
Enjoy sound only when driving.
Page 11
4” In-Car Navigation System
Radio
6. Radio
6.1. Starting Radio
To start Radio, tap on [RADIO] button from main menu screen.
6.2. Button Description
Function of buttons are described in the following.
Quit Radio
Start Navigation
Voice guide over radio sound
Seek Previous /Next radio frequency
Press long – set current playing station as favorite
Press short – Tune saved station
Main Radio Screen provides information
regarding Channel, mode, and band
Page 12
4” In-Car Navigation System
AV-IN
7.AV-IN
7.1. Starting AV-IN Mode
AV In mode displays and/or plays audio & video source from connected device.
To start AV-IN Mode, tap on [AV-IN] button from main menu screen.
Start Navigation
Navigation Voice guide on
Exit AV-IN
Page 13
4” In-Car Navigation System
AV-IN
NOTE
‘NO VIDEO SIGNAL’ will be displayed when there is no Video source signal detected.
Page 14
4” In-Car Navigation System
Utility
8. Utility
Utility contains various features for user comfort and convenience.
Tap on [Utility] button from main menu screen to enter Utility menu screen.
Start Calculator
Start Calendar
Exit to Main Menu Screen
Page 15
4” In-Car Navigation System
Entertainment
8.1. Calculator
8.1.1. Starting Calculator
To start Calculator, tap on [Calculator] button from Utility menu screen.
8.1.2. Button Description
Function of buttons are described in the following.
MC
Memory numeric clear
MR
Memory numeric restore ( display )
MS
Numeric save memory
M+
Add edit numeric to memory numeric
C
+, -, *, /
0~9
Back space Back space
CE
Display numeric clear
Current calculative nemeric clear
The four arithmetical operations
Numeric display
.
Dot display
=
Enter
Program exit
Page 16
4” In-Car Navigation System
Entertainment
8.2. Calendar
8.2.1. Starting Calendar
To start Calendar, tap on [Calendar] button from Utility menu screen.
You can set current date in SETTING MENU.
8.2.2. Button Description
Function of buttons are described in the following.
YEAR
MONTH
Decrease / Increase Year
Decrease / Increase Month
Exit Calendar and back to previous screen
Page 17
4” In-Car Navigation System
Setting
9. Setting
Your device has default system settings. You can customize the settings to suit
your personal needs. Once you change settings, your new settings will remain until
you change it again.
To enter Setting, tap [SETTING] button from main menu screen.
9.1. Sound Control
10 different setting is possible through sound control menu.
Tap [Sound Control] button from setting menu screen.
Setting
EQ
Description
Select EQ mode
NAVI VOICE
VOICE GUIDE ON / OFF
TA VOLUME
TA Volume Control (Radio)
Page 18
4” In-Car Navigation System
Setting
Setting
Description
BASE
Base up/down
TREBLE
Treble up/down
BALANCE
Left/Right Balance Control
FADER
Front/Back Fader Control
Setting
Description
BEEP
LOUD
SUB WOOFER
Loud Sound Setting
Sub Woofer Base support setting
Page 19
4” In-Car Navigation System
Setting
9.2. Display
Tap [DISPLAY] button from setting menu screen.
Setting
BRIGHTNESS
Description
LCD Brightness
Setting
DUAL
Description
Dual Mode Control
KEY
Key Control
VOL
Vol Setting
Page 20
4” In-Car Navigation System
Setting
9.3. Date & Time setting
Tap [DATE&TIME] button from setting menu screen.
12 Hour Mode
Tap
24 Hour Mode
button to change time mode to 24 hours.
9.4. RDS & Radio
Tap [RDS&RADIO] button from setting menu screen.
Page 21
4” In-Car Navigation System
Setting
Tap [II] button from RDS & RADIO I menu screen.
Various Radio options can be set.
Choose location where you are using Radio to set frequency configuration.
Page 22
4” In-Car Navigation System
Setting
Setting
Description
TA
TA SEEK mode:
When newly tuned station does not receive TP information for 5 sec, the radio retunes to next
station which has not the same station(PI) as the last station, but has the TP information.
When TP information gets lost at the current station for retune time which is set by RETUNE
SHORT( 30 sec ) or RETUNE LONG ( 90 sec), the radio start to retune to next same PI
station. When same PI station does not catch in 1 cyclic search, the radio retunes to next
station with TP information.
TA ALARM mode.
When this mode is selected, any automatic retune mode is not activated. Only double beep
sound ( ALARM) is out -put .
So, in this mode, the unit keeps the current station anyhow.
( The higher priority is PI rather than TP.)
PI
When different PI sound (DIP) is heard once in a while, the DIP ‘s sound will be heard for less
than 1 second.
PI MUTE mode
Under the same situation, a mute sound will be heard for less than 1 sec.
REG
Regional mode ON
: AF switching or PI SEEK is implemented to the station which have all PI codes are the same
as current station. REG of individual segment is turned on also together with displaying “REG
ON” on numeric display for a few seconds.
* In double displaying mode, the individual segment may be deleted in case of not
enough- space in display.
Regional mode OFF
: The regional code in the format of PI code is ignored when AF switching or PI SEEK is
implemented. REG of individual seg. is turned off together with displaying “ REG OFF” on
numeric display for a few seconds.
RETUNE
The initial time of automatic TA search or PI SEARCH mode is selected. When PI information
is not caught for retune time, the radio start to retune to next same PI station. When same PI
station does not catch 1 cyclic search, the radio goes to last
satiation and waits for 4 -5 minute until PI code is received.
- RETUNE L mode : Selected as 90 seconds.
- RETUNE S mode: Selected as 30 seconds.
MASK
MASK DPI mode : masked only the AF which has Different PI .
MASK ALL mode : masked the AF which has Different PI and NO RDS signal with high
field strength
EONTA
EONTA LOCAL mode
When the filed strength level of EON linked is less than the threshold level, the radio does not
switch that station, and a customer can hardly listen to any disturbances.
EONTA DISTANCE mode
EON TA switching is try to implemented by the information of current station . When EONTA
DISTANCE mode is selected, “ EONTA DX” on numeric display is indicated for a few seconds.
Page 23
4” In-Car Navigation System
Setting
9.5. SYSTEM INFORMATION
You can view detail system information including serial number of the software.
Tap [SYSTEM] button from setting menu screen. Also, by pressing RESET, it will make the
settings for Navigation and other personal settings to default.
9.6. Calibration
Tap [CALIBRATION] button from setting menu screen.
When the target moves to another position, tap and hold at the center of the
new target. Repeat each time to complete the calibration process.
When completed, tap anywhere in screen to go back to menu screen.
Page 24
4” In-Car Navigation System
Setting
9.7. Update Mode
Tap
[UPDATE] from Setting menu to enter Update mode.
Insert SD card with upgrade files stored before proceeding upgrade.
Tap desired upgrade feature button in Update mode.
9.7.1. Button Description
Software Update
OS Update
Application + Map Update
Application Update
Map Update
Page 25
4” In-Car Navigation System
Setting
9.7.2. Upgrade Procedure
Update will begin when you tap each update buttons.
**IMPORTANT**
Never remove SD card, or turn power off while updating.
This may cause critical problem in system.
Reset the device once update is completed.
Page 26