1
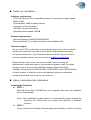
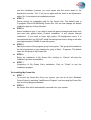
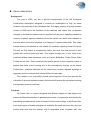
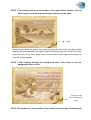
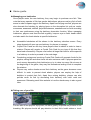
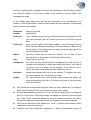
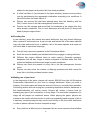
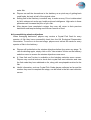
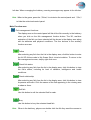
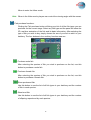
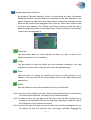
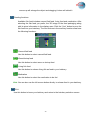
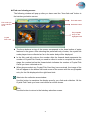
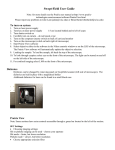
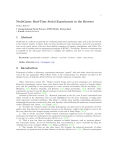
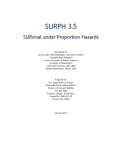
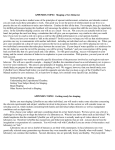
My Ocean Sim User Manual Table of Contents Table of Contents ---------------------------------------------------------1 Notes on installation -----------------------------------------------------2 Hardware requirement --------------------------------------------2 Software requirement ---------------------------------------------2 Technical support ---------------------------------------------------2 Game installation/de-installation --------------------------------------2 Installing My Ocean Sim -------------------------------------------2 De-installing My Ocean Sim --------------------------------------3 Game description ---------------------------------------------------------4 Background -----------------------------------------------------------4 Contents ---------------------------------------------------------------4 Getting to know the game ----------------------------------------------5 Game guide ----------------------------------------------------------------8 Managing your hatcheries ----------------------------------------8 Taking care of your fish --------------------------------------------8 Breeding fish -------------------------------------------------------------10 Making use of your fund -----------------------------------------------10 Accomplishing mission objectives ----------------------------------11 Main screens in the game ---------------------------------------------12 Main screen ---------------------------------------------------------13 Environment setting screen -------------------------------------14 Hatchery selection screen ---------------------------------------------15 Hatchery management screen ---------------------------------------16 Main Function area ------------------------------------------------------17 Fish card viewing screen -----------------------------------------------21 Game control reference ------------------------------------------------22 Credits ----------------------------------------------------------------------24 1 Notes on installation Hardware requirements CPU: Intel Pentium 233 or compatible products of equivalent or higher speed RAM: 64 MB 3D accelerator: 8MB of display memory Soundcard: 16-bit soundcard CD-ROM: 4X optical disc drive Hard disk space needed: 100 MB Software requirements Microsoft Windows Vista/XP/2000/ME/98/95 Microsoft DirectX 7.0 or higher (included in the installation CD) Technical support Are you stuck? The quickest way to get technical support is to visit our website at www.viva-media.com and click on the help tab. Most problems are easily and quickly solved here. If you have done this and still can‘t figure out how to solve your problem, please send us an email at [email protected]. Please include in your email a list of the hardware used, including the manufacturer‘s name and model of your sound and graphic cards. If possible include a copy or printout of the DXDIAG-operation (Start>Run>Enter ”DxDiag“) as well as the AUTOEXEC.BAT, CONFIG.SYS und SYSTEM.INI files for older systems. In addition to your email address include your telephone number and the best time of day we can reach you. Game installation/de-installation Installing My Ocean Sim z STEP. 1 Place My Ocean Sim’s CD-ROM into your computer’s disc drive; the installation will run automatically. (Hint): If the installation program doesn’t run automatically, please execute the Setup.exe file found under your optical disc directory in Windows Explorer. z STEP. 2 Please read over the Software License Agreement carefully. In order to continue 2 with the installation process, you must agree with the terms stated in the Agreement and click “Yes”. If you do not agree with the terms in the Agreement, select “No” to terminate the installation process. z STEP. 3 Please specify an installation path for My Ocean Sim. The default path is C:\program Files\VIVA MEDIA\My Ocean Sim. You can also change the default installation path by clicking “Browse”. z STEP. 4 Select installation type. If you wish to install the game’s background music onto your hard disk, please select “Custom installation”. If not, choose “Normal installation”. (If you wish to enjoy high quality CD background music, it is recommended that you DO NOT install the background music; doing so will also save approximately 300MB of hard disk space.) z STEP. 5 Specify the name of the program group for the game. This group will be added to the list of programs on your desktop by going to Start – Programs. The default name for the group is My Ocean Sim. z STEP. 6 Begin the installation of My Ocean Sim; clicking on “Cancel” will stop the installation process immediately. z STEP. 7 Completion of My Ocean Sim’s installation. Click on “Finish” to end the installation program. De-installing My Ocean Sim z STEP. 1 To remove My Ocean Sim from your system, you can do so from Windows’ Control Panel by selecting “Add/Remove Program” and choosing My Ocean Sim from the list of programs showed. z STEP. 2 My Ocean Sim will be automatically removed from your system. 3 Game description Background The year is 2020; you are a special correspondent of the UN Ecological Preservation Association assigned to conduct an investigation of Guji; an island located in the proximity of the Caribbean Sea. The raging eruption of a huge oceanic volcano in 2005 led to the formation of this relatively new island. Due to dramatic changes in the plate formations and the constant occurrence of upwelling caused by volcanic eruptions, special substances from the earth’s core have been released in the area which led to the formation of a Category C marine water body. This newly formed territory has become a new habitat for countless migrating ocean life forms. The soil on Guji Island is exceptionally fertile; the local flora has thrived in their growth with unusual speed and size. The unique ecology has, in turn, bred exotic creatures seldom seen elsewhere, such as Cameo Butterflies, Purple Flume Giant Turtles and so forth. These creatures are special genera in their respective class of species that have come to being due to the extraordinary ecology on the island. Furthermore, scientists stationed on the island have recently reported sightings of legendary ancient creatures that existed billions of years ago. Your mission is to successfully breed various species of fish and prevent the extinction of rare and valuable oceanic life forms while solving the mysteries involving the legendary ancient creatures! Contents My Ocean Sim is a game designed with different stages to lead players into waters of different territories in a predetermined order, to experience and witness the fascinating and spectacular views of ocean life forms and ecology. In My Ocean Sim, three major types of ocean ecologies are available; the coral reef area, the ruins of a sunken ship area and the strange rock & deepwater area, complete with nine 4 different hatcheries, each with its own distinctive features. The nine hatcheries correspond to the nine stages in the game, and players must try to breed all types of fish in the hatchery they manage in each stage to accomplish their given mission. Getting to know the game After running My Ocean Sim, you will first see the disc verification screen (the time required for the program to perform disc verification may vary depending on the brand and make of your cd rom drive). After the disc verification process has been completed, the opening animation of the game will be played. An adorable and funny sea turtle will take the players to the main screen of My Ocean Sim. The island in the center of the screen is Guji Island. STEP. 1 Left click on the New Game button Players will see schools of dolphins leaping out of the water around the Guji Island and schools of sharks patrolling the island. You will embark on a journey to defend ocean ecology after clicking on New Game. Press to begin a new game 5 STEP. 2 The background story and images of the game will be shown; click on Next Page to scroll through the background story of the game Next Before players begin the game, they must first learn the role of the scientist and the missions he must complete in the game. After browsing through the text for the current page, left click on the “Next Page” button found at the bottom right of the screen to view the next paragraph. STEP. 3 After reading through the background story, click Close to exit the background story screen. Click to close the background story STEP. 4 Description for the scientist’s first mission will be shown. Read through 6 the story development and mission briefing Now that players have learned the mission of the scientist, it’s time to tackle the task of breeding various types of fish. At this point you will be briefed on the mission for the first stage. Click on Close to exit the mission briefing page after you have read through the instructions. STEP. 5 The hatchery selection menu will appear. Click on the shown silhouettes of water bodies to access the hatcheries in the specific area. Silhouettes of water bodies After entering the hatchery selection menu, the silhouette of the area where the next mission takes place will be shown on screen. Move the cursor to the preview area and left click to access the first hatchery in the coral reef area. Players’ mission for the first stage is to raise and breed coral reef tropical fish. Players may begin to manage and breed fish after accessing the hatchery. 7 Game guide Managing your hatcheries Once players enter the new hatchery, they may begin to purchase new fish. Take note that every species of fish has gender distinctions; players must buy fish of both sexes in order to spawn eggs in the hatchery. Apart from buying new fish, players can also decorate the hatchery by placing items on the decoration list such as corals, anemones, seaweeds, starfish, polyclad flatworms, seashells and so forth according to their own preferences using the hatchery decoration function. When managing hatcheries, players must feed the fish regularly, keep an eye on fish’s health status and also watch for shark attacks at specific hatcheries. z z z z Accessible hatcheries will be shown in the hatchery selection screen. Every stage cleared will open up new hatchery for players to manage. Crystal Fish Cards are the key items players need to obtain in order to clear a mission. Players will receive a Crystal Fish Card for any type of fish that they have bred successfully. Players must collect all target fish card for all the species in a hatchery in order to proceed to the next stage. Completing a stage and receiving Crystal Fish Cards will generate funds for the players; selling fish and other items can also net some cash. If players spend too much money decorating their hatcheries or try to raise too many fish at once at the beginning of the game, they may find themselves lacking funds to complete the mission. Players may notice sharks around their hatchery as the game becomes more difficult. In order to prevent shark attacks, players can employ the help of dolphins to protect their fish. Apart from raising dolphins, players can also provide cover for fish by decorating their hatchery with coral reefs and anemones. Releasing small fries as baits to lure the sharks away is also a good idea. Taking care of your fish For the sake of the players’ enjoyment, we have greatly simplified the process of fish breeding. But players should still pay attention to their fish’s health status or touch 8 them (by clicking them) to enhance the fun and interaction of fish breeding. Players can check the status of every fish in detail on the hatchery’s control panel in the management mode. In the display area, apart from the real-time animation of fish swimming in the hatchery, various information of fish’s current status are also available. The following are the items of fish’s status: Nickname: Gender: Fish card: name of your fish male/female “Yes” indicates that you have received the card for the species of fish you have selected, and “No” means you have yet to receive its fish card. Fish food: there are two types of fish food available – dry and living fish food. Each has three different selections. Diet information for different fish will be shown in the feeding area; be sure to give the right type of fish feed according to fish’s diet. Status: your fish’s status may be shown as “normal”, “ill” or “dead”. If your fish has fallen ill, information on its illness will be shown. Age: Intelligence: current age of your fish this value not only reflects the fish’s intelligence but also its level of intimacy with the player. A high value means the fish is very fond of you and it will try to entice you by dancing. If the value is low, it means that the fish has relatively little attachment to you. Satiation: shows how satiated your fish is at the moment. The higher the value, the more satiated your fish is and vice versa. Health: the value reflects your fish’s current health status; the higher the value, the healthier your fish is. The lower the value is, the more likely your fish will fall ill. z z z z The system will automatically assign a name for newly added fish. To change a fish’s name, simply left click on its name and input a new name. Fish will age according to real time (i.e. fish will be one day older for one day that went by in real time). Fish newly bought will appear as a small fry and will grow as it ages. Once it reaches adulthood, its body length will remain the same. Players can adjust fish’s growing speed in the game’s environment settings. Left click any fish while in the hatchery to “touch” it. Players can increase a fish’s intelligence value by touching it. Dolphins must have adequate intelligence in order to automatically ward off 9 z z z sharks for the players and protect fish from these predators. If a fish has fallen ill (as indicated in its status window), players must provide a cure by administering the appropriate medication according to its conditions. A fish will die when its health falls to 0. Players can remove fish that have passed away from the hatchery with the “Bury” button found in the fish management function menu. Players can still manage and breed fish for hatcheries in the stages that they have already completed. Fish in such hatcheries are still prone to illness and death if players neglect them. Breeding fish In the hatchery, when fish mature and reach adulthood, they may breed offsprings after a period of continued care. A pair of male and female fish of the same species may only mate and breed once. In addition, fish of the same species and same sex will not be able to reproduce offsprings. z z Fish will only mate and reproduce in the Professional Mode. Adult fish must be healthy and satiated before they engage in mating activities. z Different fish require different times to reach maturity. Generally speaking, deepwater fish will take longer to mature compared to shallow water fish. Sea turtles and dolphins will take even longer to reach adulthood. z Players can check the parents of every fish in the fish management function menu. z Players can also check the number of offspring produced and birth record for every fish in the fish purchase function menu. Making use of your fund In the beginning of the game, players will receive $20,000 from the UN Ecological Preservation Association as your fund to manage hatcheries. When you enter a hatchery, the control panel will show the amount of fund you currently have available. Performing actions such as buying fish, purchasing decorative items for hatcheries or fish feed/medication will require money. Players will receive a bonus fund for breeding any type of fish successfully in every stage. The successful completion of a stage will net players an additional bonus. When playing the game, players are advised to be careful with their funds. In order to successfully breed all types of fish in a hatchery, sometimes players may need to sell fish/fry or fish from other hatcheries in order to obtain sufficient funds to complete a stage. z Every fish has a different price; deepwater fish are more expensive than shallow 10 z z z water fish. Players can sell the decorations in the hatchery as a quick way of getting back used funds, but only at half of the original value. Selling fish in the hatchery is another way to make money. Price is determined by fish’s status such as its age, health point and intelligence. High value in these perimeters will increase the price of your fish. After players have completed a stage, they may still return to their previous hatcheries and keep breeding new fries as a source of fund. Accomplishing mission objectives When managing hatcheries, players may receive a Crystal Fish Card for every species of fish they have successfully bred from the UN Ecological Preservation Association. To move on to the next stage, players must collect fish cards for every species of fish in the hatchery. z z z Players will be briefed on the mission objectives before they enter any stage. To view the briefing again, simply click on the “View mission” button on the hatchery selection menu to access the mission objectives once more. A “View fish card” button is available on the hatchery selection menu screen. Players may use this button to check their crystal fish card collection and view the fish cards they have obtained so far, along with encyclopedia entries for the fish. Useful information, such as Crystal Fish Cards players collected so far and the number they need to complete the stage, can be found in the fish card collection screen. 11 Interfaces in My Ocean Sim: Main screen: There are four buttons on the game’s main screen. Each button will take the players to the corresponding window. The four buttons are New Game, Ocean’s Door, Environment Configuration and Quit. →click to start a new game. z z Click on the New Game button to view the opening cinematic and the introductions to the background of My Ocean Sim. A warning window will pop up if you click New Game with a previous saved game. If you select “Yes” at the prompt, the previous save game will be deleted and a new game will begin. →click to resume game. z Clicking the Ocean’s Door will resume the game at the point where the players have last left the game. 12 →players can change various game settings here. z Environment settings include: resolution, music, sfx, follow mode and feeding mode configurations. →click to leave the game. z Use the Quit button to automatically save the current game progress, exit from the game and return to Windows. Environment Setting screen: →Click the Environment Setting in the main game screen to access the environment Click to close setting window as shown below: Adjustment button z Environment settings include: resolution, music, sfx, follow mode and feeding mode configurations. z Click the different setting buttons to see their current values. Left click the yellow adjustment icon and move it left or right to adjust its settings. z Click the Close button on the upper right hand corner of the window to save the changes you have made and exit from the window. z In the Feeding Settings, players can choose between Easy Mode and Professional Mode. 13 Easy Mode Professional Mode Easy Mode: When the Easy Mode has been selected, your fish’s satiation level will never reach the danger zone. Your fish will neither grow nor die. They will also not mate but they may still display behaviors of foraging and aggression. You may choose this mode if you are unable to play the game and feed the fish on a daily basis. Professional Mode: In the Professional Mode, your fish may starve and die if you neglect them for too long. Taking care of fish in this mode will require more of your time and attention. However, fish will only show the traits of natural behavior (such as growing and mating) in the Professional Mode. Please note that if you do not feed your fish for more than two consecutive days, your fish may die of starvation (the time in the game will progress normally even if the program isn’t running). z In the Feeding Setting, players can adjust the Time Controller. Time Controller: it can be used to adjust the speed of fish’s growth. Use the “+” and “ “ buttons to specify the number of days it takes a fry to mature into an adult fish. The default growth speed is set to 3 (days); the minimum value is 2 and maximum speed is at 7. Number of days it takes for a fry to mature into an adult 14 ◆Hatchery Selection screen: In My Ocean Sim’s main screen, clicking on Ocean’s Door will bring up the hatchery selection menu as shown in the image below: Hatcheries you have Hatcheries you have Hatcheries currently completed Check mission View fish yet to unlock cards objectives under management Click to close the window Fish card info Hatchery description : View fish card button Use this button to view all the fish cards you have collected so far. : View mission objectives button Use this button to see the descriptions for the objectives of the current stage. : Exit Use this button to return to the main screen. z In the hatchery selection menu, there are three water body selection buttons available, representing the coral reef area, the ruins of the sunken ship area and the strange rock & deepwater area. Use these buttons to toggle between the different water bodies. Each area has three hatcheries waiting for players to challenge. z New hatcheries will become available to the players according to the stages they have cleared. Accessible hatcheries will be shown in the preview area; inaccessible ones will remain hidden. The color of the hatchery crystal for 15 hatcheries players are currently managing is blue; it will turn orange for hatcheries already cleared and gray for hatcheries that are still inaccessible. z Click on any hatchery and the descriptive text about it will be shown at the bottom of the screen. The number of fish cards players have collected so far will be shown in the fish card information column. z After selecting a hatchery, enter the hatchery by left clicking it to resume the game. Hatchery management screen: After entering your hatchery, the following control panel will appear at the bottom of Display Back to Main the screen: Fish card info area screen Data area Fund info. Info bar Auxiliary function area Panel minimization button Auxiliary function area Important information, such as your current funds available and fish cards you have received so far, are on top of the control panel. The main function area has five buttons corresponding to five major functions. Each major function has four auxiliary functions and their descriptions have been provided below. Fund info: the figure represents the amount of funds you have available at the moment. Fish card info: the number after the forward slash represents the number of Crystal Fish Cards you need to collect in order to complete the current stage; the number before the forward slash indicates the number of Crystal Fish Cards you have collected so far. Minimize button: use this button to minimize the control panel. The minimized control panel is located at the bottom of the screen. 16 Info bar: When managing the hatchery, warning messages may appear in the info bar. Hint : When in the game, press the〔Enter〕to minimize the control panel and 〔Esc〕 to hide the minimized control panel. Main Function area: Fish management functions: The display area on the control panel will list all the fish currently in the hatchery when you click on the fish management function button. The 3D, real-time animation of the fish you have selected will be shown in the display area along with its attributes and physical conditions. The four buttons in the auxiliary function area are: : Follow After selecting any fish from the list in the display area, click this button to enter the full 3D follow mode in My Ocean Sim’s virtual simulation. To return to the fish management screen, simply right click once. : Check fish status After selecting any fish from the list in the display area, click this button to view the fish’s status, including its level of satiation, intelligence and health conditions. : Check relationship After selecting any fish from the list in the display area, click this button to view its parents and mate. Click the names of the fish appearing in the viewing area to observe them. : Sell fish Use this button to sell the selected fish for cash. : Bury Use this button to bury the selected dead fish. Hint: When in the hatchery, players can double click the fish they want the camera to 17 follow to enter the follow mode. Hint: When in the follow mode, players can control the viewing angle with the mouse. Fish purchase functions: Clicking the Fish purchase button will bring up a list of all the fish types you can purchase for the current stage. Select any fish type and the panel will show the 3D, real-time animation of the fish and its basic information. After selecting the type of fish you wish to buy, simply choose the sex of your fish to add it to your hatchery. The four buttons in the auxiliary function area are: : Purchase male fish After selecting the species of fish you wish to purchase on the list, use this button to purchase a male fish. : Purchase female fish After selecting the species of fish you wish to purchase on the list, use this button to purchase a female fish. : Show purchased fish Use this button to see the list of all fish types in your hatchery and the number of fish in each species. : Show bred fish Use this button to see the list of all fish types in your hatchery and the number of offspring reproduced by each species. 18 Hatchery decoration functions: By pressing “Decorate hatchery” button, a list showing all corals, anemones, seaweeds, starfish, polyclad flatworms, seashells and so forth available to the player. Players can select the items they wish to use and the viewing area will show the 3D model of the highlighted item. Click on “Place item” button to add the item to your hatchery. The “Rotate” and “Zoom” buttons can also be used to adjust the angle and sizes of decorative items. The four buttons in the auxiliary function area corresponds to: : Place item Use this button after you have selected the item you wish to add to your hatchery to place it in your hatchery. : Rotate Use this button to rotate the object you have selected (clockwise). You may hold the left mouse button until you have reach the desired angle. : Zoom Use this button to enlarge or minimize the items you have placed in your hatchery. You may hold the left mouse button until the item has reached your desired size. : Delete Use this button to remove the selected item from your hatchery. Hint: To move an item, simply move the mouse cursor within the item’s yellow frame; left click and hold the item, and drag it to the desired location. Hint: To rotate an item, you can also move the cursor over the blue circular icon on the object; left click and hold the item, and drag it laterally to rotate the item in the orientation of your mouse movement. Hint: To adjust the size of an item, move the cursor over the blue rectangular icon on the object; left click and hold the item, and drag it vertically. Dragging the 19 mouse up will enlarge the object and dragging it down will shrink it. Feeding functions Available fish feed includes canned fish feed, living feed and medication. After selecting the fish feed you prefer, the 3D image of the feed packaging along with its price information in the display area. Click the “Use” button to pour the fish feed into your hatchery. The four buttons in the auxiliary function area have the following functions: : Canned fish feed Use this button to select canned fish feed. : Worm/shrimp feed Use this button to select worm or shrimp feed. : Living fish feed Use this button to release living fish as feed in your hatchery. : Medication Use this button to select the medication to be fed. Hint: You can also use the left mouse button directly to release feed in your hatchery. Exit Use this button to leave your hatchery and return to the hatchery selection screen. 20 Fish card viewing screen: The following window will pop up after you have used the “View fish card” button in the hatchery selection screen: Fish card status Fish cards you have collected so far Maximize button Encyclopedia entry for the highlighted fish Crystal Fish Card z The three buttons on top of the screen correspond to the three bodies of water featured in the game. After selecting the preferred body of water, the crystal fish cards players have collected so far in the water body will be displayed. z In the fish card info column, the number after the forward slash represents the number of Crystal Fish Cards you need to collect in order to complete the current stage; the number before the forward slash indicates the number of Crystal Fish Cards you have collected so far. z When players select any Crystal Fish Card they have received, the image of the fish will appear in the bottom left hand corner of the screen with the encyclopedia entry for the fish displayed at the right hand side. : Maximize the collection area window Use this button to maximize the display area for your fish card collection. All the Crystal Fish Cards you have received so far will be shown. : Exit Use this button to return to the hatchery selection screen. 21 Game control reference z Opening animation 〔Esc〕Skips the opening cinematic presentation and goes directly to the main screen z View controls in game Using mouse controls: ﹝Cursor at the center of the screen﹞┼﹝Press and hold Moves the viewing angle to the right the left mouse button﹞┼﹝Drag left﹞ ﹝Cursor at the center of the screen﹞┼﹝Press and hold Moves the viewing angle to the left the left mouse button﹞┼﹝Drag right﹞ ﹝Cursor at the center of the screen﹞┼﹝Press and hold Moves the viewing angle forward the left mouse button﹞┼﹝Drag up﹞ ﹝Cursor at the center of the screen﹞┼﹝Press and hold Moves the viewing angle backward the left mouse button﹞┼﹝Drag down﹞ ﹝Cursor at the left margin of the screen﹞┼﹝Press and Moves the viewing angle to the right hold the left mouse button﹞ ﹝Cursor at the right margin of the screen﹞┼﹝Press and Moves the viewing angle to the left hold the left mouse button﹞ ﹝Cursor at the upper margin of the screen﹞┼﹝Press and Moves the viewing angle downward hold the left mouse button﹞ ﹝Cursor at the lower margin of the screen﹞┼﹝Press and Moves the viewing angle upward hold the left mouse button﹞ Using keyboard controls: 〔←〕 Moves the viewing angle to the right 〔→〕 Moves the viewing angle to the left 〔↑〕 Moves the viewing angle downward 〔↓〕 Moves the viewing angle upward 〔Page Up〕 Moves the viewing angle forward 〔Page Down〕 Moves the viewing angle backward [1] Fish management functions [2] Fish purchase functions [3] Hatchery decoration functions [4] Feeding function [5] Previous message [6] Next message 〔Delete〕 Delete 〔Ctrl〕+〔S〕 Screen display speed 22 〔Ctrl〕+〔V〕 z Version information Panel controls in hatchery management screen 〔Enter〕 Minimize/Restore control panel 〔Esc〕 Hide/Show minimized control panel 〔Tab〕 Drag down the main control panel 〔Ctrl〕 + [decoration items] Duplicate items 〔F2〕 Current safe file for your hatchery 23 CREATED BY FORMOSOFT INTERNATIONAL, PUBLISHED IN NORTH AMERICA BY VIVA MEDIA, LLC. CREDITS: Executive director: Yang Jui-Ming Product manager: Kuo Si-Hung Virtual environment core technology: Huang Sen-Yuan, Liu He-Yun, Kuo Si-Hung, Luo Kuo-Jung Oceanic life form simulation program: Liu He-Yun, Huang Sen-Yuan, Kuo Si-Hung, Luo Kuo-Jung Planning: Kao Hsiao-Chiu, Kuo Si-Hung 3D scenes: Lin Ming-Hsin, Feng Chia-Hui, Ting Kuei-Ping 3D models: Lin Ming-Hsin, Feng Chia-Hui, Ting Kuei-Ping GUI design: Feng Chia-Hui, Lin Ming-Hsin, Huang Sen-Yuan Opening animation: Lin Ming-Hsin Music: Lei You-Wen User manual production: Huang Li-Wan Encyclopedic texts and images: Feng Chia-Hui, Huang Li-Wan Testers: Chuo Chia-Hua, Peng Ming-Cheng, Sun Pei-Feng, Kao Hsiao-Chiu, Huang Shang-Wei, Chuang Wen-Long, Chien Sheng-Hsiung, Hsieh Ai-Lin, Kuo Si-Hung, Huang Sen-Yuan, Liu Chia-Yun, Wang Shi-Lin, Lin Ming-Hsin, Feng Chai-Hui, Luo Kuo-Jung, Huang Li-Wan Special thanks to: Fisheries Research Institute, Keelung Office http://www.tfrin.gov.tw/english/ FOR THE NORTH AMERICAN EDITION Project Management: Ting Lam Editorial: Ashley Collins Testing: Joaquin Liguas, Stefano Cassar Package design: Ann Marie Burkel, Isabelle Jelonek Manual layout: Stefano Cassar Sales and Distribution: Stacy Rachels and Tony Costa Executive Director: Eve Seber 24