1
ChirpSim
A Prototype of a Simulator for the Chirp
Swarm Robot
Robert Versvik
Master of Science in Computer Science
Submission date: June 2013
Supervisor:
Pauline Haddow, IDI
Norwegian University of Science and Technology
Department of Computer and Information Science
Abstract
This project attempts to create a simulator for the Chirp robot capable of running
a large amount of robots concurrently in real-time. It also needs to be realistic
enough to be used for prototyping experiments meant to run on the physical
robots, while being simple enough to be able to handle the amount of objects
in the simulated world. To achieve these goals, different approaches for each
subsystem of the simulator have been evaluated against each other.
Experiments showed that the simulator was able to run a couple of hundred
robots simultaneously while still having some computational time to spare each
frame. Due to time constraints it lacks some realism in how certain objects
behave, like friction on movable objects. It is possible to improve the realism of
the simulation relatively easily.
A simple networking interface was added to allow controllers to run completely
separate of the simulation, communicating through UDP to control a robot. This
allows users to quickly get a controller interfacing with the simulator to start
experimenting.
ii
Sammendrag
Dette prosjektet prøver å lage en simulator for Chirp-roboten. Den skal være
kapabel til å simulere flere hundre roboter samtidig i sanntid. Det er viktig at
simulatoren er realistisk nok til å kunne brukes til å prototype eksperimenter som
til slutt skal kunne kjøre uten å måtte endre grunnprinsippene bak ideen, samtidig
som den er enkel nok til å kunne håndtere alle objektene i den simulerte verden.
For å oppnå disse målene ble flere forskjellige metoder testet mot hverandre for
hvert subsystem i simulatoren.
Forsøk har vist at simulatoren klarte å kjøre et par hundre roboter samtidig med
beregningstid til overs hvert steg i simulasjonen. På grunn av tidsbegrensninger
i prosjektet er deler av simulasjonen for lite realistisk, f.eks. friksjonsmodellen til
objekter som kan dyttes. Dette burde kunne forbedres relativt lett.
Simulatoren bruker et relativt enkelt nettverksgrensesnitt for å la kontrollere kjøre
helt separat av simulasjonen. Kontrollere kan kun kommunisere med simulatoren
ved å bruke en UDP-socket til å styre en robot. Dette lar brukere komme igang
med en kontroller relativt raskt.
iii
Preface
This report has been written by Robert Versvik as part of a master’s thesis at
the Norwegian University of Science and Technology (NTNU) during the spring
of 2013. The master’s thesis concludes my five year integrated study at the
Department of Computer and Information Science (IDI). The purpose of the
project is to build a simulator for the Chirp robot capable of running hundreds
of robots concurrently at near real-time, each controlled by a separate controller.
I would like to thank my teaching supervisor, Pauline Haddow (Professor), for
her support and guidance throughout the project.
Robert Versvik
Trondheim, June 18, 2013
iv
Contents
1 Introduction
1.1 Motivation . . . . . .
1.2 Existing Simulators . .
1.2.1 Webots . . . .
1.2.2 Enki . . . . . .
1.2.3 Player/Stage .
1.3 The ChirpSim Project
1.3.1 Goals . . . . .
.
.
.
.
.
.
.
.
.
.
.
.
.
.
.
.
.
.
.
.
.
.
.
.
.
.
.
.
.
.
.
.
.
.
.
.
.
.
.
.
.
.
.
.
.
.
.
.
.
.
.
.
.
.
.
.
.
.
.
.
.
.
.
.
.
.
.
.
.
.
.
.
.
.
.
.
.
.
.
.
.
.
.
.
.
.
.
.
.
.
.
.
.
.
.
.
.
.
.
.
.
.
.
.
.
.
.
.
.
.
.
.
.
.
.
.
.
.
.
.
.
.
.
.
.
.
1
1
1
1
2
2
3
3
. . . . . . .
. . . . . . .
. . . . . . .
Framework
. . . . . . .
. . . . . . .
. . . . . . .
. . . . . . .
. . . . . . .
. . . . . . .
. . . . . . .
. . . . . . .
. . . . . . .
.
.
.
.
.
.
.
.
.
.
.
.
.
.
.
.
.
.
.
.
.
.
.
.
.
.
.
.
.
.
.
.
.
.
.
.
.
.
.
.
.
.
.
.
.
.
.
.
.
.
.
.
.
.
.
.
.
.
.
.
.
.
.
.
.
.
.
.
.
.
.
.
.
.
.
.
.
.
.
.
.
.
.
.
.
.
.
.
.
.
.
.
.
.
.
.
.
.
.
.
.
.
.
.
.
.
.
.
.
.
.
.
.
.
.
.
.
.
.
.
.
.
.
.
.
.
.
.
.
.
.
.
.
.
.
.
.
.
.
.
.
.
.
.
.
.
.
.
.
.
.
.
.
.
.
.
.
.
.
.
.
.
.
.
.
.
.
.
.
.
.
.
.
.
.
.
.
.
.
.
.
.
.
.
.
.
.
.
.
.
.
.
.
.
.
.
.
.
.
.
.
.
.
.
.
.
.
.
.
.
.
.
.
.
.
.
.
.
.
.
.
5
5
5
6
6
6
6
7
7
8
8
8
9
9
. . . . . . . . . .
. . . . . . . . . .
Between Robots
. . . . . . . . . .
.
.
.
.
.
.
.
.
.
.
.
.
.
.
.
.
.
.
.
.
.
.
.
.
.
.
.
.
.
.
.
.
.
.
.
.
.
.
.
.
.
.
.
.
.
.
.
.
.
.
.
.
.
.
.
.
.
.
.
.
11
11
12
12
13
.
.
.
.
.
.
.
2 Choices
2.1 Programming Language
2.1.1 C++ . . . . . . .
2.1.2 Alternatives . . .
2.2 Graphical User Interface
2.2.1 Qt . . . . . . . .
2.2.2 Alternatives . . .
2.3 Controller Architecture
2.3.1 UDP Socket . . .
2.3.2 Alternatives . . .
2.4 Physical Simulation . .
2.4.1 Box2D . . . . . .
2.4.2 Alternatives . . .
2.5 Plugin Architecture . . .
3 Results
3.1 Benchmark . . . . . .
3.2 Future Work . . . . .
3.2.1 Communication
3.2.2 World Editor .
.
.
.
.
.
.
.
.
.
.
.
.
.
.
.
.
.
.
.
.
.
.
.
.
.
.
.
.
v
.
.
.
.
.
.
.
.
.
.
.
.
.
.
vi
CONTENTS
3.2.3
3.2.4
3.2.5
3.2.6
Automatically Start Controllers .
Improve Friction Model . . . . .
More Sensor Types . . . . . . . .
Port Chirp Library to Simulator
.
.
.
.
.
.
.
.
.
.
.
.
.
.
.
.
.
.
.
.
.
.
.
.
.
.
.
.
.
.
.
.
.
.
.
.
.
.
.
.
.
.
.
.
.
.
.
.
.
.
.
.
.
.
.
.
.
.
.
.
Bibliography
Appendices
3.3 Documentation . . . . . . . . . . . . .
3.4 Building and Running ChirpSim . . .
3.4.1 Building . . . . . . . . . . . . .
3.4.2 Running . . . . . . . . . . . . .
3.5 Controller Server API . . . . . . . . .
3.6 Chirp Robot Controller API . . . . . .
3.6.1 ”setspeed” Message Details . .
3.6.2 ”getsensors” Message Details .
3.6.3 Example Controller in Python
3.7 World Format . . . . . . . . . . . . . .
3.7.1 Root Object . . . . . . . . . .
3.7.2 Chirp Object . . . . . . . . . .
3.7.3 Wall Object . . . . . . . . . . .
3.7.4 PushableObject Object . . . .
13
13
14
14
17
.
.
.
.
.
.
.
.
.
.
.
.
.
.
.
.
.
.
.
.
.
.
.
.
.
.
.
.
.
.
.
.
.
.
.
.
.
.
.
.
.
.
.
.
.
.
.
.
.
.
.
.
.
.
.
.
.
.
.
.
.
.
.
.
.
.
.
.
.
.
.
.
.
.
.
.
.
.
.
.
.
.
.
.
.
.
.
.
.
.
.
.
.
.
.
.
.
.
.
.
.
.
.
.
.
.
.
.
.
.
.
.
.
.
.
.
.
.
.
.
.
.
.
.
.
.
.
.
.
.
.
.
.
.
.
.
.
.
.
.
.
.
.
.
.
.
.
.
.
.
.
.
.
.
.
.
.
.
.
.
.
.
.
.
.
.
.
.
.
.
.
.
.
.
.
.
.
.
.
.
.
.
.
.
.
.
.
.
.
.
.
.
.
.
.
.
.
.
.
.
.
.
.
.
.
.
.
.
.
.
.
.
.
.
.
.
.
.
.
.
.
.
.
.
19
19
19
19
20
20
20
20
21
21
22
22
22
23
24
Chapter 1
Introduction
1.1
Motivation
The Chirp robot needed a simulator able to run a full swarm experiment without
slowing down too much. After looking at a few simulators capable of simulating
custom robots, I found a few issues stopping me from creating a model for the
Chirp robot for these simulators. Some simulators are simply too slow, trying
to be too realistic to be able to run many hundreds of robots concurrently in
near real-time. Others are too complex to quickly jump into, requiring the user
to understand yet another layer of abstractions or requiring a complex setup to
build and run the simulator.
I wanted to make a simulator capable of running hundreds of robots concurrently
while being relatively simple to use and learn. It needs to be accurate enough to
be useful in experiments, but simple enough to be able to handle many objects
moving at once.
1.2
1.2.1
Existing Simulators
Webots
Webots was originally started as an attempt to improve the Khepera Simulator by
adding realistic vision sensors and allowing for more robotics architectures.[1] It
comes with a few example worlds showing several robots in use, like a gantry robot
1
2
CHAPTER 1. INTRODUCTION
playing the towers of Hanoi, a hexapod robot walking, a swimming salamander
robot, a stewart platform robot and more.[2]
It supports writing controller code for both simulator and a physical robot through
a single API, compiling it to either target through makefiles linking against the
correct library. Webots comes with support for cross-compiling code to multiple existing robots, like the e-puck, Khepera, Hemisson, LEGO Mindstorms and
Aibo. Users are able to extend this to their own robots, providing an implementation of the API that runs on their design and a makefile able to cross-compile
to the architecture.[3]
Webots has a Fast2D simulation mode that uses the Enki simulator as a backend.
This removes a lot of the features Webots have, but speeds up the simulation
drastically by simplifying the environment being simulated. Enki is sadly not
integrated too well, being unable to simulate many objects used in normal Webots
because of how they are defined.
While the Fast2D mode definitively enables Webots to be used with swarm experiments, it is relatively hard to use. The world can only have a restricted set
of items in it for the simulator to recognize them, otherwise they will be ignored.
Webots is also very expensive to license, and with Fast2D it is merely a frontend
for the free Enki simulator.
1.2.2
Enki
Enki is a fast 2D robot simulator created by Stephane Magnenat. It is used in
Webots as a Fast2D-plugin, but can be run alone as a standalone simulator. Enki
supports several robots out of the box, like the Alice, the e-puck, the khepera
and the s-bot. It is also possible to extend Enki to add support for custom robots
and the sensors used by this.
1.2.3
Player/Stage
The Player/Stage project consists mainly of two applications: The Player robot
device server and the Stage multiple robot simulator.
Player works as an abstraction layer over the hardware, giving a predefined
set of interfaces to interact with devices on a robot. It contains client libraries
in multiple languages to help write controllers for the robots, but any language
able to do TCP networking can communicate with Player.
1.3. THE CHIRPSIM PROJECT
3
Stage is a multi-robot simulator able to simulate a simple 2D environment.
The environment is simplified to be able to run many robots concurrently, or
run a few computation heavy controllers without being limited by the simulator
itself.
It exposes all sensors and actuators through Player interfaces so that clients are
able to run through these interfaces on both the simulator and the physical robot.
See [4] for more details on the Player/Stage project.
1.3
The ChirpSim Project
ChirpSim is a simulator written for the Chirp robot, developed for use in swarm
experiments, and aims to be capable of running several hundreds of robots simultaneously in a simple 2D environment.
1.3.1
Goals
The goals of the ChirpSim project are:
• The ability to run hundreds of Chirp robots concurrently in real-time.
• A simulation that is quick, but realistic enough to be useful to simulate
experiments.
• A simple interface to code controllers against.
The questions I needed to answer were:
• Which programming language should I use?
• What can I use to create the user interface?
• How can I scale the controller system to be able to run hundreds of controllers concurrently against robots in the simulation?
• What are my options for simulating a physical world?
• How can I enable extensibility?
4
CHAPTER 1. INTRODUCTION
Chapter 2
Choices
2.1
Programming Language
I had a couple of requirements to help me select a programming language for the
simulator. I wanted a language that can be used for writing high-performance
applications, stable, mature and that I have some experience in.
2.1.1
C++
C++ is a language often used for real-time games, simulations and in software
crunching numbers. It is able to use many C libraries directly, and can also
export a C interface if needed for other languages to make use of. There are also
many C++ libraries and frameworks to help implement desired functionality like
networking, GUI and physics simulation. It compiles into native code for the
CPU, which gives it high performance but forces it to be recompiled for each
platform it targets.
ChirpSim has around 16 ms between each frame to simulate and draw the environment while handling messages sent by controllers to the robots. C++ has
libraries to solve that efficiently and quickly, making it a good choice to achieve
the requirements set. Because of this I settled on C++ as my language of choice.
5
6
2.1.2
CHAPTER 2. CHOICES
Alternatives
Java is another language that can reach the speed requirements set by the
program. It runs on a virtual machine, enabling it to run on multiple platforms
without having to be compiled separately for each. Java is slower than C++, but
comes with a much larger standard library to help ease development.
I chose C++ over Java because the Qt framework gave me the convenience of the
Java standard library, along with QGraphicsView and its related classes allowing
me to build a moving scene more easily than in Java.
2.2
2.2.1
Graphical User Interface Framework
Qt
Qt is a cross-platform application and UI framework for C++. It contains many
features like networking, threading, database connectors, multimedia and camera
playback, unit testing along with classes to build a graphical user interface. It
also contains an implementation of JavaScript extended with support for signals
and slots. This allows applications to be scriptable, having scripts react to events
happening in the application.[5] It extends C++ through a preprocessor they call
the Meta-Object System, enabling signals and slots, reflection, qobject cast which
is a more efficient version of the standard C++ dynamic cast.[6]
I chose Qt because of the QGraphicsView class and related classes, a scene graph
with built in scaling, moving and rotation of the view. Every node in the scene
can respond to mouse events, keyboard events when selected and more, making it
easier to interact with the scene compared to having to implement it all manually.
I can also create my own items for the scene that draw themselves to achieve the
look I want.
2.2.2
Alternatives
wxWidgets is a cross-platform library for building GUIs. It is available for
Windows, OS X, Linux and UNIX, along with some mobile and embedded operating systems like iOS and Windows CE. Along with the core library there are
several libraries bundled with the download. These include networking, extra
widgets for GUIs, animations and widget layout, making it a good alternative to
Qt.[7]
2.3. CONTROLLER ARCHITECTURE
7
I chose Qt over wxWidgets because I was unable to find a widget similar to the
QGraphicsView of Qt. This would mean I would’ve needed to implement scaling,
rotation, and translation of the scene myself, along with mouse and keyboard
handling for each item.
GTKMM is the C++ bindings to the Gtk+ toolkit used in the GNOME desktop environment. It only offers classes for making a GUI, meaning the user has to
find other libraries for any other functionality required by the application. The
GNOME project provides two companion projects in glibmm and libsigc++.[8]
glibmm is a C++ wrapper around glib and provides threading, networking, smart
pointers, a main event loop, asynchrous IO and more.[9] libsigc++ provides a signal/slot system similar to Qt, but implemented without a preprocessor step.[10]
A GUI can be quickly created in GLADE, a software specialized in creating a
GTK+ GUI and saving it as an XML file. These XML files can be read by
GTKMM to rebuild the GUI as designed in GLADE. This makes it easier to
rapidly evolve the user interface, and allows stakeholders to see a close mockup
of the user interface without having to flesh out the whole application. It is also
possible to create the GUI directly in code where needed.
I chose Qt over GTKMM and glibmm because it, like wxWidgets, lacks an answer
to QGraphicsView. It also fails to create a native-looking GUI, instead opting
for its own look and feel.
2.3
Controller Architecture
A swarm of robots is a highly distributed computing platform, containing a controller for each robot that runs separate from the rest of the swarm. For a
simulator this means each robot must have at least one controller running with
no method of directly reading any state but its own from the simulator. Due
to the amount of robots often employed in a swarm experiment it is unfeasible
to run the controllers synchronously and sequentially with the simulation as this
would scale poorly.
2.3.1
UDP Socket
The simulator will start a new thread listening on messages from a UDP socket,
forwarding any message read to the controller interface of a robot based on id.
The controller processes the message further before calling the correct setter or
8
CHAPTER 2. CHOICES
getter to finish handling the message, returning the string ”ok” plus any data
expected. This is kept simple intentionally because I wanted the least amount of
overhead for controllers as they communicate with the simulator.
I elected to use a UDP socket to read short messages over localhost on a separate
thread from the simulation. It is a very simple protocol that most languages
have some support for, which makes it possible to start creating controllers for
the simulator relatively quickly.
2.3.2
Alternatives
Zero Message Queue is a library for implementing a fast message queue
between threads, processes and machines. It is available in many languages,
works on most operating systems and implements multiple message carriers. It
tries to abstract away where the recipient of the message is, whether it is over
a local socket to another thread or process, or to a completely different machine
on the local network.[11]
I chose not to use this because it feels like overkill for the project, especially when
the simulator is intended to run on one computer with very simple interfaces for
the controllers. It also requires more setup compared to the UDP socket solution,
making it harder to jump in and start making controllers for the simulator.
See [11] for more information.
2.4
Physical Simulation
I decided to use a library for the physics of the simulation. Some of the key
features I was looking for were speed, ease of use and amount of code examples
and tutorials available. The speed requirement enabled me to quickly discard
physics engines made for 3D simulations as the extra dimension would go to
waste and would increase the simulation complexity.
2.4.1
Box2D
Box2D is a physics engine written in C++ with a focus on speed. It simulates
a 2D environment, with or without gravity, filled with bodies and sensors that
interact with each other.[12] It has been used to simulate 2D environments in
many applications requiring high speed per step, making it a good match for
2.5. PLUGIN ARCHITECTURE
9
my goals with the simulator. It has been ported to many languages, e.g. Java,
C#, Python, Javascript, which means the simulator can be ported to another
language without having to rewrite the physics layer.
Box2D has an active community behind it, helping new users through well-written
tutorials and helpful discussions on the official forums of Box2D. This makes it
very easy to get started on the physics engine and understand how to implement
desired behavior.
See http://box2d.org for more information.
I chose Box2D because of the amount of example code and tutorials explaining
the concepts available. It is sufficiently fast, has a mature API, and is relatively
easy to customize. I also have more experience using it from past projects.
2.4.2
Alternatives
Chipmunk2D is an alternative 2D physics engine often used in real-time environments. It is based on an early version of Box2D, but has since departed
in many areas to distinguish it from Box2D.[13] It is written in the C language,
enabling many languages to use it with relative ease without having to write a
port. It comes in a commercial pro version optimized for use on ARM processors
and contains tools for generating collision geometry from images and procedural
data.[14] Neither of these is important for ChirpSim due to it running on x86
processors and only using relatively simple shapes for most objects.
I decided against Chipmunk2D because I found less tutorials easily available, I
prefer an object-oriented API and I have less experience using it.
2.5
Plugin Architecture
I considered a plugin architecture for the root objects in the world, so that each
object is implemented as a plugin loaded dynamically from a plugin-folder. Qt
has support for loading plugins at runtime through the class QPluginLoader, as
long as it implements an interface class available in the core. This enables an
application to search for plugins in a folder and load them all dynamically at
run time. For ChirpSim this would mean loading new physical objects through
a plugin folder, extending the simulator without having to recompile it all.
I decided against using plugins because any plugin has to be compiled once per
platform it will be used on, and against the specific version of Qt the core appli-
10
CHAPTER 2. CHOICES
cation uses. This will become somewhat of a maintenance nightmare over time,
as plugins has to be updated to keep compatibility with the core application on
new releases. It’s better to simply keep it as one application that is open sourced
and open for contributions.
Chapter 3
Results
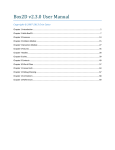
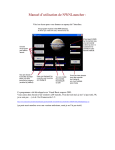
The simulator is able to run many robots concurrently without slowing down
much. Figure 3 and table 3.1 show the performance of the simulator while running
200 robots simultaneously, in a close quarters world where the robots collide with
the walls or each other frequently. The controller architecture ensures that many
controllers can run asynchronously of the simulator, only affecting the simulator
through bottlenecking the CPU.
I have tried to keep the code relatively clean, simple, straight forward and documented so it is easier to understand the structure of the code and start extending
it to support features needed for new experiments.
The simulator has a fast forward function that will allow the user to speed up
2x and 3x real-time. It is important to note that controllers run asynchronously
from the simulator and will get less computation time between frames to work.
3.1
Benchmark
The benchmark was run on a laptop with a dual core Intel i7-3520M processor
running at 2.90GHz. I let it run for about 5000 frames, then discarded a couple
of hundred frames at the start and end to avoid measuring unstable frames as it
starts up and shuts down. The goal is to keep each frame within 16 milliseconds,
allowing the simulation to run at real-time speeds. The world contained 200
robots with a controller each, two small static obstacles in the middle and the
walls surrounding the arena. Table 3.1 contains the results of this benchmark.
11
12
CHAPTER 3. RESULTS
Figure 3.1: 200 robot experiment.
Average
Stdev
Minimum
Maximum
7.81 ms
0.94 ms
6 ms
35 ms
Table 3.1: Time spent per frame with 200 robots and 200 controllers. Data was
collected over 3200 frames picked in the middle of a run to avoid warm-up period.
3.2
Future Work
3.2.1
Communication Between Robots
The IR sensor class used in the Chirp class has a function objectHit() that
allows the user to get a pointer to the closest object a distance sensor can sense.
This can be used to implement a fake communications channel simulating how the
real Chirp robots communicate over the distance sensors. A controller message
looking something like:
<id> sendmessage <message>
and
<id> getmessages
could be used as an API to support message sending.
Alternatively the robot controller can receive the messages through a push functionality, where the simulator receives a message to be sent out on a specific
sensor and automatically sends it to the robot being hit by the sensor.
3.2. FUTURE WORK
13
Messages should be in the same format as the physical robot uses, which has yet
to be defined at the time of writing.
3.2.2
World Editor
The simulator as of now has no way to visually edit a world, relying on users to
manually edit the JSON-file detailing the world instead. An editor for simulation
worlds would be a very beneficial addition to the simulator, enabling users to
visually edit their worlds to suit their experiments.
I think the editor should be a separate program so to not affect the simulator
itself, and avoiding complexity in the user interface for the simulator.
3.2.3
Automatically Start Controllers
The world concept should be changed from being just a json-file to being a folder
with the following items:
• JSON-file describing the environment and objects within it.
• Controller-folder containing the controller executables attached to this
world. These can be referenced by the JSON-file and the simulator should
automatically start the controller when the world is loaded.
Right now the world file has no way to say which controller is attached to each
robot, and assumes instead that the user starts the controllers manually. If the
simulator could automatically start the controllers it would be a big improvement
to usability.
3.2.4
Improve Friction Model
Due to time constraints I was unable to model the friction in PushableObject
correctly. I set a constant 0.3f as friction on each part of the body, which is used
for both static and kinetic friction. A proper simulation of the friction would
model both static and kinetic friction, and apply the correct force to the body to
counteract any movement.
14
3.2.5
CHAPTER 3. RESULTS
More Sensor Types
The prototype only supports distance sensors. This is enough to support the full
functionality of the base Chirp model, but there will be demand for other types
of sensors like line-following, light, heat or alcohol to mention a few.
Light, heat and alcohol sensors can be implemented using very small, circular
Box2D sensor bodies to simulate the actual sensors, then a bigger circular Box2D
sensor body to simulate the area where detection is possible. Calculating the
distance from the sensor to the center of the detection area will give a scale
that can be used to calculate the sensor value, e.g. distance2 for light sensors.
Collision filtering will then be used to make the areas only detectable by the
sensor assigned to that type of area.
A line following sensor is slightly different, in that the detectable area isn’t a circle
but instead a line segment. The first type is the line segments on the ground to
follow, categorized so they only collide with line sensor bodies. The other type
of sensor are the line sensors themselves, implemented through Box2D sensors to
only detect ”collisions” with the line segments.
See:
https://www.iforce2d.net/b2dtut/collision-filtering,
https://www.iforce2d.net/b2dtut/sensors,
https://www.iforce2d.net/b2dtut/raycasting and
https://www.iforce2d.net/b2dtut/world-querying
in particular to read more about sensors, collision filtering and raycasting the
world works in Box2D. World querying is a more efficient way to do a raycast,
and is the preferred way to do so.
3.2.6
Port Chirp Library to Simulator
The Chirp robot will have a library for ease of programming it, giving a much
higher-level view and access of the functionality in the robot. The interface used
by this library should be ported to a simulator library, allowing users to use the
exact same code for the simulator and the physical robot, only needing to change
the library linked to when compiling.
For a C++ implementation this would be relatively easy to do, as the original
library will be written in C++. The simulator version of the library would use
the same headers, but with a different implementation of all functions in the cppfiles. This way, when a user controller wants to compile against the simulator it
3.2. FUTURE WORK
15
can simply link against the simulator library. Linking against the physical robot
library will make the exact same code work on the robot instead.
For other languages the Simplified Wrapper and Interface Generator (SWIG)
can be used to generate an interface those languages can use. SWIG supports 19 languages as of June 18, 2013, but an up-to-date list can be found
at http://www.swig.org/compare.html.
16
CHAPTER 3. RESULTS
Bibliography
[1]
Olivier Michel. “Webots: Symbiosis between virtual and real mobile robots”.
In: Virtual Worlds. Springer. 1998, pp. 254–263.
[2]
Cyberbotics S.à r.l. Webots: robot simulator - Documentation - User guide Section 3.1. 2013. url: http://www.cyberbotics.com/guide/section3.
1.php (visited on 06/16/2013).
[3]
Cyberbotics S.à r.l. Webots: robot simulator - Documentation - User guide
- Section 5.8. 2013. url: http://www.cyberbotics.com/dvd/common/
doc/webots/guide/section5.8.html (visited on 06/16/2013).
[4]
Brian Gerkey, Richard T Vaughan, and Andrew Howard. “The player/stage
project: Tools for multi-robot and distributed sensor systems”. In: Proceedings of the 11th international conference on advanced robotics. Vol. 1. 2003,
pp. 317–323.
[5]
Qt Project Hosting. Documentation — Qt Project. 2013. url: http://qtproject.org/doc/ (visited on 06/16/2013).
[6]
Qt Project Hosting. The Meta-Object System — Documentation — Qt
Project. 2013. url: http://qt-project.org/doc/qt-4.8/metaobjects.
html (visited on 06/16/2013).
[7]
Julian Smart et al. wxWidgets 2.8.12: A portable C++ and Python GUI
toolkit. 2011. url: http : / / docs . wxwidgets . org / stable/ (visited on
06/16/2013).
[8]
GNOME project. Features - gtkmm - C++ Interfaces for GTK+ and GNOME.
2013. url: http://docs.wxwidgets.org/stable/ (visited on 06/16/2013).
[9]
GNOME project. libsigc++ – The Typesafe Callback Framework for C++.
2012. url: https://developer.gnome.org/glibmm/2.34/ (visited on
06/16/2013).
17
18
BIBLIOGRAPHY
[10]
Martin Schulze and Murray Cumming. libsigc++ – The Typesafe Callback
Framework for C++. 2013. url: https://developer.gnome.org/glibmm/
2.34/ (visited on 06/16/2013).
[11]
iMatix Corporation. The Intelligent Transport Layer - zeromq. 2013. url:
http://www.zeromq.org/ (visited on 06/16/2013).
[12]
Erin Catto. Box2D v2.2.0 User Manual. 2013. url: http://www.box2d.
org/manual.html (visited on 06/16/2013).
[13]
Howling Moon Software. Chipmunk2D Physics. 2013. url: http://chipmunkphysics.net/ (visited on 06/16/2013).
[14]
Howling Moon Software. Chipmunk2D Physics Pro. 2013. url: http://
chipmunk-physics.net/chipmunkPro.php (visited on 06/16/2013).
Appendices
3.3
Documentation
The documentation has been attached along with this report, placed in the docs
folder of the zip-file. This contains call/caller graphs, inheritance graphs, include
graphs and class diagrams. It has been generated with Doxygen, a standard
utility for generating documentation of code.
3.4
3.4.1
Building and Running ChirpSim
Building
ChirpSim has the following requirements to build:
Box2D compiled for your platform as a static library, then place the output files
in the Libraries/lib folder. For windows the output files are Box2D.lib and
Box2Dd.lib. For OS X and Linux the output file is Box2D.a.
Qt 5 for your platform. Easiest way to get this set up is to download the installer for your platform from http://qt-project.org/downloads. This
contains Qt Creator, an IDE for C++ able to build and run Qt projects.
Open ChirpSim.pro in Qt Creator and build in release mode. The build button
is on the bottom left corner of the IDE window.
19
20
3.4.2
APPENDICES
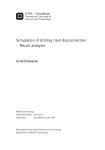
Running
After starting ChirpSim, click the FileFile menu and select Load World. In the
ChirpSim-win32bin/examples folder there are three worlds containing roughly
the same things, but with differing amounts of robots. Select one of these in
the Open File dialog and put the window back in focus (Yes, it is a bug). Now
the world is loaded, and you can move the camera using either the scrollbars or
the arrow keys on the keyboard. The Zoom menu lets you zoom in or out, but
scrolling the mouse wheel (or using the trackpad scrolling gesture) will also zoom.
There is also a file named runbots.py, which implements a random controller
setting random speeds and reading the sensor values continuously. It accepts
the number of robots to run either as a parameter when started, or by manually
typing it in when prompted. To run it, execute it as a normal python script.
3.5
Controller Server API
The controller server in ChirpSim listens to port 37875 only. It will receive a
message and read the ID number at the start, then forward the rest of the message
to the controller attached to the robot with the correct ID. This will be the entry
point for all controllers to communicate with any robot in the simulation.
3.6
Chirp Robot Controller API
The Chirp robot implements a very simple API with only two messages recognized
at this time: setspeed and getsensors. The returned message will start with ”ok”
if there were no errors completing the request, or ”error” if an error happened.
The controller server on the simulator requires each message to be prepended with
the id of the robot receiving the message. This makes the connection completely
stateless, and helps make it easier to understand.
3.6.1
”setspeed” Message Details
Template:
<id> setspeed <leftWheelSpeed> <rightWheelSpeed>
Parameters:
<id > id of the robot being controlled.
<leftWheelSpeed > speed desired on the left wheel
3.6. CHIRP ROBOT CONTROLLER API
21
<rightWheelSpeed > speed desired on the right wheel
Returns:
”ok”
3.6.2
”getsensors” Message Details
Template:
<id> getsensors
Parameters:
<id > id of the robot being controlled.
Returns:
”ok <sensor1> <sensor2> . . . <sensor8>”
where sensor1 to sensor8 are the sensor values read from each sensor, separated
by a space.
3.6.3
Example Controller in Python
This controller simply sets the speed of the robot with id to random numbers
between min speed and max speed
import random , socket , time
def runbot ( id ):
min_speed = -10
max_speed = 30
host = " 127.0.0.1 "
port = 37875
s = socket . socket ( socket . AF_INET , socket . SOCK_DGRAM )
speed_msg = " {0} setspeed {1} {2} "
sensor_msg = " {0} getsensors "
while True :
left = random . randint ( min_speed , max_speed )
right = random . randint ( min_speed , max_speed )
s . sendto ( speed_msg . format ( id , left , right ) ,
( host , port ))
tmp = s . recv (1024)
s . sendto ( sensor_msg . format ( id ) , ( host , port ))
tmp = s . recv (1024)
22
APPENDICES
time . sleep (0.016) # sleep 16 ms
3.7
World Format
3.7.1
Root Object
The root object only contains the attribute ”children”, which is an array of
objects in the world. This allows for attributes to be set on the world at the
root object while keeping it easy to access the objects under the world. If the
root object was the children array it would be necessary to parse whether each
element in the array is an attribute or a physical object of the world.
Listing 3.1: Root object
{
" children ": [
< object1 > ,
< object2 > ,
< object3 >
]
}
Attributes:
children contains all the objects currently in the world.
3.7.2
Chirp Object
The Chirp object contains all the attributes required to create a Chirp object in
the simulator. It can be placed at different places in the world by setting the
position attribute of the object.
Listing 3.2: Chirp object
{
" type ": " Chirp " ,
" position ": {
" x ": 73.0 ,
" y ": -84.0
},
" id ": 0 ,
3.7. WORLD FORMAT
23
" angle ": 120 ,
" noisemax ": 0.1
}
Attributes:
string type must be ”Chirp” (not case-sensitive)
object position has two attributes:
float x x component of the position
float y y component of the position
int id unique id of the robot, used for sending messages to control the robot
float angle starting angle of the robot
float noisemax affects how much noise is applied to the wheel speeds during
simulation.
3.7.3
Wall Object
The Wall object is a static body in the world, impossible to move by any means. It
is created as a polygon body through vertices stored in the object. These vertices
must form a convex shape and be in counterclockwise order for the simulator to
accept them. To simulate a concave shape, split it into multiple convex parts and
put those in the hulls attribute.
Listing 3.3: Wall object
{
" type ": " Wall " ,
" position ": {
" x ": -10 ,
" y ": -10
},
" angle ": 0 ,
" hulls ": [
[
{ " x ": -10 , " y ": 10 } ,
{ " x ": -10 , " y ": -10 } ,
{ " x ": 10 , " y ": -10 }
]
]
24
APPENDICES
}
Attributes:
string type must be ”Wall” (not case-sensitive)
object position has two attributes:
float x x component of the position
float y y component of the position
float angle start rotation in degrees
list hulls list containing hull objects, which are lists of position objects:
object element position object containing an x and y coordinate:
float x x component of the position
float y y component of the position
3.7.4
PushableObject Object
The PushableObject object is similar to the Wall object, only implemented as a
dynamic body instead of a static body. This means that robots and other objects
can push them around, unlike the walls that are immovable. It currently uses
dampening to emulate a bit of friction, but it should be improved to properly
simulate the friction instead.
The difference between the Wall object and the PushableObject object is the
density attribute. This is used by Box2D to calculate the mass of the object.
Listing 3.4: PushableObject Object
{
" type ": " PushableObject " ,
" position ": {
" x ": 10 ,
" y ": 10
},
" density ": 1.0 ,
" angle ": 180 ,
" hulls ": [
[
{ " x ": -10 , " y ": 10 } ,
3.7. WORLD FORMAT
25
{ " x ": -10 , " y ": -10 } ,
{ " x ":
0 , " y ": -10 }
],
[
{ " x ":
{ " x ":
{ " x ":
0 , " y ":
0 , " y ":
10 , " y ":
-10 } ,
10 } ,
10 }
]
]
}
Attributes:
string type must be ”PushableObject” (not case-sensitive)
object position has two attributes:
float x x component of the position
float y y component of the position
float density density of the object (used to calculate mass)
float angle start rotation in degrees
list hulls list containing hull objects, which are lists of position objects:
object element position object containing an x and y coordinate:
float x x component of the position
float y y component of the position