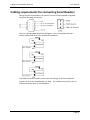
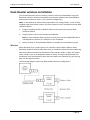
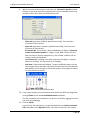
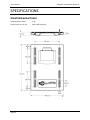
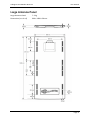
1
PUBLISHED BY Gallagher Group Limited Kahikatea Drive, Private Bag 3026 Hamilton, New Zealand www.gallagher.com Copyright © Gallagher Group Limited 2015. All rights reserved. Gallagher SmartReader BR Series User Manual 3E0680 - Edition 13 - May 2015 DISCLAIMER Whilst every effort has been made to ensure accuracy, neither Gallagher Group Limited nor any employee of the company, shall be liable on any ground whatsoever to any party in respect of decisions or actions they may make as a result of using this information. In accordance with the Gallagher policy of continuing development, design and specifications are subject to change without notice. Developed and manufactured by Gallagher Group Limited, an ISO 9001:2000 Certified Supplier. Table of Contents Overview ............................................................................................................................. 1 Electronic ID tags .............................................................................................................. 2 Storage of SmartReader when not in use ......................................................................... 2 Configurator ...................................................................................................................... 2 MyScale Pro ...................................................................................................................... 2 User information ................................................................................................................. 3 SmartReader user interface .............................................................................................. 3 Using the SmartReader ..................................................................................................... 7 SmartReader power options ............................................................................................. 9 Installation ........................................................................................................................ 12 Connecting the SmartReader batteries .......................................................................... 12 Mounting the Antenna Panel ......................................................................................... 13 Mounting the SmartReader ............................................................................................ 15 Testing the SmartReader EID tag read range ................................................................. 17 Advanced Electronic ID tag read range testing .............................................................. 19 Advanced Electronic ID tag read range testing .............................................................. 24 Installing multiple SmartReaders ....................................................................................... 25 Wireless installation ........................................................................................................ 25 Wired installation ........................................................................................................... 26 Cabling requirements for connecting SmartReaders ..................................................... 27 Dual‐Reader Mode .......................................................................................................... 28 Dual‐Reader wired installation ....................................................................................... 29 Dual‐Reader wireless installation ................................................................................... 31 MyScale Pro ....................................................................................................................... 32 Introduction .................................................................................................................... 32 Installation ...................................................................................................................... 32 Starting MyScale Pro ....................................................................................................... 37 Closing MyScale Pro ........................................................................................................ 37 MyScale Pro main menu ................................................................................................. 38 Transfer sessions from SmartReader to computer ........................................................ 41 Reviewing SmartReader session file names ................................................................... 42 Session files ..................................................................................................................... 43 MyScale Session Editor ................................................................................................... 45 Creating an NLIS Transaction File ................................................................................... 46 Using CCIA Transaction Files ........................................................................................... 52 Accessories ........................................................................................................................ 64 4 Metre Antenna Extension Cable Kit ............................................................................. 64 Optional ............................................................................................................................. 66 Overview ......................................................................................................................... 66 Bluetooth RS‐232 Adaptor .............................................................................................. 66 Bluetooth USB Adaptor ................................................................................................... 67 Specifications ..................................................................................................................... 70 Small Antenna Panel ....................................................................................................... 70 Large Antenna Panel ....................................................................................................... 71 SmartReader ................................................................................................................... 72 Battery ............................................................................................................................ 72 Battery charger ............................................................................................................... 72 Standards ........................................................................................................................ 72 Waste Electrical and Electronic Equipment .................................................................... 74 Gallagher SmartReader BR Series User Manual OVERVIEW The SmartReader BR Series enables Electronic ID tags to be automically read as animals pass by the SmartReader. The Electronic ID tag data can be downloaded and stored on a computer as required, or sent to a connected Smartscale. The SmartReader BR Series has two parts: The SmartReader The Antenna Panel The SmartReader contains the memory and rechargeable batteries. The rechargeable batteries run the Antenna Panel for up to 8 hours and the memory can store up to 20,000 tag numbers. The Antenna Panel contains the aerial used to capture the Electronic ID tag data. Two Antenna Panel sizes are available to suit the animals being scanned. There are two models in the SmartReader BR Series: BR600 RFID Panel Reader (G03113 & G03121) Small Antenna Panel (600 mm x 400 mm). SmartReader with memory and re‐chargeable batteries. Serial port (DB9) for downloading collected information to a computer, hand held device or Scale. USB adapter. Recommended if scanning constrained animals (sheep and cattle) on the move. BR1300 RFID Panel Reader (G03113 & G031424) Large Antenna Panel (1300 mm x 600 mm). SmartReader with memory and re‐chargeable batteries. Serial port (DB9) for downloading collected information to a computer, hand held device or Scale. Page 1 User Manual Gallagher SmartReader BR Series USB adapter. Recommended if scanning animals (cattle and deer) on the move. If required, multiple SmartReaders can operate in close proximity, so long as they are setup to ensure all Electronic ID tags are read correctly. Electronic ID tags The Gallagher SmartReader enables you to read both HDX (Half Duplex) and FDX‐ B (Full Duplex‐B) Electronic ID tags. HDX and FDX‐B Electronic ID tags operate differently and therefore have different applications. Storage of SmartReader when not in use For optimal battery life, Gallagher recommends that you store the SmartReader in a cool, dry area (15 to 25 ° C) out of direct sunlight. Charge the battery completely before storage, as the battery may lose capacity if left empty for a period of time. Configurator The Configurator is a software program provided with the SmartReader BR Series. Use it to alter settings and to diagnose performance problems in the installed SmartReader. The Configurator is for advanced users and should be used with care as altering settings affects the operation of the SmartReader. The Configurator software is automatically installed with the MyScale Pro software. MyScale Pro The MyScale Pro software enables you to transfer Electronic ID tag numbers stored in the SmartReader memory from the SmartReader to a computer. Note: The SmartReader does not need to be connected to the panel for this activity. With MyScale Pro you can perform the following functions: Page 2 Transfer sessions from the SmartReader Change session file names View and edit sessions Print sessions Create long term record storage using MyScale Pro to backup information from the SmartReader Gallagher SmartReader BR Series User Manual USER INFORMATION SmartReader user interface Rotary dial The following table describes the three modes of the rotary dial. Mode Description OFF The SmartReader is OFF. ON The SmartReader is ON. The scanned Electronic ID data is sent out the Serial port (DB9). The data can then be captured by an external device such as a Scale or Computer. Note: Data is not stored in the internal memory. MEMORY The SmartReader is ON. The scanned Electronic ID data is: saved to the internal memory, and sent out via the Serial port (DB9) on the SmartReader. The data can then be captured by an external device such as a Scale or Computer. Page 3 User Manual Gallagher SmartReader BR Series Buttons The following table describes the function of each button. Button Function Reset Counter Only operational when the SmartReader is in ON mode. Press the Reset Counter button to reset the counter on the SmartReader. New Session Only operational when the SmartReader is in MEMORY mode. Press the New Session button to create a new session on theSmartReader and add all new Electronic ID tag reads to this session. All previous sessions are maintained until they are downloaded to the computer via MyScale Pro. A new session is created each time the SmartReader is turned on. Volume There are three volume modes on the SmartReader. 1. Flash and beep every read. (Default factory setting) 2. Flash and beep once 3. Volume Off To change the volume mode on the SmartReader while it is operating, press the Volume button once for each mode. Pressing the volume button will cycle through the 3 modes. Note: Warning beeps (low battery warning etc) ignore the Volume setting and beep as required. Audible beep The SmartReader beeps whenever one of the following situations occurs: Page 4 An Electronic ID tag has been read, except if the volume is set to OFF. The volume level is set. The battery charge level is low. This warning sounds regardless of the volume set. Gallagher SmartReader BR Series User Manual Display The following table describes the messages shown on the display. Message Description Blank The display is blank when the internal batteries are charging. BATT Displayed when the battery charge level is at a critically low level and the SmartReader is shutting down. For additional information, see Low voltage shutdown (p 10). VOLT Displayed when a power source providing a voltage greater than 16 V is connected to the SmartReader. The SmartReader automatically shuts down to protect the electronics. For additional information, see High voltage shutdown (p 11). FULL Displayed when the internal memory is full of Electronic ID tag data. You will need to download the Electronic ID tag data to a computer. See Transfer sessions from SmartReader to computer (p 41). Tag count Displays the number of Electronic ID tags read in this session, or the counter was reset to zero. Bargraph The bargraph on the SmartReader is used to indicate the following: Battery charge level Battery charging Beeper volume Successful tag read Battery charge level The battery charge levels display as follows: Fully charged Partially charged All bargraph lights are Some bargraph lights are constantly displayed. constantly displayed. Flat battery No bargraph lights are displayed. Note: A warning will sound, when one red bar is remaining. Page 5 User Manual Gallagher SmartReader BR Series Battery charging When the SmartReader is connected to a battery charger, the bargraph displays the charging status: Charging The battery level is indicated by the number of bars illuminated. The flashing bars indicate that charging is occurring. Note: The battery charger controls the charging of the internal batteries and stops the charging once the batteries are fully charged. Beeper volume Press the Volume button to change the beeper volume. Volume ON Volume OFF Successful tag read If set in the Configurator, each successful tag read triggers the bargraph to flash multiple times in an alternating pattern. Page 6 Gallagher SmartReader BR Series User Manual Using the SmartReader Configuring the SmartReader for use Each time you want to use the SmartReader you need to determine how you are going to use it. This determines: what device to connect to the SmartReader, and what operating mode to set on the SmartReader Connecting external devices 1. Are you connecting the SmartReader to an external device (Scale or Computer)? If yes, go to step 2. If no, no setup is required. 2. Connect the SmartReader to an external device. a) Ensure the SmartReader is turned OFF. b) Plug the supplied serial cable into the serial port on the SmartReader. c) Plug the other end into the device and set it up to receive the data. Notes: If your computer does not have a serial port, use the supplied DB9 to USB adaptor to connect to a USB port on the computer. If connecting to a Gallagher or Ruddweigh Scale, connect the serial cable into COM Port 2 on the Scale and set the port to EID Standard in the Communications menu. See your Scale manual for details. Setting the operating mode 1. Do you want to save the Electronic ID tag number to the internal memory? If yes, turn the dial to Memory. Go to next step. Note: Data is stored in the internal memory and is also sent out via the COM port in this mode. If no, turn the dial to ON. Go to next step. Note: Data is sent out via the COM port but is not stored in the internal memory in this mode. 2. Do you want to reset the counter to zero on the SmartReader? If yes, press the Reset Counter button. Go to next step. If no, go to next step. 3. Do you want to add the new tag reads to the existing session? If yes, end of procedure. If no, press the New Session button. Page 7 User Manual Gallagher SmartReader BR Series Note: A new session is always created when the SmartReader is turned off, then on. Scanning Electronic ID tags 1. Begin scanning Electronic ID tags. 2. Do you want to add the new tag reads to a new session? If yes, press the New Session button. Go to step 3. For further details, see Buttons (p 4). If no, go to step 3. 3. Continue until you have read all Electronic ID tags. Record limit The SmartReader can store up to 20,000 15 digit Electronic ID numbers. When the limit is reached the oldest recorded session will be removed to allow new records to be added. The SmartReader will display FULL, when the memory is full. Finishing a scanning session 1. Turn off the SmartReader. 2. If you had external devices connected to the SmartReader disconnect them. 3. On the SmartReader, unscrew the Amphenol connector locking nut and disconnect the antenna cable. 4. On the SmartReader, replace the cap onto the Amphenol socket and tighten to protect from debris. 5. Grasp the SmartReader on both sides and lift up until it clears the mounting bracket. 6. Screw the Amphenol connector on the antenna cable into the Amphenol socket on the Antenna Panel and tighten the locking nut. 7. Page 8 Note: This helps keep the Amphenol connector free of dust and debris. For information on downloading data from the SmartReader to your computer, see MyScale Pro (p 32). Gallagher SmartReader BR Series User Manual SmartReader power options Charging internal batteries The SmartReader will not operate with the battery charger connected. To charge the internal batteries in the SmartReader, complete the following steps: 1. Check the input voltage on the battery charger is correctly set (110 or 230 V AC). 2. Plug the battery charger into a power socket and turn on. 3. Connect the battery charger to the SmartReader. 4. On the battery charger, switch the unit on. 5. Check the LED on the battery charger to ensure SmartReader is being charged: Notes: The battery charge time is approximately 6 hours. Once the battery is fully charged the battery charger stops charging. The bargraph indicates the charge level by the number of static bars. See Bargraph (p 5). Page 9 User Manual Gallagher SmartReader BR Series Connecting to an external 12 volt battery To connect the SmartReader to an external 12 volt battery, complete the following steps: 1. Connect the supplied black and red battery lead to the SmartReader. 2. Connect the alligator clips to the 12 volt battery. Connect the Red clip to the Positive terminal Connect the Black clip to the Negative terminal. Notes: The bargraph displays the level of charge in the: external 12 volt battery, or internal battery, whichever is the greater. The internal batteries are not charged. Low voltage shutdown When the battery charge (for the battery providing power to the SmartReader) drops to below one bar the low battery beep sounds (four beeps) to indicate the battery has low voltage. This will continue regularly until the battery level becomes critical or until you charge the battery. This applies for both the internal and external (if connected) batteries. When the battery charge (for the battery providing power to the SmartReader) drops to a critical level, the SmartReader shuts down. During the shut down process the low battery beep sounds (four beeps) and the display shows BATT. The critical level occurs when the battery voltage drops below 11.5 volts. Replace the external battery or recharge the internal batteries. For further information on connecting an external 12 volt battery, see Connecting to an external 12 volt battery (p 10). Note: This warning sounds regardless of the volume level setting. Page 10 Gallagher SmartReader BR Series User Manual High voltage shutdown If the power source to the SmartReader provides a voltage greater than 16 V, the SmartReader automatically shuts down to protect the electronics. The display shows VOLT while shutting down. For additional information, see Display (p 5). Page 11 User Manual Gallagher SmartReader BR Series INSTALLATION Connecting the SmartReader batteries During factory assembly, two batteries are installed in the SmartReader. These batteries are not connected to the SmartReader to preserve the battery prior to first use. Once you are ready to use the SmartReader for the first time, it is necessary to connect the batteries. You do not need to disconnect the batteries again. 1. On a soft cloth, lay the SmartReader on its front. 2. Using a posi‐drive screw driver, remove the screws holding the lower back panel of the SmartReader. 3. Remove the lower back panel. 4. Remove the foam spacer between the batteries and retain. 5. Stand each battery up. 6. Connect the battery leads. Connect the longer leads to the left‐hand battery. Connect the Red lead to the red terminal. Connect the Black lead to the black terminal. 7. Lay down the batteries with the: Terminals to the top of the box and, The battery tops towards the connectors. Page 12 Gallagher SmartReader BR Series User Manual 8. Note: Take care not to damage the terminals when replacing the batteries Refit the foam spacer between the two batteries. 9. Note: This foam stops the batteries moving and damaging the terminals. Replace the lower back panel. 10. Replace the 4 posi‐drive screws and tighten. 11. Charge the internal batteries to ensure they are fully charged ready for use. See Charging internal batteries (p 9). Mounting the Antenna Panel Antenna Panel Kit The Antenna Panel kit contains the following components: Antenna Panel Mounting instructions Antenna Panel mounting kit: 4 x Washers M8 x 21 mm flat Stainless steel 4 x Bolt M8 x 70mm HEX Stainless steel 4 x Nut M8 HEX Stainless steel 4 x Screw Wood TEK 14 x 10 90mm 4 x Screw Wood TEK 14 x 10 65mm Notes on locating the Antenna Panel Gallagher recommends the following when installing the SmartReader Antenna Panel: The Antenna Panel can be mounted onto metal pipe or wood work of the animal handler but not solid steel handler walls. The edges of the Antenna Panel contain the antenna windings. This means that when the Antenna Panel is mounted, vertical bars should be kept away from the vertical edges of the Antenna Panel and horizontal bars should be kept away from the horizontal edges of the Antenna Panel. Considerations The position of the Antenna Panel installation depends on the type and size of the animals to be scanned and the size of Antenna Panel to be installed. Gallagher recommends you mount the Antenna Panel temporarily while you determine the most appropriate position. Mounting the Antenna Panel on a metal animal handler can alter the read range of the SmartReader. Gallagher recommends that the SmartReader is mounted on wood or spaced pipework. Multiple SmartReaders can be installed in close proximity to each other, so long as they are synchronised to ensure conflicts do not occur between SmartReaders. For further details, see Installing multiple SmartReaders (p 25). Page 13 User Manual Gallagher SmartReader BR Series Procedure 1. 2. 3. Use the defined mounting holes, because drilling through the Antenna Panel will damage the antenna. Measure the vertical range of the Electronic ID tags on the animals to be scanned. Determine the average height of the Electronic ID and mark this on the outside of the animal handler. Determine what the Antenna Panel is to be mounted on, wood or pipe work, and prepare the appropriate mounting hardware from the supplied kit. Wood ‐ washers and tek screws Pipe work ‐ washers, bolts and nuts 4. Page 14 Using the defined mounting holes, mount the Antenna Panel on the outside of the animal handler so that the middle of the Antenna Panel matches the average height. Gallagher SmartReader BR Series User Manual Note: DO NOT drill through the Antenna Panel as it will damage the antenna. Note: You may want to temporarily attach the Antenna Panel and test the read range prior to permanently attaching the Antenna Panel. Mounting the SmartReader Considerations Ensure the mounting location of the SmartReader provides protection from being knocked or damaged by animals. The SmartReader may need to be taken away from the Antenna Panel location to charge the internal batteries and to download the Electronic ID data to a computer. SmartReader Kit The SmartReader kit contains the following components: BR Series SmartReader with internal batteries Battery Charger MyScale Pro CD Instruction Manual (this manual) Cables: Short serial cable (DB9 to DB9) Long serial cable (DB9 to DB9) DB9 to USB adapter External battery cable (red and black) Mains power cord (Battery Charger) Page 15 User Manual Gallagher SmartReader BR Series Connecting the SmartReader to the Antenna Panel For information on using the 4 Metre Antenna Extension Cable Kit see 4 Metre Antenna Extension Cable Kit (p 64). 1. Ensure the SmartReader is turned off. 2. On the Antenna Panel, unscrew the Amphenol connector locking nut from the Amphenol socket and pull it down to unplug from the Antenna Panel. 3. 4. Mount the SmartReader on the mounting bracket by grasping the SmartReader on both sides and slide the back handle onto the mounting bracket. Connect the antenna cable to the SmartReader and tighten the locking nut. Page 16 Gallagher SmartReader BR Series User Manual Testing the SmartReader EID tag read range The SmartReader EID tag read range should be tested to ensure the animals passing through the animal handler are accurately and reliably identified. The SmartReader generates a balloon shaped read range (see diagram next page), within which EID tags are read reliably. The size of the read range for individual installations should be the width of the animal handler. The SmartReader EID tag read range for a particular installation is tested using the built in set up mode in the SmartReader. This set up mode changes how often the SmartReader beeps to confirm a tag read from “only on first read” to ”every read”. This enables you to easily test the SmartReader EID tag read range using the same tag. The section Testing the read range (p 17) describes how to complete an initial test on the SmartReader EID tag read range for your SmartReader installation. For more advanced testing, see Advanced EID tag read range testing (p 19). Note: The SmartReader is shipped in Setup mode. Accessing and exiting Setup mode To swap the SmartReader from Setup mode to Operational mode (or the reverse), complete the following steps: 1. Turn the SmartReader on. 2. Press and hold the Volume button. 3. Turn the SmartReader off. When you turn the SmartReader back on again the SmartReader will have swapped to the other mode. Note: Prior to use, ensure the SmartReader volume is on. Page 17 User Manual Gallagher SmartReader BR Series Testing the read range For your SmartReader installation you need to determine the size of the EID tag read range. If the read range is too small you need to take steps to improve it. You need to test the appropriate type of EID tag you will be using, either HDX (Half duplex) and/or FDX (Full duplex). To determine the size of your installation’s SmartReader EID tag read range, complete the following steps: 1. Turn on the SmartReader. 2. Ensure the SmartReader is in set up mode by holding an EID tag in front of the SmartReader or by pressing the volume button. If the SmartReader beeps continuously it is in set up mode. If the SmartReader beeps once it is in operational mode. 3. Hold the EID tag in the best orientation in the animal handler near the SmartReader Antenna Panel. The SmartReader should beep indicating it is reading the EID tag. 4. Move the EID tag around to determine the size of the read range. 5. Is the read range indicated by the EID tag reads close to the ideal? If yes, then test with live animals by passing a small group of animals through the animal handler and reading their Electronic ID tags. If no, see Investigating SmartReader read range issues (p 18). Page 18 Gallagher SmartReader BR Series User Manual Investigating SmartReader read range issues If the EID tag read range on your SmartReader installation is not adequate, check the following: The SmartReader is turned on and connected to the Antenna Panel. The EID tag is functional and is in the correct orientation for testing. The Battery Charger is disconnected from the SmartReader. The battery charge level indicator shows two or more bars. Re‐test the read range by passing a small group of animals through the animal handler and reading their Electronic ID tags. If the SmartReader read range is still not adequate, complete the advanced testing and contact your Gallagher representative, see Advanced Electronic ID tag read range testing (p 19). Advanced Electronic ID tag read range testing If an adequate EID Tag read range is not achieved during the initial testing, use the following advanced testing procedures. Install the Configurator software utility prior to starting the advanced Electronic ID tag read range testing. The Configurator software utility is automatically installed with the MyScale Pro software. You will need the following items at the animal handler: A Laptop computer with either a serial (DB9) or USB port A Serial cable (supplied) The Serial to USB cable ‐ if using the USB port (supplied). Connect the SmartReader to a computer 1. Ensure the SmartReader is turned OFF. 2. Using the supplied serial cable, connect the computer and the SmartReader. a) Connect one end of the serial cable into a COM port on your computer. If required, use the supplied DB9 to USB adapter to connect to the USB port on the computer. b) Connect the other end into the COM port on the SmartReader. 3. Turn the dial to ON or MEMORY. The SmartReader beeps twice. Page 19 User Manual Gallagher SmartReader BR Series Open Configurator software 1. Open the Configurator software. Double‐click on the Configurator icon on the desktop. OR a) Click on the Windows Start button. b) Select All Programs or Programs. c) Select MyScale. d) Click on SmartReader Configurator. 2. The Configurator application will start and should automatically detect the presence of a reader. On the EID Reader Setup window, click on the Advanced button. Note: If the reader does not connect, select the appropriate COM port. 3. Click . The current settings for the connected SmartReader are displayed on the screen. Note: Once you have finished using the Configurator ensure you click on the disconnect button in the Configurator program prior to unplugging the cable. This ensures the data transmission returns to the correct state. Page 20 Gallagher SmartReader BR Series User Manual Start the Diagnostics Wizard 1. Connect the SmartReader to a computer. Refer to Connect the SmartReader to a computer (p 19). 2. Open the Configurator software. Refer to Open Configurator software (p 20). 3. Click on the tab. The following window displays: 4. Click . The following window displays: Page 21 User Manual Gallagher SmartReader BR Series Assessing background noise With this window displayed, SmartReader “hears” background electrical noise like that generated by computers, mobile phones, and electrical generators for example, in the frequency band that the Electronic ID tags work in. This background noise can interfere with the reading of the Electronic ID tags. 1. 2. Page 22 Press . The following window is displayed: Note: While this window is displayed, the SmartReader will not read Electronic ID tags. The horizontal scale shows approximately 10 seconds viewing of the background noise. The vertical scale shows the level of background noise. The higher up the scale the more background noise and the more likely the tag read range will be reduced. If the background noise level is high, try turning off sources of electrical noise and re‐test. Gallagher SmartReader BR Series User Manual Test read range 1. Press . The following window is displayed: 2. Follow the window instructions to test the EID tag read range in your animal handler. 3. Click . The following window is displayed: Note: While this window is displayed the SmartReader is automatically set to continuously read. The type of tag being read is shown at the bottom of the window. Page 23 User Manual Gallagher SmartReader BR Series 4. Alter the mounting location of the Antenna Panel with the aim of improving the read range. See Mounting the Antenna Panel (p 13). Note: Once you have finished using the Configurator ensure you click on the disconnect button in the Configurator program prior to unplugging the cable. This ensures the data transmission returns to the correct state. Testing with live animals 1. Pass a small group of animals through the animal handler. 2. Did the SmartReader read all the tags? If yes, the SmartReader is operational. If no, contact your Gallagher representative for further information. Advanced Electronic ID tag read range testing If an adequate EID Tag read range is not achieved during the initial testing, use the following advanced testing procedures. Install the Configurator software utility prior to starting the advanced Electronic ID tag read range testing. The Configurator software utility is automatically installed with the MyScale Pro software. You will need the following items at the animal handler: Page 24 A Laptop computer with either a serial (DB9) or USB port A Serial cable (supplied) The Serial to USB cable ‐ if using the USB port (supplied). Gallagher SmartReader BR Series User Manual INSTALLING MULTIPLE SMARTREADERS When multiple SmartReaders are installed in close proximity, additional set up is required to ensure all Electronic ID tags are read correctly. Each SmartReader must be able to communicate with all other SmartReaders to enable the antenna panel to be switched on and off at the appropriate times to ensure both Electronic ID tags can be read. For additional information about tags, see Electronic ID tags (p 2). If you have two SmartReaders to install you may use either wired or wireless installation. The wired option is the preferred option for the greatest reliability. If you have more than two SmartReaders you must use wired installation. Wireless installation Note: This option is applicable if you are installing two SmartReaders. Once you have installed both SmartReaders, you need to change the following settings in the SmartReader via the Configurator program on your computer. Procedure 1. Connect the SmartReader to a computer. Refer to Connect the Electronic Controller to a computer (p 19). 2. Open the Configurator software. Refer to Open Configurator software (p 20). 3. Click . The SmartReader current settings are transferred to the Configurator and displayed. 4. Set the Synchronisation ‐ Wireless option to On. 5. Click to copy the changes down to the SmartReader. 6. Repeat for the second SmartReader. Page 25 User Manual Gallagher SmartReader BR Series Wired installation Applicable if you are installing more than two SmartReaders. Applicable for two SmartReader installations where greater reliability is required and it is practical to run the required cables. Once you have installed the SmartReaders, you need to change the following settings in the SmartReader via the Configurator program on your computer. Procedure 1. Connect the SmartReader to a computer. See Connect the SmartReader to a computer (p 19). 2. Open the Configurator software. See Open Configurator software (p 20). 3. Click . The SmartReader current settings are transferred to the Configurator and displayed. 4. Set the Synchronisation ‐ Wired option to On. Page 26 5. Click to copy the changes down to the SmartReader. 6. Repeat for all other SmartReaders. Gallagher SmartReader BR Series User Manual Cabling requirements for connecting SmartReaders During the wired installation you need to connect all SmartReaders together using the following connectors: The sync cabling is not supplied by Gallagher ‐ you are expected to have a custom cable made to suit the individual installation. The COM connectors enable you to alter the settings of each SmartReader. Create one for every SmartReader you have. This enables you to easily set up and communicate with all SmartReaders. Page 27 User Manual Gallagher SmartReader BR Series Dual‐Reader Mode This option enables increased Electronic ID reading performance, using two panel readers, which can be connected to operate in tandem as a Dual‐Reader. If you are unable to get a consistent 100% read of animals in a race, then the Dual‐Reader option may deliver the required performance. Positioning two panel readers opposite each other on either side of a race, enables them to be operated as if they were a single reader with a larger read range. This provides a solution that works across races up to 1.2 metres wide. However, it is important the animals move through the race in single file to avoid a missed read. The readers are installed as a master (primary reader) and slave (secondary reader). Once you have installed both SmartReaders you will need to change the settings in each SmartReader via the Configurator program on your computer. Note: To use the Dual‐Reader mode, you will need vSR1.09//b03 of reader software and v2.12.0.15 of SmartReader Configurator software, or higher versions. Procedure 1. Connect the SmartReaders to a data collection device. (PC, TSi, SmartScale) For a wired connection between the readers, refer to Dual‐Reader Wired Installation. For a Bluetooth connection between the readers, refer to Dual‐Reader Wireless Installation (p 31). 2. Turn the Primary SmartReader on. 3. If the Dual‐Readers are connected to a PC/laptop, open the Configurator software. See Open Configurator software (p 20). 4. The Dual‐Reader mode is set to the default, OFF. Select Primary to set up the master SmartReader and then select Custom Wired or Bluetooth. The Synchronisation settings default, depending on your selection. 5. Click . The settings are transferred to the SmartReader. 6. Click . 7. Unplug the first SmartReader (master) and connect to the other SmartReader (slave). Repeat from Step 2, to Step 7 to set up the Secondary SmartReader. Refer to the Configurator Online Help: Operational Settings ‐ Dual‐reader mode, to set up the Operational Settings screen for the Primary and Secondary SmartReaders. Page 28 Gallagher SmartReader BR Series User Manual Dual‐Reader wired installation This section shows how to connect a master and slave SmartReader using a custom serial cable, and how to establish a connection between the SmartReaders and the data collection device. (PC, SmartTSi, Weighscale) Note: You will need a simple custom serial cable in a "Y" configuration. This cable is not supplied by Gallagher ‐ you are expected to have a custom cable made to suit your individual installation. Procedure 1. Plug the supplied reader to RS‐232 cable into the serial port on your data collection device. 2. Plug the other end into the Female plug on the custom serial cable. 3. Plug the Male plugs of the custom serial cable into the master and slave SmartReaders. 4. Note: If your computer does not have a serial port, use the supplied RS‐232 to USB adaptor to connect to a USB port on the computer. Return to Step 2. of Dual‐Reader Mode to complete the installation process for Dual‐Readers. Custom Cable The master reader has two two cables entering the single male DB9 serial connector. One cable carries the Incoming Secondary Tag Data (pin 3) and Ground (pin 5). This cable crosses pin 3 to pin 2 between the master and slave readers and terminates with a Male DB9 connector suitable for connecting to the slave reader. The other cable carries the Outgoing Primary Tag Data (pin 2) and Ground (pin 5). This cable goes from the master reader to terminate with a Female DB9 connector, suitable for connecting to the data collection device (SmartTSi, Weighscale or PC) Page 29 User Manual Gallagher SmartReader BR Series The following diagram shows the Dual‐Reader Wired configuration: Page 30 Wired sync is achieved by a separate cable as outlined in Cabling requirements for connecting SmartReaders. Gallagher SmartReader BR Series User Manual Dual‐Reader wireless installation This section describes how to connect a master and slave SmartReader using the Bluetooth module, and how to establish a connection between the SmartReaders and the data collection device. (PC, SmartTSi, Weighscale) Note: A standard serial cable will be required for this configuration, so the Primary tag data (tags read at both master and slave readers) can be transported to the data collection device. 1. Plug the supplied reader to RS‐232 cable into the serial port on your data collection device. 2. Plug the other end into the master SmartReader. 3. Note: If your computer does not have a serial port, use the supplied RS‐232 to USB adaptor to connect to a USB port on the computer. Return to Step 2. of Dual‐Reader Mode to complete the installation process. Wireless When Wireless Sync is used, there is no need for custom cables. Master mode Bluetooth reader firmware (vSR1.08 or later) is needed to allow the slave reader tag data to be communicated over Bluetooth to the master reader. It does not matter which reader is set up as Bluetooth master or slave, so long as the Bluetooth link establishes itself automatically when the two readers are powered up, and the tag data can be communicated. The following diagram shows the Dual‐Reader Wireless configuration: Page 31 User Manual Gallagher SmartReader BR Series MYSCALE PRO Introduction MyScale Pro is software that can be run on a personal computer. After a connection has been made between the computer and the SmartReader, MyScale Pro can process information obtained from the SmartReader. The SmartReader does not have to be connected to the panel for this interaction. With MyScale Pro you can perform the following functions: Transfer sessions from the SmartReader Change session file names View and edit sessions Print sessions Create long term record storage using MyScale Pro to backup information from the SmartReader Installation Operating systems You can run MyScale Pro on either of the following operating systems: Windows XP Windows 2000 Installation procedure Ensure you install the most recent version of MyScale Pro each time you purchase new hardware from Gallagher. Before installing the MyScale Pro software, make sure that you close all open applications on your computer. Note: The MyScale Pro software only needs to be installed once. If you are installing over a previous version, see Installing over a previous version. Page 32 Gallagher SmartReader BR Series User Manual 1. 2. 3. 4. If installing MyScale Pro from CD. Insert the MyScale Pro software CD into the CD Drive on your computer. The Installer screen displays. Click to select the appropriate option from the list provided. MyScale Pro is able to be installed to accommodate both Gallagher and Ruddweigh products. Click Next. The Select Country window is displayed. Check the box next to your country. If your country is not displayed, select Other. Page 33 User Manual Gallagher SmartReader BR Series This option sets some of the terminology used, as well as the weight units. In the USA and Canada options, the default weight unit is pounds. In all other countries, the default weight unit is kilograms. The weight unit selection can be changed after installation. 5. Click Next. The License Agreement window is displayed. 6. Click Yes to accept the License Agreement. The Choose Destination Location window is displayed. 7. To accept the default destination folder, click Next, otherwise click Browse to select a different folder. The Destination Folder, is the folder to which the MyScale Pro program files install. 8. Click Next. The Select Hardware window is displayed. Page 34 Gallagher SmartReader BR Series User Manual 9. Select the check box next to the hardware you have purchased and click Next. The options you select determine what options are installed on the Main menu. You are now given the option of storing the tutorials on your computer hard drive. If installed, the files will take approximately 40 MB of disk space. Note: The tutorials include interactive lessons for MyScale Pro and demonstrations of the Model 800 Smartscale hardware. 10. Click Next. The Setup Status window is displayed while the program files are installed on your computer. If this computer does not have the USB to Serial Driver to support a USB to Serial cable (should one be required) a window displays. 11. Click Next to install the required USB to Serial Driver. The driver files are installed on your computer. 12. Click Finish to complete the MyScale Pro installation. 13. To set up a shortcut to MyScale Pro on your desktop, select Yes in the check box and click Finish. 14. Click Exit to close the installer. Page 35 User Manual Gallagher SmartReader BR Series Installing over a previous version Ensure you install the most recent version of MyScale Pro each time you purchase new hardware from Gallagher. The InstallShield Wizard detects if you already have a version of MyScale Pro installed on your computer. This will automatically be updated with this later version of the software. Note: Updating this version of MyScale Pro will retain the data previously recorded and still enable full access to view and edit. To manually start the installation, complete the following steps: Select Run from the Windows Start menu. Type d:\setup (where d is your CD Drive) Click OK. Connecting the SmartReader to the computer In order to view or alter settings on the SmartReader, you need to establish a connection between the SmartReader and the computer. To connect the SmartReader to a computer, complete the following steps: 1. Plug the supplied COM cable (RS‐232 to RS‐232) into the RS‐232 port on the SmartReader. 2. Plug the other end into the serial port on your computer. Note: If your computer does not have a serial port, use the supplied RS‐232 to USB adaptor to connect to a USB port on the computer. Page 36 Gallagher SmartReader BR Series User Manual Starting MyScale Pro Connecting the SmartReader to the computer by cable To connect the SmartReader to a computer by cable, complete the following steps: 1. Plug the supplied reader to RS‐232 cable into the SmartReader. 2. Plug the other end into the serial port on your computer. Notes: If your computer does not have a serial port, use the supplied RS‐232 to USB adaptor to connect to a USB port on the computer. Connection via Bluetooth does not work for MyScale Pro. To Start MyScale Pro: Double‐click the MyScale Pro icon on the desktop. Alternatively... You can start MyScale Pro from the Windows Start menu. 1. Click on the Windows Start button. 2. Select All Programs (Windows XP) or Programs (Windows 2000). 3. Select MyScale. 4. Click on . Closing MyScale Pro To close MyScale Pro: Click on the button or on the at the top right of the window. Note: It is recommended that you close MyScale Pro when it is not in use, this will enable the serial port to be available to other programs. Page 37 User Manual Gallagher SmartReader BR Series MyScale Pro main menu The list of hardware selected during installation determines what menu options display on the MyScale Pro Main menu. If other hardware is connected to MyScale Pro, the associated menu options are also added to the Main menu. All added menu options remain on the Main menu once added, however MyScale Pro checks each time to determine if the selected option is applicable to the connected hardware. Each group of hardware (Scale, DairyScale or Reader) has its own tab on the menu which is only displayed if selected during install or connected to MyScale Pro. If you connect other models of Gallagher Scales or new Gallagher products to the computer, MyScale Pro dynamically updates available menu options. Once these options are displayed they are always available. The NLIS and CCIA options are only displayed when the country code is set to Australia and USA/Canada or French Canada respectively. To select an option, click on the associated radio button and then click Next. Whenever a list is displayed in the Main menu, pressing the F5 key refreshes the list. Each option is described in detail in the following sections of this manual. Page 38 Gallagher SmartReader BR Series User Manual SmartReader connection status MyScale Pro checks that a valid connection between the computer and SmartReader exists each time a request is made to access the reader. If text similar to the following is displayed… Then… Unable to connect to a Gallagher Reader. The computer has tried to connect to the SmartReader and has been unable to connect. Ensure that your Gallagher reader is connected to the computer and switched on. Attempting to communicate with the reader. Please wait.... The computer is attempting to connect to the SmartReader. The Gallagher SmartReader memory does not contain any session records. A valid connection with the SmartReader exists but there are no sessions on the SmartReader to transfer to the computer. Gallagher SmartReader connected and The computer and SmartReader are on line. correctly connected. The download of sessions begins automatically. Note: Only closed sessions are copied to the computer. The current session is not copied. Opening MyScale Editor There are two options for opening the MyScale Editor: Open session files in MyScale Editor This option allows you to open session files in the MyScale Editor. Files can then be viewed or altered. Open MyScale Editor This option allows you to open the MyScale Editor without having to open a session file. Opening session files in MyScale Editor With the MyScale Editor closed, you can open session files in any of the following ways: Selecting Open session files in MyScale Editor option on the MyScale Pro Main menu. on the window Checking that displays after transferring sessions from the Scale or SmartReader to the computer and then clicking Finish. Page 39 User Manual Gallagher SmartReader BR Series "Dragging and Dropping" from MS Explorer. With MyScale Editor open, you can open session files by: 1. Select File > Open. The Open file window displays. Sessions from your Ruddweigh/SmartScale will be listed. 2. If using a Gallagher SmartReader select the folder applicable to the product you are using, (e.g. for a SmartReader HR3, select the Reader ‐ Handheld folder. For a SmartReader BR Series, select Reader ‐ Panel folder). Note: If there are no session files in the selected MyScale folder you need to transfer sessions from the Scale or SmartReader to the computer. If you want to… then… open a single session click on the file to select it and click Open. file open several session files hold down the Ctrl key and click on each file. Each selected file is highlighted. Click Open. open a block of session files click on the first file in the block. Hold down the Shift key and click on the last file in the block. All files between the first and the last are highlighted. Click Open. If you are using Microsoft Explorer to view the files in your MyScale Folder and have the MyScale Editor open at the same time, your screen may look like this: Page 40 Gallagher SmartReader BR Series User Manual To open a .csv file that is in Explorer, click and hold on the name of the file that you wish to open and drag it into any area in the MyScale Editor window. When you drop a file onto the MyScale Editor the file opens. Transfer sessions from SmartReader to computer This option transfers sessions from the SmartReader to the computer. Before you begin Connect the SmartReader to the computer. See Connect the SmartReader to a computer (p 19). Notes: Once the sessions have been successfully transferred to the computer they are deleted from the SmartReader. Only closed sessions are transferred to the computer. Close the current session by, turning off the SmartReader or pressing the New Session button. If the connection between the SmartReader and the computer is broken during the transfer process, only completely transferred sessions are displayed. You will need to reconnect the cable and restart the transfer process. Procedure 1. 2. Select the "Transfer sessions from reader to computer" option and click Next. MyScale Pro attempts to communicate with the SmartReader. Did MyScale Pro connect to the SmartReader? If yes, the transfer of sessions from the SmartReader to the computer begins immediately. Go to step 3. Note: If there are no sessions to transfer a message is displayed. To return to the Main menu click Back. If no, MyScale Pro informs you of the connection problem. See SmartReader connection status (p 39). Page 41 User Manual Gallagher SmartReader BR Series 3. Once the transfer is finished, click Next to review the session file names. Reviewing SmartReader session file names Once the session files have been transferred from the SmartReader to the computer, the following window displays with the session file names listed. Note: If the connection between the SmartReader and the computer is broken during the transfer process, only completely transferred sessions are displayed. You will need to reconnect the cable and restart the transfer process. The following options are now available to the user: Accept the generated session file names. Change the generated session file names. To accept the generated session file name: Click . The displayed session file names are accepted and saved on your computer in the Reader ‐ <product> sub‐folder under the MyScale folder. The Main menu displays. To change the generated session file names: Page 42 Gallagher SmartReader BR Series User Manual 1. Click . A Windows Explorer window opens listing all sessions in the Reader ‐ <product> folder. 2. Change the individual file names, as required, using the normal Windows methods. Session files Overview Session files are created and saved to your computer whenever sessions are transferred from the SmartReader. The following sections describe what you need to know about session files when working with them on your computer or when transferring them from the SmartReader. Session files are saved into the Reader ‐ <product> sub‐folder under the MyScale folder. Note: Once the sessions are successfully transferred to the computer they are deleted from the SmartReader. Naming format for session files Each Scale session file name created by MyScale Pro has the following format: YYYY-MM-DD hh-mm TITLEnn.CSV. Where… YYYY Is the… Example… 4 digit year 2010 MM 2 digit month 03 DD 2 digit day 26 hh 2 digit hour in 24 hour format 15 mm 2 digit minutes 21 TITLE Session name. Defaults to SESSION. This can SESSION be changed once the session files have been transferred to the computer. nn A two‐digit number. Used to uniquely identify 01 sessions that are transferred to the computer 02 etc. at the same time. Note: There is a space between the date and the time and between the time and the title. Examples of valid formats The following are examples of valid Scale session file names. 2010-03-26 15-21 Session01 Page 43 User Manual Gallagher SmartReader BR Series 2009-03-26 15-21 Session02 2009-03-26 15-21 Session03 Session file structure MyScale Pro creates session files in a comma separated values (CSV) format. This means that, within each record of the session file, fields are separated from each other by a comma. Each of the session files in your MyScale folder will have a CSV file extension. Note: MyScale Pro requires files to be in CSV format if you want to transfer them to a Gallagher Scale. How session files are created Each time you transfer a session to the computer, MyScale Pro creates a new session file. Session files are saved into the Reader ‐ <product> sub‐folder under the MyScale folder. How this works To understand how this works: Page 44 The session file name includes the computer's date and time of the transfer. The file name is always in the same format, for example 2010-03-26 15-30 Session01 or 2010-02-26 15-29 Session02. See Naming format for session files (p 43). Gallagher SmartReader BR Series User Manual MyScale Session Editor MyScale Pro has a built‐in Session Editor that lets you edit files transferred from your SmartReader. The MyScale Session Editor operates like most other spreadsheet applications but has added options that let you work specifically with session files. MyScale Session Editor overview Components of the MyScale Session Editor window are shown below. Session information is displayed in a spreadsheet containing rows and columns. Each row is numbered. Within the session editor, a row is referred to as a record. The intersection of each row and column on the spreadsheet is referred to as a cell. Each item of information on the spreadsheet is contained within a cell. In most cases, the MyScale Session Editor works like most spreadsheet applications. Some exceptions are evident. For example, you cannot select individual cells by use of the Ctrl + Click command. Page 45 User Manual Gallagher SmartReader BR Series Creating an NLIS Transaction File What It Is NLIS stands for National Livestock Identification System. The MyScale NLIS Utility is a simple alternative to the NLISLink program. The MyScale NLIS Utility generates a transaction file that contains information about changes in livestock ownership and location. These files are used in the same way as those created by the NLISLink program. Note: The NLIS application is only available to the Australian market. When to use You can create an NLIS transaction file using MyScale Pro if : You take part in the NLIS program. You have sold or transferred livestock from your farm, and, You have transferred session files from your SmartReader to your computer that contain Electronic ID records for these animals. Procedure To create an NLIS transaction file, follow these steps: 1. Select Create NLIS file on the MyScale Pro Main menu and then click Next. The following window displays: 2. Click on the session containing the animals to be sold or transferred to another property. Note: If no sessions are displayed, you will need to connect to the SmartReader and transfer sessions to the computer. See Transfer sessions from Electronic Controller to computer (p 41). If the animals are not contained within one session you can open multiple session files. To open multiple files hold down the Ctrl key and click on each session file name. 3. Page 46 Click Next. Gallagher SmartReader BR Series User Manual The following window displays: If you want to .... then select .... display the visual tag numbers stored in the session files. display the visual tag numbers stored in Tag Bucket files. 4. If you selected Use Tag Bucket files, the window changes to the following: MyScale Pro will use the Tag Bucket files listed in the right hand pane to obtain the visual tag number for each Electronic ID. If the Tag Bucket file(s) do not contain the Electronic ID, MyScale Pro will use the visual tag numbers contained in the session file instead. Adding a Tag Bucket File To add a new Tag Bucket file to the list, click Add. A 'browse for folder' dialog box will display. Use the dialog box to locate and click on the Tag Bucket file. Click Open. Removing a Tag Bucket File If you want to remove a Tag Bucket file from the list, click on the file and then right‐click within the pane. A menu displays. Click Delete. When all the Tag Bucket files that you want to use are listed in the right‐ hand pane, click Next. Page 47 User Manual Gallagher SmartReader BR Series A dialog box similar to the following displays if some of the session file records will not be displayed, because they have duplicate Electronic IDs or no Electronic ID. 5. Click OK to continue. The following window displays. 6. Click on the check box to the left of each animal to be transferred. 7. Click Select All if you want to transfer all animals. Note: Only records containing Electronic IDs will be shown. Duplicate records (i.e another Electronic ID record for the same animal contained in a different session file) will not be displayed. 8. Click Next. A confirmation window displays. If the correct animals are displayed, click Next. If the selection is incorrect click Back to return to the previous window and change your selection. Page 48 Gallagher SmartReader BR Series User Manual 9. When you have confirmed your selection, the Transaction details window displays. If you have used this program before you can double click on any text box to fill in the values you entered last time. You must enter the following information: Seller PIC (your own property identification code). This must be a minimum of 8 characters. Buyer PIC (the buyer's property identification code). This must be a minimum of 8 characters. EU Vendor No. This must be a letter followed by six digits, or National Vendor Declaration Number is 7 digits. If your NVD is loose leaf and does not have a number stamped on it, the number 1234567 can be used or leave the field blank. Your Phone No, including area code. Only enter the digits; no spaces, dashes or brackets. You can enter up to 12 digits. Sale Date. Today's date will display. To select a different date, click on the triangle next to the date and select the sale date from the calendar that displays. Click the right or left arrow buttons to change the month. Click on the day to select it. Note: You cannot select a future date. 10. If you want to open your web browser and display the NLIS web page after clicking Finish, check the Launch Web Browser checkbox. The file created for this transaction can be sent to NLIS by logging on to the site from this web page. 11. Click on Finish. A text file for this transaction is created and placed in an NLIS Transaction Files sub folder of the MyScale folder. The name of the file is the unique Page 49 User Manual Gallagher SmartReader BR Series vendor declaration number (EU Vendor Number), followed by the sale date, current time and phone number of the seller for the particular transaction. A window displays confirming the name and location of the NLIS transaction file. 12. Check Copy the path to the clipboard for me if you want to copy the path to your NLIS transaction file to the clipboard. This lets you use the paste command (Ctrl+V) in your web browser to copy the path to the text box on the NLIS website page where you select the transaction file to upload. The option you select (checked or unchecked) will display again the next time you use the NLIS Utility. Note: If you use the copy command again in this or any other application the contents of the clipboard will be overwritten. 13. Click on OK. If you chose to open the NLIS web page (i.e. Launch Web Browser was checked in the Transaction details window) your web browser opens and displays the NLIS web page (www.nlis.mla.com.au). Follow the instructions provided by NLIS to logon to the site and upload your transaction file. Notes: For deceased cattle: Enter DECEASED in the Buyer PIC box. If selling outside of the EU and PIC of purchaser is unknown: Enter AAAAAAA (Every effort must be made to identify the purchaser, before using this option). For transfer with an unknown national vendor declaration number (NVD), or if your NVD is loose leaf and does not have a number stamped on it: Page 50 Enter 1234567 in the EU/ NVD box or leave it blank. Gallagher SmartReader BR Series User Manual Sending the NLIS Transaction File To send the NLIS transaction file, you can do either of the following: Copy the file to a cd and post to: Database Administrator, Level 1, 165 Walker St NORTH SYDNEY. NSW 2060 Access the NLIS Web Page (www.nlis.mla.com.au) with your NLIS provided password, and follow instructions from there to upload the file directly onto the NLIS Database Website. This requires Internet Explorer version 4.0 or higher. If you do not already have it, you can download and install Internet Explorer from the Microsoft website ‐ http://www.microsoft.com/windows/ie/downloads/default.asp Page 51 User Manual Gallagher SmartReader BR Series Using CCIA Transaction Files The Canadian Livestock Tracking System (CLTS) is run by the Canadian Cattle Identification Agency (CCIA) to track the movement of cattle into, out of, and throughout Canada. If you take part in the CCIA scheme you are required to report changes in animal ownership and location to the CCIA authorities. This information can be reported by uploading a file (CCIA transaction file) directly from MyScale Pro to the CCIA website. You can specify the animals you want to include in the file. You can create a CCIA transaction file, if: you are a registered member of the CCIA program you have bought, sold or moved livestock to or from your farm you have set the country code in MyScale Pro to USA/Canada or French Canada CCIA transaction file types Types of CCIA transaction files you can create are: CCIA transaction file type Used to indicate... Animal Birthdate the actual birth date or first day of calving applied to single tag or a tag range of animals Animal Exported if animals have been moved outside the Canadian border Animal Imported if animals have been brought from outside the Canadian border into Canada Move into Inventory if animals have been moved into your inventory from the inventory of another party Move out of Inventory any animals that have been moved out of your inventory into the inventory of another party Animal Retired or Slaughtered any animals that have been slaughtered or died within the Canadian borders ‐ to be reported at point of slaughter Animal Sighted an arbitrary sighting of a CCIA tag number on an animal Page 52 Gallagher SmartReader BR Series User Manual Creating a CCIA transaction file To create a CCIA transaction file, follow these steps: 1. From the MyScale Pro main menu, select Create CCIA file and click Next. The following screen displays. To open the MyScale Pro Online Help for the CCIA Utility, click Help. To close the CCIA Utility without creating a CCIA file, click Back. 2. Click on the session containing the animals to be sold or transferred to another party. Note: If no sessions are displayed, you will need to connect to the Scale and copy sessions to the computer. Refer to Copying Sessions to the Computer. If the animals are not contained within one session you can open multiple session files. To open multiple files hold down the Ctrl key and click on each session file name. 3. Click Next. The following screen displays. If you want to..... Display the visual tag numbers stored in the session files. Then select..... Page 53 User Manual Gallagher SmartReader BR Series Display the visual tag numbers stored in Tag Bucket files. 4. Select Load from Session files or Use Tag Bucket files. If you selected 5. , refer to Using Tag Bucket files (p 63). Click Next. A dialog box similar to the following displays. If some of the session file records are not displayed, it is because they have duplicate Electronic IDs or no Electronic ID. 6. 7. Click OK to continue. The following screen displays. Note: Only records containing Electronic IDs will be shown. Duplicate records (i.e another weight record for the same animal contained in a different session file) will not be displayed. Click on the check box to the left of each animal to be included in the CCIA file. To select all the animals, click Select All. Page 54 Gallagher SmartReader BR Series User Manual 8. 9. Click Next. A confirmation screen displays. If the correct animals are displayed, click Next. If the selection is incorrect click Back to return to the previous screen and change your selection. The following screen displays: This screen enables you to specify the CCIA transaction file type that you are about to create. 10. Select the type of transaction file you require and click Next. What happens next Refer to one of the topics below on how to create and send your chosen CCIA transaction file type. Creating a CCIA 'Birthdate' file (p 56) Creating a CCIA 'Export' file (p 57) Creating a CCIA 'Import' file (p 57) Creating a CCIA "Move into Inventory' file (p 59) Creating a CCIA 'Move out of Inventory' file (p 60) Creating a CCIA 'Retired/ Slaughtered' file (p 61) Creating a CCIA 'Sighted' file (p 62) Page 55 User Manual Gallagher SmartReader BR Series Creating a CCIA 'Birthdate' file Follow these steps to create a CCIA 'Birthdate' file: 1. Ensure you have selected the appropriate animals in the MyScale CCIA Utility screens. See Creating a CCIA transaction file (p 53). The following screen is displayed: 2. Enter your Source Account code (maximum 20 characters, numeric or uppercase). This code is retained in this field once it has been entered for the first time. Note: The CCIA issue an Account ID to each registered user. You will need to be a registered member of the CCIA before entering this data. 3. If the Date of Birth displays as blank, click the drop down arrow and select the birth‐date. Note: This field defaults to the current date. If one animal is selected, the birth‐date of that animal can be entered, for a group of animals, enter a date at the beginning of the calving season. You cannot enter a date greater than the current date. 4. Enter optional information in the Comment field. 5. Check the Open CLTS website on finish, if you want to open your web browser and display the CLTS website once the file has been created. 6. Click Finish. The CCIA transaction file will be saved, and the path where the file is found will be displayed. The check box Copy the path to the clipboard for me is checked by default. This will enable you to 'Copy' the path into the web‐site without having to 'Browse' for the file. 7. Click OK. If you have left the check box Open CLTS website on finish, checked, the CLTS website (www.clia.livestock.ca) will open in your web browser. Login using your CCIA username and password, then follow the on screen instructions to upload the file you have created. This requires Internet Explorer version 4.0 or higher. If you do not already have it, you can download and install Internet Explorer from the Microsoft website ‐ http://www.microsoft.com/windows/ie/downloads/default.asp Page 56 Gallagher SmartReader BR Series User Manual Creating a CCIA 'Export' file Follow these steps to create a CCIA 'Export' file: 1. Ensure you have selected the appropriate animals in the MyScale CCIA Utility screens. See Creating a CCIA transaction file (p 53). The following screen is displayed: 2. Enter your Source Account code (maximum 20 characters, numeric or uppercase). This code is retained in this field once it has been entered for the first time. Note: The CCIA issue an Account ID to each registered user. You will need to be a registered member of the CCIA before entering this data. 3. Click the Date of Export drop down arrow to select the date of export, and click on the up or down arrow to select the time. Note: A date later than the current date cannot be selected. 4. Enter optional information in the Comment field. 5. Check the Open CLTS wesite on finish, if you want to open your web browser and display the CLTS website once the file has been created. 6. Click Finish. The CCIA transaction file will be saved, and the path where the file is found will be displayed. The check box Copy the path to the clipboard for me is checked by default. This will enable you to 'Copy' the path into the web‐site without having to 'Browse' for the file. 7. Click OK. If you have left the check box Open CLTS website on finish, checked, the CLTS website (www.clia.livestock.ca) will open in your web browser. Login using your CCIA username and password, then follow the on screen instructions to upload the file you have created. This requires Internet Explorer version 4.0 or higher. If you do not already have it, you can download and install Internet Explorer from the Microsoft website ‐ http://www.microsoft.com/windows/ie/downloads/default.asp Page 57 User Manual Gallagher SmartReader BR Series Creating a CCIA 'Import' file Follow these steps to create a CCIA 'Import' file: 1. Ensure you have selected the appropriate animals in the MyScale CCIA Utility screens. See Creating a CCIA transaction file (p 53). The following screen is displayed: 2. Enter the Destination Account code of where the animals are being imported to (maximum 20 characters, numeric or uppercase). This code is retained in this field once it has been entered for the first time. Note: The CCIA issue an Account ID to each registered user. You will need to be a registered member of the CCIA before entering this data. 3. Click the Date of Import drop down arrow to select the date of import, and click on the up or down arrow to select the time. Note: A date later than the current date cannot be selected. 4. Enter optional information in the Comment field. 5. Check the Open CLTS wesite on finish, if you want to open your web browser and display the CLTS website once the file has been created. 6. Click Finish. The CCIA transaction file will be saved, and the path where the file is found will be displayed. The check box Copy the path to the clipboard for me is checked by default. This will enable you to 'Copy' the path into the web‐site without having to 'Browse' for the file. 7. Click OK. If you have left the check box Open CLTS website on finish, checked, the CLTS website (www.clia.livestock.ca) will open in your web browser. Login using your CCIA username and password, then follow the on screen instructions to upload the file you have created. This requires Internet Explorer version 4.0 or higher. If you do not already have it, you can download and install Internet Explorer from the Microsoft website ‐ http://www.microsoft.com/windows/ie/downloads/default.asp Page 58 Gallagher SmartReader BR Series User Manual Creating a CCIA 'Moved into Inventory' file Follow these steps to create a CCIA 'Moved into Inventory' file: 1. Ensure you have selected the appropriate animals in the MyScale CCIA Utility screens. See Creating a CCIA transaction file (p 53). The following screen is displayed: 2. Enter the Destination Account and Destination Premises of the animals destination, (maximum 20 characters, numeric or uppercase). Notes: The data is retained in these fields once it has been entered for the first time. The CCIA issue an Account ID and Premise ID to each registered user. You will need to be a registered member of the CCIA to receive this data. 3. Click the Date of Moving drop down arrow to select the date of movement, and click on the up or down arrow to select the time. Note: A date later than the current date cannot be selected. 4. Enter optional information in the Comment field. 5. Check the Open CLTS website on finish, if you want to open your web browser and display the CLTS website once the file has been created. 6. Click Finish. The CCIA transaction file will be saved, and the path where the file is found will be displayed. The check box Copy the path to the clipboard for me is checked by default. This will enable you to 'Copy' the path into the web‐site without having to 'Browse' for the file. 7. Click OK. If you have left the check box Open CLTS website on finish, checked, the CLTS website (www.clia.livestock.ca) will open in your web browser. Login using your CCIA username and password, then follow the on screen instructions to upload the file you have created. This requires Internet Explorer version 4.0 or higher. If you do not already have it, you can download and install Internet Explorer from the Microsoft website ‐ http://www.microsoft.com/windows/ie/downloads/default.asp Page 59 User Manual Gallagher SmartReader BR Series Creating a CCIA 'Moved out of Inventory' file Follow these steps to create a CCIA 'Moved out of Inventory' file: 1. Ensure you have selected the appropriate animals in the MyScale CCIA Utility screens. See Creating a CCIA transaction file (p 53). The following screen is displayed: 2. 3. 4. Enter the Source Account and Source Premises of the animals destination, (maximum 20 characters, numeric or uppercase). Notes: The data is retained in these fields once it has been entered for the first time. The CCIA issue an Account ID and Premise ID to each registered user. You will need to be a registered member of the CCIA to receive this data. Click the Date of Moving drop down arrow to select the date of movement, and click on the up or down arrow to select the time. Note: A date later than the current date cannot be selected. 5. Enter optional information in the Comment field. 6. Check the Open CLTS website on finish, if you want to open your web browser and display the CLTS website once the file has been created. 7. Click Finish. The CCIA transaction file will be saved, and the path where the file is found will be displayed. The check box Copy the path to the clipboard for me is checked by default. This will enable you to 'Copy' the path into the web‐site without having to 'Browse' for the file. 8. Click OK. If you have left the check box Open CLTS website on finish, checked, the CLTS website (www.clia.livestock.ca) will open in your web browser. Login using your CCIA username and password, then follow the on screen instructions to upload the file you have created. This requires Internet Explorer version 4.0 or higher. If you do not already have it, you can download and install Internet Explorer from the Microsoft website ‐ http://www.microsoft.com/windows/ie/downloads/default.asp Page 60 Gallagher SmartReader BR Series User Manual Creating a CCIA 'Retired / Slaughtered' file Follow these steps to create a CCIA 'Retired / Slaughtered' file: 1. Ensure you have selected the appropriate animals in the MyScale CCIA Utility screens. See Creating a CCIA transaction file (p 53). The following screen is displayed: 2. Enter the Source Account code for where the animals are being retired (maximum 20 characters, numeric or uppercase). Notes: The data is retained in this field once it has been entered for the first time. The CCIA issue an Account ID to each registered user. You will need to be a registered member of the CCIA to receive this code. 3. Click the Date Retired drop down arrow to select the date of movement, and click on the up or down arrow to select the time. Note: A date later than the current date cannot be selected. 4. Enter optional information in the Comment field. 5. Check the Open CLTS website on finish, if you want to open your web browser and display the CLTS website once the file has been created. 6. Click Finish. The CCIA transaction file will be saved, and the path where the file is found will be displayed. The check box Copy the path to the clipboard for me is checked by default. This will enable you to 'Copy' the path into the web‐site without having to 'Browse' for the file. 7. Click OK. If you have left the check box Open CLTS website on finish, checked, the CLTS website (www.clia.livestock.ca) will open in your web browser. Login using your CCIA username and password, then follow the on screen instructions to upload the file you have created. This requires Internet Explorer version 4.0 or higher. If you do not already have it, you can download and install Internet Explorer from the Microsoft website ‐ http://www.microsoft.com/windows/ie/downloads/default.asp Page 61 User Manual Gallagher SmartReader BR Series Creating a CCIA 'Sighted' file Follow these steps to create a CCIA 'Sighted' file: 1. Ensure you have selected the appropriate animals in the MyScale CCIA Utility screens. See Creating a CCIA transaction file (p 53). The following screen is displayed: 2. Enter the Source Account and Source Premise of the animals destination, (maximum 20 characters, numeric or uppercase). Notes: The data is retained in these fields once it has been entered for the first time. The CCIA issue an Account ID and Premise ID to each registered user. You will need to be a registered member of the CCIA to receive this code. 3. Click the Date of Sighting drop down arrow to select the date of the sighting, and click on the up or down arrow to select the time. Note: A date later than the current date cannot be selected. 4. Enter optional information in the Comment field. 5. Check the Open CLTS website on finish, if you want to open your web browser and display the CLTS website once the file has been created. 6. Click Finish. The CCIA transaction file will be saved, and the path where the file is found will be displayed. The check box Copy the path to the clipboard for me is checked by default. This will enable you to 'Copy' the path into the web‐site without having to 'Browse' for the file. 7. Click OK. If you have left the check box Open CLTS website on finish, checked, the CLTS website (www.clia.livestock.ca) will open in your web browser. Login using your CCIA username and password, then follow the on screen instructions to upload the file you have created. This requires Internet Explorer version 4.0 or higher. If you do not already have it, you can download and install Internet Explorer from the Microsoft website ‐ http://www.microsoft.com/windows/ie/downloads/default.asp Page 62 Gallagher SmartReader BR Series User Manual Using Tag Bucket files Ensure you have completed steps 1 to 4 of either; Creating a CCIA transaction file (p 53) or Creating an NLIS transaction file before continuing: 1. If you selected , the screen changes to the following: MyScale Pro uses the Tag Bucket files listed in the right hand pane to obtain the visual tag number for each Electronic ID. If the Tag Bucket file(s) do not contain the Electronic ID, MyScale Pro uses the visual tag numbers contained in the session file instead. Adding a Tag Bucket File To add a new Tag Bucket file to the list: Click Add. A 'browse for folder' dialog box displays. Use the dialog box to locate and click on the Tag Bucket file. Click Open. Removing a Tag Bucket File If you want to remove a Tag Bucket file from the list: Click on the file and then right‐click within the pane. A drop‐down menu displays. Click Delete. A confirmation dialog box displays. Click Yes to confirm the deletion. 2. Once all the Tag Bucket files that you want to use are listed in the right‐hand pane, return to Step 5 of Creating a CCIA transaction file (p 53) or Creating an NLIS transaction file, depending on the type of file you are creating. Page 63 User Manual Gallagher SmartReader BR Series ACCESSORIES 4 Metre Antenna Extension Cable Kit The 4 Metre Antenna Extension Cable Kit contains: 1 x Extension cable (4m) 1 x Mounting bracket 2 x Metal TEK screws Mounting the extension kit to the SmartReader Mount the Antenna Panel as per Mounting the Antenna Panel (p 13). Considerations The Extension cable is part of the Antenna Panel circuit so keep away from large metal surfaces. Ensure the SmartReader mounting location provides protection from being knocked or damaged by animals. Ensure the Extension cable is run so it can not be damaged or tripped over. Protect the Extension cable from damage from the environment, animals, people or weather. Avoid mounting the Extension cable in wet areas. The extension cable length is 4 m. Procedure 1. 2. Determine the location of the SmartReader based on the above considerations. Using the supplied metal tek screws attach the mounting bracket to a solid mounting location using at least two of the holes in the mounting bracket. The two sets of two holes allows for installation on horizontal or vertical pipe work. Page 64 3. Run the Extension cable from the SmartReader to the Antenna Panel along the proposed path and temporarily fasten the cable in place. 4. Ensure the SmartReader is turned off. Gallagher SmartReader BR Series User Manual 5. 6. 7. 8. On the Antenna Panel, unscrew the Amphenol connector locking nut from the Amphenol socket and pull it down to unplug from the Antenna Panel. Connect the Extension cable to the Amphenol connector and tighten. Mount the SmartReader on the mounting bracket by grasping the SmartReader on both sides and slide the back handle onto the mounting bracket. Connect the Extension cable to the Amphenol socket on the side of the SmartReader and tighten the locking nut. 9. Once the Extension cable location is finalised, attach the cable permanently using cable ties. The SmartReader is now ready to use. Page 65 User Manual Gallagher SmartReader BR Series OPTIONAL Overview The SmartReader (BR and R series) come with Bluetooth installed, for communications between the SmartReader and a Scale, or a SmartReader and a computer. For communications between a SmartReader and a computer, a Bluetooth USB adaptor will need to be purchased if the computer is not already Bluetooth enabled. In addition, the computer will need to be running Windows XP or later. Bluetooth RS‐232 Adaptor Compatibility This Bluetooth device should work with Scales that have power to pin 9 on the serial port. In this configuration a power supply is not required and is not supplied with the RS‐232 adaptor. Power is expected to be provided from pin 9 of the RS‐232 port to the adaptor from the Scale. When the RS‐232 Bluetooth adaptor is powered from the Scale, the slide switch on the side should be set to the PoRI position (sometimes represented by this symbol: ). Setting up the Bluetooth RS-232 Adaptor 1. Plug the RS‐232 adaptor into the serial port on the side of the Scale using the small serial cable that comes with the adaptor. 2. Power up and configure the Scale to receive data on that serial port. 3. For a Gallagher Smartscale this would be in the Setup menu under Communications, set the relevant port to "EID Standard". Check that the power light on the adaptor has illuminated. 4. Turn on the reader. Once powered up, the Bluetooth should connect automatically an d can be confirmed by a blue LED on the RS232 adaptor. 5. Tag data will automatically be sent to the Scale. Notes: The wireless connection should be effective to a range of at least ten metres. The "Power" LED illuminates when power is supplied to the adaptor. The Bluetooth light flashes when a wireless connection is active. The "Mode" LED (middle LED) only illuminates during configuration. Pairing the RS-232 Adaptor with your reader The RS‐232 Adaptor must be paired with your individual SmartReader, i.e. the adaptor must be uniquely identified by your reader. Page 66 Gallagher SmartReader BR Series User Manual This is achieved by assigning your SmartReader "MAC address" to the adaptor. Other Bluetooth devices (including other readers working in the immediate area) will then be of no concern to your operation. The pairing process must be carried out by your Gallagher distributor. If you have received the Bluetooth adaptor with your reader, the pairing should already be in effect. If not, take your reader and your adaptor to your nearest distributor for pairing. Bluetooth USB Adaptor Introduction A Bluetooth USB adaptor is available from your Gallagher distributor to allow a Bluetooth enabled SmartReader to communicate with a computer. This section describes how to install a Bluetooth USB adaptor to a USB port, to enable your computer to make a wireless communication with any Bluetooth device, including a Gallagher SmartReader. The wireless connection can be used to download tag numbers to MyScale Pro or to configure the reader with the software supplied on the MyScale Pro CD. Many modern computers are manufactured "Bluetooth enabled" and this accessory is not required for those models. Compatibility The Computer must be running the Windows XP operating system and have one available USB port. MyScale Pro Version 2.5.1 or later must be installed on the computer. Installing and connecting the USB Adaptor 1. Insert the adaptor into the USB port. This will be detected automatically. 2. 3. After a period of configuration the Bluetooth icon will appear in the taskbar notification area. Click on the Bluetooth icon. The following menu will be displayed: Page 67 User Manual Gallagher SmartReader BR Series 4. Select the Add a Bluetooth Device option. This opens the Bluetooth Wizard. 5. Populate the My device is set up and ready to be found check box. 6. Turn on your SmartReader. A panel reader will constantly scan for a connecting computer. 7. Click Next on the Wizard. The following window will be displayed: Page 68 Gallagher SmartReader BR Series User Manual 8. Double click on . The following window will be displayed: 9. Select Let me choose my own passkey. Enter 0000 (four zeroes) and click Next. 10. Passkeys will be exchanged and the wizard completes. 11. Click on Finish. Note: The Bluetooth connection should be effective to a range of at least ten metres. Page 69 User Manual Gallagher SmartReader BR Series SPECIFICATIONS Small Antenna Panel Small Antenna Panel 3 kg Dimensions (w x h x d) 400 x 600 x 50 mm Page 70 Gallagher SmartReader BR Series User Manual Large Antenna Panel Large Antenna Panel 7.3 kg Dimensions (w x h x d) 600 x 1300 x 50 mm Page 71 User Manual Gallagher SmartReader BR Series SmartReader Weight BR Series 6.8 kg Dimensions (w x h x d) 300 x 220 x 100 mm (approx) The front and back are slightly curved out. Battery Battery type 12V 7AH Sealed Lead Acid battery Expected 8 hours minimum battery life per Note: Battery life is reduced if the SmartReader is stored at elevated full charge temperatures for extended periods Battery charge 6 hours approx. time (Depending on operating temperature and discharge) Battery charger Protection Over Voltage/ Over Current/ Over Power/ Auto Recovery/ Short Circuit AC input range 110 V AC & 230 V AC Compatible Output Voltage 12 V Note For use only with Gallagher BR series panel SmartReader. Avoid charging in unventilated areas, for example, a cupboard Standards IP (Ingress Protection) Rating: IP66 Operating temperature range: ‐10 to +55 °C Storage temperature range: ‐40 to +85 °C Safety Standards Australia and New Zealand (AS/NZS 3350.2.29 or AS/NZS 60335.2.29) Europe(EN 60335.2.29) C‐Tick approval New Zealand & Australia CE Mark EN 300 330‐2, EN 301 489‐3 FCC This device complies with Part 15 of the FCC Rules. Operation is subject to the following two conditions: Page 72 Gallagher SmartReader BR Series User Manual FCC cont. (1) this device may not cause harmful interference, and (2) this device must accept any interference received, including interference that may cause undesired operation. This equipment has been tested and found to comply with the limits for a Class B digital device, pursuant to part 15 of the FCC Rules. These limits are designed to provide reasonable protection against harmful interference in a residential installation. This equipment generates, uses and can radiate radio frequency energy and, if not installed and used in accordance with the instructions, may cause harmful interference to radio communications. However, there is no guarantee that interference will not occur in a particular installation. If this equipment does cause harmful interference to radio or television reception, which can be determined by turning the equipment off and on, the user is encouraged to try to correct the interference by one or more of the following measures: Reorient or relocate the receiving antenna. Increase the separation between the equipment and receiver. Connect the equipment into an outlet on a circuit different from that to which the receiver is connected. Consult the dealer or an experienced radio/TV technician for help. CAUTION: Changes or modifications not expressly approved by Gallagher Group Limited could void the user’s authority to operate the equipment. Industry Canada This device complies with Industry Canada licence‐exempt RSS standard(s). Operation is subject to the following two conditions: (1) this device may not cause interference, and (2) this device must accept any interference, including interference that may cause undesired operation of the device. Under Industry Canada regulations, this radio transmitter may only operate using an antenna of a type and maximum (or lesser) gain approved for the transmitter by Industry Canada. To reduce potential radio interference to other users, the antenna type and its gain should be so chosen that the equivalent isotropically radiated power (e.i.r.p.) is not more than that necessary for successful communication. This radio transmitter (IC: 7369A‐G03111) has been approved by Industry Canada to operate with the antenna types listed below with the maximum permissible gain and required antenna impedance for each antenna type indicated. Antenna types not included in this list, having a gain greater than the maximum gain indicated for that type, are strictly prohibited for use with this device. Antenna Types: ‐ BR600 Small Antenna Panel (G03121) ‐ BR1300 Large Antenna Panel (G031424) ‐ Sheep Auto Drafter Antenna Panel (G05714) Page 73 User Manual Gallagher SmartReader BR Series Waste Electrical and Electronic Equipment This symbol on the product or its packaging indicates that this product must not be disposed of with other waste. Instead, it is your responsibility to dispose of your waste equipment by handing it over to a designated collection point for the recycling of waste electrical and electronic equipment. The separate collection and recycling of your waste equipment at the time of disposal will help conserve natural resources and ensure that it is recycled in a manner that protects human health and the environment. For more information about where you can drop off your waste equipment for recycling, please contact your local city recycling office or the dealer from whom you purchased the product. Page 74