1
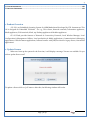
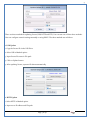
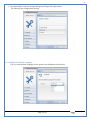
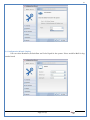
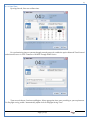
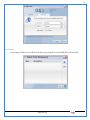
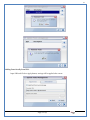
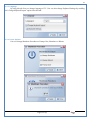
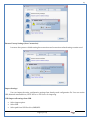
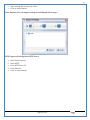
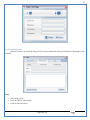
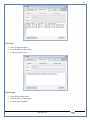
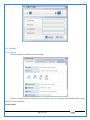
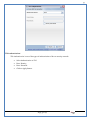
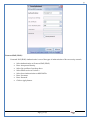
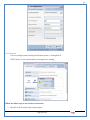
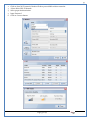
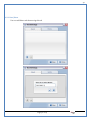
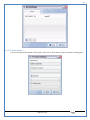
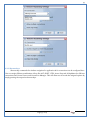
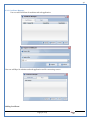
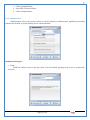
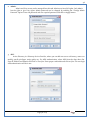
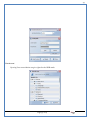
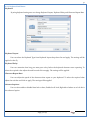
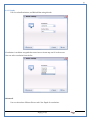
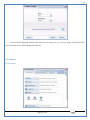
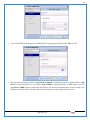
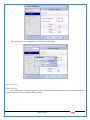
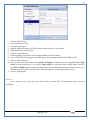
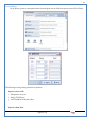
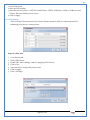
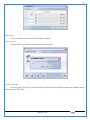
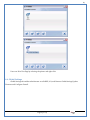
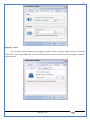
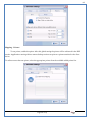
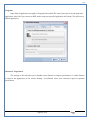
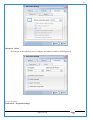
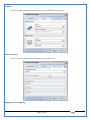
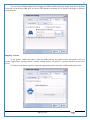
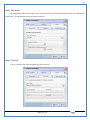
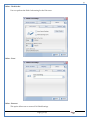
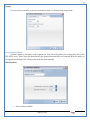
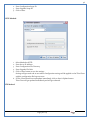
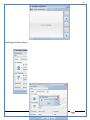
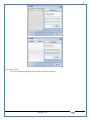
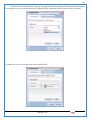
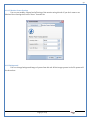
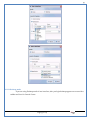
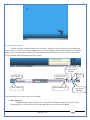
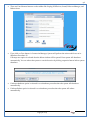
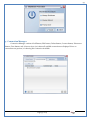
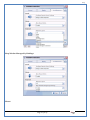
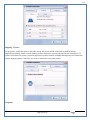
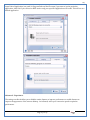
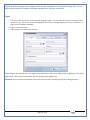
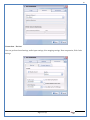
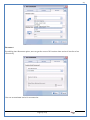
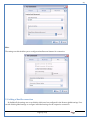
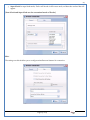
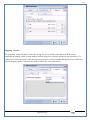
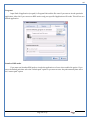
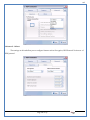
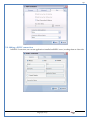
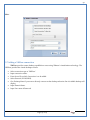
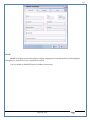
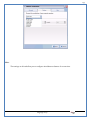
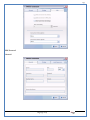
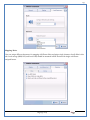
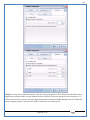
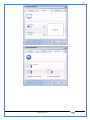
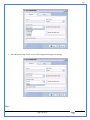
1 User Manual VOS-ARM Version: 1.0.3 [Date: 05-May-2014] Page 1 of 151 2 Table of Contents 1. PRODUCT OVERVIEW .............................................................................................................................................4 2. UPDATE LICENSE ....................................................................................................................................................4 3. CONFIGURATION WIZARD ......................................................................................................................................7 3.1. CONFIGURATION WIZARD- LANGUAGE ..................................................................................................................................... 8 3.2. CONFIGURATION WIZARD- KEYBOARD ..................................................................................................................................... 9 3.3. CONFIGURATION WIZARD- USER INTERFACE ............................................................................................................................. 9 3.4. CONFIGURATION WIZARD- DISPLAY ....................................................................................................................................... 10 3.5. CONFIGURATION WIZARD- HOST NAME ................................................................................................................................. 11 3.6. CONFIGURATION WIZARD- NETWORK .................................................................................................................................... 11 3.7. IMPORT ............................................................................................................................................................................. 12 4. CONTROL CENTER ................................................................................................................................................ 15 4.1. SYSTEM ............................................................................................................................................................... 16 4.1.1. DATE-TIME ..................................................................................................................................................................... 17 4.1.2. FONTS ........................................................................................................................................................................... 18 4.1.3. LANGUAGE ..................................................................................................................................................................... 22 4.1.4. POWER OPTIONS ............................................................................................................................................................. 22 4.1.5. TOOLS............................................................................................................................................................................ 23 4.2. NETWORK ............................................................................................................................................................ 32 4.2.1. ETHERNET ...................................................................................................................................................................... 32 4.2.2. WIRELESS ....................................................................................................................................................................... 38 4.2.3. HOST/XHOST .................................................................................................................................................................. 40 4.2.4. TC NAME SETTINGS ......................................................................................................................................................... 42 4.3. ADMINISTRATION .................................................................................................................................................. 43 4.3.1. SERVICES ........................................................................................................................................................................ 43 4.3.2. SHORTCUT KEYS ............................................................................................................................................................... 44 4.3.3. CERTIFICATE MANAGER .................................................................................................................................................... 46 4.3.4. AUTHENTICATION ............................................................................................................................................................ 47 4.3.5. VMS SETTINGS: .............................................................................................................................................................. 50 4.4. PERIPHERALS ........................................................................................................................................................ 50 4.4.1. KEYBOARD AND MOUSE ................................................................................................................................................... 51 4.4.2. DISPLAY ......................................................................................................................................................................... 53 4.5. PRINTERS ............................................................................................................................................................. 54 4.5.1. PRINTERS ....................................................................................................................................................................... 54 Page 2 of 151 3 4.5.2. JET DIRECT...................................................................................................................................................................... 62 4.5.3. LPD PRINTERS................................................................................................................................................................. 63 4.6. GLOBAL SETTINGS .................................................................................................................................................. 65 4.6.1. RDP GLOBAL .................................................................................................................................................................. 66 4.6.2. ICA GLOBAL ................................................................................................................................................................... 70 4.6.3. BROWSER GLOBAL ........................................................................................................................................................... 76 4.6.4. FIRMWARE UPDATE ......................................................................................................................................................... 77 4.6.5 FIREWALL CONFIGURATOR ................................................................................................................................................. 79 4.7 STORAGE .............................................................................................................................................................. 82 4.7.1 SMB .............................................................................................................................................................................. 83 4.7.2 NFS ............................................................................................................................................................................... 85 4.7.3 USB ............................................................................................................................................................................... 86 4.8 APPEARANCE ......................................................................................................................................................... 87 4.8.1 SCREEN SAVER ................................................................................................................................................................. 88 4.8.2 BACKGROUND .................................................................................................................................................................. 90 4.8.3 USER INTERFACE ............................................................................................................................................................... 93 5. CONNECTION MANAGER ..................................................................................................................................... 99 5.1 ADDING A FREERDP CONNECTION ............................................................................................................................ 100 5.2 ADDING A ICA CONNECTION.................................................................................................................................... 109 5.3 ADDING A MOZILLA CONNECTION ............................................................................................................................. 115 5.4 ADDING A PNAGENT CONNECTION ........................................................................................................................... 118 5.5 ADDING AN POWERTERM CONNECTION...................................................................................................................... 119 5.6 ADDING AN RDP CONNECTION ................................................................................................................................ 120 5.8. ADDING A REXEC CONNECTION .............................................................................................................................. 130 5.7 ADDING A VMVIEW CONNECTION ............................................................................................................................ 131 5.8 ADDING A SSH CONNECTION................................................................................................................................... 141 5.9 ADDING A SPICE CONNECTION ................................................................................................................................. 143 5.10 ADDING A X11 CONNECTION ................................................................................................................................. 144 5.11 EDITING A CONNECTION........................................................................................................................................ 147 5.12 DELETING A CONNECTION...................................................................................................................................... 147 5.13 ESTABLISHING A CONNECTION ................................................................................................................................ 147 5.14 DISCONNECTING AN ACTIVE CONNECTION ................................................................................................................. 148 6. LOCAL APPLICATIONS ......................................................................................................................................... 149 6.1 CITRIX-RECEIVER .................................................................................................................................................. 149 6. 2 LEAFPAD ............................................................................................................................................................ 150 6.3 CHROMIUM BROWSER ........................................................................................................................................... 150 7. SYSTEM INFORMATION ...................................................................................................................................... 150 Page 3 of 151 4 7.1 SYSTEM-INFORMATION .......................................................................................................................................... 150 7.2 INSTALLED-COMPONENTS ....................................................................................................................................... 151 1. Product Overview GV OS is an Embedded Operating System for ARM Motherboard developed by VXL Instruments. This OS is designed for Embedded Terminals. For e.g., Thin clients, Network terminals, Information appliances, Media appliances, POS terminals, Kiosk, any Desktop appliances & Headless appliances. GV OS Flash provides features of Network & Connectivity Protocols, Local Window Manager, Local Configuration & Management Utilities, Local productivity & Media applications, Communication & Messaging applications, Office document applications, Internet browser with JVM, Provision for legacy clients, Customized applications. 2. Update License When user boot up the system for the first time, it will display a message “License not available. Do you wish to update license now?” To update a license click on “yes” button. After this, the following window will invoke. Page 4 of 151 5 There are three methods for updating license (USB, HTTP and FTP). User can use one of these three methods. User can configure network settings manually or using DHCP. The three methods are as follows: 1. USB Update 1. Copy the license file in the USB Drive. 2. Select USB in Method option. 3. Input license file name in File path. 4. Click on Update button. 5. After updating license, system will reboot automatically. 2. HTTP Update 1. Select HTTP in Method option. 2. Input server IP address and File path. Page 5 of 151 6 3. Click on Update button. 4. After updating license, system will reboot automatically. 3. FTP Update 1. Select FTP in Method option. 2. Input server IP address, User name, and Password and File path. 3. Click on Update button. 4. After updating license, system will reboot automatically. Page 6 of 151 7 3. Configuration Wizard User can configure settings automatically or manually or import settings. In Automatic option, the defaults settings are set automatically after the timeout. Page 7 of 151 8 In manual option, user can change settings according to his requirements. The following are configuration settings. 3.1. Configuration Wizard- Language User can select default Language for the system from dropdown selection box. Page 8 of 151 9 3.2. Configuration Wizard- Keyboard User can select a Keyboard Type for the system. 3.3. Configuration Wizard- User Interface User can select either Kiosk or Desktop user interface mode for the system. Page 9 of 151 10 3.4. Configuration Wizard- Display User can select Resolution, Refresh Rate and Color Depth for the system. Driver would be Mali for k54 mother board. Page 10 of 151 11 3.5. Configuration Wizard- Host name User can set the Hostname and Domain for the system. 3.6. Configuration Wizard- Network User can select the network device to connect to the Local Area Network or Internet, Ethernet. User can choose to obtain network settings from DHCP or can set it manually. This is the last step of the configuration wizard. When user clicks on Finish button, the system will reboot after this process. After reboot, the changes will be applied to the system. Page 11 of 151 12 After clicking on finish, System will reboot and boot with the above configuration settings. 3.7. Import User can Import all the configuration settings from already saved configuration file using USB, HTTP and FTP methods. USB: Import all settings from USB pen drive. Select Import option. Select USB. Select path from USB Pen drive. Select settings file from the list of files. Click on Import button. Page 12 of 151 13 Page 13 of 151 14 HTTP: Import all settings from HTTP Server. Select Import option. Select HTTP method. Enter HTTP Server IP. Enter filename. Click on Import button. FTP: Import all settings from FTP Server. Select Import option. Select FTP method. Page 14 of 151 15 Enter IP address of FTP Server. Enter Filename. Enter Username & Password of FTP Server. Click on Import button. 4. Control Center User can view and edit general system settings and system information from TC Control Manager. It has 8 Options to change the settings of TC which are explored below. Page 15 of 151 16 4.1. System Through System Tab user can configure and view all the system related settings. System tab contains Date-Time, Fonts, Language, Shutdown Procedure, Tools. Using this tab you can change system’s setting. All system settings are described below: Page 16 of 151 17 4.1.1. Date-Time By using this tab, User can set Date-time. For synchronizing time on systems through network protocols, enable the option Network Time Protocol and select the server i.e. NTP Timeserver OR NTP Through DHCP Server. Time zone tab shows Continent and Region. Select appropriate time zone according to your requirement. For Day light saving, enable “Automatically adjust clock for Daylight Saving Time”. Page 17 of 151 18 4.1.2. Fonts Font’s option enables you to add fonts locally using storage devices like SMB, NFS, USB and URL. Page 18 of 151 19 Adding Fonts: Adding Fonts locally from local storage: Browse the Font files from local storage and Click on Apply button, setting will be applied after restart. Page 19 of 151 20 Adding fonts from Font Server: Select the server type (XFS/NFS), enter the IP of that server, path and click on apply button. To delete existing fonts: Page 20 of 151 21 Adding Fonts locally from URL: Input URL and Click on Apply button, settings will be applied after restart. Page 21 of 151 22 4.1.3. Language By using this tab User can change language of TC. User can also change Keyboard Settings by enabling the “Change Keyboard Layout” option from this tab. 4.1.4. Power Options User can change Shutdown Procedure to Prompt User, Shutdown or Reboot. Page 22 of 151 23 Below image shows scenario for Prompt User 4.1.5. Tools Tools tab consist of System Tools, Network Tools & Logs. 4.1.5.1. System Tools System Tools tab consist of System related settings, like Restore Factory Settings, Restore Factory Settings (Save Connection), Import Settings and Export Settings. Restore Factory Settings: It restores the system to default settings and the changes and configuration done, will get vanished. Page 23 of 151 24 Restore Factory Settings (Save Connection): It restores the system to default setting but connections and connections related settings remain saved. Import Settings: User can import the entire configuration settings from already saved configuration file. User can use the USB, Network mounted drives, HTTP Server or FTP Server for importing. USB: Import all settings from USB. Select import option. Select USB. Select path from USB Pen drive/SMB/NFS. Page 24 of 151 25 Select settings file from the list of files. Click on Import button. Note: Similarly User can import settings from SMB and NFS storages. HTTP: Import all settings from HTTP Server. Select Import options. Select HTTP. Enter HTTP Server IP. Enter Filename. Click on Import button. Page 25 of 151 26 FTP: Import all settings from FTP Server. Select import options Select FTP. Enter IP address of FTP Server. Enter Filename. Enter Username & Password of FTP Server. Click on Import button. Page 26 of 151 27 Export Settings: User can export the entire settings to a file. User can use the USB pen drive and FTP Server. USB: Export all settings from USB pen drive. Select export options. Select USB. Select path from USB Pen drive/SMB/NFS. Select settings file from the list of files. Click on Export button. FTP: Export all settings from FTP Server. Select export options. Select FTP. Enter IP address of FTP Server. Enter filename. Enter Username & Password of FTP Server. Click on export button. Page 27 of 151 28 4.1.5.2. Network Tools Network Tools are to check the Ping and Trace route commands with any IP address or Hostname in the network. Ping: Select Ping option. Enter IP address / Host Name. Click on Start Execution. Page 28 of 151 29 Traceroute: Select Traceroute option. Enter IP address / Host Name. Click on Start Execution. DNS Lookup: Select DNS Lookup option. Enter IP address / Host Name. Click on Start Execution. Page 29 of 151 30 4.1.5.3. Logs User can check Logs of Configuration & Firmware, Kernel, XServer and CUPS .User can export logs in USB or FTP server. User can export logs in USB or FTP server. Page 30 of 151 31 USB: Click on USB. Select proper path, where user wants to keep the exported file. Click on Export button. Click on FTP. Enter Server IP. Enter Filename. Enter Username & Password of FTP Server. Click on Export Button. FTP: Page 31 of 151 32 4.2. Network 4.2.1. Ethernet Network tab shows you about network settings. User can configure Ethernet network using this option. User can configure Network Manually or using DHCP server provided data. Disable Mode: Page 32 of 151 33 User can disconnect the Thinclient from a network by disabling the Ethernet connection. Select Disable option from the list and click on Apply option. The settings will be applied. Manual Configuration: User can configure network manually, input IP Address, Subnet Mask, Gateway etc. Configure Using DHCP: Page 33 of 151 34 If you want to configure network using DHCP, use this option. 802.1x Security: 802.1x is an IEEE standard for Port based Network Access Control, It has 4 types of authentication: MD5 Authentication: MD5 Authentication is one of the type of authentication of 802.1x security network. Select Authentication as MD5 Enter Username. Enter Password. Click on Apply button. Page 34 of 151 35 TLS Authentication: TLS Authentication is one of the types of authentication of 802.1x security network. Select Authentication as TLS Enter Identity. Enter Password. Click on Apply button. Page 35 of 151 36 Tunneled TLS Authentication: Tunneled TLS Authentication is one of the types of authentication of 802.1x security network. Select Authentication as Tunneled TLS. Enter Identity. Enter Username & Password. Click on Apply button. Page 36 of 151 37 Protected EAP (PEAP): Protected EAP (PEAP) Authentication is one of the types of authentication of 802.1x security network. Select Authentication as Protected EAP (PEAP). Enter Anonymous Identity. Select CA certificate from drop down. Select PEAP version as Version 0. Select Inner Authentication as MSCHAPV2. Enter Username. Enter Password. Click on Apply button. Page 37 of 151 38 4.2.2. Wireless User can configure network using the Wireless option i.e. through Wi-Fi. If Wi-Fi device is not connected then it prompts error message. Follow the below steps to use wireless connection: 1. Plug Wi-Fi device and invoke wireless option. Page 38 of 151 39 2. 3. 4. 5. 6. Click on Scan Wi-Fi network. Result will show you available wireless networks. Select desired Wi-Fi Network. Select proper Authentication. Input Password. Click on Connect button. Page 39 of 151 40 4.2.3. Host/Xhost User can add Hosts and xhosts using this tab. Page 40 of 151 41 Hosts: Enter appropriate IP and Name and click on Save to add. Page 41 of 151 42 4.2.4. TC Name Settings User can change the Hostname of the system. User can set Thinclient Location, Domain or Workgroup. Page 42 of 151 43 4.3. Administration User can perform administrative actions using this tab. 4.3.1. Services User can Start or Stop services like X11VNC. User can change the VNC settings like Notify Users, Query User, Silently Connect, Password Protected, View Only mode, multiple connections. Page 43 of 151 44 4.3.2. Shortcut keys Shortcut key commands for window navigation for application & for connections can be configured here. User can assign different combination of keys like ALT, SHIFT, CTRL, Arrow Keys and all alphabets for different connections and Control Center and Connection Manager. This will allow user to invoke the assigned options by simply pressing the respective shortcut keys. Page 44 of 151 45 Assign New: Select any application / Connection / Control from the list. Click on “Assign New” button or double click on a required Connection. Select Key or Key Combination from first drop down box. Eg: Ctrl, Alt, Ctrl+Shift, Alt+Ctrl etc. Select any Alphabet / Numeric / Arrow keys / Function keys from second drop down box. Click on “Set” button. Click on “Apply” button. Page 45 of 151 46 4.3.3. Certificate Manager User can add Certificate for websites and web application. User can add Keys for websites and web application and for connecting servers . Adding Certificate: Page 46 of 151 47 Click on Import button. Enter URL or External Drives. Click on Import button. 4.3.4. Authentication Authentication refers to the process where an entity's identity is authenticated, typically by providing evidence that it holds a specific identity such as valid credentials. Authentication Types: 1. User: USER has limited access to the thin client. User has limited privileges and access to system-wide resources. Page 47 of 151 48 2. Admin: Admin and User access can be managed from this tab. Admin user have full rights. Only Admin has the right to give User rights. Admin password can be changed by enabling the “Change Admin Password” option. Enter old password and new required password and click on Apply button. 3. ADS: Active Directory is a Directory Service Provider, where you can add new user to a directory, remove or modify, specify privileges, assign policy etc. For ADS authentication, select ADS from the drop down list. Enter IP address and Domain and click on Test Join. Enter proper credentials and click on Join. For next login ADS authentication will be in use. Page 48 of 151 49 User Access: By using User access Admin can give rights for the USER mode. Page 49 of 151 50 4.3.5 VMS Settings: VMS Settings is client side configuration to communicate with VMS server i.e. centralized Device Management Suite. 4.4. Peripherals Set your keyboard layout, monitor settings and other input options from this tab. The following parameters can be configured: Page 50 of 151 51 4.4.1. Keyboard And Mouse Keyboard: By using keyboard setting user can change Keyboard Layout, Keyboard Delay and Character Repeat Rate. Keyboard Layout: User can select the Keyboard Type from Keyboard Layout drop down list and apply. The settings will be applied on the fly. Keyboard Delay: User can customize how long you must press a key before the keyboard character starts repeating. To select the required value adjust the seek bar and click on apply. The settings will be applied. Character Repeat Rate: User can adjust the speed of the characters that repeat on your keyboard. To select the required value adjust the seek bar and click on apply. The settings will be applied. Advanced options: User can also enable or disable Num lock on boot, Enable Scroll Lock, Right Alt to behave as to Left Alt in the advanced option. Page 51 of 151 52 Mouse: Mouse setting can change Mouse Orientation, Acceleration and Auto Hide Mouse Cursor settings using this tab. Acceleration: Determines how fast the cursor moves in response to the movements of the mouse. Auto Hide Mouse Cursor: This setting if applied hides the mouse cursor after specified interval. Page 52 of 151 53 4.4.2. Display User can select Resolution, and Refresh Rate using this tab. If resolution is set below 1024x768 then some icons or items may not fix in the screen. User can select resolution from the list. Advanced: User can also select different Drivers and Color Depth for resolutions. Page 53 of 151 54 Drivers will be displayed based on the board you are using, for e.g. if you are using “Intel” board, then ‘vesa’ and ‘Intel’ drivers will be displayed in the list. 4.5. Printers 4.5.1. Printers Page 54 of 151 55 Adding a printer: . Local Printer: (If your Printer is connected locally to the thin client) 1. Click on “Add” option. 2. Select USB Port. 3. Note : Raw Input Option is used to print in raw mode. 4. Provide printer name and click forward button, default ppd files with Vendor name and their Model list will be loaded. Page 55 of 151 56 5. User can add PPD file through Provide PPD option, using storage media like NFS, SMB or USB. 6. User can select the options such as ‘Set printer as default’ to make that printer as default printer, ‘Map in ICA’ to map that printer in ICA session, ‘Map in RDP’ to map that printer in RDP session, user can use ‘Share via SMB’ option to share that printer(User can access the shared printer from run utility. Give IP address of the thin client. Double click on the shared printer and configure printer driver. Page 56 of 151 57 7. When the user click’s on apply button it ask for Print Test Page. Network Printer: SAMBA Printing: This mechanism is useful when printer is connected to any windows machine in network and you want to fire a print from thin client to that windows machine. Page 57 of 151 58 1. 2. 3. 4. 5. 6. 7. 8. 9. 10. 11. Click on “Add” button. Select mechanism as SAMBA. Provide printer name Input IP address (IP address of windows machine where printer is connected). Input Share name of that printer. Input User name and Password. Click on Forward button. Default ppd files with Vendor name and their Model list will be loaded. User can add PPD file through Provide PPD option, using storage media like NFS, SMB or USB. Click on Forward button. User can select the options such as ‘Set printer as default’ to make that printer as default printer, ‘Map in ICA’ to map that printer in ICA session, ‘Map in RDP’ to map that printer in RDP session, user can use ‘Share via SMB’ option to share that printer(User can access the shared printer from run utility. Give IP address of the thin client. Double click on the shared printer and configure printer driver. 12. Click on Apply Button. IPP Printing: This mechanism is useful when printer is connected to any LINUX machine in network and you want to fire a print from thin client to that LINUX machine. Page 58 of 151 59 1. 2. 3. 4. 5. 6. 7. 8. 9. 10. Click on “Add” button. Select mechanism as IPP. Provide Printer Name. Input IP address (IP address of LINUX machine where printer is connected). Input Share Name of that printer. Click on Forward button. Default ppd files with Vendor name and their Model list will be loaded. User can add PPD file through Provide PPD option, using storage media like NFS, SMB or USB. Click on Forward button. User can select the options such as ‘Set printer as default’ to make that printer as default printer, ‘Map in ICA’ to map that printer in ICA session, ‘Map in RDP’ to map that printer in RDP session, user can use ‘Share via SMB’ option to share that printer(User can access the shared printer from run utility. Give IP address of the thin client. Double click on the shared printer and configure printer driver. 11. Click on Apply Button. Jet Direct: If user wants to fire a print from your Thin Client to another Thin Client/Network printer, use this mechanism. Page 59 of 151 60 Thin Client from where printing would be fired: 1. 2. 3. 4. 5. 6. 7. 8. 9. Click on “Add” button. Select mechanism as IPP. Provide Printer Name. Input IP address (IP address of thin client where printer is connected). Click on Forward button. Default ppd files with Vendor name and their Model list will be loaded. User can add PPD file through Provide PPD option, using storage media like NFS, SMB or USB. Click on Forward button. User can select the options such as ‘Set printer as default’ to make that printer as default printer, ‘Map in ICA’ to map that printer in ICA session, ‘Map in RDP’ to map that printer in RDP session, user can use ‘Share via SMB’ option to share that printer(User can access the shared printer from run utility. Give IP address of the thin client. Double click on the shared printer and configure printer driver. 10. Click on Apply Button. Thin Client where the printer is connected: 1. Go to Printing tab. 2. Select Jet Direct option. 3. Select the port for printer i.e. LPT for Parallel Printer, USB for USB Printer, COM for Serial Printers. Here the default port no. is 9100. 4. Click on Apply button. Remote Printing: User can use this mechanism with any of above local printing protocols and Network protocols to map the Local printer in RDP/ICA session with Windows driver name which is installed on server side. Page 60 of 151 61 1. 2. 3. 4. 5. Click on “Add” button. Select any Local or Network Printer. Provide Printer Name. Provide Driver Name. (Exactly Same As in Server.) User can select the options such as ‘Set printer as default’ to make that printer as default printer, ‘Map in RDP’ to map that printer in RDP session, ‘Map in ICA’ to map that printer in RDP session. 6. Click on Apply button. Page 61 of 151 62 4.5.2. Jet Direct In Jet Direct, printer is connected to thin client and print can be fired from various servers/Thin Clients. The following are the printing scenarios for Jet direct: Steps for server side: 1. Add printer on server. 2. Assign TCP/IP port. 3. Give IP address of the thin client. Steps for client side: Page 62 of 151 63 1. Go to Printing tab. 2. Select Jet Direct option. 3. Select the port for printer i.e. LPT1 for Parallel Printer, USB for USB Printer, COM1 or COM2 for Serial Printers. Here the default port no. is 9100. 4. Click on Apply. 4.5.3. LPD Printers The Line Printer Daemon protocol/Line Printer Remote protocol (LPD) is a network protocol for submitting print jobs to a remote printer. Steps for client side: 1. 2. 3. 4. 5. 6. 7. Go to Printing tab. Select LPD Printers. Enable LPD. After enabling, it asks for stopping CUPS services. Click on Yes. Select the device and provide printer name. Click on Apply. Print a Test Page. Page 63 of 151 64 Edit Printer: User can edit the printer by selecting edit printer option. Delete Printer: User can delete any printer by selecting delete printer option. Printer Test Page: User can print a test page to check whether the printer has been added properly and whether printer works fine with Thin Client. Page 64 of 151 65 Users can Print Test Page by selecting the printer and right click. 4.6. Global Settings Global Settings tab enables administrator to edit RDP, ICA, and Browser Global Settings,Update Firmware and Configure firewall. Page 65 of 151 66 4.6.1. RDP Global Display: User can set global settings for the Color Depth, Resolution and Backing Store. Local Resources: User can set the Keyboard Layouts, Configure Remote Audio Settings and map key bindings. Page 66 of 151 67 Mapping – Drive: User can assign different characters for mapping of different disks and assign single character for all disks in this tab. Local storage (SMB, NFS, and Local USB) should be mounted in RDP session with single or different assigned letters. Page 67 of 151 68 Mapping – Printer: To use printer, enable this option. After this global setting the printer will be redirected in the RDP session. Applications running within a remote desktop session can print to a printer attached to the client device. To redirect more than one printer, select the appropriate printer from the available added printer list. Page 68 of 151 69 Programs: Input Path of Application (exe path) in Program Path and the file name if you want to invoke particular application. After this if you connect to RDP session only your specified application will invoke. This will act as a default application. Advanced – Experience: The settings on this tab allow you to disable certain features to improve performance or enable features to improve the appearance of the remote desktop. As indicated, select your connection speed to optimize performance. Page 69 of 151 70 Advanced – Other: The settings on this tab allow you to configure miscellaneous features of RDP protocol. 4.6.2. ICA Global Preferences – Keyboard Settings: Page 70 of 151 71 User can set the Keyboard Layouts, Keyboard Type (Client), Keyboard Type (Server), enable or disable Window Alert Sounds, allow or disallow Audio Input. Preferences – Keyboard Shortcuts: User can set the Keyboard Shortcuts from this tab. Page 71 of 151 72 Window: User can set global settings for the Screen, Size, and Window Colors options. Server Location: User can select the Default Network Protocol for the ICA server. Mapping – Drive Mapping: Page 72 of 151 73 User can assign different characters for mapping of different disks and assign single character for all disks in this tab. Local storage (SMB, NFS, and Local USB) should be mounted in ICA session with single or different assigned letters. Mapping - Printer: To use printer, enable this option. After this global setting the printer will be redirected in the ICA session. Applications running within a remote desktop session can print to a printer attached to the client device. To redirect more than one printer, select the appropriate printer from the available added printer list. Page 73 of 151 74 Other – Reconnect: By enabling Auto Reconnect option, user can get the access of ICA session when session is lost due to low connectivity. The maximum retires can be set from here. Other – Firewall: User can perform the Firewall setting for the ICA server. Page 74 of 151 75 Other – Disk Cache: User can perform the Disk Cache setting for the ICA server. Other – Font: Other – Restore: This option allows user to restore ICA Global Settings. Page 75 of 151 76 4.6.3. Browser Global Proxy Settings: User can set Proxy settings (if available) for Browser in this tab. Page 76 of 151 77 Display: User can choose resolution for browser and choose mode i.e. Normal, Kiosk, Super kiosk. 4.6.4. Firmware Update Firmware update is the utility used to update the Thin Clients by putting the configuration file on the FTP/ HTTP server. Thin Clients will automatically get updated automatically once rebooted. With this utility we can upgrade the multiple Thin Clients at the same time automatically. DHCP Method: 1. Select method as DHCP. Page 77 of 151 78 2. Enter Configuration Scope ID. 3. Enter Upgrade Scope ID. 4. Click on Save. HTTP Method: 1. 2. 3. 4. 5. Select Method as HTTP. Enter Server IP Address. Enter Configuration File Directory. Enter Upgrade File Path. Click on Save button to save the settings. Settings will get saved and at next reboot Configuration settings will be applied on the Thin Client with the configuration file kept on server. 6. If Thin Client should save and update immediately, click on Save & Update button. Thin Client will get updated immediately and will get rebooted. FTP Method: Page 78 of 151 79 1. 2. 3. 4. 5. 6. 7. Select Method as FTP. Enter Server IP Address. Enter Username of the FTP Server. Enter Password of the FTP Server. Enter Configuration File Directory. Enter Upgrade File Path. Click on Save button to save the settings. Settings will get saved and at next reboot Configuration settings will be applied on the Thin Client with the configuration file kept on server. 8. If Thin Client should save and update immediately, click on Save & Update button.Thin Client will get updated immediately and will get rebooted. 4.6.5 Firewall Configurator Firewall Configurator is GUI Utility to block incoming or outgoing traffic with different IP address as well as web sites. Page 79 of 151 80 Blocking by IP/Port Settings: Page 80 of 151 81 Blocking by Sites: To delete created IP or sites: Page 81 of 151 82 4.7 Storage In storage tab, User can mount different storages like SMB and NFS. Mount other devices like USB pen drive. Page 82 of 151 83 4.7.1 SMB User can add, edit, delete and Mount / Unmount shared storage drives over network using SMB Protocol using this Tab. SMB share can be mapped as ‘Read-Only’ by checking in the check box. For SMB share user need to provide some information. Page 83 of 151 84 To edit a SMB share, click on Umount button. The SMB share gets umounted successfully. User can edit the SMB share only after umounting it. If wrong credentials are enter it gives as error message. To umount a SMB share, click on Umount button. The SMB share gets umounted successfully. To again mount the share, click on Mount button. The SMB share gets mounted successfully. To delete a share, umount the SMB share and click on Delete button. The SMB share gets deleted successfully. Page 84 of 151 85 4.7.2 NFS Using NFS tab user can add, edit, delete and Mount/Unmount shared storage drives over network using NFS protocols. NFS share can be mapped as ‘Read-Only’ by checking in the check box. For SMB share user need to provide some information. Page 85 of 151 86 To edit a NFS share, click on Umount button. The NFS share gets umounted successfully. User can edit the NFS share only after umounting it. If wrong credentials are enter it gives as error message. To umount a NFS share, click on Umount button. The NFS share gets umounted successfully. To again mount the share, click on Mount button. The NFS share gets mounted successfully. To delete a share, umount the NFS share and click on Delete button. The NFS share gets deleted successfully. 4.7.3 USB Using USB tab user can enable Mount/Unmount USB devices. USB can be mapped as ‘Read-Only by checking in the check box. Share Drives via SMB: By using this option you can access mounted drives in your Windows desktop through RUN utility. To access this feature go to Windows start menu => run => command prompt =>input IP address or Host name of Thinclient then click on OK button. User can now access the USB data. Page 86 of 151 87 4.8 Appearance User can personalize the appearance of the system from this tab. Page 87 of 151 88 \ 4.8.1 Screen Saver 4.8.1.1 Screen Saver User can set screen-saver to the desktop. To set a screen saver, enable the checkbox of Screensaver. By default, the time-out will be set to 5 min. User can change the time-out period. When the time-out completes, the screen saver will appear. Page 88 of 151 89 Click next for Advanced Settings. User can also apply advanced settings by selecting the advanced option. In this option user can set screensaver mode, Slideshow mode, Slideshow interval options of the screensaver. To enable lock screen, enter Password in the password field. Page 89 of 151 90 4.8.1.2 Monitor Power Settings User can set standby, suspend and off timing of the monitor using this tab. If you don’t want to use Monitor Power Settings then select “Never” from the list. 4.8.2 Background User can change background image of system from this tab. All the images present in the file system will be shown here. Page 90 of 151 91 To view images from Local Storages choose “Select path to list backgrounds”. All the images present in the mounted storages will be shown here. The background can be set in different styles: Tile, Center and Fullscreen. Page 91 of 151 92 User can also select a color as a background. Three options are given: Solid Color, Horizontal gradient and Vertical gradient. Page 92 of 151 93 4.8.3 User Interface By using this tab User can change Mode (Desktop/Kiosk), task bar properties. Page 93 of 151 94 Mode change to Kiosk: After changing mode to kiosk , user can launch either Control Center, different Connections or Applications as the default program, once settings is been applied. Page 94 of 151 95 4.8.3.1Desktop mode If you are using Desktop mode of user interface, after you login desktop appears on screen with a taskbar and icon for Control Center. Page 95 of 151 96 4.8.3.2 Taskbar Utilities Task bar is always visible by default. You can make it auto hide from User Interface by disabling the feature. User can invoke Connections, Applications, and can do Reboot and Shutdown operations from Start button. There are Four Shortcut buttons on the taskbar like Show Desktop Key, Lock Screen, Unplug USB Devices, Sound, Ethernet Manager and Print Queue. Unplug USB Devices Lock Screen Trial Licensee Show Desktop Ethernet Manager Sound Print Queue Manager The following are the icons present on the taskbar. 1. Show Desktop If Applications are open and you want to go back to the desktop screen, click on the Show Desktop option. It will minimize all the open application and desktop will displayed. Page 96 of 151 97 2. Lock Screen – Lock screen is used to lock your Desktop. 3. Unplug USB Device If you have connected a removable hardware device like USB pen drive. In order to unplug the removable device, click on this Button. 4. Trial License – By default OS is with 20 hrs trial license. User can update the license by clicking on icon of Trial License on the task bar. 5. Sound Sound Button is used to adjust the volume level. 6. Start menu In the Start menu we can see the list of local application, list of added connections, Connection manager, Control Center, Reboot and Shutdown. One can choose these options using mouse click or keyboard. 7. Print Queue Manager – Print Queue Manager is a printer queue controller for local or remote printers. All the completed and non completed jobs will be listed here. 4.8.3.1 Kiosk mode If you are using kiosk mode of user interface then after you login, the Connection Manager will appear on screen. Using connection manager you can add, edit, delete and connect to different connections like RDP, ICA and VNC etc. (for details on connections please read section no 6. Connection Manager.) User can change other settings like Printing, Network, and Administration by clicking Control Center. If you want to switch to Desktop mode, click on Control Center; go to Appearance User InterfaceModeDesktop. Select mode as Desktop option. Then click on Apply. The changes will be effective on the fly. Page 97 of 151 98 There are Four Shortcut buttons on the taskbar like Unplug USB Devices, Sound, Ethernet Manager, and Reboot icons. If you click on Close button in Connection Manager, System will perform the actions which are set in Shutdown Procedure UI. If Prompt user option is selected then the below window will be opened. Here system will shutdown automatically. You can reboot the system or cancel the action by clicking respective button before system shutdown. If Always shutdown option is selected in as a shutdown procedure then the system will shutdown automatically. If Always Reboot option is selected in as a shutdown procedure then the system will reboot automatically. Page 98 of 151 99 5. Connection Manager Connection Manager consists of Add button, Edit button, Delete button, Connect button, Disconnect button, Close button, and a list area (tree view) where all available connection are displayed. Since no connections are present, it is showing No Connection Available. Page 99 of 151 100 List of Connection Type: User can also add connection by clicking on the + (ADD) button. The list of connection type will be shown. Select the required type and do the configuration for the connection. Apply the settings and click on Connect. Connection will be launched. 5.1 Adding a FreeRDP connection FreeRDP is a free, open source implementation of the RDP protocol. General: Input server IP address manually. Input Connection name. Input proper user name and password. Input Domain name. Enable/Disable Remote FX. Note: If RemoteFX is enabled then color depth has to be 32bit locally. Page 100 of 151 101 Display: User can perform settings for the Color Depth, Resolution. Resolution List: User can select the required resolution from the list. The RDP connection will be launched with selected resolution Page 101 of 151 102 Resolution can be customized according to the requirement. Choose Custom option from the resolution list and configure the settings. Color Depth: Select the required color depth for the connection. The connection will be launched with the selected color depth. Local Resources: Page 102 of 151 103 User can set the Keyboard Layouts, Configure Sound Settings and map key bindings. Keyboard Layout: User can select the Keyboard Type from the Type drop down list and apply. The settings will be applied on the fly. Page 103 of 151 104 Keep Window Manager Key Bindings: Mouse: Page 104 of 151 105 User can select the motion of the mouse by enabling or disabling option, and it will affect the Free RDP Connection. Mapping – Drive: User can assign different characters for mapping of different disks and assign single character for all disks in this tab. Local storage (SMB, NFS, and Local USB) should be mounted in RDP session with single or different assigned letters. Page 105 of 151 106 Mapping – Printer: To use printer, enable this option. After this setting, the printer will be redirected in the RDP session. Applications running within a remote desktop session can print to a printer attached to the client device. To redirect more than one printer, select the appropriate printer from the available added printer list. Disable the printer mapping option, if user does not want to redirect the connected printer Programs: Page 106 of 151 107 Input Path of Application (exe path) in Program Path and the file name if you want to invoke particular application. After this if you connect to RDP session only your specified Application will invoke. This will act as a default application. Advanced – Experience: The settings on this tab allow you to disable certain features to improve performance or enable features to improve the appearance of the remote desktop. As indicated, select your connection speed to optimize performance. Page 107 of 151 108 Advanced – Others: The settings on this tab allow you to configure features such as Encryption, RDP Protocol Version etc. of RDP protocol. Page 108 of 151 109 Misc: The settings on this tab allow you to configure miscellaneous features for connection. 5.2 Adding a ICA connection Select connection type as ‘ICA’. Page 109 of 151 110 By default all the settings are set to default, which user has configured in the ICA global settings. User can use default global settings or configure individual settings for the respective connection. Login: 1. User can search ICA server in the network using this option. For searching ICA servers in network click on Search icon. ICA Server list will be displayed. Then choose the appropriate ICA server to connect. Or Input server IP address manually. 2. Input Connection name. 3. Input proper user name and password. Depending on the selected server, the applications launched on the server will be listed in Application list. If any application is selected, the connection will directly launch the application. Network: User can select the Network Protocol for the ICA server and also specify the working directory. Page 110 of 151 111 Connection – Devices: User can perform Sound settings, audio input settings, drive mapping settings, Data compression, Disk Cache settings. Page 111 of 151 112 Connection – Screen Latency: User can configure settings for Mouse Click Feedback, Local Text Echo and Encryption Level from this tab. Firewall: If end-users will be connecting to the ICA Server via the Internet, then firewall settings are necessary. User can select the proxy settings from the Proxy Mode drop down list. Page 112 of 151 113 Window: User can select Screen size as Default/ Fixed Size/ Full Screen/Screen percentage. The screen size can also be set to different sizes by selecting Screen percentage in Screen Size which enables the Size drop down list. Then select the size from the list. Now the session will appear in the selected size. User can change the Window Colors of the session. Page 113 of 151 114 Reconnect: By enabling Auto Reconnect option, user can get the access of ICA session when session is lost due to low connectivity. User can set maximum retries for reconnection. Page 114 of 151 115 Misc: The settings on this tab allow you to configure miscellaneous features for connection. 5.3 Adding a Mozilla connection By default all the settings are set to default, which user has configured in the Browser global settings. User can use default global settings or configure individual settings for the respective connection. Page 115 of 151 116 Select connection type as ‘Mozilla’. Give appropriate name to connection. Enter Webpage URL for browser. Select screen size (full screen/fit to screen/default) Mode: 1. Normal: In normal mode, Firefox will invoke with Menu bar and Toolbar utilities. 2. Kiosk: In Kiosk mode, Firefox will invoke with tool bar only. Page 116 of 151 117 3. Super Kiosk: In super kiosk mode, Firefox will invoke in full screen mode, no Menu bar and tool bar will appear. [Note: Kiosk and Super Kiosk are the customized mode of Firefox.] Misc: The settings on this tab allow you to configure miscellaneous features for connection. Page 117 of 151 118 5.4 Adding a PNAgent connection General: Select connection type as ‘PNAgent’. Give appropriate name to connection. Enter Server IP. Input correct User name and Password. Input Domain name. If you have checked “Display Application Icons on Desktop” check box, you will get Icons of the published applications on desktop. If you uncheck this option then all the published applications will be displayed in connection manager associated with Particular created connection. Misc: The settings on this tab allow you to configure miscellaneous features for connection. Page 118 of 151 119 5.5 Adding an Powerterm connection Select connection type as ‘Powerterm’. User can select the desired Session Type from the list. Session Type: COM Session Type: Telnet Page 119 of 151 120 5.6 Adding an RDP connection Select connection type as ‘RDP’. By default all the settings are set to default, which user has configured in the RDP global settings. User can use default global settings or configure individual settings for the respective connection. General: User can search RDP server in the network using this option. For searching RDP servers in network click on Search icon. RDP Server list will be displayed. Then choose the appropriate RDP server to connect. Or Input server IP address manually. Input Connection name. Input proper user name and password. Input Domain name. Page 120 of 151 121 Display: User can perform settings for the Color Depth, Resolution and Backing Store. Resolution List: User can select the required resolution from the list. The RDP connection will be launched with selected resolution. Page 121 of 151 122 Resolution can be customized according to the requirement. Choose Custom option from the resolution list and configure the settings. Color Depth: Select the required color depth for the connection. The connection will be launched with the selected color depth. Local Recourses: User can set the Keyboard Layouts, Configure Remote Audio Settings and map key bindings. Page 122 of 151 123 Audio: To allow remote audio settings, select the appropriate option from the list. Keyboard Layout: User can select the Keyboard Type from the Type drop down list and apply. The settings will be applied on the fly. Keep Window Manager Key Bindings: Mapping – Drive: User can assign different characters for mapping of different disks and assign single character for all disks in this tab. Local storage (SMB, NFS, and Local USB) should be mounted in RDP session with single or different assigned letters. Page 123 of 151 124 Page 124 of 151 125 Mapping – Printer: To use printer, enable this option. After this setting, the printer will be redirected in the RDP session. Applications running within a remote desktop session can print to a printer attached to the client device. To redirect more than one printer, select the appropriate printer from the available added printer list. Disable the printer mapping option, if user does not want to redirect the connected printer. Page 125 of 151 126 Programs: Input Path of Application (exe path) in Program Path and the file name if you want to invoke particular application. After this if you connect to RDP session only your specified Application will invoke. This will act as a default application. Seamless RDP mode: If you want use Seamless RDP mode to invoke the applications of server then enable this option. If you want, the default path then select the “Default path” option or you want to enter the path manually then select the “custom path” option. Page 126 of 151 127 Advanced – Experience: The settings on this tab allow you to disable certain features to improve performance or enable features to improve the appearance of the remote desktop. As indicated, select your connection speed to optimize performance. Page 127 of 151 128 Advanced – Others: The settings on this tab allow you to configure features such as Encryption, RDP Protocol Version etc. of RDP protocol. Page 128 of 151 129 Misc: The settings on this tab allow you to configure miscellaneous features for connection. Page 129 of 151 130 5.8. Adding a REXEC connection In REXEC Connection, user can use applications installed on REXEC server, invoking them on client side. Page 130 of 151 131 Misc: 5.7 Adding a VMView connection VMView provides remote desktop capabilities to users using VMware's virtualization technology. The VMView provides the virtual desktops to users. Select connection type as 'VMView'. Input connection name. Enter Server IP to which Connection is to be added. Select Protocol (PCOIP/RDP). Give Desktop Name if you want to directly connect to that desktop otherwise list of available desktop will display. Input Domain Name. Input User name & Password. Page 131 of 151 132 PCOIP: PCoIP is a display protocol that allows complete compression of a desktop which is then displayed through a zero client device over a standard IP network. User can enable or disable SSL port for desktop connectivity. Page 132 of 151 133 Display: The Setting on this tab allows you to configure the display area of the VMware view client, as full screen or customized resolution. Page 133 of 151 134 Misc: The settings on this tab allow you to configure miscellaneous features for connection. Page 134 of 151 135 RDP Protocol: General: Page 135 of 151 136 Display: The Setting on this tab allows you to configure the display area of the VMware view client, as full screen or customized resolution. Local Resources: User can set the Keyboard Layouts and map key bindings. Page 136 of 151 137 Mapping: Drive User can assign different characters for mapping of different disks and assign single character for all disks in this tab. Local storage (SMB, NFS, and Local USB) should be mounted in RDP session with single or different assigned letters. Page 137 of 151 138 Printer: To use printer, enable this option. After this setting, the printer will be redirected in the RDP session. Applications running within a remote desktop session can print to a printer attached to the client device. To redirect more than one printer, select the appropriate printer from the available added printer list. Disable the printer mapping option, if user does not want to redirect the connected printer. Page 138 of 151 139 Advanced – Experience: The settings on this tab allow you to disable certain features to improve performance or enable features to improve the appearance of the remote desktop. As indicated, select your connection speed to optimize performance. Page 139 of 151 140 Advanced - Others: The settings on this tab allow you to configure features such as Encryption, RDP Protocol Version etc. of RDP protocol. Misc: The settings on this tab allow you to configure miscellaneous features for connection. Page 140 of 151 141 5.8 Adding a SSH Connection SSH (Secure Shell) Protocol Connection is to take console based session of any Linux Machine. Page 141 of 151 142 Page 142 of 151 143 5.9 Adding a Spice Connection SPICE (the Simple Protocol for Independent Computing Environments) is a remote-display system built for virtual environments which allows users to view a computing "desktop" environment - not only on its computer-server machine, but also from anywhere on the Internet and using a wide variety of machine architectures. General: Select connection type as ‘Spice’. Input server IP address manually. Input Password and Port. Select Screen Size from drop down box, by default “Default” is selected Input Connection name. Page 143 of 151 144 Misc: The settings on this tab allow you to configure miscellaneous features for connection. 5.10 Adding a X11 Connection X11 is a network protocol designed for Linux and similar operating systems to enable remote graphical access of Linux server to thin clients. General : Select connection type as ‘X11’. Input connection name. Page 144 of 151 145 Enter Server IP to which Connection is to be added. Select XDM Mode (Query/ Indirect/ Broadcast/ Chooser). Types of XDM modes : User can select Screen size from the drop down list. Now the session will appear in the selected size. Page 145 of 151 146 Select Keyboard map (Local/ server) and configure Backing Store settings.. Misc : Page 146 of 151 147 The settings on this tab allow you to configure miscellaneous features for connection. Common settings of Connection Manager 5.11 Editing a connection To edit an existing connection settings 1. 2. 3. 4. Select that connection which you want to edit. Click on edit button. Edit the contents (user are not allowed to change connection name and type. Click on OK. 5.12 Deleting a connection To delete an existing connection 1. Select a connection to be deleted from list area. 2. Click on Delete button. 5.13 Establishing a connection To establish a connection in list area 1. Select a connection from list area. 2. Click on connect button. Page 147 of 151 148 5.14 Disconnecting an active connection To disconnect a active connection 1. Select a connection to be disconnected. 2. Click on Disconnect button. Following are some common settings for all connections: Page 148 of 151 149 Failover connection: If any other connections are added like RDP, X11 etc will be listed in the failover connection list. User can select a connection which will be invoked if connection you are trying to invoke fails to establish successfully. Connection ending option: User can select an operation to be performed by image after termination of the connection i.e. None, Shutdown the image or Reconnect to the connection. Automatic Start: This check box allows user to enable or disable automatic start of the connection (Very useful if user don't want user to access other feature of the system). If this option is enabled then whenever user boots the system, it will be connected to the session automatically. Add to menu: if this option is enabled then a shortcut for created ICA connections will appear in the Start Menu (Useful only in desktop mode). Add to desktop: if this option is enabled then a shortcut for created ICA connections will appear on the Desktop (Useful only in desktop mode). 6. Local Applications 6.1 Citrix-Receiver Citrix Receiver is the client to connect Citrix Server and then to XEN Desktops. Here we can access the published applications. To invoke Citrix-Receiver double click on Citrix-Receiver application. Page 149 of 151 150 6. 2 Leafpad A text editor is a type of program used for editing plain text files. 6.3 Chromium Browser Chromium is an open-source browser project that aims to build a safer, faster, and more stable way for all Internet users to experience the web. 7. System Information 7.1 System-Information System Information shows details about your computer's hardware configuration, computer components, and software, including drivers. Page 150 of 151 151 7.2 Installed-Components Page 151 of 151