1
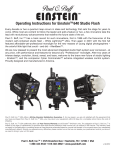
The White Lightning Ultra Series
(White Lightning Models Ultra 600, Ultra 1200, and Ultra 1800)
Operating Instructions
WARNINGS:
To avoid potentially lethal conditions, this unit must be connected to a 3-wire grounded outlet. Do
not operate with two-wire extension cords or use an adapter to connect to ungrounded outlets.
This unit contains high voltages and internal components that can store dangerous voltages even
when unit is unplugged. The unit contains no user serviceable parts and should not be
disassembled, except by a qualified technician.
The flashtube and modeling lamp can get extremely hot. To change lamps, turn the unit off, then
unplug the power cord from the outlet. Allow the unit to cool, and use insulating gloves to remove
or replace lamps. Do not allow finger oils to contact the lamps as this can cause excess heating
and premature lamp failure.
Before attempting to operate the unit, ensure that it is securely mounted to a light stand or other
suitable mechanism. Do not allow unattended children around studio flash equipment as
potentially dangerous conditions may result. These dangers may include burns and electrical
shock hazards as well as the possibility of falling equipment if cords are tripped over.
SETTING FLASHPOWER:
Ultra units allow continuous variable flashpower over a 5 f-stop range from Full to 1/32 power. To
adjust the flashpower simply set the “Flashpower” control to the desired position, reading either
the lower “f” scale or the upper “fractional increment” scale. When adjusting flashpower upward,
the green “Ready” LED will go off momentarily, then return on when the capacitors have been
charged to the new higher-power setting. When adjusting flashpower downward the red “Dump”
LED will light, serving to remind you to dump the excess power stored from the previous higherpower setting by pressing the “Test” button. Failure to test–flash the system following a downward
power change can result in overexposure of the film-frame immediately following a downward
power change.
RELATIVE MODEL SWITCH:
The three-position slide marked “Relative Model” is used to establish the desired maximum
modeling intensity and lamp life. It is also used to establish accurate model-to-flash ratios when
Ultra 600, 1200 & 1800 units are mixed, or when Ultra units are used with other White Lightning
units. The function on the relative model switch is as follows:
1. The “0” Position: The model lamp produces a full intensity of 8000 lumens at 300 degrees
Kelvin, and can be expected to burn after 3-4 hours of full intensity operation. In comparison to a
100 watt tungsten or 2900 degrees Kelvin quartz lamp, this position provided approximately 5
times as much light (500W effective).
2. The “-1” position: The lamp produces 5000 lumens at 3150 degrees Kelvin and will burn for
about 50 hours. This position produces 300 watts worth of effective light.
3. The “-2” position: The lamp produces 2500 lumens of light at 2800 degrees Kelvin and burns
for about 1000 hours, relating to the output and life of a 150 watt standard lamp.
It is generally recommended that Ultra 1800 units be operated in the “0” position, and Ultra 600
units be placed in the “-2” position. They will then all produce the same model-to-flash ratios
established for WL 10,000 units (100W bulb) and WL 5,000 units fitted with 60W bulbs. Certainly
if the job requires more intense modeling the position(s) of the relative model switch(s) can be
raised as needed, or lowered if longer lamp life is important. If necessary, the BBA1 photoflood
lamps supplied can be replaced with ordinary household lamps having a maximum rating of 205
watts. In this case, it is advisable to place the Relative Model switch at “0” for brightness.
MODEL LAMP MODES:
The three-position toggle marked “Model” allows the use of any of three basic model lamp
modes. In the “Off” position, the model lamp remains extinguished at all times. In the “Full”
position the lamp is set to be full-on regardless of the selected flash-power (but as determined by
the position of the Relative Model switch). In the “Tracking” position, the model lamp will be
dimmed in proportion to the selected flashpower (and still affected by the position of the Relative
Model switch). For most work it is recommended the Model switch be left in the “Tracking”
position at all times to assure accurate modeling (the “Full” position may be useful for critical
focusing, while the “Off” position would be selected when multiple flash exposures must be taken
in a dark room with the camera lens left open).
MODEL/READY SWITCH:
The push-button switch labeled “Model/Ready” allows the modeling lamp to indicate
Ready/Recycle status. When this button is pressed in, the modeling lamp will be extinguished
when the unit is flashed, and will return on when the unit is recycled and ready for another shot.
In addition to providing visual confidence of flash and recycle, this mode reduces the amount of
current drawn from the power line during recycle- an important consideration when a number of
units are being operated from marginal power lines, particularly in older buildings. Placing the
Model/Ready switch in the “Out” position will defeat this function and allow the modeling lamp to
remain on during recycle.
BUILT-IN SLAVE TRIPPER:
The slave cell, which is seen on the rear panel, is quite sensitive to pulses of light produced by
other electronic flash units, and is relatively nondirectional, seeing approximately 180 degrees. In
normal studio usage this slave will reliably trip the unit from light bouncing from the walls and
ceilings of the shooting area. It should be noted that whenever a plug is inserted into the rear
panel sync jack the built-in slave is automatically disabled and will not fire the unit. Thus, when
shooting at weddings or other events where it may be undesirable to have other photographers’
flash units fire the Ultra, connecting the unit to the camera via the hard sync cord or radio slave
will disable the built-in slave function. Please note that a 10-20 second delay may occur between
the insertion of a sync cord and the actual disconnect of the slave.
SYNC JACK:
The rear panel sync jack provides a connection point for hard-wired sync to the camera via the
cords supplied. Multiple Ultra units may be hard-wired together by joining the sync cord wires in
parallel and connecting the resulting junction to the “OC” type connector that attaches to the
camera. If this is done, care must be taken to ensure that sync polarities are the same on all
units. Perhaps a better approach when hard-wiring of multiple Ultra units is a necessity would be
the use of the Ultra remote control accessory.
READY/DUMP LEDs:
The two light-emitting diodes (LEDs) marked “Ready” and “Dump” indicate the status of charge in
the main capacitors. Whenever the capacitor charge is within 1/4f of the setting of the Flashpower
control, the green “Ready” LED will be lit, indicating the unit is ready fire. If the charge in the
capacitors exceeds the setting of the Flashpower control by over 1/4f, the red “Dump” LED will be
lit, indicating the need to test-flash the unit to eliminate the unwanted power (the “Dump” LED will
normally come on only following a reduction in Flashpower setting).
TEST/DUMP BUTTON:
The red “Test/Dump” button is used whenever it is desired to flash the unit for testing. This button
is momentary acting, and should fire the unit whenever pressed. If multiple units have their sync
cords hard-wired together, pressing the test button on one unit should fire only that unit, not the
others.
POWER SWITCH:
The toggle switch serves to completely turn the unit on or off, without regard to the settings of the
other controls. For the sake of safety, to service personnel, the unit should flash whenever the
Power switch is turned off, thus discharging the internal capacitors. It is suggested the Power
switch be turned off when the unit is not in use.
CIRCUIT PROTECTION:
The rear panel 6 amp circuit breaker is for the general protection of the unit and the operator in
case of malfunction. It should not require attention in normal usage, with the possible exception
that the circuit breaker may need to be reset when a modeling lamp fails from mechanical shock.
It is possible for the circuit breaker to open if the unit is subjected to extremely rapid firing for long
periods of time. Should this be the case it should be taken as a warning that reliability of the unit
may be in danger due to overuse. If prolonged rapid firing of the unit is necessary, pressing the
“Model/Ready” switch in will increase the safety factor by eliminating the current draw and
subsequent heat build up during the recycle period.
REFLECTOR MOUNTING:
The Ultra is supplied with a standard 7” general purpose reflector (coverage approx. 80º).
Available as an accessory is a clear Lexan shipping cover that can double as a protective cover
and gel attachment point for bare-bulb use. When the Lexan cover is used with the unit operating,
the user is urged to replace the modeling lamp with a household bulb rated at 100 watts or less,
to prevent damage to the unit, the Lexan cover, or any gels that might be attached.
To remove reflectors, loosen the four thumb screws located around the front of the unit, releasing
the reflector from the four associated “claw grips” which hold the reflector from the inside. To
install the reflector, make sure the thumb screws are first loosened, then place the reflector on the
unit and tighten the thumbscrews using only light finger pressure. Installation and removal of
reflectors should be done only with the back panel Power Switch in the “Off” position.
Ultra Units will mount directly to most softbox back plates designed to mount Balcar lightheads.
Specifically, a proper mounting plate for Ultra will provide a simple 3.50” diameter hole in the
metal plate no thicker than 0.125”. The Ultra unit may be attached to such a mount directly,
without a reflector, providing optimum light characteristics.
STAND MOUNTING:
The stand mount will accommodate up to and including a 5/8” shaft. Please note that the stand
mount/swivel bracket assembly is secure to the bottom of the light in the unique Ultra rail
attachment system. It can be removed or adjusted from the back by loosening the two small set
screws in the mount’s base. You’ll need a long shaft, 1/16” Allen wrench.
If Ultra units are to be suspended overhead where people will be passing underneath, it is highly
recommended that a safety chain or wire be attached between the light housing and whatever
structure the swivel mount bracket is mounted on. This is a safety precaution.
WATTSECOND RATINGS:
It should be noted that the familiar “wattsecond” rating (ws) defines only the amount of electrical
power dissipated with each flash, not the actual light output. Flash systems currently on the
market vary by as much as three to one in the amount of light they produce for a given number of
wattseconds. Thus, the ws rating is not a very good barometer of how much light one can expect
from a given system.
Because of this, Ultra units are rated in Lumenseconds, which is the proper and accurate
specification of actual light output from an electronic flash unit or system. An “effective ws” rating
is also stated for Ultra units to form rough comparisons to other systems rated in ws.
TROUBLESHOOTING:
Problem: Unit will not operate in any mode.
Action: Check rear panel circuit breaker if the button is protruding.
Problem: Unit will not fire reliably from sync cord, particularly on concrete floors or outdoors, but
fires OK from slave or test button.
Action: Reverse the sync polarity by reversing the insertion of the coiled cord into the longer cord
section. Make sure the unit connected to the camera is plugged into a grounded three-wire outlet.
Check the sync circuit by momentarily shorting the inner and outer contacts of the camera PC
end of the cord together with a paper clip or knife blade, etc. The unit should flash each time the
contacts are shorted.
Problem: Unit has low output and recycles faster than it should at Full Power.
Action: Check to see if both flashtube halves are firing. Do this by setting the unit to 1/32 power
and firing several times while viewing tubes through tightly squinted eyes.
Problem: Unit flashes spontaneously.
Action: Check Ultra AC power source. Line spike (instantaneous surge) from a motor, generator,
etc. can cause the unit to fire. Try plugging the unit into a different circuit. Make certain that the
slave dome on the rear panel is not in direct or reflected sunlight. Shading the rear panel from
sun should correct the problem.
Problem: Unit does not always flash when triggered from the sync cord.
Action: Check the sync cord for tip to tip polarity. With Ultra ON, plug sync cable into sync jack.
By touching the sleeve of the PC connector (the sleeve is the outer ring and not the center pin of
the end that connects to the camera) to the Ultra ON/OFF switch, the incorrect cable will fire the
flash. Reverse the plug where the straight and curly sections of the Sync Cords connect. Next,
check the AC power source for ground and line/neutral polarity. The easiest way to do so is with a
three-way outlet checker, which you can buy at any hardware store or Radio Shack. The checker
plugs into your AC power source (wall socket, three-wire extension cord or multiple plug-in power
bars). LEDs will light up on the checker and will show you if there is a problem with your wiring. If
the line/neutral lines are reversed, the Ultra will misfire as a warning to the photographer that
there is a potential shock hazard. An incorrectly wired AC source is a potential shock hazard
when using any electrical device that is plugged into it. Change your power source to a correctly
wired outlet.
Problem: Ready light comes on but unit does not flash and only makes a clicking sound when
fired.
Action: Flashtubes are malfunctioning. Reseat the tubes or replace them with a spare set.
For comments, questions, or repair needs, please contact Paul C. Buff Inc. by phone or e-mail.
This product was made in the USA by:
Paul C. Buff, Inc.
2725 Bransford Ave.
Nashville, TN 37204
Toll Free Customer Service Line: 1-800-443-5542
e-mail: [email protected]