1
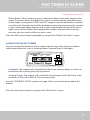
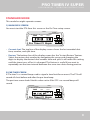
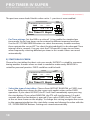
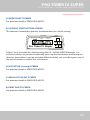
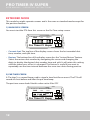
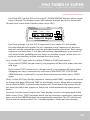
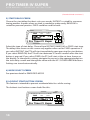
O P E R AT I N G I N S T R U C T I O N S
PRO TIMER IV
SUPER
Please read this manual!
This manual contains
setup information
necessary to achieve
proper performance from
your Pro Timer IV Super.
Look inside
for accessories to use
with your Pro Timer IV Super!
PRO TIMER IV SUPER
U S E R M A N U A L / O P E R AT I N G I N S T R U C T I O N S
Thank you for purchasing the PRO TIMER 4 SUPER. With features like HIT FACTOR
scoring, PLATE SENSOR INPUT, REMOTE START, RELAY OUTPUT, MULTIPLE
OPERATING MODES and ADJUSTABLE SENSITIVITY, it is one of the most full
featured shot timers on the market.
TABLE OF CONTENTS
Getting Started . . . . . . . . . . . . . . . . . . . . . . . . . . . . . . . . . . . . . . . . . . . . . . 3
Battery Installation . . . . . . . . . . . . . . . . . . . . . . . . . . . . . . . . . . . . . . . . . . . . . . . . 3
Quick Start . . . . . . . . . . . . . . . . . . . . . . . . . . . . . . . . . . . . . . . . . . . . . . . . . . . . . . . . 3
Menu Navigation, & Programming . . . . . . . . . . . . . . . . . . . . . . . . . . . . . . . . . 3
The Start Button . . . . . . . . . . . . . . . . . . . . . . . . . . . . . . . . . . . . . . . . . . . . . . . . . . 3
Mode Selection . . . . . . . . . . . . . . . . . . . . . . . . . . . . . . . . . . . . . . . . . . 4-15
Select from 3 Modes of Operation . . . . . . . . . . . . . . . . . . . . . . . . . . . . . . . . . 4
Simplified Mode . . . . . . . . . . . . . . . . . . . . . . . . . . . . . . . . . . . . . . . . . . . . . . . . 5-8
Standard Mode . . . . . . . . . . . . . . . . . . . . . . . . . . . . . . . . . . . . . . . . . . . . . . . . 9-11
Extended Mode . . . . . . . . . . . . . . . . . . . . . . . . . . . . . . . . . . . . . . . . . . . . . . 12-15
Interface Jacks . . . . . . . . . . . . . . . . . . . . . . . . . . . . . . . . . . . . . . . . . 16-17
Advanced Controls . . . . . . . . . . . . . . . . . . . . . . . . . . . . . . . . . . . . . . . . 18
Shot Sensitivity Adjustments . . . . . . . . . . . . . . . . . . . . . . . . . . . . . . . . . . . . . 18
Quick Keys . . . . . . . . . . . . . . . . . . . . . . . . . . . . . . . . . . . . . . . . . . . . . . . . . . . . . . . 18
Limited Warranty & Service Information . . . . . . . . . . . . . . . . . . . . . . . . . . . 19
Accessories . . . . . . . . . . . . . . . . . . . . . . . . . . . . . . . . . . . . . . . . . . . . . . . . . . 20-23
2
PRO TIMER IV SUPER
U S E R M A N U A L / O P E R AT I N G I N S T R U C T I O N S
GETTING STARTED
BATTERY INSTALLATION
The PT4 operates on one 9 volt ALKALINE battery (not included). To install your
battery, press the battery compartment latch and remove the cover. Install the
battery and replace the cover.
QUICK START
To turn on the PT4, press the POWER ON membrane switch on the bottom of
the timer. Check the HORN switch on the bottom to be sure it is ON, then press
the START button on the display panel. You will notice an instant report from the
buzzer indicating the timer has been activated. Tap on the front of the timer near
the shot sensor opening to register some “shots” and familiarize yourself with the
display. The time to the last shot is located in the upper left corner of the display.
All time values displayed are in seconds. The front panel label is marked around
the display area to identify the values shown on the MAIN DATA SCREEN. The PT4
will save up to 59 shots for review. If over 59 shots are in a string, it will always save
the last one as the 59th. Automatic power down after 10 minutes of idle time will
eliminate accidental battery discharge as a result of forgetting to turn the unit off.
MENU NAVIGATION, & PROGRAMMING
The PT4 uses 5 pushbuttons for operation. (Press the RIGHT or LEFT ARROW
button to move the cursor from digit to digit, right or left on the screen, and on to
the next screen. The menu runs in a continuous loop, so after becoming familiar
with the order of the screens, you will know which arrow button will navigate
most efficiently for the intended task.
Any settable digit will flash. To increase a digit that is flashing, press the UP ARROW
button. To decrease a digit that is flashing, press the DOWN ARROW button. (Digits
will be added to or borrowed from automatically if the current digit is changed
from 0 to 9 or 9 to 0.) Changed values are automatically saved when the unit
powers down after 10 minutes of idle time. If all this makes sense, you are now
able to program the PT4.
THE START BUTTON
The START button serves two functions. It will start /reset the timer from the MAIN
screen and PAR TIME screen or send data from the PRINT SHOTS screen. If it is
pressed on other screens, it will do nothing.
3
PRO TIMER IV SUPER
U S E R M A N U A L / O P E R AT I N G I N S T R U C T I O N S
MODE SELECTION
SELECT FROM THREE MODES OF OPERATION
The PT4 can operate as three different timers to best suit your needs. Specialized
features are added in the Standard and Extended modes
• Simplified: This is the default mode. Shot review, Par time and Start delay
settings are accessed on the main screen. This mode is convenient if you switch
Par times often during use.
• Standard: This mode adds an instant review feature on the main screen. Par
time and Start delay are accessed from separate screens. Use this mode if
you would like to review a selected shot number or split repeatedly without
pressing buttons while retaining the last shot data on the same screen.
• Extended: This mode has the same main display layout as the Standard mode.
When selected, it allows setup of multiple par times that run once in a string
when started or continuously over and over until stopped.
To change the operating mode, press the left arrow button repeatedly until you
reach the “Select Operating Mode” screen, then press the up arrow or down arrow
button to change the mode.
4
PRO TIMER IV SUPER
U S E R M A N U A L / O P E R AT I N G I N S T R U C T I O N S
SIMPLIFIED MODE
(This mode has five separate screens.)
1) MAIN DATA SCREEN
You must Start the PT4 from this screen.
• Review: With the current shot number flashing, all shots (up to 59) can be
reviewed by pressing the UP ARROW or DOWN ARROW button.
• Split time: The difference between the shot time on the display and the shot
time previous to it is shown in the upper right corner of the display.
• Par Time: A “Par time” is a second beep used to signal a time limit for an event.
The PT4 has up to 6 par times that are settable and stored automatically during
power down. The number in the lower right corner of the display is the par
number location (1-6). The number in the lower middle of the display is the set
par time for that location. To retrieve a different par time from memory, move
the flashing digit with the LEFT ARROW or RIGHT ARROW button until the
par number is flashing and press the UP ARROW or DOWN ARROW button. To
change the par time for the current number displayed, move the flashing digit
to the appropriate location and adjust the digit with the UP ARROW or DOWN
ARROW button. The PT4 will record all shots before and after the par time beep.
• Start Delay: Start delay type is displayed in the lower left position. INST (instant)
will begin as soon as you press the start button, and RAND (random) will begin
3.5 to 6 seconds after the start button is pressed. To toggle between the two
settings, use the RIGHT/LEFT ARROW buttons to shift the cursor until the delay
type flashes and then use the UP/DOWN ARROW buttons to change.
• Low Battery: When the battery voltage drops to approximately 7 volts, the
letters BAT will flash in the lower right corner of the display. It is time to change
the battery.
Press the left arrow button repeatedly to jump to the “Mode Select” screen.
5
PRO TIMER IV SUPER
U S E R M A N U A L / O P E R AT I N G I N S T R U C T I O N S
(Simplified Mode continued...)
2) MODE SELECT SCREEN
To select between Simplified, Standard, and Extended operating modes, press the
UP / DOWN ARROW button until the desired mode is displayed. The setting will be
saved automatically.
COMPETITION ELECTRONICS
REVIEW-SHOT REVIEW-SPLIT
PAR TIME PAR NO LOW BAT
Pro Timer IV Super
JUMP
REVIEW-TIME
DELAY
-PAR
START
SPLIT
FACTOR
SHOT
+PAR
TIME
Press the left arrow button to jump to the “Hit Factor” screen.
3) HIT FACTOR (scoring) SCREEN
This is where you can use the PT4 to calculate your score for an IPSC stage. Hit
Factor is calculated by dividing your points score by your time. When running a
match, this is a time saving feature that will eliminate manual calculations that can
cause errors. When practicing, it can reveal the best score when you try different
methods.
COMPETITION ELECTRONICS
START
-PAR
REVIEW-SHOT REVIEW-SPLIT
PAR TIME PAR NO LOW BAT
Pro Timer IV Super
FACTOR
SPLIT
+PAR
REVIEW-TIME
DELAY
SHOT
JUMP
TIME
• Total Stage Points: In order for the PT4 to calculate your score (hit factor) for
a stage, add up the total possible points for the stage and enter the value in
the upper right corner of the display. Use the RIGHT / LEFT ARROW buttons to
navigate the location, then UP / DOWN ARROW buttons to input the numbers.
• Time: The time displayed is total time recorded and carried over from the main
display after the course has been shot. It can be altered by the user to see the
effect of a different time on the score during practice.
6
PRO TIMER IV SUPER
U S E R M A N U A L / O P E R AT I N G I N S T R U C T I O N S
(Simplified Mode continued...)
• Points Down: This is where you enter the points down from each target in the
stage. The points down are deductions from a score based on shot placement
in the target scoring zones. IDPA and IPSC targets have the deductions marked
on each zone. Navigate and set the total points down by increasing the number
as you score each target and you will see the calculated hit factor in the lower
right corner of the display. By changing the number of points down during
practice, you can see the effect on your score.
Press the left arrow button repeatedly to jump to the “Relay Out Select” screen.
4) RELAY OUT SELECT SCREEN
You can control the duration of the output signal to the relay jack for interface
with external devices such as turning targets, external horns, and lights.
COMPETITION ELECTRONICS
START
Pro Timer IV Super
-PAR
REVIEW-SHOT REVIEW-SPLIT
PAR TIME PAR NO LOW BAT
FACTOR
SPLIT
+PAR
REVIEW-TIME
DELAY
SHOT
JUMP
TIME
• Standard: The output will activate for the duration of every beep, or until user
terminates the cycle by pressing any button.
• Turning Target: The output will activate for the duration of the Par Time. It deactivates at the end of the Par Time automatically.
See the ”INTERFACE JACKS” section on page 16 for more information about this
feature.
Press the left arrow button to jump to the “Print Shots” screen.
7
PRO TIMER IV SUPER
U S E R M A N U A L / O P E R AT I N G I N S T R U C T I O N S
(Simplified Mode continued...)
5) PRINT SHOTS SCREEN
For a hard copy of your data, you can transmit the data recorded from the PT4 to
an optional portable thermal printer (Hewlett Packard HP 82240B) available direct
from Competition Electronics. It comes with paper. Common thermal calculator
paper and (4)AA batteries are consumables used in this HP product.
COMPETITION ELECTRONICS
START
Pro Timer IV Super
-PAR
REVIEW-SHOT REVIEW-SPLIT
PAR TIME PAR NO LOW BAT
FACTOR
SPLIT
+PAR
REVIEW-TIME
DELAY
SHOT
JUMP
TIME
• To print: Position the bottom of the PT4 within about two feet of the front of
the printer. Upon pressing the Start button, the shot string times and scoring
data are wirelessly sent from an infra-red LED on the bottom of the PT4 to the
printer. Maintain positioning until the words PRINTING DATA are gone from the
PT4 display.
Use the left arrow button to navigate back to the “Mode Select” screen if you
would like to change modes, or navigate to the “Main Data” screen to run the timer
8
PRO TIMER IV SUPER
U S E R M A N U A L / O P E R AT I N G I N S T R U C T I O N S
STANDARD MODE
This mode has eight separate screens:
1) MAIN DATA SCREEN
You must start the PT4 from this screen or the Par Time setup screen.
COMPETITION ELECTRONICS
REVIEW-SHOT REVIEW-SPLIT
PAR TIME PAR NO LOW BAT
Pro Timer IV Super
JUMP
REVIEW-TIME
DELAY
-PAR
START
SPLIT
FACTOR
SHOT
+PAR
TIME
• Current shot: The top line of the display screen shows the last recorded shot
time, number, and split time.
• Review: The bottom line of the display screen has the “Instant Review” feature.
Select the review shot number by navigating the cursor and changing the
digits to display the desired shot number time and split. It will retain this setting
until the timer turns off or it is changed. This feature is useful if you want to
repeatedly see the time interval between the same two shots during practice.
2) PAR TIME SCREEN
A “Par time” is a second beep used to signal a time limit for an event. The PT4 will
record all shots before and after the par time beep.
The par time screen looks like this when set to 0 for OFF- no second beep will
sound.
COMPETITION ELECTRONICS
START
Pro Timer IV Super
-PAR
REVIEW-SHOT REVIEW-SPLIT
PAR TIME PAR NO LOW BAT
FACTOR
SPLIT
+PAR
REVIEW-TIME
DELAY
SHOT
JUMP
TIME
9
PRO TIMER IV SUPER
U S E R M A N U A L / O P E R AT I N G I N S T R U C T I O N S
(Standard Mode continued...)
The par time screen looks like this when set to 1 - par time is now enabled.
COMPETITION ELECTRONICS
REVIEW-SHOT REVIEW-SPLIT
PAR TIME PAR NO LOW BAT
Pro Timer IV Super
JUMP
REVIEW-TIME
DELAY
-PAR
START
SPLIT
FACTOR
SHOT
+PAR
TIME
• Par Time settings: Set the PAR to a value of 1-6 to enable the standard par
time mode. Up to 6 par times can be entered in different memory locations.
Use the UP / DOWN ARROW buttons to select the memory location number,
then navigate the cursor LEFT to select the desired digit(s) to be changed. Time
intervals are in seconds. You may start the PT4 from this screen to save time
when frequently selecting different par times in this mode. Values are saved
automatically.
3) START DELAY SCREEN
Choose the start delay that best suits your needs. INSTANT is suited for someone
timing another shooter where no time is needed to make ready, RANDOM is
suited for personal practice. FIXED could be used for both.
COMPETITION ELECTRONICS
START
-PAR
REVIEW-SHOT REVIEW-SPLIT
PAR TIME PAR NO LOW BAT
Pro Timer IV Super
FACTOR
SPLIT
+PAR
REVIEW-TIME
DELAY
SHOT
JUMP
TIME
• Select the type of start delay: Choose from INSTANT, RANDOM, or FIXED start
tone. The delay time shown on the screen only applies when set for FIXED
operation. If you select INSTANT, the PT4 will start immediately upon pressing
the start button. If you select RANDOM, the PT4 will start between 3.5 and 6
seconds after the start button is pressed. If you select FIXED, the PT4 will start
at the set time shown on the display. To change this setting, navigate the cursor
to the appropriate digit on the start delay screen and change the value with the
UP / DOWN ARROW buttons. Settings are stored automatically.
10
PRO TIMER IV SUPER
U S E R M A N U A L / O P E R AT I N G I N S T R U C T I O N S
(Standard Mode continued...)
4) MODE SELECT SCREEN
See previous detail in SIMPLIFIED MODE
5) LOCKOUT START BUTTON SCREEN
This feature is intended to prevent accidental data loss while scoring.
COMPETITION ELECTRONICS
START
-PAR
REVIEW-SHOT REVIEW-SPLIT
PAR TIME PAR NO LOW BAT
Pro Timer IV Super
FACTOR
SPLIT
+PAR
REVIEW-TIME
DELAY
SHOT
JUMP
TIME
Select Y (yes) to enable this feature using the UP / DOWN ARROW buttons. It is
useful in matches to prevent accidentally pressing the start button and losing the
shooters time before it can be recorded. When enabled, you must first press any of
the arrow buttons to unlock the start button.
6) HIT FACTOR (scoring) SCREEN
See previous detail in SIMPLIFIED MODE
7) RELAY OUT SELECT SCREEN
See previous detail in SIMPLIFIED MODE
8) PRINT SHOTS SCREEN
See previous detail in SIMPLIFIED MODE
11
PRO TIMER IV SUPER
U S E R M A N U A L / O P E R AT I N G I N S T R U C T I O N S
EXTENDED MODE
This mode has eight separate screens and is the same as standard mode except for
the par time features:
1) MAIN DATA SCREEN
You must start the PT4 from this screen or the Par Time setup screen.
COMPETITION ELECTRONICS
REVIEW-SHOT REVIEW-SPLIT
PAR TIME PAR NO LOW BAT
Pro Timer IV Super
JUMP
REVIEW-TIME
DELAY
-PAR
START
SPLIT
FACTOR
SHOT
+PAR
TIME
• Current shot: The top line of the display screen shows the last recorded shot
time, number, and split time.
• Review: The bottom line of the display screen has the “Instant Review” feature.
Select the review shot number by navigating the cursor and changing the
digits to display the desired shot number time and split. It will retain this setting
until the timer turns off or it is changed. This feature is useful if you want to
repeatedly see the time interval between the same two shots during practice.
2) PAR TIME SCREEN
A “Par time” is a second beep used to signal a time limit for an event. The PT4 will
record all shots before and after the par time beep.
The par time screen looks like this when set to 0 for OFF
COMPETITION ELECTRONICS
-PAR
FACTOR
REVIEW-SHOT REVIEW-SPLIT
PAR TIME PAR NO LOW BAT
Pro Timer IV Super
12
START
SPLIT
+PAR
REVIEW-TIME
DELAY
SHOT
JUMP
TIME
PRO TIMER IV SUPER
U S E R M A N U A L / O P E R AT I N G I N S T R U C T I O N S
(Extended Mode continued...)
• Par Time OFF: Set the SEQ to 0 using UP / DOWN ARROW buttons when no par
time is desired. The display screen will indicate that the par time is turned off.
The par time screen looks like this when set to SEQ 1
COMPETITION ELECTRONICS
START
-PAR
REVIEW-SHOT REVIEW-SPLIT
PAR TIME PAR NO LOW BAT
Pro Timer IV Super
FACTOR
SPLIT
+PAR
REVIEW-TIME
DELAY
SHOT
JUMP
TIME
• Par Time settings: Set the SEQ 0 (sequence #) to a value of 1-6 to enable
the extended par time mode. Up to 6 separate string/sequences of par time
intervals can be entered by using the provided memory locations. Each string/
sequence can have from 1 to 9 par time settings depending on your needs. If
only three of the available nine par times are needed, simply set the extra six
times to zero and they will be omitted from the string.
First, set the TYP- (type select) to either STRING or CONT(continuous).
- If you select STRING, the par time(s) you program will be run in order one time
and stop.
- If you select CONT (continuous), the par time(s) you program will run in order
(skipping any zeros) continuously until one of the RIGHT/LEFT/UP/DOWN
ARROW buttons is pressed. To restart the continuous par times, press START
again.
Then, set the Par Times for the sequence. Starting with PAR#1, navigate the cursor
to change the digits following TIME on the display screen. When done, move the
cursor back to PAR# , increment the number to 2, then repeat the process for all
par times desired in the sequence. Values are saved automatically upon power
down.
You may start the timer from the Par Time display screen or navigate back to the
Main screen. Press START to begin, and if you are running a continuous sequence,
press any of the ARROW buttons to terminate the sequence. The PT4 will record
shots from the moment the PT4 is started regardless of the par time settings.
13
PRO TIMER IV SUPER
U S E R M A N U A L / O P E R AT I N G I N S T R U C T I O N S
(Extended Mode continued...)
3) START DELAY SCREEN
Choose the start delay that best suits your needs. INSTANT is suited for someone
timing another shooter where no time is needed to make ready, RANDOM is
suited for personal practice. FIXED could be used for both.
COMPETITION ELECTRONICS
REVIEW-SHOT REVIEW-SPLIT
PAR TIME PAR NO LOW BAT
Pro Timer IV Super
JUMP
REVIEW-TIME
DELAY
-PAR
START
SPLIT
FACTOR
SHOT
+PAR
TIME
Select the type of start delay: Choose from INSTANT, RANDOM, or FIXED start tone.
The delay time shown on the screen only applies when set for FIXED operation. If
you select INSTANT, the PT4 will start immediately upon pressing the start button.
If you select RANDOM, the PT4 will start between 3.5 and 6 seconds after the start
button is pressed. If you select FIXED, the PT4 will start at the set time shown on
the display. To change this setting, navigate the cursor to the appropriate digit on
the start delay screen and change the value with the UP / DOWN ARROW buttons.
Settings are stored automatically.
4) MODE SELECT SCREEN
See previous detail in SIMPLIFIED MODE
5) LOCKOUT START BUTTON SCREEN
This feature is intended to prevent accidental data loss while scoring.
The lockout start buttons screen looks like this:
COMPETITION ELECTRONICS
-PAR
FACTOR
REVIEW-SHOT REVIEW-SPLIT
PAR TIME PAR NO LOW BAT
Pro Timer IV Super
14
START
SPLIT
+PAR
REVIEW-TIME
DELAY
SHOT
JUMP
TIME
PRO TIMER IV SUPER
U S E R M A N U A L / O P E R AT I N G I N S T R U C T I O N S
(Extended Mode continued...)
Select Y (yes) to enable this feature using the UP / DOWN ARROW buttons. It is
useful in matches to prevent accidentally pressing the start button and losing the
shooters time before it can be recorded. When enabled, you must first press any of
the arrow buttons to unlock the start button.
6) HIT FACTOR (scoring) SCREEN
See previous detail in SIMPLIFIED MODE
7) RELAY OUT SELECT SCREEN
See previous detail in SIMPLIFIED MODE
8) PRINT SHOTS SCREEN
See previous detail in SIMPLIFIED MODE
15
PRO TIMER IV SUPER
U S E R M A N U A L / O P E R AT I N G I N S T R U C T I O N S
INTERFACE JACKS
There are three 1/8’’ jacks on the bottom of your PT4 which can be used to further
enhance it’s operational capabilities.
• Plate jack: Intended for use with a steel plate to record shot times based on
plate hits, this input allows you to connect a normally closed external switch
to the PT4. When in use, the internal sound sensor is deactivated. A 2.5 second
minimum time between each hit is implemented due to the characteristics
of the switch. (we recommend OMRON model Z-15G-B7-K for use as a plate
sensor) Connect an 18-22 gauge 2 conductor wire (stereo speaker wire works
well) up to 300 yards in length between the switch and a 1/8” 2 conductor
phone plug. If the connection is broken between the timer and switch, you will
get a message PLATE/LINE OPEN on the display screen when the start button is
pressed and will disable starting the timer.
• Start Jack: The start jack can be used two ways. It can start the timer remotely
with the use of a normally open momentary switch, which is useful if the range
officer can’t be located near the shooter. It can also be wired to a second PT4
for a simultaneous start of both timers from one of the units which is used for
man on man competition. To wire a remote start switch, connect a 2 conductor
wire between a normally open momentary push button switch and a 1/8” 2
conductor phone plug. Insert the plug into the start jack on the PT4 and the
timer will be activated by the switch. To simultaneously start two PT4 timers,
connect a 2 conductor wire between two 1/8” 2 conductor phone plugs. Insert
the plugs into the start jack of each timer. When the start button on one of the
timers is pressed, both timers will be activated.
• Relay Jack: The ProTimer IV has a built in relay output jack that provides a signal
output for interface with external devices such as turning targets, external
horns, lights and other devices. Its function can be controlled by the menu
selection entitled “Select Relay Out.”
16
PRO TIMER IV SUPER
U S E R M A N U A L / O P E R AT I N G I N S T R U C T I O N S
The output of the Pro Timer 4’s relay jack will normally be connected to the Pro
Timer 4’s internal ground. When active, it will output the battery voltage (nominal
9VDC) at a maximum of 600 uA, dependent upon the current state of charge of
the battery.
For interfacing to and controlling higher voltage/higher current devices, you will
need an external device of some type. An auxiliary relay module is available from
Competition Electronics. (See Accessories Section)
The Competition Electronics relay module is intended to provide a higher current/
higher voltage switching interface for the Pro Timer 4 timer in order to control
things such as turning targets, horns, lights and other auxiliary devices.
17
PRO TIMER IV SUPER
U S E R M A N U A L / O P E R AT I N G I N S T R U C T I O N S
ADVANCED CONTROLS
SHOT SENSITIVITY ADJUSTMENT
Increase the shot sensitivity if your PT4 is not picking up all shots or decrease if
registering echoes as “extra” shots.
The PT4 shot sensor sensitivity can be adjusted by using a small, flat screwdriver
with approx. 1/8“ blade. There is an adjustment potentiometer located in an
opening between the START and PLATE jack on the bottom of the unit. It comes
from the factory at a middle setting. Adjusting clockwise will increase the shot
sensitivity. Putting tape over some of the holes for the shot sensor is another way
to control the sensitivity.
QUICK KEYS
The quick key feature provides shortcuts to more common screens with two
button presses. To use this feature, you will always start by pressing and holding
the LEFT ARROW button. Then you will press one of the following buttons to jump
to the desired display screen.
START- Jumps to the MAIN screen
RIGHT ARRROW- Jumps to the HIT FACTOR screen
UP ARROW- Jumps to the PAR TIME screen and will increase PAR/SEQUENCE #
DOWN ARROW- Jumps to the PAR TIME screen and will decrease the PAR/
SEQUENCE #
18
PRO TIMER IV SUPER
U S E R M A N U A L / O P E R AT I N G I N S T R U C T I O N S
LIMITED WARRANTY
*********************************************************
COMPETITION ELECTRONICS, INC. warrants the Pro Timer 4 manufactured by it to be free from defects
in material and workmanship for a period of 2 years from date of purchase by the original purchaser for
use. COMPETITION ELECTRONICS, INC., at it’s option, will repair or replace without charge, or refund the
purchase price of, any product which fails during the warranty period by reason of defect in material or
workmanship found upon examination by COMPETITION ELECTRONICS, INC. to have been the cause
of failure. This warranty does not cover any failures attributable to abuse, mishandling, and failure to
follow operating instructions, alteration or accident.
To make a claim under this warranty, the purchaser must return the product to COMPETITION ELECTRONICS, INC. at the address shown above, properly packed and with shipping charges prepaid. All
claims must be made within 30 days after the product failure, and in any event, within 30 days after the
expiration of the 2 year warranty. All claims must be accompanied by the sales receipt or other written
proof of date of purchase.
TO THE EXTENT PERMITTED BY LAW, ANY AND ALL IMPLIED WARRANTIES, INCLUDING MERCHANTABILITY AND FITNESS FOR A PARTICULAR PURPOSE, ARE EXCLUDED. ANY IMPLIED WARRANTIES NOT
EXCLUDED ARE LIMITED IN DURATION TO 2 YEARS FROM DATE OF PURCHASE. INCIDENTAL AND
CONSEQUENTIAL DAMAGES ARE EXPRESSLY EXCLUDED FROM THE REMEDIES AVAILABLE TO THE
PURCHASER, AND THE REMEDIES PROVIDED IN THIS WARRANTY SHALL BE EXCLUSIVE TO THE EXTENT
PERMITTED BY LAW.
(Note: Some states do not allow limitations on how long an implied warranty lasts or the exclusion or
limitation of incidental or consequential damages, so the foregoing limitations and exclusions may not
apply to you. This warranty gives you specific legal rights, and you may also have other rights which
vary from state to state.)
If any product returned by the purchaser is found by COMPETITION ELECTRONICS, INC. to require
service not covered by warranty, COMPETITION ELECTRONICS, INC. will so advise the purchaser and
request further instructions.
COMPETITION ELECTRONICS, INC. will recondition to working order any Pro Timer 4 returned to it
regardless of condition, upon the purchaser’s remittance of payment of ½ of current retail price, if it is
still manufactured by COMPETITION ELECTRONICS, INC.
*********************************************************
SERVICE FOR YOUR PRO TIMER IV SUPER
For assistance with your PT4, use the information below.
Competition Electronics, Inc.
3469 Precision Dr.
Rockford, IL 61109
Phone: 815-874-8001
Fax: 815-874-8181
www.competitionelectronics.com
19
PRO TIMER IV SUPER
U S E R M A N U A L / O P E R AT I N G I N S T R U C T I O N S
ACCESSORIES
Hewlett Packard
Portable Thermal Printer
Get an instant printout of your results with this high
quality Hewlett Packard portable printer. Powered by
4 AA batteries or a 9 volt adapter (not included). Uses
infra-red (wireless) communication. Portable thermal
printer HP82240B includes paper.
Relay Module
• Includes 25’ cable for connection to the ProTimer 4
• 5 amp capacity
• Requires one 9 volt battery OR a 9-12 VDC power
source wired to the unit
• Convenient screw terminals for connection to
external devices
Use this device to control turning target systems or
large horns/lights with your ProTimer 4.
20
PRO TIMER IV SUPER
U S E R M A N U A L / O P E R AT I N G I N S T R U C T I O N S
Vibration Switch
• Includes 25’ cable for connection to the
ProTimer4
• Mounting screws included
Use this device to record shot times from
a steel plate hit. (The sound sensor is
deactivated when the vibration switch is
used).
Remote Start Switch
• Includes 25’ cable for connection to the
ProTimer 4
Use this device to activate the ProTimer 4
from a remote location.
21
PRO TIMER IV SUPER
U S E R M A N U A L / O P E R AT I N G I N S T R U C T I O N S
(Accessories continued...)
Simultaneous Start Cable
Use for connection of two ProTimer 4
units in a “man on man” competition. Both
units will start simultaneously when the
start button of one unit is pressed.
22
PRO TIMER IV SUPER
U S E R M A N U A L / O P E R AT I N G I N S T R U C T I O N S
23
O P E R AT I N G I N S T R U C T I O N S
PRO TIMER IV SUPER
Revised August, 2015
www.competitionelectronics.com