1
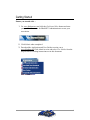
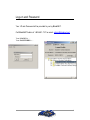
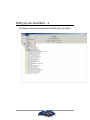
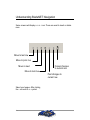
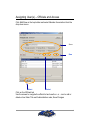
BladeNET Schedule User Manual Document Version 7.0 Copyright Information The use of the information contained within this manual is restricted to educational and not-for-profit purposes unless prior written permission has been obtained from BladeNET Hockey Council. For more information, contact: BladeNET Hockey Council 130 Dundas Street East, Suite 500 Mississauga, ON L5A 3V8 e-mail: [email protected] Our Commitment To create the best Knowledge Network for Amateur Hockey in the World Our Mission • Leveraging the power of the Internet to address the needs of the Amateur Hockey Community • Creating a direct link between the business community and amateur sports that benefits all stakeholders • Creating a value added network of products and services for our sponsors and the Amateur Sports Community iii Contents Getting Started ...................................................................................................... 5 Loading the Schedule Application....................................................................... 6 Log-on and Password ........................................................................................... 7 Setting up your Association -1 ............................................................................ 8 Setting up your Association - 2 ........................................................................... 9 Understanding BladeNET Navigation .............................................................. 10 Assigning User(s) – Officials and Access .......................................................... 11 Configure your Division ..................................................................................... 12 Configure Categories (A, AA, AAA) ................................................................. 13 Define the Ranking sets (tie breaker rules) - 1 ................................................. 14 Define the Ranking sets (tie breaker rules) - 2 ................................................ 15 Add your Venues and Surfaces.......................................................................... 16 Add Teams........................................................................................................... 17 Schedule Games - 1 Add Schedule Group ....................................................... 18 Schedule Games - 2 Define Schedule............................................................... 19 Schedule Games - 3 Add Schedule and Teams............................................... 20 Schedule Games - 4 Creating Games ................................................................ 21 Setting up Venues (to repeat once a week) ....................................................... 22 Add and delete Venues ....................................................................................... 23 Set Games Venues (time and place) .................................................................. 24 Change Teams Playing ....................................................................................... 25 Delete a game....................................................................................................... 26 Publish games to the Browser / Web................................................................. 27 Reset all Games ................................................................................................... 28 Auto Generate a Schedule and Games -1 ......................................................... 29 Auto Generate a Schedule and Games - 2 ........................................................ 30 Auto Generate a Schedule using the Wizard.................................................... 31 Viewing Game Conflicts ..................................................................................... 32 iv Getting Started Ensure you started with … 1. Go www.bladenet.net and click the Get Started Here button and enter your profile information for BladeNET Administration to create your association. 2. Click Submit when completed. 3. Download the Application and User Guides to assist you at www.bladenet.net Click Administration and select User Guides from the drop-down list. Loading instructions are in this document. 5 Loading the Schedule Application The user or administrator of the Bladenet software must download the base software. The software is compatible with Windows 3.0, 98, 2000 and XP. Use settings, 1024X768 pixels for screen area display settings. Loading base Software To run these programs, you need to install Java Web Start. http://allplayers.bladenet.net/jws/javaws-1_0_1_02-win-us-rt.exe then download the following application for the production database download http://allplayers.bladenet.net/allplayers/association/bladenet.jsp Contact the BladeNET Administrator to obtain your password and Logon ID 6 Log-on and Password Your ID and Password will be provided to you by BladeNET. Call BladeNET Admin at 1-905-681-1172 or email [email protected]. Your LOGON is … Your PASSWORD is … 7 Setting up your Association -1 The following screens are accessed from Edit/View on the top toolbar: Seasons – BladeNET will set this up for you Associations - BladeNET will set this up for you Member Associations - BladeNET will set this up for you Divisions – You start here to set up Categories – then go here Ranking Sets – then go here Venues – then go here Teams – then go here Conferences – then go here Schedules – then go here Other features you may wish to use Auto schedule generation Add a team Change a team name Change the rankings sets And Add tournament (s) Add your houseleague(s) 8 Setting up your Association - 2 The following screens are accessed from Edit/View on the top toolbar: - 9 Understanding BladeNET Navigation Some screens will display a + or – icon. These are used to insert or delete rows. Move to last row Move to prior row Move to next Move to last row Select your league. After clicking, the + converts to a – symbol 10 Cancel changes to current row Post changes to current row Assigning User(s) – Officials and Access Click Edit/View on the top toolbar and select Member Associations from the drop down menu Enter Save Select Select Click on the Officials tab Use the arrows to navigate the official list and use the + or – icon to add or delete a line. Enter Title and Administration rules; Save Changes 11 Configure your Division Click Edit/View on the top toolbar and select Divisions from the drop-down menu Step a: Select the division you wish to configure, (+) to add new divisions Step b: Enter the required information Click Save Changes ; Next, configure categories Add Step b Step a 12 Configure Categories (A, AA, AAA) Click Edit/View on the top toolbar and select Categories from the drop-down menu Step a: Select a Category, (+) to add new categories. Step b: Select the checkbox required for this category, default is check box. Click Save Changes: Step b Add Step a 13 Define the Ranking sets (tie breaker rules) - 1 Click Edit/View on the top toolbar and select Ranking Sets from the dropdown menu Step a: Select a Ranking Set or create a New Set using the (+) Type in the name of the set and save. Go to ranking Rules Tab. Step b: enter points per win, ties or losses. Type in your rules location URL, if presented on your website. NOTE: It is important to review your rules and regulations. The rankings contribute to automatic standing changes (based on the setup you select or create). Add 14 Define the Ranking sets (tie breaker rules) - 2 Click Ranking Rules tab.(+) to Add. Step a: Add from the drop down the tiebreakers rules. Example 1. more points 2. more wins 3. higher net score 4. manual – leave blank (coin toss) Step b: Save. Min and Max represents # of teams. 0 = All. Add 15 Add your Venues and Surfaces Click Edit/View on the top toolbar and select Venues from the drop-down menu Step a: Select any venue and/or (+) to add/edit information. Go to surfaces tab if venue has multiple pads. Click Save Changes The entered venues appear on the left of the screen To add a surface Add 16 Step a Add Teams Click Edit/View on the top toolbar and select Teams from the drop-down menu Step b: Enter all required information and any additional information you select Click Save Changes: Next, schedule games Step b Add 17 Schedule Games - 1 Add Schedule Group Click Edit/View on the top toolbar and select Schedules Step a: Enter your Schedule group, typically the name of the schedule / can be a tournament. Select tournament, regular, playoff from the drop down. Click Save Changes. Step b: Enter the name of the schedule; i.e. Atom AA . Select divisions, Category and Ranking set (as you may have defined or already defined) Step c: Enter rights, authority for association and team level Click Save Changes Next, continue to configure your Schedule Note: publish promotes entries to the web, at the URL as presented (Show URLS). URL can be cut and pasted to explorer as an address. Step a URL for the browser Step b 18 Step c Schedule Games - 2 Define Schedule Con’t Step d: Select record. Click on what your league will report. Example - penalty minutes ; first score Step e: Click publish if you wish to promote info to the web / browser. Click Save Changes, Next, allocate games to a venue 19 Schedule Games - 3 Add Schedule and Teams You must have a schedule selected in the filter to add games Step a: Press the (+) to add schedules. Highlight schedule. You may be asked to automatically add to the schedule. Select yes if you have added teams already. Step b: From the team window, enter your team group (use (+) to add. Example Gold, East Step c: Add Teams (+) to add. Use the drop down, Click Save Changes, Next, allocate games to a venue Step a 20 Schedule Games - 4 Creating Games Step a: Use the filter to organize the games; by date; by home team; by venue Step b: Hit the (+) to add new teams. Using the drop down, select the teams you wish to add – home team, away team. Select OK. Click Save . Next (+) add venue and allocate venue to team Step a Step b 21 Setting up Venues (to repeat once a week) Venue event represents a venue, surface, date and time relating to scheduled ice time. Step a: To repeat a venue event for the selected event (meaning the same ice time scheduled the same day once a week), click the Repeat event button. The Venue events window appears Step b: Enter the number of repeats desired. Click OK. The new events are created and entered Click Save Changes Step a Step b 22 Add and delete Venues Step a: Use the filter to organize the games; by date; by home team; by venue Step b: Select the venue in the venue events view Step c: Click the – button or the + button , Select yes to delete Use the scroll downs to select the venue, enter date and time. Step d: Allocate back to the game. Click Save Changes Step d Step a Step c Step b Venue view Step c 23 Set Games Venues (time and place) Step a: Use the filter to organize the games; by date; by home team; by venue Step b: Select the game in the game events view Step c: Select the venue in the venue events view Step d: Click the Allocate event button to link the game to the venue Note the new date and time in the game events view Click Save Changes Step d Step a Game events view Step b 24 Venue view Step c Change Teams Playing Step a: Click the Change teams button. A Select teams window will appear Step b: Use the drop down and select the correct teams. They must be added for them to appear. Click Save Changes Step a Step b 25 Delete a game You must have a schedule selected in the filter to add games Step a: Press the - sign on the games panel. The Select Teams window appears Step b: From the drop down list, select the desired home and away team Step c: When finished click Yes Support & Contact Numbers For administration, sponsor support and loading support call 416 706-2769 or email [email protected]For technical support, email [email protected] For sales, senior management correspondence, sponsor management, opportunities email [email protected]. Information regarding the business, the executive team and the vision can be found at BladeNET’s Internet site, ex Step a Step b 26 Publish games to the Browser / Web Step a: Click the Games tab Step b: Click the Publish All button A new window will appear Step c: Confirm your selection by clicking Yes or click No to stop your games from being published Click Save Changes Step a Step b 27 Reset all Games Step a: Click the Reset All button A new window will appear Step b: Read the caution and confirm your selection by clicking Yes or click No to reverse your selection Click Save Changes Step a Step b 28 Auto Generate a Schedule and Games -1 Step a: Click the Add Games button. A Confirm window will appear Step b: Select Yes or No Step c: The first of two Add games window appears. Enter the Number of games per team, Starting date, and Number of games per week Step d: When complete, click Next. The second Add games window will appear. See next page Next, continue to create your schedule Step b Step a Step c Step d 29 Auto Generate a Schedule and Games - 2 Step d: A new window will appear. Press OK to generate a schedule or click Previous to change any information Click Save Changes Your schedule will now be generated Step d 30 Auto Generate a Schedule using the Wizard Click Edit/View on the top toolbar and select Schedules Step a: Select Wizards; Enter the number of teams, type of match-ups Click Add to Save Changes Your schedule will now be generated Step a 31 Viewing Game Conflicts Click Edit/View on the top toolbar and select Schedules Select Review Conflicts 32