1
Eurex Exchange’s T7
Eurex Trader GUI & Eurex Admin GUI –
Installation Manual
Version
2.1.0
Date
19 March 2014
Eurex Exchange’s T7
Eurex Frankfurt AG
Eurex Trader GUI & Eurex Admin GUI Installation Manual
Version 2.1.0
© Eurex 2014
Deutsche Börse AG (DBAG), Clearstream Banking AG (Clearstream), Eurex Frankfurt AG, Eurex Clearing AG (Eurex Clearing) as well as Eurex Bonds GmbH (Eurex
Bonds) and Eurex Repo GmbH (Eurex Repo) are corporate entities and are registered under German law. Eurex Zürich AG is a corporate entity and is registered under
Swiss law. Clearstream Banking S.A. is a corporate entity and is registered under Luxembourg law. U.S. Exchange Holdings, Inc. and International Securities Exchange
Holdings, Inc. (ISE) are corporate entities and are registered under U.S. American law. Eurex Frankfurt AG (Eurex) is the administrating and operating institution of Eurex
Deutschland. Eurex Deutschland and Eurex Zürich AG are in the following referred to as the “Eurex Exchanges”.
All intellectual property, proprietary and other rights and interests in this publication and the subject matter hereof (other than certain trademarks and service marks listed
below) are owned by DBAG and its affiliates and subsidiaries including, without limitation, all patent, registered design, copyright, trademark and service mark rights. While
reasonable care has been taken in the preparation of this publication to provide details that are accurate and not misleading at the time of publication DBAG, Clearstream,
Eurex, Eurex Clearing, Eurex Bonds, Eurex Repo as well as the Eurex Exchanges and their respective servants and agents (a) do not make any representations or
warranties regarding the information contained herein, whether express or implied, including without limitation any implied warranty of merchantability or fitness for a
particular purpose or any warranty with respect to the accuracy, correctness, quality, completeness or timeliness of such information, and (b) shall not be responsible or
liable for any third party’s use of any information contained herein under any circumstances, including, without limitation, in connection with actual trading or otherwise or
for any errors or omissions contained in this publication.
This publication is published for information purposes only and shall not constitute investment advice respectively does not constitute an offer, solicitation or
recommendation to acquire or dispose of any investment or to engage in any other transaction. This publication is not intended for solicitation purposes but only for use as
general information. All descriptions, examples and calculations contained in this publication are for illustrative purposes only.
Eurex and Eurex Clearing offer services directly to members of the Eurex exchanges respectively to clearing members of Eurex Clearing. Those who desire to trade any
products available on the Eurex market or who desire to offer and sell any such products to others or who desire to possess a clearing license of Eurex Clearing in order to
participate in the clearing process provided by Eurex Clearing, should consider legal and regulatory requirements of those jurisdictions relevant to them, as well as the
risks associated with such products, before doing so.
Eurex derivatives (other than EURO STOXX 50® Index Futures contracts, EURO STOXX® Select Dividend 30 Index Futures contracts, STOXX® Europe 50 Index Futures
contracts, STOXX® Europe 600 Index Futures contracts, STOXX® Europe Large/Mid/Small 200 Index Futures contracts, EURO STOXX® Banks Futures contracts,
STOXX® Europe 600 Banks/Industrial Goods & Services/Insurance/Media/Personal & Household Goods/Travel & Leisure/Utilities Futures contracts, Dow Jones Global
Titans 50 IndexSM Futures contracts, DAX® Futures contracts, MDAX® Futures contracts, TecDAX® Futures contracts, SMIM® Futures contracts, SLI Swiss Leader Index®
Futures contracts, Eurex inflation/commodity/weather/property and interest rate derivatives) are currently not available for offer, sale or trading in the United States or by
United States persons.
Trademarks and Service Marks
Buxl®, DAX®, DivDAX®, eb.rexx®, Eurex®, Eurex Bonds®, Eurex Repo®, Eurex Strategy WizardSM, Euro GC Pooling®, FDAX®, FWB®, GC Pooling®,,GCPI®, MDAX®,
ODAX®, SDAX®, TecDAX®, USD GC Pooling®, VDAX®, VDAX-NEW ® and Xetra® are registered trademarks of DBAG. Phelix Base® and Phelix Peak® are registered
trademarks of European Energy Exchange AG (EEX). The service marks MSCI Russia and MSCI Japan are the exclusive property of MSCI Barra. iTraxx ® is a registered
trademark of International Index Company Limited (IIC) and has been licensed for the use by Eurex. IIC does not approve, endorse or recommend Eurex or iTraxx ®
Europe 5-year Index Futures, iTraxx® Europe HiVol 5-year Index Futures and iTraxx® Europe Crossover 5-year Index Futures. Eurex is solely responsible for the creation
of the Eurex iTraxx® Credit Futures contracts, their trading and market surveillance. ISDA® neither sponsors nor endorses the product’s use. ISDA® is a registered
trademark of the International Swaps and Derivatives Association, Inc. IPD UK Annual All Property Index is a registered trademark of Investment Property Databank Ltd.
IPD and has been licensed for the use by Eurex for derivatives. SLI ®, SMI® and SMIM® are registered trademarks of SIX Swiss Exchange AG. The STOXX ® indexes, the
data included therein and the trademarks used in the index names are the intellectual property of STOXX Limited and/or its licensors Eurex derivatives based on the
STOXX® indexes are in no way sponsored, endorsed, sold or promoted by STOXX and its licensors and neither STOXX nor its licensors shall have any liability with
respect thereto. Dow Jones, Dow Jones Global Titans 50 IndexSM and Dow Jones Sector Titans IndexesSM are service marks of Dow Jones & Company, Inc. Dow JonesUBS Commodity IndexSM and any related sub-indexes are service marks of Dow Jones & Company, Inc. and UBS AG. All derivatives based on these indexes are not
sponsored, endorsed, sold or promoted by Dow Jones & Company, Inc. or UBS AG, and neither party makes any representation regarding the advisability of trading or of
investing in such products. All references to London Gold and Silver Fixing prices are used with the permission of The London Gold Market Fixing Limited as well as The
London Silver Market Fixing Limited, which for the avoidance of doubt has no involvement with and accepts no responsibility whatsoever for the underlying product to
which the Fixing prices may be referenced. PCS® and Property Claim Services® are registered trademarks of ISO Services, Inc. Korea Exchange, KRX, KOSPI and
KOSPI 200 are registered trademarks of Korea Exchange Inc. BSE and SENSEX are trademarks/service marks of Bombay Stock Exchange (BSE) and all rights accruing
from the same, statutory or otherwise, wholly vest with BSE. Any violation of the above would constitute an offence under the laws of India and international treaties
governing the same. The names of other companies and third party products may be trademarks or service marks of their respective owners.
2
Eurex Exchange’s T7
Eurex Frankfurt AG
Eurex Trader GUI & Eurex Admin GUI Installation Manual
Version 2.1.0
Content
1. Introduction
5
1.1 Document structure
5
1.2 Java Web Start Details
5
1.3 Client PC requirements
6
1.3.1 Operating system
6
1.3.2 Hardware
7
1.4 Java Runtime Environment (JRE)
7
1.5 Network
7
1.5.1 Leased line network aspects
9
1.5.2 Internet connections aspects, public key pair authentication
9
1.5.3 Local proxy servers
10
2. Java Plugin Settings on the local computer
11
3. Local files
14
3.1 Directory structure
14
3.2 Changing directories
14
3.3 Verify local settings
15
4. SSH key pair generation
16
4.1 Private and public key with OpenSSH (ssh-keygen)
16
4.2 Key generation with puttygen
18
4.3 Public key – Member Section upload
20
4.3.1 New Participant Key
21
4.3.2 New Trader Key
23
5. Troubleshooting
25
5.1 Three tiers of Eurex GUI communication
25
5.1.1 Tier I, Web browser -> landing page -> JNLP file
25
5.1.2 Tier I, javaws -> Web Start, JAR File delivery
25
5.1.3 Tier III, Running GUI -> (crypto) proxies
26
3
Eurex Exchange’s T7
Eurex Frankfurt AG
Eurex Trader GUI & Eurex Admin GUI Installation Manual
Version 2.1.0
5.2 Verify connectivity, Internet
26
5.3 Verify connectivity, leased line
28
5.3.1 Simple checklist for simulation network configuration test via leased line
28
5.3.2 Example simulation network setup, leased line
29
5.3.3 Application test over leased line
30
5.4 Bandwidth monitoring
30
5.5 General issues
31
5.6 Java tools
32
5.6.1 Java console
32
5.6.2 Monitoring and cleaning of the local Java Web Start application cache
32
5.7 Related Documents
33
5.8 Contacts
33
6. Change log
34
4
Eurex Exchange’s T7
Eurex Frankfurt AG
Eurex Trader GUI & Eurex Admin GUI Installation Manual
Version 2.1.0
1.
Introduction
There are two graphical user interfaces for Eurex Exchange’s T7:
•
The Eurex Trader GUI which is used for On-exchange trading and EurexOTC Trade Entry
services
•
The Eurex Admin GUI which is used for trader maintenance, entitlement and transaction size
limit settings
Both GUIs can be accessed via leased line connections (using a GUI-Channel) or alternatively
through the Internet (native Internet connection). The new GUI solution relies on Oracle/Sun Java
Web Start technology for delivery of the software to the participant. Once downloaded the new Eurex
Trader GUI as well as the Eurex Admin GUI run independent from the web browser used to start the
Java Web Start Process.
Please note: Internet connections require an additional security layer which requires the trading
member to create SSH key pairs and to upload the public key to the Eurex Exchange before using the
GUIs over an Internet connection.
1.1
Document structure
Chapter 1 of this document outlines the general technical concept and requirements on the client
computer and the connecting network.
Chapter 2 gives an overview of the suggested Java Runtime Environment settings.
Chapter 3 outlines the configuration and log files which are kept locally on the client computer running
the GUI.
Chapter 4 applies only to Internet connections and describes in detail several approaches to SSH key
creation and the procedure to upload a created public key to the Member Section of
http://www.eurexchange.com.
Chapter 5 summarizes a number of scenarios for testing and troubleshooting, together with links to
further documentation.
1.2
Java Web Start Details
Java Web Start is part of the Java Runtime Environment (JRE) and is automatically installed together
with the JRE package.
The Java Web Start mechanism ensures that a user is always using the latest version of a given Java
software package without the need for installation or upgrade procedures.
Clicking on a Eurex GUI link on the Eurex website http://webgui.eurexchange.com/ downloads the
latest version of either the Eurex Trader GUI or Eurex Admin GUI if required and starts it
automatically.
5
Eurex Exchange’s T7
Eurex Frankfurt AG
Eurex Trader GUI & Eurex Admin GUI Installation Manual
Version 2.1.0
Each version of the Eurex Trader GUI and Eurex Admin GUI will be stored on the local client PC in the
local cache of Java Web Start. On each subsequent launch of the GUI the locally stored version will
be compared with the latest version on the Eurex Exchange servers. If a newer version is available
this newer version will be downloaded and launched, otherwise the locally stored version is used.
Please Note: In order to guarantee that Participants are always using the latest software versions of
the Eurex Trader GUI and Eurex Admin GUI, from release 2.1 onwards trader logins from all outdated
GUI instances will be rejected and a link to the appropriate landing page will be provided. In this way
the compatibility between the T7 backend and T7 GUI components is ensured.
1.3
Client PC requirements
The Eurex Trader GUI and Eurex Admin GUI require a Java Plugin (JRE) on the client computer.
Furthermore the end-user of the Eurex Trader GUI or Eurex Admin GUI needs access rights to the
local Java Plugin (e.g. Plugin cache).
To access the initial website a standard internet browser is required. The browser must support the
Java Plugin (JRE) available at https://www.java.com/en/download/index.jsp
The following browsers were tested:
•
MS Internet Explorer 8
•
Mozilla Firefox 10
•
Opera 11
Other standard browsers were not tested but are considered to be possible.
1.3.1
Operating system
Eurex only supports the following operating systems which have been tested together with the Eurex
Trader GUI and Eurex Admin GUI:
•
MS Windows (32-bit), x86
(Windows 7, XP)
•
MS Windows (64-bit), x64
(Windows 7, XP)
•
Linux (32-bit), x86,
(Red Hat Enterprise Linux 6.2)
•
Linux (64-bit), x64,
(Red Hat Enterprise Linux 6.2)
•
Oracle Solaris, Sparc,
(5.10)
•
Oracle Solaris, x64,
(5.10)
Other operating systems are considered to be possible as long as they are compatible with the
required Java Runtime Environment.
Following the announcement from Microsoft that support and updates for the Windows XP operating
system will no longer be available from 08. April 2014 onwards, the T7 Trader and Admin GUI in
conjunction with the Windows XP operating system will not be supported any longer from Eurex T7
release 2.5 (Q4/2014). From this point forward, the Windows XP operating system will only be
classified as a possible solution.
6
Eurex Exchange’s T7
Eurex Frankfurt AG
Eurex Trader GUI & Eurex Admin GUI Installation Manual
Version 2.1.0
1.3.2
Hardware
Recommended requirements for desktop computers running one new Eurex Trader GUI and/or one
new Eurex Admin GUI:
•
A computer capable of running the above listed operating systems and Java Runtime
Environment with at least 2 GB memory and a dual-core processer that runs at least with
2 GHz.
Display server solutions (i.e. Citrix, Tarantella) were not tested, but are considered to be possible.
1.4
Java Runtime Environment (JRE)
The following versions of the Java Virtual Machine are supported and need to be present on the client
computer:
•
Minimum: JRE by Oracle, version 1.7.0_45 or newer 1.7_x version
•
Recommended: JRE by Oracle, version 1.7.0_51 or newer
Please note: JRE by Oracle, version 1.7.0_25 has known limitations leading to unexpected issues
running the T7 Admin or T7 Trader GUI. Therefore it is advisable to avoid version 1.7.0_25 to run the
T7 Admin or T7 Trader GUI.
From T7 release 2.1 onwards JRE 1.6 versions are no longer supported and are also not available
possible solution. The T7 GUIs make use of features only provided with Java 1.7. Please be aware
that Oracle also terminated support for all 1.6 versions in February 2013:
http://www.oracle.com/technetwork/java/eol-135779.html
The required JRE version can be downloaded from:
•
1.5
http://www.java.com/
Network
The connection to the Eurex Exchange can be made through the Internet, with or without a proxy
server (with or without authentication) or over a leased line (dedicated network connection to the
Eurex Exchange back end network).
Per concurrent Eurex Trader GUI bandwidth consumption approximately 330 Kbit/s has to be
expected. Bandwidth usage is mainly driven by market data updates and depends on the selected
instrument profile. As the new Eurex Admin GUI does not receive any market data the bandwidth
requirement of the Eurex Admin GUI is considerably lower (can be neglected).
Currently offered bandwidth options for GUI channels on leased lines:
1 Mbit
~
estimated for 3 Eurex Trader GUIs
3 Mbit
~
estimated for 10 Eurex Trader GUIs
5 Mbit
~
estimated for 15 Eurex Trader GUIs
10 Mbit
~
estimated for 30 Eurex Trader GUIs
40 Mbit
~
estimated for 120 Eurex Trader GUIs
7
Eurex Exchange’s T7
Eurex Frankfurt AG
Eurex Trader GUI & Eurex Admin GUI Installation Manual
Version 2.1.0
To start the Eurex Admin GUI or the Eurex Trader GUI and to initiate the Java Web Start process a
standard web browser should be used to navigate to a landing page which can be reached by the
following URL address:
Connection option
URL / IP address Landing Page
Ports
Protocol
Internet
http://webgui.eurexchange.com/
80
TCP/IP
Leased line
http://193.29.93.173/
80
TCP/IP
Clicking one of the GUI links will initiate the Java Web Start mechanism which will download the GUI
in form of a JAR file from the Web Start server. Java Web Start will verify if the current version of the
GUI is already present in the local cache of the participant's client computer.
If the latest version has already been downloaded during a previous launch, the cached version is
used with no download being necessary. If a newer version is available on the Web Start server, it will
be downloaded automatically and stored in the local Java Web Start cache to be used in the future.
Browsing to the launch page and transferring the JAR file via Web Start is based on TCP/IP on port 80
or port 443, SSL (for future use). To serve that purpose, two sets of Java Web Start servers are used:
one for Internet and one for leased line connections.
Connection option
URL / IP address Java Web Start Server
Ports
Protocol
Internet
193.29.90.190
80 / 443
TCP/IP
Leased line
193.29.93.173
80 / 443
TCP/IP
Please note: usage of port 443 (SSL) is planned for a future release and not active yet.
As soon as the download of the JAR file has been completed or the most recent version has been
found in the local cache, it will be started from the local Java Virtual Machine (JVM).
Once the GUI application has been started within the local Java Virtual Machine the network
communication between the client computer and the receiving proxy servers at Eurex Exchange will
be done on the ports listed below.
Environment
Connection
option
Proxy IP subnets
Ports
Protocol
Production
Internet
193.29.90.192/27
Port 80 for both GUIs.
TCP/IP
Leased line A
193.29.91.224/28
TCP/IP
Leased line B
193.29.93.224/28
Port 80 for the Eurex
Admin GUI and port
8089 for the Eurex
Trader GUI.
Internet
193.29.90.224/27
Port 80 for both GUIs.
TCP/IP
Leased line A
193.29.89.224/28
TCP/IP
Leased line B
193.29.95.224/28
Port 80 for the Eurex
Admin GUI and port
Simulation
8
Eurex Exchange’s T7
Eurex Frankfurt AG
Eurex Trader GUI & Eurex Admin GUI Installation Manual
Version 2.1.0
Environment
Connection
option
Proxy IP subnets
Ports
Protocol
8089 for the Eurex
Trader GUI.
If a firewall is in place, the ports listed above need to be configured. All connections will be opened
only from the client side to the Eurex Exchange. Please note that traffic over the Internet will be
encrypted. Although port 80 is being used, firewalls will not be able to read the content (payload) of
the TCP/IP packets sent on this port.
1.5.1
Leased line network aspects
For leased lines connections the outbound TCP/IP address for GUI connections is expected to be
within the assigned member LAN.
The technical implementation can be performed by placing a proxy server in the member LAN, taking
on one side the connections to the trading desks and on the other side residing in the assigned
member LAN.
Alternatively NAT’ing (static or dynamic) protocols can be implemented in the trading participant’s
network to shield the in-house network addresses and translate them to addresses in the assigned
member LAN.
Routes to the leased line networks listed in the table above need to be present on the client computer.
Please note that these should point to the leased lines and not to the Internet.
If present, local Internet proxy servers should implement an exception to access the leased line
networks. This can be configured in .pac files of most proxy servers by commanding direct
connections to the specified network/host:
if ( isInNet( host, "193.29.93.173", "255.255.255.255" ))
{return "DIRECT";}
For leased line connections SSH authentication is not required or possible.
1.5.2
Internet connections aspects, public key pair authentication
GUI connections established over the Internet require an additional security level for encryption and
authentication.
An SSH-2 key pair has to be created and the public key has to be uploaded to Eurex Exchange via the
web portal in the Member Section of http://www.eurexchange.com. Please see chapter 3 for detailed
instructions on how to create an SSH key pair and how to upload the public key.
The SSH key pair is used just for authentication. The Eurex GUI solutions do not establish an SSH
tunnel, but encrypt the payload of the network packets on application level.
9
Eurex Exchange’s T7
Eurex Frankfurt AG
Eurex Trader GUI & Eurex Admin GUI Installation Manual
Version 2.1.0
1.5.3
Local proxy servers
Customers may deploy their own proxy servers for connection via Internet or via leased lines.
The following general proxy server requirements are needed for running the Eurex Admin or Eurex
Trader GUI via proxy:
•
•
•
proxy must accept „HTTP 1.1“
proxy must understand header „Proxy-Connection“ and „Connect“ with value „keep-alive“
proxy must understand header „Transfer-Encoding“ with value „chunked“
Known proxy server versions and limitations
•
commercial proxy BlueCoat
o Version SGOS 4.3, 5.4, 5.5 and 6.x known to be good
o Version SGOS 4.2 known to be not working (End of live was 2010 according to
BlueCoat)
•
Open Source proxy Squid
o Version 3.2.x or newer known to be good
o (note Squid 3.2 STABLE exists only for Unix/Linux. Windows just at 2.7 STABLE)
o Incoming port must be configured for http11 in squid.conf
10
Eurex Exchange’s T7
Eurex Frankfurt AG
Eurex Trader GUI & Eurex Admin GUI Installation Manual
Version 2.1.0
2.
Java Plugin Settings on the local computer
To access the Java Control Panel open the Control Panel on a MS Windows based computer.
Double click the icon „Java” to open the plugin settings. If the icon is missing, the plugin is not
correctly installed.
For Linux based computers open the Java settings by selecting “Preferences” / “Java” – depending on
the installed desktop environment.
11
Eurex Exchange’s T7
Eurex Frankfurt AG
Eurex Trader GUI & Eurex Admin GUI Installation Manual
Version 2.1.0
The following window should open (or similar, depending on operating system used):
The Java plugin version can be verified with a click on „About…“:
The version should be 1.7.0_45 or higher. From T7 release 2.1 Java 1.6 is no longer supported or
possible.
12
Eurex Exchange’s T7
Eurex Frankfurt AG
Eurex Trader GUI & Eurex Admin GUI Installation Manual
Version 2.1.0
Open the network settings with a click on “Network Settings…”:
These settings are specific for your infrastructure. Normally you can use the settings from your internet
browser (for Internet Explorer: Tools -> Internet Options -> Connections -> LAN Settings).
Open the settings for temporary internet files with a click on “Settings…”
It is recommended to reserve sufficient disk space (at least 100MB) for the temporary files on the local
computer. The JAR files of the Eurex Admin GUI and Eurex Trading GUI will be less than 20MB per
version. Disabling disk space for temporary files on the local computer will require Java Web Start to
download the Eurex GUI applications with each start of the application.
The end-user of the Eurex GUI applications must have read and write access to the temporary files
location. If you encounter problems with the download, please try to clear the cache (Button “Delete
Files…”) and download the application again.
13
Eurex Exchange’s T7
Eurex Frankfurt AG
Eurex Trader GUI & Eurex Admin GUI Installation Manual
Version 2.1.0
3.
Local files
Both, the Eurex Trader GUI and the Eurex Admin GUI store setup information and log files on the local
client computer. Administrators are advised to keep these files on local disc storage and not on
network mounts to avoid adverse effects of network delays.
3.1
Directory structure
The default location for these files is in the operating system user’s home directory in a sub folder
“gmc” (working directory)
~/gmc
C:\users\<user>\gmc
Within this folder sub folders for production and simulation are created. Each folder
contains another folder “etc” for the GUI configuration (settings directory) and a folder “log” for the GUI
log files (log directory).
3.2
Changing directories
All three directory paths stated above can easily be changed by the use of operating system
environment variables:
Directory
Environment Variable
Default
Working directory
GMC_WORKING_DIR
~/gmc/<environment>
Settings directory
GMC_SETTINS_DIR
~/<GMC_WORKING_DIR>/<environment>/etc
Log directory
GMC_LOG_DIR
~/<GMC_WORKING_DIR>/<environment>/log
Example, MS Windows:
SET GMC_WORKING_DIR=N:\home\gmc\
ECHO %GMC_WORKING_DIR%
Example, UNIX (bash)
export GMC_WORKING_DIR=\mount\home\gmc
echo $GMC_WORKING_DIR
14
Eurex Exchange’s T7
Eurex Frankfurt AG
Eurex Trader GUI & Eurex Admin GUI Installation Manual
Version 2.1.0
3.3
Verify local settings
Local settings can easily be verified within the GUI itself. Open a Login view and click on the blue
“Info” bar at the bottom of the window:
The window will expand and display a list of the settings currently used by the GUI store and read files
in the client computer’s file system:
15
Eurex Exchange’s T7
Eurex Frankfurt AG
Eurex Trader GUI & Eurex Admin GUI Installation Manual
Version 2.1.0
4.
SSH key pair generation
The following chapter applies only for customers who intend to run the Eurex Trader GUI or Eurex
Admin GUI via the native Internet. GUI connections over leased lines do not require any SSH key pair
authentication.
To generate an SSH-2 public/private key various freeware tools are available for download in the
Internet, for instance:
•
PuTTYgen.exe (available for MS Windows),
•
ssh-keygen from http://www.openssh.org for various operating systems.
The key generation process will produce both the public and the private key.
Key pairs can be created either for an entire business unit or for individual traders. Key generation for
both options is identical. The use of the keys (business unit vs. individual traders) is determined during
upload into the Member Section as outlined in chapter 3.4.
To help associate keys with business unit or individual member IDs it is suggested to use
corresponding filenames as indicated in the examples below.
IMPORTANT: Each key private must be protected with a passphrase. This is mandatory for the Eurex
T7 simulation and for production environments.
4.1
Private and public key with OpenSSH (ssh-keygen)
After installing OpenSSH type the following command on the command line to create both, a public
and a private key (in this example with the minimum length of 2048 bytes):
$ ssh-keygen -t rsa -b 2048 -N <passphrase> -f /home/username/.ssh/
MEMBRTRD001
Generating public/private rsa key pair.
Your identification has been saved in /home/username/.ssh/ MEMBRTRD001.
Your public key has been saved in /home/username/.ssh/ MEMBRTRD001.pub.
The key fingerprint is:
f8:e9:1a:ee:a0:d7:2b:4a:8e:fa:4d:80:43:e0:96:1a [email protected]
The key's randomart image is:
+--[ RSA 2048]----+
|.
|
|o .
|
|E=
|
|+o
.
|
|+ .
. S
|
| . .
. .
|
| . o.. o
|
| + +oo.o
|
|+.=o.o=o.
|
+-----------------+
16
Eurex Exchange’s T7
Eurex Frankfurt AG
Eurex Trader GUI & Eurex Admin GUI Installation Manual
Version 2.1.0
The following keys will be created:
$ ls -al MEMBR*
-rw------- 1 username group 1675 Jul 17 16:28 MEMBRTRD001
-rw-r--r-- 1 username group 405 Jul 17 16:28 MEMBRTRD001.pub
The public key can be identified by the file extension “.pub”, while the private key has no file extension.
Please note the different file access rules for both keys.
The private key file must be accessible from the GUI user’s workstation, but should never be
distributed further.
Alternatively the tool ssh-keygen can be used in an interactive session:
$ ssh-keygen -t rsa -b 2048
Generating public/private rsa key pair.
Enter file in which to save the key (/home/username/.ssh/id_rsa):
/home/username/.ssh/MEMBRTRD002
Enter passphrase (empty for no passphrase):
Enter same passphrase again:
Your identification has been saved in /home/username/.ssh/MEMBRTRD002.
Your public key has been saved in /home/username/.ssh/MEMBRTRD002.pub.
The key fingerprint is:
17:0f:1c:7b:67:bc:34:6f:a6:52:7c:4b:7e:d7:16:8e [email protected]
The key's randomart image is:
+--[ RSA 2048]----+
|
.
|
|
. o .
|
|
= . * |
|
= = + |
|
S . . +o=|
|
.
.==+|
|
.E.+=|
|
. .o|
|
|
+-----------------+
The following keys will be created:
$ ls -al MEMBR*
-rw------- 1 username group 1743 Jul 17 16:30 MEMBRTRD002
-rw-r--r-- 1 username group 405 Jul 17 16:30 MEMBRTRD002.pub
The public key can be identified by the file extension “.pub”, while the private key has no file extension.
Please note the different file access rules for both keys.
The private key file must be accessible from the GUI user’s workstation, but should never be
distributed further.
17
Eurex Exchange’s T7
Eurex Frankfurt AG
Eurex Trader GUI & Eurex Admin GUI Installation Manual
Version 2.1.0
4.2
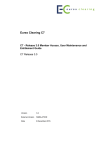
Key generation with puttygen
The following chapter describes the key generation procedure with puttygen.exe under MS Windows.
After starting PuTTY Key Generator (run “puttygen.exe”) there will be an almost empty PuTTY Key
Generator screen visible.
2048
Parameters:
•
Type of key to be generated:
SSH-2 RSA
•
Number of bits in a generated key:
2048 (up to 16384)
Once the parameters are set, click on “Generate” and move your mouse pointer for a while over the
blank area. The key pair will be generated.
IMPORTANT: Each key private must be protected with a passphrase. This is mandatory for both the
Eurex T7 simulation and for production environments.
18
Eurex Exchange’s T7
Eurex Frankfurt AG
Eurex Trader GUI & Eurex Admin GUI Installation Manual
Version 2.1.0
Check!
To save the public key, select the key in the textbox with the mouse. Make sure that you have
selected the full key. This may require scrolling. Copy the selected key to the clipboard (CTRL-C).
Open a text editor, i.e. “Notepad” or “Editor” and paste (CTRL-V) the key into the editor. Save the file
as the public key.
The public key needs to be uploaded to the Member Section of the Eurex Exchange website. The
process is described in the next chapter.
To save the private key, click on “Conversion” in the menu bar of PuTTYgen and select “Export
OpenSSH key”.
19
Eurex Exchange’s T7
Eurex Frankfurt AG
Eurex Trader GUI & Eurex Admin GUI Installation Manual
Version 2.1.0
Both keys are required to run the Eurex Admin GUI or Eurex Trader GUI over the internet.
Please note: Both key files must be accessible from the GUI user’s workstation, but should never be
distributed further.
4.3
Public key – Member Section upload
The public key created as outlined above needs to be uploaded to the Member Section of
http://www.eurexchange.com. The user uploading public keys needs to be a registered “Technical
User Administrator”.
From there it will be transferred to the proxy servers for GUI usage via Internet. An uploaded key will
be usable within one hour after successful upload.
Keys can be created either for the entire business unit or for individual traders.
Please note: Uploading a new key for a trader or a business unit overwrites any previously uploaded
key.
20
Eurex Exchange’s T7
Eurex Frankfurt AG
Eurex Trader GUI & Eurex Admin GUI Installation Manual
Version 2.1.0
Before the Eurex Admin GUI or Eurex Trader GUI can be accessed via the Internet, the public key has
to be uploaded in the DBAG Member Section This task can be performed by the technical user
administrator. Follow the path below to reach the Eurex Trader GUI and Eurex Admin GUI key upload
page.
DBAG Member Section-> Technical Connection-> Technical User Administration->
Eurex Exchange GUIs
The path above will take you to the Eurex Exchange GUI Keys page:
Public keys can be uploaded and registered either for a whole business unit where every trader uses
the same key or individually for every trader individually.
4.3.1
New Participant Key
Click on “New Participant Key” to upload a key which will be used by all traders of a given business
unit. Select the Member ID/Business unit, the desired market (Eurex), the environment
(production/simulation) and choose an expiration date.
Expired keys will be deleted at the expiry date. Expiry dates can be modified at any time prior to
expiry. Additionally an optional text description can be added.
21
Eurex Exchange’s T7
Eurex Frankfurt AG
Eurex Trader GUI & Eurex Admin GUI Installation Manual
Version 2.1.0
Then click on the “Upload Public Key” button. In the popup window select “Browse…” and navigate to
the public key file you have created previously.
Click on “Save” to close the popup window.
22
Eurex Exchange’s T7
Eurex Frankfurt AG
Eurex Trader GUI & Eurex Admin GUI Installation Manual
Version 2.1.0
Click on “Save” to complete the key upload. The screen will return to show a list of all already
uploaded keys.
Uploaded keys will be activated and ready to be used within one hour after the upload.
4.3.2
New Trader Key
Click on “New Trader Key” if you want to upload a key which is used by one individual trader. Select
the Member ID/Business unit, the desired market (Eurex), the environment (production/simulation) and
choose an expiration date.
Expired keys will be deleted at the expiry date. Expiry dates can be modified at any time. Additionally
an optional text description can be added.
Follow the procedure described in the previous chapter to select a local public key file and upload it.
23
Eurex Exchange’s T7
Eurex Frankfurt AG
Eurex Trader GUI & Eurex Admin GUI Installation Manual
Version 2.1.0
Click on “Save” to complete the key upload. The screen will return to show a list of all already
uploaded keys.
Uploaded keys will be activated and ready to be used within one hour after the upload.
24
Eurex Exchange’s T7
Eurex Frankfurt AG
Eurex Trader GUI & Eurex Admin GUI Installation Manual
Version 2.1.0
5.
Troubleshooting
Although the setup of the Eurex Admin GUI and/or Eurex Trader GUI is straight forwards and
relatively simple, the following chapters give some advise on troubleshooting in case connectivity
cannot established in the first place.
5.1
Three tiers of Eurex GUI communication
The whole process of downloading, starting and running the Eurex Trader and Eurex Admin GUI
consists of three tiers:
5.1.1
Tier I, Web browser -> landing page -> JNLP file
Any web browser can be used to navigate to the landing pages (Internet http://193.29.90.190 , leased
line http://193.29.93.173 ). The GUI links on the landing page lead to JNLP files. If the mime type is
set correctly to the javaws binary, a click on the link will launch Java Web Start. Proxy settings in the
web browser are only relevant for accessing the landing page.
5.1.2
Tier I, javaws -> Web Start, JAR File delivery
The JNLP files contain information about the JAR files Java Web Start needs to download. This
communication is still on port 80 to the same addresses used above. Proxy settings within the Java
control panel apply here.
25
Eurex Exchange’s T7
Eurex Frankfurt AG
Eurex Trader GUI & Eurex Admin GUI Installation Manual
Version 2.1.0
5.1.3
Tier III, Running GUI -> (crypto) proxies
The GUI will pick one of the (crypto) proxies listed in the JNLP file to open a communication channel
which is then used further on for communication from the running GUI to the Eurex exchange:
Leased line
Simulation: 193.29.89.224/28, 193.29.95.224/28
Production: 193.29.91.224/28, 193.29.93.224/28
Internet
Simulation: 193.29.90.224/27
Production: 193.29.90.192/27
5.2
Verify connectivity, Internet
Open a web browser and navigate to http://www.eurexchange.com/gui. The landing page for Internet
connectivity should be displayed. If not, verify that your browser can reach the Internet. Check local
proxy settings.
Clicking on any of the presented Eurex GUI links will trigger the Java Web Start process. If not, verify
the network settings of your Java plugin as described in chapter 2. If a local proxy server is present,
this should be configured in the Java plugin as in the web browser.
The Eurex Trader GUI or Eurex Admin GUI will start after the Java Web Start process has been
completed. In the login screen, open network settings and select Internet.
26
Eurex Exchange’s T7
Eurex Frankfurt AG
Eurex Trader GUI & Eurex Admin GUI Installation Manual
Version 2.1.0
nd
If present, specify a local proxy server on the 2 tab. If your proxy server requires authentication,
please specify username and password for your proxy authentication too.
rd
On the 3 tab point to your public and private SSH key, matching the previously uploaded public key.
Clicking on the login button connects the Eurex Trader GUI or Eurex Admin GUI with the exchange. If
not, verify the data entered in the network settings of the GUI.
27
Eurex Exchange’s T7
Eurex Frankfurt AG
Eurex Trader GUI & Eurex Admin GUI Installation Manual
Version 2.1.0
5.3
Verify connectivity, leased line
5.3.1
Simple checklist for simulation network configuration test via leased line
Please note: IP addresses below are for simulation only. See chapter 1.5 for production addresses.
1.) Find the correct member LAN to connect from: In the member portal, go to “Request &
Configuration”. Get an X-Con for ETI and/or GUI channel. Take note of the “MEMLAN IPnet”.
This is the network from which you should connect:
2.) Find the router assignment to back end half “A” and “B” in the same X-Con
3.) For initial testing put a computer into the assigned member LA.
4.) Add three static routes to this computer
route 193.29.89.224 255.255.255.240
-> pointing to router for BE half “A” (alternative
subnet naming 193.29.89.224/28)
route 193.29.95.224 255.255.255.240
-> pointing to router for BE half “B” (alternative
subnet naming 193.29.95.224/28)
route 193.29.93.173 255.255.255.255
-> pointing to either one of the routers or a virtual
HSRP address.
5.) Test basic connectivity using telnet on the test computer
telnet 193.29.93.173 80
-> you should get an open port on a webserver
telnet 193.29.89.225 80
-> you should get an open port
telnet 193.29.95.225 80
-> you should get an open port
(use port 8089 instead of port 80 to test trader GUI on a dedicated GUI channel)
6.) Verify with the GUI software (only if the telnet tests above were successful)
Open URL http://193.29.93.173 in a browser on the test computer
Click on the “Eurex Admin GUI” link.
-> Java Web Start will initiate, download the GUI and
start it.
Provide a trader ID (ending with “_GUI”) and a password. Make sure you enter letters in the
password as uppercase. Click on “Login”.
After a while reference data will be downloaded and the Welcome Screen of the Admin GUI
will open.
If all above works, add HSRP fail-over for 193.29.93.173 if desired. Add NAT’ing device between
Member LAN and trading floor network.
See chapter 1.4 for production environment IP addresses.
28
Eurex Exchange’s T7
Eurex Frankfurt AG
Eurex Trader GUI & Eurex Admin GUI Installation Manual
Version 2.1.0
5.3.2
Example simulation network setup, leased line
29
Eurex Exchange’s T7
Eurex Frankfurt AG
Eurex Trader GUI & Eurex Admin GUI Installation Manual
Version 2.1.0
5.3.3
Application test over leased line
Open a web browser and navigate to http://192.29.93.173. The landing page for leased line
connectivity should be displayed. If not, verify that routes to 193.29.93.173 are present in your local
network, pointing to your leased lines. Verify local proxy settings. If a local proxy is present and used
by the web browser for accessing the Internet, ensure that an exception for network 193.29.93.173
has been created as described in chapter 1.5.1.
Clicking on any of the presented Eurex GUI links will trigger the Java Web Start process. If not, verify
the network settings of your Java plugin as described in chapter 2. If a local proxy server is present,
this should be configured in the Java plugin as in the web browser. Verify that routes to 193.29.93.173
are present in your local network, pointing to your leased lines.
The Eurex Trader GUI or Eurex Admin GUI will start after the Java Web Start process completes. In
the login screen, open network settings and select leased line.
Clicking on the login button connects the Eurex Trader GUI or Eurex Admin GUI with the exchange. If
not, verify that routes to the proxy addresses listed in chapter 1.5 are present in your local network,
pointing to your leased lines. Note: you need to have routes set to both networks per environment if
you use two leased lines for redundancy.
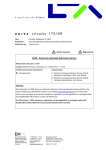
5.4
Bandwidth monitoring
Once connected to Eurex Exchange’s T7, the bandwidth monitor view in the Admin GUI allows online
monitoring of bandwidth usage and GUI latency for all users of within a business unit. Use the “Chart”
checkbox to create a real time diagram of bandwidth usage per GUI instance:
Furthermore every running GUI displays current bandwidth consumption in real time in the lower right
corner:
.
30
Eurex Exchange’s T7
Eurex Frankfurt AG
Eurex Trader GUI & Eurex Admin GUI Installation Manual
Version 2.1.0
5.5
General issues
Symptom
Possible causes
Measure
Eurex Trader GUI or Eurex
Admin GUI does not start via
desktop link.
Miscellaneous
•
Start the Eurex Trader GUI or Eurex
Admin GUI via the URLs described in
chapter 1.4 which is the recommended
procedure.
Java Web Start does not
start; instead a .jnlp file is
downloaded.
Java Web Start not
correctly installed
•
Verify Java Plugin version and
installation according to chapter 2. The
mime type of JNLP files should be
linked to the Java Web Start executable
(javaws) in your local JRE installation.
Java Web Start starts, but
immediately shows an error.
Eurex Trader GUI or Eurex
Admin GUI does not start.
Application can not
be downloaded or
saved
•
Ensure that you have write access to
the temporary cache location and the
disk is not full.
•
Ensure that the downloaded jar archive
was not changed by an internal virus
scanner.
•
Verify if the proxy settings of the Java
Plugin match your network setup as
described in chapter 2.
•
Ensure that no firewall is blocking the
traffic to the IP addresses listed in
chapter 1.4
•
Ensure that the master login matches
your trader id ending with “_GUI”.
•
The master login password will be
initially identical to your existing trader
account login. Upon first login to T7
every user is required to choose a new
password.
•
Follow the network test procedures
outlined in chapters 5.2 and/or 5.3
•
Verify local proxy setting
•
Verify no firewalls are blocking relevant
ports and all routes are set.
Java Web Start starts, but
the GUI JAR file is not
downloaded.
Access to the GUI
infrastructure at
Eurex Exchange
impossible
Eurex Trader GUI or Eurex
Admin GUI starts, but login is
denied with error message
„Wrong user or password” in
“Master Login” window.
Wrong credentials
for trader master
account
Admin GUI starts, but login is
denied with error message
„Connection error” in “Master
Login” window.
Basic network
connectivity
between client
computer and
Eurex exchange
servers failing
31
Eurex Exchange’s T7
Eurex Frankfurt AG
Eurex Trader GUI & Eurex Admin GUI Installation Manual
Version 2.1.0
5.6
Java tools
A local Java installation will contain a number of helpful tools for additional monitoring in case of
problems.
5.6.1
Java console
It is possible to monitor technical status messages of the GUI application by activating the Java
Console. Select “Show console” or “Hide console” in the “Advanced” tab of the Java Control Panel to
do this.
5.6.2
Monitoring and cleaning of the local Java Web Start application cache
Old and deprecated versions of the GUI software can be removed from the local cache using the Java
Application Cache Viewer.
Windows: go to the Control Panel (Start > Settings -> Control Panel) and double-click on the Java
icon. Select the "General" tab, then "Temporary Internet Files" and click on the "View..." button. This
will open the Java Application Cache Viewer.
Linux: go to the Preferences Menu (Preferences > Java). Select the "General" tab, then "Temporary
Internet files" and click on the "Settings..." button to open the Temporary File Settings dialog. Click on
"View Applications..." to open the Java Application Cache Viewer.
32
Eurex Exchange’s T7
Eurex Frankfurt AG
Eurex Trader GUI & Eurex Admin GUI Installation Manual
Version 2.1.0
5.7
Related Documents
Documents related to Eurex Exchange’s T7 are available on the Eurex website
http://www.eurexchange.com under the path:
Technology > T7 > System Documentation
The following documents may be of particular interest for user of the Eurex Trader GUI or the Eurex
Admin GUI:
Document
Description
Participant and User Maintenance
Manual
•
A document assisting service administrators
maintaining participant and user related data in Eurex
Exchange’s T7.
Eurex Trader GUI & Eurex Admin GUI
– Manual
•
A document providing a detailed description of the
new Eurex GUI solutions, the Eurex Trader GUI and
Eurex Admin GUI.
This document describes how to verify connectivity to
Eurex classic from the T7 Trader GUI and gives
advice on how to establish this connection should it
not be there.
Eurex OTC trade entry
Network Access to Eurex Exchange’s
T7
•
A document providing details on the network access
options for the new interfaces of Eurex Exchange and
Eurex Clearing. It includes detailed technical
background information, such as router equipment
information and port numbers for the configuration of
firewalls.
User Manual – Request and
Configuration
•
A document providing help for the use of the tools
available in the Member Section of Deutsche Börse
Group. Please note, this document is available in the
Member Section.
5.8
Contacts
For any questions you may have about GUI setup process please contact your Technical Account
Manager using your VIP number or e-mail [email protected].
For questions regarding the Member Section please contact the Member Section Team Tel: +49-69211-1 78 88 or e-mail [email protected].
33
Eurex Exchange’s T7
Eurex Frankfurt AG
Eurex Trader GUI & Eurex Admin GUI Installation Manual
Version 2.1.0
6.
Change log
The change log serves as a record of the latest major changes.
No
Date
Chapter
Change
1.0
26 July 2012
-
Creation of document
1.0.1
23 August 2012
1.4
The port to access to the Eurex Admin GUI via leased line
has changed from port 80 to 8089.
3.3.2
Correction of the trader key from private to public.
1.1
Landingpage URL
1.4
Landingpage URL
1.4.1
PAC Example
3.2
PuTTYgen procedure
4.1
GUI Screenshots
4.2.1
New checklist for leased line connectivity
4.2.2
New network overview
1.4
Modified IP-subnet for access via Internet in simulation.
4.2
Added note about the simulation vs. production addresses
in the examples.
1.1.0
1.1.1
29 October 2012
5 November 2012
1.1.2
29 November 2012
3.0, 3.2
SSH passphrase mandatory for production and simulation
environments
1.2
6 May 2013
1.4, 3,
4.1, 5
Proxy server details added, chapter 3 “Local files” added,
screenshots updated, rewrote troubleshooting chapter
1.3
19 July 2013
All
Updated text and screenshots to reflect Eurex Exchange’s
T7 release 1.1
2.0
12 August 2013
1.4
Update for T7 release 2.0. Java 1.7 optional.
2.0.1
12 September 2013
1.4
Added latest Java RT 1.7.0_40 as recommended.
2.0.2
11 November 2013
1.4
Java 1.7.0_45 as recommended, 1.6.0 end-of-life, known
issues with 1.7.0_25
2.1.0
19 March 2014
All
Updated for T7 release 2.1 (in particular 1.2, 1.3 and 1,4)
34