1
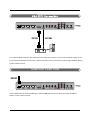
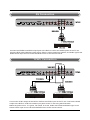
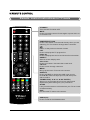
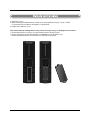
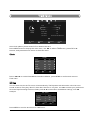
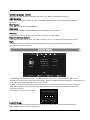
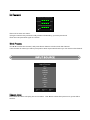
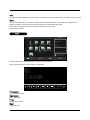
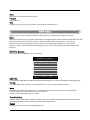
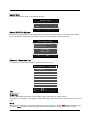
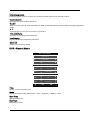
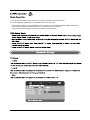
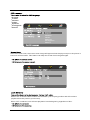
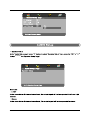
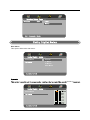
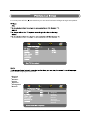
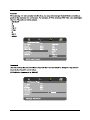
LCDV2656HD
LCDV3256HD
LCD Digital TV
1
PREFACE
3
2
SAFETY
PRECAUTIONS
3
3
IN THE CARTON
5
4
FRONT BACK
CONNECTIONS
OF LCD
6
5
6
7
BASIC
INSTALLATION
INSTALL A TION
REMOTE CONTROL
MENU
OPERATION
Power Cord Connection
7
Antennas Connection
7
VGA( PC) Connection
8
USB PORT FUNCTION
8
HDMI Connection
9
COAX Connection
9
AV Connection
10
YPbPr Connection
10
Remote control instructions in TV mode
11
Remote control instructions in DTV/USB mode
12
Remote control instructions in TELETEXT mode
13
Remote control instructions in DVD mode
14
Remote control setup
15
INSTALLATION GUIDE
16
CHANNEL MENU
16
PICTURE MENU
19
SOUND MENU
21
TIME MENU
22
OPTION MENU
23
LOCK MENU
24
INPUT SOURCE
25
EPG and Channel List MENU
26
Multimedia(USB) MENU
27
DVR MENU
33
1
8
DVD OPERATION
General Setup
39
Audio Setup
41
Dolby Digital Setup
42
Preference Setup
43
9
TROUBLESHOOTING
AND ADVICE
47
10
SPECIFICATIONS
48
2
1
1.. PREFACE
Thank you for Choosing this TEAC product. Before operating the TV, please read and follow all
instructions and heed all warning.
Please keep these instructions for future reference.
Please note the diagrams in this manual are for reference only, your unit may differ slightly.
2.
2 . SAFETY PRECAUTIONS
Put the TV on a stable surface.
Do not place any material on the TV.
Minimum distances
10cm
10cm
20cm
5cm
Do not use the TV with fixtures other than those provided or
suggested by the manufacturer.
Do not block or cover the ventilation openings on the TV.
Power cord and cables must be properly routed and protected to prevent
people from stepping on them and causing the TV to fall.
3
Keep the TV dry and away from humidity.
Do not subject the TV to dripping liquids or moist environments.
Do not place any vessels containing liquids on or near the TV such as
vases,cups, etc.
Keep the TV away from heat sources.
Unplug the TV before cleaning it. Do not use solvent or liquid to clean
the TV.
Only clean the TV with a soft and dry cloth.
If the following problems occur,turn off the TV set and unplug the AC power
cord immediately:
- AC power cord is damaged.
- Poor fitting AC power outlet.
- TV set is damaged by being dropped, hit or having something thrown at it.
- Any liquid or solid object has fallen through the openings in the cabinet.
NEVER attempt to repair the unit yourself. Contact your dealer or the
TEAC Customer Care Centre (see back page for details) to have your
unit checked and repaired by approved service personnel.
Unplug the TV during lightning storms or when unused for long periods
of time.
4
3 . IN THE CARTON
Please make sure the following items are included in your package.
If any items are missing,please contact your dealer.
R.LIS T
T.LIST
Remote Control
LCD TV SET
1.5V
1.5V
Power Cable
2 x AAA Battery
User Manual
Quick Start Guide
User Manual
Quick Start Guide
5
4.
4 . FRONT , BACK , CONNECTIONS OF LCD
Front View
1. Press“ VOL+/VOL-”to increase or decrease the sound level.
2. Press“ CH+/CH-”to scan through channels.
3. Press “MENU”to bring up the main menu on the screen.
4. Press“INPUT”to select the input source.
5. Press“POWER” button to turn the TV on or off.
6. Insert the DVD with the label toward the device’s back panel into the DVD slot on the right side of
you TV set. Only push the DVD slightly until the unit feeds it automatically.
PLAY/PAUSE in DVD mode.
8.
OPEN/CLOSE in DVD mode.
9.
STOP in DVD mode.
VOL+
7
10. POWER INDICATOR: show red in
standby mode, show green or blue
when your TV is switched on.
DVD( LABEL SIDE)
7.
1
VOL+
8
CH+
9
2
CH-
MENU
INPUT
11. REMOTE SENSOR: infrared
POWER
sensor for the remote control.
11
3
4
5
10
6
Back View and Control Connections
1. POWER: Power on/off the TV set.
2. AC IN: Main power input.
3 USB PORT: Connect to the External drive.
4. HDMI1/HDMI2/HDMI3: Connect to the HDMI output jack
of DVD.
5. VGA(PC): Connect to the PC-RGB output jack of PC.
6. PC AUDIO : Connect the Audio output jack of PC.
7. YPbPr1/YPbPr2: Connect the YPbPr output jack of DVD
or VCR.
8. COAX: Connect the SPDIF receiver.
9. VIDEO/Audio(L/R): Connect to the Video/Audio output jack
of DVD or VCR.
On
10. RF IN: Connect the antenna.
Off
11. PHONE: Connect the headphone.
POWER ( LCDV2656HD))
7
1
POWER
AC IN
USB
1
2
3
HDMI1
HDMI2
4
HDMI3
VGA ( PC )
PC
AUDIO
5
6
( LCDV3256HD)
6
Y1
Pb1
7
Pr1
COAX
8
Y2
Pb2
Pr2
VIDEO
L
R
9
RF IN
PHONE
10
11
5. BASIC INSTALLATION
INSTALL A TION
Power Cord Connection
On
Off
LCDV3256HD
On
Off
LCDV2656HD
- Connect the power cord correctly as shown.
- Press the POWER switch of your LCD TV to switch on the LCD TV.
The power indicator on the front panel lights up in red.
Antennas Connection
VHF
ANTENNA
UHF
ANTENNA
OUTDOOR
ANTENNA
AMPLIFIER
INDOOR
ANTENNA
AMPLIFIER
RF IN
75 OHM
ANTENNA
PLUG
POWER PLUG OF
ANTENNA
AMPLIFIER
To ensure good picture and sound, TV antenna system needs to be installed. The antenna system as
Shown can be sourced from TV equipment shops, which will provide service for correct installation
and connection. After installation, insert the 75-ohm antenna plug into the antenna jack as shown.
7
Y2
Pb2
Pr2
TV Back
USB
HDMI1
HDMI2
HDMI3
VGA ( PC )
PC
AUDIO
VGA Cable
Y1
Pb1
Pr1
COAX
VIDEO
L
R
RF IN
PHONE
Audio Cable
RGB-PC OUTPUT AUDIO
Connect the RGB output of the VGA to the PC IN jack on the set. Connect the AUDIO output of the
PC to the PC AUDIO jack on the set . Select the VGA (or PC) input source with using SOURCE button
on the remote control.
USB PORT FUNCTION
USB PORT
Y2
Pb2
Pr2
TV Back
USB
HDMI1
HDMI2
HDMI3
VGA ( PC )
PC
AUDIO
Y1
Pb1
Pr1
COAX
VIDEO
L
R
RF IN
PHONE
Put the USB flash drive to the USB port, Select USB channel source with using the SOURCE
button on the remote control.
8
HDMI Connection
Y2
Pb2
Pr2
TV Back
USB
HDMI1
HDMI Cable
HDMI2
HDMI3
VGA ( PC )
HDMI Cable
HDMI OUT
PC
AUDIO
Y1
Pb1
DVD or VCR
COAX
L
VIDEO
R
RF IN
PHONE
HDMI Cable
HDMI OUT
DVD or VCR Back
Pr1
HDMI OUT
DVD or VCR Back
DVD or VCR Back
DVD or VCR
DVD or VCR
HDMI connection allows the user to transfer all audio/video/control signals through one
cable only. These signals are transferred in digital.
COAX Connection
Pb2
Y2
Pr2
TV Back
USB
HDMI1
HDMI2
HDMI3
VGA ( PC )
PC
AUDIO
Pb1
Y1
Pr1
COAX
VIDEO
L
R
RF IN
PHONE
Coax Cable
SPDIF INPUT
Audio Amplifier Back
Audio Amplifier
Connect to Audio Amplifier device to the COAX output jack on the TV.
9
AV Connection
Pb2
Y2
Pr2
TV Back
USB
HDMI1
VGA ( PC )
HDMI3
HDMI2
PC
AUDIO
Y1
Pb1
Pr1
COAX
VIDEO
L
R
RF IN
PHONE
Video cable
DVD or VCR back
DVD or VCR
Connect the VIDEO and AUDIO output jack of the DVD or VCR to the VIDEO jacks on the TV set
using the RCA cable. Match the jack colors: Video is yellow, Audio left is white, and Audio right is red.
Select the AV input source via the SOURCE button on the remote control.
YPbPr Connection
YPbPr Cable
Pb2
Y2
Pr2
TV Back
USB
HDMI1
VGA ( PC )
HDMI3
HDMI2
PC
AUDIO
Y1
Pb1
Pr1
CO A X
VIDEO
L
R
RF IN
PHONE
YPbPr Cable
Auido Cable
Y
Pb Pr
L
R
Y
DVD or VCR Back
DVD or VCR
Pb Pr
L
R
DVD or VCR Back
DVD or VCR
Connect the YPbPr output of the DVD or VCR to the YPbPr input on the TV set. Connect the Audio
output of the DVD or VCR to the Audio input jacks on the TV set using the RCA cable.
Match the jacks colors : Y is green, Pb is blue, Pr is red, Audio left is white and Audio right is red.
Select YPbPr input source via the SOURCE button on the remote control.
10
6.REMOTE
6 . REMOTE CONTROL
Remote control instructions in TV mode
MUTE
STANDBY
STANDBY
Turn the LCD TV ON or OFF.
MUTE
Press to mute the sound. Press again or press VOL+ to
un-mute the TV.
NUMBER BUTTONS
Press 0-9 to select a TV channel directly when you are
watching TV. The channel change after 2 seconds.
10
PROGRAM
+10
LIST
DISPLAY
INFO
ASPECT
ZOOM
MENU
EXIT
OK
ENTER
SLEEP
D.SETUP
TTX
REPEAT
SOURCE
D.MENU
TITLE
R.LIST
T.LIST
D.DISPLAY
INDEX
HOLD
A-B
GOTO
I/II
REVEAL
SIZE
SUBTITLE
EPG
FAV
AUDIO
REC
SUBPAGE TV / RADIO
Return to the previous channel viewed.
LIST
Press to display the TV program list.
DISPLAY
Press to display the source and channel's information.
ASPECT
Selects screen display ratio.
VOL+/VOLPress to increase / decrease the sound level.
CH+/CHPress to scan through channels.
MENU
Brings up the main TV menu to the screen.
SOURCE
Press SOURCE to display the OSD input source,
Press▲▼to select an input spurce,and then press
OK to confirm.
THUMBSTICK( ▲/ ▼/◄ / ►/ OK ENTER )
Allows you to navigate the on-screen menus and
adjust the system settings to your preference.
SLEEP
Lets you select amount of time before your TV turn itself
off automatically.
EXIT
Exit the main TV menu to the screen.
AUDIO(I/II)
Press to search the NICAM modes.
11
Remote control instructions in DTV / USB mode
NUMBER BUTTONS
Press 0-9 to select a channel.
MUTE
STANDBY
INFO
Press to display the source and channel's information.
CH+/CHWhen watching a channel, changes the channel.
10
PROGRAM
+10
LIST
DISPLAY
INFO
ASPECT
ZOOM
MENU
EXIT
OK
ENTER
SLEEP
D.SETUP
TTX
REPEAT
SOURCE
D.MENU
TITLE
R.LIST
T.LIST
D.DISPLAY
INDEX
HOLD
A-B
GOTO
I/II
REVEAL
SIZE
SUBTITLE
EPG
FAV
AUDIO
REC
SUBPAGE TV / RADIO
COLOR BUTTONS
Color buttons (respectively red, green, yellow and blue)
used in a few sub-menus.
T.LIST
Press to display the Record Timer Schedule List.
R.LIST
Display the recorded file list.
SUBTITLE
To display subtitle in DTV mode.
FAV
Favorite program list.
REC
Press to record the TV program in DTV mode .
EPG
Launches the EPG(Electronic Program Guide)in DTV
mode.
AUDIO
To display audio menu.
TV/RADIO
When watching a channel,allows you switch between
TV and Radio modes.
( Timeshift)
Play or pause.
Press to enter Timeshift, the image paused and it start
record from the paused position.
Stop playing or stop recording.
Fast reverse and Fast forward.
Previous / next chapter in USB mode,or play the Previous
/next scene of the recorded programs, jump by 30 seconds.
REPEAT
Press to select the repeat mode in USB mode.
12
Remote control instructions in TELETEXT mode
MUTE
STANDBY
NUMBER BUTTONS
Press 0-9 to select a teletext page.
10
PROGRAM
+10
LIST
DISPLAY
INFO
CH+/CHPage up and Page down.
ASPECT
ZOOM
MENU
EXIT
OK
ENTER
TTX
Press to switch between TV and Teletext mode.
SLEEP
D.SETUP
TTX
REPEAT
SOURCE
D.MENU
TITLE
R.LIST
T.LIST
D.DISPLAY
INDEX
HOLD
A-B
GOTO
I/II
REVEAL
SIZE
SUBTITLE
EPG
FAV
AUDIO
REC
SUBPAGE TV / RADIO
COLOR BUTTONS
Select 4 Preferred TELETEXT page.
SUBTITLE
To display subtitle.
HOLD
Freeze the current page.
SIZE
Change the picture size.
REVEAL
Reveal or hide the hidden words.
INDEX
Request index page when index link is valid.
SUBPAGE
TELETEXT Subpage.
13
Remote control instructions in DVD mode
Note: Please ensure that the TV you have bought with DVD loader, otherwise, all these parts
with no effect.
NUMBER BUTTONS
Numerical buttons for various data.
MUTE
STANDBY
PROGRAM
Program a disc playing in a desired sequence.
ZOOM
In play state, press ZOOM, the player will zoom
in the picture one time.
THUMBSTICK( ▲/ ▼/◄ / ►/ OK ENTER )
Allows you to navigate the on-screen menus and
adjust the system settings to your preference.
10
PROGRAM
+10
LIST
DISPLAY
INFO
ASPECT
Press to display the DVD information of DVD mode.
ZOOM
MENU
EXIT
OK
ENTER
SLEEP
D.SETUP
TTX
REPEAT
SOURCE
D.MENU
TITLE
R.LIST
T.LIST
D.DISPLAY
INDEX
HOLD
A-B
GOTO
I/II
REVEAL
SIZE
SUBTITLE
EPG
FAV
AUDIO
To eject the disc.
A-B
This button enables you to repeat a selected section
from the disc.
GOTO
It is possible to get access to any point on the directly
using the "GOTO" menu.
Press GOTO to access the "GOTO" menu.
AUDIO(I/II)
AUDIO selection buttons in DVD mode.
REPEAT
Press REPEAT to cycle through the repeat play options.
DVD STOP
REC
SUBPAGE TV / RADIO
D.SETUP
Used for selecting programs. It may also be used to
execute commands.
D.MENU
DVD disc menu Access to menu.
D.DISPLAY
SUBTITLE
Select a different subtitle language(the DVD disc must have
the subtitle you selected.
PLAY/PAUSE in DVD mode.
Fast backward and forward key.
Jump to previous and next track.
14
Remote control setup
1. Open the cover.
2. When inserting the AAA batteries, make sure correct polarities as per”+“and ”-“marks
.
on the batteries and within the battery compartment
3. Replace the battery cover.
To prevent battery leakage which may result in bodily injury or damage to the remote:
1. Install all batteries correctly, and as marked on the remote control.
2. Do not mix batteries:(OLD and NEW or CARBON and ALKALINE, etc)
Remove batteries when the remote is not used for a long time.
15
7 . MENU OPERATION
In ATV/DTV mode press the MENU button to enter the main menu. A window will appear, use ◄►
to scroll through the following menu headings: CHANNEL, PICTURE, SOUND, TIME, OPTION
and LOCK. Press ▼ or OK to enter the sub menus under the headings listed above.
While in MENU mode, press the MENU button to return to the previous menu window, or press
EXIT to exit menu mode completely.
INSTALLATION GUIDE
Installation Guide
Please do some selects,Then
Press OK button to begin auto tuning.
OSD Lauguage
English
Country
Australia
Tune Type
ATV+DTV
Move
OK
Select
EXIT
Quit
When powering up for the first time or after Factory Reset, the Installation Guide will appear on
screen.
Press▲▼◄► to set the OSD language/Country/Tune Type and press OK to begin auto tuning.
CHANNEL Menu
ATV Manual Tuning
Program Edit
Auto Scan
Signal information
DTV Manual Tuning
Record Start
Record ed List
ATV Manual Tuning
CHANNEL
Move
CHANNEL
Program Edit
MENU
Record ed Mode
Signal information
Schedule List
Record Start
D VR File System
Back
OK
Select
EXIT
Quit
Move
MENU
Back
OK
Select
EXIT
Quit
Press MENU button to display the main menu, use ◄► to select CHANNEL menu , press OK or ▼
to enter , and press menu to return to the main menu .
Note
CHANNEL can be only selected under ATV/DTV mode. The CHANNEL menu is disabled
while in all other input modes.
Auto Scan
Auto Scan
Country
Australia
Tune Type
Move
ATV+DTV
OK
OK
16
EXIT
Exit
Auto Scan
In the Auto Scan menu there are 2 options for you select from, Country and Tune Type.
Press ◄/► to select Country and Tune Type, press OK to start scanning. If you select ATV+DTV,
the first 50% of the processing is for ATV tuning, while the second 50% represents DTV tuning.
When ATV tuning, you can press MENU to skip ATV tuning and start DTV tuning, or press EXIT to
exit tuning.
Channel Tuning
TV
:
0
Programme(s)
DTV
:
0
Programme(s)
Radio
:
0
Programme(s)
.
474 00 MHz (TV)
9%
MENU
Skip
EXIT
Quit
DTV manual tuning
You can manually tune DTV channels in the CHANNEL menu.
Press the ◄► buttons to select the channel you wish to tune, then press ENTER button to scan for
the channel.
DTV Manual Tuning
UHF CH 27
Press OK to search
Bad
Normal
MENU
Back
Good
EXIT
Quit
ATV manual tuning
You can manually tune ATV channels in the CHANNEL menu.
ATV Manual Tuning
◄
Storage To 1
►
◄
◄
System DK
Current CH 1
►
►
◄
Search
►
Fine - Tune
►
◄
Frequency 511.31 Mhz
Move
Save
17
EXIT
Quit
Storage to
press the ◄► buttons to change the numbered location of the found channel.
System
Select the system using the ◄► buttons.
Current CH
Displays the current channel number, press the ◄► buttons to choose the channel you wish to modify.
Search
Press the ◄► buttons to scan through the frequencies to find new channels.
Fine tune
In case of bad reception, you can press the ◄► buttons to make fine adjustments to the tuning.
After manual tuning is complete, please press the RED key to save any found channels.
Program Edit
Program Edit
CH . NAME
SKIP
LOCK
FAV
2 ABC TV Meihour
DTV
20 ABC HDTV
Move
Type
DTV
702 BBC Radio 2
Radio
703 BBC Radio 3
Radio
704 BBC Radio 4
Radio
714 heat
Radio
1 C-26
ATV
2 C-44
ATV
3 C-56
ATV
OK
Select
MENU
Back
Delete
Move
Skip
Rename
FAV
FAV
Use ▲▼ to navigate through the Program Edit window.
DELETE
Press the RED button to delete the highlighted channel, a red circle will appear next to the channel
name.
Press the RED key again to confirm delete.
Press MENU to return to the main menu.
MOVE
Press ▲▼ to select the channel , press yellow button to enter the move mode, then press ▲/▼
to move the channel location, press yellow button again or press OK to confirm.
Press MENU to return to the main menu.
SKIP
Press ▲ ▼ to select the channel you wish to skip.
Press the BLUE button, a logo will appear next to the channel name and the channel will be skipped
when you scroll through the channels.
Press the BLUE button again on the highlighted channel to disable the skip function.
Press MENU to return to the main menu.
18
Rename(Only available in ATV)
Modify current channel name, only used in ATV mode.
Press green button to enter RENAME mode, then use the ◄►▲▼ change name.
Press green button again or press menu button to confirm.
FAV
Set your favorite channel by pressing the ▲ ▼ buttons to highlight the channel, then press the
FAV button.
A logo will appear next to the channel name. When you are viewing you can press the FAV button
to see a list of your favorite channels.
Signal Information
Only available in DTV mode, Signal Information includes:channel /network /modulation/quality
/strength.
DVR MENU
Enter DVR menu.(See page 33 for more details)
PICTURE Menu
Red
50
50
Green
50
Brightness
50
Blue
Color
50
Aspect Ratio
Picture Mode
Standard
Contrast
PICTURE
Move
MENU
Sharpness
50
Tint
50
Noise Reduction
Screen
Red
Over Scan
OK
Select
EXIT
Quit
Move
Middle
3D Display
PICTURE
Color Temperature
Back
50
16 : 9
MENU
Back
Off
Video
OK
Select
EXIT
Quit
Press MENU button to display the main menu, use ◄► to select PICTURE menu , press OK or ▼
to enter , and press menu to return to the main menu .
Picture Mode
Standard
Picture Mode
Adjust
MENU
Back
EXIT
Quit
Press ◄► to select the picture mode,press MENU to return to the main menu.
You can select from the following preset modes - Dynamic, Standard or Mild.
Only User mode allows the adjustment of Contrast, Brightness, Colour and Sharpness, Tint is only
available to adjust for NTSC.
Contrast / Brightness / Color / Sharpness/Tint
Contrast
Adjust
50
MENU
Back
EXIT
Quit
In User mode, select from Contrast/Brightness/Colour/Sharpness using ▲▼ and press ◄► to
make adjustments.
19
Color Temperature
Medium
Color Temperature
Adjust
MENU
Back
EXIT
Quit
You can select from the following preset modes Cool, Medium or Warm. Only User mode allows
adjustment of Red, Green and Blue values.
Red/Green/Blue
In User mode press ▲▼ to select Red/Green or Blue, then press ◄► to adjust.
Press MENU to return to the main menu.
Aspect Ratio
Press ▲▼ to highlight Aspect Ratio and OK to enter. A window will appear at the bottom of the screen,
press ◄► to scroll through the following options to get the best fit picture on your screen - 16:9,
ZOOM 1, ZOOM 2, Pan Scan, Panorama, Auto, 4:3.
Noise Reduction
Press ▲▼ to highlight Aspect Ratio and OK to enter.
Use ◄►to select from noise reduction modes as follows: Off, Low, Middle, High.
Note
Noise Reduction is not available in PC mode.
3D Display
In order to play 3D programme, this switch can convert 3D signal to 2D signal, and indicate in our
tv sets.
Screen( Only available in PC mode).
Screen
Auto Adjust
Horizontal Pos.
50
Vertical Pos.
50
Size
50
Phase
30
Move
MENU
Back
EXIT
Quit
Auto Adjust
Select “Auto Adjust”and press ► , the unit will automatically adjust all items.
.
Horizontal Pos
Pos.
Allows you to use ◄► buttons to adjust the Horizontal Position.
.
Vertical Pos
Pos.
Allows you to use ◄► buttons to adjust the Vertical Position.
Size
Allows you to adjust the width of image.
20
Phase
Allows you to adjust the definition.
OVER SCAN
under HDMI SOURCE, user can select the HDMI input signal mode: PC/VIDEO, select PC mode
used for PC input, other signal source input please select VIDEO mode;
SOUND Menu
Sound Mo de
SOUND
Standard
Treble
50
Bass
50
Balance
0
Auto Volume
Off
Surround Sound
Off
SPDIF MO DE
Move
MENU
Back
OK
Auto
Select
EXIT
Quit
Press MENU button to display the main menu, use ◄► to select SOUND menu , press OK or ▼
to enter , and press menu to return to the main menu .
Sound mode
Music
Sound Mode
Adjust
MENU
Back
EXIT
Quit
Press ◄► to select from the following sound modes: User, Standard, Music, Movie and Sports.
Press MENU or OK to confirm.
Treble/ Bass /Balance
Use ▲/▼ to select the Treble /Bass /Balance, and press ◄► to adjust.
Treble and Bass are only adjustable in User mode.
Auto Volume
Auto sound adjust, press ◄► to set ON/OFF.
Surround sound
Surround sound settings, press ◄► to set ON/OFF.
SPDIF MODE
Press OK to enter the sub menu, use ▲▼ to select Off/PCM/Auto, press MENU or OK to confirm.
21
TIME Menu
I
31/May 14:25
Clock
I
I
I
I
I
I
I
I
I
I
I
TIME
Move
MENU
Off Time
Off
On Time
Off
Sleep Timer
Off
Auto Sleep
On
Time Zone
South Australia GMT+9.5
Back
Select
OK
EXIT
Quit
Auto clock update: please select DTV to obtains the time.
Press MENU button to display the main menu, use ◄► to select TIME menu , press OK or ▼
to enter , and press menu to return to the main menu .
Clock
Date
Month
Clock
◄
◄
Year
◄
◄
◄
Hour
Minute
Move
MENU
Back
20
►
May
►
2010
►
►
►
13
25
EXIT
Quit
Press ◄►▲▼ to set the Date/Month/Year/Hour/Minute, press MENU to confirm and return to
Time menu.
Off time
You can set a time for the TV to turn off automatically. The Repeat mode allows the unit to be set to
turned off Once, Every day, Mon-Fri, Mon-Sat, Sat-Sun or only Sun, use ◄► to select your preference.
Once the Repeat setting has been made, press ▲▼ to select Hour and Minute settings, use ◄►
to adjust.
Off Time
Once
Repeat
Hour
13
Minute
28
Move
MENU
Back
Press MENU to confirm and return to TIME menu.
22
EXIT
Quit
On time
You can specify a time, input source, channel and volume for the TV to turn on.
Press ▲▼ to select Repeat mode and use ◄► to select your preference as above.
Use ▲▼ to select the other parameters and ◄► to adjust.
On Time
Repeat
◄
Once
►
Hour
◄
12
►
Minute
◄
◄
◄
◄
00
►
►
►
►
Source
Channel
Volume
Move
MENU
Back
DTV
1
30
EXIT
Quit
Press MENU to confirm and return to TIME menu.
Sleep time
Press OK to enter Sleep Time sub menu, use ▲▼ to set the sleep time. You can select from the
following Sleep times: 10, 20, 30, 60, 90, 120, 180, 240 minutes or Off to disable the Sleep time
function. Then press OK or MENU to confirm..
Auto Sleep
Press ◄►to select ON/OFF..
This function allows you to set your TV to automatically turn off after 10 minutes if the TV detects
no signal from the inputs.
Time zone
Press OK to enter Time Zone sub menu, use ▲▼ to set time zone for your local area. Press OK or MENU
to confirm.
OPTION Menu
Audio Languages
OPTION
MENU
1st
English
2nd
English
OSD Language
English
Subtitle Languages
Audio Languages 1st
English
OSD Duration
40s
Audio Languages 2nd
English
Blue Screen
On
Subtitle Languages 1st
English
Subtitle Languages 2nd
English
Back
OK
Select
50
Back Light
OPTION
Australia
Country
40S
OSD Duration
Move
English
2nd
Subtitle Languages
Restore Factory Default
EXIT
Quit
Move
MENU
Back
OK
Select
EXIT
Quit
Press MENU to display main menu, use ◄►to select OPTION menu, then press OK or ▼ to
enter, press MENU to return to main menu.
OSD Language
Press OK to enter OSD Language sub menu, use ▲▼ to set OSD language.
Audio Language 1St/2nd
Press OK to enter Audio Language sub menu, use ▲▼ to set Audio language.
23
Subtitle Language 1st/2nd
Press OK to enter Subtitle Language sub menu, use ▲▼ to set Subtitle language.
OSD Duration
Press OK to enter OSD Duration sub menu, use ▲▼ to select the amount of time the OSD will remain on
the screen.
Blue Screen
Press ◄► to set the Blue Screen ON/OFF.
Back Light
Press OK and use ◄► to adjust the Back Light, press Menu or OK to confirm.
Country
Displays your country as set in the Installation Guide, not adjustable.
Restore factory default
Press OK to enter second menu, use ▲▼ to select “yes” or “no”,and press OK again to confirm.
Note
Use Restore Factory Reset function with caution as it will erase all channels and return
your settings to factory default.
LOCK Menu
Lock Channel
Off
Set Password
Block Program
Program Guide
LOCK
Move
MENU
Back
OK
No Block
Select
EXIT
Quit
Press MENU to display main menu, use ◄►to select LOCK menu, then press OK or ▼ to enter.
A password is required to enter the Lock settings. Enter the default password '0000' to unlock the menu.
Press ◄ to quite password and return to main menu.
Press ► to clear any incorrectly entered numbers. The correct numbers will need to be entered to
enter the LOCK sub menu. The message 'Wrong Password' will be displayed if the numbers are
entered incorrectly.
Press Menu to return to Lock menu.
Please enter password
Cancel
Clear
Lock Channel
This setting enables a password lock for the Program Edit function under the Channel menu.
Press ◄► or OK to turn the lock On or Off.
24
Set Password
Please enter old password
Please enter new password
Confirm new password
Cancel
Clear
Press OK to enter sub menu.
Using the numeric keys enter the old password followed by your new password.
Enter the new password again to confirm.
Block Program
Use ▲▼ to select the channel, and press Green buttom to lock/unlock the channel.
If the channel is locked you will be prompted to enter a password before you can access the channel.
INPUT SOURCE
Input Source
DTV
ATV
YPBPR1
YPBPR2
DVD
PC
HDMI1
HDMI2
HDMI3
AV
USB
Move
OK
Select
EXIT
Quit
Change input
Press source button to display the source menu . Use ▲▼ to select the input source, press OK to
confirm.
25
EPG and Channel List Menu
Program Guide
Use ◄► to select
between TIME and
CHANNEL modes
TIME
31 May 2010 13:00-18:00
31 May 13:36
700 BBC Radio 1 Edith Bowman
The best rock thranks including the 3
form 1S.
702 BBC Radio 2 Steve Wright in the Afternoon
This is a list of
programs that
are scheduled to
be shown by the
broadcaster.
TIME --
Detailed information
for the highlighted
program.
703 BBC Radio 3 Afternoon on 3
704 BBC Radio 4 Afternoon Play: JACK's Love
721 heat
Uptemp party Pop
1/1
Move
OK
Select
EXIT
Quit
Ind ex
Index
RECORD
Record
Remind
Schedule
Move
Use ▲▼ to select programme.
EXIT
exit EPG.
OK
View the highlighted programme.
Index
switch to type option.
Record
Press REC button to enter a window to book a recording, see page 35 for details.
Schedule
Press YELLOW key to show a list of scheduled recordings.
Remind
Press GREEN button to enter a sub window to book a reminder.
You can select the channel, repeat mode, minute and hour, date and month using the ◄► ▲▼
buttons.
When a reminder has been set and the time arrives, a window will appear on the display and the
channel will change after 10 seconds.
You can also intercept and confirm the change by pressing ◄.
Reminder Setting
◄-
2 ABC TV Melbourne
◄
◄
◄
◄
◄
Mode
Minute
Hour
Date
Month
Move
MENU
12
00
DTV
Back
Favourite List
Press FAV button to display the Favorite Channel List.
26
1
30
EXIT
+►
►
►
►
►
►
Quit
Channel List
Press LIST button to display a list of tuned channels.
The status of the channels (Skip/Lock/Favourite) will also be displayed, see below.
Channel List
5 Five
DTV
6 abc1
DTV
7 abc2
DTV
8 abc3
DTV
9 abc5
DTV
1 C-01
ATV
2 2C-01
ATV
3 3S-02
ATV
4 4S-03
ATV
Move
OK
Select
EXIT
Quit
Multimedia(USB) Menu
Multimedia main menu style:
PHOTO
MUSIC
MOVIES
TEXT
Discs
Disc:C
Multimedia
PHOTO
USB Status
2.0
Move
MENU
Menu
OK
Select
Inserted USB
device info
Operation
USB Status
If a compatible USB is attached the logo will appear blue. If not USB is attached the logo will be grey.
Multimedia style
Choose from the menu across the top of the screen which file type you would like to play: Photo,
Music, Movie or Text.
DISC (HDD)
Shows the inserted HDD Discs. Each disc is assigned a letter from C onwards.
27
Inserted USB device info
Displays USB version of the device that is attached, for example if a USB 2.0 device is attached,
2.0 will be displayed. When no device is attached it will display 'No Device'.
Disc
Show the current disc.
Operation guide
Operational buttons on the remote ◄►▲▼, Menu and OK.
Multimedia main board keypress instruction:
The follows only list MM page and other relavant function, Menu, sleep and other systerm
function is not included.
◄ /►
Move Focus to left/right, it can circle move.
▲/▼
Turn up/down.
OK/Enter
Enter submenu.
PHOTO
Multimedia PHOTO’s submenu layout:
1/2
C:\
Page
Disc
File folders in disc,
press ok to enter
Picture overview
Return
UP.png
200*200
1.bmp
1
Preview
2
Resolution
Size
Date
Time
2.bmp
1024x768
200KBytes
----/--/---/--/--
Picture
information
Delete Current Filt
Add/Remove all
OK
Full Screen
Move
MENU
Menu
Add/remove to playlist
EXIT
Quit
Page
Indicates the total number of pages containing files. example as per picture - '1/2' represents page
1 of 2.
Picture list
U se ◄► ▲▼ to scroll through the picture list. Press OK to select the picture, a tick will appear on the file.
Press PLAY to view picture in full screen.
Preview window
Displays a preview of the highlighted picture in the Picture list.
28
Slide Show
When in Picture List mode you can select multiple pictures to be viewed as part of a Slide Show.
Use ◄► ▲▼ to scroll through the list, press OK when the desired pictures are highlighted.
If you wish to highlight all pictures, press the GREEN button. Press the RED button to de-select all
pictures. Press the PLAY button to enter Slide Show mode, the pictures will scroll after
approximately 5 seconds.
90
90
Rotate
Rotate
A
Repeat ALL
Music
Play List
Info.
Zoom In
Zoom Out
Exit
Exit playing,enter previous menu.
Full screen playing of photos.
Stop playing,enter list menu.
Play previous file.
Play next file.
Repeat
Press once to repeat once, press again to repeat all photos, press three times to disable the repeat function.
Rotate
Clockwise/ counter clockwise turn pictures.
MUSIC
Multimedia MUSIC submenu layout.
When selected songs in the list, press OK to show the songs preview, as follows:
1/2
C:\
Page
Disc
Preview
Return
EQ
2...
2564
200-200 2asd-200
Asdkj.mp3
Album:
Title:
Bit rate:
Artist:
Sampling:
Year:
Size:
Dkj.mp3
File window
Bounce
Asdkj
48K
Sarah
20K
2008
600KBytes
Delete Current Filt
Put.mp3
Add/Remove all
OK
Full Screen
Move
MENU
29
Menu
Add/remove to playlist
EXIT
Quit
Files
information
MUSIC submenu equip description:
Page
Show pages.
Preview window
Music picture.
Files information
Show songs name and size etc.
MUSIC playing conditon and keys function
MUSIC playing is the menu just like playing software in PC, mainly have Playlist、basic
information, processing sign, operation guide part,as follows:
Songs name
Screen Mute
AUD.MP3
Songs infor
Album: Govergirl
Title: Far Amay From Home
Artist: Groove Goverage
Bit Rate:
96k
Sampling:
48k
Year: 2002
529KBytes
Size:
Songs list
AUD.MP3
Sanple.MP3
AUD_2.MP3
MUSIC image
1/1
Remove
Remove all form playlist
00:01:00/00:00:45
Operation guide
Repeat ALL
Goto Time
Songs name
Current songs name.
MUSIC image
One image used to sign MUSIC.
Songs list
Songs marked in Browser,from the top files on, orders by letters.
Playing time
Show playing time and in total,such as 00:01:23/00:04:56 format.
Operation guide
Show current operation guide.
Processing sign
Show current procession time and rate.
OK/Enter
Play selected files.
Exit
Exit MUSIC playing menu.
▲▼◄►
Scroll through songs on file list.
Stop playing.
/
Play Previous/next files.
30
Play Time
Fast forward and fast reverse.
Repeat
Repeat playing,can choose repeat 1, repeat all, and disable repeat mode.
MOVIE
Video format: AVI etc.
Enter the movie menu and scroll through the files using the ◄► ▲▼ keys.
1/2
C:\
Preview window
Return
200*200
2
3
File list
Resolution: 800x336
Audio Track: 1/ 1
Subtitle:
Artist:
Prpgram:
Size:
122311 KBytes
File information
Delete Current Filt
Add/Remove all
OK
Move
Full Screen
MENU
Add/remove to playlist
Menu
EXIT
Quit
Press OK to select the file and to view a preview as above.
Press PLAY to view the file in full screen.
00:00:00/00:50:00
A/B
Repeat ALL
SetA
Play List
Slow
Info.
Step
Goto Time
Zoom In
Repeat
Can choose repeat1,repeat all, repeat none.
Set A/
B
A/B
Set A/B circle playing.
File list
You can scroll through the file list using ◄► ▲▼ . Press OK to select a file and view a preview,
you can also select multiple files to be played in sequence.
Press PLAY to view selected file in full screen.
Note
Larger files may take longer to load, please wait for the file to load.
Some files may not play even though they are the correct format.
31
Info
Displays the highlighted file's information including resolution, audio track, subtitle, artist and size.
Goto
This function allows you to jump to a preset time during playback. Press GOTO, a window will
appear displaying time in hour minutes and seconds as follows 00:00:00.
Enter the time you would like to jump to using the numeric keys.
Press OK to confirm.
TEXT
C:
1/2
Pet
Puppy Linux
Return
2...
200-200 2asd-200
Make
jack.txt
60KBytes
Size:
EQ
2564
jack.text
jack1.text
Remove all form playlist
Add all to playlist
OK
put.text
Move
Full Screen
MENU
Add/remove to playlist
Menu
EXIT
Quit
Choose TEXT files, press OK and it shows the above frame.
Press play to start full screen playing as follows:
#Czech 0
#Danish 1
#German 2
#Engelsh 3
#Spanish 4
#Greek 5
en_str_Picture_Text.0=OBRAZ
en_str_Picture_Text.1=BILLEDE
en_str_Picture_Text.2=BILD
en_str_Picture_Text.3=PICTURE
Prev Page
Next Page
Prev.
Next
Stop
Prev page
Play previous page.
Next page
Play next page.
Prev.
Play previous files.
Next
Play next files.
32
Music
Play List
Info.
Stop
Stop playing and Exit to Browser menu.
Playlist
Show play list.
Info
Displays the current file's information including file name and size.
DVR menu
DVR function is only available for DTV,includes Record,Timeshift and Playback function.
Note
When DVR function is in progress, please don’t unplug the power and the external USB device at will.
When DVR function is active, the power indicator will blink with red and blue consecutively.
Before start recording a program, please make sure the external USB device is connected.
While recording, if the available storage space becomes low, the recording will be automatically
stopped.
DVR File System
Enter DVR from CHANNEL menu, as follows:
DVR File Syetem
Select Disk
C:
Check DVR File Syetem
Start
USB Disk
Format
Time Shift Size
Speed
Move
OK
Select
MENU
Back
USB Disk
If a compatible USB device is attached, this will indicate 'PASS'. If no device is attached it will appear grey.
Format
Your USB device will need to be formatted before it can be used for DVR functions.
Note
Formatting a USB device will erase any existing data on the device, back up all existing data.
TEAC accepts no responsibility for any loss of data.
Larger devices will take longer to format.
Time Shift Size
Can’t be chosen. After Check DVR File System,it means the USB passed Mstar Format and can be used
At Timeshift space,the size is choosen by clients when doing format.
Speed
Displays the speed of the attached USB device.
33
Select Disk
Choose the drive for DVR, C: is the default drive.
Select Disk
USB
0
Disk
C:
Move
OK
Select
Check DVR File System
Press 'OK' button to check if your USB device is ready for DVR functions. If the disc is formatted
and compatible it will display 'SUCCESS', if the disc is not ready it will display 'FAIL'.
File System Size
DVR File System Type
Hi Speed FS
DVR File System Size
ALL
SD104 Mins
HD 29 Mins
Move
OK
Select
Channel - Recorded List
To view a list of recorded programs, press the R.LIST button.
Recorded List Programme
8 Simples Rules
Before Winter Comes
Before Winter Comes
Love Comes Softly
Delete
OK
Title
Select
INFO
INFO
Index
Index
Recorded List.
Ordering
Show in title right,means the current ordering way,Index key can switch option:
Program me -> Channel -> Time,which make orders by programme name, channel order and record
time.
Mark
Show current condition,recoreded programme shows no mark, if shows Record means recording,and
if it shows Play ,it means on the playing,if Focused,it shows color image,otherwise it is gray.
34
Prgramme name
The programme name is construct by channel number and record channel number.
Operation guide
Show the current available operation.
R.LIST
When no menu, press to show Recorded List; When it show Recorded List menu,switch recording programme
orders.
▲▼
Up and down to move Focus to select programme.
◄►/OK/Enter
Close/pop out the programme instruction.
Info/Display
Pop out or close the programme instruction.
DELETE
Delete Focused programme.
DVR –Record Mode
Recorded Mode
09 Jun 18:14
20 ABC HDTV
Mode
Once
Start Time
Minute
00
Hour
00
Month
Jan
2010 / 05 / 04
Date
End Time
Minute
00
Hour
00
Month
Jan
2010 / 05 / 04
Date
Move
OK
Select
MENU
Back
Title
Shows current channel name.
Mode
Choose recording mode; Switch order:Once -> Everyday -> Weekly -> Auto.
Start Time
Start recording time;
End Time
Recording end time.
35
DVR – Recorder Schedule
Menu and function
Schedule List
Time
Date
Programme Title
Channel Name
19:28-20:20
Satos Jun
New Tanks
2 ABC TV
Mode
AUTO
Result
18:14 09th Jun
Move
Delete
MENU
Back
EXIT
Quit
Note
1.List timer recording will start according to date and time priority.
2.Newly added items will be last on the listed.
3.It enter the menu when recording,Focus on current recording plans.
Menu
Exit Recorder Schedule List menu,enter DVR menu,Focus on Recorder Schedule List;
Move
Move Focus up and down;
Delete
Delete Focus items;
Exit
Exit menu;
DVR shortcut function
REC
Enter Record mode;
Enter Timeshift mode;
R.LIST
Pop out Recorded List menu, enter OK/Enter to enter Playback,play it;
T.LIST
Pop out Recorded Timer Schedule List.
Note
Record and Recorded List can be enter from DVR menu.
Record
Record menu includes two kind, one is Full Mode,the other is Simple Mode. At Simple mode, there
is only power indicator blinking but no operation menu display.
They can switch by REC/EXIT key.
At Record mode, Record menu shows still.
36
The details is as follows:
Full Mode:
Max Recording Time [0000:10:20]
Recording Time [00:00:20]
Play
FB
FF
5 Five
Prev
Next
Pause
Stop
14:30
Before Winter Comes
Channel name and Programme name
Current Time
Stop
Exit Record,shows Processing;
Record/Exit
Switch Record menu mode;
Play
Enter Playback mode, play it from the start recorded programme Check Playback instruction in details;
R.LIST
Close Record menu,pop out Recorded List menu;when exit from Recorded List menu, it shows record again;
Timeshift
Timeshift menu
Timeshift is similar with Record menu, includes two kind: one is Full Mode and the other is
Simple Mode. They can switch by Exit key. At Timeshift mode, Timeshift keeps still.
Simple Mode:
Full Mode:
S
SHIFT TIME/MAX SHIFT TIME [00:00:00/00:50:00]
Play
FB
FF
Prev
Next
Pause
S
Stop
Note
At Simple Mode,it shows current Timeshift playing conditon, such as Play,Pause;
Simple Mode shows on the right down side;
Timeshift conditon
Timeshift Start conditon
Enter Timeshift to press
,and the image paused and it start record from the paused position.
Stop
Stop Timeshift.
Exit
Swich Timeshift menu mode.
37
R.LIST
Close Timeshift,pop out Recorded List;From Recorded List menu to enter Playback,and then exit
Timeshift;
Play
Enter Timeshift Play condition;
Timeshift Play
At Timeshift Play condition, the system record DTV and play it at the same time.
Timeshift Play is start by press
,at Timeshift Play condition, it can work Pause,Fast Forward,
Fast Rewind,and it would enter A->B circle playing condition.
Timeshift Record
Timeshift Record condition,similar to Record mode.
Playback
Playback is similar with Timeshift,one is Full Mode,and the other is Simple Mode, they can be
switch by Exit key.
At Playback mode,Playback shows still.
Full Mode:
00:00:00/00:50:00
Play
FB
FF
Prev
Next
Pause
Stop
18:13
Note
At Simple mode, there is only power indicator blinking but no operation menu display.
38
1. Press Source button on the remote controller to select DVD input source.
2. Press OPEN/CLOSE button to load/eject disc from disc tray.
Hold the disc without touching either or its surfaces, insert the DVD with the label toward the
device’s back panel into the DVD slot on the right side of you TV set.
Only push the DVD slightly until the unit feeds it automatically.
39
English
French
German
Italian
Spanish
Portuguese
Russia
English
French
German
Italian
Spanish
Portuguese
Russia
Start the screen saver, the screen saver image will appear when the player stops or the picture is
frozen for a few minutes. This feature can keep the screen from being damaged.
Select "On" so that the DVD module will remember your last play position and will continue
playback from the position you last stop.
When "Off" is selected, unit will start playback from the beginning regardless of disc.
40
to enter
41
Dual Mono
This Option Select the dual mono.
Dual Mono
Stereo
L-Mono
R-Mono
Mix-Mono
Volume
Dual Mono
42
You must press STOP (
)twice before you can enter Preference Page through Setup Menu.
PAL
Else, default language will be used.
English
French
German
Italian
Spanish
Portuguese
Russia
PAL
English
French
German
Italian
Spanish
Portuguese
Russia
43
Subtitle
You can select preferred language for subtitle. When subtitle is switched on, it will display the
subtitle in selected language.
Note: Only Disc with supported subtitle language can be display.
English
French
German
Italian
Spanish
Portuguese
Russia
PAL
English
French
German
Italian
Spanish
Portuguese
Russia
Else, default language will be used.
English
French
German
Italian
Spanish
Portuguese
Russia
PAL
English
French
German
Italian
Spanish
Portuguese
Russia
44
PAL
PAL
45
PAL
46
9. TROUBLESHOOTING AND ADVICE
If you encounter problems with your TV, please check the countermeasures below.
If the problem persists, please contact your dealer or the TEAC Customer Care Centre, see back
page for details.
Troubleshooting
Control
No signal
Please check that all cables are correctly plugged in.
No color
Adjust the contrast, the color and the brightness
Interference on the
screen.
Maybe result from a lighting signal from car, motor, neon light and
other electrical devices or appliances.
Double or multiple
display image
Maybe the result of an electrical wave disturbances from other TV,
Computer and Game machine or Radio
Snow on the screen
The cables of the antenna are not correctly plugged in.
The remote control
does not work
Please check the batteries polarity and alignment. Make sure the
signal from the remote control to the TV i blocked by any objects.
No sound
Make sure that you have not press the MUTE button of the panel
or of the remote control. Adjust the volume setting.
No DVD
DVD player not
working properly
Make sure if the TV Set have been switched to DVD mode
Ensure disc is correctly inserted into the player. Ensure the disc
does not damaged and with correct format. Please wait patiently
as some discs need longer time to play.
47
10. SPECIFICATIONS
Design and specifications subject to change without notice. Weight and dimensions are approximate.
LCDV2656HD
LCDV3256HD
2 6- inch
32-inch
1366X768 Pixels
2600 : 1
800 : 1
8ms
6.5ms
DVR
USB device MAX size 1TB
DVD Player
DVD+/-RW, DVD-R, CD, CD-R, CD-RW, JPEG, DivX
3.11/4.x/5.x/6.x
0
8W 8W
AC110 to 240V,50/60Hz
< 140 W
< 160 W
<1W
664 x 210 x 507 mm (WxDxH) 794 x 246 x 565 mm (WxDxH)
Dimension(without stand) 664 x 103 x 499 mm (WxDxH) 794 x 104 x 565 mm (WxDxH)
200 x 100mm (WxDxH)
400x 200 mm (WxDxH)
M4 x 12mm
Gross weight
About 11.5Kg
48
About 14Kg