1
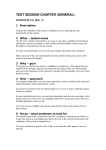
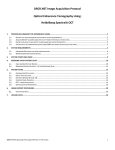
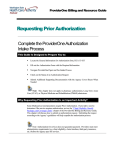
ViewPlus©
User Manual
FDA regulations require me to state that Sanders Data Systems
medical products may no longer be offered for use in the diagnosis
of disease or other conditions in man or other animals.
These are the same products and still have FDA approval. However, due to the
increasingly draconian requirements of the FDA, I have decided to no longer register
Sanders Data Systems as a Medical Device Establishment.
Of course, products that you have already purchased are not affected by this change in
status.
SANDERS DATA SYSTEMS
SOFTWARE LICENSE AGREEMENT
SINGLE USE LICENSE
SANDERS DATA SYSTEMS grants to you a nonexclusive license to use the SOFTWARE through a single user interface connected
to a single computer. You may not sell, assign, rent, or distribute any copies of the SOFTWARE. You may make one copy of the
SOFTWARE solely for backup purposes, or transfer the SOFTWARE to a single hard disk provided that you keep the original solely
for backup purposes.
OWNERSHIP
The SOFTWARE is copyrighted by and the property of SANDERS DATA SYSTEMS, and its suppliers. SANDERS DATA SYSTEMS
and its suppliers retain title and ownership of all copies of the SOFTWARE. No title or ownership rights in the SOFTWARE are
transferred to the purchaser. You agree to hold the SOFTWARE in confidence and to take all reasonable steps to prevent
unauthorized disclosure. Except as stated above, this License does not grant you any rights to patents, copyrights, trade secrets,
registered or unregistered trademarks, or any rights, franchises, or licenses with respect to the SOFTWARE. You may not
disassemble, decompile, or reverse engineer the SOFTWARE, in whole or in part.
LIMITED WARRANTY
SANDERS DATA SYSTEMS warrants that purchased SOFTWARE will perform substantially in accordance with the accompanying
documentation for a period of 90 days from the date of receipt. You must report all defects within the warranty period to be eligible
for remedies. Any implied warranties on the SOFTWARE are limited to 90 days. Gratis SOFTWARE or SOFTWARE updates are
provided solely on an "as-is" basis, without warranty.
The entire liability of SANDERS DATA SYSTEMS and your exclusive remedy, upon return to SANDERS DATA SYSTEMS of the
SOFTWARE, documentation, security keys and verification of purchase, shall be either (a) return of the price paid for the
SOFTWARE, or (b) replacement of all or part of the SOFTWARE. The above warranty applies to any replacement for the remainder
of the original warranty period or 30 days, whichever is longer.
NO OTHER WARRANTIES
SANDERS DATA SYSTEMS disclaims all other warranties, either express or implied, including but not limited to implied warranties
of fitness for a particular purpose, with respect to the SOFTWARE. The entire risk as to the performance of the SOFTWARE is with
the purchaser. SANDERS DATA SYSTEMS does not warrant that the operation of the SOFTWARE will be uninterrupted or errorfree. SANDERS DATA SYSTEMS assumes no responsibility or liability of any kind for errors in the SOFTWARE or documentation
or for the consequences of any such errors.
LIMITATION OF LIABILITY
In no event shall SANDERS DATA SYSTEMS or its suppliers be liable for any damages whatsoever, (including, without limitation,
incidental, consequential, compensatory, exemplary, or other pecuniary loss) arising out of the use or inability to use this SANDERS
DATA SYSTEMS product, even if SANDERS DATA SYSTEMS or any representative of SANDERS DATA SYSTEMS has been
advised of the possibility of such damages.
RESTRICTED RIGHTS
Use, duplication, or disclosure by the government is subject to restrictions as set forth in subparagraph (c)(i)(ii) of the Rights in
Technical Data and Computer Software clause DFARS 252.227-7013.
RETURNS
The SOFTWARE may not be returned for credit or refund unless all copies of the SOFTWARE, related documentation and security
keys are returned.
EXPORT
Laws and regulations of the United States may restrict the export or re-export of the SOFTWARE. You agree not to export or reexport the SOFTWARE in any form without appropriate United States and foreign government approval.
This agreement is governed by the laws of the State of California.
Sanders Data Systems ViewPlus© User Manual - Version 16 March 2010
Page 2
Introduction
©
ViewPlus is a program for viewing images recorded on Compact Discs in the DICOM 3
format.
Installing ViewPlus
System Requirements
ViewPlus will run on any current version of Microsoft Windows. These include Windows 2000
and XP.
The computer must have a CD drive. To ensure adequate performance, at least 128 megabytes of
RAM must be installed on the computer and there should be at least 150 megabytes of available
disc space on the system hard drive. The computer must also have a USB port.
Hardware Setup
In order for ViewPlus to operate, the supplied copy-protection device must be connected to a
USB port of the computer.
Software Installation
Software installation consists of inserting the ViewPlus installation disc into a disc drive and
executing the program ViewPlusSetup.exe on the disc. Installation of ViewPlus proceeds in a
manner that is similar to other software setup programs. Please follow the instructions on the
screen.
A driver for the copy-protection device will also be installed. The driver installation is the last
step in the setup program and is performed silently. It will take one or two minutes to complete.
If the driver is installed, you will need to restart Windows before ViewPlus can be used.
Sanders Data Systems ViewPlus© User Manual - Version 16 March 2010
Page 3
Running ViewPlus
Before running ViewPlus, you should insert a DICOM CD into the CD drive on your computer.
After inserting the CD, a light on the drive (sometimes labeled Read or Busy) either will
illuminate or flash for a few seconds. This indicates that the CD drive is attempting to recognize
the disc that you just inserted. To guarantee reliable operation of ViewPlus, you should always
wait until the light goes out or stops flashing before proceeding. Occasionally, the light will flash
or remain illuminated for a very long time; this usually indicates that the CD is incompatible
with your CD drive. Newer CD drives have a greater range of compatibility.
The setup program installs a ViewPlus icon on your desktop and a ViewPlus folder in your Start
Menu. You may run ViewPlus either by double-clicking the desktop icon or selecting ViewPlus
from the ViewPlus folder.
Upon starting, ViewPlus will read the DICOM directory from the CD and display the directory
in the DICOM Directory Tree (see Using the ViewPlus Screen and Controls). ViewPlus will then
display the first image of the first cine run on the CD.
If you insert a CD, start ViewPlus and see nothing on the screen but the Exit and File Open
buttons, this means that either the CD drive or ViewPlus was unable to recognize your CD. You
should try another CD. If this also fails, please contact your ViewPlus vendor for technical
assistance.
You can exchange CDs without exiting from ViewPlus. You should NEVER eject a CD while
images are playing - instead, you should use the CD Eject button on the View Plus screen. Then
insert the replacement CD and press the CD Load button.
Processing DICOM images in real time requires a lot of memory. Unless you have a large
amount of RAM memory, you should probably exit from most other applications before running
ViewPlus. Even exiting from the programs may not immediately free the memory. When you
first begin displaying images, you may experience very slow image display. This will typically
be accompanied by hard disc activity as Windows "swaps-out" RAM onto the hard disc. Once
more RAM is available, ViewPlus will begin to display images faster.
The ultimate limit on how fast ViewPlus is able to display images is determined by how fast
image data can be read from the CD, decompressed by the computer and displayed. A fast CD
drive, a fast CPU, a large amount of RAM and a fast VGA board all contribute to enhancing the
speed of ViewPlus.
Biplane Images
ViewPlus is capable of displaying pairs of biplane image runs that are recorded simultaneously.
Coupled pairs of imaging runs are detected automatically from the DICOM data. The mousecontrolled Zoom Cursor can be used to display and zoom each imaging run individually without
losing synchronization with the other imaging run.
Audio
ViewPlus is capable of playing a audio “tracks” that are recorded simultaneously with imaging
runs. Coupled pairs of imaging runs and audio tracks are detected automatically from the
DICOM data. Audio will accompany an imaging run whenever it is played at normal speed. The
audio will be resynchronized as closely as possible with the images whenever the position in the
imaging run is is changed. If you expect to hear audio, you should be sure that the computer’s
audio output is not muted and that the Wave volume is set to an appropriate level.
Sanders Data Systems ViewPlus© User Manual - Version 16 March 2010
Page 4
Using the ViewPlus Screen and Controls
The picture above shows the ViewPlus screen while viewing images from a DICOM CD.
In order to enhance your understanding of the ViewPlus DICOM viewer, each of the elements of
the ViewPlus screen will be illustrated and discussed.
Directory Tree
The DICOM directory tree is used to display information
from the current CD as well as to allow the selection of
images for display and creating DICOM discs.
The information is displayed as a hierarchical tree. At the top
level are patients - the patient ID and name are displayed, if
available. The next level is the study - the study date and
description are displayed, if available. The third level is the
image series - the series number is displayed; a series
description is displayed, when available. The final level
contains image runs - an exemplary icon and the image
number are displayed; an image comment is displayed, when
available. When an image comment is not available, the
gantry angles are displayed.
Most often, only images from one patient, study and series will be contained on a CD. Series
descriptions and image comments are not displayed in the directory tree until the first time the
series or image is displayed. Clicking on any item will select it and cause ViewPlus to begin
displaying images from it. If the entire directory tree cannot be displayed, a scroll bar on the
right of the box will allow viewing of the additional items.
Sanders Data Systems ViewPlus© User Manual - Version 16 March 2010
Page 5
The File Open Button
Clicking the File Open button will cause a standard Windows File Open dialog box to
appear. Any supported DICOMDIR or DICOM image file from any CD, hard disc or
network share can be selected and displayed by ViewPlus.
The Exit Button
Clicking the Exit button will cause ViewPlus to immediately terminate.
The Eject CD Button
Clicking the Eject CD button will cause ViewPlus to close the current CD and eject it
from the computer (if supported by the CD drive) or the disc can be manually ejected.
The Load CD Button
Clicking the Load CD button will load the CD into the CD drive (if supported by the CD
drive), open the CD and begin playing it. If the CD drive does not support software
control of loading, first load the CD manually, then click the Load CD button.
The Copy Button
Clicking the Copy button will place the current image on the Windows
clipboard. This allows images to be transferred to other software programs for
use in documents, e-mail, presentations, web pages, etc..
The Print Button
Clicking the Print button will cause the currently displayed image frame to be
printed together with the patient and image information.
The E-Mail Button
Clicking the E-mail button will cause ViewPlus to create a temporary JPEGcompressed image file from the currently displayed frame and initiate an email containing the image and patient data. This should be particularly useful
to a clinician who wishes to mail results to a referring physician or patient.
The Make JPEG Button
Clicking the Make JPEG button will cause ViewPlus to create a JPEGcompressed image file from the currently selected frame and present a Save
As dialog box that will allow you to save the image to a location of your
choice. As opposed to the E-Mail button, the Make JPEG button does not add patient
information to the image. The file is created using lossy JPEG compression with a quality factor
of 90.
The Create Hider Button
Hiders are grey rectangles that can be placed on an image in order to hide information
that would prevent the image from being totally anonymized. Examples of hiders are
shown in the left corners of the example image. In order to place a hider on an image, click the
Create Hider button, place the mouse cursor on one corner of the area that you wish to hide and
“drag” the hider over the area. You may reposition a hider you are drawing by dragging the
upper-left and lower-right corners. When you are satisfied with the hider, click OK or click the
right mouse button. Up to eight hiders can be drawn on an image. For convenience, when hiders
are added to one image of an imaging series, they are propagated to all other images of the series.
Sanders Data Systems ViewPlus© User Manual - Version 16 March 2010
Page 6
The Erase Hiders Button
The Erase Hiders button erases all hiders in the current image. Hiders for other images in
the series are not erased.
The Make CD Button
If the Anonomyze checkbox is checked, clicking the Make CD button will
initiate the copying of all imaging runs. All identifying data are removed in
the process. Any hiders associated with the imaging run are superimposed
on the images. A new DICOM directory file (DICOMDIR) will be created
for the selected files. The resulting file set is can be displayed or distributed without
compromising patient confidentiality.
If the Anonymize button is not checked, an exact copy of the image files will be made.
After the files are anonomyzed or copied, you will be asked to insert a blank recordable CD or
DVD. When you are ready to record, click the Record Now button. The progress of the recording
process will be displayed. When recording process has been completed, the disc will be ejected.
Each disc produced by this method will also include a copy of the ViewPlus Lite DICOM
viewer. (ViewPlus Lite is a version of ViewPlus with all but the most basic features removed.)
This will make it possible to view the DICOM files on the disc without a DICOM viewer
installed on the viewer’s PC.
The Make AVI Button
Clicking the Make AVI button will initiate the conversion of the current
imaging run to an AVI file suitable for use in presentations, web pages, etc.
First you will be presented with a
Save As dialog box, which allows
you to specify where the AVI file
will be saved.
After clicking Save, you will be presented with a Video Compression dialog box. You must
choose a compression method and configure the compressor. After clicking OK, a Progress Bar
will display the progress of the conversion.
The current Subtract, Brightness, Contrast, Gamma, Negative Image and Edge-Enhancement
settings and any hiders will be applied to the image run prior to conversion to an AVI file. The
AVI file will play at the recorded frame rate. However, if the Display Rate is set to 1/2, only
every other frame will be included in the AVI file and the images will be reduced to 1/2 size; if
the Display Rate is set to 1/4, only every fourth frame will be included and the images will be
reduced to 1/4 size.
Sanders Data Systems ViewPlus© User Manual - Version 16 March 2010
Page 7
The Play All Button
Clicking the Play All button toggles it between up and down states. When the Play
All button is down, ViewPlus will cycle through all of the image runs on the
DICOM CD. After the last run, the runs are repeated starting with the first run.
The Play Run Button
Clicking the Play Run button toggles it between up and down states. When the Play
Run button is down, ViewPlus will continuously loop through the currently
selected image run. When neither Play All nor Play Run is down, playing is stopped
The Right Mouse Button
Clicking the Right Mouse button will cause ViewPlus to enter a "slow loop" mode. In slow loop
mode, one second of images surrounding the current image are displayed at five frames-persecond. Clicking the Right Mouse button again reverts to the previous display mode. Slow loop
mode allows the viewer to carefully examine a small piece of an image run without having to
stop and start Play mode. The space bar on the keyboard may also be used to toggle the slow
loop mode.
The Speedometer
The Speedometer shows the current image display rate in frames-per-second
together with the rate at which the run was recorded. In the example, the images
were recorded at 30 fps and are being displayed at 26 fps.
The Image Display Rate Buttons
The Image Display Rate buttons control the maximum speed at
which images will be displayed in the Play All and Play Run
modes. If 1 is selected, images will be displayed no faster than the recorded rate. If 1/2 or 1/4 is
selected, images will be displayed no faster than 1/2 or 1/4 of the recorded rate, respectively.
Frame Selection Controls
The Frame Selection Controls consist of a frame
slider, a frame number/elapsed time display and an
elapsed-time reset button. You may click on the slider
button and drag it or you may click on either of the two arrows. The left arrow moves toward the
beginning of the image run, the right arrow moves toward the end of the run. If an arrow is "held
down", the run will play continuously in the appropriate direction until the button is released.
As new frames are displayed, the frame number/elapsed time display is updated. At any frame,
the elapsed time and Corrected TIMI Frame Count (CTFC) may be set to zero by clicking the
"0" button. Subsequently moving to another frame will cause the elapsed time and CTFC
between the two frames to be displayed.
You may also change frames by using the left and right arrow keys on the keyboard or the roller
button on a mouse. The Delete key can also be used to set the elapsed time/TIMI count to 0.
The Brightness Gauge
The Brightness Gauge depicts the range and distribution of image
brightness (or density). The left end of the box represents black and the right end represents
white. The black line within the box connects the darkest and brightest image values. The three
"whiskers" represent, respectively, the 10th percentile, 50th percentile and 90th percentile
brightness values. In other words, 90 percent of the pixels in the image are brighter than the left
whisker, 50 percent are brighter than the middle whisker and 10 percent are brighter than the
right whisker.
Sanders Data Systems ViewPlus© User Manual - Version 16 March 2010
Page 8
In the example above, the brightness ranges from almost black to something less than white.
However, 80 percent of the brightness values (the values between the left and right whiskers)
occur in about half of the total range. There are few really dark pixels, because the darkest 10
percent of the image is distributed over a fairly wide range of values.
The gauge is updated whenever there are changes to the image being displayed. However, it will
"disappear" during image adjustments and while image runs are being played.
The Brightness Control
The Brightness Control changes the image by adding or subtracting a constant
brightness value to all pixels in the image. Changes made by the Brightness
Control can be observed with the Brightness Gauge as the line staying the same
length, but shifting to the left or right.
The Contrast Control
The Contrast Control changes the image by multiplying all of the pixels in the
image by values between 0.6 and 1.4. This has the effect of decreasing or
increasing the range of brightness values. This can be observed on the Brightness
Gauge as a shortening or lengthening of the line.
The Auto Brightness/Contrast Button
When the Auto Brightness/Contrast button is depressed, ViewPlus automatically and
continuously adjusts the brightness and contrast controls in order to achieve optimum
settings for display of each imaging run.
The Gamma Control
Moving the Gamma Control to the left expands the range of the brightest pixels of
the image and compresses the range of the darkest pixels. Moving the Gamma
Control to the right compresses the range of the brightest pixels and expands the
range of the darkest pixels. The Gamma Control can be used to bring out details at
one of the extreme ends of the brightness range. The effect of the Gamma Control can be
observed in the Brightness Gauge by the compression and expansion of the left and right whisker
positions. Gamma values range between 0.5 and 1.5.
The Reset Button
The Reset Button sets the Brightness, Contrast and Gamma controls to neutral values.
Clicking the Reset Button can provide a starting place for image adjustment.
The Negative Image Control
Clicking the box in the Negative Image Control toggles the image between positive and
negative. When a checkmark is displayed, the image is negative. Digitally recorded
images will look like cine images if they are viewed as negatives.
The Edge-Enhancement Control
The Edge-Enhancement Control is used to emphasize the edges of objects
in an image. It is useful for viewing fine details - however it also
emphasizes image noise, so it must be used judiciously. Clicking "0" provides no edge
enhancement; clicking ">" provides moderate edge enhancement; clicking ">>" provides strong
edge enhancement.
Sanders Data Systems ViewPlus© User Manual - Version 16 March 2010
Page 9
The Digital Subtraction Angiography (DSA) Controls
The DSA controls allow the user to view an
angiogram with a background mask subtracted from
each image. When the Subtract button is depressed,
a background mask is automatically calculated as the average of the first five images of the
imaging run. This mask is then subtracted from each image and a difference image is displayed.
When the Subtract button is raised, normal viewing will be restored.
You can manually define a mask. Clicking Clear Mask will cause the current mask to be erased.
Depressing the Add to Mask button will create a mask consisting of the current frame and any
subsequent frames that are viewed until the Add to Mask button is raised. The Add to Mask
function can be used more than once, if desired, to cumulatively add images to the mask. A new
mask can be tested by lifting the Add to Mask Button and depressing the Subtract button.
With the Subtract button depressed, subtracted images will be copied to the clipboard, included
in e-mails, printed in reports and saved in AVI files.
The Image "Flip" Buttons:
The image flip buttons, when depressed, will "flip" the images horizontally and
vertically in order to obtain correct image orientation.
The Echo Calibration Buttons:
These buttons will appear if a DICOM echocardiogram file includes pixel
calibration data. Depressing the left button will cause small calibration crosses
to be superimposed on the images. Depressing the right button will cause a
calibration grid to be superimposed on the images.
The Insert Key
Pressing and releasing the Insert key will put ViewPlus in full-screen mode. In fullscreen mode, all controls are hidden and the DICOM images fill the entire screen. Fullscreen mode is particularly useful when ViewPlus is connected to a digital projector
because it emulates the capabilities of a cine projector. The keyboard or the optional ShuttlePRO
controller can be used to operate ViewPlus while in full-screen mode. Pressing and releasing the
Insert key again will restore ViewPlus to normal viewing mode.
The Zoom Cursor
Whenever the cursor is over the image area of the screen, the cursor changes to a Zoom
Cursor. A plus sign in the center of the magnifying glass signifies that clicking the left
mouse button will magnify the image in a region centered on the cursor. A minus sign in
the center of the magnifying glass signifies that the image is already magnified and clicking the
left mouse button will restore the full image to the screen. When viewing biplane image pairs,
the zoom cursor also can be used to select each individual image for viewing.
The Copyright Button
Clicking the Copyright button will cause ViewPlus to exit and
will connect your Web browser to the ViewPlus download page
on the Sanders Data Systems website. This is a convenient way to download updated versions of
ViewPlus. (ViewPlus usually is updated every few months.)
Sanders Data Systems ViewPlus© User Manual - Version 16 March 2010
Page 10
The Keyboard/Mouse Command Help Button
Clicking the Keyboard/Mouse Command Help button will cause a help screen to be
displayed over the main ViewPlus screen. This help screen shows additional features of
ViewPlus for controlling functions from the keyboard and mouse.
Sanders Data Systems ViewPlus© User Manual - Version 16 March 2010
Page 11