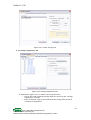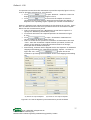
1
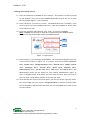
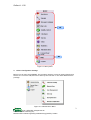
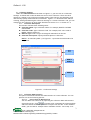
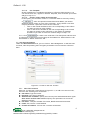
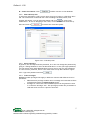
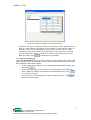
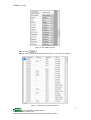
iCollect 1.1.50
iCollect: User’s Guide
Copyright © 2011
© 2011 ISL/BIOTEC. All Rights reserved.
Information Systems Laboratory (ISL),
National Center for Genetic Engineering and Biotechnology (BIOTEC), Thailand
iCollect 1.1.50
Table of Contents
1 Getting started with iCollect
2 iCollect Configuration Settings
2.1 Collection Settings
2.1.1 Collection Description
2.1.2 Collection Data Structure
2.1.2.1 Import from an MS-Excel file
2.1.2.2 Use Template
2.1.2.3 Specify column names and constraints
2.2 User Account Settings
2.2.1 New User Accounts
2.2.2 Edit and Drop User
2.2.3 Reset Password
2.2.4 Grant Privileges
2.3 Material Type Settings
2.4 Automatic Backup Setting
2.5 Storage /Container Setting
2.6 Quality Control Profiles Setting
2.7 Service Configuration Settings
3 Specimen
3.1 Management
3.1.1 Add New Record
3.1.2 Edit a Single Record
3.1.3 Edit/Delete Record
3.2 Geographic Coordinates
3.3 Molecular Sequences
3.4 References
3.4.1 Add/Import the references
3.4.2 Set/Remove references to a specimen/sample
4 Sample Management
4.1 Search Specimen/Samples
4.2 Create Samples
4.3 Remove Samples
5 Catalog
5.1 Catalog profiles
5.2 Catalog formats
6 Storage/Container Management
6.1 Container Settings
6.2 Storage Configuration
6.2.1 Create Storage Tab
6.2.2 Storage Organization Tab
6.2.3 Copy Storage Tab
6.2.4 Move Container Tab
6.3 Storage Operations
6.3.1 Moving samples into storage
6.3.2 Viewing samples or containers in storage
6.3.3 Searching samples in storage
6.4 Storage Monitoring
7 Barcode
7.1 Storage Map Using Barcode Scanner
7.2 Scan Barcode
7.3 Print Barcode
8 Quality Control
8.1 Quality Control Profiles
8.2 Quality Control Records
© 2011 ISL/BIOTEC. All Rights reserved.
Information Systems Laboratory (ISL),
National Center for Genetic Engineering and Biotechnology (BIOTEC), Thailand
1
2
3
3
3
3
4
4
4
4
5
5
5
6
7
7
7
7
8
8
8
8
8
8
8
10
10
10
11
11
13
14
14
14
16
17
17
19
19
20
21
21
22
23
23
24
24
25
25
26
26
27
27
28
iCollect 1.1.50
8.2.1 Search Sample/Specimen in Quality Control Records
8.2.2 Update the Quality Check Results
9 Services
9.1 Service Configuration
9.1.1 Service Types
9.1.2 Documents for services
9.1.3 Service Profiles
9.2 Customers & Accounts Registration
9.2.1 Customer Registration
9.2.2 Account Registration
9.2.3 Nationality
9.3 Service Operations
9.3.1 Deposit
9.3.2 Make a Service order
9.3.3 Renewal and Termination of Maintenance
10 Statistics & Log
10.1 Collection Summary
10.2 Storage Summary
10.3 User Summary
10.4 Data Log
11 Other
11.1 Import/Export
11.2 Data Exchange
11.2.1 Data Exchange using a Specific Schema
11.2.2 Data Exchange via Web Services
11.2.2.1 Data Preparation for DataSet and Array Type
11.2.2.2 Data Preparation for an Array of Web-Service
Defined Type
11.2.2.3 Data Preparation for a single record of
Web-Service Defined Type
11.2.2.4 Calling Web Service
11.3 Taxonomical Data Checking
11.4 Link to BIOTEC BRC
11.4.1 Submit Data
11.4.2 View submit log
11.4.3 New Order From BRC
11.4.4 New Deposit From BRC
11.4.5 Deposit to BRC
12 Backup and Restore
13. Help
© 2011 ISL/BIOTEC. All Rights reserved.
Information Systems Laboratory (ISL),
National Center for Genetic Engineering and Biotechnology (BIOTEC), Thailand
28
28
28
28
28
29
30
30
31
31
32
33
34
34
36
39
39
39
40
40
41
41
41
41
44
45
46
47
48
50
51
51
53
54
55
56
58
58
iCollect 1.1.50
© 2011 ISL/BIOTEC. All Rights reserved.
Information Systems Laboratory (ISL),
National Center for Genetic Engineering and Biotechnology (BIOTEC), Thailand
iCollect 1.1.50
1.Getting started with iCollect
1.1. After the installation of iCollect on your machine. The iCollect icon will be placed
on your desktop. Now you can start iCollect by Double-click on the icon to open
the Log In page (Figure 1.1) of the system
1.2. Select ‘DB Server’ you want to connect. The default DB Server is localhost. If you
want to connect to other iCollect’s DB server, type the IP address or server name
at the ‘DB Server’ box.
1.3. Type your username and password. Click ‘Login’ to connect to iCollect.
Note: A MySQL root account is required for initially setup the iCollect system.
The root user has all privileges within the iCollect system.
1.2
1.3
Figure 1.1 Login Screen
1.4. Once you sign in, you can begin using iCollect. The menu panel appears at the left
of the screen as shown in Figure 1.2. It contains, from top to bottom, Specimen
Menu, Sample Menu, Storage/Container Menu, Barcode Menu, Quality Control
menu,
Catalogue
Menu,
Services
Menu,
Other
Menu,
Statistics
Menu,
Administration Menu, Current User Menu, Help Menu and Logout Menu. The
Administration menu will not appear for user without administrative rights. To
open or navigate menus, drag mouse over the menu bar/title, then left-click (or
just click with a single button mouse) on the item you want.
1.5. At the bottom-left corner of the menu panel, you can see current logon user name.
The current logon user can click on ‘Change password’ to edit the account profile
such as Password, Address and E-mail and click on the Logout when want to exit
from the system.
1
© 2011 ISL/BIOTEC. All Rights reserved.
Information Systems Laboratory (ISL),
National Center for Genetic Engineering and Biotechnology (BIOTEC), Thailand
iCollect 1.1.50
1.4
1.5
Figure 1.2 Menu panel
2. iCollect Configuration Settings
Before you can start using iCollect, the necessary settings in several menus (described in
Section 2.1 to Section 2.8) need to be done by the root user or user with administrative
privilege.
Figure 2-1 Administration Menu
2
© 2011 ISL/BIOTEC. All Rights reserved.
Information Systems Laboratory (ISL),
National Center for Genetic Engineering and Biotechnology (BIOTEC), Thailand
iCollect 1.1.50
2.1. Collection Settings
Under the Administration menu shown in Figure 2-1, you can click on ‘Collection
Settings’ to define and create the data structure of each collection. There are three
options in creating a new collection including import from CSV file, use templates, and
interactively specify field names and constraints. Figure 2.1.1 illustrates three tabs for
creating, editing and deleting the collection settings. In “Create Collection” tab, you can
configure a new collection in three steps described in Section 2.1.1 to Section 2.1.3.
2.1.1. Collection Description
This section contains three following items.
Collection Name: Type collection name. For example, BIOTEC CULTURE
COLLECTION.
Collection Code: Type Collection Code. For example, BCC is the code of
BIOTEC Culture Collection.
Material Type: Select a type of biological materials from the list
Collection Description: Specify the description of collection.
Notice: An asterisk symbol (*) in Figure 2.1.1 specifies the field need to be
completed.
2.1.1
2.1.2..1
2.1.2..2
2.1.2..3
Figure 2.1.1 Collection Settings
2.1.2. Collection Data Structure
This part involves how to define the data structure of a new collection. You can
perform one of the following options.
2.1.2.1.
Import from an MS-Excel file
You can add a new collection by importing the collection data and structure
from an Excel file. Click
to browse a file containing the collection data
and select which worksheet you want to import from the file. In the installed
folder, you can find for example files in subfolder ‘ExFile’. Go to step 2.1.3.
3
© 2011 ISL/BIOTEC. All Rights reserved.
Information Systems Laboratory (ISL),
National Center for Genetic Engineering and Biotechnology (BIOTEC), Thailand
iCollect 1.1.50
2.1.2.2.
Use Template
Several templates are included as examples of collection data structure. You
can choose which one, appears in iCollect Template, that would suit your needs
and go to step 2.1.3.
2.1.2.3.
Specify column names and constraints
In this option, you can add a column to a collection data structure by clicking
on
. After all required columns have been added, you need to
determine which column is a key of the collection. A key column is one that
uniquely identifies a particular record in the collection.
o Click on the isCode checkbox at the row corresponding to the column
you want to select as a key column.
o Click on the Select checkbox at the row corresponding to the column
you want to include in the collection or click Select All Columns
checkbox if you want to select all columns and go to step 2.1.3.
2.1.3. Click
to create a new collection. The description and structure
of collections created from previous step can be modified in “Edit Collection” tab
and deleted in “Delete Collection” tab.
2.2. User Account Settings
Under the Administration menu, you can click on ‘User Management’ to add new user
accounts, edit/drop existing users and grant permission to access and use collection
data.
2..2..1
2.2.2
2.2.4
Figure 2.2.1 Create a new user account
2.2.1. New User Accounts
Open the “Create User” tab as shown in Figure 2.2.1, to add a new user account,
and enter the following user information
User Name: Type user name.
Password: Type user’s password.
Administrator Checkbox: Specify user security level with administrative rights.
Allow access to/from other servers: Specify user permission to access the
database remotely.
Full Name: This part includes First name, Middle name and Last name.
E-mail: Fill out user’s email address
Contact Information: Fill out user’s contact information.
4
© 2011 ISL/BIOTEC. All Rights reserved.
Information Systems Laboratory (ISL),
National Center for Genetic Engineering and Biotechnology (BIOTEC), Thailand
iCollect 1.1.50
Create User Button: Click
to add a new user in the database.
2.2.2. Edit and Drop User
To edit user information, select a user name from List of Users in “Edit/Drop User”
tab. The information of selected user name including Full Name, Email, and
Contact will appear. You can edit information and click
to record your
modification. In case of dropping a user name, click on a user name from List of
Users and click on
to remove user from the system.
Figure 2.2.2 Edit/Drop User
2.2.3. Reset Password
In general, user already knows the password, he or she can change the password by
going to “Change Password” menu as described above. In case you forget password,
you can ask any users with administrative security level to set your new password.
To reset a user’s password, select a user name from List of Users shown in Figure
2.2.2. Type new password and click
.
2.2.4. Grant Privileges
iCollect provides privileges that apply in different contexts and different level of
operations.
Administrative privilege enables users to manage and customize iCollect
configurations under the Administration menu.
Privilege for collections within iCollect system can be granted to users
in “Collection Privilege” tab. This privilege provides user permission to
read and write access on a specific collection.
5
© 2011 ISL/BIOTEC. All Rights reserved.
Information Systems Laboratory (ISL),
National Center for Genetic Engineering and Biotechnology (BIOTEC), Thailand
iCollect 1.1.50
Figure 2.2.3 Grant Privileges on Collections to User
In Figure 2-2.3, open “Collection Privilege” tab and select a user name you want to
grant or revoke collection privilege from List of Users. On the right-hand side, in
the table, at the row corresponding to the collection you want, check “Grant”
checkbox to grant read or write access permission on the collection to selected
user and uncheck the “Grant” checkbox to revoke the permission from the user.
When you finish, click
to update user’s permissions.
2.3. Material Type Settings
Under the Administration menu, open the “Material type” window (Figure 2.3) to add,
edit and delete a type of biological materials. A list of default material types has also
been included in the iCollect system.
o To add a new type of material, enter the material name and description, and
o
o
then click
.
To edit a material type, click on the row corresponding to the material you
want. Make your changes to the material name and description. Click
to record your changes.
Click on the row corresponding to the material type you want, click
delete the material type
to
6
© 2011 ISL/BIOTEC. All Rights reserved.
Information Systems Laboratory (ISL),
National Center for Genetic Engineering and Biotechnology (BIOTEC), Thailand
iCollect 1.1.50
Figure 2.3 Material Type Settings
2.4. Automatic Backup Setting
Under the Administration menu, select ‘Backup Configuration’ to do the following tasks.
Schedule the backup to automatically run daily, weekly, monthly or at certain
times.
Specify the location where the backup database will be saved.
Change and turn off the backup schedule.
The scheduled backup files will be maintained in the user-defined folder. However, you can
manually copy the backup files to other folders to maintain several backups.
2.5. Storage /Container Setting
Under the menu “Storage/Container”, users can define container type and storage
structure. (See detail in Section 6)
2.6. Quality Control Profiles Setting
Under the menu “Quality Control”, you can click on ‘Profiles’ to add a new profile. (See
detail in Section 8)
2.7. Service Configuration Settings
Under the menu “Services”, you can define a new service type and its profile. (See detail
in Section 9)
7
© 2011 ISL/BIOTEC. All Rights reserved.
Information Systems Laboratory (ISL),
National Center for Genetic Engineering and Biotechnology (BIOTEC), Thailand
iCollect 1.1.50
3. Specimen
This part allows user to enter basic specimen information in a collection as defined in
collection settings, record-by-record through the menu “specimen management” or
“Import/Export Specimens”.
3.1 Management
When you open the “Specimen Management” window, you will find three tabs
including “Add New Record”,”Edit a Single Record” and “Edit /Delete Record
(Sheet view)”.
3.1.1 Add New Record: In this tab, you first choose a collection, the
collection data structure of a single record will appear. You can
then enter information on a specimen for the selected collection
and click
.
Edit a Single Record: There are three steps in updating the
specimen information.
Step 1: Choose a collection you want, the list of specimens of that
collection will display.
Step 2: Locate a specimen from the list to edit the data presented in the
“Specimen’s Detail” frame.
Step 3: Other types of specimen information including images, references,
and applications can be added to each specimen as well.
3.1.2
•
Click
to add/update information about
specimen’s utilizations.
•
Click
to add/update a list of references to a
specimen record. (See detail in Section 3.4)
•
Click
records.
to add/update images into specimen
to add/update files into specimen records.
• Click
In addition, iCollect provides you to view the deposit and quality check
records for each specimen.
•
Click
to view the quality checking records
Click
to view the deposit history for the
selected specimen.
Edit/Delete Record (Sheet View): This tab allows user to search,
view and update multiple specimen records.
•
3.1.3
3.2 Geographic Coordinates
If the specimen contains the information of location in latitude and longitude
format, user can view the location on map via this menu.
• To view map
Step 1: Select a collection from “select collection” combo box.
Step 2: Specify criteria and choose column to display data in filters box
(optional)
Step 3: Click
Step 4: Select sample to display on the map.
Step 5: Click
3.3 Molecular Sequences
Users can add, update, delete and search the molecular sequences. When you
click “Molecular Sequences” from the menu panel, the “Sequence” window will be
display. The “Sequence” window is vertically separated into two main parts. On
the left-hand side, you can search the molecular sequences of the
specimens/samples in a collection. On the right hand side, you can add a new
8
© 2011 ISL/BIOTEC. All Rights reserved.
Information Systems Laboratory (ISL),
National Center for Genetic Engineering and Biotechnology (BIOTEC), Thailand
iCollect 1.1.50
sequence (file), update and remove the existing sequence file to a
specimen/sample.
• To add a sequence,
Step 1: Select a collection from “Search collection” in “Search
Samples” frame”.
Step 2: Choose a specimen/sample from the list in “Code”.
Step 3: Browse for a sequence file or enter a sequence directly in
the “Sequence” tab.
Step 4: Type “Name” , select “ Gene Type” and “Sequence Type”
Step 5: If the input sequence contain invalid character
Step 6: Click
database
to add the sequence information into
Figure 3.3-1 Molecular Sequence Interface
•
To modify or delete a sequence
Step 1: Select a collection from “Search collection” in “Search
Samples” frame”.
Step 2: Specify the criteria to retrieve the record you want to
modify or delete. For example, specify the “strain code”
column as “AOM0005” and click “Search”. The results will be
shown in the “Search Result” tree view.
Step 3: Select a sequence you want to update/delete. For example,
click on “test” in the tree, iCollect will display the sequence
information of “test” in the “Detail” frame.
a. If you want to update the data, modify any information
as you want and click
to record your changes.
b. If you want to delete the data, click
.
9
© 2011 ISL/BIOTEC. All Rights reserved.
Information Systems Laboratory (ISL),
National Center for Genetic Engineering and Biotechnology (BIOTEC), Thailand
iCollect 1.1.50
Figure 3.3-2 Search and Update Sequence Data
3.4 References
The “Reference” menu provides user to manage information on references of a
specimen/sample. The “References” information includes journal articles, books,
book chapters, proceeding articles and reports. In this part, users can perform two
following tasks.
3.4.1 Add/Import the references
• Enter directly a single record of reference to the system
o
o
o
Enter a reference title into “Reference Title” and Click
.
iCollect will add and display a row containing the reference title from
previous step into the “Search Result(s)-List of Reference(s)” table.
Update the data for each row of reference and set the reference code.
Click
o
•
Click
.
to delete the reference on that row
Import the references from the BibTex file
o
o
Click on
to browse and select for a file containing the
references data in BibTex format.
iCollect will upload the file into “Search Result(s)-List of Reference(s)”
table.
o
Update the data for each row of reference and click
o
Click
to delete the reference on that row
3.4.2 Set/Remove references to a specimen/sample
10
© 2011 ISL/BIOTEC. All Rights reserved.
Information Systems Laboratory (ISL),
National Center for Genetic Engineering and Biotechnology (BIOTEC), Thailand
iCollect 1.1.50
Figure 3.4.2 Set Specimen‘s references
Step 1: Select a collection and click a specimen in the “List of Specimens” from
Reference(s) window (Figure 3.4.2) to select a specimen you want to add
references
Step 2: In “Search Result(s)-List of Reference(s)” table, click “ Select “ checkbox
on the row corresponding to the reference you want
Step 3: Click
to set the selected references to the specimen. The
list of selected references of the active specimen will then appear in the “List
of Specimen’s Reference”
Step 4: Click on the checkbox in front of the reference code appear in the “List of
Specimen’s Reference” and click
reference from the specimen
to remove the checked
4. Sample Management
Figure 4-1 “Sample” Menu
In Sample Management (Figure 4-1), this part allows users to search, create and
remove samples of biological materials.
4.1 Search Specimen/Samples
Users can search for specimens/samples in a particular collection and perform
actions on the selected specimen/samples in three steps as shown in Figure 4.2.1-1.
Step 1: Choose a collection from the list shown in “Select collection”. The columns
of selected collection will appear. Users can specify values of each column to
search the specimen/samples and Click “Search”.
11
© 2011 ISL/BIOTEC. All Rights reserved.
Information Systems Laboratory (ISL),
National Center for Genetic Engineering and Biotechnology (BIOTEC), Thailand
iCollect 1.1.50
Step 2: Search result will display in “List of Samples” treeview, a visual
presentation of hierarchical node data. There are three types of icons displayed at
each branch of the tree. Within “List of Samples” treeview, users can use to do
following.
o
Click on the
checkbox to select the specimen/sample
o
Click
to expand the tree branch to view the list of samples
o
Click
to collapse all levels within that branch
o
Right click on the tree node to view the history log of the specimen/sample
within that branch or edit the reason in creating/removing the sample on
that node
Step 2
Step 1
Step 3
Figure 4.2.1-1 Search and Select Specimens/Samples within three steps
Step 3: The selected specimens/samples will display in “Selected sample (s)”.
Users can click on
o
Click
to select and submit samples from the selected
specimens/samples to be appear in “Create samples”. See detail in
Section “Create samples”.
o
Click
to submit samples to “Remove samples” datagrid as shown
in Figure 4.2.1-2 to be further removed, see detail in Section “Remove
samples”.
Figure 4.2.1-2 A Selected sample appear in “Remove samples” datagrid
o
Click
in to view the history log of the selected
specimens/samples as illustrated in Figure 4.2.1-3.
12
© 2011 ISL/BIOTEC. All Rights reserved.
Information Systems Laboratory (ISL),
National Center for Genetic Engineering and Biotechnology (BIOTEC), Thailand
iCollect 1.1.50
Figure 4.2.1-3 History of actions performed on the selected sample
4.2 Create Samples
From previous section, some specimens/samples has already been selected
and displayed in “Create samples” data-grid. Each row in “Create samples” can be
used to increase a number of samples/aliquots from the selected
specimens/samples within the following steps.
Figure 4.2.2 Steps to increase the number of samples
At each row as shown in Figure 4.2.2, specify the specimen/sample
container and quantity of samples you want to create. Check
keep the source specimen/sample.
“Keep” to
The quantity of samples specified will be generated into the data-grid on
the right as shown in Figure 4.2.2. You can click
to
create samples for preservation, otherwise click
to open the
“Select reason” frame to choose reasons for each sample. After that, click
to store and preserve the created samples into storage.
In “Select Reason” frame, select a reason for creation of the samples
without storing into any storage facilities and click
. Click
13
© 2011 ISL/BIOTEC. All Rights reserved.
Information Systems Laboratory (ISL),
National Center for Genetic Engineering and Biotechnology (BIOTEC), Thailand
iCollect 1.1.50
to select the selected reason for all samples you want to create. Then,
click
to create the samples.
4.3 Remove Samples
In “Remove samples” as shown in Figure 4.2.3, you can perform the following steps
to remove the samples.
At the row corresponding to the specimen/sample you want to remove,
click
to choose reason in removing the sample. The “Select reason”
frame will appear on the right.
In “ Select Reason” frame, select a reason in removing the sample and click
. Click
remove.
to select reason for all samples you want to
Click
to remove the samples. The samples removed with
quality checking reason will appear in the menu “Quality Control Records”.
Figure 4.2.3 Removing a sample
5. Catalog
This part allows users to create custom catalog printing for distribution or report. Users
can determine criteria for data selection in creating their own personalized collection of
specimens/samples.
Figure 5 Catalogue Menu
5.1 Catalog profiles
Users are able to create the catalog profiles in order to select a set of
specimens/samples to be public available.
14
© 2011 ISL/BIOTEC. All Rights reserved.
Information Systems Laboratory (ISL),
National Center for Genetic Engineering and Biotechnology (BIOTEC), Thailand
iCollect 1.1.50
Figure 5.1-1 Profile Detail
In Profile Tab, a catalog profile can be created within five steps.
Step 1: Select a collection and enter the following items in the “Profile Detail”
(Figure 5.1-1)
Name: Type catalog profile name.
Display Name: Type the catalog name used for display
Type: Select a type of catalogs: Private and Public.
In Use: Specify the description of collection.
Step 2: Click
to add the new profile
Step 3: Add/Set the criteria for selection of the specimen/sample the catalog
profile in the “Profile’s criteria “ as illustrated in Figure 5.1-2.
Step 4: Click
to record the profile’s criteria and update the list of
specimens/strains that will be included in the catalog.
Step 5: Click
to open the “preview” tab to view the data that will be
shown in the catalog.
Notice that specimens from safe and patent deposits will not included in the
catalog.
Figure 5.1-2 Profile‘s criteria settings
Step 6: In “Preview “tab, the data that matches the profile criteria will be shown
in a table. You can select specimens by clicking on the checkbox and click
to remove them from the catalog. Click
catalog list.
After saving the catalog list, you can perform the following tasks.
•
•
Click
catalog
Click
to save the
to open the “catalog format” window to view the
to export the data into an XML file
15
© 2011 ISL/BIOTEC. All Rights reserved.
Information Systems Laboratory (ISL),
National Center for Genetic Engineering and Biotechnology (BIOTEC), Thailand
iCollect 1.1.50
•
Click
to export the data into an Excel file
Figure 5.1-3 Catalog Preview
5.2 Catalog formats
This part allows user to view the catalog report generated from the specified
catalog profile within the following steps.
o Select a collection and its catalog profile
o You can change the column title if you want
o
Click
to view the catalog report
Figure 5.2 Catalog Format
16
© 2011 ISL/BIOTEC. All Rights reserved.
Information Systems Laboratory (ISL),
National Center for Genetic Engineering and Biotechnology (BIOTEC), Thailand
iCollect 1.1.50
6. Storage/Container Management
The Storage/Container management module allows user to configure and customize the
physical layout of the storage capacity at the laboratory.
Container and Storage are two generic terms used in this module:
• Container – There are two types of containers as below.
o
Containers that are used to store aliquots or samples of biological materials.
Containers, for instance, boxes, tubes, plates, cane and bags can be with both
single-position and multiple positions.
o
Containers that will be stored inside the storage for holding sub-containers.
Shelves, drawers and racks are considered this type.
o Storage –Storages include storage cabinets, compartments and rooms. Most often
this will be freezers and refrigerators which used to preserve the aliquots or samples
at a very low temperature.
6.1
1
6.2
2
6.3
3
6.4
4
Figure 6 Storage/Container menu
6.1. Container Settings
The two main steps involved in the configuration process are:
Step 1: Open ‘Container Type’ from the menu ‘Storage/Container’ to create generic
container and storage types as shown in Figure 6.
To add a new type of containers, enter the container name and set the
container properties as below and Click
.
If both “Is Freezer” and “Is Storage” are not checked, the container
will be used to store the samples of biological materials.
If both “Is Freezer” and “Is Storage” are checked, the container is
considered Freezer. For example, the refrigerated cabinets where
biomaterials can be preserved at a very low temperature could be
specified as freezers.
If “Is Storage” is checked, the container is considered Storage or what
containers can be stored inside.
To edit a container type, click on the row corresponding to the container you
want. Make your changes to the container name and properties. Click
to
record your changes.
To delete the container, click on the row corresponding to the container you
want, click
.
17
© 2011 ISL/BIOTEC. All Rights reserved.
Information Systems Laboratory (ISL),
National Center for Genetic Engineering and Biotechnology (BIOTEC), Thailand
iCollect 1.1.50
,
Figure 6.1.1 Container Type Settings
Step 2: Select ‘Container Configuration’ from the menu ‘Storage/Container’ to create
container configurations that represent actual containers used in the lab and where the
container configurations will be stored. In “Container Configuration” window as shown
to define a new container configuration within
in Figure 6.1.2, click
three steps.
Choose a Container Type defined in Step 1 and enter the configuration name.
If the selected container type is Freezer, the “Freezer Details” will be enabled
otherwise will be disabled.
• In “Freezer Detail”, users need to specify a type of coolant such as
liquid nitrogen, liquid carbondioxide, temperature, and volume
Determine the sample capacity of container: single position and multiple
positions.
(a) For single position container, click “single position” and click
.
(b) If multiple positions checked, there are two options as below
Option I: Specify “Maximum sub-containers” to limit the number of
samples stored in the container, but the storage-position
assignment is not required.
Option II: Select “Assign Position” if position assignment is required
for
(c) For both options, at the “Sub-Container Relation” section, you can
define what types of sub-contianers can store inside the container.
18
© 2011 ISL/BIOTEC. All Rights reserved.
Information Systems Laboratory (ISL),
National Center for Genetic Engineering and Biotechnology (BIOTEC), Thailand
iCollect 1.1.50
(a)- (b)
(c)
Figure 6.1.2 Container Configuration Settings
6.2. Storage Configuration
Select ‘Storage Management’ from the menu ‘Storage/Container’ to create storage
configurations that use the predefined container configurations into storage structure
hierarchy. There are four main tabs to support the storage management.
Create Storage Tab: This tab allows user to create a new storage facility into the
database.
Storage Organization Tab: Storages created in will be defined their storage
structure hierarchy in this tab.
Copy Storage Tab: The structure of existing storages can be copied to a new
storage that has the same model.
Move Container Tab: Sometime, the existing storage facility might be failed, it is
necessary to transfer specimens/samples and their data to another storage. This part
allows user to move the container between storages.
6.2.1 Create Storage Tab
To create a new storage, click
and enter the storage information as
below.
o Select a type of storage from the list of “Storage Configuration”
previously defined in the “Container Type” setting.
o Enter the storage facility name in Storage Label
o Specify the warning condition for storage monitoring : the minimum
liquid volume and maximum temperatures
o
Click
19
© 2011 ISL/BIOTEC. All Rights reserved.
Information Systems Laboratory (ISL),
National Center for Genetic Engineering and Biotechnology (BIOTEC), Thailand
iCollect 1.1.50
Figure 6.2.1 Create Storage Tab
6.2.2 Storage Organization Tab
Figure 6.2.2 Storage Organization Tab
As illustrated in Figure 6.2.2, to define the storage structure,
o click on the node containing storage name you want from the “Storage
organization” treeview
o Select a container type to be stored inside the storage from the list of
“Container Configuration”
20
© 2011 ISL/BIOTEC. All Rights reserved.
Information Systems Laboratory (ISL),
National Center for Genetic Engineering and Biotechnology (BIOTEC), Thailand
iCollect 1.1.50
o
o
If you want to store only one container inside the storage, just enter the
name at “Label (Specified)” and click
to finish the
process.
If you want to store more than one container, click “more than one
containers” checkbox to enable the “Label (Running)” part.
o Choose the label type to be alphabetic or numeric
o Specify the letter or number used in running the container label
name
o Specify the quantity of containers you want to store inside the
selected storage
o
Click
to finish the process.
6.2.3 Copy Storage Tab
Figure 6.2.3 Copy Storage Tab
To
o
o
o
o
o
copy a storage structure,
Click to open “Copy Storage “ tab as illustrated in Figure 6.2.3
Select a storage configuration shown in the list of “Storage Configuration”
Enter the quantity of storages to be copied
Specify the name for new storages copied from the selected configuration
in the following two alternatives.
o Name (Specified): you can manually specify the individual storage
name
o Name (Running): The storage name will be automatically running
by user-defined label type and start of the label.
Click
to generate copies of storage facilities
6.2.4 Move Container Tab
To move container between storage facilities,
o Click to open “Move Container “ tab as shown in Figure 6.2.4
o Select a container you want to move out from the left source-container
treeview
o Locate and select a target container that you want to move the sourcecontainer in
21
© 2011 ISL/BIOTEC. All Rights reserved.
Information Systems Laboratory (ISL),
National Center for Genetic Engineering and Biotechnology (BIOTEC), Thailand
iCollect 1.1.50
o Click
container
to move the source-container into the target/destination
Figure 6.2.4 Move Storage Tab
6.3. Storage Operations
In the “Storage Map” menu, the in and out movement of samples in the storage are
recorded and tracked for audit trail. Moreover, the graphical tree view of the samples
can be used to trace the aliquot/sample back to its original parent.
Figure 6.3.1 Add Samples to Storage
22
© 2011 ISL/BIOTEC. All Rights reserved.
Information Systems Laboratory (ISL),
National Center for Genetic Engineering and Biotechnology (BIOTEC), Thailand
iCollect 1.1.50
6.3.1. Moving samples into storage
In “Storage Map” menu as shown in Figure 6.3.1, you can move sample to and
from storage within the following steps
o Select a container containing the sample you want or you can search for
location of the samples
o When the container is selected, the samples stored inside will appear.
Click on the sample you want to move and click
you want to move all samples in the containers, click
o
o
. If
.
All removed samples from previous steps will display in the “List of
unallocated samples”. Select the samples you want to move and locate
the target container in the tree
Select the target container, click
.
6.3.2. Viewing samples or containers in storage
Figure 6.3.2 Storage Tree and Map
There are two main parts in viewing samples and containers in storage facilities
as shown in Figure 6.3.2.
o Storage Tree: On the left, a list of defined storages is display in a
visual presentation of hierarchical storage structure.
o The
icon indicates the container can be expanded to view
the next level or the list of samples. You can click
to expand
the branches of the tree.
o Click
to collapse all levels within that branch
o Storage Map and Table : On the right, a list of samples in the
containers will display in the map or table.
o If the container is assigned the exact position dimension, the
samples will be presented in a map.
o If the container is not assigned the exact positions, the samples
in the container will be presented in a table.
23
© 2011 ISL/BIOTEC. All Rights reserved.
Information Systems Laboratory (ISL),
National Center for Genetic Engineering and Biotechnology (BIOTEC), Thailand
iCollect 1.1.50
6.3.3. Searching samples in storage
Figure 6.3.3 Search Samples in Storage
To search samples in storage,
o Open “Search Specimen’s samples” part (Figure 6.3.3) in “Storage Map”
window, specify the search criteria for each column and click
o
o
.
You can leave all criteria blank and click
to get all the samples in
the selected collection
Search results will appear on the right. Samples stored in storage facilities
will display with its location in the “Pos” column.
You can also export the search result to a file in a particular format such as
CSV, EXCEL. Select a file format, enter the filename and click
6.4. Storage Monitoring
This part provides users to manually keep history of storage status for monitoring and
alarm needs. Users can regularly record liquid nitrogen level and temperature of
freezers. If the recording liquid level and temperature are under/over the specified
threshold values, the storage name with warning message will display in red.
In Figure 6.4, open “Liquid level” tab to make a record of liquid level for a specific
storage and switch to “Temperature” tab to update the temperature of storage.
Figure 6.4 Storage Monitoring Records
24
© 2011 ISL/BIOTEC. All Rights reserved.
Information Systems Laboratory (ISL),
National Center for Genetic Engineering and Biotechnology (BIOTEC), Thailand
iCollect 1.1.50
7. Barcode
This part allows user to easily find a sample’s position in the storage, and add a sample to a
selected storage position using the barcode assigned by iCollect. Users can also print
barcode labels in any compatible printers and paste label on each sample container. The
barcode number found on the sample container can be read from the barcode scanner or
entered directly into iCollect system to search for sample information. In the “Barcode”
module, there are three following menus.
Figure 7-1 Barcode Menu
7.1. Storage Map Using Barcode Scanner
You can use the barcode scanner to read the barcode number from the sample
container in order to move sample to and from the storage.
Figure 7.1.1 Storage Map using Barcode Number
• Add sample to storage
After reading the barcode, iCollect will retrieve and display a row of sample
information in the table in “List of unallocated samples”. You can click on a row
corresponding to the sample/specimen you want to store into storage. At the ‘Storage
25
© 2011 ISL/BIOTEC. All Rights reserved.
Information Systems Laboratory (ISL),
National Center for Genetic Engineering and Biotechnology (BIOTEC), Thailand
iCollect 1.1.50
Map’ treeview, click on the storage you want to keep the specimen/sample and
click
.
• Remove sample from storage
The sample stored in the storage facilities can be searched using barcode number. Search
result will appear in “Search Specimen’s Sample”. The container position, where sample is
stored, will display in “Storage Map” or “Storage Table” so that you can remove the sample
from the storage by clicking
.
7.2. Scan Barcode
To retrieve basic information of a sample, you can use barcode scanner to read the
barcode number labeled on the container. If no barcode scanners are available, you
can type the barcode number found on the label to search for sample information. In
Figure 7.2.1 enter the barcode number and click
.
Figure 7.2.1 Scan Barcode/ Enter Barcode Number
7.3. Print Barcode
Under the menu “Print barcode”, three main steps are involved in printing the barcode
labels.
• Step 1: Sample Selection:
Select a collection you want to print the barcode label, specify the search
condition and click
. Search results will appear as a list of
samples/specimens presented in the “Tree view” tab.
• Step 2: Label and Printer setting:
In this step, you can create the customized barcode label with including sample
information with the barcode image. At the top-right frame of “Print Barcode”
window, you can also setup a custom printing layout according to number of
barcode labels within a single page, page margins, label width & height,
barcode image size, font size and horizontal & vertical pitch, so the labels can
be printed in compatible printer. Click
to open “Show Barcode”
tab, and you can preview a page of barcode labels before printing.
• Step 3: Barcode Labels Printing:
To print all the labels, you can click
“Show Barcode” tab.
or click
on the toolbar in
26
© 2011 ISL/BIOTEC. All Rights reserved.
Information Systems Laboratory (ISL),
National Center for Genetic Engineering and Biotechnology (BIOTEC), Thailand
iCollect 1.1.50
8. Quality Control
This part allows user to create definable quality control profiles. Each profile allows test
methods to be defined and data to be recorded for each sample. Under the menu “Quality
Control” which illustrated by figure 8-1, you can perform the following tasks.
Figure 8-1 Quality Control Menu
8.1. Quality Control Profiles
This part allows users to create and edit the quality control profiles.
• Add a new profile
Step 1: Click
, a dialog box as shown in Figure 8.1.1 will appear.
Type the profile name and Click
. The new profile will be found in the
table ‘List of Quality Control Profiles’.
Figure 8.1.1 Add a New Profile Name
Step 2: Click at the row containing the new profile name, and click
to add a type of quality control result. A dialog box in Figure 8.1.2 will appear
so you can enter the result type and click
. The added result type will
be displayed in the table “Result Set”. You can add more than one result type
for each profile.
Figure 8.1.2 Add a Result Type
•
Edit a profile
You can click
to retrieve all quality control profiles from the
database. Search results will display in the table ‘List of Quality Control
Profiles’.
Step 1: In the ‘List of Quality Control Profiles’, click at the row containing the
profile name you want to edit. The result types of that profile will appear in
the table “Result Set”.
27
© 2011 ISL/BIOTEC. All Rights reserved.
Information Systems Laboratory (ISL),
National Center for Genetic Engineering and Biotechnology (BIOTEC), Thailand
iCollect 1.1.50
Step 2: Click
if you want to add a new type of quality control result.
Step 3: In the table “Result Set”, click the row you want to modify, make
change on the result type and click
type.
. Click
to remove the result
8.2. Quality Control Records
Two main functions are allowed in the menu “Quality Control Records” as below.
8.2.1. Search Sample/Specimen in Quality Control Records
You can specify search criteria and click Search. Search results will display in the
List of Quality Checking Samples.
8.2.2. Update the Quality Check Results
In the List of Quality Checking Samples, you can
o
update the result for each row by specifying the result values for “Result
type” and “Check Date” and click
o
Click
, and
to remove the quality check record.
9. Services
7.3
7.2
7.1
Figure 9-1 Services Menu
9.1. Service Configuration
Under the Service Configuration menu, iCollect allows user to create custom types of
services.
9.1.1. Service Types
In “Service types” menu, you can add, edit and delete a type of services. A list of
default service types has been included in the iCollect system as shown in Figure 9.1.1.
o To add a new type of services, enter the service type and description, and then
o
o
click
.
To edit a type of services, click on the row corresponding to the service type
you want. Make your changes to the service type and description. Click
to record your changes.
Click on the row corresponding to the service type you want, click
to
delete that type.
28
© 2011 ISL/BIOTEC. All Rights reserved.
Information Systems Laboratory (ISL),
National Center for Genetic Engineering and Biotechnology (BIOTEC), Thailand
iCollect 1.1.50
Figure 9.1.1 Service Type Definitions
9.1.2. Documents for services
This part allows user to register the generic types of required documents that must
be submitted by the customers in the service process. In “Documents for services”
menu, you can add, edit and delete a document type. A list of default document
types has been included in the iCollect system as shown in Figure 9.1.2.
o To add a new type of documents, enter the Document Name and Description,
o
and then click
.
To edit a type of documents, click on the row corresponding to the document
type you want. Make your changes to the Document Name and Description.
o
Click
to record your changes.
Click on the row corresponding to the document type you want, click
delete the document type.
to
Figure 9.1.2 Documents used in service process
29
© 2011 ISL/BIOTEC. All Rights reserved.
Information Systems Laboratory (ISL),
National Center for Genetic Engineering and Biotechnology (BIOTEC), Thailand
iCollect 1.1.50
9.1.3. Service Profiles
This part gives user to define each profile for services. After specifying the service
and document types, open the “Service Profiles” window (as shown in Figure 9.1.3)
to define the service profile in following steps.
Step 1: Enter the profile name of service and determine the service type. For
example, the profile name “supply-bacteria” is in “supply of materials” service
type. In “Details” textbox, users can optionally add the more detailed description
of service profile
Step 2: Specify the conditions of service and the required documents for service
requests.
Step 3: Define pricing options for each service profile. For example, pricing
depends on the costs of different sample preparations.
Step 4: Click
to record the profile
Figure 9.1.3 Service Profile Settings
9.2. Customers & Accounts Registration
To request the services, customers need to register an account within the following
steps.
30
© 2011 ISL/BIOTEC. All Rights reserved.
Information Systems Laboratory (ISL),
National Center for Genetic Engineering and Biotechnology (BIOTEC), Thailand
iCollect 1.1.50
Figure 9.2.1 Customer Registration
9.2.1. Customer Registration
To register a new customer, open the “Customer Data” window as shown in Figure
9.2.1
o Click “New” to start the registration for a new customer
o Enter the following information of the customer
Name: Type the customer name
Profit: Checked if is affiliated with a profit organization
Home Address: Specify the customer‘s home address
Email: Type an email address
Office Address: Specify the customer‘s office address
Billing Address and/or Shipping Address: Specify if it is the same as
customers’ Home Address or Office Address
o Click
The registered customer will appear in the bottom-left table, you can click on the
row containing the customer name you want to edit or delete.
o If you want to delete the customer, click
o
If you make changes on the customer, click
to record your changes.
9.2.2. Account Registration
To open an account for a registered customer, open “Account” window as shown in
Figure 9.2.2
o Click “New Account” to open a new account for a customer
o Enter the following information of the account
Customer Name: Select the registered customer name
Account Name: Specify the account name
Billing Address and/or Shipping Address: Specify if it is the same as
customers’ Home, Office, Billing or Shipping Address. You can enter other
address by clicking “Other” checkbox to enable typing other address.
Active Account: Click if the account is active
31
© 2011 ISL/BIOTEC. All Rights reserved.
Information Systems Laboratory (ISL),
National Center for Genetic Engineering and Biotechnology (BIOTEC), Thailand
iCollect 1.1.50
Discount: Enter the discount rate for this account
o Click
The opened account will appear in the bottom-left table, you can click on the row
containing the account name you want to edit or delete.
o If you want to delete the account, click
o
If you make changes on the account, Click
to record your changes.
Figure 9.2.2 Account Registration
9.2.3. Nationality
Under the Nationality menu, you can add, edit and delete a nationality. A list of
default nationality has been included in the iCollect system as shown in Figure 9.2.3.
o To add a new type of material, enter the nationality name and description,
o
o
and then click
.
To edit a nationality, click on the row corresponding to the nationality you
want. Make your changes to the nationality name and description. Click
to record your changes.
Click on the row corresponding to the nationality you want, click
to
delete the nationality
32
© 2011 ISL/BIOTEC. All Rights reserved.
Information Systems Laboratory (ISL),
National Center for Genetic Engineering and Biotechnology (BIOTEC), Thailand
iCollect 1.1.50
Figure 9.2.3 Nationality Data Settings
9.3. Service Operations
This part allows users to manage the service process using the predefined service
profiles.
Figure 9.3.1-1 New Deposit Interface
33
© 2011 ISL/BIOTEC. All Rights reserved.
Information Systems Laboratory (ISL),
National Center for Genetic Engineering and Biotechnology (BIOTEC), Thailand
iCollect 1.1.50
9.3.1. Deposit
To make a deposit transaction of specimens/samples, user can process a deposit via
the “New Deposit” Menu as described below.
o Open “Detail” tab, as illustrated in Figure 9.3.1-1
o Select Collection, Service Profile, Account for the deposit transaction
o Specify Order date and Service Date
o
Import the specimens/samples from the Excel file and click
Imported data will appear in the List of Specimen(s). You can select the
container type, quantity and deposit decision for all or each
specimen/sample
Switch to “Options” tab, select a pricing option as shown in Figure 9.3.1-2
o
Back to “Detail” tab, click
o
o
Figure 9.3.1-2 Selection on Pricing Options
9.3.2. Make a Service order
To make a service order, open the “Service Data” menu
o Locate the “Detail” tab, as illustrated in Figure 9.3.2-1
o Select Service Profile, Account for the deposit transaction
o Specify Order date
o
o
o
Click
to open “ Select Sample(s) for Service” window as shown
in Figure 9.3.2-2
Select a collection and its catalogue you want to retrieve specimens and
samples for services
Click on a specimen, the list of samples will appear. Click on a sample and
click
to send the sample into “Selected Sample(s)”. To remove a sample
from the selected list, click on the sample and click
. In case of deposit
service, the specimens/samples for deposit must be previously imported
through the “Import/export Specimens” menu.
o
o
o
Click
to finish samples selection and close “ Select Sample(s) for
Service” window . The selected samples will appear in “List of
Specimen(s)” in “Detail” tab.
Switch to “Options” tab, select a pricing option as shown in Figure 9.3.2-3
Back to “Detail” tab, update status (accept or reject) for each row and
click
o
. Total price will be calculated and shown.
Click
to receive the order. The order status bar will display at
the bottom of the window. The received order will be display as in Figure
9.3.2-4
34
© 2011 ISL/BIOTEC. All Rights reserved.
Information Systems Laboratory (ISL),
National Center for Genetic Engineering and Biotechnology (BIOTEC), Thailand
iCollect 1.1.50
o
iCollect will display a confirmation dialog box asking user to save changes
o
that have been made. Click
to confirm, otherwise click
The “confirm receive order” dialog box will appear after user has saved
changes in the previous step. Click
click
.
to receive order, otherwise
.
Figure 9.3.2-1 Make a Service Order
Figure 9.3.2-2 Select Samples for Services
35
© 2011 ISL/BIOTEC. All Rights reserved.
Information Systems Laboratory (ISL),
National Center for Genetic Engineering and Biotechnology (BIOTEC), Thailand
iCollect 1.1.50
Figure 9.3.2-3 Select a pricing option
Figure 9.3.2-4 Received Order
9.3.3. Renewal and Termination of Maintenance
This part allows user to handle requests from depositors to renew or terminate
their deposit. After the deposition period has expired, the depositors may request
to renew or terminate their deposit. To make a renewal deposit, you may search
36
© 2011 ISL/BIOTEC. All Rights reserved.
Information Systems Laboratory (ISL),
National Center for Genetic Engineering and Biotechnology (BIOTEC), Thailand
iCollect 1.1.50
for specimens/strains that their maintenance period has expired (Figure 9.3.3-1a).
A list of specimen will appear for your selection.
•
Click
to open “Renewal “ window to renew the
deposit of selected specimens (Figure 9.3.3-3)
•
Click
to remove all the samples of selected
specimens/strains from storage, destroyed and terminate the deposit, if
depositors not responding to your requests for renewal of maintenance.
However, depositors may request termination of their deposit at any time. Figure
9.3.3-1b illustrates how to search for specimens/strains for termination request
before the end of maintenance period.
• Select a collection and click “Maintenance period has not expired” or
specify the “Remaining maintenance period”
• Click search and select the required specimens as illustrated in Figure
9.3.3-2
•
•
•
Click
to open “Termination of Maintenance”
service windows as shown in Figure 9.3.3-4
Select a created service profile for termination of maintenance and click
“Save”. After the termination request has been processed, iCollect will
remove all the samples of selected specimens/strains from storage,
destroyed and terminate the deposit.
Alternatively, materials will be shipped back to the depositor for additional
shipping and handling fee, if depositors send their request. As shown in
Figure 9.3.3-1b, click
to open the service
windows for processing the termination service with shipping and handling
fee.
(a) Search for expired deposits
(b) Search for non-expired deposits
Figure 9.3.3-1 Search deposits by the maintenance period conditions
37
© 2011 ISL/BIOTEC. All Rights reserved.
Information Systems Laboratory (ISL),
National Center for Genetic Engineering and Biotechnology (BIOTEC), Thailand
iCollect 1.1.50
Figure 9.3.3-2 Select a list of specimens for termination
Figure 9.3.3-3 Make a renewal deposit
38
© 2011 ISL/BIOTEC. All Rights reserved.
Information Systems Laboratory (ISL),
National Center for Genetic Engineering and Biotechnology (BIOTEC), Thailand
iCollect 1.1.50
Figure 9.3.3-4 Termination of specimens/samples maintenance
10. Statistics & Log
iCollect provides feature for BRC administrators and collection managers to summarize and
analyze trends of collection data and usages of storages. Under the menu “Statistics”, you
can find three types of summary statistics.
Figure 10-1 Statistics Menu
10.1.
Collection Summary
When you open the menu “Collection Summary”, iCollect will give you a summary on all
specimen collections including
Total number of collections registered
Total number of specimens and samples
Maximum, Average and Minimum number of specimens and samples per
collection and storage
Maximum, Average and Minimum number of samples per specimen
In the “Collection Summary” tab, choose a collection to see the summary of number of
specimens and samples. Two in-built comparison charts of collections are included to
give you see the different number of specimen/samples registered within the
collections.
10.2.
Storage Summary
In the menu “Storage Summary”, you can find the summary and charts of storage
usages by storage types and storage configurations.
Total number of storages included in iCollect
Total number and Percentage of occupied positions for each storage
Total number and Percentage of empty/available positions for specimens in
each storage
39
© 2011 ISL/BIOTEC. All Rights reserved.
Information Systems Laboratory (ISL),
National Center for Genetic Engineering and Biotechnology (BIOTEC), Thailand
iCollect 1.1.50
Comparison charts of storage usages
10.3.
User Summary
iCollect provides the summary of collections and specimens/samples created by each
user. When you open “User Summary” window, you will find the following
Total number of user accounts registered within iCollect
Average number of collections created by a user
Number of collections and samples per user account
Charts of collection distribution
Click on Refresh to reload the update summary.
10.4.
Data Log
In addition to usage statistics, the full audit trail history of any individual user within
iCollect is provided. Under the Administration menu, open the “Data Log” (as show in
Figure 10.4) to search and view who acted what to which data from which terminal and
when.
Step 1: Specify the search criteria and Click
to retrieve the history logs.
Step 2: The following items in Search Result will be displayed in “Data Log“ table.
User Domain Name: Display the Network Domain name where the computer
used by user is located.
Computer Name: Display the Computer Name where the user logon to the
system.
User Name: Display the User name of who made the action.
Action: Display the type of actions that users acted to the data including insert,
update and delete.
Action Detail: Display the detail on data attributes that were changed.
Data Group: Display the data group that was affected by the action
Date: Display the date when the action was done.
Step 3: Check or Uncheck “Show” checkbox to select the column from search result. You
can also export the data log to a specified file by selecting a file format and clicking
the
.
Figure 10.4 Data Log
40
© 2011 ISL/BIOTEC. All Rights reserved.
Information Systems Laboratory (ISL),
National Center for Genetic Engineering and Biotechnology (BIOTEC), Thailand
iCollect 1.1.50
11. Other
11.1 Import/Export
This part allows you to import/export specimen data from/to data file.
• The “Import” tab provides users to import the data from an MS-excel file in
three steps.
Step 1: Choose a collection you want to import the data.
Step 2: Click
to open the specimen data file and choose the worksheet
that contains the data.
Step 3: You need to map the column from the excel file with the collection data
column. At each row in the mapping table, choose the value under “Source
Column” that you want to import into the column in “Destination Column”. When
you finish the column mapping, click Import.
• The “Export” tab allows users to export the specimen data from iCollect into a
file in particular format including Excel, CSV, TXT, and XML. First, choose a
collection and its columns you want to export the data and click View. Next,
choose the file format “Select Fileexport” and click Export.
11.2 Data Exchange
In “Data Exchange“ menu, there are two options provided for schema mapping,
data mapping and exchanging the data with other organizations: Standard Schema
and Web Services.
11.2.1 Data Exchange using a Specific Schema
This part allows user to upload the target Data Schema from the specified
schema file (e.g., Excel, XML File formats) to use in data mapping. In “Create
data” tab as shown in Figure 11.2.1-1, select “Load Schema” tab to create the
dataset by mapping data columns of source schema (iCollect) and target
schema within following steps.
41
© 2011 ISL/BIOTEC. All Rights reserved.
Information Systems Laboratory (ISL),
National Center for Genetic Engineering and Biotechnology (BIOTEC), Thailand
iCollect 1.1.50
Figure 11.2.1-1 Upload Schema in Create Data Tab
Step 1: Click
to load the schema file
Step 2: Select Table from the following choices
Figure 11.2.1-2 Specifying the Data Source
•
•
•
Select Collection – select a data set that has been stored by iCollect
itself.
Browse File – import a dataset from ms excel file (.xls) or ms access file
(.mdb)
Connect DB - retrieve dataset from MySQL or MS SQL database server.
Step 3: Determine what data you want to retrieve from database in “Data
Source” by clicking on the checkboxes and choose a collection from the list
shown in “Select Collection”. When you change the ‘Data Source’ selection,
you need to refresh “Data Source” by reselecting the collection in “Select
Collection”.
42
© 2011 ISL/BIOTEC. All Rights reserved.
Information Systems Laboratory (ISL),
National Center for Genetic Engineering and Biotechnology (BIOTEC), Thailand
iCollect 1.1.50
Figure 11.2.1-3 Customized Column Mapping
Step 4: Go to “Column Mapping”, specify the destination column (from
loaded schema) that will be mapped with the source column
Step 5: Click
to select the column on that row or Click “Select all” to
select all columns and click
Figure 11.2.1-4 Mapping Data
43
© 2011 ISL/BIOTEC. All Rights reserved.
Information Systems Laboratory (ISL),
National Center for Genetic Engineering and Biotechnology (BIOTEC), Thailand
iCollect 1.1.50
Step 6: Mapped and retrieved data will appear in the “Create data” as shown in
Figure 11.2.1-4, click “Select All” to select all rows to be exported or click
only the rows you want to export to the file
Step 7: You can filter the number of columns by selecting column displayed in
“Select column (s)”
Step 8: Specify the file format for data export and click
.
Step 9: Type filename and click
. The progress bar will display during
export process. When the export finished, a message appears saying “Export
completed”.
11.2.2 Data Exchange via Web Services
This part allows user to select and submit a dataset to a destination via SOAP
protocol. In “Web Service Management” tab as shown in Figure 11.2.2, you can
specify URL or a web service location and click
to load the WSDL
or Web Service Definitions for parsing and analyzing what services are
available, what are needed for input parameters and what will be
returned. The available services will appear in “Web service function list”.
When you double-click on a service in “Web service function list”, its required
input parameters will be listed and displayed in the bottom-left table.
URL
Figure 11.2.2 Accessing to the web service APIs
o
If the types of required parameters are
Generic and single such as String, you can directly enter the
data value into the “Input parameter”.
DataSet and Array type, you need to construct a set of
multiple data values for this parameter. See detail in
Section 11.2.2-1
Web-services Defined Type, you must load the web-service
defined type and perform the data mapping. See detail in
Section 11.2.2-2
44
© 2011 ISL/BIOTEC. All Rights reserved.
Information Systems Laboratory (ISL),
National Center for Genetic Engineering and Biotechnology (BIOTEC), Thailand
iCollect 1.1.50
o
After all required input parameters are ready, you can input the
o
parameter and click
.
Results will return and appear in the “Web service results”.
11.2.2.1 Data Preparation for DataSet and Array Type
To prepare the DataSet or Array type, you can perform the following steps.
Step 1: In “Create Data” tab, open “Select dataset type “tab
Step 2: Select the data type you want to create (Figure 11.2.2-1)
o
Click “DataSet” to select the DataSet type
o
Click “String Array” for an array of string values.
o
Click “Integer Array” to prepare an array of integer values.
o
Click “Decimal Array” to prepare an array of decimal values.
o
Click “Bitmap Array” to prepare an array of bitmaps.
Figure 11.2.2-1 Select a type of dataset
Step 3: Determine what data you want to retrieve from database for the
preparation. At the “Source Data” in Figure 11.2.2-2(a), click
to select
the data source and choose a collection from the list shown in “Select
Collection”. Or you can import data from a file and database server which
use the same procedure as described in section 9.2.1
(a) Data Source
Figure 11.2.2-2
(b) Column Mapping
Data Source and Data Mapping
Step 4: Go to “Column Mapping” as shown in Figure 11.2.2-2(b), specify the
destination column that will be mapped with the source column. Click
to select the column on that row or Click “Select all” to select all columns.
Step 5: click
45
© 2011 ISL/BIOTEC. All Rights reserved.
Information Systems Laboratory (ISL),
National Center for Genetic Engineering and Biotechnology (BIOTEC), Thailand
iCollect 1.1.50
Step 6: Mapped and retrieved data will appear in the “Create data” as
shown in Figure 11.2.2-3, click “Select All” to select all rows to be exported
or click
only the rows you want to include in the dataset
Figure 11.2.2-3 Mapped Dataset Result
Step 7: You can filter the number of columns by selecting column displayed
in “Select column (s)”. In case of Array data types (String Array, Integer
Array, Decimal Array and Bitmap Array), you can choose only one column
that its data type is not mismatch.
Step 8: Type the dataset name and click
created will appear in the “List of Datasets”.
. The dataset
11.2.2.2 Data Preparation for an Array of Web-Service Defined Type
To prepare an array of Web-Service Defined type, you can perform the following
steps.
Step 1: In “Create Data” tab, open “Select dataset type” tab
Step 2: Click “Other” (Figure 11.2.2-4) to select a web-service defined type
Figure 11.2.2-4 Web-service Defined Data type
Step 3: Determine what data you want to retrieve from database for the
preparation. At the “Source Data”, click on the checkboxes to select the data
source and choose a collection from the list shown in “Select Collection”
Step 4: Go to “Column Mapping” as shown in Figure 11.2.2-5,
o
o
Click
“Refer to columns defined in a web service” to be checked
Specify the “Reference object” and its “Method” that will be used
in mapping with the source column.
o
Click on
to select the column on that row or Click “Select all”
to select all columns.
46
© 2011 ISL/BIOTEC. All Rights reserved.
Information Systems Laboratory (ISL),
National Center for Genetic Engineering and Biotechnology (BIOTEC), Thailand
iCollect 1.1.50
Figure 11.2.2-5 Reference Objects and Methods defined by Web Services
Step 5: click
Step 6: Mapped and retrieved data will appear in the “Create data” as shown in
Figure 11.2.2-5, click “Select All” to select all rows to be exported or click
to
select only the rows you want to include in the dataset
Step 7: You can filter the number of columns by selecting column displayed in
“Select column (s)”.
Step 8: Type the dataset name and click
appear in the “List of Datasets”.
. The dataset created will
11.2.2.3 Data Preparation for a single record of Web-Service Defined Type
To prepare a single record of Web-Service Defined type, you can perform the
following steps.
Step 1: Double click on the row containing the web-service defined type (Figure
and open the “create new data type from web service” tab .
Figure 11.2.2-6 Double-click on the web-service defined type
47
© 2011 ISL/BIOTEC. All Rights reserved.
Information Systems Laboratory (ISL),
National Center for Genetic Engineering and Biotechnology (BIOTEC), Thailand
iCollect 1.1.50
Step 2: Input the values for each parameter in the “Input Parameter Value” column.
When finished, specify the dataset name and click
The created dataset will appear in a table “List of Datasets”.
(Figure 11.2.2-7).
Figure 11.2.2-7 Create a single record of a web-service defined type
11.2.2.4 Calling Web Service
After finishing data preparation, the dataset created will appear in “Created
dataset” table in “Web Service Management “tab. You can select the created
dataset from the list to specify for “Input Parameter” of the web service. When you
have already specified all input parameters for the service function, click
to invoke the web service function. Return results will display in the
“Web service result” as shown in Figure 11.2.2-8
48
© 2011 ISL/BIOTEC. All Rights reserved.
Information Systems Laboratory (ISL),
National Center for Genetic Engineering and Biotechnology (BIOTEC), Thailand
iCollect 1.1.50
Figure 11.2.2-8 Invoke a web service function
Figure 11.2.2-9 demonstrates how to access KEGG database through web services.
Accessing the URL “http://soap.genome.jp/KEGG.wsdl”, available web services will
be listed. In Figure 11.2.2-9, a web service
“get_html_of_colored_pathway_by_elements” was selected and invoked to get the
html page of a color pathway map for a specified pathway “hsa00010”. You can get
the html page at
http://www.genome.jp/tmp/color_pathway.127121207110735/hsa00010.html from
result in “Web service result”. You can use a web browser to access the html result
to view the pathway map as shown in Figure 11.2.2-10.
49
© 2011 ISL/BIOTEC. All Rights reserved.
Information Systems Laboratory (ISL),
National Center for Genetic Engineering and Biotechnology (BIOTEC), Thailand
iCollect 1.1.50
Figure 11.2.2-9 Accessing web services at KEGG
Figure 11.2.2-10 View the returned HTML via a web browser
11.3 Taxonomical Data Checking
In several cases, the collection data will include taxonomic data which need
validation and update of taxonomical classification. iCollect provides this feature to
enable user to check the taxonomic data with the Global Check list at
www.sp2000.org and the fungal database at www.indexfungorun.org. Figure
11.3.4 illustrates a part of the “Check Taxonomy” window.
50
© 2011 ISL/BIOTEC. All Rights reserved.
Information Systems Laboratory (ISL),
National Center for Genetic Engineering and Biotechnology (BIOTEC), Thailand
iCollect 1.1.50
Figure 11.3.4 Check taxonomy data
There are two validation modes of taxonomic data: Check Spelling and Check
Taxonomy. You can process the validation of taxonomic data within three steps.
Step 1: Choose a collection and its taxonomic columns such as Family, Genus, and
Species and click
. Search Results will appear in the bottom sheet view
and the selected columns will be shown in the table within the frame “Check”.
Step 2: Choose a data reference from “Reference To”. There are two modes of
data validation.
• Click “Check Taxonomy” if you want to validate the hierarchy of taxonomic
relationship. Otherwise click “Check Spelling” to verify only the spelling of
the data.
• Specify the column from the reference in “Column Mapping” for each row.
You can select more columns by clicking the
checkbox in the Search
table on the top-left of the screen. In “Check spelling” mode, you can
select only one column at a time of validation.
•
Click
to start the validation. Results from validation will display
by coloring the sample data with different colors:
o Green if the data is correct spelling or containing the valid
taxonomic classification.
o Yellow if the data is not found from the Global Check list or the
selected reference website.
o Red if the data contains the invalid taxonomical classification.
Step3: For the invalid taxonomic data or Red record, you can click
update the data as specified in the Check List.
to
11.4 Link to BIOTEC BRC
This menu provides a convenient way to send and receive data to BIOTEC BRC web
service. In this menu, user can submit, deposit, and order samples or collections
through BRC.
11.4.1 Submit Data
This part allows user to submit samples to BIOTEC BRC (as shown in Figure
11.4.1-1)
51
© 2011 ISL/BIOTEC. All Rights reserved.
Information Systems Laboratory (ISL),
National Center for Genetic Engineering and Biotechnology (BIOTEC), Thailand
iCollect 1.1.50
Figure 11.4.1-1. Submit data form
Step 1: select source (as shown in Figure 11.4.1-2)
i. Select data – choose samples data from collections that has been
stored in iCollect.
ii. Brose file – import samples from ms excel file (.xls) or ms access file
(.mdb)
iii. Connect to DB Server – retrieve samples from MySQL or MS SQL
Database server.
Figure 11.4.1-2. Select source option
Step 2: Go to select column(s) & criteria (as shown in Figure 11.4.1-3) to include
whether columns to be sent with sample data. **If you choose to browse file or
connect to DB server, please select table first.
Step 3
Step 4
Step 5
Step 2
Figure 11.4.1-3. Set column criteria and column name for catalogue
52
© 2011 ISL/BIOTEC. All Rights reserved.
Information Systems Laboratory (ISL),
National Center for Genetic Engineering and Biotechnology (BIOTEC), Thailand
iCollect 1.1.50
Step 3: Set column criteria.
Step 4: Set column name for catalogue.
Step 5: Check set as code checkbox at the column that used to stored sample code.
Step 6: Click
Step 7: Specify the samples that you want to submit. See figure 11.4.1-4 for the
example.
Figure 11.4.1-4. Select sample to submit
Step 7: Choose submit data option.
Step 8: Select a collection on web that the samples will be stored on BIOTEC BRC.
Step 9: Set material type.
Step 10: Click
. The program will open a confirm dialog
ask you for a confirmation, click
.
Step 11: The login to BRC dialog will appear on the screen. Specify username and
password and then click
.
Step 12: iCollect will display a submit result message on the screen.
11.4.2 View submit log
Submit log records the information of your collection that has been submitted to
BIOTEC BRC. See figure 11.4.2-1 for more details.
Figure 11.4.2-1. “Submit log” window
53
© 2011 ISL/BIOTEC. All Rights reserved.
Information Systems Laboratory (ISL),
National Center for Genetic Engineering and Biotechnology (BIOTEC), Thailand
iCollect 1.1.50
11.4.3 New Order From BRC
This menu is used to retrieve order that has been sent from BIOTEC BRC. See figure
11.4.3-1 for more details.
Figure 11.4.3-1. New Order from BRC Interface
• To manage order
Step 1: Select new order from BRC tab.
Step 2: The “login window” will appears on the screen as shown in Figure 11.4.3-2,
login using your BRC account.
Figure 11.4.3-2 “Login to BIOTEC BRC” window
Step 3: iCollect will retrieve and list orders from BRC automatically.
Step 4: Click on certain order to view sample list.
Step 5: Map the ordered sample with your collection in iCollect.
Step 6: To accept order, check accept. Otherwise check reject.
Step 7: Select service profile then click
.
54
© 2011 ISL/BIOTEC. All Rights reserved.
Information Systems Laboratory (ISL),
National Center for Genetic Engineering and Biotechnology (BIOTEC), Thailand
iCollect 1.1.50
11.4.4 New Deposit From BRC
This menu is used to retrieve sample that has been deposited to you from BIOTEC BRC.
See figure 11.4.4-1 for the screen example.
Figure 11.4.4-1. New Deposit Interface
• To manage deposit order
Step 1: Click on “New Deposit from BRC” tab. The “login” window will appears on
the screen, login using your BIOTEC BRC account.
Step 2: iCollect will retrieve and list orders from BIOTEC BRC automatically.
Step 4: Click on certain order to view sample list.
Step 4: Select collection to save sample.
Step 5: Select a service profile
Step 6: Click
55
© 2011 ISL/BIOTEC. All Rights reserved.
Information Systems Laboratory (ISL),
National Center for Genetic Engineering and Biotechnology (BIOTEC), Thailand
iCollect 1.1.50
11.4.5 Deposit to BRC
This menu is used to deposit sample to the specified user (as shown in Figure 11.4.5-1).
Figure 11.4.5-1 Deposit to BRC Interface
Step 1: Select recipient from deposit to combo box.
Step 2: Select collection
Step 3: Select deposit type
Step 4: Set order date
Step 5: Set service length
Step 6: Add remark (optional)
Step 7: Select source collection
Step 8: Map source collection’s columns with BIOTEC BRC collection’s columns.
Figure 11.4.5-2 illustrates the example of column mapping.
56
© 2011 ISL/BIOTEC. All Rights reserved.
Information Systems Laboratory (ISL),
National Center for Genetic Engineering and Biotechnology (BIOTEC), Thailand
iCollect 1.1.50
Figure 11.4.5-2 Map columns
Step 9: click
Step 10: select sample to be deposited. See figure 11.4.5-3 for an example
Figure 11.4.5-3 Select sample to submit.
57
© 2011 ISL/BIOTEC. All Rights reserved.
Information Systems Laboratory (ISL),
National Center for Genetic Engineering and Biotechnology (BIOTEC), Thailand
iCollect 1.1.50
Step 11: click
12. Backup and Restore
Backup and restore operations are available to users with administrative rights. Under the
Administration menu, select ‘Backup/Restore’ to backup the database to any folder
specified by users and restore the backup file to database. The backup/restore process will
start if no other users still logged in iCollect system.
Figure 12.1 Backup and restore
As shown in Figure 12.1, you are allowed to perform the following tasks.
Click on “Backup” tab to backup the database
•
Default Backup location will appear. Click
folders.
to change to other
• Click
to start the backup process
Click on “Restore” tab to restore the backup files to database
• Browse to locate the backup folder
•
Click
to restore the backup data into database
13. Help
Help menu provides a user manual for new user to getting start with the program.
13.1 View Manual
To view user manual, please click on view menu. The user manual will be displayed
as shown in Figure 13.1
58
© 2011 ISL/BIOTEC. All Rights reserved.
Information Systems Laboratory (ISL),
National Center for Genetic Engineering and Biotechnology (BIOTEC), Thailand
iCollect 1.1.50
Figure 13.1 “User manual” window
59
© 2011 ISL/BIOTEC. All Rights reserved.
Information Systems Laboratory (ISL),
National Center for Genetic Engineering and Biotechnology (BIOTEC), Thailand