1
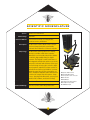
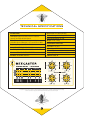
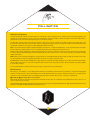
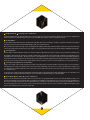
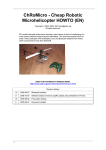
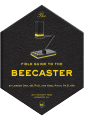
Welcome to the sweet and spacious world of the Beecaster.
The Beecaster, Bombus voce thundorum, is a newly-discovered
microphone species that is magnificent in appearance, sonic quality,
and unmatched audio reproduction. A proud member of the Cardiodigitum
euessbi sub-order of Bee recording tools, its predecessors include
many of the finest microphones ever created for studio, stage, film, and
broadcast. Easily identified in the field by its leading-edge technology,
innovative engineering, and distinctive looks, the Beecaster delivers
the clearest, most accurate sound found anywhere, no matter what
type of recording hive you inhabit.
Adaptive by nature, the Beecaster is the perfect all-purpose creature
for today’s digital environments. With its direct USB connection, integrated
articulating stand, and built-in control center, the Beecaster easily
complements your favorite recording software for simple “plug and
play” operation. Four different Sonic Images are optimized for various
applications—so from Vocals to Videos, Conferences to Concerts,
Desktop Demos to Hexadecimal Hits, the Beecaster earns its stripes
by giving your recordings or podcasts the finest professional edge.
We know you’re eager to embark, but before you begin recording, please
read through this guide and become familiar with the Beecaster’s
features and setup. Not only will you learn all about the Beecaster’s
audio anatomy, our experts will suggest many tips and tricks, based on
years of research and study of sound in the wild, that will help you make
even better recordings.
So…pull up a chair, and let’s get started!
3
scientific nomenclature
Species
Native Range
Preferred Habitat
Bombus voce thundorum
Worldwide
Professional and home recording studios,
broadcast centers, wildflowers
Description
The Beecaster features Neat’s unique array of
four fixed-charge back plate, permanently
polarized 24 mm diameter condenser capsules.
Morphology
The Beecaster delivers pristine sonic fidelity
directly to your Mac or Windows computer,
without the need to install pesky drivers, thanks
to a built-in, high-quality analog-to-digital
converter. The fingertip controls at the base of
the integrated stand provide quick access to the
Beecaster’s onboard audio features: A four-position Sonic Image selector, gain control to adjust
the microphone output level, volume control for
the built-in zero-latency (geek talk for “you hear
things the same time you say or play them, not
later”), headphone amplifier, and a mute function
to silence the output of the microphone. Setup
is easy—just plug in the Beecaster, open up your
favorite audio software, and start recording!
Related Species
Additional Markings
Bumblebee (Bombus aura nirvanus)
Custom pop filter; USB 2.0 Type A/B cable.
4
B
A
C
D
H
E
F
G
A: Capsule Address Side
B: Adjustable Boom Arm
C: Four-position Sonic Selector
D: Gain Control
E: Mute Button
F: Headphone Volume Control
G: Headphone Input Jack
H: USB Cable Input
technical specifications
MICROPHONE
Transducer Type: Proprietary 24 mm condenser
capsule, internally shockmounted
Polar Pattern: Selectable – Mono (cardioid), Stereo
(XY), Wide Stereo (Blumlein), or Focused Stereo (M/S)
Frequency Response: 20 Hz – 20 kHz
Sample Rate/Bit Depth: 96 kHz/24 bit
Sensitivity: 16.0 mV/Pa at 1 kHz (1 Pa = 94 dB SPL)
Maximum SPL: 128 dB SPL (0.5% THD)
S/N Ratio: 98.0 dB-A (IEC 651)
Noise Level: 14.0 dB-A (IEC 651)
Dynamic Range: 98.0 dB (@ 2.5k ohms)
Power Requirement: 5V USB
Weight: 4.2 lb (1.9kg)
HEADPHONE AMPLIFIER
Impedance: 16 ohms
Power Output (RMS): 100 mW
THD: 0.05%
Frequency Response: 20 Hz – 22 kHz
S/N Ratio: 90.0 dB
This Beecaster Capsule Frequency Chart is an accurate representation of the mic’s response, but how the microphone reacts in a particular application will
vary greatly depending on various conditions—room acoustics, distance from the sound source (proximity), instrument tuning, microphone cabling,
and more. For an artist or engineer, these internal and external variables create the basis of the final sound.
5
care & feeding
The Beecaster arrives fully assembled on a low-profile articulating stand and base, making it the perfect choice for today’s desktop
multimedia applications. With minimal distortion and variable sonic signatures, the Beecaster is an ideal microphone for recording a
wide variety of sources in multiple applications.
The two-piece articulating arm adjusts in three directions, allowing optimum capsule placement for any source. The arm extends up
to 12” (30 cm) and moves both vertically and horizontally. Additionally, the arm can rotate 45 degrees on the base; for fine tuning,
the capsule itself rotates.
!
Caution: the Beecaster capsule is designed to tilt on one axis only. Use caution when positioning the capsule
to avoid broken appendages!
The Control Center in the base includes 3 rotary knobs. On the left, a four-position rotary switch selects the Sonic Image (discussed
in detail later) that’s applied to the signal.
The center Gain control adjusts the amount of signal that reaches your recording software’s input. Adjust the Gain for proper level,
using your software’s level indicators (meters) while making sure the level does not reach the top of these indicators.
The headphone amplifier’s Volume Control is on the right. Plug your headphones into the standard 1/8” (3.5 mm) headphone jack on
the front of the base, and adjust the volume for a comfortable and safe listening level. Note that this controls playback volume only,
and not the mic’s output level. To silence the volume of the microphone during playback when monitoring through headphones, press
the Mute Button, it will illuminate. To activate the audio simply press again.
The Beecaster includes a custom pop filter designed to help eliminate sibilance and plosive sounds when used with vocals. Always
use the filter during vocal recording to protect the diaphragm from damage.
The LED power light on one side of the Beecaster indicates the
mic’s front (active) side. Align the microphone and stand so the
active side faces the sound source. The Beecaster’s selectable
pickup patterns suppress sounds hitting the back of the mic,
and determine the strength of signals reaching the sides.
Beecaster custom pop filter
6
Your Beecaster is friendly, and assimilates well with all species when properly introduced. The following instructions will
ensure the Beecaster’s gracious acceptance into its new colony.
Windows 8, Windows 7, and Windows Vista
1. Connect the Beecaster to your computer with the included cable. The square end (Type B) connects to the back of the
Beecaster’s base, while the flat end (Type A) connects to a USB port on your computer. The lights surrounding the control
knobs illuminate when the Beecaster is receiving power.
2. Go to the Start menu, and open the Control Panel.
3. From the Control Panel, click on the Sound icon.
4. Select the Recording tab, then select Beecaster USB.
5. Select the Playback tab, and again select Beecaster USB. From this window, you can also adjust your computer’s master
output volume. Initially set it at 100%, then use the Volume control on the Beecaster’s base to adjust the headphone output level.
Please note: Your computer will recognize the Beecaster as both an input device (microphone) and an output device (headphone amplifier),
so all of your computer’s audio will be routed to the Beecaster. You can change this if necessary in the Control Panel/Sound window, or in your
recording program’s settings. Also in this window, you can adjust the microphone monitoring level by moving the Microphone fader to the left or right.
Mac (OSX 10.4.11 or higher)
1. Connect the Beecaster to your Mac with the included cable. The square end (Type B) connects to the back of the
Beecaster’s base, while the flat end (Type A) connects to a USB port on your Mac. The lights surrounding the control
knobs illuminate when the Beecaster is receiving power.
2. From the Apple menu, select System Preferences.
3. Click on the Sound icon.
4. Select the Input tab, then select Beecaster USB.
5. Select the Output tab, and again select Beecaster USB. From this window, you can also adjust your Mac’s master output
volume. Initially set it at 100%, then use the volume control on the Beecaster’s base to adjust the headphone output level.
Please note: Your Mac will recognize the Beecaster as both an input device (microphone) and an output device (headphone amplifier), so all of your computer’s audio will be routed to the Beecaster. You can change this if necessary in the Sound Preferences window, or in your recording program’s settings.
7
pollination
Exploring Sonic Signatures
Scientists studying the behavior of the Beecaster were astonished to discover that the species exhibited certain shape-shifting abilities, not
normally seen in nature. Extensive research led to the identification of four distinct shapes, called Sonic Images. These allow the Beecaster to
adapt quickly to any environment, thus bypassing years of evolutionary change.
The Beecaster employs powerful on-board processing to create not one, but four separate Sonic Images—Mono, Stereo, Wide Stereo and
Focused Stereo. Developed by professional studio engineers, applying these images to your recordings can enhance the dimensional spectrum
and maximize separation. The result is recordings with greater impact and clarity.
Mono selects a cardioid pickup pattern. Signals reaching the front of the mic—indicated by the Neat logo—are strong, while signals reaching the
back are suppressed. Use this image for voices or instruments that will occupy a single point in your stereo field.
Stereo selects a natural left/right stereo image. Signals will appear in a full stereo field based on their positions around the mic. Use this image
to create a natural 3-dimensional image for stereo instruments. This is also a good choice for conferences, interviews, or broadcasts involving
multiple participants.
Wide Stereo selects an expanded left/right stereo image. Signals recorded with this image will appear wide, and will not crowd the center of the
mix. Use this image for huge accompaniment parts when you need to reserve the center for the star.
Focused Stereo selects a forward left/right stereo image. Signals recorded with this image will appear closer, with a full 3-dimensional image.
Use this image for the lead voice—the center of attention. Note: You will need to create a stereo track (or two mono tracks) in your audio software
to use the stereo images.
So let’s get moving! Here’s a swarm of Tricks & Tips to help you get the most out of your Beecaster:
Music Production
Part of the joy—and challenge—of recording instruments and voices is that they each have unique personalities, so a placement strategy that
works for one may not work so well for another. Often, even a small adjustment to the mic’s angle or distance from the source can make a world
of difference in the results. We’ll provide some starting points, but don’t feel limited. Use your ears—and let your creativity soar.
Lead Vocals
Sonic Image: Mono or Focused Stereo
Start with the microphone at lip level and position the vocalist 4 to 5 inches (10 - 13 cm) away. For more intimacy and presence, move in—as
close as 1 inch (2.5 cm), if needed.
Experiment with different angles. Aiming directly at the mouth provides the most clarity and articulation. A slight upward tilt adds head tone and
projection. A downward tilt adds warmth and softens the top end.
8
Background Vocals
Sonic Image: Stereo or Wide Stereo
For group background vocals, move the singers in as close as possible, in a semi-circle around the front half of the mic. The stereo width will add
dimension to the voices, while allowing sonic space for the lead. Wide Stereo allows even more separation, if needed.
Acoustic Guitars
Problem: Most desktop stands place the mic high on the desk. While this is fine for speaking, it does little to capture the brilliant sound of a guitar
that sits at chair level in front of the desk. Enter the Beecaster, and...problem solved!
Move your Beecaster’s base to the edge of your desk. Bring the articulating arm all the way forward and down to position the capsule below the edge
of the desk, facing forward. This will be the perfect height to record your guitar. Now fine-tune the placement using the rotating base and capsule.
Sonic Image: Mono
Use this image for guitars that will be “stacked” or doubled. The Mono image allows each part to occupy its own space without crowding the mix.
Each guitar is different, but the “sweet spot” is usually near where the neck and body join (around the 12th – 14th frets). For maximum presence,
start with the mic close to the guitar—about 3 or 4 inches (7 - 10 cm). Moving the mic closer to the sound hole increases the warmth and fullness,
but beware the dreaded “sound hole boom” that can give acoustic guitars a “muddy” quality. Now try moving the mic farther from the guitar. This
may help even the sound and create a better image, with the tradeoff of a little less presence. Find the right balance, and your guitar will sing.
Sonic Image: Stereo, Wide Stereo, or Focused Stereo
Using a stereo image creates a large, full guitar sound. Choose the image based on how the part will be used in the mix. For a solo performance,
start with the Stereo image. The part will fill the entire space, while maintaining center presence. For duets, try a Wide Stereo image for the
accompaniment to extend the width and create center space. For the featured part, try the Focused Stereo image. This brins the part forward
to occupy the center.
For the best stereo image, position the guitar farther from the mic than you would with a mono image. Start with the mic 12”-14” away in front
of and above the sound hole. Adjust the tilt angle to control tonal balance; adjust the distance to control the width.
Electric Guitar
Sonic Image: Mono, Stereo, or Wide Stereo
Because of its robust characteristics, the Beecaster is an excellent choice for any amplified guitar sound, clean or dirty. An amplifier’s speaker cone
provides a broad palette of tones and as the artist, you supply the color. Brightness is strongest in the cone’s center, and decreases gradually as you
move to the outer edges. Clean sounds often benefit from the top boost near the center, while overdriven sounds enjoy the warmth and “beef” at
the outside. Keep the mic close for a “direct” sound, or move it back a foot (30 cm) or more for some room ambience. With distorted guitars, a little
distance adds depth and helps round out the rough edges.
9
Use the Mono image with a close mic for maximum presence. For greater dimension, move the mic back and switch to Stereo. And for huge
sound, place one Mono Beecaster in close, and add a second Wide Stereo Beecaster at a distance of 3 to 10 feet. Use the close mic for presence,
and blend in the room mic for size.
Here’s a nifty trick: the next time you record a “Jazz Box” guitar through a direct (D.I.) setup, place your Beecaster in front of the guitar, toward the
fingerboard. Now mix in a small amount of that “finger” sound with the direct signal to add personality. A little bit can make a big, big difference.
Guitar amps and sounds come in all shapes and sizes, so always experiment. Your Beecaster provides all the tools you need to stretch your imagination.
Saxes, Flutes and Reeds
Sonic Image: Mono
The Beecaster’s exceptionally smooth response delivers a modern tonality when recording saxophones and other wind instruments. One
woodwind characteristic is that the sound from different registers emanates from a different point on the instrument, so the goal is to achieve an
even balance throughout the horn’s range. For soprano sax, clarinet, and other straight instruments, position the capsule about 8 to 12 inches
(20 - 30 cm) directly above and in front of the keys, between the middle of the horn and the lowest pads. To adjust the balance of airy highs
(toward the mouthpiece) and cutting midrange (toward the bell), try moving the microphone up or down along the body’s length. For a more
biting tone, move the mic to include some bell sound. For a darker and smoother sound, move the microphone farther away from the instrument.
For curved horns—alto, tenor, and baritone saxes, bass clarinets, and similar—place your Beecaster 8 to 12 inches (20 - 30 cm) in front of, and
to the side of, the bell. Angle the capsule up toward the mouthpiece to capture more air, brightness, and high notes. For a mellower sound, orient
the capsule toward the floor to emphasize the sax’s low range as well as tame the biting upper midrange frequencies that project straight out of
the bell. With all woodwinds, avoid aiming directly down the bell—this makes the lowest notes “honk.”
For flute, start by placing the Beecaster 2 feet (60 cm) in front and above the middle of the instrument. Remember that the flautist is moving a
lot of air, so avoid the jet stream! If you want more highs and breath sound, move the capsule closer to the mouthpiece.
Percussion
Sonic Image: Mono, Stereo, or Wide Stereo
The Beecaster’s image control and fast transient response make it a perfect choice for hand drums and percussion. For congas, djembes, or
other hand drums, begin by moving the base to the edge of the desk, and extend the arm out and up. Orient the capsule downward towards
the drum, aiming the microphone just inside the rim 2 to 4 inches (5 - 10 cm) above the head. Directing the capsule toward the point of impact
emphasizes attack and definition. Angling the capsule back toward the rim produces a rounder tone. To maximize separation and boost the
fundamentals, keep the mics close. Or raise the mics for a natural, ambient interplay between drums and their surroundings. For a single drum,
choose a Mono image. For a two or more, choose Stereo and place the mic evenly over the center of the group.
10
the bee family
king bee
worker bee
bumblebee
beecaster
beehive
beestro
With its sparkling high-end qualities, the Beecaster is an excellent choice for shakers and small hand percussion. For shakers, extend the arm up
and tilt the capsule forward. Play the shaker at a distance of about 12” (30 cm). Use a Mono image for best definition.
For small percussion, arrange the instruments on your table, using a towel to reduce unwanted noises. Raise the arm as high as possible, switch
to a Stereo image, and aim the capsule down towards the desk. For balance, arrange the instruments so that the loudest ones are farthest from
the mic and the softer ones are closer. Try switching to the Wide Stereo image to widen the table or to emphasize the motion of a Mark Tree.
Podcasts and Voiceover
Sonic Image: Mono
A Mono image delivers outstanding presence and clarity for all spoken word applications.
Start with the mic at lip level at a distance of 4-6” (10 - 15 cm), but remember that proximity plays an important role in creating the “mood” of
your spoken word. Move closer for more intimacy, or further back for a conversational tone. If your podcast requires the calm, reassuring voice
of a public radio host, speak softly, and get very, very close to the mic. However, if your tone is MONSTER TRUCK BATTLES! . . . BATTLES! . . .
BATTLES! . . . , move back and let loose!
Conferences and Video Chat
Sonic Image: Mono or Stereo
For online conversation applications such as Skype, use the Beecaster much as you would for podcasts or narration. For a single voice, use the
Mono image. For more participants, choose Stereo.
If you don’t want to monitor using headphones, open your computer’s control panel (refer to the setup instructions above) and change the
output setting to your computer’s audio output. Our beekeepers recommend not using the Beecaster’s headphone output to power speakers,
which can cause feedback and poor voice quality.
We hope you enjoy your Beecaster—it’s a honey of a mic for a wide spectrum of multimedia recording needs. With proper care and usage, the
Beecaster will provide a lifetime of creative cross-pollination no matter what—or where—you record!
bee accessories
beekeeper
honeycomb
11
beeline
beefriend the bees!
Honeybee populations are in decline worldwide due to various factors ranging from pesticide use and parasites to climate change. In
the United States and Europe alone, honeybees have seen a 25% - 45% decline over the last twenty years.
Honeybees play an important role in ecosystems and are essential pollinators of many of the foods we eat everyday — apples,
peaches, almonds, zucchini, and hundreds more — literally a third of all the food we eat depends on bees and other pollinators to
make sure it makes it to your table.
To learn the latest buzz on the many challenges facing bees today, visit sos-bees.org for information and background on the problems
and solutions in creating a stable and healthy worldwide bee population. Get involved and help save the bees!
neatmic.com
warranty
This Microphone or related part is warranted under the conditions outlined below to its original, registered owner, provided the purchase was made from an
authorized (NEAT) dealer. This Microphone or related part is guaranteed to remain free from operating defects for three (3) years from the date of purchase.
In the event that service is required, all necessary parts and labor will be furnished free of charge. This warranty is void if the serial number has been altered,
removed or defaced. The warranty is void if, in NEAT’s sole opinion, the equipment is altered, misused, mishandled, maladjusted, suffers excessive wear, or is
serviced by any parties not authorized by NEAT. The warranty does not include transportation costs incurred because of the need for service unless arranged
for in advance. NEAT reserves the right to make changes in design and improve upon its products without obligation to install these improvements in any of
its products previously manufactured. This warranty is in lieu of any or all expressed or implied. In keeping with our policy of continued product improvement,
NEAT reserves the right to alter specifications without prior notice.
©2015 Neat Microphones. All rights reserved. Neat, Bee, and Beecaster are the trademarks of Gibson Brands, Inc.
Designed in USA. Made in China.
BRANDS
BMLBC_501-15