1
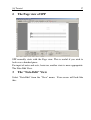
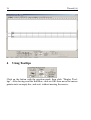
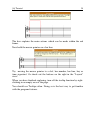
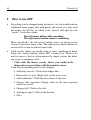
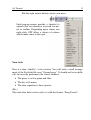
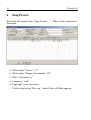
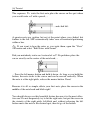
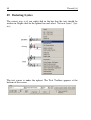
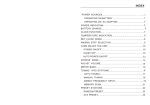
24
Tutorial [A]
Score Perfect Professional
Notensatz- und –druckprogramm
© 1990 – 2007
© 2007
Translation:
Klaus Kleinbrahm (Programmautor)
Klaus Recke (Autor des Handbuchs)
John Ellis 2008
Vertrieb: Scoretec
Postfach 2151
47642 Kerken
eMail:
[email protected]
Homepage: www.scoretec.de
1
Starting Score Perfect Professional ---------------------------------26
2
The Page view of SPP --------------------------------------------------27
3
The "Note-Edit" View -------------------------------------------------27
4
Using Tooltips -----------------------------------------------------------28
5
How to use SPP----------------------------------------------------------30
6
Song Presets--------------------------------------------------------------32
7
Square Brackets and Piano Braces ---------------------------------35
8
Entering Notes-----------------------------------------------------------36
9
Changing Note Values -------------------------------------------------39
10
Upbeats -------------------------------------------------------------------39
11
Dotted Notes and Rests ------------------------------------------------40
12
Accidentals ---------------------------------------------------------------41
13
Inserting Notes ----------------------------------------------------------42
14
Creating Endings -------------------------------------------------------42
15
Using Playback ----------------------------------------------------------43
16
Saving Scores ------------------------------------------------------------43
[A] Tutorial
25
17
Take a Break? -----------------------------------------------------------43
18
Loading Songs -----------------------------------------------------------44
19
Writing Triads and Chords-------------------------------------------44
20
Writing Slurs ------------------------------------------------------------45
21
Duplicating Staves ------------------------------------------------------47
22
Highlighting Bars -------------------------------------------------------48
23
Reducing Staff Size -----------------------------------------------------49
24
Moving Staves -----------------------------------------------------------49
25
Entering Lyrics----------------------------------------------------------50
26
Moving Lyrics Vertically----------------------------------------------52
27
Transposing Staves -----------------------------------------------------53
28
Changing Note Values in Highlight Sections ---------------------54
29
Dynamics and Special Symbols --------------------------------------56
30
Layout ---------------------------------------------------------------------59
31
Printing -------------------------------------------------------------------60
32
Concluding Remarks---------------------------------------------------62
26
Tutorial [A]
Tutorial
1
Starting Score Perfect Professional
Start Score Perfect Professional, in short SPP:
• Either in the program group in the Start Menu
• Or by double-clicking on the program icon in Explorer.
After a short time, the welcome window appears, after which you will be
looking at:
[A] Tutorial
2
27
The Page view of SPP
SPP normally starts with the Page view. This is useful if you wish to
look over a finished piece.
For input of notes and rests, however, another view is more appropriate:
The Note-Edit View.
3
The "Note-Edit" View
Select "Note-Edit" from the "View" menu. Your screen will look like
this:
28
4
Tutorial [A]
Using Tooltips
Click on the button with the question mark, then click "Display Tooltips". After having read the Info-Box, click on OK, then move the mouse
pointer into an empty bar, and wait, without moving the mouse:
[A] Tutorial
29
The box explains the main actions which can be made within the red
frame.
Now hold the mouse pointer on a bar line:
Try moving the mouse pointer to a clef, bar number, bar line, key or
time signature! Or check out the buttons on the right in the "Layout"
view!
When you have finished exploring, turn off the tooltip function by rightclicking in an empty area of the page.
You should use Tooltips often. Doing so is the best way to get familiar
with the program features.
30
5
•
Tutorial [A]
How to use SPP
Everything can be changed using the mouse! As you would work on
traditional music paper only with pencil and eraser, you only need
the mouse, the left key of which is the "pencil" and right key the
"eraser". Or in other words:
The left mouse button adds something.
The right mouse button removes something.
More specifically, the left mouse button causes an action on the
screen, or increases input value. The right mouse button deletes an
action on the screen or reduces input value.
•
Click exactly where you would write or erase something by hand!
Enjoy the "analog feeling" which SPP is famous for. There is no
need to choose a tool or set parameters for simple actions like deleting a note or changing a clef.
Click with the mouse exactly where you would write
down notes or erase them with the pencil or eraser.
Click where something needs to be changed:
• Add notes or rests? Click on the ledger lines
• Delete notes or rests? Right click on the note or rest
• Add accidentals? Click directly in front of the note.
• Change time signature? Simply click on the time signature
shown on screen.
• Change clef? Click on the clef.
• Add repeat signs? Click on the bar line.
• (Etc.)
[A] Tutorial
31
But the right mouse button can do even more:
Such pop-up menus provide a shortcut to
options that are otherwise accessed via menu or toolbar. Depending upon where you
right-click, SPP offers a choice of actions
which make sense at this spot.
Your task:
Now it is time - finally! - to be creative. You will write a small arrangement of the Scottish folk song "Greensleeves". It should not be too difficult, because the performers are school children:
• The piece is set for piano and flute.
• The key is D minor.
• The time signature is three-quarter.
(Etc.)
This and other data can be easily set with the feature "Song Presets":
32
Tutorial [A]
6
Song Presets
Select the File menu, then "Song Presets ..." . Enter all the required information.
• Write under "Staves" a "3".
• Write under "Tempo" the number "110"
• Title: "Greensleeves"
• Composer: "trad."
• Copyright: your own name.
•
Click on the button "Key sig.", and a Circle of Fifths appears:
[A] Tutorial
33
• Click on "D minor" and confirm by clicking "OK".
• Click on the button " time sig.". The window for time signature selection appears:
• Click the right mouse button on the top 4 of the fraction, then click
"OK".
34
Tutorial [A]
• Now, write in the column "system name" from top to bottom the
designations "Flute", "Piano", " Piano". Click with the left mouse
button in the cell in which you want to write.
• Click on the button "Auto 1-16".
Click in the column "program" on the entry in the first row. Select
Flute (No. 74).
• In the column headed "clef", enter from top to the bottom: treble,
treble, bass. Select the appropriate clef from the selection window
by clicking on it.:
[A] Tutorial
35
If you have set everything right, the window "song Presets" now looks
like this:
Close the window and click on the "OK" button..
7
Square Brackets and Piano Braces
Now set the braces. The solo part should be optically separate from the
accompaniment. This is done by altering the brace and changing the barline subdivision. Here is how it's done:
• Click the right mouse button on the thick bar of the square bracket.
Select the pop-up window, the top entry "delete"
• Place your mouse on the word "Piano" and continue with the
mouse slowly to the right until a grey brace is vivible. Then click.
36
Tutorial [A]
• Click the right mouse button on the first Barline (i.e. between bars
1 and 2), and select the entry "like square brackets".
• Finally, right click on the square bracket and select the entry
"transform to piano brace".
The staff picture should now look like this:
8
Entering Notes
Now comes the exciting moment when you write your first notes in the
staff. We will begin with the melody of "Greensleeves", which you
should notate in the following manner:
[A] Tutorial
37
The sequence: To write the first note place the cursor on the spot where
you would write a d' with a pencil, ...
... and click left.
A quarter note was written, but not at the point where you clicked, but
further to the left. SPP automatically takes care of horizontal poitioning
within a bar.
If you want to hear the notes as you write them, open the "View"
menu and select "Edit Notes with Sound".
Did you mistakenly write an e' instead of a d'? No problem: place the
cursor exactly on the center of the note head, ...
... Press the left mouse button and hold it down. As long as you hold this
button, the note sticks to the cursor and can be moved vertically. When
the note is at the right pitch, release the mouse button. Done!
Because it is all so simple, delete your first note: place the cursor in the
middle of the note head and klick right!
You should always use this beautiful feature because it is the most effective one! Do not desperately try to hit the right note, but put the cursor in
the vicinity of the right pitch, left-klick and, without releasing the left
button move the note to the desired spot, then let go of the button.
38
Tutorial [A]
Use this method now to write the d' in the first bar.
With that the upbeat is already written, and now comes the repeat sign.
Right click on the barline, and the following box is shown:
Select "Select..."
In the Barline window you will find everything connected with barlines.
Click on the appropriate repeat sign.
[A] Tutorial
9
39
Changing Note Values
How did SPP know that it should write a quarter note [KR11]?
Surely you have noticed the panel with the note and rest values. The
quarter note is set by default.
Select the Half Note value by clicking on this note. The button is then
depicted as depressed, and the next click in the score would write a halfnote.
Look carefully at the buttons and you will see letters, from left to right
"QWERTZ ..." These letters are identical with the top row of letters on
your computer keyboard. Instead of clicking buttons with the mouse, a
very elegant option is to set note values with the left hand and set the notes with the right hand.
Try selecting the note values with the keyboard. Write the next bar using
this "accordion principle": Half Note f ', quarter note g'.
10 Upbeats
In case you haven't already noticed, we urgently need to correct the bar
numbers! The current first bar is not at all the first bar, but an upbeat.
Right click on the "1" above the upbeat. [KR12].
40
Tutorial [A]
Write a "0" in the "Bar Number" window and click OK.
You can assign any bar number to the first of a piece. You can divide a
big score, for example, into different sections share and still use consecutive bar numbers.
11 Dotted Notes and Rests
... Will be needed in the second bar. Let's look again at the panel of notes and rests. To the right you will see buttons with various dits and a
triplet-3.
To write triplets or dotted notes, click on the appropriate button. As long
as the button is active you will write dotted values or triplets.
Dotted values can also be chosen directly directly from the keyboard:
[Ctrl] key, and desired letter key.
IMPORTANT: Incidentally, you can not write a quarter note and later
add a dot (more on this subject later). If you have accidentally written a
[A] Tutorial
41
simple quarter note instead of a dotted quarter, you have to delete it and
write the correct note anew.
Now write a dotted quarter note a' in the second bar, as well as the following eigth note. And the natural sign?
12 Accidentals
First write the eighth note, then click to the left of, and close to, the note
head.:
Result:
SPP has an intelligent accidental administration, which recognized that a
natural sign was needed! If you click on the accidental again, a different
accidental will appear.
Now write the rest of the melody. If you write a wrong note: delete and
rewrite. If you come (at the latest by bar 4) to the right of the screen and
the computer will not scroll, you can use the horizontal slider at the bottom of the window.
42
Tutorial [A]
13 Inserting Notes
If you want to insert a note before an existing one, you have to hold
down the [Ctrl] - and also the [Shift] - keys.
Example: Inserting an eighth note.
Hold down [Ctrl. + Shift] keys and click:
14 Creating Endings
Click right in bar 5. The following popup menu appears:
Click on the entry "set 1. bar brace". Repeat this process for bars 6 to 8.
In bars 9 to 13 click on "set 2. bar brace".
[A] Tutorial
43
15 Using Playback
If you have speakers connected to the sound card in your computer, you
can now listen to the melody.
Press the button "Pos1", in order to jump to the beginning of the piece.
Then press the spacebar to start playback.
You will now hear that SPP plays both the repeat signs and the endings
perfectly.
(If you can't hear anything, it's probably because the wrong sound output
is set. In this case, click the menu "File/SPP Presets". Select the "Sound"
tab and set the correct sound output.)
16 Saving Scores
The first part of the tutorial has been completed successfully! Now you
should save your work, and continue after a break. Click on the "File"
menu and choose "Save":
The file selector box of your computer will appear. If you are saving a
piece for the first time, SPP proposes the name "Song1". Please change
the file name to "Greensleeves1".
17 Take a Break?
Close SPP like any Windows program under the "File" menu and the entry "Quit".
44
Tutorial [A]
18 Loading Songs
Click the "File" menu and select "Open". Select "Greensleeves.Son in
the file selector.
Now, write the right-hand chords of the piano part:
19 Writing Triads and Chords
No problem with SPP! Just click vertically above or below existing notes. Write seconds by clicking right beside the stem. Write accidentals
by clicking just to the left of the note head. Delete accidentals with a
right-click.
Try it out: Write the right hand triads.
Now write the bass line. That's very fast, because it mainly consists dotted half notes:
[A] Tutorial
45
20 Writing Slurs
SPP uses two methods of highlighting: highlighting notes or highlighting entire bars. Two examples:
notes
entire bar
Now we need to highlight notes. Go to bar 2. Hold the Ctrl-key down
and, while pressing the left mouse key, move the cursor from left to
right over the first two notes. This will highlight the notes:
46
Tutorial [A]
Highlight the following passages in the same way:
In order to write slurs, press the key sequence "x 2". Magic?
No. If notes or rests are highlighted, "x 2" is the shortcut for the menu
"Section/Legato Slurs/"Auto Direction".
[A] Tutorial
47
Shortcuts are much faster. Therefore: Look for the letters and numbers
in the menu items. You will soon know the most important ones by
heart!
(To delete the highlighting right-click anywhere in an empty area of the
page.)
21 Duplicating Staves
Next, we plan to have a flute play the melody, and to write lyrics.
Select the menu "Staves/Duplicate Staff/Normal". Place the cursor over
the notes of the flute staff and click left.
The staff was duplicated. Exit duplication with a right click.
The flute doesn't sound good here in the low register, so it should be
moved up an octave.
First we will highlight the flute part.
48
Tutorial [A]
22 Highlighting Bars
I will show you a quick method of highlighting:
Move the mouse pointer to the upbeat of the flute part and press the
Shift key. There will be a message:
Click on the upbeat. The upbeat bar is highlighted in grey.
Press the "End" key to jump to the last bar of the piece. Press "Alt", and
the following message appears:
Click in the last bar of flute part. As you can see, the entire flute part is
highlighted as a block.
How about a "Turbo-8va"? Press the keys after "Y" and "2" one after the
other!
Exit highlighting by right-clicking anywhere in an empty area of the
page.
[A] Tutorial
49
23 Reducing Staff Size
Because the flute is to be ad lib., the part could be printed in smaller
notes: Choose the menu "Staves/Small Size", place the cursor over the
top staff and click.
24 Moving Staves
We will now set lyrics to the voice part. But at the moment there is not
enough space available!
On the far left side of the screen you can see a ruler. Click left in the
ruler at 3,5 and hold the mouse button down. Now press the right mouse
button as well. Move the mouse down the screen. While doing this you
can see the distance between staves in red on the right side of the screen.
Slide your mouse while down until the distance is 1.5 cm.
50
Tutorial [A]
25 Entering Lyrics
The easiest way is if you right-click in the bar that the text should be
written in. Right-click in the upbeat bar and select "Set new lyrics" (lyrics).
The text cursor is under the upbeat. The Text Toolbox appears at the
bottom of the screen:
[A] Tutorial
51
Keep the following points in mind when writing lyrics:
• Separate syllables with the minus sign. The cursor jumps under the
next note, amd SPP automatically centers the hyphen between the
two syllables.
• Move the cursor under the next note by pressing the space bar.
• Write a prolonged hyphen by using the stroke key ("_").
• Exit text input with the Return (Enter) key.
• The arrow keys move the cursor within syllables, and you can correct typing errors with the [<--] (backspace) and [Del] keys.
Now enter the lyrics in the first line. For clarity's sake I have added all
key commands between words and syllables in square brackets:
A [minus] las [Space] my [Space] love [stroke (_)] [Stroke] you
[Space] do [Space] me [Space] to [stroke] [stroke] cast [Space] me
[Space] off [stroke] [stroke] dis [minus] cour [minus] teos [minus]
ly [Return]
Now right click in the first bar (not the upbeat!) and again choose "Set
new lyrics". The syllable "las" has a bluish background.
In the text toolbox you will see a row of numbers from 1 to 9. Choose
"2".
The cursor is in position to write the second verse:
I [Space] have [Space] lov [minus] [minus] ed [Space] you [Space]
so [Space] long [Space] de [minus] [Return]
Right click in the first "second time" bar and again select "Set new lyrics". Press the "2" button and continue writing:
52
Tutorial [A]
Light [minus] [minus] ing [Space] in [Stroke] [Stroke] your [Space]
com [minus] pa [minus] ny. [Return]
The Toolbox for text is now no longer required. To hide it again:
In the menu bar at the top of the screen you can see a series of small buttons, for example:
Press the "T" button, and the text toolbox diappears.
26 Moving Lyrics Vertically
Some syllables are too close to the notes and have to be moved down a
little.
While holding the Ctrl key down, highlight all the notes under the first
time bracket. The syllables are highlighted as well.
Move the first syllable "cast" down with the left mouse button. All other
syllables follow automatically! Exit highlighting by right clicking anywhere on the blank area of the page.
Proceed accordingly with the second time bracket.
[A] Tutorial
53
27 Transposing Staves
Your arrangement is finished. But the bad news is that the flautist is ill,
and a clarinettist offers to save the day. However the clarinet is a B flat
instrument and the part will have to be transposed. In the old days of
pencil and eraser this would have taken forever, but you have SPP.
From the Menu bar select "Staves/Transpose Staff/B flat (Trumpet)".
(The designation trumpet is to be understood as an example!)
A so-called runner appears. Move it with the mouse onto the highest
staff and left click:
The staff was transposed instantly. Right-click to exit transposition.
Now, the instrument name has to bechanged. But instead of calling up
the "Song Presets", there is another quick method:
Click on the word flute. An options window appears.
54
Tutorial [A]
Replace the Instrument Name with "clarinet" and then click OK.
28 Changing Note Values in Highlight Sections
The right hand piano part should be made a little more interesting. Every
bar, except for the last two should begin with a quarter note rest, followed by half-note chords. We do this in two steps. First, switch to a
smaller screen display for a better over-all view.
Highlight bars 1 to 11. Open the note value toolbox and select half notes. The change to half notes is accomplished by a key sequence. Press
"A 1".
[A] Tutorial
55
Right-click to exit.
Go to the beginning of the piece. Select quarter rests in the note value
toolbox, which will be entered by hand. To insert a rest, hold the Ctrl
and Shift keys down (info box "Insert Note") while clicking just to the
left of the chord.
Repeat the same procedure in the other bars as well. Select "normal"
view again by clicking on the magnifying glass icon in the menu bar.
If you now press the space bar, you should hear two things:
• The transposed part is played in concert pitch(!),
• The recording sounds more interesting.
56
Tutorial [A]
29 Dynamics and Special Symbols
Various toolboxes can be accessed with the buttons which you see under
the menu bar.
Click on the button with the mf-symbol to open the dynamics toolbox.
In order not to clutter the bottom of the screen, you should close the slur
toolbox. Click on the button with the slur.
Click on the mf button and place the cursor on the desired spot in bar 1.
Move the symbol to the desired location. The red cross helps you with
the exact alignment. Drop the symbol with a left-click [KR25].
The red reference line tells you to which note SPP will connect the symbol. When copying notes connected to such symbols, the symbols are
copied as well.
[A] Tutorial
57
Place the pointer between the two upper staves of the upbeat bar and
place an mf there as well. To return to normal mode, click right.
The dynamics toolbox for is no longer needed and can be closed.
Adjust the view so that the first ending (bar5) is centered on the screen,
because we want to write a crescendo hairpin there. This is done by
highlighting.
Highlight the following notes by passing the cursor over them while
holding down Ctrl and the left mouse button:
Now click with the right mouse button in this defined area to open this
popup menu.
58
Tutorial [A]
Select Crescendo ... / Set Crescendo. Exit with a right-click. Position the
crescendo to your taste by dragging and dropping the hairpin with the
left mouse button.
[A] Tutorial
59
Now write a Decrescendo in bar 8.
Look for fermata (pauses) in the toolbox
with the dal segno sign.
Use the same procedure as for dynamics.
30 Layout
Now that everything is set, we have to fine-tune the layout prior to printing. To do this, select the menu item "View" and choose "Layout View".
60
Tutorial [A]
If you only see two stavess on the page, click on the blue line at the top
of the page ("Place for Title ...") and drag this line up until three staves
have room on the page.
If the bar distribution per line is not displayed as in the printout on the
following page, you can use the + / - box on the right edge of the screen
to adjust the number of bars per line.
(This is enough for now. Further on in the manual you can read more
about layout.)
31 Printing
Choose "File/Print", in the next window, click OK. In a moment you can
admire SPP's fantastic print quality!
[A] Tutorial
61
62
Tutorial [A]
32 Concluding Remarks
Congratulations! You have created and printed your first score! You
have passed the course with flying colors, and at the same time have
learned about 75% of the most important program functions. Now you
can see why SPP has received such favorable reviews in various computer and music magazines. SPP is so easy to use that you will hardly
ever need the user's manual.
If you feel like it and have the time, browse through the Reference section, where all program functions are explained in their full scope.
As time goes by, you will very likely find working with the menu bar
too time consuming. Gradually switch over to using keyboard shortcuts,
since every important menu entry has a corresponding shortcut. The appropriate keys can be found at the right hand margin of the menu entry
in question.
If you can't find a feature, just look in the index. There you will find it
for sure!
And for persistent problems there is always the hotline.
[C] Anhang
63