1
9
IO.KAP-03.01(ENG)
If the value of errors amounts to 0 it means that there were no errors notified during the
transmission, and no configuration change took place.
If the value of an error flag is different from 0 then in the upper left corner of the screen an
exclamation sign appears.
The errors may be removed by running the "RESET CONFIGURATION FLAG" function
which is available at the „CONFIGURATION – transmitter configuration” tab. After this
action the exclamation sign displayed in the upper left corner of the screen vanishes.
8.2. CALIBRATION
1) ZEROING
The function for zeroing the transmitter is performed in order to eliminate the shift in its
characteristic after installing it on a new object. After the ZEROING function has been
executed the pressure becomes stabilised and the current pressure is displayed on the
Communicator’s screen in the form of a number and unit. If the displayed value is
appropriate the zeroing operation should be acknowledged by pressing the F3 key [ ↵ ].
The Communicator confirms performance of the zeroing by displaying the following
message: „FIRST PROCESS VARIABLE ZEROED”.
2) PRESSURE CALIBRATION
Before calibration ought to be enter calibration code: 00000000.
Change of calibration code: see item 8.5. options of communicator page no. 16.
This function enables calibrating the upper and the lower value of pressure.
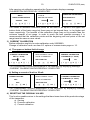
The to be calibrated is chosen by pressing the key F1 [ < ] or the F2 key [ > ] and
acknowledged by pressing the F3 key [ ↵ ].
-PRESSURE CALIBRATION.
PRESSURE CALIBRATION
SET LOWER PRESSURE
SET UPPER PRESSURE.
[ < ][ > ][ ↵ ][ ↑ ]
[ < ][ > ][ ↵ ][ ↑ ]
After choosing the pressure to be calibrated (the upper or the lower one) the pressure
becomes stabilised and the current pressure is displayed on the Communicator’s screen
in the form of number and unit. When the chosen pressure is displayed it should be
acknowledged by pressing the F3 key [ ↵ ] and the master pressure value should be
typed in.
Typing in figures
Moving on the screen is possible with the use of the F1 key [ < ] and F2 key [ > ].
A single short pressing the F1 key [ < ] causes removing one character before the
cursor whereas a longer pressing it results in removing the whole line.
A text box may be modified when the pulsing cursor is present in it. Figures may be
typed in by pressing appropriate keys of the keyboard. Pressing the F3 key [ ↵ ] causes
input of the typed in value, then the cursor vanishes. It is possible to type in up to 5
figures and the point. After typing in each character the cursor automatically moves to
the next position right after the newly typed in character.
It is possible to type in for example figure 2 instead of 02 without fear – both forms are
accepted by the device.
It is possible to type in up to 5 figures and the point.