1
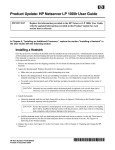
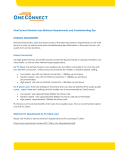
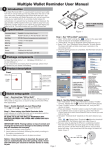
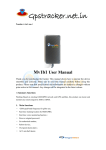
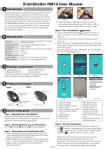
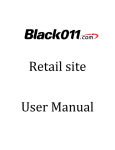
Getting Started with NETServer Plus Overview This guide provides a quick overview for installing and configuring your NETServer/8 V.34 Plus, NETServer/16 V.34 Plus, NETServer/8 I-Modem Plus, and NETServer/16 I-Modem Plus. For additional information and details, refer to the NETServer Plus manuals as noted. This guide is divided into four sections: 1. Installing NETServer Plus Hardware 2. Configuring NETServer Plus Software 3. Installing NETServer Manager Plus Software 4. Obtaining NETServer Plus Wizard Setup Information We recommend that you complete the tasks in this guide in the order they are presented. 1. Installing NETServer Plus Hardware Note: The NETServer Plus comes with factory default DIP switch settings. Do not change them. 1. Rack Mount Installation: Attach the enclosed adapter brackets to the NETServer Plus. Then mount the NETServer plus to the rack. Desktop Installation: Attach the four enclosed rubber feet to the bottom of the NETServer Plus. 2. Be sure that the on/off switch on the rear panel is in the off position. Then make the following cable connections: • AC Power: Connect the AC power cable to the three-pronged power outlet in the upper lefthand corner or the rear of the NETServer Plus. • 10Base2 Ethernet: Connect the Ethernet cable to the Coax port. 10BaseT Ethernet: Connect the Ethernet cable to the RJ-45 UTP port. • Analog: Connect the analog phone lines to the RJ-11 ports. ISDN: Connect the ISDN phone lines to the RJ-45 ports. • Console Cable: You must connect the console cable if you do not have a Windows PC connected to the same LAN segment as the NETServer Plus. For local access, use the enclosed null modem adapter to connect the cable directly to the serial port on your PC or terminal. For remote dial-in access, connect the serial port directly to a modem. 3. Once all of the cables are connected, power up the NETServer Plus by turning the on/off switch to the on position. 2. Configuring NETServer Plus Software Select the configuration method best suited for you from the following three options. Easiest Method - Configuration Wizard and NETServer Manager Plus Use System requirements Recommended experience level How to start Windows- and SNMP-based program including setup for the most common network requirements. Use the wizard for IP configuration. Configuration is via Ethernet. Windows 3.1, Windows 95, or Windows NT, Ethernet connection Beginner to advanced 1. Complete the "Obtain NETServer Plus Wizard Setup Information" section in this guide. 2. Refer to the "Installing NETServer Manager Plus Software" section in this guide to install NETServer Manager Plus software. 3. Double click the NETServer Manager Plus USR Management window to start the program. 4. Click the wizard icon toolbar. icon in the in the NETServer Manager Plus 5. Configure NETServer Plus by entering the information you noted in the "Obtain NETServer Manager Plus Wizard Planning Information" section in this document. Note: If you also require IPX and/or AppleTalk, explanation about adding a network is included in the “Using NETServer” section of the Help contents. Page 2 1997 U.S. Robotics 8100 North McCormick Boulevard Skokie, IL USA 60076-2999 Easy Method - Command Line Interface (CLI) Quick Setup Use System requirements Recommended experience level Refer to… How to start CLI Quick Setup Use for most common network requirements, including IP, IPX, and AppleTalk. Configuration is via the serial/console port on the rear of the NETServer Plus. Terminal-based or terminal emulation program, Serial connection. Settings - 9600 8-N-1 Intermediate to advanced "Using the CLI Quick Setup Program" section of the Basic Installation and Setup chapter in the NETServer 8/16 Plus CLI Reference Guide. Start a terminal session with NETServer Plus through the serial/console port. Respond to the Quick Setup prompts. Advanced Method - Command Line Interface (CLI) Use System requirements Recommended experience level Refer to… Use CLI for configuring NETServer Plus with the full setup and administrative command structure. Configuration is via the serial/console port on the rear of the NETServer Plus. You may also use Telnet once the NETServer Plus is initially configured. Terminal-based or terminal emulation program, Serial connection. Settings - 9600 8-N-1 Advanced NETServer 8/16 Plus User Manual and NETServer 8/16 Plus CLI Reference Guide 3. Installing NETServer Manager Plus Software This procedure describes how to install the NETServer Manager Plus software. Note: The following procedure assumes that your floppy disk drive is the a: drive, and that your hard disk drive is the c: drive. If your drive letters are different, substitute them appropriately in the procedure. 1. Insert the NETServer Manager Plus diskette in your PC's floppy drive (for example, drive a:). 2. Click Start 3. Type a:\nsplus.exe and click OK. This opens the Win-zip self extractor utility. 4. Click OK on each of the two Win-zip screens that appear. 5. Type c:\templus and click OK to extract the NETServer Manager Plus setup files to a temporary setup directory on your hard disk drive. 6. Click OK after the files have been extracted. 7. Click Close to exit the Win-zip self-extractor. 8. Click Start 9. Type c:\templus\setup.exe and click OK to start the NETServer Manager Plus installation. and then select Run. and then click Run. 10. Follow the prompts on your screen to finish the installation. Page 3 1997 U.S. Robotics 8100 North McCormick Boulevard Skokie, IL USA 60076-2999 4. Obtaining NETServer Plus Wizard Setup Information This section describes how to gather user configuration information required for the NETServer Manager Plus Wizard setup utility. Wizard overview Use the wizard to configure users for NETServer Plus access. The wizard will prompt you to enter information for telecommuter, Internet Service Provider, or terminal user access. The configuration wizard is a Windows-based program. All other operating systems require you to use the Command Line Interface QuickSetup, or the Command Line Interface (CLI). See the NETServer Plus User Manual, and the CLI Reference Guide for CLI configuration instructions. You do not need to use this form with CLI or CLI Quick Setup. How to use this planning form Use the information in this section to record user configuration data for each user or group of users you plan to configure on the NETServer Plus. Network users must be configured for one of three access methods: • • • Internet Service access Telecommuter access Terminal access We recommend that you complete the tables provided in this section before you begin the Wizard setup program. Obtain Information for Telecommuter and Internet Service users The following Wizard screens show you the information required for adding an Internet Service user and a Telecommuter user. This is the Wizard Setup screen for adding an Internet Service user: This is the Wizard Setup screen for adding a Telecommuter user: Page 4 1997 U.S. Robotics 8100 North McCormick Boulevard Skokie, IL USA 60076-2999 Table 1 below describes the information required for each Telecommuter or Internet Service user. Note: All characters are case sensitive. Table 1: Telecommuter/Internet Service User Configuration Field Descriptions Field Definition User Name This field will contain the user name you define for this user account. Protocol This is the protocol assigned to the dial-in user. Select either PPP, SLIP, or ARAP. MTU Maximum transfer unit. This is the largest data packet size allowed. The default is 3468. Routing This field sets the routing type (RIP packets) accepted on this connection. Select Listen to detect packets destined for the system's networks. Select Broadcast to route packets destined for the remote network. Select Broadcast & Listen to enable both Listen and Broadcast. Select None to have the NETServer Plus ignore all routing packets. IPX Address For Telecommuter users only. If you are using IPX, enter the address for the user. IP Address Assignment This is the method used to assign an IP Address to the dial-in user. If you select Unnumbered (0.0.0.0), the IP address will be the same for your LAN and WAN ports. If you select Dynamic (255.255.255.255), the address is dynamically assigned by the remote site. Many Internet Service Providers assign IP addresses dynamically. If the remote device requires that the LAN and WAN ports must be on different networks, use a Specified IP address provided by your service provider or network administrator. List the required information for each Internet Service and/or Telecommuter user in the Table 2 below. Use an additional sheet of paper if necessary. We have provided a sample entry. Table 2: Telecommuter/Internet Service User Configuration Information Page 5 User Name Protocol MTU Routing johndoe SLIP 3468 SEND IPX Address (Telecommuter only) IP Address Assignment Dynamic 1997 U.S. Robotics 8100 North McCormick Boulevard Skokie, IL USA 60076-2999 Obtain Information for Terminal Access Users The following Wizard screen shows you the information required for adding Terminal Access users. This is the Wizard Setup screen for a Terminal access user: Table 3 below describes the configuration information required for each Terminal user. Note: All characters are case sensitive. Table 3: Terminal User Configuration Field Descriptions Field Definition User name This field will contain the user name you define for this user account. Login Service This is the login service for the user. Select TCP, Rlogin, or Telnet. TCP Port This optional parameter specifies the NETServer Plus port number that will be used when a user’s application requests a TCP session with this NETServer Plus. Host Connection Type This is the type of connection made to this NETServer Plus when the user logs in. Select Prompt to have the NETServer Plus ask a user for an IP address to be connected to when they have logged in. Choose Select to cause a user to be connected to a host from a default host. Select Specified to connect only to the address you specify in the field. Use Table 4 to list the required Wizard Setup information for each Terminal access user. Use an additional sheet of paper, if necessary. We have provided a sample entry. Table 4: Terminal User Configuration Information User Name Login Service TCP Port Host Connection Type janedoe TELNET 3 Select Copyright 1997 by U.S. Robotics 8100 North McCormick Blvd. Skokie, IL 60076-2999 All Rights Reserved Worldwide 1.024.1221-00 Page 6 1997 U.S. Robotics 8100 North McCormick Boulevard Skokie, IL USA 60076-2999