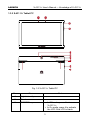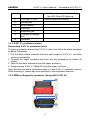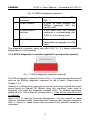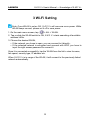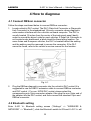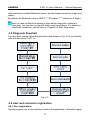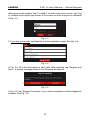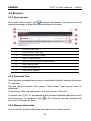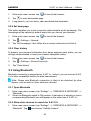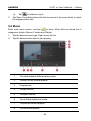
1
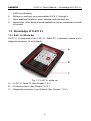
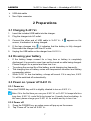
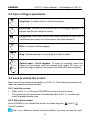
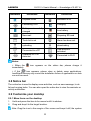
Version: V1.00.000 Revised date: 2013-10-25 LAUNCH X-431 V+ User’s Manual — Safety Precautions Copyright Information Copyright © 2013 by LAUNCH TECH. CO., LTD. All rights reserved. No part of this publication may be reproduced, stored in a retrieval system, or transmitted in any form or by any means, electronic, mechanical, photocopying, recording or otherwise, without the prior written permission of LAUNCH. The information contained herein is designed only for the use of this unit. LAUNCH is not responsible for any use of this information as applied to other units. Neither LAUNCH nor its affiliates shall be liable to the purchaser of this unit or third parties for damages, losses, costs, or expenses incurred by purchaser or third parties as a result of: Accident, misuse, or abuse of this unit, or unauthorized modifications, repairs, or alterations to this unit, or failure to strictly comply with LAUNCH operating and maintenance instructions. LAUNCH shall not be liable for any damages or problems arising from the use of any options or any consumable products other than those designated as Original LAUNCH Products or LAUNCH Approved Products by LAUNCH. Trademark Information LAUNCH is a registered trademark of LAUNCH TECH CO., LTD. (also called LAUNCH for short) in China and other countries. All other LAUNCH trademarks, service marks, domain names, logos, and company names referred to in this manual are either trademarks, registered trademarks, service marks, domain names, logos, company names of or are otherwise the property of LAUNCH or its affiliates. In countries where any of the LAUNCH trademarks, service marks, domain names, logos and company names are not registered, LAUNCH claims other rights associated with unregistered trademarks, service marks, domain names, logos, and company names. Other products or company names referred to in this manual may be trademarks of their respective owners. You may not use any trademark, service mark, domain name, logo, or company name of LAUNCH or any third party without permission from the owner of the applicable trademark, service mark, domain name, logo, or company name. You may contact LAUNCH by visiting the website at www.cnlaunch.com, or writing to LAUNCH TECH. CO., LTD.,Launch Industrial Park, North of Wuhe Avenue, Banxuegang, Bantian, Longgang, Shenzhen, Guangdong, P.R.China, to request written permission to use Materials on this manual for purposes or for all other questions relating to this manual. i LAUNCH X-431 V+ User’s Manual — Safety Precautions Safety Precautions Before using X-431 V+, please read the following safety information carefully. Never collide, throw, or punch X-431 V+, and avoid falling, extruding and blending it. Do not use X-431 V+ in exceptionally cold or hot, dusty, damp or dry environments. In places where X-431 V+ is forbidden or using X-431 V+ may cause interference or generate a potential risk, please turn off it. To ensure a safe driving, please do not use X-431 V+ while driving. Turn off X-431 V+ before boarding any airplane. Do not dismantle X-431 V+ by yourself. If there is any inquiry, please contact the dealer. Never place X-431 V+ into apparatus with strong electromagnetic field. Keep X-431 V+ far away from magnetic devices because its radiations may erase the data stored on the devices. Store X-431 V+ out of reach of children and do not allow children to use it unsupervised. Please use the included battery and charger. Otherwise, explosion may happen. Do not disconnect power abruptly when X-431 V+ is being formatted or in process of uploading or downloading. Or else it may result in program error. Precautions on Using X-431 V+ z z z z The ignition switch should be OFF while plugging or unplugging the DBScar diagnostic connector. When DBScar connector is not used, remember to place it into the diagnostic connector housing located at the back of the protection sleeve to avoid loss. If your vehicle keeps unattended for a week or a long period, it is suggested to unplug the connector from vehicle’s DLC to save battery power. While diagnosing a vehicle, you are not advised to use phone or messaging, because it may cause a data communication interruption. If it happens, it is abnormal and just try to re-do it. Precautions on Operating Vehicle’s ECU z Do not disconnect the vehicle inner consumer when the ignition switch is ii LAUNCH z z z z z X-431 V+ User’s Manual — Safety Precautions on. High voltage transients may encounter at the moment of disconnecting, which may damage the sensors and the ECU. Protect the computer from magnetic object. Do cut off the power supply of ECU system before welding on the vehicle. Pay more attention to the ECU and the sensors when the operation is next to them. Ground yourself when you disassemble PROM, otherwise ECU and sensors will be damaged by static electricity. Do connect ECU harness connector firmly, otherwise electronic elements, such as IC inside ECU, will be damaged. iii LAUNCH X-431 V+ User’s Manual — Table of Contents Table of Contents 1 INTRODUCTION .............................................................................................. 1 1.1 PRODUCT PROFILE ................................................................................... 1 1.2 FEATURES ................................................................................................ 1 1.3 KNOWLEDGE OF X-431 V+ ....................................................................... 2 1.3.1 X-431 V+ Whole Set .......................................................................... 2 1.3.2 X-431 V+ Tablet PC ........................................................................... 3 1.3.3 X-431 V+ protection sleeve ............................................................... 4 1.3.4 DBScar diagnostic connector (using with X-431 V+) ........................ 4 1.3.5 GOLO diagnostic connector (applied for personal car owners) ........ 5 1.4 TECHNICAL PARAMETERS ......................................................................... 6 1.5 PACKAGE LIST .......................................................................................... 6 2 PREPARATIONS.............................................................................................. 7 2.1 CHARGING X-431 V+ ................................................................................... 7 2.2 ON USING YOUR BATTERY ............................................................................ 7 2.3 POWER ON / POWER OFF X-431 V+.............................................................. 7 2.3.1 Power on............................................................................................ 7 2.3.2 Power off............................................................................................ 7 2.4 TIPS ON FINGER OPERATIONS ....................................................................... 8 2.5 LOCK & UNLOCK THE SCREEN ...................................................................... 8 2.5.1 Lock the screen ................................................................................. 8 2.5.2 Unlock the screen.............................................................................. 8 2.6 SCREEN LAYOUT.......................................................................................... 9 2.7 STATUS BAR ................................................................................................ 9 2.8 NOTICE BAR ............................................................................................... 10 2.9 CUSTOMIZE YOUR DESKTOP ....................................................................... 10 2.9.1 Move items on the desktop ............................................................. 10 2.9.2 Create a widget on the desktop........................................................11 2.9.3 Delete items from the desktop..........................................................11 2.9.4 Change your wallpaper.....................................................................11 2.9.5 Adjust brightness ..............................................................................11 2.9.6 Set standby time ...............................................................................11 2.9.7 Set screen lock ................................................................................ 12 2.9.8 Adjust the volume ............................................................................ 12 2.10 INPUT METHOD......................................................................................... 12 2.10.1 Activate / Hide on-screen keyboard .............................................. 12 2.10.2 Edit text.......................................................................................... 12 2.10.3 Android input method .................................................................... 13 2.10.4 Huawei input method..................................................................... 14 3 WI-FI SETTING .............................................................................................. 15 iv LAUNCH X-431 V+ User’s Manual — Table of Contents 4 HOW TO DIAGNOSE..................................................................................... 16 4.1 CONNECT DBSCAR CONNECTOR ................................................................ 16 4.2 BLUETOOTH SETTING ................................................................................. 16 4.3 DIAGNOSIS FLOWCHART ............................................................................. 17 4.4 USER AND CONNECTOR REGISTRATION ...................................................... 17 4.4.1 User registration .............................................................................. 17 4.4.2 Software layout ................................................................................ 20 4.5 DOWNLOAD DIAGNOSTIC SOFTWARE .......................................................... 20 4.6 START DIAGNOSING ................................................................................... 23 4.6.1 Read trouble code ........................................................................... 26 4.6.2 Clear trouble code ........................................................................... 26 4.6.3 Read data stream ............................................................................ 27 4.6.4 Special function ............................................................................... 29 4.7 MAINTENANCE DATABASE .......................................................................... 30 4.8 MY DATA ................................................................................................... 31 4.8.1 Diagnostic Report ............................................................................ 31 4.8.2 Operation record.............................................................................. 34 4.9 WHAT’S NEW ............................................................................................. 34 4.10 CUSTOMER MANAGEMENT ....................................................................... 34 4.11 ONE KEY UPGRADE ................................................................................. 35 4.12 CIRCLE .................................................................................................... 35 4.13 USER MANAGEMENT ................................................................................ 37 4.13.1 Connector registration ................................................................... 37 4.13.2 Modify Personal Information.......................................................... 37 4.13.3 Change Password ......................................................................... 38 4.13.4 Setup Security Question................................................................ 38 4.13.5 Forget Password ........................................................................... 38 4.13.6 Theme............................................................................................ 38 4.13.7 Select Serial Number..................................................................... 38 4.13.8 Connector firmware upgrade file download................................... 39 4.13.9 Log Out .......................................................................................... 39 4.14 MORE ...................................................................................................... 39 5 OTHERS......................................................................................................... 40 5.1 EMAIL ........................................................................................................ 40 5.1.1 Configure an email account............................................................. 40 5.1.2 Send a email.................................................................................... 40 5.1.3 View a email .................................................................................... 40 5.1.4 Delete an email................................................................................ 41 5.1.5 Revise a account setting ................................................................. 41 5.1.6 Delete an email account .................................................................. 41 5.2 BROWSER .................................................................................................. 42 5.2.1 Open browser .................................................................................. 42 v LAUNCH X-431 V+ User’s Manual — Table of Contents 5.2.2 Download files ................................................................................. 42 5.2.3 Manage bookmarks ......................................................................... 42 5.2.4 Set homepage ................................................................................. 43 5.2.5 Clear history..................................................................................... 43 5.3 USING BLUETOOTH .................................................................................... 43 5.3.1 Open Bluetooth................................................................................ 43 5.3.2 Allow other devices to search for X-431 V+ .................................... 43 5.3.3 Search other devices and pair X-431 V+ with it .............................. 44 5.3.4 Send file via Bluetooth..................................................................... 44 5.4 CAMERA .................................................................................................... 44 5.4.1 How to take a picture....................................................................... 44 5.4.2 How to record a video...................................................................... 45 5.5 GALLERY ................................................................................................... 46 5.5.1 Open gallery .................................................................................... 46 5.5.2 View pictures or videos.................................................................... 47 5.5.3 Edit photos....................................................................................... 47 5.6 MUSIC ....................................................................................................... 48 5.7 CALENDAR ................................................................................................. 49 5.8 ALARMS ..................................................................................................... 49 5.8.1 Add an alarm ................................................................................... 49 5.8.2 Delete an alarm ............................................................................... 49 5.8.3 Turn on/off alarm.............................................................................. 49 5.9 FILE MANAGER .......................................................................................... 49 5.10 APPLICATIONS ......................................................................................... 49 5.10.1 Install applications ......................................................................... 49 5.10.2 View installed applications............................................................. 50 5.10.3 Uninstall applications..................................................................... 50 5.11 SET DATE & TIME ..................................................................................... 50 5.12 ENTER POWER SAVING MODE ................................................................... 50 5.13 CLEAR CACHE .......................................................................................... 51 6 FAQ.............................................................................................................. 52 vi LAUNCH X-431 V+ User’s Manual — Knowledge of X-431 V+ 1 Introduction 1.1 Product Profile X-431 V+ is a new Android-based vehicle trouble diagnostic device developed for internet applications. It inherits from LAUNCH’s advanced diagnosing technology and is characterized by covering a wide range of vehicles, featuring powerful functions, and providing precise test result. Through the Bluetooth communication between vehicle diagnostic connector and variant mobile intelligent terminals, it achieves X431 series full car model and full system vehicle trouble diagnosis, which include Reading DTCs, Clearing DTCs, Reading Data stream, Actuation Test and Special Functions. Meanwhile, taking advantage of mobile internet, it integrates more application and service, such as Customer Management, Maintenance Database, One Key Upgrade, Circle etc. X-431 V+ adopts a higher performance-price ratio tablet computer, which is equipped with Android 4.0 operating system, 1.2GHz four-core CPU and 10.1” HD IPS screen display. 1.2 Features 1. Diagnose: Can diagnose the electronic control system of prevailing vehicle models covering Asian, European, American and Chinese. Diagnosis functions include: Read DTCs, Clear DTCs, Read datastream, Special functions etc; Specially designed for Android platform with clear and user-friendly interface; Via Bluetooth, it is simple for DBScar diagnostic connector to communicate with X-431 V+; Equipped with an exclusive X-431 V+ protection sleeve to prevent it from being damaged; 2. Browser: built-in Wi-Fi module makes surfing on the internet freely; 3. Email: allows you to send and receive email. External POP3 or IMAP email account for some common Web email service provider can be added; 4. Search: enables you to locate your target quickly and conveniently; 5. File Manager: with it, you can manage the files or downloaded files stored 1 LAUNCH X-431 V+ User’s Manual — Knowledge of X-431 V+ in SD card efficiently; 6. Settings: to configure your personalized X-431 V+ through it; 7. Other additional functions: alarm, calendar and calculator etc. 8. Applications: Other android based applications can be customized to install or uninstall. 1.3 Knowledge of X-431 V+ 1.3.1 X-431 V+ Whole Set X-431 V+ is composed of an X-431 V+ Tablet PC, a protection sleeve and a diagnostic connector (in red & black). Fig. 1-1 X-431 V+ whole set A ---- X-431 V+ Tablet PC (See Chapter“1.3.2”) B ---- Protection sleeve (See Chapter “1.3.3”) C ---- Diagnostic connector (in red & black) (See Chapter “1.3.4”) 2 LAUNCH X-431 V+ User’s Manual — Knowledge of X-431 V+ 1.3.2 X-431 V+ Tablet PC Fig. 1-2 X-431 V+ Tablet PC No. Name 1 Light intensity sensor 2 Front camera 3 POWER key Notes In Off mode, press it to turn on X-431 V+; In On mode, press it to activate the LCD if the LCD is blank. 3 LAUNCH X-431 V+ User’s Manual — Knowledge of X-431 V+ In On mode, press it to turn off the LCD if the LCD lights up. 4 VOLUME +/- key 5 Microphone 6 Rear camera 7 Card slot 8 Earphone jack 9 USB port /Charging slot 10 Speakers Used to adjust the volume. 1.3.3 X-431 V+ protection sleeve Dismantling X-431 V+ protection sleeve To remove protection sleeve from X-431 V+ main unit, follow the steps described as below to proceed: 1. Pull the black sleeve outwards from the right margin of X-431 V+, and then remove it completely. 2. Reverse the upper enclosure and then use the screwdriver to loosen all screws. 3. Take out the lower enclosure from the upper enclosure. 4. Finally remove X-431 V+ Tablet PC from the upper enclosure. Note: Reverse the above-mentioned steps to install X-431 V+ protection sleeve. While mounting it, please pay more attention to the installation direction. 1.3.4 DBScar diagnostic connector (using with X-431 V+) 1 2 3 4 4 LAUNCH X-431 V+ User’s Manual — Knowledge of X-431 V+ Fig. 1-5 DBScar diagnostic connector ① OBD-16 connector ② Power indicator It lights up while plugging the DBScar connector into the vehicle’s DLC. ③ Communication indicator It will flash once the DBScar connector is communicating with X-431 V+ or it is being reset. ④ Micro USB port To connect to PC for data transmission or upgrade via USB cable. diagnostic To connect to vehicle’s OBD2 DLC. This diagnostic connector works only with X-431 V+. If it keeps unattended, please place it in right position. 1.3.5 GOLO diagnostic connector (applied for personal car owners) Fig. 1-7 GOLO diagnostic connector (optional) The GOLO diagnostic connector shown in Fig. 1-7 provides same indicators and ports as the DBScar diagnostic connector (in red & black). Please refer to Chapter 1.3.4. However it is designed for personal car owners and mainly applied with smart phone based on Android OS (Before using this connector, users need to download and install the diagnostic software firstly. For detailed operations, please refer to “User’s Manual” included with it.). It can not be used with X-431 V+ together. Since X-431 V+ features Customer Management, it is very helpful for repair shops to maintain friendly relationship with customers and manage customer’s data. In view of it, repair shops may recommend this powerful connector to customers. 5 LAUNCH X-431 V+ User’s Manual — Knowledge of X-431 V+ 1.4 Technical Parameters X-431 V+: ¾ ¾ ¾ ¾ ¾ ¾ ¾ ¾ ¾ ¾ ¾ ¾ ¾ ¾ ¾ ¾ Operating system: Android CPU: Four-core 1.2GHz processor Battery: 6600mh, rechargeable polymer lithium battery Extension memory card: 32G Micro SD(TF) card supported Memory: 1GB Storage capacity: 8GB LCD: 10.1 inch LCD resolution: 1280 X 800 Touch screen: capacitive touch screen Cameras: 3.2 mega rear and 0.3 mega front Wi-Fi: supported Bluetooth: supported Working temperature: -10℃ ~ 55℃ (14°F to 131°F) Storage temperature: -20℃ ~ 70℃ (-4°F to 158°F) Weight: about 0.64Kg Outline dimension: 257.4*175.9*9.9mm DBScar Connectors: ¾ ¾ ¾ ¾ ¾ ¾ ¾ ¾ Working voltage: 9 ~15V Average working current: about 35mA Standby current: about 25mA Working temperature: -20 to 55℃ (-4°F to 131°F) Storage temperature: -30 to 70℃ (-22°F to 158°F) Storage humidity: <80% Working humidity: <60% Net weight: about 26g 1.5 Package List While purchasing, please check the following accessories: ¾ ¾ ¾ ¾ ¾ ¾ X-431 V+ Tablet PC (including X-431 V+ protection sleeve) Confidential paper DBScar diagnostic connector (in red & black) OBD II extension cable Cigarette lighter cable Power adaptor 6 LAUNCH ¾ ¾ X-431 V+ User’s Manual — Knowledge of X-431 V+ USB data cable Non-16pin connector 2 Preparations 2.1 Charging X-431 V+ 1. 2. Insert the included USB cable into the charger. Plug the charger into AC outlet. 3. Connect the other end of USB cable to X-431 V+. If screen, it indicates it is being charged. 4. If the logo changes into , it indicates that the battery is fully charged. Disconnect the charger from the AC outlet. Unplug the USB cable on the charger from X-431 V+. 5. appears on the 2.2 On using your battery If the battery keeps unused for a long time or battery is completely discharged, it is normal in case it can not be turned on while being charged. Please charge it for a period and then turn it on. To prolong the service life of the battery, avoid charging too frequently. The charging time of battery varies with temperature condition and battery consumption status. While X-431 V+ has low battery, a beep will sound. If it is very low, X-431 V+ will be switched off automatically. 2.3 Power on / power off X-431 V+ 2.3.1 Power on Press the POWER key until it is slightly vibrated to turn on X-431 V+. Note: if it is the first time you use your X-431 V+ or X-431 V+ keeps idle for a long time, X-431 V+ could fail to be turned on. It results from low battery. In this case, please charge your X-431 V+ for a while and try to turn it on. 2.3.2 Power off 1. 2. Press the POWER key, an option menu will pop up on the screen. Tap “Power off” to turn off X-431 V+. 7 LAUNCH X-431 V+ User’s Manual — Knowledge of X-431 V+ 2.4 Tips on finger operations Single-tap: To select a item or launch a program. Double-tap: To zoom in so that the text on a webpage appears in a column that fits your device’s screen. Long press: Press and hold on the current interface or area until a contextual menu pops up on the screen, and then release it Slide: To jump to different pages. Drag: Tap the desktop icon and drop it to other location. Spread apart / Pinch together: To zoom in manually, place two fingers on the screen and then spread them apart. To zoom out, place two fingers apart on the screen and then pinch them together. 2.5 Lock & unlock the screen Many screen lock modes are available on X-431 V+. Take the preset screen-lock mode as example for demonstration. 2.5.1 Lock the screen When X-431 V+ is ON, press POWER key once to lock the screen; The system will lock the screen automatically after X-431 V+ remains idle over the preset standby time. 2.5.2 Unlock the screen Press POWER key to activate the screen, and then drag the “Unlock” position. lock to Note: if you define as unlock using the pattern, you have to draw the right 8 LAUNCH X-431 V+ User’s Manual — Knowledge of X-431 V+ target pattern to unlock it. 2.6 Screen Layout On-screen keys and status bar are as follows: 1 Tap to view the recently launched applications and running applications. 2 Tap to jump to the main menu screen. 3 Tap to return to the previous screen. 4 It shows: system time, Wi-Fi connection status and signal strength, battery status and other information. Tap the digital clock to open the notice panel. 5 to hide operation bar. Swipe the screen from the Tap bottom to restore it. 6 Display the widget and application icons. 7 Tap to create a widget. 2.7 Status bar For detailed indicators, please see the following table. 9 LAUNCH X-431 V+ User’s Manual — Knowledge of X-431 V+ Indicators Definitions Indicators Definitions Airplane mode Bluetooth is on Positioning GPS Charging Battery charged is fully Low battery New mail Preparing SD card To do list is set Alarm has been set. uploading downloading Connected to a PC USB bound is activated Available Wi-Fi is detected Connected to Wi-Fi Notes: > When the immediately. icon appears on the status bar, please charge it > If this icon appears, please clear or delete some applications. Insufficient memory may cause the installation failure of applications or data can not be saved. 2.8 Notice bar The notice bar is used to display some activities, such as new message, to do list and running tasks. You can also open the notice bar to view the reminder or activity notification. 2.9 Customize your desktop 2.9.1 Move items on the desktop 1. 2. Hold and press the item to be moved until it is shaken. Drag and drop it to the target location. Note: Drag the icon to the margin of the screen and keep it still, the system 10 LAUNCH X-431 V+ User’s Manual — Knowledge of X-431 V+ will switch to other extension desktop, place it to the desired location. 2.9.2 Create a widget on the desktop 1. 2. Tap on the upper top corner. Tap a widget, keep it pressed and then drag it to the desired desktop window. 2.9.3 Delete items from the desktop 1. 2. Hold and press the item to be moved until it is shaken. Drag it on the trash icon, then release it. Warning: Deleting an icon will uninstall the corresponding application. Please be careful to do so. 2.9.4 Change your wallpaper 1. 2. Hold and press a blank area on the desktop, a pop-up wallpaper window will be shown on the screen. Set different wallpaper as desired: • Wallpapers: Choose a still picture from gallery as wallpaper. • Live Wallpapers: Open it to choose one of the preset live wallpapers as wallpaper. • Gallery: Set the pictures you captured as wallpaper. 2.9.5 Adjust brightness X-431 V+ is equipped with a built-in light intensity sensor. It can adjust the screen brightness according to the ambient light intensity automatically. Alternatively, you can also adjust it manually. Tips: Reducing the brightness of the screen is helpful to save the power of X-431 V+. 1. 2. On the main menu screen, tap > All > Display > Brightness. Choose one of the followings to adjust it: > Automatic brightness: check the box before “Automatic brightness”. > Manual adjustment: Deselect the “Automatic brightness”, and then drag the slider to adjust it. 2.9.6 Set standby time If no activities are made within the defined standby period, the screen will be locked automatically and the system enters sleep mode to save power. 1. On the main menu screen, tap > All > Display > Sleep. 11 LAUNCH 2. X-431 V+ User’s Manual — Knowledge of X-431 V+ Choose the desired sleep time. 2.9.7 Set screen lock This function is designed to lock the screen and buttons to avoid accidental operations while X-431 V+ keeps unattended. 1. 2. On the main menu screen, tap > All > Security > Screen lock. Choose the desired screen lock mode and follow the on-screen instructions to finish your setting. 2.9.8 Adjust the volume This option enables you to adjust the volume of the ringtones, media player, alarm and notice. 1. 2. On the main menu screen, tap Drag the slider to adjust it. > All > Sound > Volume. Note: Alternatively, you can also press the volume keys to control the volume of the current application. 2.10 Input method 2.10.1 Activate / Hide on-screen keyboard Several preset input methods are available on X-431 V+. ¾ To input text, tap the input box and the on-screen keyboard will be activated automatically. ¾ After inputting, tap to hide the keyboard. Note: In some applications, the on-screen keyboard may appear over some interfaces partially. Close it to view more so that you can judge what’s next to do. 2.10.2 Edit text Cut, copy and paste operations are supported. 1. Tap the desired text area until a blue cursor appears. 2. Press and drag the cursor to highlight the text to be edited. 3. Tap SELECT ALL, CUT or COPY to perform the corresponding operations. To delete the selected text, tap the delete key on the keyboard. 12 LAUNCH X-431 V+ User’s Manual — Knowledge of X-431 V+ 2.10.3 Android input method 1 To jump to next textbox. 2 To switch to numeric & symbol keyboard. 3 To toggle between upper case and lower case. 4 To bring up an input options menu. Input languages and Android keyboard settings such as auto-capitalization and sound on keypress are available. 5 To enter a space. 6 Line feed. 7 > To delete the character before the cursor. > Long-press this key to delete all characters before the cursor. Note: For different input box, keyboard layout may vary. The figure shown as above is provided for reference purpose. 13 LAUNCH X-431 V+ User’s Manual — Knowledge of X-431 V+ 2.10.4 Huawei input method 1 To toggle between upper case and lower case. 2 To switch to numeric & symbol keyboard. 3 To select the desired input language. 4 To enter a space. 5 To proceed to next step or perform line feed. 6 > To delete the character before the cursor. > Long-press this key to delete all characters before the cursor. 14 LAUNCH X-431 V+ User’s Manual — Knowledge of X-431 V+ 3 Wi-Fi Setting Note: Once WLAN is set as ON, X-431 V+ will consume more power. While WLAN keeps unused, please set it off to save power. 1. On the main menu screen, tap > ALL > WLAN. 2. Tap or slide the WLAN switch to ON, X-431 V+ starts searching all available wireless LANs. 3. Choose the desired WLAN, If the network you chose is open, you can connect to it directly; If the selected network is encrypted and secured with WPA, you have to input the right access password to connect it. Once it is connected successfully, tap the WLAN from the list to view its name, link speed, security type, IP address etc. When X-431 V+ is in range of the WLAN, it will connect to the previously linked network automatically. 15 LAUNCH X-431 V+ User’s Manual — Vehicle Diagnosis 4 How to diagnose 4.1 Connect DBScar connector Follow the steps mentioned below to connect DBScar connector: 1. Locate vehicle’s DLC socket. The DLC (Data Link Connector or Diagnostic Link Connector) is the standardized 16-cavity connector where diagnostic code readers interface with the vehicle's on-board computer. The DLC is usually located 12 inches from the center of the instrument panel (dash), under or around the driver’s side for most vehicles. If Data Link Connector is not located under dashboard, a label should be there telling location. For some Asian and European vehicles, the DLC is located behind the ashtray and the ashtray must be removed to access the connector. If the DLC cannot be found, refer to the vehicle’s service manual for the location. Fig. 4-1 2. Plug the DBScar diagnostic connector into the vehicle’s DLC socket (It is suggested to use the OBD 2 extension cable to connect DBScar connector and DLC socket.). For non-16PIN DLC socket, please select the corresponding non-16pin connector adaptor, then plug the non-16pin end of the adaptor into the DLC socket, and then connect the standard 16pin end DBScar connector. 4.2 Bluetooth setting Enter X-431 V+ Bluetooth setting screen (“Settings” --> “WIRELESS & NETWORK” --> “Bluetooth”), slide the Bluetooth switch to ON and X-431 V+ will 16 LAUNCH X-431 V+ User’s Manual — Vehicle Diagnosis start searching available Bluetooth device, tap the desired connector to pair and match. By default, the Bluetooth name is 98374*****00 (where ***** stands for 5 digits.). Note: In case no Bluetooth setting is done before diagnostic software is launched, you can also configure it while using the software. For details on Bluetooth connection, please refer to “Chapter 4.6 Start diagnosing”. 4.3 Diagnosis flowchart For new users, please follow the operation chart shown in Fig. 4-2 to get familiar with and start using X-431 V+. Fig. 4-2 4.4 User and connector registration 4.4.1 User registration Tap the program icon on the desktop to launch the application, a disclaimer page 17 LAUNCH X-431 V+ User’s Manual — Vehicle Diagnosis will pop up on the window. Tap “I’ve read it” to enter main menu screen, tap “Log In” located at the upper right corner of the screen to enter a screen as indicated in Fig. 4-3. Fig. 4-3 1. If you are a new user, tap Register to enter registration page. See Fig. 4-4. Fig. 4-4 In Fig. 4-4, fill in the information in each field. After inputting, tap “Register and log in”, a prompt message similar to the following will appear: Fig. 4-5 In Fig. 4-5, tap “Register Connector” if you want to experience vehicle diagnostic software. See Fig. 4-6. 18 LAUNCH X-431 V+ User’s Manual — Vehicle Diagnosis Fig. 4-6 Input the Serial Number and Verification Code, and then tap “Confirm”. Note: The Serial Number and Verification Code can be obtained from the password envelope. See Fig. 4-7. Product SN Product SN Verification code Fig. 4-7 To exit and register it later, tap “No connector”. Alternatively, you can also register your connector by tapping “Register Connector” in “Account”. For details, please refer to Chapter 4.13.1 DBScar connector registration. 2. If you have registered to be a member, input your name/CC and password in Fig. 4-3, and then tap the “Log In” button to enter the main menu screen directly. 19 LAUNCH X-431 V+ User’s Manual — Vehicle Diagnosis 4.4.2 Software layout Fig. 4-8 Note: Tap indicates that this vehicle diagnosis software is downloadable. to unfold function menu, it mainly includes the following items: Diagnose: to enter vehicle diagnosing function. Maintenance Database: to provide a large amount of service data for car owners and maintenance personnel to make reference and review. My Data: to view diagnostic report and operation log. What’s New: to view the Launch’s latest information and product trends. Customer Management: to manage customer’s information, including add new customer and remote diagnosis etc. One Key Upgrade: It enables you to perform online software update. Account: To maintain and manage your personal information. More: To view software version and user’s manual. While accessing other menus, tap extend the display window. While browsing information, tap shown on the bottom of the screen to or to zoom in or zoom out. 4.5 Download diagnostic software Before diagnosing a vehicle, you have to download the corresponding vehicle 20 LAUNCH X-431 V+ User’s Manual — Vehicle Diagnosis diagnosis software. In Fig. 4-8, tap on the desired vehicle to enter a screen similar to the following: Fig. 4-9 Tap the serial number to proceed to Fig. 4-10. Fig. 4-10 Tap “Check download” to enter download page. See Fig. 4-11. 21 LAUNCH X-431 V+ User’s Manual — Vehicle Diagnosis Fig. 4-11 Tap “Download” to start downloading. Once it is complete, a screen similar to the following will be shown on the screen: Fig. 4-12 icon disappears from the lower Tap “Return” to the main menu screen. The right corner of the vehicle name logo. See Fig. 4-13. Alternatively, you can also tap and choose “One Key Upgrade” from the context menu to download your software. For details, please refer to Chapter 4.11 One Key Upgrade. 22 LAUNCH X-431 V+ User’s Manual — Vehicle Diagnosis Fig. 4-13 4.6 Start diagnosing Tap on the main menu screen, and then choose “Diagnose” to enter the vehicle selection page. Take Demo as an example to demonstrate how to diagnose a vehicle. Tap “Demo”, the system will prompt you to make Bluetooth pair firstly (if no Bluetooth pair is made in “Settings”, “Not Connected” and “Not Paired” will be displayed next to the Bluetooth device). If Bluetooth pair has been done, “Not Connected” but “Paired” will appear on the screen. See Fig. 4-14. 23 LAUNCH X-431 V+ User’s Manual — Vehicle Diagnosis Fig. 4-14 Tap the desired connector to start connecting. If successful, a pop-up message “Connected to 98374*****00” will be shown. After Bluetooth is properly connected, the system will enter software version selection screen. See Fig. 4-15. 24 LAUNCH X-431 V+ User’s Manual — Vehicle Diagnosis Fig. 4-15 To check whether a new version is available or not, tap “Check Latest Version”. If a newer version is detected, it will start downloading the latest version. Tap the desired version to start initializing. After initializing is complete, the screen will display as below: Fig. 4-16 Tap “Demo” to enter system selection interface. See Fig. 4-17. Tap to return to the function selection screen. 25 LAUNCH X-431 V+ User’s Manual — Vehicle Diagnosis Fig. 4-17 Tap “Engine”, the system will jump to the function menu. See Fig. 3-13. Fig. 4-18 To return to the previous screen, tap . 4.6.1 Read trouble code Tap “Read trouble code” in function menu, the screen will display the diagnostic result. Generate Current Text Reports: to save the current data in text format. Generate Screenshot Reports: to save the current data in screenshot form. Tap to return to the function selection screen. 4.6.2 Clear trouble code Tap “Clear trouble code” function menu, the system will automatically delete the currently existing trouble code. 26 LAUNCH X-431 V+ User’s Manual — Vehicle Diagnosis Note: The trouble code will not disappear until the trouble was completely cleared. 4.6.3 Read data stream Tap “Read data stream” in function menu, the system will display datastream items. Fig. 4-19 Check the box before the desired item and then tap “Confirm”. To select all, tap “Select all”. To deselect all, tap it again. To return to the previous screen, tap . After communication is complete, dynamic data of the selected datastream will 27 LAUNCH X-431 V+ User’s Manual — Vehicle Diagnosis appear on the screen. See Fig. 4-20. Fig. 4-20 Tap one item, the system will display data changes in waveform. To stop reading, tap . Tap to resume. On datastream reading page, the following operations can be done: On-screen buttons descriptions: 28 LAUNCH X-431 V+ User’s Manual — Vehicle Diagnosis Data Stream: Tap to select the desired datastream to be browsed, and then tap “Confirm” to view the waveform. See Fig. 4-21; Start to record: Tap to start recording diagnostic data for future playback and view. The saved file follows the naming rule: it begins with vehicle type, and then the record starting time and ends with .x431 (To differentiate between files, please configure the accurate system time). The file is stored in “Diagnosis playback” under “Diagnosis Report” tab in “My Space”. For details on playback operations, please refer to Chapter 3.7.1 Diagnosis Report”. Generate Current Text Reports: to save the current data in text format. Generate Screenshot Reports: to save the current data in screenshot form. To stop reading the datastream, tap waveform. Tap . Tap the certain item to view its to return to the function selection screen. Fig. 4-21 4.6.4 Special function This option allows you to detect whether the system parameters are normal or not. It mainly includes: injector test, fuel pump test, purge control solenoid and so on. Take “1# injector” as an example. To detect whether 1# injector works normally or not, tap “1# injector”, the system will automatically carry out the function. After complete, a prompt dialog box will pop up on the screen. 29 LAUNCH X-431 V+ User’s Manual — Vehicle Diagnosis 4.7 Maintenance Database This function provides a mass of service information for various vehicle models, which enables users to retrieve service data of some vehicle online. Note: To access service information successfully, please make sure X-431 V+ is properly connected to internet. Tap “Maintenance Database” to enter. Tap unfold the browse window. on the bottom of the screen to Fig. 4-22 Select one option to enter. Here we take “Repair Case” as an example. Tap “Repair Case” to enter vehicle selection interface, choose the desired one to enter. To return to the previous screen, just tap 30 . LAUNCH X-431 V+ User’s Manual — Vehicle Diagnosis Tap “Check” to browse the repair case. Tap -/+ to zoom out / zoom in. Moreover, users can also download the repair case to your local disk by tapping “Download” located on the bottom of the screen. To view the downloaded file, you have to download and install a PDF reader firstly. 4.8 My Data There are 2 options available in My Data: diagnostic report and history. 4.8.1 Diagnostic Report This option is used to view the diagnostic report generated in process of vehicle diagnosis. Additionally, delete, send operations are also supported. Tap “Diagnostic Report”, a list of diagnostic report will appear below the tab. Tap the desired one to view its content. Fig. 4-23 31 LAUNCH X-431 V+ User’s Manual — Vehicle Diagnosis Note: Diagnosis playback will appear on the screen if you chose to record while reading datastream. In Diagnosis report, tap certain report to view it. See Fig.4-24. Fig. 4-24 Button definitions: : To revise the diagnosis report filename; 32 LAUNCH X-431 V+ User’s Manual — Vehicle Diagnosis : To delete the selected report; : To send the report via Bluetooth, email or messaging. In Diagnosis playback, tap certain file to view it. See Fig. 4-25. Fig. 4-25 Button definitions: 33 LAUNCH X-431 V+ User’s Manual — Vehicle Diagnosis Delete: To delete the current report; Character: To view the diagnostic report in character form. Graph: To view the diagnostic report in waveform form. 4.8.2 Operation record This item records all your operations. It mainly includes the following information: connector serial number, operation date and check vehicle brand etc. 4.9 What’s New This option allows you to view the latest information and news from Launch. Tap “What’s New” and the system will display the relevant information title. Tap the desired title to view the details. 4.10 Customer Management This function enables you manage your customer information. Tap “Customer Management” to enter Fig. 4-26: Fig. 4-26 Add Customer: to create customer’s data. Customer’s Info.: to view and modify the customer’s information (Where Serial No. and Password described in Basic Info. indicate that of the GOLO diagnostic connector). The next service miles setting is also supported. Message Center: It is designed for repair shops to send some sales promotion or activities to customers. Remote Diagnosis: to receive vehicle diagnostic report from customers for 34 LAUNCH X-431 V+ User’s Manual — Vehicle Diagnosis remote diagnosis service. 4.11 One Key Upgrade This function allows users to download or upgrade multiple vehicle diagnosis software. Tap “One Key Upgrade” to enter a screen similar to Fig. 4-27. Fig. 4-27 Check the box next to the software that you intend to download (To select all, just tap “Select All”), then tap the “Next Step” to enter download page. Tap “Download” to start downloading. Note: While downloading a single vehicle software, the system may detect whether the current version is the latest version or not. If yes, it is not necessary for users to download it. In case of using one key upgrade, the system will ignore the detection step and directly download all the selected software. 4.12 Circle After logging in successfully, tap the user name to enter. 35 LAUNCH X-431 V+ User’s Manual — Vehicle Diagnosis Fig. 4-28 The following options are available: Message: Tap the desired friend to view the details if there are historical messages, otherwise the screen will appear blank. Friends: displays all friends list. To add a new friend, tap 36 on the right LAUNCH X-431 V+ User’s Manual — Vehicle Diagnosis upper corner of the screen, then input the desired CC number and tap “Search” and add it as your friend. Circle: To view and create a circle. Circle allows you to look for a rider circle with common interest for technical exchange and experience sharing. Tap a circle to view all history messages; tap create a new circle, just tap to view its detailed information. To . Mine: this option lets you to view your profile and make some preference settings. 4.13 User Management This function allows you to register DBScar connector, change password, type password hint and take back password etc. 4.13.1 Connector registration Tap “Register Connector” to enter a screen similar to Fig. 4-29. Input Serial Number and Verification Code, and then tap “Register” to complete registration. Fig. 4-29 4.13.2 Modify Personal Information Tap “Modify Personal Information” to enter information modification screen. Fill in each field, and then tap “Submit Information” to confirm; tap “Cancel” to abort. 37 LAUNCH X-431 V+ User’s Manual — Vehicle Diagnosis Fig. 4-30 4.13.3 Change Password Tap “Change Password” to enter password modification screen. Fill in each field, and then tap “Confirm” to confirm; tap “Cancel” to abort. 4.13.4 Setup Security Question Tap “Setup security question” to enter setting interface. Follow the on-screen instructions to fill in each field, and then tap “Confirm” to save your setting. Note: Please record the question well so that you can use it to get back the password. 4.13.5 Forget Password Tap “Forgot password” to enter. Input the correct user name and tap “Next Step”: If you set the security question before, the screen will enter the Answer the security question interface. Key in your answer and tap “Confirm”, the system will feedback your new password. If you have not set the security question ever, a message box prompting you of you haven’t set the security question will appear. In this case, tap “Mailbox Retrieve”, the system will send the password to your email. 4.13.6 Theme This option is used to change your UI style. 4.13.7 Select Serial Number This item is used to select the right serial number corresponding to the DBScar connector to diagnose a vehicle. 38 LAUNCH X-431 V+ User’s Manual — Vehicle Diagnosis 4.13.8 Connector firmware upgrade file download It is designed to upgrade the connector firmware. If a newer firmware version is available, tap it to start downloading. 4.13.9 Log Out Tap it to return to the login interface. 4.14 More This option is used to view software information, quick start guide and user’s manual etc. 39 LAUNCH X-431 V+ User’s Manual — Others 5 Others 5.1 Email The function allows you to send and receive email. You can add POP3 or IMAP email account for some common web email service provider. 5.1.1 Configure an email account Note: Before sending or receiving email, you have to set up an email account. In addition, this function required a stable network connection. 1. On the desktop, tap 2. Choose the desired email account type. 3. Input email address and password, tap “Next” or “Manual setup”. . Note: If “Manual setup” is selected, please consult your email service provider for detailed parameter setting. 4. Follow the on-screen instructions to proceed until the system prompts you that the account setup has been finished. 5.1.2 Send a email 1. 2. Enter main menu screen, and tap to enter account screen. If several email accounts are configured, choose the desired one. to enter new mail writing interface. Input the receiver address in Tap “To” field and a title in “Subject” column, and then type in the content in “Compose” email area. 3. After inputting, tap , you can perform any one of the followings: attach file, add CC/BCC, save draft, discard and setting. 4. Tap to send email. 5.1.3 View a email 1. 2. 3. Enter main menu screen, and tap Tap the desired email account. Tap the desired one to read: a) Tap to enter account screen. to reply it. 40 LAUNCH X-431 V+ User’s Manual — Others b) Tap to reply all. c) Tap to forward it. Note: For different networks, inbox may have some delays. Tap upper right corner to refresh the email list. on the 5.1.4 Delete an email 1. 2. Enter main menu screen, and tap to enter account screen. Tap the desired account, and then select the mail to be deleted. 3. Tap to delete. Note: To delete multiple emails, check the box before the message and then . Once “Messages deleted” appear, it indicated the selected tap messages has been removed successfully. 5.1.5 Revise a account setting 1. 2. 3. 4. Enter main menu screen, and tap to enter account screen. Tap > Settings. Choose the desired Email account from the account list. Follow the instructions on the screen to make general settings and notification settings. Note: Never change the default settings of the server, otherwise email failure may occur. 5.1.6 Delete an email account Once Email account is removed, X-431 V+ stops receiving the emails from this account, but all messages in it still keeps as it is. 1. 2. 3. 4. Enter main menu screen, and tap to enter account screen. Tap > Settings. Choose the desired Email account from the account list. Choose “Remove account” to delete it. 41 LAUNCH X-431 V+ User’s Manual — Others 5.2 Browser 5.2.1 Open browser Enter main menu screen, tap to launch the browser. You can choose the desired homepage or input the website address to browse. 1 Create a new tab. 2 Close the current page. 3 Refresh the current page. 4 Input a web address. 5 Add the current page as bookmark. 6 Open search bar. 7 Open bookmark list. 8 View more options. 5.2.2 Download files Files, pictures, and applications can be downloaded from the website in browser. For example: Tap and press a picture, then choose “Save image” from pop-up menu to download it. To download a link, tap and press it, and then choose “Save link”. To protect your X-431 V+ and personal data, please download applications from trusted sources. To configure it, tap box next to Unknown sources. > All > Security, and then deselect the 5.2.3 Manage bookmarks You can set the favorite website as bookmark for your quick access. 42 LAUNCH X-431 V+ User’s Manual — Others 1. Enter main menu screen, tap 2. Tap 3. Long press it, you can share, open and delete the bookmark. to launch the browser. to enter bookmarks page. 5.2.4 Set homepage This option enables you to set commonly visited website as the homepage. The homepage will be opened by default every time you launch your browser. 1. Enter main menu screen, tap 2. Tap 3. Tap “Set homepage”, then follow the on-screen instructions to finish it. to launch the browser. > Settings > General. 5.2.5 Clear history To prevent your personal information from being exposed much better, you are strongly recommended to clear your browser navigation history. 1. Enter main menu screen, tap 2. Tap 3. Tap “Clear history” to launch the browser. > Settings > Privacy & security. 5.3 Using Bluetooth Bluetooth connection is supported on X-431 V+. Using it, you can connect X-431 V+ to other compatible devices for data transmission. Note: Please note Bluetooth connection is likely to be disturbed by other objects, such as walls or other electronic devices. 5.3.1 Open Bluetooth 1. 2. Enter main menu screen, tap “Settings” --> “WIRELESS & NETWORK” --> “Bluetooth”. When the Bluetooth switch is ON position, it indicates it is already on and a corresponding Bluetooth icon will appear on the status bar of X-431 V+. 5.3.2 Allow other devices to search for X-431 V+ 1. Enter main menu screen, tap “Settings” --> “WIRELESS & NETWORK” --> “Bluetooth”. Tap and choose “Visibility timeout”. 43 LAUNCH 2. X-431 V+ User’s Manual — Others Set the desired visibility option. 5.3.3 Search other devices and pair X-431 V+ with it Before transmitting data with other Bluetooth devices, you have to pair X-431 V+ with it. 1. 2. 3. 4. Check and ensure Bluetooth is ON. Enter main menu screen, tap “Settings” --> “WIRELESS & NETWORK” --> “Bluetooth”. X-431 V+ starts scanning all Bluetooth devices. Choose the desired one from the search result to pair it with X-431 V+. 5.3.4 Send file via Bluetooth You can send pictures, video, audio files or test reports to others for sharing and review via Bluetooth. To transfer files via Bluetooth, please proceed following the steps described below: 1. 2. 3. 4. Enter main menu screen, and tap “File Manager”. Access the corresponding folder and choose the desired picture, video or audio file. Tap and choose “Bluetooth” from the pull-down menu. Tap the target Bluetooth device you want to transmit files. 5.4 Camera 5.4.1 How to take a picture Enter main menu screen, tap . 44 LAUNCH X-431 V+ User’s Manual — Others 1 Drag the slider to toggle between camera and video mode. 2 Tap it to take a picture. 3 Tap it to browse your pictures. 4 Slide to right or left to zoom in/out the screen. 5 Slide it to open settings menu, the following settings are available: : To select a desired photographing mode. > : To select a filter. > : To set white balance. > : Set some photographing parameters, such as > Review, ISO etc. 6 Tap to toggle between front camera and rear camera. 5.4.2 How to record a video In camera mode, drag the slider to camrecorder mode. 45 LAUNCH X-431 V+ User’s Manual — Others 1 Drag the slider to toggle between camera and video mode. 2 Tap it to start recording a video. 3 Tap it to play back your video. 4 Slide to right or left to zoom in/out the screen. 5 Slide it to open settings menu, the following settings are available: : To select a video size. > : To set white balance. > : To make some video settings, including Review, > Preferred save location. 6 Tap to toggle between front camera and rear camera. 5.5 Gallery This option is used to manage pictures and video files. 5.5.1 Open gallery Enter the main menu screen, tap to open gallery, the system starts 46 LAUNCH X-431 V+ User’s Manual — Others scanning all pictures and videos on X-431 V+. 5.5.2 View pictures or videos 1. Enter the main menu screen, tap to open gallery. 2. Tap a picture or video file to view it in full screen mode. Swipe the screen to right or left to view the previous or next one. To zoom in manually, place two fingers on the screen and then spread them apart. To zoom out, either double-tap again or place two fingers apart on the screen and then pinch them together. Featuring gravity sensor, X-431 V+ will adjust the orientation of the pictures automatically if it is rotated. The following operations can be also done while browsing gallery: To hide fragmentary albums. To play back pictures in the current folder. To launch camera. To share pictures or videos. To view more options. 5.5.3 Edit photos Without installing third-party photo processing software, X-431 V+ provides powerful photo editing functions, such as light compensation, red eye processing, crops etc. 1. Open the pictures to be edited in 2. Tap . > Edit, the followings can be done: a) Tap to adjust the brightness. b) Tap to process color separation etc. c) Tap to reverse its color or colorize it. 47 LAUNCH d) 3. X-431 V+ User’s Manual — Others Tap to rotate or crop it. Tap Save, the edited picture will also be saved in the same folder in which the original picture lies. 5.6 Music Enter main menu screen, and tap to enter. Music files are stored into 4 categories: Artists, Albums, Folders and Playlist. 1. Tap the desired music type. Open music file list. 2. Tap the desired audio files to start playing. 1 To switch between different play modes. 2 To add it to my favorite playlist. 3 Progress bar 4 To play/resume. 5 To adjust volume. 6 To set Dolby digital plus mode. 7 To open the current playlist. 8 To view more options. 48 LAUNCH X-431 V+ User’s Manual — Others 5.7 Calendar This function lets you view calendar or create to-do events. Enter main menu screen, tap . Tap the time in the upper left corner to switch between Day, Week, Month and Agenda. 5.8 Alarms 5.8.1 Add an alarm 1. 2. 3. 4. Enter main menu screen, tap . Tap to enter new alarm setting interface. Set the detailed items. After setting, tap “DONE” to confirm. 5.8.2 Delete an alarm 1. 2. On alarm list screen, hold and press the desired alarm. Choose “Delete alarm” from the pull-down list, then tap “OK” in the confirmation dialog box to delete it. 5.8.3 Turn on/off alarm On alarm list screen, tick off the desired alarm to activate it. To disable it, just deselect the check box. 5.9 File Manager This option enables you to manage your files. File Manager”, and then choose the desired folder to perform Tap “ corresponding operations. 5.10 Applications 5.10.1 Install applications To install an application, you need to download it firstly. All items downloaded in default browser are saved in this folder. 1. On the main menu screen, tap 2. Tick off the desired application. AppInstaller. 49 LAUNCH X-431 V+ User’s Manual — Others > Install. 3. Tap 4. Tap “Done” to finish it. Note: In process of installation, a message prompting installation prohibited may appear. Please read it carefully. To install it, please tap “Settings” > “Security”, and check the box next to “Unknown sources”, which allows you to install non-Market application. 5.10.2 View installed applications 1. Tap 2. Swipe the screen from right to left until ALL tab appears. > ALL > Manage apps. 3. Tap the desired one to view its detailed information. 5.10.3 Uninstall applications To release storage space, you can uninstall some unused applications. 1. Tap 2. Swipe the screen from right to left until ALL tab appears. 3. Tap the desired one to enter. 4. Tap “Uninstall” and then tap “OK” in the dialog box to start uninstalling. > ALL > Manage apps. 5.11 Set date & time X-431 V+ is preset to use the network-provided date, time zone and time. Note: If Automatic date & time is set as Use network-provided time, date, time and time zone will not be defined. 1. 2. 3. Settings” > All > “Date & time”. Enter the main menu screen, tap “ Deselect “Automatic data & time”. Follow the on-screen instructions to set date, time and time zone. 5.12 Enter power saving mode To consume less power, X-431 V+ provides one smart key to enter power saving. 1. 2. Enter the main menu screen, tap “ Settings” > All > Power saving. Tap “Battery saver” or “Balanced” to enter power saving mode. 50 LAUNCH X-431 V+ User’s Manual — Others 5.13 Clear cache If insufficient memory occurs, please clear cache to spare more storage space. 1. 2. 3. Tap > ALL > Manage apps. Swipe the screen from right to left until ALL tab appears. Tap “Clear cache”. 51 LAUNCH X-431 V+ User’s Manual — Others 6 FAQ 1、How to save power? ¾ Please turn off the screen while X-431 V+ keeps idle. ¾ Set a shorter standby time. ¾ Decrease the brightness of the screen. ¾ Try to use earphone. ¾ Please turn off Bluetooth while Bluetooth keeps unattended. ¾ If WLAN connection is not required, please turn it off. ¾ Disable GPS function if GPS service is not in use. 2、What should I do in case I forgot the screen lock? You can set screen lock as pattern or password. If you forgot the password, please consult your device provider or reset your device. Warning: Resetting may cause data loss. Before use, please make sure important data has been backed up. 3、How to do if the system runs slowly? In this case, please do the followings: > Check all running applications stop the unnecessary applications. > Check all installed applications, remove the unnecessary applications. If all steps mentioned above are finished, the system still works slowly. Please try to close the system and reboot your X-431 V+. 4、How to format internal storage? 1. On the main menu screen, tap > ALL to enter. 2. Tap “Storage” > “Erase internal storage” to enter and confirm your operation. Warning: Doing so will erase all stored data and all running application may encounter abnormal operations. To restore it, just restart your X-431 V+. 5、How long will X-431 V+ last if playing a video? 52 LAUNCH X-431 V+ User’s Manual — Others X-431 V+ supports at least 6 hours video playing. 6、Why some videos on the website can be not played? It possibly results from: 1. The current browser does not support Flash playing; 2. Flash player does not support this video. Try to use other browsers to watch it or install other Flash player. 7、The data and time of X-431 V+ can not be set. It is because Automatic date & time is set on your X-431 V+. Tap > ALL, enter Date & time, deselect “Automatic date & time” and then set the time and date manually. 8、How to distinguish between PIN and password in screen lock? The difference between PIN and password is as follows: > PIN: Generally, it is composed of 4~16 numbers. > Password: it may include: 4~16 numbers, characters and symbols. 53 Warranty THIS WARRANTY IS EXPRESSLY LIMITED TO PERSONS WHO PURCHASE LAUNCH PRODUCTS FOR PURPOSES OF RESALE OR USE IN THE ORDINARY COURSE OF THE BUYER’S BUSINESS. LAUNCH electronic product is warranted against defects in materials and workmanship for one year from date of delivery to the user. This warranty does not cover any part that has been abused, altered, used for a purpose other than for which it was intended, or used in a manner inconsistent with instructions regarding use. The exclusive remedy for any automotive meter found to be defective is repair or replacement, and LAUNCH shall not be liable for any consequential or incidental damages. Final determination of defects shall be made by LAUNCH in accordance with procedures established by LAUNCH. No agent, employee, or representative of LAUNCH has any authority to bind LAUNCH to any affirmation, representation, or warranty concerning LAUNCH automotive meters, except as stated herein. Disclaimer The above warranty is in lieu of any other warranty, expressed or implied, including any warranty of merchantability or fitness for a particular purpose. Purchase Order Replaceable and optional parts can be ordered directly from your LAUNCH authorized tool supplier. Your order should include the following information: Order quantity Part number Part name Customer Service Any question during the operation, please call 86-755-84528722. If your unit requires repair service, return it to the manufacturer with a copy of the sales receipt and a note describing the problem. If the unit is determined to be in warranty, it will be repaired or replaced at no charge. If the unit is determined to be out of warranty, it will be repaired for a nominal service charge plus return freight. Send the unit pre-paid to: Attn: Customer Service Department LAUNCH TECH. CO., LTD. Launch Industrial Park, North of Wuhe Avenue, Banxuegang, Bantian, Longgang, Shenzhen, Guangdong P.R.China, 518129 Launch website: http://www. cnlaunch.com http://www.x431.com Statement: LAUNCH reserves the rights to make any change to product designs and specifications without notice. The actual object may differ a little from the descriptions in the manual in physical appearance, color and configuration. We have tried our best to make the descriptions and illustrations in the manual as accurate as possible, and defects are inevitable, if you have any question, please contact local dealer or after-sale service center of LAUNCH, LAUNCH does not bear any responsibility arising from misunderstandings.