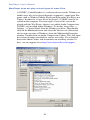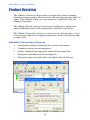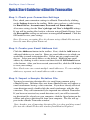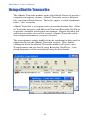
1
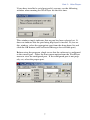
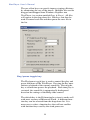
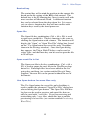
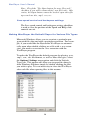
WavPlayer
by Bytescribe, Inc.
Additional Documentation and Training
•
For more information on using WavPlayer, please visit:
http://www.bytescribe.com/support
•
Free online training videos are available at:
http://www.bytescribe.com/eshuttle/videos
Personal Technical Support
To contact Bytescribe for additional technical support:
•
By Phone — (408) 987-5628
•
By E-mail — [email protected]
Upgrades
For product upgrades:
•
Within WavPlayer — click on the Help menu and select Check
For Updates
•
Bytescribe Website — visit www.bytescribe.com/downloads for the
installation file for the newest version of WavPlayer
2
Table of Contents
Part I: WavPlayer
Product Overview .........................................................................................4
Installation ....................................................................................................4
Connecting a USB Port Pedal.......................................................................5
Connecting a Serial Port Pedal .....................................................................6
Registering WavPlayer Software..................................................................8
Working with Audio Files ............................................................................8
Opening Files .................................................................................8
Previewing Wav Files.....................................................................9
Drag & Drop Support ...................................................................10
Controlling Playback ....................................................................11
Controlling Fast Forward/Backspace ...........................................11
Controlling Speed.........................................................................12
Adjusting Volume ........................................................................12
Using a Word Processor with WavPlayer ....................................12
Streaming Files from the Internet .................................................12
Hot Keys and Keyboard Shortcuts ...............................................13
Custom Settings ..........................................................................................13
Making WavPlayer the Default Player for Various File Types ....16
Troubleshooting the WavPlayer .................................................................17
Part II: eShuttle Transcribe
Product Overview .......................................................................................24
eShuttle Dictate ............................................................................25
eShuttle Transcribe.......................................................................25
Quick Start Guide for eShuttle Transcribe..................................................26
Using eShuttle Transcribe...........................................................................28
Configuring eShuttle Transcribe ..................................................29
Creating an Email Address List....................................................30
Physician and Account Lists.........................................................31
Opening Dictation Files................................................................32
Transcribing Dictation Files .........................................................32
Using Microsoft Word Templates ................................................34
Attaching External Documents.....................................................35
Completing Jobs ...........................................................................35
Purging and Deleting Files ...........................................................36
Creating Reports .........................................................................................36
Quick Reports...............................................................................36
Custom Reports ............................................................................37
Using the Document Manager ......................................................37
File Management and Workflow ................................................................38
Troubleshooting eShuttle Transcribe..........................................................39
3
WavPlayer User’s Manual
Product Overview
WavPlayer by Bytescribe is a software & foot pedal combination that
allows the user to listen to a large variety of sound files while controlling them with a foot pedal, leaving the hands completely free to type
dictated reports.
The foot pedal controls the play, pause, rewind and fast forward functions and plugs directly into any serial or USB port of any PC computer. The USB Version of WavPlayer runs on Windows 98/
ME/2000/XP. The Serial Port Version of WavPlayer runs on Windows 95/98/ME/NT/2000/XP.
The WavPlayer software can run in a minimized state so that the transcriptionist is able to type into a word processor on the same computer. The WavPlayer software also offers speed and adjustable backspace controls for many file types.
Installation
To install the WavPlayer, first connect the foot pedal to the appropriate port on your PC. If you are connecting a USB pedal, see the following section entitled Connecting a USB Port Pedal. If you are connecting a serial port pedal, see the section of this manual entitled Connecting a Serial Port Pedal.
Next, make sure that your headset or speakers are properly installed
and turned on.
4
Part I: WavPlayer
Finally, install the WavPlayer software by using the installation
CD. Place the installation CD into the appropriate drive. Follow the
prompts through the installation process.
Once the software has been installed, you can begin using the software by clicking the WavPlayer icon that appears on your desktop or
click Start → Programs → Bytescribe → WavPlayer.
Connecting a USB Port Pedal
Connect the foot pedal to the USB port of your PC. The foot pedal
cable fits directly into the USB port. Once connected, your PC should
automatically configure the port with the proper drivers.
To ensure that Windows properly detected the pedal, you can open the
WavPlayer window (once the software has been installed), and click
on the Ports menu. The check mark should be next to the USB item
on the ports list.
If USB is not checked, please see the Troubleshooting guide at the
end of the WavPlayer section of this manual.
5
WavPlayer User’s Manual
Connecting a Serial Port Pedal
If a computer has a 9-pin serial port, a serial port foot pedal can be
connected.
If you are not certain about which COM ports your computer has
available, check the Port settings in the Device Manager. To access
the Device Manager in Windows XP/2000, right-click on My Computer and select the Manage menu option. Select Device Manager
from the list as shown in the image on the following page. In earlier
version of Windows, select Start → Settings → Control Panel from
the Windows task bar. Then double-click the System icon and select
the Device Manager tab from the System Properties window
(Hardware tab on some versions of Windows). Find Ports in the device list and double-click on it to view the available ports.
The COM setting in the WavPlayer must match one of the port settings recognized by Windows and it must correspond to the port into
which the foot pedal is connected. The figure below shows COM1
available for this example.
6
Part I: WavPlayer
If you have installed a serial port pedal, you may see the following
window when running the WavPlayer for the first time.
This window simply indicates that no port has been selected yet. It
does not indicate that the port being displayed is invalid. If you see
this window, select the appropriate port from the drop-down list and
click the OK button (refer to Device Manager for available port).
Before using the program, check to see that the software is configured
to the correct port. Select the Ports menu option from the WavPlayer
menu to view the configured port. If the configured port is not properly set, select the proper port.
7
WavPlayer User’s Manual
Registering WavPlayer Software
The first time the WavPlayer program is opened, you may be asked to
register, and instructions will be provided by the program on how to
complete registration.
If you are registering using a USB dongle, please follow the installation instructions included with the dongle.
If you have difficulties with the registration process, please see the
Troubleshooting guide at the end of the WavPlayer section of this
manual.
Working with Audio Files
The following section describes the functions of WavPlayer. The
software is easy to use. Becoming familiar with all of its functions
can improve efficiency and productivity.
Opening Files
Sound files can be opened in a number of ways.
•
Files can be opened using the Open button or Open menu.
•
Files can be dragged & dropped from Windows Explorer (see the
section entitled Drag & Drop Support).
•
Files with known file type extensions can be opened from Windows Explorer by double-clicking (see the section entitled Making WavPlayer the Default Player).
•
Previously opened files can be selected from the drop down list
in WavPlayer.
The File | Open menu option will display the Open Dialog Box. You
may also press the Open button on the right side of the WavPlayer
window. The Open Dialog Box can be used to view the contents of
various folders on your computer by clicking on the down arrow at
the end of the Look in field. Select the file you wish to play and click
the Open button (or double click the file).
8
Part I: WavPlayer
If the file you wish to play is of another format, you will need to select the appropriate format from the drop down list at the bottom
named Files of type:
Previewing Wav Files
Wav files can be previewed using a separate Open dialog box. The
File | Preview Wav Files menu option will display the Open Wave
File dialog box shown on the next page. This dialog box can be used
to preview and open wav files only.
The wav file format and size is displayed. A Play/Stop button can be
used to listen to a selected file before opening it in WavPlayer. The
Preview checkbox enables a visual graph of the sound being played
(only certain wav file formats can be graphed). The Auto Play checkbox enables files to automatically start playing as they are selected.
9
WavPlayer User’s Manual
If you wish the Open Wave File window to appear each time you
click the Open button, select the "Use Open button for wav files only"
checkbox from the Settings window. To access the Settings window,
select Options | Settings from the WavPlayer menu. This dialog box
cannot be used to open other types of file formats such as .dss, .vox,
.mp3, etc.
Drag & Drop
With the WavPlayer you can Drag & Drop your audio files from Windows Explorer into the WavPlayer.
To do this, press and hold down the left mouse button over the files
you want to move. Still holding down the button, move the files to
the top of the WavPlayer and then release the mouse button. The audio files have now been added to the drop down list (click the down
arrow at the end of the file field to see this list of files). Click on a
file from the list to open it in WavPlayer. Files from the list can also
be queued using hot keys (see section entitled Hot Keys or Custom
Settings).
10
Part I: WavPlayer
Controlling Playback
The Play, Pause, Rewind, Fast Forward and Stop functions can be
controlled in several ways. Stepping on the foot pedal, clicking buttons, selecting menu options or using keyboard shortcuts can control
the functions.
The most convenient method for controlling these functions is by using the foot pedal. In order to use the keyboard shortcuts (such as
Ctrl-P to Play), the WavPlayer window must be the active window on
your screen. Hot keys can be used to control playback even when the
WavPlayer is minimized.
Controlling Fast Forward/Backspace
By default, the Rewind function of the WavPlayer moves the position
in the voice file approximately 3 seconds backward from the current
position. The Fast Forward function moves the position 3 seconds
forward from the current position. There is also an auto back-step
function that rewinds the position about 1 second when the Run/Play
function is selected.
Adjusting the “BkSp” (Backspace) slider on the WavPlayer will
change these incremental values when using your foot pedal. Also,
continuous rewind and fast forward can be used with the foot pedal.
The longer the pedal is held down, the further the position is moved.
11
WavPlayer User’s Manual
Controlling Speed
The speed at which a sound file is played can be changed by adjusting
the Speed bar on the WavPlayer window or by selecting menu options
from the Speed menu. There are three keyboard shortcuts to control
the speed. The Function Keys F10, F11 and F12 can be used to
quickly change the speed at which a sound file is played (the
WavPlayer window must be the active window in order to use the
keyboard shortcuts).
Adjusting Volume
Selecting the Options | Volume menu option opens the Windows
Volume Control, allowing you to adjust the sound from your computer .
Using a Word Processor with WavPlayer
The WavPlayer can be used with any word processor in Windows.
Once a file has been opened, the WavPlayer window may be minimized so that it does not obstruct the view of the current document.
The foot pedal will still be able to control the sound file while the
WavPlayer is minimized.
Streaming Files from the Internet
The WavPlayer has the capability of playing files directly from an
Internet site. It also has the capability of playing files while they are
being downloaded. This capability is referred to as audio streaming.
Only certain types of file formats support streaming, including .wav
files. To play files from the Internet, simply type in the web address
of the sound file on the Internet. (For example, www.bytescribe.com/
audio/0724-006.wav). Then press the foot pedal to begin playing.
Note: To stream large files from the Internet, you must click the Controls | Play menu option from the WavPlayer menu to begin the
streaming process. Once streaming has begun, you may use the foot
pedal to control playback.
When playing files from an Internet site, it is necessary to have proper
access to the web site. Consult the web site administrator if user
names and passwords are necessary. The WavPlayer will not send
this information.
12
Part I: WavPlayer
Hot Keys and Keyboard Shortcuts
Hot keys can be used within any program to control the WavPlayer
functions. Keyboard shortcuts can only be used if the WavPlayer window is the active window.
Hot Keys
Play/Pause toggle key...........F6 (default)
Rewind key......................F9 (default)
Open file.......................Ctrl + Alt +
Toggle minimize/restore.........Ctrl + Alt +
Open previous file in list......Ctrl + Alt +
Open next file in list..........Ctrl + Alt +
F6
F7
F8
F9
Keyboard Shortcuts
Play............................Ctrl
Pause...........................Ctrl
Stop............................Ctrl
Rewind..........................Ctrl
Fast Forward....................Ctrl
Beginning of File...............Ctrl
End of File.....................Ctrl
Open File.......................Ctrl
Toggle Window Size..............F4
Slow Down.......................F10
Normal Speed....................F11
Speed Up........................F12
+
+
+
+
+
+
+
+
P
U
S
R
F
B
E
O
Custom Settings
The Options | Settings menu option displays the Settings window
shown on the next page. The General tab contains settings that enable
the use of hot keys and set WavPlayer preferences. The Default
Types tab enables the user to set the WavPlayer as the default player
for various file types based on the file extensions. Details of each
setting are described below.
Enable the use of hot keys
Hot keys are keyboard keys or key combinations that execute functions regardless of the program or word processor from which you are currently working. Use of hot
keys can replace the use of a foot pedal since they control
the play, pause and rewind functions. Hot keys can also
be used to open sound files or queue the next file in the
list. The hot keys will auto-backspace and rewind based
on the current setting of the BkSp slide control.
13
WavPlayer User’s Manual
The use of hot keys can greatly improve typing efficiency
by eliminating the use of the mouse. Multiple files can be
dragged and dropped from Windows Explorer into
WavPlayer (see section entitled Drag & Drop). All files
will appear in the drop down list. Hot keys can then be
used to control each file and then queue the next file in
the list.
Play/pause toggle key
The Play/pause toggle key is used to control the play and
pause functions of the WavPlayer. Pressing the key once
initiates playback of the current sound file. Pressing the
key a second time pauses the playback. Each time play is
restarted, the sound file is automatically backspaced
based on the settings of the BkSp slide control.
The default key is the F6 function key since it works well
with most versions of Microsoft Word. A different function key can be selected from the drop down list. It is
necessary to select a function key that will not conflict
with function keys used by the word processor.
14
Part I: WavPlayer
Rewind key
The rewind key will rewind the position in the current file
based on the the setting of the BkSp slide control. The
default key is the F9 function key since it works well with
most versions of Microsoft Word. A different function
key can be selected from the drop down list. It is necessary to select a function key that will not conflict with
function keys used by the word processor.
Open file
The Open file key combination (Ctrl + Alt + F6) is used
to open new sound files. The key function is the same as
clicking the Open button with a mouse. The function will
display the "Open" or "Open Wav File" dialog box (based
on the "Use Open button for wave files only" checkbox
shown in the Settings window). Once the Open dialog
box appears, the Tab or Shift-Tab keys can be used to
select a file, and the Enter key can be used to open the file
in WavPlayer.
Open next file in list
The Open next file in list key combination (Ctrl + Alt +
F9) is used to queue the next file in the WavPlayer drop
down list. If multiple files have been added to the list
using drag and drop (see section entitled Drag & Drop
Support), the next file can be queued without the use of
the mouse.
Use Open button for wave files only
The Use Open button for wave files only checkbox is
used to enable the advanced "Open Wav File" dialog box
when clicking the Open button. The Open Wav File dialog box can be used to preview and open files but can
only be used with *.wav files. If you are receiving and
transcribing only *.wav files, check this box to enable
previewing of wave files (see section entitled Previewing
Wav Files).
15
WavPlayer User’s Manual
Note: Check the "Use Open button for wave files only"
checkbox if you will be transcribing .wav files only. Otherwise, the Open button cannot be used to open other file
types such as .dss, .mp3, .vox, etc.
Save speed control and backspace settings
The Save speed control and backspace settings checkbox
is used to save the position of the Speed and BkSp slide
controls on exit.
Making WavPlayer the Default Player for Various File Types
Microsoft Windows allows you to associate a particular program with files that end with a particular extension. For example, if you would like the Bytescribe WavPlayer to automatically open when double-clicking on a file with a .wav extension, you need to associate the .wav extension with the
WavPlayer program.
To make the WavPlayer the default program for playing .wav,
.mp3, .vox, .dss file formats, as well as other file types, select
the Options | Settings menu option and click the Default
Types tab. This option will allow you to open files directly
from Windows Explorer simply by double clicking the files
you wish to play. It is not necessary to close the WavPlayer
after each file when opening files in this manner.
16
Part I: WavPlayer
Troubleshooting the WavPlayer
Refer to the section below if you are having trouble with your
WavPlayer.
The foot pedal does not work.
If the WavPlayer is able to play files by clicking the buttons
with a mouse but the foot pedal has no effect, it is likely that
the serial port is not configured correctly or the USB foot
pedal is not being recognized.
First, check to see that the foot pedal is plugged in correctly.
Then check to see which port Windows has detected by clicking the Ports menu option. Make sure that the WavPlayer port
setting under the Ports menu corresponds to the correct
port. For additional help troubleshooting serial port problems,
see our support web site at http://www.bytescribe.com/
support.
You should also check the hardware acceleration for the sound
card. Go to the Control Panel and double-click the Sounds
and Audio Devices icon. Then check the Hardware Acceleration for the current Audio Device. If the Hardware Acceleration is set to high, try turning the level down. This may improve the performance and enable the pedal to control the
sound.
The USB foot pedal is not recognized by my computer.
The WavPlayer uses drivers that have been loaded onto your
computer through your Windows version. If your computer is
not recognizing the USB foot pedal contact your Original
Equipment Manufacturer (OEM) to make sure all the drivers
have been loaded including the generic drivers.
If you have Windows 98, visit our support site at
http://www.bytescribe.com/support and click on Troubleshooting USB Port Problems for Windows 98.
17
WavPlayer User’s Manual
The position of the wave file moves around erratically when stepping on the foot pedal.
This may indicate a conflict with another program or perhaps a
problem with your serial port. Programs such as Norton Antivirus are know to slow down processing, and may occasionally cause decreased performance when using the WavPlayer.
Try closing all unused or unnecessary programs to see if the
performance will improve. If a serial port problem is suspected, try using another port if one is available.
WavPlayer displays an "OLE Error" upon startup.
This error message may indicate that some other audio software may have modified some registry settings. Reinstalling
the WavPlayer software should resolve this issue since the
installation process will properly configure the settings.
This error may also indicate that Windows Media Player is not
properly installed or an old version (prior to Windows Media
Player 9) is installed on the PC. Updating Windows Media
Player from Microsoft’s website (http://www.microsoft.com)
may correct the issue.
The WavPlayer locks up when started.
This most likely indicates a conflict with the selected serial
port and another device on your computer (such as a modem).
In this case you will need to select another COM port on your
computer or resolve the IRQ conflict between the serial port
and the conflicting device. A detailed guide to troubleshooting
serial port conflicts is described on our support site at
http://www.bytescribe.com/support
18
Part I: WavPlayer
Sound quality of files being played is poor.
There are several factors that may affect the quality of sound.
Quality of the original recording and the file format are important factors. To determine whether the quality of the file is
poor, it is helpful to play several files of different file formats
to see if there is a difference in sound quality. There are often
many sound files in the C:\Windows\Media folder that can be
used for testing.
If all files played have poor sound quality, there may be problems with the speakers, sound card or headset being used. You
may also try playing the sound files with a different program
such as Windows Media Player to determine if the sound quality is the same when played from a different program. Also try
closing other programs that are running to determine if another
program may be interfering with the playback sound quality.
The sound is distorted when playing .vox files.
The proper format may not be correctly set. Click the Format
menu option and select the proper .vox format for your file.
How to navigate through the WavPlayer to find audio files.
If the WavPlayer cannot be used as a default player then you
can either use the Drag & Drop feature or navigate through the
WavPlayer to find your files. To navigate through the
WavPlayer, double click the WavPlayer icon and then click on
Open. At the top of the Open screen click the down arrow at
the end of the Look in field. A drop down menu will appear.
Using this menu, click on the folders and files until you find
your audio files.
For example, if you have downloaded your files into My
Documents, click on the down arrow at the end of the Look in
field. When the drop down menu appears, click on My Documents and the audio files will appear in the box. Double click
the file you want to transcribe. If you do not see your audio
files, check the Files of type at the bottom of the screen and
change to the appropriate file type.
19
WavPlayer User’s Manual
WavPlayer does not play certain types of wave files.
A CODEC (Coder/Decoder) is a software driver used by Windows to
enable wave files to be played through a computer’s sound card. Programs such as Windows Media Player and Bytescribe WavPlayer use
Codecs. In order for a wave file to be played, a CODEC must be installed on the computer. If certain types of wave files can not be
played with the WavPlayer, check to see which Audio Compression
CODECs are installed within Windows. To do this select Start →
Settings → Control Panel from the Windows task bar. Then double
click on the Multimedia icon and select the Devices tab (Advanced
tab on some versions of Windows) from the Multimedia Properties
window. Double click on Audio Compression Codecs. This will show
the various decoders installed for various wave files. For a detailed
discussion about Codecs and instructions on installing custom Codecs, see our support site at http://www.bytescribe.com/support.
20
Part I: WavPlayer
I'm having problems registering my WavPlayer software.
You can register the WavPlayer software online, offline, or by
using a dongle.
A dongle is a USB hardware device that can be purchased to
bypass the registration process. If you are using a dongle and
are still prompted to register, then the dongle was not successfully installed.
If you are not using a dongle, just follow the on-screen instructions when prompted to register. To register online, enter the
name of purchaser and product serial number and click the
Register Online button.
To register offline, click the Register Offline button and follow the instructions. You will be prompted to enter a confirmation code to register your software. You can receive the
confirmation code by completing an online form. The online
form will prompt you for the name of purchaser, product serial
number and registration number as it appears on your
screen. Be careful to enter all characters of the registration
number including any hyphen. Once you have receive a confirmation code, be careful to enter the confirmation code including any preceding hyphen. For example, if the confirmation code is –4120, then the hyphen needs to be entered before
the 4120.
Remember that registration is unique for each computer/hard
drive, so, if you load the WavPlayer on another computer or
reformat your hard drive, you will be prompted to register
again.
After going through all the troubleshooting section I am
still having trouble with the WavPlayer.
If you are still having trouble with the WavPlayer program, go
to our website at http://www.bytescribe.com. Click on Support
→ WavPlayer Support Site → Contact Technical Support and
fill out the support form. After submitting the form you will
be contacted by a technical support person to assist you with
the issue. Customers are usually contacted within one business day.
21
WavPlayer User’s Manual
22
eShuttle Transcribe
by Bytescribe, Inc.
Additional Documentation and Training
•
For more information on using eShuttle Transcribe, please visit:
http://www.bytescribe.com/support
•
Free online training videos are available at:
http://www.bytescribe.com/eshuttle/videos
Personal Technical Support
To contact Bytescribe for additional technical support:
•
By Phone — (408) 987-5628
•
By E-mail — [email protected]
Upgrades
For product upgrades:
•
Within eShuttle Transcribe — click on the Help menu and select
Check For Updates
•
Bytescribe Website — visit www.bytescribe.com/downloads for the
installation file for the newest version of eShuttle Transcribe
23
WavPlayer User’s Manual
Product Overview
The eShuttle software by Bytescribe is designed for securely sending
dictation and transcription files between a dictator and transcriptionist via
email. The eShuttle system uses two programs: eShuttle Dictate and
eShuttle Transcribe.
The eShuttle Dictate software is used to record dictation, import files
from handheld recorders and automatically send files using email.
The eShuttle Transcribe software is used to receive dictation files, assist
in transcription and email completed documents back to the dictator and/
or supervisor.
eShuttle Transcribe features
•
Automated emailing of dictation files and text documents
•
Complete tracking and management
•
Secure, automated encryption of audio and document files
•
Integration with Microsoft Word templates
•
Foot pedal control of audio files using Bytescribe WavPlayer
24
Part II: eShuttle Transcribe
eShuttle Dictate
The eShuttle Dictate module allows the user either to import dictation
files from a dictation station or handheld recorder, or to record dictation
files using a microphone. Voice files are then securely transferred to
transcriptionists via email. Returned, completed documents can be
viewed, printed and managed within eShuttle Dictate.
While in process, the status of each job is displayed for the user. In addition, the entire email function can be fully automated.
eShuttle Transcribe
The eShuttle Transcribe module works with eShuttle Dictate to provide a
complete transcription solution. eShuttle Transcribe receives dictation
files sent from eShuttle Dictate. These files appear as email attachments
with a ".dict" extension.
The transcriptionist simply double-clicks the attachment in their email to
import the file into the eShuttle Transcribe window. Then, doubleclicking the file in the eShuttle Transcribe window will create a new
Word document and play the file using Bytescribe WavPlayer. Completed documents can be emailed back using the Send button.
25
WavPlayer User’s Manual
Quick Start Guide for eShuttle Transcribe
Step 1. Check your Connection Settings
First, check your connection settings in eShuttle Transcribe by clicking
on the Settings button in the toolbar. Make sure you have a valid setting
for Email Server, Account name, Password and From address.
Also enter settings for the User’s job type and User’s 4-digit ID settings.
If you will be sending files back to a dictator using eShuttle Dictate, leave
the Encrypt files setting on and enter an encryption Password. Click the
OK button to save your settings.
Note: If you are encrypting files, the dictator using eShuttle Dictate must
have the same Encryption Password.
Step 2. Create your Email Address List
Click the Addresses button in the toolbar. Next, click the Add button to
add email addresses to your list. Enter any email addresses to which you
would like to email transcription files. Delete out any sample email addresses. Select one email address as the default. Highlight one email
address by clicking it with a mouse and then click the Set Default button
at the bottom. After you have created your email list, click the OK button
to save your settings.
Note: Each entry can contain multiple email addresses. To enter multiple
addresses, separate each email address with a comma.
Step 3. Import a Sample Dictation File
You may be receiving dictation files via email from someone using
eShuttle Dictate. Dictation files sent from eShuttle Dictate will appear as
email attachments having a .dict extension. If you have already received
some dictation emails, double click the email attachments with the .dict
extension. They will automatically be imported into eShuttle Transcribe.
If you have not received any email dictations or if you will be transcribing dictation files already on your computer, click the Open button on the
toolbar and select a dictation file from your computer. The file will appear in the eShuttle Transcribe window.
Note: Another way of importing dictation files is to drag and drop sound
files into the eShuttle Transcribe window from Windows Explorer.
26
Part II: eShuttle Transcribe
Step 4. Listen to Voice Files and Create Documents
To play a dictation file, double-click on the file in the eShuttle Transcribe
window. The audio file will appear in Bytescribe WavPlayer. Make sure
that Bytescribe WavPlayer has also been installed on your computer.
If you are using Microsoft Word as the word processor, the Create New
Word Document window will also appear. Select the appropriate report
type and complete the fields in the form. Click OK to create a new Word
document. Once the document has been completed, save the document
and close the WavPlayer.
Note: If you will not be using Microsoft Word as the word processor,
click on the Tools menu, select Settings, then click on the Local tab and
find the checkbox labeled Create new Word document when transcribing file. Click in that box to disable Automatic Document Creation.
Step 5. Attach External Documents
If you wish to attach an external document to the current job, rightmouse-click the voice file in the lower pane of the eShuttle Transcribe
window and select Attach External Document from the popup menu
that appears. A dialog box will appear prompting you to attach the document you have completed. Find the file and click Open to attach the file.
eShuttle supports attaching multiple text documents.
Step 6. Email the Transcribed Files
Highlight any file in the eShuttle Transcribe window and click the Send
button. If the computer has Internet access and correct email settings, the
highlighted file will be sent. A window will appear showing the email
progress. After the file has been successfully sent, the status of the file
will be changed to “Completed”.
27
WavPlayer User’s Manual
Using eShuttle Transcribe
The eShuttle Transcribe module works with eShuttle Dictate to provide a
complete transcription solution. eShuttle Transcribe receives dictation
files sent from eShuttle Dictate. These files appear as email attachments
with a ".dict" extension.
eShuttle Transcribe is a program used to transcribe dictation files. eShuttle Transcribe integrates with Microsoft Word and Bytescribe WavPlayer
to provide a complete transcription environment. Reports including line
and character counts can easily be created. eShuttle Transcribe can deliver completed documents to anyone via email.
The transcriptionist simply double-clicks the attachment in their email to
import the file into the eShuttle Transcribe window. Then, doubleclicking the file in the eShuttle Transcribe window will create a new
Word document and play the file using Bytescribe WavPlayer. Completed documents can be emailed back using the Send button.
28
Part II: eShuttle Transcribe
Configuring eShuttle Transcribe
Before you can use eShuttle Transcribe, you will need to configure the
settings. Click on the Tools menu and select Settings. This will display
the Settings window.
Check your current email client (e.g. Outlook, Outlook Express, Thunderbird, etc.) for these settings. Enter the settings for Email server, Account name, Password and From Address.
You will need to enter settings for User’s job type and User’s 4-digit ID.
If you are setting up your own eShuttle system from the beginning, you
may use whatever you wish for these numbers. If you are joining someone else’s system, you will need to get these two numbers from them.
If you will be emailing files to a dictator using eShuttle Dictate, leave the
Encrypt files option selected and enter an encryption password. This
exact same encryption password must also be used by the eShuttle Dictate user in order to properly decrypt the files.
29
WavPlayer User’s Manual
Creating an Email Address List
You can send dictation files in eShuttle to the same default address every
time, or you can select different recipients from a list. Creating an email
address list will save time when creating new dictation emails. One entry
can be selected as the default email address, which will automatically
appear when creating new files.
To add a new email address to the list, click the Add button and then enter the address in the box that appears. Multiple addresses can be entered
as a single entry by separating each address with a comma. Once the
email list is completed, select one entry as the default address by highlighting the desired entry and clicking the Set Default button.
30
Part II: eShuttle Transcribe
Physician and Account Lists
Physician and Account lists can also easily be modified. Click the Tools
menu, select Settings, and click on the Physicians or Accounts tab. Use
the Add, Edit, and Delete buttons on this screen to modify physician
entries.
31
WavPlayer User’s Manual
Opening Dictation Files
Dictation files can be imported into the eShuttle Transcribe window in
several ways. These include using the Open button, dragging & dropping
files into the eShuttle Transcribe window or double-clicking on .dict files
that have been emailed from someone using eShuttle Dictate.
Dictation files already on the computer hard drive can be accessed using
the Open button. Clicking the Open button will allow you to select a file
from the local computer and import it into eShuttle Transcribe. To play
the file, simply double-click the file from the eShuttle Transcribe window. Multiple files can be imported into the eShuttle Transcribe window
by dragging & dropping files from Windows Explorer into the eShuttle
Transcribe window.
The eShuttle Transcribe program will import dictation files emailed from
eShuttle Dictate. Dictation files appear as email attachments with a
".dict" extension. Simply double-click the attachment to import it into
the eShuttle Transcribe window.
Transcribing Dictation Files
Once files have been downloaded to the local computer, the files can be
played and transcribed by double-clicking on selected files. If the
Bytescribe WavPlayer is installed on the computer, the WavPlayer will
launch and play the voice files. The WavPlayer is capable of being controlled with a foot pedal.
If you do not have the WavPlayer installed, double-clicking on the file
will open the file in Windows Sound Recorder, which cannot be controlled by a foot pedal. Regardless of which player is used, the files will
be heard through a headset or speakers connected to the computer's sound
card.
If using Automatic Document Creation, the Create New Word Document window will also appear, prompting for information to be inserted
into the document.
32
Part II: eShuttle Transcribe
The Account and Report Type can be selected from a drop down list.
The Report Type field determines the template that will be used to create
the Microsoft Word document. Report Templates can be created and
customized using the Edit List button beside the Report Type field.
33
WavPlayer User’s Manual
Once all fields have been filled, clicking the OK button will create a new
Word document using the specified template.
When a document file has been created or attached, a document icon will
appear in the eShuttle window next to voice files. Additional documents
can be created, edited, added or deleted using the corresponding buttons
in the button bar at the top of the eShuttle window.
Double-clicking on files that already have attachments will merely play
the sound file without launching the document creation process again.
Using Microsoft Word Templates
A list of available templates can be can be found by clicking on the Tools
menu, selecting Settings, and choosing the Templates tab. From this
location, templates can be added, edited, and deleted.
To modify a template, go to the Templates tab, highlight a template, and
click the Edit button. The template will open in Microsoft Word for editing.
Fields that will be merged with patient information appear with brackets
surrounding them, e.g. <<PatientLastName>>. All fields and text can be
rearranged in the template and any text can be added. Once changes have
been completed, save and close the Word document.
Note: At least one field must be present in the template for eShuttle to be
able to use the template.
34
Part II: eShuttle Transcribe
Attaching External Documents
If a transcriptionist is using a word processor other than Microsoft Word,
Automatic Document Creation cannot be used. In that case, documents
can be typed and saved and then attached to any voice file. ZIP and PDF
files may also be attached.
As a transcriptionist listens to voice files that have been downloaded, the
transcription can be typed into any standard word processor such as Word
or WordPerfect. These documents can be saved in any folder on the computer, such as the "My Documents" folder. Once a text document has
been typed and saved to the computer, it is ready to be attached to the
original voice file in the eShuttle Transcribe window.
To attach a document, right-click on the voice file in the eShuttle Transcribe window and select the Attach External Document option from
the popup menu that appears. Multiple documents can be added using
this method. To view and edit attached documents, right-click on the
voice file and select View Attached Documents. Documents can also be
attached by dragging and dropping files from Windows Explorer into the
Attachments window.
Completing Jobs
Some companies may not need for transcriptionists to send text documents through eShuttle. In this case it would be enough for the voice
files to be marked as Completed. In order to mark a voice file as Completed, right-click on the voice file and select Change Status To and then
select Completed. You can also use the “Ctrl+M” key combination to
mark files as Completed.
35
WavPlayer User’s Manual
Purging and Deleting Files
eShuttle Transcribe requires that files must be marked as Completed or
Uploaded before they can be deleted. To delete files that have been
marked as Completed or Uploaded, highlight the file and press the Delete
key on the keyboard. Files may also be deleted by selecting the Tools |
Purge Files menu option or by selecting the Purge Files button. This
purge function will delete all Completed or Uploaded files that are older
than a given number of days. To set the number of purge days, select
Tools | Settings from the menu and click the General tab.
Creating Reports
There are two kinds of reports in eShuttle: Quick Reports and Custom
Reports. Both report types can be created either from within the main
eShuttle Transcribe window or from within Document Manager.
Quick Reports
To create a Quick Report, highlight files you wish to appear in the report
from the eShuttle Transcribe window. Then click the Quick Report button. A report will appear in a new text file, allowing you to print, modify,
or save the report.
Another method of creating a Quick Report is to right-click in the eShuttle Window and select Report of Local Files from the popup menu.
36
Part II: eShuttle Transcribe
Custom Reports
To create a Custom Report, click the Custom Report button. The Custom Report window will appear with a number of fields. Specify the
criteria for the report and click the Create button.
If the documents downloaded by eShuttle are Microsoft Word documents
and Microsoft Word is installed on the computer, you may select the Include MS Word Statistics checkbox to include line count information in
the report.
Using the Document Manager
To view all completed text documents, click on the Tools menu and select Document Manager. The Document Manager window will appear.
The Document Manager displays all attached documents. This window
enables functions such as printing, viewing, searching and creating reports.
37
WavPlayer User’s Manual
File Management and Workflow
File management with eShuttle Transcribe is easy. Each file is marked
with a flag indicating the current status of the file.
When a dictator records a dictation file in eShuttle Dictate, the file is
marked as New or Stat. New files are marked with a green flag. Priority
or “Stat” files are marked with a yellow flag. Files that have been sent to
a transcriptionist using eShuttle Transcribe are marked as Downloaded
with a yellow lightning icon. When a transcriptionist completes a document and sends it back to the dictator, the file is marked as Uploaded with
a red flag icon. Files that have transcribed documents attached are shown
with a document icon.
38
Part II: eShuttle Transcribe
Troubleshooting eShuttle Transcribe
I have a problem emailing files
First, check to see that your email settings are correct. You must use
eShuttle with a SMTP email server. eShuttle will not work with webbased email servers like Hotmail, Yahoo, or Gmail. Check with your
email provider for these settings. If you are using an email client such as
Outlook, Eudora, or Outlook Express, compare your email settings in
eShuttle with those in your email client.
Also, some SMTP servers require an Account name and Password to
send emails. Others require a valid From address to send emails. Check
your settings to verify that these have been entered correctly.
Second, verify that you have Internet access. Open a web browser to
verify that you are able to connect to Internet sites. eShuttle will not
work without an Internet connection.
Third, try using another email client to send emails to the same address.
If other email programs cannot send emails, there may be computer or
network problem.
Finally, check the eShuttle Log (click Tools > View Log) to see if any
information is given as to why the delivery failed.
When I receive a file as an email attachment, it cannot
be played or will not open.
The file may have been decrypted with the wrong decryption password.
Check to see that you have the correct encryption password. If you did
have an incorrect encryption password, the other party will need to resend
the encrypted attachment. Dictators and transcriptionists must have the
same encryption password.
39