1
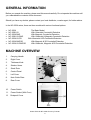
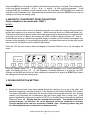
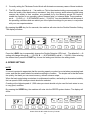
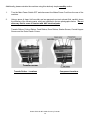
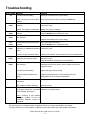
MODEL NC-350A Series
CURRENCY COUNTER
USERS GUIDE
(Version 2.0 - First Edition: May 2001)
CONTENTS
• Contents Page (This Page)
1
• General Information
• Machine Overview
2
2
• Technical Specification
3
• Initial Operation Steps
4
• Function Setting
• Length Detection Setting
• Width Detection Setting
6
6
6
• UV Counterfeit Detection Setting
• Magnetic Counterfeit Detection Setting
7
8
• Double Detection Setting
8
• Speed Setting
9
• Counting Mode Setting
10
• Dustproof Cover setting
10
• Maintenance Routines
12
• Troubleshooting
13
Users Guide for NC-350A Currency Counter
1
GENERAL INFORMATION
Before you operate the machine, please read this manual carefully. Do not operate the machine until
you understand the contents of this document.
Should you have any doubts, please contact your local distributor, or sales agent, for further advice.
In the NC-350A series, there are three models with various functional options:
•
•
•
•
•
•
•
NC-350A
NC-350A UV
NC-350A 2MG
NC-350A UV/2MG
NC-350A UV/3D
NC-350A 2MG/3D
NC-350A UV/2MG/3D
The Basic Model
With Ultraviolet Counterfeit Detection
With Magnetic Counterfeit Detection
With Ultraviolet & Magnetic Counterfeit Detection
With Ultraviolet & 3D Counterfeit Detection
With Magnetic & 3D Counterfeit Detection
With Ultraviolet, Magnetic & 3D Counterfeit Detection
MACHINE OVERVIEW
1.
Carrying Handle
2.
Right Cover
3.
Thickness Knob
4.
Stacker Vanes
5.
Stack Plate
6.
Control Panel
7.
Left Cover
8.
Note Guide Plate
9.
Rear Cover
10.
Power Switch
11.
Power Socket (With Fuse)
13
Dustproof Cover
8
9
1
7
2
6
3
13
5
4
Users Guide for NC-350A Currency Counter
2
TECHNICAL SPECIFICATION
Counting Speed
1500 pcs/min (High Speed)
1000 pcs/min (Standard Speed)
600 pcs/min (Low Speed)
Hopper Capacity
200 pcs
Suitable Note Size
130 x 60~190 x 80mm
Operation Mode
Double Detection Mode
Accumulation Counting Mode
Ultraviolet Detection Mode (Option)
Magnetic Detection Mode (Option)
Length Detection Mode (Option)
Width Detection Mode (Option)
Remote Display (Option)
RS232 Communication Interface (Option)
Power Consumption
50 Watts (Operating)
Power Requirements
110 or 220 or 240 Volts 50/60Hz
Dimensions
320(L) x 330(W) x 320(H) mm
Weight
7.5 Kg
Users Guide for NC-350A Currency Counter
3
INITIAL OPERATION STEPS
CAUTION:
Before you turn on the machine, please ensure you remove ALL Notes from the
Hopper and Stacker areas.
Turn ON the Power Switch on the rear of the machine. The machine will enter a 'Self-Test' mode
whereby the display will show:
The machine Motor systems will run for approximately 1 second and then, if correct, the Motors will
stop and the display will change to show:
When the machine leaves the factory, the Default Functions are set as follows:
UV Counterfeit Detection (UVD)
Uv - - 2
(Only for the model with 'UV')
MaGnetic Counterfeit Detection
Off
(Only for the model with 'MG')
Counting Speed
As Last User Selection
Double Detection
dd - - 2
Length Detection
Ld - - 5
(Only for the Model with “3D”)
Width Detection
Hd - -5
(Only for the Model with “3D”)
Counting Mode
As Last User Selection
Auto/Manual Start
Auto Start
(Switch to AutoStart when turn on the power again)
Users Guide for NC-350A Currency Counter
4
If the various function settings of the machine were pre-set by the previous operator, the machine will
automatically default back to these previous selections when you turn the machine back ON.
If you wish to change the default function setting, please see the section headed ‘Function Setting’ (See Page 6).
It is vitally important to adjust the distance between the two Note Guides according to the length of the
notes you will be counting. Place the notes in the Hopper, ensuring that the lower notes within the
bundle are inserted firmly into the rear of the feed area.
The correct Feed Gap setting of the Central Feed Roller assemblies is vitally important to the smooth
functioning of the machine. After extremely long-term usage, the urethane components of both the
Feed Roller and the Friction Roller may be subject to natural wear. Under this condition, the Feed
Gap may become too wide and, as a result, Error Codes will be generated and note feeding will
become erratic.
To check and adjust the Feed Gap to counteract this simple wear condition, please use the following
procedure:
1.
Manually insert a genuine bank note into the Feed Gap and pull it rearwards, if you did not feel
any resistance whilst removing the note, this indicates the gap is too wide. If you feel the
resistance is very strong, it indicates the Feed Gap is too narrow. (When the machine leaves
our factory, the initial setting of the Thickness Dial is 8).
2. If the Feed Gap is found to be too wide, please adjust the Thickness Knob (which is mounted on
the right side cover) clockwise to slowly reduce the Feed Gap until the proper slipping- resistance
is achieved with your bank note.
3. If the Feed Gap is found to be too narrow, please adjust the Thickness Knob counter- clockwise
to increase the feed gap until the proper slipping-resistance is achieved with your bank note.
The machine will start counting automatically.
The machine will stop automatically under the following Conditions:
l
All the notes in the Hopper have been counted.
l
The machine count has achieved the pre-set batch quantity.
l
When an error occurs - An Error Code message will be shown on the display. Please refer to the
Troubleshooting ‘Error Code’ table at the end of this Users Guide.
Users Guide for NC-350A Currency Counter
5
Function Setting
1. LENGTH DETECTION
(Only available for the model with “3D”)
NOTES:
1. Length Detection (LD) is an optional feature of the NC350A series currency counter. It is
principally used to identify the denomination of the bank notes being counted where the particular
national currency has a significant (+3 mm) difference, in length, between denominations.
2. This system will allow reasonable latitude for bent/missing bill corners, but will not ignore extreme
vertical edge errors, or misalignment.
3. Correct equidistant positioning of the Note Guides will greatly assist the machine to feed the bank
notes.
By pressing the 3-D key, the machine will enter into the Length Detection Setting. The display will
show:
The selectable range of the Length Detection Accuracy is 3mm, 5mm, 7mm, 9mm and off. You can
select the Length Detection Accuracy simply by pressing the corresponding numeric keys. Turn off
this function by pressing the key “0”. After selecting the desired leve l, press the START key to save
the setting and exit from the setting mode.
2. WIDTH DETECTION
(Only available for the model with “3D”)
NOTES:
The Width Detection (WD) is measuring the smaller dimension of the bank note. It then compares this
information with preceding bills in the present count run, in order to largely eliminate the possibility of
smaller denominations being included in the count, in error. This usually happens when small notes
are ‘hidden’ within a bundle of larger ones (Although the WD fe ature will also cause the machine to
STOP if the bill is larger).
1. When opting to use this feature, from the H - - 0 (OFF) position, there are many available settings
to choose from:- H - - 3, H - - 5, H - - 7 and H - - 9. These numbers indicate the millimetre (mm)
difference, in the narrow dimension size, between the denominations of your bank notes. It is
important to know that you should measure the difference beforehand, and set the machine to
detect to the nearest of your differential. Your local Distributor will readily provide guidance on
domestic currency settings.
By pressing the 3-D key two times, the machine will enter into the Width Detection Setting. The
Users Guide for NC-350A Currency Counter
6
display will show:
The selectable range of the Width Detection Accuracy is 3mm, 5mm, 7mm, 9mm and off. You can
select the Width Detection Accuracy simply by pressing the corresponding numeric keys. Turn off this
function by pressing the key “0”. After selecting the desired level, press the START key to save the
setting and exit from the setting mode.
When both the Length Detection Function and the Width Detection Function are turned off, the red
LED indicator on the 3-D key will be off.
3. UV COUNTERFEIT DETECTION SETTING
(Only available for the model with “UV”)
NOTES:
1. The vast majority of the world's bank notes are printed on a quality of paper designed to
withstand frequent handling and extend the time in circulation. This specification normally means
that they are printed on a high quality, linen-based paper, which has low fluorescence
characteristics. Because the majority of counterfeit bank notes are printed on poorer quality
papers, which have been bleached and therefore fluoresce, UV detection is normally the most
useful method of helping to find forged bills at the speed at which a currency counter operates.
2. As the machine has stopped, because of the possibility of a counterfeit being present, you should
then remove the last (top) note to have arrived in the Stacker area in order to make a decision on
the validity of the bill by closer visual examination.
3. Most users will find the default position of U - - 2 (Standard) to be correct for their requirements.
Some experimentation using a lower, or higher setting may, in exceptional circumstances, be
necessary. Your local Distributor will be able to provide guidance, if required.
By pressing the CFA key, the machine will enter into the UVD system feature. The display will show:
Users Guide for NC-350A Currency Counter
7
Press the UVD keys to change the default UVD detection level setting, if required. The indicated U - 2 will now change through U - - 3, U - - 0, U - - 1 and U - - 2, then recycle sequentially. The 0
indicates OFF, the 1 indicates a LOW detection level, the 2 indicates a STANDARD level, and the 3
indicates a HIGH detection level. After selecting the desired level, press the START key to save the
setting and exit from the setting mode.
4. MAGNETIC COUNTERFEIT DETECTION SETTING
(Only available for the model with “2MG”)
NOTES:
Magnetic is a device that is useful in detecting forgeries only when the currency being counted is
printed with magnetic ink as a security feature. (Most commonly found on USA$’s and Italian Lira).
This feature will examine specific areas of the bank note surface for the presence of a magnetic field,
and where this is low, or absent, the machine will ‘STOP’, the Batch Display will show “CF”, and an
audible Buzzer Alarm to indicate that a possible forgery is present. As the machine has stopped only
because of the possibility of a counterfeit being present, you should then remove the last (top) note to
have arrived in the Stacker area for detailed examination.
Press the CFA key two times to select the Magnetic Counterfeit Detection on or off, the display will
show:
When the Display shows “CF – 1”, the Magnetic Counterfeit Detection is on. Press the MAG key
again, the display will show “CF – 0”, the Magnetic Counterfeit Detection is off and the red LED
indicator on the MAG key will be off. After selecting the desired level, press the START key to save
the setting and exit from the setting mode.
5. DOUBLE DETECTION SETTING
NOTES:
1. Detecting that two bank notes have passed through the machine, one on top of the other, and
therefore suggesting a possible miscount, is the function of the Double Detection (DD) system.
This feature operates by measuring the amount of light that penetrates each bill, as it is being
counted, and compares this measurement with the known signal from a single note. If the
signal is significantly reduced, the machine will STOP, an Audible Alarm will sound and the Batch
Display will show “db”. All bills must be removed and recounted. The machine will force a
recount because, by definition, the count displayed cannot be assumed as accurate.
This also applies in the case of a suspected ‘Chained’ note – (Chaining is where only part
of a following bank note overlaps the one being counted).
Users Guide for NC-350A Currency Counter
8
2. Correctly setting the Thickness Control Knob will eliminate unnecessary cases of these incidents.
3. The DD system defaults to d - - 3 at switch-on. This is the standard setting recommended for use
when the quality of the bank notes is consistent. Very dirty currency and/or where the bills being
counted vary widely in their condition, are provided for by the following pre-set DD levels to
enable the machine to run smoothly without frequent false, or ‘nuisance’ stops. These positions
are d - - 1 (LOW), d - - 3 (STANDARD) and d - - 5 (HIGH). Your local distributor will be aware of
the prevailing conditions and can advise you of the optimum settings for your area, in conjunction
with your own experimentation.
By pressing the ADD key for five seconds, the machine will enter into the Double Detection Setting.
The display will show:
Press the LEVEL key to sequentially change the Double Detection (DD) level. The default d - - - 2
setting will change through d - - - 1 (LOW), d - - - 2 (STANDARD) and d - - - 3 (HIGH). After selecting
the desired level, press the START key to save the setting and exit from the setting mode.
6. SPEED SETTING
NOTE:
It is most important to appreciate that the counting speed you select is crucial when processing bank
notes, and that the speed should be varied according to condition. The simple rule is that the better
the quality, the faster you can count currency, without nuisance stops.
When the bank notes being counted are in a distressed condition, and lacking in dimensional stability,
the low speed of 600 notes per minute should be selected.
Counting at the highest speed of 1,500 notes per minute should only be used for bank notes in new,
to very good, condition.
By pressing the SPEED key, the machine will enter into the SPEED system feature. The display will
show:
Users Guide for NC-350A Currency Counter
9
Press the SPEED key to change the default SPEED setting, if required. There are three selectable
speed: 600pcs/min(Low), 1000pcs/min(Standard) and 1500pcs/min(High). After selecting the desired
speed, press the START key to save the setting and exit from the setting mode.
7. COUNTING MODE SETTING
Auto/Manual Start Mode
By pressing the START key for five seconds, the machine will enter into the START system feature.
The display will show:
Press the two numeric keys “0” & “1” to select the Auto/Manual Start Mode. Select “1” to enter into the
Auto Start Mode. Select “0” to enter into the Manual Start Mode. After selecting the desired level,
press the START key to save the setting and exit from the setting mode.
CONTINUOUS COUNTING MODE
When the 3 digits of small LED Display shows ‘ - - - ‘, the machine is in the Continuous Counting
Mode. If you place some notes in the Hopper, the machine will count the notes until the Hopper is
either empty, or stops whenever an Error occurs during the process.
BATCH COUNTING MODE
Input your desired batch number by using the ten numeric keys.
For example, if you want to set the batch number to 20, just first press the numeric key 2, and then
press the numeric key 0. The display will show:
Users Guide for NC-350A Currency Counter
10
If you want to clear the batch setting and switch to the Continuous Counting Mode, press the C key.
If there is counting number on the counting display, the counting number will be first cleared. The
machine is switched to the Continuous Counting Mode. The display will show:
ACCUMULATION COUNTING MODE
By pressing the ADD key, you can select the Accumulation Mode ON, or OFF. When the machine is
in the Accumulation Mode, the LED indicator on the ADD key will be on and the counting number will
be accumulated on the last counted number. The display will show:
After the above customizing steps, you can start counting now. When there is any error occurs, press
the START key to continue counting. After the counting is finished, you can clear the counting number
by pressing the C key. In Accumulation Counting Mode, press the C key first time to clear the last
counting number. Press it second time to reset the counting display to zero.
Dustproof cover setting
By pressing the ‘ C’ key for five seconds, the machine will enter into the Dustproof Cover Setting. The
display will show:
The dustproof cover will automatic be closed while counting notes and be opened when counting
ends
By pressing the ‘ C’ key for five seconds again, the display will show ‘ dp-0’. The automatic function
will be turned off.
Users Guide for NC-350A Currency Counter
11
MAINTENANCE ROUTINES
Please maintain the machine via this simple daily procedure:
1.
Turn the Main Power Switch OFF and disconnect the Mains Power Cord from the rear of the
machine.
2.
Using the brush provided, clean the central Hopper Sensor, the two Stack Sensors, Hopper
area and the Stacker area. The photograph below shows the location of these devices:
Hopper sensor
Durm Roller
Friction Roller
Feed roller
Stack sensor
Users Guide for NC-350A Currency Counter
12
Additionally, please maintain the machine using this relatively simple monthly routine:
1.
Turn the Main Power Switch OFF and disconnect the Mains Power Cord from the rear of the
machine.
2.
Using a piece of clean, lint-free cloth and an approved non-toxic solvent fluid, carefully clean
the surfaces of the following parts, which are identified in the two photographs below. Do not
allow any fluid to come in contact with ANY electrical parts.
Transfer Rollers, Friction Rollers, Feed Rollers, Drum Rollers, Stacker Sensor, Central Hopper
Sensor and the Outer Plastic Covers.
Transfer sensor
Transfer Rollers - Locations
Component Locations
Users Guide for NC-350A Currency Counter
13
Troubleshooting
Error Code Reason
JA
HF1
(HF2)
Remedy
Incorrect Feed Gap setting
Adjust the Feed Gap for the correct setting
There is a jammed note in the feed
passage
A partial, or folded note, has been
detected
Remove the jammed note by pressing the START key
Remove the partial, or folded note, and press the START key to
continue the count
Notes in the Hopper are misaligned Realign the notes in the Hopper
Hd1
(Hd2)
CH1
(CH2)
Abnormal width note(s) have been
detected
A chained, or abnormal, note has
been detected.
Remove the abnormal note(s)
Press the START key to continue the count
Remove the chained/abnormal note(s)
Adjust the Feed Gap for the correct setting
Ld1
(Ld2)
Ud1
(Ud2)
CF1
(CF2)
db1
(db2)
E1
Uv bad
Abnormal length note(s) have been Remove the abnormal note(s)
detected
Press the START key to continue the count
Suspect counterfeit note has been Remove the suspected counterfeit note, and press the RS key to
detected by the Ultraviolet detection continue the count
sensor
Incorrect UV light sensitivity setting Adjust the UV detection level according to the note characteristics
Suspect Counterfeit note has been Remove the suspected counterfeit note, and press the RS key to
detected by the magnetic sensor
continue the count
Adjust the MG level according to the characteristics
Double, or overlapped notes, have Take out all the notes from the Stacker, remove the double, or
been detected
overlapped note from the bundle, put the bundle back into the
Hopper to recount
Incorrect Feed Gap setting
Adjust Feed Gap to proper setting
Incorrect Double Detection level
setting
Notes still in/on the machine when
switched on.
Adjust the Double Detection level according to the note
characteristics of ink and thickness properties
Remove notes;
Dirty Hopper or Stacker sensor(s);
Clean all sensors;
The detection system, comprising Replace the UV lamp, the UV Sensor, or the CPU PC Board
the UV lamp, UV Sensor, or the Main (Maintenance engineer tasks)
CPU PC Board, are suspect
NOTE: Counting is still possible
under this condition, but the UV
Counterfeit Detection system is
inoperative.
*
The error code of “xx1” means that the suspicious note is on the top of the bundle in the stacker.
The error code of “xx1” means that the suspicious note is the second one of the bundle in the stacker.
Users Guide for NC-350A Currency Counter
14
*** In the interests of our ongoing policy of continual product improvement, specifications are subject to change without prior notice.
Users Guide for NC-350A Currency Counter
15
***