1
is used as shown in Figure 1 as this will supply clean,
lubricated air at the correct pressure to the tool. Details
of such equipment can be obtained from your supplier.
If such equipment is nit used then the tool should be
lubricated by shutting off the air supply to the tool,
depressurizing the line by pressing the trigger on the
tool. Disconnect the air line and pour into the intake
bushing a teaspoonful (5 ml) of a suitable pneumatic
motor lubricating oil preferably incorporating a rust inhibitor. Reconnect tool to air supply and run tool slowly for a few seconds to allow air to circulate the oil. If
tool is used frequently lubricate on daily basis and if
tool starts to slow or lose power. When lubricating,
also ensure that screen in intake bushing is clean.
It is recommended that the air pressure at the tool
whilst the tool is running at 90 psi/6.3 bar. The tool can
run at lower and higher pressure with the maximum
permitted working air pressure of 100 psi/ 7.0 bar. For
a lower air pressure the tool will give a lower output
for a given setting of the sir regulator set for 90 psi/6.3
bar. operation and increased output for higher pressure. Hence it is possible that changes in supply pressure can give situation where the fastener is under over
tightened. For changes in pressure, the regulator position and application should be reassessed. It is recommended that joint tightness of the threaded fastener
assembly be checked with suitable measuring equipment. Follow the national legislation of waste disposal.
Putting Into Service
Air Supply
Use a clean lubricated air supply that will give a measured air pressure at the tool of 90 psi/ 6.3 bar when
the tool is running with the trigger fully depressed And
the air regulator in its maximum opening flow position.
Use recommended hose size and length. It is recommended that the tool is connected to the air supply as
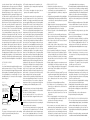
shown in figure 1.
FIGURE 1.
Take air from top
All pipe and fitting
should be 1/2” or larger
Compressor with sufficient
capacity to maintain
recommended working
pressure at each tool outlet
Receiver tank
40 gallons or more
Easy to reach and
operate shut off valve
Air tool
Low
spot
to trap
water
Air regulator set at
recommended working
air pressure
Drain daily
Filter lubricator
Drain daily
Recommended air supply system
Operating
The output of the impact wrench in prime working
condition is governed by mainly three factors
a) The input air pressure
2
b) The time the impact wrench is operated on joint.
Normal time for joints of average tension requirement
3 to 5 seconds.
c)The setting of air regulator for a given joint at a
given pressure operated for a given time.
The air regulator can be used to the regulate the output of the impact wrench if no other control means is
available. It is strongly recommended that an external
pressure regulator ideally as part of a fitter/regulator/
lubricator (FRL) is used to control air inlet pressure so
that the pressure can be set to help control the tension
required to be applied to the threaded fastener joint.
There is no consistent reliable torque adjustment on an
impact wrench of this type. However, the air regulator
can be used to adjust torque to the approximate tightness of known threaded joint. To set the tool to the desired torque, select an nut or screw of known tightness
of the same size, thread pitch and thread condition as
those on the job. Turn air regulator to low position, apply wrench to nut and gradually increase power (turn
regulator to admit more air) until nut moves slightly in
the direction it was originally set. The tool is now set
to duplicate that tightness, note regulator setting for
future use. When tightness nuts not requiring critical
torque values, run nut up flush and then tighten an additional one-quarter to one-half turn(slight additional
turning is necessary if gaskets are being clamped). For
additional power needed on disassembly work, turn
regulator to its fully open position. This impact wrench
is rated a bolt size(please refer technical specification
of tool). Rating must be down graded for spring U
bolts, tie bolts, long cap screws, double depth nuts
badly rusted conditions and spring fasteners as they
absorb much of the impact power. When possible,
clamp or wedge the bolt to prevent spring back.
Soak rusted nuts in penetrating oil and break rust seal
before removing with impact wrench. If nut does not
start to move in three to five seconds use a large size
impact wrench. Do not use impact wrench beyond rated capacity as this will drastically reduce tool life.
Note: Actual torque on a fastener is directly related to
joint hardness, tool speed, condition of socket and the
time the tool is allowed to impact.
Use the simplest possible tool = to-socket hook up.
Every connection absorbs energy and reduces power.
Safe Rules When Using an Impact Wrench
Read all these safety instructions before operating this
product and save these instructions.
The tool has been manufactured in conformity with
the instruction of EU machine directive. The EU mark
will be considered void in the event of inexpert repairs,
the use of non-original parts and in case of non-observance of the safety instructions in the user’s manual.
General safety rules:
1. Watch the tool at all times when in use.
2. People under the influence of alcohol or drugs are
not allowed to use, repair or maintain the tools.
3. Keep unqualified persons, children, etc. away from
the tool.
4. Keep work area clean and with sufficient daylight or
artificial lighting. The work area on which the machine
is used must be cleaned up. Disorder is potential
cause of accidents.
5. Danger of explosion. Never use oxygen and combus tible gas as an air supply for the tool which many be
ignited by spark and cause fire or explosion.
6. Never use gasoline or other flammable liquids to
clean the tool.
7. Do not use air tools in potentially explosive atmos pheres such as in the presence of flammable liquids,
cleaning solvents, fluid energy or stored gases.
8. Do not expose air tools to rain. Do not use air tools
in damp or wet locations.
9. When a fault or failure is detected, the tool must
immediately be disconnected from the air supply
and returned for repair.
10.It is not permitted to modify the tool in any way.
11.When not in use, keep tools in a dry place, either loc ked up or i a high place, out of the reach of children.
Do not force small air tools to do the job of a heavy duty task. Do not use air tool for purpose of which
was not intended.
12.Wear suitable ear protection at environment noise
level>80db(A) and safety spectacles when using
the tool. Always wear approved safety goggles if
work in dusty. This also applies to other persons in
the near by vicinity.
13.Do not wear loose clothing or jewelry. They can be
caught in moving parts. Rubber gloves and non-skid
foot wear are recommended when working out doors. Wear protective hair covering to contain
long hair.
14.Keep proper footing and balance at all times.
15.Use clamps or a vice to hold work-piece. It is safer
than using your hand and free both hands to
operate the air tool.
16.When not use, before performing service or chan ging accessories please disconnect tool from air
compressor.
17.Do not carry plugged in air tool with your finger
on the switch trigger. Be sure switch is in the “OFF”
position when connecting to air supply.
18.Watch what you are doing
19.Use common sense, even unsafe situation or un balanced positions, particularly when you are tired.
20.Air powered tools can vibrate in use. Vibration,
repetitive motions or uncomfortable positions may
be harmful to your hands or arms. Stop using any
tool if discomfort, tingling feeling or pain occurs.
Seek medical advice before resuming use.
21.For multiple hazards, read and understand the safety
instructions before installing, operating, repairing,
maintaining, changing accessories on, or working
near the assembly power tool for threaded fasteners.
Failure to do so can result in serious bodily injury.
22.Only qualified and trained operators should install,
adjust or use the assembly power tool for threaded
fasteners.
23.Do not modify this assembly power tool for threaded
fasteners. Modifications can reduce the effective ness of safety measures and increase the risks to
the operator.
24.Do not discard the safety instructions; give them
to the operator.
25.Do not use the assembly power tool for threaded
fasteners if it has been damaged.
26.Tools shall be inspected periodically to verify that
the ratings and markings required by this part of
EN ISO 11148 are legibly marked on the tool. The
employer/user shall contact the manufacturer to
obtain replacement marking labels when necessary.
Safety precautions for projectile hazards
1. Failure of the workpiece, of accessories or even of
the inserted tool itself can generate high-velocity
projectiles.
2. Always wear impact-resistant eye protection during
the operation of the assembly power tool for threa ded fasteners. The grade of protection required
should be assessed for each use.
3. Ensure that the workpiece is securely fixed
Safety precautions for entanglement hazard
1. Entanglement hazards can result in choking, scal ping and/or lacerations if loose clothing, personal
jewelry, neckwear, hair or gloves are not kept away
from the tool and accessories.
2. Gloves can be become entangled with the rotating
drive, causing severed or broken fingers.
3. Rotating drive sockets and drive extensions can easily
entangle rubber-coated or metal-reinforced gloves.
4. Do not wear loose-fitting gloves or gloves with cut or
frayed fingers.
5. Never hold the drive, socket or drive extension.
6. Keep hands sway from rotating drives.
Safety precautions for operating hazards
1. The use of the tool can expose the operator’s hands to
hazards including crushing, impacts, cuts and abrasions
and heat. Wear suitable gloves to protect hands.
2. Operators and maintenance personnel shall be
physically able to handle the bulk, weight and power
of the tool.
3. Hold the tool correctly: be ready to counteract normal
or sudden movements and have both hands available.
3