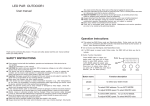
1
Texcellent® System
Remote Control User’s Manual
V2.2
Information in this document is subject to change without notice. Companies, names and data used in
examples herein are fictitious unless otherwise noted. No part of this document may be reproduced or
transmitted in any form or by any means, electronic or mechanical, for any purpose, without written
permission from the manufacturer
Copyright © 2009-2015. All rights reserved.
Remote Control User’ s Manual
Table of Contents
General Information ....................................................................................................................................... 2
1.0
Features and Functions of the Remote Control Box .................................................................. 3
1.1 Applicability.............................................................................................................................................. 3
1.2 Features .................................................................................................................................................... 3
1.3 Functions of the Remote Control Buttons ............................................................................................ 3
1.3.1 Systematical Buttons............................................................................................................................ 3
1.3.2 Editing Buttons ..................................................................................................................................... 5
1.3.3 Visible-Character Buttons .................................................................................................................... 9
2.0
Main Menu & Sub Menus ............................................................................................................... 9
2.1 Main Menu................................................................................................................................................. 9
2.2 File Operate Sub Menu .......................................................................................................................... 10
2.3Setup Sub Menu Setup Sub Menu......................................................................................................... 11
3.0
Basic Operations .......................................................................................................................... 12
3.1 Understanding the File Format ............................................................................................................. 12
3.2 Turning the Display ON/OFF ................................................................................................................. 13
3.3 Setting the Time and Date ..................................................................................................................... 13
3.4 Creating a Text Message ....................................................................................................................... 15
3.5 Making Changes to an Existing Message............................................................................................ 17
3.6 The Order Messages are displayed...................................................................................................... 18
3.7 Setting Messages with Specific Run Times ........................................................................................ 19
3.8 Deleting Messages................................................................................................................................. 21
Remote Control User’ s Manual
Special Notes
All rights reserved. No part of this manual may be reproduced or transmitted in any form
or by any means, electronic or manual, including photocopying and recording, for any
purpose without the express written permission of us.
Information in this document is subject to change without notice. We reserve the right to
change or improve our products or to make changes in the content without obligation to
notify any person or organization of such changes or improvements. The release of the
technical information does not constitute the granting of any license.
This document is for instructions to use the Texcellent® Remote Control Box. The
Texcellent® Remote Control Box manual 2.2 presents detailed instructions to users on
how to communicate with the Texcellent® indoor displays, manufactured in China.
(1) When you want to use the Sigma3000© software to send file to the sign,
please make sure the sign is in Schedule status (display status). If the sign
is already in remote control status (you can see remote control list on the
LED sign), please press the “PROGRAM” key on the remote controller to
switch to Schedule status from remote control status; if the sign is in shut
down status, please set the sign back to schedule status by pressing the
“Shift +PROGRAM” button.
(2) If you use the remote controller to change the content of file “B” which was
received originally from the Sigma3000© software before, when you use the
Sigma3000© software to send file “B” to the LED sign, please change the file
name or change the display content and then send it to the LED sign,
otherwise, the LED sign will not display this file content even after your
sending it to the sign successfully.
For example, suppose you have just sent a file named “B” to the sign from
the Sigma3000© software and the display contents are “Welcome Name1
to U.S”. And then you use the remote controller to change the display
contents to be “Welcome Name2 to U.S.” but with the same file name “B”.
One day or some time later, you want to use the Sigma3000© software to
send the original file B (its content being “Welcome Name1 to U.S”) to the
LED sign. If you don’t change the file name “B” to other file name, or if you
do not change the display contents, the sign will not display this file from the
Sigma3000© software.
1
Remote Control User’ s Manual
You need to change the file name from “B” to other name, such as file name
“C”. If you don’ want to change the file name B, you will need to change the
contents, such as “Welcome Name3 to U.S.”, and the sign will display the
contents accordingly.
General Information
In addition to the Sigma3000
©
software, all the Texcellent® displays can also be
programmed by using the Texcellent® Remote Control Box. This handheld remote control
box can be used to create text messages, edit existing text messages, and set the date
and time, set the order of how you want the messages to be displayed and much more.
Terms and their explanation
1. Schedule Mode
The system is in Schedule Mode generally. In this mode, the files will be displayed
according to the preset schedule (time/date/weekday)
2. On Line Ticker Mode
The pictures will be displayed moving left or right, but the LED sign need to be
connected to the PC on line. This display mode can be used only after the user has
developed new software based on our own protocol.
3.Head-to-tail Mode
In this display mode status, all files will be displayed moving left (or moving right) one
after another
4.Software-shutdown mode
Press the Shift & PROGRAM buttons on remote to enter software – shutdown mode
status. Press shift & PROGRAM buttons on remote again to exit
5.Remote Ctrl. Mode
Press the Program button on remote to enter remote control mode. In this mode, the
user can control the LED sign with the remote controller
6.Clear(Blank) Mode
©
The LED sign will be in Clear (Blank) mode status before the Sigma3000 software sends
files to the LED sign. In this mode, the LED sign will not display anything.
2
Remote Control User’ s Manual
7.Self Test Mode
©
The LED sign can enter Self-Test Mode to do self testing in The Sigma3000 software
1.0 Features and Functions of the Remote Control Box
1.1 Applicability
The control box is one accessory of the remote control LED sign. You can use the remote
control box to edit text or messages that you want to display without resorting to the
computer or the related software.
1.2 Features
• Support the function of deleting text
• Support text editing & text displaying
• Support the display pattern of character & location
• Capital and lower case entry is supported
• Different character and background color
• About 50 displaying patterns
• Display day, time, and different time zones.
• Flashing, pause and speed control.
• Support the setting of displaying order
• Display time control
• Day, time, week and time zone display
• Automatic power on and off
1.3 Functions of the Remote Control Buttons
1.3.1 Systematical Buttons
Most of these buttons will only work under the programming/editing mode.
3
Remote Control User’ s Manual
1. PROGRAM Button
Function: Program/Run switch. When the sign is displaying text, this
button is used for entering the programming mode. When the sign is
under the mode of programming, the button is used for going into Run
mode.
2. ESC Button
Function: When in the programming mode, you can cancel the
current operation and/or return to previous menu.
3. ENTER Button
Function: When in the programming mode confirm the current
operation, enter into the next menu or perform the current operation.
4. BACKSPACE & DELETE Button
Function: When in the programming mode you can delete characters.
BACKSPACE button will delete the previous character. When the
SHIFT button and the DELETE button are pushed together it will
delete the next character.
5. CAPS Button
Function: When in the programming mode you can switch from
capital to lower case letters.
6. SIMULATOR Button
Function: When in the programming mode you can view the message
for one play to see how your message will appear before saving that
message to the display.
7. SAVE & EXIT Button
Function: Save the information entered and exit to run mode. You
4
Remote Control User’ s Manual
can either save the editing text or exit the editing environment, or you can save the
current operation and exit the setting environment.
8. SHIFT Button
Function: Above-combination key. This button will not operate when it
is pressed alone. For example, you should press both the SHIFT
button and the "1" button to get the character "!".
9. (UP) Arrow Button
Function: Move the menu up or move one line up.
10. (DOWN) Arrow Button
Function: Move the menu down or move one line down.
1.3.2 Editing Buttons
These buttons will only work under the programming mode.
1. FONT Button
Function: Size of character. Usually, the size varies with the height of
the sign. For example, on a one-line display you will only have the
choice of a 5 or 7 pixel characters. You can also choose which font
you want to use. The only way to download more fonts to the display is
©
by using the Sigma3000 software.
2. FLASH Button
1. Flash On
2. Flash Off
Function: When entering a message you can choose to have either
all or part of that message to flash. Where ever the cursor is, anything
to the right of that cursor will flash. The default is "Flash Off". If only
one letter is to flash you must place the cursor just before the
5
Remote Control User’ s Manual
character to turn "Flash On" and then place cursor just past the
character and turn "Flash Off".
3. STAY Button
>>Stay:_(Sec) ranging from 00-99
Function: You can enter how long you want the message to stay on
the display per play.
The default is 03 seconds.
4. SPEED Button
1. Fastest
2. Fast
3. Medium Fast
4. Medium
5. Medium slow
6. Slow
7. Slowest
Function: This will let you control the speed at which your message
appears to the display and also the speed that it leaves the display.
The default value it set by Sigma software, in Default display setting
menu.
5. IN MODE (OUT MODE) Button
1. Auto
2. Move left
3. Move right
4. Scroll O/L
5. Scroll O/R
6. Move up
7. Move down
8. Scroll O/C... and many more
Function: The "IN MODE" button refers to how the message appears
on the display. The "OUT MODE" button refers to how the message is
6
Remote Control User’ s Manual
taken off the display. If you don't choose an "IN MODE" or and "OUT
MODE" the display will default to "AUTO". There are more than 50
patterns for you to choose from.
6. COLOR (BACK COLOR) Button
COLOR button
1. Black
2. Red
3. Green
4. Yellow
5. Mixcolor 1
6. Mixcolor 2
7. Mixcolor 3
8. Mixcolor 4
BACK COLOR
1. Black
2. Red
3. Green
4. Yellow
Function: Setting the color of the character and the background. The
"COLOR" button refers to the color of the character; the "BACK
COLOR" button is the color of the background. The default value it set
by Sigma software, in Default display setting menu.
CAUTION: Do not change the background and foreground color to
the same choice or the display cannot read the text. Also, if you have
a single color sign do not choose a color that the sign does not have.
7. JUSTIFY (HORIZONTAL) Button
J USTIFY
1. Center
2. Left
7
Remote Control User’ s Manual
3. Right
HORIZONTAL
1. Fill
2. Top
3. Bottom
4. Center
Function: The "JUSTIFY" button refers to the control of the vertical
direction. The "HORIZONTAL" button refers to the control of the
horizontal direction. The "HORIZONTAL" button can only be used on 2
line displays. This function controls the position of the text on the
display.
8. CAPS Button
Function: When entering a message you can press "CAPS" to switch
from capital letters to lowercase. The default is capital letters.
9. FRAME Button
Function: It can be used under the editing state. You can use it to
input the frame character to have a new frame.
10. F4 ("SHIFT"+"SPEED") Button
1. Wrap Word.
2. Not Wrap (Scrolling)
Function: Wrap refers to how the text is shown on the display. When
entering text, if the number of characters exceeds the width of the
display, the display will automatically "Wrap" the text in the running
mode to another screen (or page) of the display, if "Wrap Word " is
selected. The "ENTER" button will also force the text entered after the
"ENTER" button is pressed to wrap to the next page. Currently, the
wrap function will not pay attention to breaks in a word so the user
must force a manual wrap (by pressing the "ENTER" button) to not
8
Remote Control User’ s Manual
allow a break in a word. The "SIMULATE" button is helpful in reviewing for this before
saving and exiting program mode. “Not Wrap” will keep all text entered to be on the same
page (assuming the "ENTER" button is not pressed) and all the text entered will move
across the screen from right to left at the speed chosen by using the "SPEED" button.
1.3.3 Visible-Character Buttons
The visible-character consists of several frequently used characters, like numbers,
English characters and punctuations. All the punctuations are used through a
combination of keys. You can use the punctuations by pressing the "SHIFT" button and
any punctuation button.
1. Numbers 0-9
2. English Characters
2.0 Main Menu & Sub Menus
The display has one main menu and two sub menus. In this section you can become
familiar with the main menu and the sub menus.
2.1 Main Menu
When the sign is running, you can press the "PROGRAM" button to get to the main menu.
9
Remote Control User’ s Manual
The "UP" and "DOWN" arrow buttons are used to move up and down in this menu. Press
the "ENTER" button and then you will get to the sub menus.
Main Menu Contents
1. File Operate
2. Edit File
3. Setup
4. Quit
File Operate
Function: In this menu you will be able to delete individual files, delete all files, delete
sequences and delete run times.
Edit File
Function: In this menu you will be able to create and edit messages.
Setup
Function: In this menu you will be able to set the message sequence (order), set the
message run time, set the date and time, and set the power on/off time of the display unit.
Quit
Function: This option will exit you back to the display mode.
2.2 File Operate Sub Menu
File Operate Sub Menu
1. Delete File
2. Del All Files
3. Del Sequence
4. Del Run Time
5. Esc to Return
Delete File
10
Remote Control User’ s Manual
Function: Delete a specified message file.
Del All Files (Delete All Files)
Function: Delete all message files.
Del Sequence (Delete Sequence)
Function: Delete the sequence (order) of messages to display.
NOTE: Deleting the sequence will allow all stored messages in the sign to display once
the sign is in RUN mode.
Del Run Time (Delete Run Time)
Function: Deletes the run time on all message files.
ESC to Return
Function: Returns to the main menu.
2.3Setup Sub Menu Setup Sub Menu
1. Set Sequence
2. Set Run Time
3. Set Date Time
4. Power ON/OFF
5. Esc to Return
Set Sequence
Function: Put files in a sequence (order) in which you want them displayed.
Set Run time
Function: This allows you to set the run time that each file is to be displayed based on
the time of day.
Set Date Time
11
Remote Control User’ s Manual
Function: This allows you to set the current date and time.
Power ON/OFF
Function: This allows you to control the displays power and set the display to turn on
and off based on the time of day.
ESC to Return
Function: Returns to the main menu.
3.0 Basic Operations
There are a few basic operations you will need to know before you start using the remote
control sign. The remote control box will only work under the software Texcellent®. Before
you use the remote control box, please make sure that the sign is on and the batteries
are good. You should point the remote control box directly towards the receiver window
(the red window on the right side of the sign).
3.1 Understanding the File Format
It is better to get an understanding of the file formats (Example: [D:\T\A]) before creating
your messages. There are 2 different drives available on the LED Display, D: and E: (the
drive is in bold [D:\T\A
]). The D: drive is your non-volatile (flash) drive, meaning that
when you enter information in this drive and the display is powered off and then powered
back on, that information will still be there. The E: drive is your volatile (RAM) drive,
meaning that when you enter information in this drive when the display is powered off
and then back on, that information will be gone.
The center letter is the folder (the folder is in bold [D:\T\A
]). Usually, we save the new
edited files into the folder T, when using the remote control. And the files which saved in
different folder can be called when setting up the sequence (Play list). The T folder is
used for text only and is the only folder that can be used to display messages on a sign.
The S folder is used for any word or sentence that will be repeated often. The S folder
can be embedded into text messages.
The last letter is the file name (the file is in bold [D:\T\A
12
]). Every English character
Remote Control User’ s Manual
(capital and lowercase), number and punctuation can be used as a file name. There are
about 384 messages, which can be stored in the non-volatile memory, but only 128
messages can be added into each individual sequence (Play list).
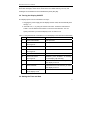
3.2 Turning the Display ON/OFF
The displays power can be controlled in two ways:
1. Plugging the power supply into the display and the outlet, will automatically start
the sign. -or2. Automatic On, i.e., by using the remote control box. Follow the instructions in
Table 1: Use the Remote Control Box to Turn the Power ON/OFF. You can
specify which time you want the display to turn on and turn off.
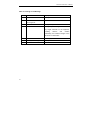
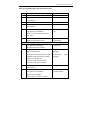
Table 1: Using the Remote Control Box to Turn the Display Power ON/OFF Automatically
Step
Function
Display Will Read...
1
Press "PROGRAM"
File Operation
2
Press "DOWN" Arrow
Setup
until it gets to...
3
4
Press "ENTER"
Set Sequence
Press "DOWN" Arrow
Power ON/OFF
until it gets to...
5
6
7
Press "ENTER"
Disabled
Press "UP" Arrow
Enabled.. (if the “Enabled..” is showing
until it gets to...
on the display, skip this step)
Press "ENTER"
OFF TIME 00:00-Enter the time you want
the display to turn off
8
Press "ENTER"
ON TIME 00:00- Enter the time you want
the display to turn on
9
Press "ESC" until it gets
to the display mode
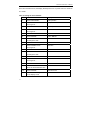
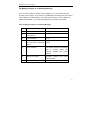
3.3 Setting the Time and Date
13
Remote Control User’ s Manual
Once time and date are set, the display will keep time even on power loss for a maximum
of 2 weeks.
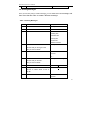
Table 2: Setting the Time and Date
Step
Function
Display Will Read...
1
Press "PROGRAM"
File Operation
Press "DOWN" Arrow
Setup
2
until it gets to...
3
Press "ENTER"
Set Sequence
4
Press "DOWN" Arrow
Set Date time
until it gets to...
5
Press "ENTER"
Set Date
6
Press "ENTER"
YYYY-MM-DD
7
Press numerical buttons
2005-11-17
to change the date
8
Press "ENTER
Set Date
9
Press "DOWN" Arrow
Set Time
until it gets to...
10
Press "ENTER"
TIME HH:MM
11
Press numerical buttons
TIME 08:19
to change the date
12
Press "ENTER"
Set Time
13
Press "DOWN" Arrow
Set Time Zone
until it gets to...
14
Press "ENTER"
L. GMT+08:00
15
Press "DOWN" Arrow or “UP”
E. GMT+01:00
arrow to choose the time zone
16
Press "ENTER"
17
Press "ESC" until it gets
to the display mode
14
Set Time Zone
Remote Control User’ s Manual
3.4 Creating a Text Message
In this feature you can create a text message and also pick an existing message for
modification. When creating messages, make sure you understand the file format
(detailed in Section 3.1 Understanding the File Format). You can refer back to the
description of the editing buttons in
Section 1.3.2 Editing Buttons to add more features to your message.
NOTE: To switch from capital to lowercase letters anytime while entering a message
presses the "CAPS" button.
NOTE: If at any time you have keyed in the wrong character you can press the "BACK
SPACE" button to delete your mistake. If the mistake is at the beginning of the message
press the "SHIFT" + "W (HOME)" buttons to take you to the beginning of that message.
You can use your "LEFT" and "RIGHT" arrow buttons to move your cursor back or
forward to any mistake that needs to be corrected. The "SHIFT" + "BACK SPACE
(Delete)" buttons will delete the characters in front of the cursor.
NOTE: Press "SHIFT" + "SAVE (ENTER)" buttons to save the message entered. The
message added or changed must be saved or it will be lost.
NOTE: Once a new message is created either delete all sequences or refer to “3.6 The
Order Messages are Displayed” to place this message in order.
15
Remote Control User’ s Manual
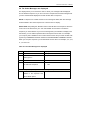
Table 3: Creating a Text Message
Step
Function
Display Will Read...
1
Press "PROGRAM"
File Operation
2
Press "DOWN" Arrow
Edit File
until it gets to..
3
Press "ENTER"
[D:\T\_
]
4
Enter the file name
Here [D:\T\(file name goes here and is
any single character on the keyboard,
including
"SHIFT"
and
"CAPS"
characters), the maximum length of the
file name is 8 characters.
16
5
Press "ENTER"
The display will be blank
6
Enter your message
Example: "THANK YOU COME AGAIN"
7
Press "SAVE&EXIT"
Remote Control User’ s Manual
3.5 Making Changes to an Existing Message
Once you have created a message and it is displaying, you can go back and make
changes to the message. In 3.4 Creating a Text Message the message that was created
was "THANK YOU COME AGAIN". If you wanted the message to read "THANK YOU
COME AGAIN SOON" you can follow the steps below to add the word "SOON".
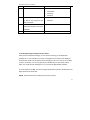
Table 4: Making Changes to an Existing Message
Step
Function
Display Will Read...
1
Press "PROGRAM"
File Operation
2
Press "DOWN" Arrow
Edit File
until it gets to...
3
Press "ENTER"
[D:\T\_
]
4
Press "DOWN" or “UP”
[D:\T\(the existing file name goes
Arrow to select a existing file
here)]
name
5
Press "ENTER"
The display will show the message
that
is
currently
saved.
For
example: 'THANK YOU COME
AGAIN"
6
Make your changes
Example: "THANK YOU COME
AGAIN SOON"
7
Press "SAVE&EXIT"
17
Remote Control User’ s Manual
3.6 The Order Messages are displayed
The display allows you to choose the order in which your messages will be displayed.
This is called the sequence. If you do not choose a sequence then all the messages that
you have created will be displayed one after another with no sequence.
NOTE: If a sequence is created and then a new message is added, then this message
must be added to the current sequence or it will not show on display.
QUICK TIPS: Keep hitting the "ENTER" button to add all files to the sequence. Move the
cursor over to the left and use your "UP" and "DOWN" arrow buttons to review the
sequence you have selected. If you have a message that you would like to display more
than others, you can add that particular file in the sequence more often. For example,
your company has a deadline to turn in their insurance forms and you have created a file
(A) that says "REMINDER PLEASE TURN IN YOUR INSURANCE FORMS BY FRIDAY".
When you set up the sequence you can add the file A more often. For example, A, F, A, B,
A, T, A and so on.
Table 5: The Order Messages are displayed
Step
Function
Display Will Read...
1
Press "PROGRAM"
File Operation
2
Press "DOWN" Arrow
Setup
until it gets to...
3
Press "ENTER"
Set Sequence
4
Press "DOWN" and “UP” Arrow
1.
xx
to review the sequence
2.
xxxx
Delete Files (see Step 5~6)
5
Add Files (see Step 7~10)
Find the file name you want to
Delete to the sequence and
Press "Back Space”
18
Remote Control User’ s Manual
6
Press "ENTER" or “Y”
7
Press "ENTER"
8
Find the file Model
you want
to add to the sequence and
1.
Add Text
2.
Add Picture
3.
Add Array
4.
Add FLW
Example: Text Model
1.
Add Text
Press "ENTER"
9
Find the file name you want to
Example: D:\xxx
add to the sequence and Press
"ENTER"
10
Press "SAVE&EXIT"
3.7 Setting Messages with Specific Run Times
After you have created a message, you can choose how long you would like that
message to run. For example, if you have a message that only needs to be displayed
during a lunch break you can specify for that message to run from 11:00 am to 13:00pm
(1:00p.m.) everyday. You can only specify the calendar days or days of the week in
©
which you would want the message to run if you have the Sigma3000 software.
The time pattern is HH:MM. The first four digits represent the start time, while the last four
digits represent the finish time.
NOTE: The times are shown in military time (24 hour format).
19
Remote Control User’ s Manual
Table 6: Setting Messages with Specific Run Times
Step
Function
Display Will Read...
1
Press "PROGRAM"
File Operation
2
Press "DOWN" Arrow
Setup
until it gets to...
3
Press "ENTER"
Set Sequence
4
Press "DOWN" Arrow
Set RunTime
until it gets to...
5
Press "ENTER"
1. xx
Use the "UP" and "DOWN"
2. xx
arrows to view the Sequence list for
Run Time
6
Press "ENTER"
1. Play Time
Select the file to set run time
2. Play Weeks
Set Play Time step 7~8, set Play Weeks setp9~10
7
Use the "UP" and "DOWN"
1. Play Time
arrows to set Time or Weeks
8
Set Play Time
[00:00-00:00]
Enter in the times by
changing)
moving the cursor with the "LEFT" and
[11:00-13:00]
"RIGHT" arrows and use the numeric
changing)
buttons to enter the time
the left “00:00” is the Start time
the right “00:00” is the End time
9
Press "DOWN" Arrow
2.Play weeks
until it gets to...
10
Set Play Weeks
[*] means Select
Use the "UP" and "DOWN"
[ ] means Cancel
arrows to select Weeks
Press “Space” to select or Cancel
20
(before
(after
Remote Control User’ s Manual
11
Press "SAVE&EXIT"
3.8 Deleting Messages
Once you are done using a certain message, you can delete that entire message, and
then reuse that file name to create a different message.
Table 7: Deleting Messages
Step
Function
Display Will Read...
1
Press "PROGRAM"
File Operation
2
Press "ENTER"
Delete File
3
Press "ENTER"
1.Text File
2.String File
3.Picture File
4.Array File
5.FLW File
6.ESC to Return
4.
Example Text File
Press "UP" and "DOWN"
arrows until you find type of the
file you want to delete
5.
Press "ENTER"
1.xxx
2.xxxxx
3…..
6
Example: 1.123.Nmg
Press "UP" and "DOWN"
arrows until you find the
file you want to delete
7
8
Press "ENTER"
Use your "LEFT" and
DelSure? (Y/N)
"RIGHT"
DelSure? (Y/N)
arrows to select either Y=Yes or
N=No
9
Press "ENTER"
1.xxx
2.xxxxx
21
Remote Control User’ s Manual
3…..
10
Either select another file
name and follow steps 3-6 or Press
"ESC" until you get back to the
display mode
22