1
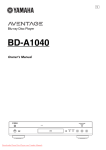
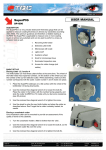
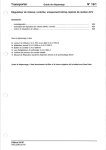
M090 REV. D
PRODUCT MANUAL - M090
MODEL 203/266 ELECTRIC CAN OPENER
Please read thoroughly before operation and keep for future reference
1
M090 REV. D
SAFETY
CAUTION: SEVERED CAN LIDS HAVE “CUTTING” EDGES. USE OF A PROTECTIVE
GLOVE OR TONGS IS ADVISED WHEN HANDLING LIDS.
WARNING
To avoid risk of electrical shock, this slicer must be
grounded and plug must not be altered.
Grounding/Earthing Instructions
Slicer MUST be grounded. Grounding reduces risk of electric shock by providing an escape
wire for the electric current, if a electrical short occurs. This slicer is equipped with a cord
having a grounding wire with a grounding plug. The plug must be plugged into an outlet that
is properly installed and grounded.
LABELS
L009—Caution Label
Please read thoroughly before operation and keep for future reference
2
M090 REV. D
I. SPECIFICATIONS
MODEL NO.
203
266
POWER
REQUIREMENTS
NORMAL SPEED
LOW SPEED
SIZE
115 VOLT, 3 AMP, 50-60HZ
230 VOLT, 1.5 AMP, 50-60 HZ
200-250 RPM
150-200 RPM
4 - 3/8" W X 7" D X 12" H
(111mm x 178mm x 305mm)
13 lbs. (5.85 kg.)
115 VOLT, 3 AMP, 50-60HZ
230 VOLT, 1.5 AMP, 50-60 HZ
200-250 RPM
NONE
4 - 3/8" w X 7" D X 12" H
(111mm x 178mm x 305mm)
12-3/4 lbs. (5.75 kg.)
WEIGHT
II. CAN OPENER DESCRIPTION
The Models 203/266 electric can openers, manufactured by the Edlund Company, are approved
by the appropriate certifying organizations. The two models differ only in that the model 266 can
opener operates at a single speed while the model 203 can opener operates at the normal speed
and a slower speed so that it is easier to open smaller or difficult to open cans.
The model 203/266 can openers are table-type openers with a weighted base to
offset the weight of a full No. 10 can. The external housing and knife holder are manufactured
from stainless steel.
III. CAN OPENER OPERATION
To operate, plug the power cord into a grounded outlet with the same voltage as listed on the
back of the can opener. If you are opening a standard seven-inch high no. 10 can, slide the can
against the can opener drive gear and push the handle back to its locked-down position.
The can opener motor will start after the can bead is captured between the knife and drive gear
and before the knife pierces the can. The can will start to rotate, and after one full revolution the
lid will be severed from the can. After the lid is completely severed from the can, pull the handle
forward to stop the can opener motor. If for some reason the lid is not completely severed or if
the can is ejected from the gear, consult the maintenance instruction and/or trouble-shooting
guide later in this manual.
To open a shorter can, the operator must support the can on his left or right hand, place the bead
or rim of can’s top over the drive gear, and push the handle back to its locked down position so
that the can is held firmly between the knife and gear. The supporting hand should then be
removed completely from the can until the can lid us completely severed from the can. If the
operator restricts the rotation of the can by holding on to the can, the can opener may reject the
can. After the can is opened pull forward on the handle and grasp the can simultaneously. If a
small can is not opened properly, consult the troubleshooting guide.
CAUTION: SEVERED CAN LIDS HAVE “CUTTING” EDGES. USE OF A PROTECTIVE
GLOVE OR TONGS IS ADVISED WHEN HANDLING LIDS.
Please read thoroughly before operation and keep for future reference
3
M090 REV. D
IV. CLEANING AND MAINTENANCE INSTRUCTIONS
The can openers must be kept clean, not only for the obvious reasons of sanitation but more
important, for operational reasons as well. An electric can opener’s rotary knife must rotate
freely for the can opener to operate properly. If the knife is bound by residual food product, the
knife will not rotate and wear will not be distributed around the periphery of the knife.
More important than the wear, a non-rotating knife will no longer be shearing the metal can top
as designed and metal slivers may occur.
The knife (K006) should be removed often by unscrewing the knife stud (S196) from the knife
holder (H072) so that the knife, knife stud and knife holder can be properly cleaned. Clean the
knife holder by wiping off the knife holder protrusion with a damp cloth. To greatly reduce the
chances of the knife sticking and rusting after cleaning, lubricate the knife stud, knife holder
protrusion, and hub of the knife with vegetable oil. Replace the knife with the smaller diameter
hub meeting the machined boss of the knife holder.
Be sure the knife is rotating easily after parts are reassembled.
The factory-made edge of the can opener knife is designed to shear through the metal can lid. It
will not function properly if allowed to become dull or nicked. If knife becomes excessively
dull, it will be difficult to pierce the can and the knife will no longer sever the lid completely at
the end of the cut. Replace the knife when it becomes excessively dull or if nicks occur on the
cutting edge.
Warning: The can opener knife is not designed to be sharpened. If the knife-edge is made truly
burr-free it can shave off slivers.
The teeth of the drive gear must be clean and burr free. Wipe off the drive gear with a damp cloth
after every use to remove the build-up of food residues. Coat the drive gear with vegetable oil to
prevent rusting. If the drive gear starts to slip on the bead of the can its teeth may be worn. To
replace it, give the gear a quick rap counter clockwise with Edlund gear removal tool (T140) until
it can be removed (otherwise, turning the gear will only rotate the motor), then screw a new drive
gear on clockwise until it is up against the output shaft shoulder. Verify gap between gear and
knife spacing.
T140
Caution: Thin spacers washers (W034, W140, W141) are often used to control the gap or spacing
between the knife and the gear. Inspect the worn gear when removed to be sure spacer
washers are not stuck to the gear. If they are present clean them and return them to the
output shaft behind the gear.
If for any reason the can opener does not function properly, consult the troubleshooting guide
for assistance or contact an authorized service agent. Do not operate damaged can openers.
Please read thoroughly before operation and keep for future reference
4
M090 REV. D
V. TROUBLESHOOTING
A qualified technician should do all internal repairs.
Problem
Cause
I. Can opener will
not start.
1. Cordset not plugged into outlet.
1. Plug cordset into grounded outlet with same
voltage as listed on rating label located on back of
opener.
2. Circuit breaker tripped
2. Reset breaker, if breaker continues to trip,
replace breaker (A640).
3. Inoperative actuating switch
3. Replace switch (S229).
4. Motor may have failed.
6. Broken two speed switch (Model
203 only)
4. Check motor and replace as necessary with
appropriate voltage motor/geartrain.
5. Check wiring for continuity and repair or replace
as required.
6. Replace switch assembly and diode pak.
(A2813P, A586)
7. Cordset has broken wire.
7. Check for continuity and replace as required.
1. Clearance between back of knife
and front of gear too large (see
sketch.)
1. With handle in locked-down position check
clearance between back of knife and front of gear
using flat feeler gauge. Clearance should be 0.0010.005. Shim gear with W034, W140, or W141
washer to obtain clearance. Use Edlund Tool T140
to remove knife gear.
2. Screw down on S086 adjusting screw until motor
comes on when bottom of knife is at top of gear
teeth to half way down teeth of gear (G006).
5. Broken wires or loose terminals.
II. Can opener
rejects cans.
Correction
2. Motor actuates too soon.
3. Knifeholder is sticking.
4. Knife not rotating.
3. If knifeholder does not move all the way down,
switch will come on too soon. Remove and clean
knifeholder and mounting surface. Lubricate with
non-sticking vegetable oil.
4. Remove knife and knife stud, clean and lubricate
using non-sticking vegetable oil. Replace knife and
knife stud. Knife must rotate freely.
Please read thoroughly before operation and keep for future reference
5
M090 REV. D
III. Drive gear will 1. Worn drive gear.
not turn can.
1. Replace gear (G006). Use Edlund Tool (T140)
to remove knife gear.
2. Check clearance. If clearance is larger than
2. Clearance between top of drive
gear and radius at back of knife larger 0.120 replace knifeholder (H072) and check
clearance. If clearance still too large, check linkage
than 0.120.
assembly. Assembly (A580DC) may be worn.
IV. Slivers found
on can lid or in
food product.
V. Knife will not
sever lid
completely.
3. Bent knife stud.
3. Replace stud (S196).
4. Worn knife stud hole in knife
holder.
5. Gear in gear train broken loose
from pinion.
4. Replace knifeholder (H072).
6. Threaded hole in spring block
(B057) distorted.
5. If motor runs but output shaft doesn't rotate,
replace as motor/gear train as necessary PER
VOLTAGE.
6. If linkage assembly not worn, check for distorted
hole in spring block.
7. Worn can stop on knifeholder.
7. Replace knifeholder (H072).
1. Factory knife edge altered or
nicked.
1. Replace knife (K006).
2. Knife doesn't rotate.
2. Remove knife from knifeholder, clean knife,
knife stud and knife mounting surface. Lubricate
with non-sticking vegetable oil. If knife still doesn't
turn, replace knifeholder (H072).
3. Burred edge on knifeholder can
stop.
3. Check knifeholder for burred edge or grooves on
can stop. Replace as required.
4. Drive gear is slipping or milling
(removing metal from can bead).
4. See Problem III-2.
1. Dull knife.
1. Replace knife (K006).
VI. Cans will not fit 1. Worn foot pads.
under knife when
can opener is off.
2. Broken or weak return spring
1. Replace as necessary (P001).
2. Check return spring (S166), and replace as
required.
Please read thoroughly before operation and keep for future reference
6
M090 REV. D
203/266 Electric Can Opener—Exploded View—(115 V)
Please read thoroughly before operation and keep for future reference
7
M090 REV. D
203/266 ASSEMBLY AND PARTS LIST--115V
QTY PART NUMBER DESCRIPTION
1
A2813P
ASSEMBLY, SWITCH, HI/LOW--203 ONLY
1
A580DC
ASSEMBLY, LINKAGE, ENGAGEMENT
1
A586
ASSEMBLY, SPEED CONTROL DIODES--203 ONLY
1
A587
WELDMENT, BASE/CHANNEL
1
A588DC
1
A640
ASSEMBLY, WIRING HARNESS FOR CIRCUIT BREAKER
1
A641
ASSEMBLY, CORD, 115V
1
B057
BLOCK, SPRING
1
B410
BREAKER, THERMAL, 1.2 A
1
C107M
COVER, OUTSIDE, 203
1
C108M
COVER, OUTSIDE, 266
1
G006
GEAR, DRIVE, ECO
1
H072
KNIFE HOLDER, SS
1
I004
INSULATOR, SWITCH PAD
1
K006
KNIFE, ECO
1
K012
KNOB, HANDLE
2
N011
NUT, #4-40 BRASS
2
P029
ROLL PIN, 1/8 X 9/16 SS (18-8)
1
R023
STRAIN RELIEF, ELECTRIC CORD
2
S049
SCREW, #10-32 X 3/8, SS HEX HEAD
2
S061
SCREW, #8-32 X .25 HEX HEAD, SS
1
S145
SPACER, KNIFE HOLDER
1
S161
SPRING, KNIFE BLOCK
1
S166
SPRING, ENGAGEMENT RETURN
2
S167
SPRING, TENSION
1
S196
STUD, ECO KNIFE
1
S229
SWITCH, LEAF
1
S760
SCREW, #10-32 X 3/8 SS HEX HD INDENTED HEX
2
T021
TRACK, SLIDE
1
W018
WASHER, #10 LOCK, PLATED
2
1
1
1
W019
W034
W140
W141
WASHER, #4 INTRL TOOTH LOCK, SS
WASHER, DRIVE GEAR SPACER. 0.010 THICK
WASHER, DRIVE GEAR SPACER, 0.005--AS NEEDED
WASHER, DRIVE GEAR SPACER, 0.003--AS NEEDED
ASSEMBLY, MOTOR/GEAR TRAIN, 115V
Please read thoroughly before operation and keep for future reference
8
M090 REV. D
203/266 Electric Can Opener—Exploded View—(230 V)
Please read thoroughly before operation and keep for future reference
9
M090 REV. D
203/266 ASSEMBLY AND PARTS LIST --230V
QTY
PART NUMBER DESCRIPTION
1
A1040
COVER, OUTSIDE, 203, 230V
1
A1045
COVER, OUTSIDE, 266, 230V
1
A2831P
ASSEMBLY, HIGH/LOW SWITCH--203 ONLY
1
A580DC
ASSEMBLY, LINKAGE, ENGAGEMENT
1
A586
ASSEMBLY, SPEED CONTROL DIODES
1
A587
WELDMENT, BASE/CHANNEL
1
A593DC
1
A640
ASSEMBLY, WIRING HARNESS FOR CIRCUIT BREAKER
1
B057
BLOCK, SPRING
1
B410
BREAKER, THERMAL, 1.2 A
1
F088
FILTER, EMI
1
G006
GEAR, DRIVE, ECO
1
H072
KNIFE HOLDER, SS
1
I004
INSULATOR, SWITCH PAD
1
K006
KNIFE, ECO
1
K012
KNOB, HANDLE
2
N011
NUT, #4-40 BRASS
2
P029
ROLL PIN, 1/8 X 9/16 SS (18-8)
2
S049
SCREW, #10-32 X 3/8, SS HEX HEAD
2
S059
SCREW, #6-32 X .25 HEX HEAD,SS
2
S061
SCREW, #8-32 X .25 HEX HEAD,SS
1
S145
SPACER, KNIFE HOLDER
1
S161
SPRING, KNIFE BLOCK
1
S166
RETURN SPRING
2
S167
SPRING, TENSION
1
S196
STUD, ECO KNIFE
1
S229
SWITCH, LEAF
1
S760
SCREW, #10-32 X 3/8 SS HEX HD INDENTED HEX
2
T021
TRACK, SLIDE
1
2
1
1
1
W018
W019
W034
W140
W141
WASHER, #10 LOCK, PLATED
WASHER, #4 INTRL TOOTH LOCK, SS
WASHER, DRIVE GEAR SPACER--0.010 THICK
WASHER, DRIVE GEAR SPACER, 0.005--AS NEEDED
WASHER, DRIVE GEAR SPACER, 0.003--AS NEEDED
ASSEMBLY, MOTOR/GEAR TRAIN, 230V
Please read thoroughly before operation and keep for future reference
10