1
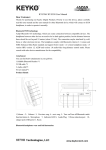
Face2Face System
Tutorial
2009
©
Abalone LLC 2009
Information
August 2009
Author’s copyright holder of the Face2Face program is Abalone LLC of Moss Beach, California..
Publishing copyright holder of the Face2Face program is Abalone LLC of Moss Beach, California.©
AbaloneLLC 2009.
Copying, merchandizing, public exhibiting or other commercial utilization of the software without
licence is strictly prohibited.
The Face2Face User’s Manual is under global author and publishing copyright.
© 2009 AbaloneLLC. This User’s Manual was written and edited by Laslo Vespremi, Abalone LLC.
Copying, extraction or translation to another language is forbidden without the written approval of
the holder of this right.
Abalone LLC.
190 Arbor Lane
Moss Beach, California, USA
Tel.:
(1) 650 302-0894
Web:
www.abalonellc.com
E-mail:
[email protected]
Distributor:
Abalone LLC
190 Arbor Lane,
Moss Beach CA 94038
USA
Web:
www.abalonellc.com
E-mail:
[email protected]
ABALONE LLC IS IN NO CASE RESPONSIBLE FOR THE DIRECT OR INDIRECT DAMAGES
ARISING FROM THE USAGE OF THE FACE2FACE PROGRAM OR THE FACE2FACE USER’S
MANUAL.
Abalone LLC and the Face2Face are the registered trademarks of Abalone LLC
Windows is the trademark of Microsoft.
The manual and illustrations were made using the Microsoft Word and Adobe Photoshop
Overview
Face2Face is a software/hardware system that shows young adults at risk how crystal
meth abuse will change their faces after 6 month, 1 year or 3 years of abuse.
This is accomplished in three steps:
1. Capture a 3D face using the stereo camera system
2. Software uses two images to create a 3D head
3. By clicking on one of the three “age” buttons software changes the shape and
texture of the 3D head to show crystal meth caused deterioration
The whole process may take 3 minutes: 1 minute for photography and two minutes for
the software to build 3D head (time dependent on the speed of the computer used).
The “before” and “after” images are shown side-by-side and can be printed via the
“Print” command. To preserve privacy images are erased from camera and computer
after use.
System requirements
Required hardware
WIN: Face2Face runs with the following minimal hardware:
A Windows-based personal computer or laptop with the following
minimal requirements:
Pentium III or IV 2 GHz (faster chips will run software faster)
2 GB RAM internal memory
True Colour video card
Screen of a resolution 1024x768
250 MB free disk space
Needed system software
Face2Face runs under the following system software:
Windows 2000, Windows XP and Windows VISTA operating systems.
To read pdf manuals Adobe Acrobat is recommended
To watch “How-to” videos Windows Media player is recommended:
Hardware Setup
Face2Face system consists of a hardware and a software component. Required hardware
includes two identical digital cameras, stereo bar, USB connector, tripod, backpaper and
a computer.
Cameras
Abalone LLC recommends the use of two identical consumer grade digital cameras.
These cameras are relatively inexpensive, ranging from $100/each to $300/each. We
tested several types of digital cameras, including the Samsung Digimax S760, the Pentax
Optio S12, as well as the more expensive mirror reflex cameras Canon Rebel EOS and
Pentax K2000 digital SLR cameras.
The main differences between the consumer grade cameras and the professional SLR
cameras is that consumer cameras seldom have a remote release option (Pentax Optio
S12 is being one of the few exceptions). However, it is acceptable to use manual shutter
button (see more in operation).
Samsung Digimax S760
Stereo Bar
The two cameras are mounted on a stereo bar. These bars are special custom-made items,
obtainable either from http://www.abalonellc.com/10quot-stero-b10.html or from
http://www.stereoscopy.com/jasper/. The cost of a stereo bar is under $100.
Tripod
Any portable tripod will serve the purpose. If portability is an issue, use lightweight
foldable tripods (shown).
USB Connector
Most cameras are delivered with cables allowing the connection of a single camera to a
single port on the computer. If you want to use a single USB port to connect both
cameras, you will need a USB hub such as shown.
Backpaper
In order for Face2Face to function properly, you need to print or buy a “Backpaper”. You
can print a backpaper using the included “backpaper” button under the Face2face
software menu. Picture should be printed in 24”x36” size on non-reflective (matt) paper.
A more durable canvas backpaper complete with four copper eyelets can be purchased
from http://www.abalonellc.com/options.html for $99.95.
The full assembly looks like this (shown the stereo bar, two cameras and tripod).
Note: The entire hardware setup (Optio S12 cameras, remote, stereo bar, canvas
backpaper, tripod) can be obtained from http://www.abalonellc.com/options.html for
$995.00.
Operation
The following chapter deals with the very simple operation of the system.
1. Setup
As a first step you need to affix the backpaper onto a wall as shown. Backpaper needs
to be put up in a “landscape” mode, with the 36” edge parallel to the floor.
IMPORTANT!! Look for this corner (below):
THIS NEEDS TO BE THE UPPER LEFT CORNER!
If you set it up wrongly, the 3D process will fail.
Affix backpaper on the wall such way that the bottom of the backpaper will be
approximately 3 feet from the ground. Set up the tripod in front also 3 feet away from
the backpaper as shown. Back of subject’s head needs to touch backpaper!
Place the two cameras on the stereo-bar. The distance between the two cameras does
not have to be exact, but approx. 6 inches.
Make sure the two cameras are lined up parallel to the stereo bar and each other.
Attach the USB cables to the cameras as shown. You also may use an USB hub to
connect the cameras to.
2. Take Picture
Camera settings with Optio S12 digital cameras:
You should set your Optio to Auto Mode.
This ensures that you get the optimal picture each time.
Set your flash on Automatic as well:
This ensures that flash will only engage when light conditions make it necessary.
If you use your cameras with the Remote option, you should set the cameras to
remote 3 second:
Set your camera height so that the lens is in level with the subject’s nose. Set your
digital camera on “Auto” which is the default mode factory setting for most cameras.
Set “timer” to 3 (or 10) second delay. (Note: In some cameras you have to set the
flash manually even in Auto mode).
Set picture quality to medium (or 1024x1024 pixels).
Make sure that the subject is centered and that you see at least 2-3 rows of the round
symbols on either side of the head.
If you have a remote shutter device, such as shown here, you can release the shutter
via the remote by reaching over the cameras and pointing back toward the sensors on
the cameras.
Remote
Firing the remote.
If your camera does not support remote shutter release, try to press down both
cameras shutter button the same time. After 5 (or 10) seconds, both cameras will fire.
NOTE! A few important hints:
When taking someone’s picture, try to avoid these three things:
3. Software
Installation:
You will simply drag from the CD the folder called F2F1.1 onto the desktop.
Connect USB connector(s) to your computer. Turn on the cameras. Your computer
will make two audible sounds indicating that extra hardware was detected. Make sure
that both cameras (volumes) are mounted (on Vista you will see the volumes appear
at the bottom of the screen).
You can also check both volumes via WIN Explorer (right click on the “Start”
button):
Launch Face2Face software. When you first time use the system, you will need to set
the “Preferences” under the “File” menu.
We recommend the following settings:
1. Load Pictures – set to “Automatically downloads and removes latest pictures from
digital cameras via USB”.
2. Select Archive Folder (use “Browse” button to find
“c:/…/Desktop/F2F1.1/Archive))
3. Background Elimination – set to Automatic.
4. Check “Remember my selection”.
Now you are ready to create the 3D head. Click on “Next” (or CNTR-N). The
software will automatically download the pictures from the cameras and start to build
the 3D head.
NOTE: performance will depend on the speed of your processor. Face2Face was
tested to create a finished head in 2:30 min running on 2.4 GHz Intel Duo processor.
(This is a screenshot of the Control Panel/Systems screen where you find info about
your processor’s speed).
Once the computer finished preparing the 3D head, you will see the following screen:
Follow instruction appearing on the small instruction screen in the upper left corner:
1. First place a dot on the corner of the left eye
2. Place a dot on the corner of the right eye
3. Place a dot on the middle of the chin.
Once you placed these three points, the application will place another 27 dots to describe
features on the face (nostrils, chin, etc.).
Move dots if needed to the right place on the head. Once finished, click OK. (If you miss,
click on “Again” and you can do the placement again).
After you finished, the next (final) screen shows two 3D heads side-by-side, like this:
TIPS:
•
•
•
You can zoom in and out using the middle mouse button (or wheel).
To pan the head use the left mouse button.
To rotate head use the right mouse button.
Now you are ready to click on any of the 3 “Age” buttons: 6 month, 1 year and 3 years.
See how the head on the right changes!
You can print the picture using the “Print” command under “File”.
Test Software
We have included a test file called “009.jpg” so that you can test the software even before taking
any pictures.
Please follow these steps:
1. Launch Face2Face software.
2. Open “Preferences” under the “File” menu.
3. Check top box: Manual (Select all separately or select an archived double picture)
4. Check “Background elimination” (on).
5. Click “OK” (Note: next time, when cameras are attached, reset Preferences to Automatic
as shown on page 15 of this manual)
6.
7. Now click on “Next” under the “File” menu (or use Control-N).
8. Browse for the Face2Face folder and open the enclosed test picture “009.jpg”.
9. A progress bar will appear and show the progress of the 3D generation.
10. In about 3 minutes you should see a completed 3D head that looks like this:
11. From this point follow the steps outlined in the manual ( page 17-19).
Additional Notes/Trouble Shooting
TroubleShooting:
F2F crashes:
The software is very stable. However, there are a few possible reasons that can cause a
crash:
1. Only one of the images is loaded. This will happen if only one of the cameras is
connected or mounted to the computer. Please check to make sure that both
cameras appear as separate mounted volumes on your computer. Faulty USB hubs
can also create the same problem.
2. Only one of the cameras fired. This can happen if the shutter is not depressed on
both cameras or, in case of the remote, the remote was not pointing at the IR eye
on the camera.
3. Backpaper out of focus. For F2F to work properly, it needs to recognize the
symbols on the backpaper. Using “Auto” settings will focus with most moden
digital cameras. However, if you have the camera set on “manual” for example,
focus problems may occur. Also, overexposure with flash may “wipe out” the
backpaper. Pls. check photos that the backpaper is sharp and not over or under
exposed.
.
Solution: retake pictures. Before you have someone sit in the chair, halfway press
shutter button to focus on backpaper.
After taken the persons picture, check on camera to ensure that backpaper is sharp.
F2F head looks “funny”:
Cause: There are more than one pair of pictures in cameras. Since the two cameras have
dissimilar datum/calendar settings, the software will look for the two last time stamps
according to the cameras datum. Thus, it may pick two images from two different photo
sessions.
How to avoid: Short of setting both cameras calendar exactly the same, the best practice
is to always erase previous images and start with empty cameras. If the preferences on
Face2Face are set to “Load Pictures – set to “Automatically downloads and removes
latest pictures from digital cameras via USB” (see also on page 16 above), you will
always start with a clean camera..