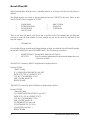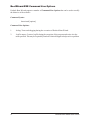
1
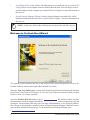
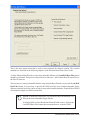
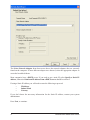
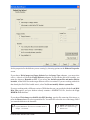
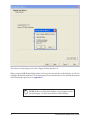
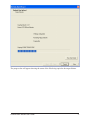
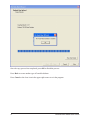
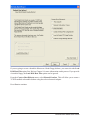
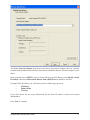
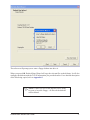
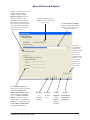
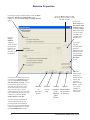
Portlock Boot Wizard User Guide 1 PORTLOCK BOOT WIZARD USER GUIDE The software described in this book is furnished under a License Agreement and may be used only in accordance with the terms of the agreement. Portlock Boot Wizard User Guide Version: 1.0 Date of Publication: June 24, 2003 ©2003 Portlock Software. All rights reserved. Any technical documentation that is made available by Portlock Software is the secure work of Portlock Software and is owned by Portlock Software, protected by copyright. NO WARRANTY. The technical documentation is being delivered to you AS-IS and Portlock Software makes no warranty as to its accuracy or use. Any use of the technical documentation or the information contained therein is at the risk of the user. Documentation may include technical, other inaccuracies or typographical errors. Portlock Software reserves the right to make changes without prior notice. No part of this publication may be copied without the express written permission of Portlock Software, 65 East Broadway 4th Floor, Butte, Montana 59701. Trademarks Portlock Software, the Portlock logo, Portlock Boot Wizard, Portlock Boot Editor, Portlock Storage Manager, Portlock Scorpion, Portlock Volume Defrag, Portlock Disk Test, Portlock Image Manager and Portlock Storage Suite are trademarks of Portlock Software. Other product names mentioned in this manual may be trademarks or registered trademarks of their respective companies and are hereby acknowledged. 2 Portlock Boot Wizard User Guide PORTLOCK PRODUCTS Portlock Storage Manager is designed to minimize the management, setup, installation, and reconfiguration time for NetWare and Windows servers. Users can copy, create, clone, image, restore, and resize DOS, NetWare, NSS, FAT 16, FAT32, and NTFS partitions and volumes. Disaster or quick recovery of failed servers is very fast and dramatically simplified. Portlock Scorpion is a solution that converts Traditional NetWare volumes to NSS (Novell Storage Services) volumes. Portlock Volume Defrag is a powerful tool for improving the layout and performance of file systems. Portlock Disk Test is a comprehensive program for testing disk drives and partitions. Portlock Storage Suite is a product bundle that includes all of our products in one attractively priced package. Portlock Storage Suite includes Portlock Storage Manager, Portlock Scorpion, Portlock Volume Defrag and Portlock Disk Test. Portlock Boot Wizard User Guide 3 CONTENTS Introduction.........................................................................................................5 Chapter 1: Load Bootable DOS Files option......................................................7 Chapter 2: Using “This Computer” option.......................................................11 Chapter 3: Using “Network Workstation/Server” option................................18 Chapter 4: Using “Manual Creation” option...................................................29 Chapter 5: Using “Create a Portlock PCI Config Diskette” option................35 Chapter 6: Using “Load a Portlock PCI Config Diskette” option...................41 Chapter 7: Using “Create a Boot Diskette for Portlock Storage Manager” option............................................................................................45 Appendix A: Detailed Menu Descriptions........................................................49 Appendix B: Portlock Boot Wizard FAQ.........................................................53 Appendix C: Notes on PCISCAN.DAT.............................................................57 Appendix D: Microsoft Remote Registry Service............................................59 Appendix E: Requirements to run Portlock Boot Wizard...............................61 Appendix F: Interfacing your Boot Diskette with Portlock Storage Manager...................................................................................63 Appendix G: Novell TCP/IP Client 32 Configuration......................................65 Appendix H: Boot Wizard.EXE Command Line Options...............................67 Appendix I: Error Messages.............................................................................69 Appendix J: NetWare Server Scan...................................................................72 4 Portlock Boot Wizard User Guide PORTLOCK BOOT WIZARD USER GUIDE Introduction to Portlock Boot Wizard The primary purpose of Portlock Boot Wizard is to combine the necessary files to create a TCP/IPenabled diskette for use with Portlock Storage Manager. The Portlock Boot Wizard can create a TCP/IP-enabled diskette for the computer the user is operating from, for another computer on the network, or you can manually specify the network adapter driver to use. In most cases Portlock Boot Wizard will dynamically detect the driver associated with the adapters on the local or remote accessed systems and present the user with a choice for each adapter found on the selected system. For non-network attached computers Portlock Boot Wizard has provided a scan program that can be used from a floppy diskette inserted into the stand-alone machine to capture the network configuration information. This information can then be imported into Portlock Boot Wizard to produce the desired TCP/IP-enabled diskette. The Portlock Boot Wizard can also create the floppy diskette so that it is bootable. This requires that you provide the necessary DOS boot files from a formatted bootable floppy diskette, and Portlock Boot Wizard will retain those files to be used to allow multiple bootable diskettes to be generated for each of your storage managed systems. WARNING: This program is protected by copyright law and international treaties. Overview of Boot Diskette Options The following are the type of boot diskettes you can create using Portlock Boot Wizard: • This Computer: has the ability to create a bootable diskette tailored for the computer you are currently operating. Refer to Chapter 2 for more information on this option. • Network Workstation/Server: has the ability to create a bootable diskette specifically for a computer on your network. Refer to Chapter 3 for more information on this option. • Manual Creation: has the ability to create a bootable diskette for a specific network adapter. Refer to Chapter 4 for more information on this option. • Create Portlock Peripheral Component Interconnect (PCI) Config Diskette: gives you the ability to create a bootable diskette that can be used on a computer to retrieve PCI configuration information for the network adapter. This information can be imported into the Portlock Boot Wizard to create a TCP/IP-enabled diskette. Refer to Chapter 5 for more information on this process. Portlock Boot Wizard User Guide 5 • Load Portlock PCI Config Diskette: the information you created with Create Portlock PCI Config Diskette can be imported into the Portlock Boot Wizard. This will display a list of network adapters for the computer you scanned. Refer to Chapter 6 for more information on this process. • Portlock Storage Manager Diskette: Portlock Storage Manager executable files will be installed onto the diskette that will be created. Refer to Chapter 7 for more information on this process. NOTE: At this time, Portlock Boot Wizard does not detect ISA and EISA devices. Welcome to Portlock Boot Wizard The opening screen welcomes the user to the Portlock Boot Wizard and provides access to the Portlock Software website and Portlock Boot Wizard User Guide. When the View User Guide button is selected, the Portlock Boot Wizard will display the Portlock Boot Wizard User Guide in PDF format. To view the User Guide you must have Adobe Acrobat Reader, version 5.0 or better, installed. Select the Portlock Web Site button to go to www.portlock.com. The Portlock website includes documentation, technical support information, answers to frequently answered questions, tips and techniques, and newsletters that may help you better understand how to use Portlock products. Don’t forget to download the evaluation version of Portlock Storage Manager! With this version, you can make unlimited backup images. To download Portlock Storage Manager, go to www.portlock.com/download.htm. 6 Portlock Boot Wizard User Guide 1 CHAPTER Contains: Portlock Boot Wizard Instructions First Step: Load Bootable DOS files Portlock Boot Wizard User Guide 7 This is the main menu screen that is used to select methods for diskette creation. The creation methods are described in the following chapters of the Portlock Boot Wizard User Guide. To allow Portlock Boot Wizard to create many bootable diskettes, the Load DOS Boot Files option should be performed. This process only needs to be done once - the Portlock Boot Wizard will save the files for later use. The first step in creating a bootable diskette using Portlock Boot Wizard is to press the Load DOS Boot Files button. It is necessary to provide the DOS boot files on a formatted bootable floppy diskette so that the boot files can be reused to create other bootable diskettes. Portlock Boot Wizard will maintain a single set of DOS system files. NOTE: To load DOS system files, you will need to have the HIMEM.SYS files on the source bootable floppy diskette. To change DOS versions that Portlock Boot Wizard creates, click on the Load DOS Boot Files button after inserting the new version of DOS. 8 Portlock Boot Wizard User Guide The software will prompt you to enter a formatted floppy diskette containing the DOS system files into drive A. When you press OK, Portlock Boot Wizard will copy over the relevant DOS system files contained on the floppy diskette. The following DOS files will be copied based upon the DOS version: MS-DOS versions • • • • COMMAND.COM IO.SYS HIMEM.SYS MSDOS.SYS DR-DOS and PC-DOS versions • • • • COMMAND.COM HIMEM.SYS IBMBIO.COM IBMDOS.COM Portlock Boot Wizard User Guide 9 A dialog box will appear showing that the files have been copied and are now available to Portlock Boot Wizard to be used to create other boot diskettes. Once this has completed, press OK to finish the process. 10 Portlock Boot Wizard User Guide 2 CHAPTER Contains: Portlock Boot Wizard Instructions Create a Boot Diskette using “This Computer” Portlock Boot Wizard User Guide 11 If you are going to create a bootable diskette on a blank floppy diskette, you must select the Load DOS Boot Files option first. Refer to Chapter 1 for details on this process. If you provide a bootable floppy, the Load DOS Boot Files option can be ignored. From the Create a Boot Diskette menu, select This computer. This will allow you to create a TCP/IP-enabled or bootable diskette for the computer that the program is currently running on. Press Next to continue. 12 Portlock Boot Wizard User Guide The Select Network Adapter drop-down menu shows the network adapters that are currently found on the computer. Select the correct adapter that applies to your system. Most companies have a DHCP server. If you need to use a static IP, select Specify a Static IP address, otherwise Obtain an IP address from a DHCP server should be selected. If using a Static IP address you will need to enter the following to proceed: • IP Address • Subnet Mask • Gateway If you don’t know the necessary information for the Static IP address, contact your system administrator. Press Next, to continue. Portlock Boot Wizard User Guide 13 Set the properties for the diskette you are creating by choosing options on the Diskette Properties screen. If you choose Write image to a floppy diskette from the Image Type submenu, you must select a drive - either A or B from the Floppy Diskette submenu. If you want the disk to be bootable, you must also choose a Bootable method. If you select Yes, Install system files and make diskette bootable, all the DOS files on the target diskette will be overwritten. If you are working with a disk that already has DOS files loaded onto it, select No, Do not modify diskette system files. If you are working with a different version of DOS than the one you provided with the Load DOS Boot Files option, and your diskette already contains a HIMEM.SYS file, deselect the Copy HIMEM.SYS checkbox. If you choose Write image to a disk file (for PXE booting), type the file extension of the image, or press the Browse button to select a particular file. You must also select the size of the image, and if you want the diskette to be bootable. NOTE: You can only make a disk bootable if the required DOS Boot files have been loaded. Refer to Chapter 1 for details. 14 NOTE: The Image Size 1.44 MB is the standard floppy diskette size. Portlock Boot Wizard User Guide The software will prompt you to enter a floppy diskette into drive A. When you press OK, Portlock Boot Wizard will copy the relevant files to the diskette. It will also configure the diskette with the TCP/IP information you provided earlier. For a detailed description of the files being copied, refer to Appendix G. NOTE: If there are files on the diskette you are using to create a bootable floppy - all files on the diskette will be deleted. Portlock Boot Wizard User Guide 15 The progress bar will appear showing the status of the files being copied to the target diskette. 16 Portlock Boot Wizard User Guide Once the copy process has completed, press OK to finish the process. Press Back to create another type of bootable diskette. Press Cancel or the close icon in the upper-right corner to exit the program. Portlock Boot Wizard User Guide 17 3 CHAPTER Contains: 18 Portlock Boot Wizard Instructions Create a Boot Diskette using “Network Workstation/Server” Portlock Boot Wizard User Guide If you are going to create a bootable diskette on a blank floppy diskette, you must select the Load DOS Boot Files option first. Refer to Chapter 1 for details on this process. If you provide a bootable floppy, then the Load DOS Boot Files option can be ignored. From the Create a Boot Diskette menu, select Network Workstation/Server. This will allow you to create a TCP/IP-enabled or bootable diskette for a computer you selected that is attached to the network. Press Next to continue. Portlock Boot Wizard User Guide 19 In the Network Computers drop-down box, enter the name of the computer, server name, or IP address of the computer on the network that you want to create the diskette for. To select from a list of available computers, press the Scan Network button. 20 Portlock Boot Wizard User Guide When choosing to Scan Network, a dialog box will appear, notifying you that Portlock Boot Wizard is scanning the computer network for available computers. Portlock Boot Wizard User Guide 21 When the scan is completed, you will have a list of available detected computers in the drop-down menu for which you can create a bootable diskette. In the above example, the Total Network Computers Found was 28. Select the computer you wish to create the diskette for. Press Next to continue. 22 Portlock Boot Wizard User Guide When you choose a computer on the network, you must login and authenticate to the selected computer. After you enter the User name and Password, press OK to continue. Portlock Boot Wizard User Guide 23 The Select Network Adapter drop-down menu shows the network adapters that are currently found on the computer. If more than one adapter was detected, select the appropriate adapter to create the bootable diskette. Most companies have a DHCP server. If you need to use a static IP, select Specify a Static IP address, otherwise Obtain an IP address from a DHCP server should be selected. If using a Static IP address you will need to enter the following to proceed: • IP Address • Subnet Mask • Gateway If you don’t know the necessary information for the Static IP address, contact your system administrator. Press Next, to continue. 24 Portlock Boot Wizard User Guide Set the properties for the diskette you are creating by choosing options on the Diskette Properties screen. If you choose Write image to a floppy diskette from the Image Type submenu, you must select a drive - either A or B from the Floppy Diskette submenu. If you want the disk to be bootable, you must also choose a Bootable method. If you select Yes, Install system files and make diskette bootable, all the DOS files on the target diskette will be overwritten. If you are working with a disk that already has DOS files loaded onto it, select No, Do not modify diskette system files. If you are working with a different version of DOS than the one you provided with the Load DOS Boot Files option, and your diskette already contains a HIMEM.SYS file, deselect the Copy HIMEM.SYS checkbox. If you choose Write image to a disk file (for PXE booting), type the file extension of the image, or press the Browse button to select a particular file. You must also select the size of the image, and if you want the diskette to be bootable. NOTE: You can only make a disk bootable if the required DOS Boot files have been loaded. Refer to Chapter 1 for details. Portlock Boot Wizard User Guide NOTE: The Image Size 1.44 MB is the standard floppy diskette size. 25 The software will prompt you to enter a floppy diskette into drive A. When you press OK, Portlock Boot Wizard will copy the relevant files to the diskette. It will also configure the diskette with the TCP/IP information you provided earlier. For a detailed description of the files being copied, refer to Appendix G. NOTE: If there are files on the diskette you are using to create a bootable floppy - all files on the diskette will be deleted. 26 Portlock Boot Wizard User Guide The progress bar will appear showing the status of the files being copied to the target diskette. Portlock Boot Wizard User Guide 27 Once the copy process has completed, press OK to finish the process. Press Back to create another type of bootable diskette. Press Cancel or the close icon in the upper-right corner to exit the program. 28 Portlock Boot Wizard User Guide 4 CHAPTER Contains: Portlock Boot Wizard Instructions Create a Boot Diskette using “Manual Creation” Portlock Boot Wizard User Guide 29 If you are going to create a bootable diskette on a blank floppy diskette, you must select the Load DOS Boot Files option first. Refer to Chapter 1 for more information on this process. If you provide a bootable floppy, the Load DOS Boot Files option can be ignored. From the Create a Boot Diskette menu, select Manual Creation. This will allow you to create a TCP/IP-enabled or bootable diskette using the selected network adapter. Press Next to continue. 30 Portlock Boot Wizard User Guide The Select Network Adapter drop-down menu shows the network adapters that are currently available in the database from which you may choose to build the diskette. Select the adapter of your choice. Most companies have a DHCP server. If you need to use a static IP address, select Specify a Static IP address, otherwise Obtain an IP address from a DHCP server should be selected. If using a Static IP address you will need to enter the following to proceed: • IP Address • Subnet Mask • Gateway If you don’t know the necessary information for the Static IP address, contact your system administrator. Press Next, to continue. Portlock Boot Wizard User Guide 31 Set the properties for the diskette you are creating by choosing options on the Diskette Properties screen. If you choose Write image to a floppy diskette from the Image Type submenu, you must select a drive - either A or B from the Floppy Diskette submenu. If you want the disk to be bootable, you must also choose a Bootable method. If you select Yes, Install system files and make diskette bootable, all the DOS files on the target diskette will be overwritten. If you are working with a disk that already has DOS files loaded onto it, select No, Do not modify diskette system files. If you are working with a different version of DOS than the one you provided with the Load DOS Boot Files option, and your diskette already contains a HIMEM.SYS file, deselect the Copy HIMEM.SYS checkbox. If you choose Write image to a disk file (for PXE booting), type the file extension of the image, or press the Browse button to select a particular file. You must also select the size of the image, and if you want the diskette to be bootable. NOTE: You can only make a disk bootable if the required DOS Boot files have been loaded. Refer to Chapter 1 for details. 32 NOTE: The Image Size 1.44 MB is the standard floppy diskette size. Portlock Boot Wizard User Guide The software will prompt you to enter a floppy diskette into drive A. When you press OK, Portlock Boot Wizard will copy the relevant files to the diskette. It will also configure the diskette with the TCP/IP information you provided earlier. For a detailed description of the files being copied, refer to Appendix G. NOTE: If there are files on the diskette you are using to create a bootable floppy - all files on the diskette will be deleted. Portlock Boot Wizard User Guide 33 Once the copy process has completed, press OK to finish the process. Press Back to create another type of bootable diskette. Press Cancel or the close icon in the upper-right corner to exit the program. 34 Portlock Boot Wizard User Guide 5 CHAPTER Contains: Portlock Boot Wizard Instructions Create a Boot Diskette using “Portlock PCI Config Diskette” Portlock Boot Wizard User Guide 35 If you are going to create a bootable diskette on a blank floppy diskette, you must select the Load DOS Boot Files option first. If you provide a bootable floppy, the Load DOS Boot Files option can be ignored. From the Create a Boot Diskette menu, select Create a Portlock PCI Config Diskette to create a manual PCI scan diskette. This diskette is used to extract PCI configuration information on the computer that the created floppy is booted on. Press Next to continue. 36 Portlock Boot Wizard User Guide You must choose which Operating System the PCISCAN will operate on. If the target diskette will be run on a DOS Operating System, select DOS. If the target diskette will be run on a NetWare server, select NetWare. Press OK to continue. Portlock Boot Wizard User Guide 37 Set the properties for the diskette you are creating by choosing options on the Diskette Properties screen. If you choose Write image to a floppy diskette from the Image Type submenu, you must select a drive - either A or B from the Floppy Diskette submenu. If you want the disk to be bootable, you must also choose a Bootable method. If you select Yes, Install system files and make diskette bootable, all the DOS files on the target diskette will be overwritten. If you are working with a disk that already has DOS files loaded onto it, select No, Do not modify diskette system files. If you are working with a different version of DOS than the one you provided with the Load DOS Boot Files option, and your diskette already contains a HIMEM.SYS file, deselect the Copy HIMEM.SYS checkbox. If you choose Write image to a disk file (for PXE booting), type the file extension of the image, or press the Browse button to select a particular file. You must also select the size of the image, and if you want the diskette to be bootable. NOTE: You can only make a disk bootable if the required DOS Boot files have been loaded. Refer to Chapter 1 for details. 38 NOTE: The Image Size 1.44 MB is the standard floppy diskette size. Portlock Boot Wizard User Guide The software will prompt you to enter a floppy diskette into drive A. When you press OK, Portlock Boot Wizard will copy the relevant Operating System files and PCI Scan program to the diskette. NOTE: If there are files on the diskette you are using to create a bootable floppy - all files on the diskette will be deleted. Portlock Boot Wizard User Guide 39 A notification screen will appear informing you that your Portlock PCI Config Diskette is complete. To use this diskette, insert the disk into a computer running the same Operating System that you created the diskette for. To run PCISCAN on the NetWare server, at the server console, type “LOAD A:\PCISCAN”. Under the DOS Operating System, at the DOS prompt, type “A:\PCISCAN.EXE”. If the diskette was made bootable, reboot your system and PCISCAN.EXE will run automatically. The file PCISCAN.DAT will be created and stored on the floppy with a listing of all PCI devices in that computer. This file can then be imported into Portlock Boot Wizard to create configuration diskettes. 40 Portlock Boot Wizard User Guide 6 CHAPTER Contains: Portlock Boot Wizard Instructions Create a Boot Diskette using “Load a Portlock PCI Config Diskette” Portlock Boot Wizard User Guide 41 From the Create a Boot Diskette for menu, select Load Portlock PCI Config Diskette. The information you created in the PCISCAN.DAT file will be loaded and read into Portlock Boot Wizard. The PCISCAN.DAT file can be generated by using a diskette created from the Create Portlock PCI Config Diskette option (for information on this process, refer to Chapter 5). 42 Portlock Boot Wizard User Guide Insert the diskette containing the PCISCAN.DAT file you created through the Create a Portlock PCI Config Diskette option. Press OK to continue. Continue the process of creating a TCP/IP-enabled or bootable diskette similar to the other creation types. Portlock Boot Wizard User Guide 43 7 CHAPTER Contains: Portlock Boot Wizard Instructions Create a Boot Diskette for “Portlock Storage Manager” NOTE: If Portlock Storage Manager is not installed on the same computer as Portlock Boot Wizard, the option “Portlock Storage Manager Diskette” is disabled. 44 Portlock Boot Wizard User Guide If you are going to create a bootable diskette on a blank floppy diskette, you must select the Load DOS Boot Files option first. Refer to Chapter 1 for information on this process. If you provide a bootable floppy, the Load DOS Boot Files option can be ignored. From the Create a Boot Diskette menu, select Portlock Storage Manager Diskette. This will allow you to create a TCP/IP-enabled or bootable diskette for Portlock Storage Manager. Press Next to continue. NOTE: For the option to be available, you must have previously installed Portlock Storage Manager on the computer Portlock Boot Wizard is running on. To download Portlock Storage Manager, go to www.portlock.com/download.htm Portlock Boot Wizard User Guide 45 Set the properties for the diskette you are creating by choosing options on the Diskette Properties screen. If you choose Write image to a floppy diskette from the Image Type submenu, you must select a drive - either A or B from the Floppy Diskette submenu. If you want the disk to be bootable, you must also choose a Bootable method. If you select Yes, Install system files and make diskette bootable, all the DOS files on the target diskette will be overwritten. If you are working with a disk that already has DOS files loaded onto it, select No, Do not modify diskette system files. If you are working with a different version of DOS than the one you provided with the Load DOS Boot Files option, and your diskette already contains a HIMEM.SYS file, deselect the Copy HIMEM.SYS checkbox. If you choose Write image to a disk file (for PXE booting), type the file extension of the image, or press the Browse button to select a particular file. You must also select the size of the image, and if you want the diskette to be bootable. NOTE: You can only make a disk bootable if the required DOS Boot files have been loaded. Refer to Chapter 1 for details. 46 NOTE: The Image Size 1.44 MB is the standard floppy diskette size. Portlock Boot Wizard User Guide The software will prompt you to enter a floppy diskette into drive A. When you press OK, Portlock Boot Wizard will copy the relevant files to the diskette. It will also configure the diskette with the TCP/IP information you provided earlier. For a detailed description of the files being copied, refer to Appendix G. NOTE: If there are files on the diskette you are using to create a bootable floppy - all files on the diskette will be deleted. Portlock Boot Wizard User Guide 47 Once the copy process has completed, press OK to finish the process. Press Back to create another type of bootable diskette. Press Cancel or the close icon in the upper-right corner to exit the program. 48 Portlock Boot Wizard User Guide A APPENDIX Contains: Detailed Menu Descriptions Portlock Boot Wizard User Guide 49 Select Boot Diskette Creation Method Create a Boot Diskette Menu: This Computer: has the ability to create a bootable diskette tailored for the computer you are currently operating. Refer to Chapter 2 for more information on this option. Network Workstation/Server: has the ability to create a bootable diskette specifically for a computer on your network. Refer to Chapter 3 for more information on this option. Manual Creation: has the ability to create a bootable diskette for a specific network adapter. Refer to Chapter 4 for more information on this option. Create Portlock Peripheral Component Interconnect (PCI) Config Diskette: gives you the ability to create a bootable diskette that can be used on a computer to retrieve PCI configuration information for the network adapter. This information can be imported into the Portlock Boot Wizard to create a TCP/IP-enabled diskette. Refer to Chapter 5 for more information on this process. Load Portlock PCI Config Diskette: the information you created with Create Portlock PCI Config Diskette can be imported into the Portlock Boot Wizard. This will display a list of network adapters for the computer you scanned. Refer to Chapter 6 for more information on this process. Portlock Storage Manager Diskette: Portlock Storage Manager executable files will be installed onto the diskette that will be created. Refer to Chapter 7 for more information on this process. The Load DOS Boot Files option must be selected in order to create bootable diskettes. If the checkbox is checked and disabled, as in this example, you will know you have already completed this process. Also, it displays the version of DOS and HIMEM.SYS that is loaded. Refer to Chapter 1 for more information on this process. 50 Opens the Portlock Boot Wizard User Manual in PDF format. You must have Adobe Acrobat Reader, version 5.0 or better, installed in order to view the manual. Returns to previous screen. Advance to next step. Cancels operation, exits Portlock Boot Wizard. Specific documentation on operation in question. Portlock Boot Wizard User Guide Select Network Adapter Displays the number of Network Adapters detected. When creating a diskette using the Manual Creation option, the number of adapters in the Portlock Boot Wizard Adapter Driver Database is shown. You may select any adapter from the drop-down menu. That adapter is the one that will be used in creating the diskette. Displays the name of the computer you are creating the diskette for. The Select Network Adapter submenu displays the Network Adapter you will be using to create the diskette. Opens the Portlock Boot Wizard User Manual in PDF format. You must have Adobe Acrobat Reader, version 5.0 or better, installed in order to view the manual. The IP Address Type menu, offers you two options. You must select either Obtain an IP address from a DHCP server if you are working from a DHCP server; or Specify a Static IP address, if you need to use a static IP address. If using a Static IP address, you will need to enter the IP Address, Subnet Mask, and the Gateway address. Portlock Boot Wizard User Guide Returns to previous screen. Advance to next step. Cancels Specific operation, documentation exits on operation Portlock in question. Boot Wizard. 51 Diskette Properties If creating an image for PXE booting, select the Write image to a disk file (for PXE booting) option. Otherwise, select the Write image to a floppy diskette option. Press the Browse button to find the image file you will be creating for PXE booting. If you select Write image to a disk file (for PXE booting), indicate the desired Image Size for the image you are creating. 1.44 MB is the standard floppy diskette size. From the Floppy Diskette submenu, select the drive the diskette is loaded in. If a drive is not detected, it will be disabled. If you want the diskette to be bootable, you must select a Bootable method. If you select Yes, Install system files and make diskette bootable, you will be prompted for file removal. If you select OK, all the DOS files on the target diskette will be overwritten. Also, the DOS version you have loaded is displayed. If you are working with a disk that already has DOS files loaded onto it, select No, Do not modify diskette system files. If you don’t have the necessary DOS Boot files loaded onto your diskette, then do so by pressing the Load DOS Boot Files button. Returns to previous screen. Advance to next step. Cancels Specific operation, documentation exits on operation Portlock in question. Boot Wizard. Opens the Portlock Boot Wizard User Manual in PDF format. You must have Adobe Acrobat Reader, version 5.0 or better, installed in order to view the manual. If you are working with a different version of DOS then the one you provided with the Load DOS Boot Files option, and your diskette already contains a HIMEM.SYS file, deselect the Copy HIMEM.SYS checkbox. 52 Portlock Boot Wizard User Guide B APPENDIX Contains: Portlock Boot Wizard FAQ Portlock Boot Wizard User Guide 53 Q) What is the purpose of the Portlock Boot Wizard? A) The Portlock Boot Wizard has several purposes: • Create a TCP/IP boot diskette preconfigured for a particular network adapter for Portlock Storage Manager. - Portlock Storage Manager supports TCP/IP communication for Remote Control, Server-to-Server Migration, Image Creation and Image Restoration. The process of creating the TCP/IP Boot Diskette is complicated, requiring knowledge about the Novell Client32 files, NetWare LAN drivers, etc. By automating this procedure, customers will have a better experience with Portlock products. • Create a Portlock Storage Manager diskette with the correct files for execution under DOS. - Portlock Storage Manager executes on NetWare as an NLM (NetWare Loadable Module) or on DOS. Determining which files to copy to a diskette is not intuitive and requires consulting the user guide. • Create a Bootable Image File to be downloaded as part of the PXE boot process. - Most computers and servers manufactured since 1998 have the ability to boot from the network using the PXE (Preboot Execution Environment) and TFTP (Trivial FTP Protocol). Portlock Boot Wizard can create image files that can then be downloaded and executed by a remote computer. Future Portlock products, including Portlock Boot Server and Portlock Console, will support full remote booting/control of computer systems. Q) What are the system requirements to install Portlock Boot Wizard? A) Portlock Boot Wizard can be installed on Windows 98 / NT / ME / 2000 / XP / 2003. Q) Why doesn’t the Portlock Boot Wizard include MS-DOS? A) MS-DOS is a copyrighted Microsoft product that would require royalties. Portlock Boot Wizard includes an automated method of loading and saving the DOS files for creating bootable diskettes and image files. Q) What is the best version of DOS to use? A) MS-DOS is no longer being developed by Microsoft. The most compatible version of DOS is Microsoft’s MS-DOS. Portlock recommends using the version of MS-DOS from Windows 98 Second Edition. Portlock Boot Wizard also supports creating bootable diskettes and image files with IBM’s PC-DOS and DR-DOS. 54 Portlock Boot Wizard User Guide Q) Why is HIMEM.SYS required? A) HIMEM.SYS, which is a memory manager, is not required for all Portlock Boot Wizard operations. • The Novell Client32 TCP/IP stack requires a memory manager. • Portlock Storage Manager does not require a memory manager. - Portlock Storage Manager has its own built-in memory manager and we do not recommend loading HIMEM.SYS from CONFIG.SYS for Portlock Storage Manager, as this will limit the amount of physical memory that can be accessed. Q) What is PCISCAN? A) PCISCAN.EXE and PCISCAN.NLM are software tools that scan the system’s PCI bus, recording the PCI devices that it finds. These tools can be used on any DOS or NetWare system to determine which network adapters are installed. By creating a file ‘PCISCAN.DAT’, Portlock Boot Wizard can load this file and then determine the network adapter to use. Q) What is PCISCAN.SYS and why does Portlock Boot Wizard recommend using it? A) The PCISCAN.SYS is a Windows device driver for Windows NT / 2000 / XP / 2003 that supports directly accessing the PCI bus on Windows-based systems. If this device driver is not installed, then Portlock Boot Wizard will attempt to determine the PCI devices from the Windows registry. Windows NT does not keep PCI device information in its registry, so this driver is required if the Portlock Boot Wizard is installed on Windows NT. Q) How does Portlock Boot Wizard scan other computer systems? A) Portlock Boot Wizard uses various methods depending on the target operating system. Note: You may be required to login or authenticate with a remote computer system. • DOS: Remote scanning is not supported. - Create a PCISCAN diskette, execute PCISCAN from DOS and then load PCISCAN.DAT PCI device information with Portlock Boot Wizard. • Windows 95: Remote scanning is not supported. - Create a PCISCAN diskette, execute PCISCAN from DOS and then load PCISCAN.DAT PCI device information with Portlock Boot Wizard. • Windows NT: Remote scanning is not supported. • Windows 98 / ME / 2000 / XP / 2003: Portlock Boot Wizard uses the Remote Registry Service to access the PCI device information stored in the Window’s registry. • NetWare 3.x: Remote scanning is only supported if the NLM portlock.nlm is loaded manually. • NetWare 4.x thru 6.5: Portlock Boot Wizard uses NCP (Novell Core Protocols) to install and execute the Portlock NLM (portlock.nlm) on the target NetWare server. Using NCP, a request is made to portlock.nlm to scan the PCI bus and return the PCI devices found. Once the scan is complete, portlock.nlm is unloaded. Portlock Boot Wizard User Guide 55 Q) How do I modify an Image File once I have created it? A) Use the Portlock Boot Editor™ to create / manage / modify image files. Q) How do I boot a remote machine using an image file that I have created? A) Use the Portlock Boot Server™ to manage booting remote machines. The Portlock Boot Server™ supports PXE and TFTP protocols embedded in most modern computer systems. Note: You may need to enable PXE boot capabilities on each Workstation / Server in their BIOS setup. This Portlock FAQ can also be found online at http://www.portlock.com/products/BootWizard/faq.htm. 56 Portlock Boot Wizard User Guide C APPENDIX Contains: Notes on PCISCAN.DAT Portlock Boot Wizard User Guide 57 Overview PCISCAN.DAT is the file that contains information about the PCI devices on a machine. Each line in the file represents a single PCI device. Each line contains six fields. These fields represent, in order: Device Type, Vendor ID, Device ID, Subvendor ID, Subsystem Device ID and Revision ID. Brief introduction of Fields Device Type represents the class of PCI devices. For instance, Device Type 01 is a storage device, and Device Type 02 is a network device. Vendor ID is used to identify the manufacturer of the device. Device ID is used in identifying the device. Together with the Vendor ID, the Device ID uniquely identifies the particular device model. Subsystem Vendor ID and Subsystem Device ID are used to uniquely identify and provide a mechanism for add-in adaptor vendors to distinguish their devices. Revision ID is the latest revision of the device. Contacting Portlock Software Should Portlock Boot Wizard not recognize your adapters, please ensure that you are running the latest version of Portlock Boot Wizard by visiting our website. If your adapters are still not being recognized by the software, please send the PCISCAN.DAT file (created with the Create a Portlock PCI Config Diskette option) to [email protected]. Please add a description of the adapters if this information is available. Also, remember to attach the file PCISCAN.DAT. 58 Portlock Boot Wizard User Guide D APPENDIX Contains: Microsoft Remote Registry Service “Operating Portlock Boot Wizard on Windows 98” Portlock Boot Wizard User Guide 59 Running Portlock Boot Wizard on Windows 98 If you are operating on a system that runs Windows 98, you must install Microsoft Remote Registry Service to use Portlock Boot Wizard. For details on using Microsoft Remote Registry visit Microsoft’s website at http://msdn.microsoft.com/library/default.asp?url=/library/en-us/sysinfo/base/ regconnectregistry.asp. The following steps show you how to install Microsoft Remote Registry Service onto your OS: 1. Double-click the file REMOTE.EXE. This will cause it to decompress itself. WARNING: Make sure that you are running this .EXE file in an empty folder or on a blank formatted diskette. Do not run this .EXE file in your \WINDOWS or \WINDOWS\SYSTEM folder. 2. To install this service, use the Network option in Control Panel, click the Add button, select Service as the type of network component to install, click the Add button, click the Have Disk button, and install from the folder that REMOTE.EXE was run. (Similar directions are in the REGSERV.TXT file.) 3. Once you have installed the files, you can delete the REMOTE.EXE file. 60 Portlock Boot Wizard User Guide E APPENDIX Contains: Requirements to run Portlock Boot Wizard Portlock Boot Wizard User Guide 61 Requirements: To run Portlock Boot Wizard, the following requirements apply: 1. Floppy diskette. 2. For bootable diskettes, a DOS Operating System of your choice must be available on a diskette. 3. Portlock Boot Wizard can be run on Windows 98/ME/2000/XP/2003. 4. For support on Windows 98 you will need to add the Windows 98 Remote Registry Service. This will need to be installed if you want to either scan another Windows 98 workstation, or if you have installed Portlock Boot Wizard to be able to scan a remote Windows workstation/ server. 5. In order to scan NetWare servers you will need to have Novell Client32 installed on the workstation from which you are running Portlock Boot Wizard. 6. For Windows NT, we only support Windows NT 4.0 SP6. 62 Portlock Boot Wizard User Guide F APPENDIX Contains: Interfacing your Boot Diskette with Portlock Storage Manager Portlock Boot Wizard User Guide 63 Interfacing your Boot Diskette with Portlock Storage Manager In order for Portlock Storage Manager to interface to TCP/IP in DOS mode you need to create a TCP/IP boot diskette. Use Portlock Boot Wizard to create the relevant TCP/IP boot diskette and boot up your computer. Once the diskette has been booted and it has an IP address, you can take out the TCP/IP boot diskette and insert the diskette that contains Portlock Storage Manager. You can use Portlock Boot Wizard to create the diskette or you can create the diskette yourself. If the diskette is created by Portlock Boot Wizard, it will copy the files off the Portlock Boot Wizard computer to a floppy diskette. The source directory used to copy the files is from the installation of Portlock Storage Manager (available from www.portlock.com/download.htm). It will copy over the following files: STORMGR.EXE The DOS executable to load Portlock Storage Manager STORMGR.CLM Compressed NLM that is decompressed during load by STORMGR.EXE STORMGR.LIC License file for Portlock Storage Manager which would have been emailed to you when you purchased the software TCPIPN.NLM TCP/IP support module for Portlock Storage Manager which allows it to interface with the Novell Client32 DOS TCP/IP stack Note: If you choose to make the Portlock Storage Manager diskette bootable, it may not be possible to copy the files depending on the amount of space the DOS boot files require on the diskette. 64 Portlock Boot Wizard User Guide G APPENDIX Contains: Novell TCP/IP Client32 Configuration Portlock Boot Wizard User Guide 65 Novell Client32 When Portlock Boot Wizard creates a bootable diskette, it will copy all of the relevant files to a diskette. The following files are copied to the boot diskette into the \CLIENT32 directory. These are the Novell Client32 files for support of TCP/IP: • • • • CMSM.NLM ETHERTSM.NLM LANSUP.NLM LSLC32.NLM • • • NBIC32.NLM NIOS.EXE TCPIP.NLM There is one other file that is copied over that is specific to the LAN Adapter that was detected/ selected to create the boot diskette. For this example we will use the driver for the Intel 10/100 network adapter. • CE100B.LAN Several other files are created on the floppy diskette to allow it to load the Novell Client32 (besides the normal CONFIG.SYS and AUTOEXEC.BAT). The files that are created are: • • STARTNET.BAT: This batch file loads Novell Client32. NET.CFG: This file contains information for the network adapter that was selected to be built. The NET.CFG created by DHCP Configuration is displayed below: Protocol TCPIP: ; DHCP Config IF_CONFIGURATION DHCP LAN_NET PATH TCP_CFG A:\CLIENT32\TCP TCP_RCV_WINDOWSZ 32768 ARP_CACHE_MAX 128 BIND CE100B The NET.CFG created by Static IP Address Configuration is below: Protocol TCPIP: ; Static IP Config IF_CONFIGURATION STATIC LAN_NET PATH TCP_CFG A:\CLIENT32\TCP TCP_RCV_WINDOWSZ 32768 ARP_CACHE_MAX 128 IP_ADDRESS 192.168.1.100 IP_NETMASK 255.255.255.0 IP_ROUTER 192.168.1.1 BIND CE100B 66 Portlock Boot Wizard User Guide H APPENDIX Contains: BootWizard.EXE Command Line Options Portlock Boot Wizard User Guide 67 BootWizard.EXE Command Line Options Portlock Boot Wizard supports a number of Command Line Options that can be used to modify the behavior of the software. Command Syntax: · bootwizard [options] Command Line Options: 1. -debug: Turns on debugging during the execution of Portlock Boot Wizard. 2. -logfile=name: Creates a logfile during the execution of the program and writes it to the name specified. This may be required by Portlock Technical Support to help resolve a problem. 68 Portlock Boot Wizard User Guide I APPENDIX Contains: Error Messages Portlock Boot Wizard User Guide 69 Possible Error Messages using Portlock Boot Wizard: The following section explains possible error messages you may receive when operating Portlock Boot Wizard. You may receive the following error message if Portlock Boot Wizard is interrupted. 70 Portlock Boot Wizard User Guide This notice will appear, anytime you are not using an empty floppy. When you enter a floppy diskette into the drive and press OK, make sure that you are working with an empty diskette. Diskette Options Menu 1) If DOS in not loaded, then the option to select DOS booting is disabled. 2) If HIMEM.SYS is not loaded, the option to select HIMEM.SYS is disabled. 3) If you are building a TCP/IP diskette and HIMEM.SYS is not loaded, an error will appear explaining that you need to copy HIMEM.SYS to your directory. 4) If you are building a TCP/IP diskette and HIMEM.SYS is loaded - but not selected - a warning will appear that HIMEM.SYS will be copied. Portlock Boot Wizard User Guide 71 J APPENDIX Contains: 72 NetWare Server Scan Portlock Boot Wizard User Guide PCI Scan Diskette If you created a diskette to allow a NetWare PCI scan, insert the floppy diskette into the server and type the following command: “Load A:\PCISCAN” Once the PCISCAN.DAT file has been created, load the file into Portlock Boot Manager in order to have the correct diskette created for that NetWare server. NetWare 3.12 Due to limitations in the NCP protocols for NetWare 3.12, you can not scan this version of NetWare remotely. In order to scan NetWare 3.12, you need to create a NetWare PCISCAN diskette and load the program as mentioned previously. Scanning Servers from a Workstation When you select a NetWare server to scan, Portlock Boot Wizard will detect whether you are already connected. If connected, then it will use that connection to create a directory on the root of SYS: called STORMGR. It will then copy over an NLM called PORTLOCK.NLM. This NLM contains the routines to scan the PCI bus of a NetWare server. If you have Portlock Storage Manager already installed, it will not overwrite the existing file. Instead it will use the PORTLOCK.NLM detected to do the scan. Portlock Boot Wizard User Guide 73 www.portlock.com 74 Portlock Boot Wizard User Guide