1
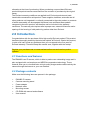
E
EM4483 - MPEG4 Network IP Camera
2 | ENGLISH
EM4483 - MPEG4 Network IP Camera
Warnings and points of attention
Due to laws, directives and regulations set out by the European Parliament, this
device could be subject to limitations concerning its use in certain European member
states. In certain European member states the use of this product could be prohibited.
More information regarding this warning can be found in the Declaration of Conformity
on the last page of this document!
Table of contents
1.0 Warranty conditions ............................................................................................... 2
2.0 Introduction ........................................................................................................... 3
2.1 Functions and features ...................................................................................... 3
2.2 Package contents .............................................................................................. 3
2.3 Explanation of the camera ................................................................................. 4
3.0 Preparing the camera ............................................................................................ 4
3.1 Connecting the camera...................................................................................... 5
3.2 Installing the camera software ........................................................................... 5
3.3 Configuring the camera for your network ........................................................... 5
3.4 Logging in to the camera ................................................................................... 6
3.5 Setting up the camera for your wireless network ................................................ 7
3.6 Using the camera in combination with a EM4050 wLINK Wireless Router ......... 8
4.0 Other camera settings ........................................................................................... 9
4.1 Adjusting the image quality ................................................................................ 9
4.2 Adjusting the sound quality .............................................................................. 10
4.3 Setting and managing users ............................................................................ 10
5.0 Using motion detection ........................................................................................ 11
5.1 Enabling motion detection................................................................................ 11
5.2 Sending an image to an FTP server ................................................................ 11
5.3 Sending an image to an e-mail address ........................................................... 12
6.0 Saving images ..................................................................................................... 13
6.1 Making, saving and viewing a screenshot ........................................................ 13
6.2 Recording, saving and viewing videos ............................................................. 14
7.0 Network Video Recorder software ....................................................................... 15
7.1 Installing the NVR software.............................................................................. 15
7.2 Schedule recordings ........................................................................................ 15
8.0 Frequently asked questions ................................................................................. 17
9.0 Service and Support ............................................................................................ 18
1.0 Warranty conditions
The warranty period of five years applies to all Eminent products, unless stated
3 | ENGLISH
otherwise at the time of purchasing. When purchasing a second-hand Eminent
product this period remains measured from the moment of purchase by the original
owner.
The Eminent warranty conditions are applied to all Eminent products and parts
inextricable connected to said product. Power supplies, batteries, antennas and all
other products not integrated in or directly connected to the main product or products
of which reasonably can be expected that these have a different wear pattern
compared to the main product, will therefore not be included in the warranty
conditions. The warranty also expires after improper use, external influences and/or
opening of the housing of said product by parties other then Eminent.
2.0 Introduction
Congratulations with the purchase of this high-quality Eminent product! This product
has been thoroughly tested by the technical experts at Eminent. Should this product,
in spite of all care, show any problems then you can appeal to the five years of
Eminent warranty. Therefore keep this manual save, together with the receipt.
Register your purchase now on www.eminent-online.com and receive product
updates!
2.1 Functions and features
The EM4483 is an IP camera, which is able to produce an outstanding image and is
also equipped with a microphone and MPEG4 compression technology. These
features allow you to view and listen to high quality images and sounds made by the
camera through the Internet or your own network.
2.2 Package contents
Make sure the following items are present in the package:
•
•
•
•
•
•
•
EM4483 IP camera
Camera mounting stand
Power adapter
Network cable
Mounting screws
CD-ROM with manual and software
User manual
4 | ENGLISH
2.3 Explanation of the camera
(1)
(2)
Power LED
LAN LED
(3)
(4)
(5)
Light Sensor
WLAN LED
Adjust Focus
(6)
Infrared LED
(7)
(8)
(9)
Lens
Microphone
Reset button
(10) Network port
(11) Screw hole
(12) Power
This LED will be on when the camera is powered.
This LED will be on when the camera is connected to a
switch, router or modem using a network cable.
This sensor measures the light intensity around the camera.
This LED will be on when the wireless connection is active.
By turning the lens you can adjust the focus of the camera
image.
These 6 LED lights make sure you can also view the camera
image when it is dark.
This is the lens of the camera.
This is the microphone of the camera.
By pushing this button the camera will be reset to factory
defaults.
This port allows you to connect the camera to your modem
or router using a network cable.
Use this screw hole to connect the mounting stand to the
camera.
Here you can connect the power adapter to the camer
3.0 Preparing the camera
Before you can start using the EM4483 IP camera, you will need to set it up for your
5 | ENGLISH
network. Make sure you have all the information about your network at hand. Consult
the manual of your modem or router to obtain this information.
3.1 Connecting the camera
1.
2.
Connect the power adapter to the camera and plug it into a power socket.
Connect the camera to your network using the provided network cable. This can
be a switch, router or modem.
3.2 Installing the camera software
To be able to connect the camera to your network the IP address of the camera has to
be changed. On the CD-ROM you will find software that can detect the camera. After
detection you can adjust the settings of the camera to your network. You will first need
to install the software. Follow the steps below:
1.
2.
3.
4.
5.
6.
7.
8.
Insert the supplied CD-ROM into the CD-ROM or DVD drive of your computer.
Select the preferred language.
Click ‘Next’.
Select ‘Install Camera Software’.
Click ‘Next’.
Click ‘Next’.
Click ‘Next’.
Click ‘Close’ to finish the installation.
Hint: If the CD-ROM does not start automatically, you can also start the installation
program manually. Follow the instructions below:
1.
2.
3.
4.
Click ‘Start’.
Click ‘Run’.
Type x:\wizard\wizard.exe (x is the drive letter of your CD-ROM or DVD station).
Click ‘OK’.
3.3 Configuring the camera for your network
After the installation is finished you can open the software to detect the camera:
1.
2.
3.
4.
5.
6.
7.
Click ‘Start’.
Click ‘All Programs’.
Click ‘EM4483 Network IP Camera’.
Click ‘EM4483 MPEG 4 Master’. The program MPEG4 Master will open.
Click the ‘Search’ button. An IP address will appear in the left field.
Enter a name for the camera in the ‘Name’ field.
If you want the camera to receive an IP address from your router, then select
‘DHCP’ in the ‘IP Address’ field. Continue to step 8.
6 | ENGLISH
8.
9.
If you want to assign an IP address to the camera yourself, select ‘Fixed’ in the
‘IP Address’ field.
Enter the preferred IP address in the ‘IP’ field.
Example: If your router uses the IP address 192.168.0.1, then change the IP address
of the camera to 192.168.0.100.
10. Enter the correct subnet mask in the ‘Netmask’ field.
11. Enter the IP address of your router in the ‘Gateway’ field.
12. If you wish to change the password of the camera, then enter the new password
in the ‘New Password’ field.
13. Enter the new password once more in the ‘Confirm Password’ field.
14. Click ‘Save’ to save the settings.
Write down the addresses and the password that you set up:
IP Address
________________________________________________________
Netmask
________________________________________________________
Gateway
________________________________________________________
Password
________________________________________________________
3.4 Logging in to the camera
The camera can now be accessed using the IP address that you assigned to the
camera or that the camera has received from your router. Follow the instructions
below to log in to the camera.
1.
2.
3.
4.
5.
6.
7.
8.
Open Internet Explorer.
Enter the IP address you set in chapter 3.3 in the address bar of the browser (for
instance 192.168.0.100).
Press the enter key or click ‘Go to’.
The home page is shown.
The message ‘Click here to install the following ActiveX Control…’ will appear.
Click this message with the left mouse button and choose the option ‘Install
ActiveX Control…’.
A security warning will appear. Click ‘Install’.
If needed, click the center of the screen with the left mouse button to activate the
ActiveX Control.
In the center of the screen you will now see the image of the camera. Left of the image
there are 4 buttons, underneath which you will find a speaker-symbol and 3 indicationlights. Follow the steps below to finish the configuration of the camera for your
network:
7 | ENGLISH
9.
10.
11.
12.
Click the third button from above, depicting a wrench (Settings).
Enter ‘admin’ in the ‘Username’ field.
Enter the password you set in chapter 3.3, step 12 in the ‘Password’ field.
Click ‘Ok’.
Note! The default password of the camera is ‘admin’. Enter this password if you did
not set a password as described in paragraph 3.3, step 12.
In the screen that now appears you can further configure the camera for your network.
If you want to wirelessly connect the camera to your network, then continue with
paragraph 3.5. If you want keep the camera connected to the network using a network
cable, then continue with chapter 4.
3.5 Setting up the camera for your wireless network
If you wish you can wirelessly connect the camera to your network. This allows you to
put the camera in locations where you can not lay network cables. To correctly set up
your camera you will need specifications of your wireless network. You can obtain this
information from your wireless modem or router. Follow the instructions below to set
up your camera for your wireless network:
1.
2.
3.
4.
5.
6.
Click ‘Network’ in the left part of the screen.
Click ‘Wireless’ in the top of the screen.
Choose ‘Infra’ for ‘Connection Type’.
Choose ‘ETSI Europe’ for ‘Country Region’.
Select the channel that your wireless router or modem is using in the ‘Channel’
field.
Enter the name (SSID) of your wireless router or modem in the ‘SSID’ field.
You will now need to configure the security settings. We assume your wireless
network is secured using a WPA-PSK key. Make sure you have the security settings
of your wireless network at hand.
7.
8.
9.
10.
Choose ‘WPA-PSK’ for ‘Authentication Type’.
Choose ‘TKIP (WPA-PSK)’ for ‘Encryption Type’.
Enter the security key of your wireless network in the ‘WPA-PSK Key’ field.
Click ‘Save’ to save the settings.
If the camera is in range of your wireless router or modem, a connection between the
camera and your wireless network will be automatically realized.
Write down the security type of your wireless router, the name (SSID), the password
and the channel:
8 | ENGLISH
[ ] WPA
[ ] WEP
Network name:
Password:
Channel:
______________________________________________________
______________________________________________________
______________________________________________________
You can now view the image of the camera on any computer that is connected to your
home network, as explained in paragraph 3.4, step 1 through 4.
3.6 Using the camera in combination with a EM4050
wLINK Wireless Router
As an example we will explain how to use the EM4483 in combination with an Eminent
EM4050 wLINK Wireless Router.
Now that the camera is set up for your network, the image of the camera can also be
viewed using an internet connection. The default settings of the camera are such that
anyone can view these images without the need to log in. In chapter 4.3 of this manual
we will explain how you can make sure that only certain users can view the images.
To be able to view the images of the camera from outside your network, you will need
to open a port in your router for the camera. In the example below we will configure an
EM4050 wireless router to pass the images of the camera. If you are using another
router, consult the documentation of your router to find out how to open ports. Use the
IP address as set in chapter 3.3. The default port the camera uses is 80. If you wish to
use a different port, consult chapter 6.
Follow the instructions below to open port 80 in the EM4050:
1.
2.
Open your Internet browser (for instance Internet Explorer, Netscape or Firefox).
Enter the IP address of your EM4050 in the address bar (the default IP address
is 192.168.0.1).
3. Press the enter key or click ‘Go to’.
4. The opening screen is shown.
5. Click ‘Advanced’ in the left menu.
6. Click ‘Virtual Servers’.
7. Check ‘Enable’ under ‘Properties’. Enter a random name in the next field, for
instance ‘Camera’.
8. Choose the IP address of your EM4483 from the list near ‘PC (Server)’ or enter
the IP address manually.
9. Choose ‘TCP/UDP’ for ‘Protocol’.
10. Enter the number 80 in both ‘Internal (LAN) Ports’ fields. The ‘External (WAN)
Ports’ fields will be automatically filled.
11. Click ‘Add as new server’.
9 | ENGLISH
Now that the port for the camera has been opened, anyone can view the images of
your camera using the Internet by following the instructions below:
1.
2.
3.
4.
Open your Internet browser (for instance Internet Explorer, Netscape or Firefox).
Enter the WAN IP address (which you received from your provider) in the
address bar.
Press the enter key or click ‘Go to’.
The opening screen of the camera is shown. In the center of the screen the
image of the camera is shown.
4.0 Other camera settings
Now that the camera has been properly connected and you can view the images, it is
possible to further configure the camera to your wishes. Before you can start
configuring, you will first need to go to the correct page of the camera menu. Follow
the instructions below:
1.
2.
3.
4.
5.
6.
7.
8.
Open your Internet browser (for instance Internet Explorer, Netscape or Firefox).
Enter the IP address you set in chapter 3.3 in the address bar of the browser (for
instance 192.168.0.100).
Press the enter key or click ‘Go to’.
The opening screen is shown.
Click the third button from above, depicting a wrench (Settings).
Enter ‘admin’ in the ‘Username’ field.
Enter the password you set in chapter 3.3, step 12 in the ‘Password’ field.
Click ‘Ok’.
4.1 Adjusting the image quality
The quality of the camera image can be adjusted to what you want to use the camera
for. If you only want to use the camera within your own network for example, you can
use the highest image quality, as opposed to a situation where you want to send
images over the Internet. To access the settings for the image quality, click ‘Video’ in
the left menu.
In the upper right part of the screen you will find 3 options. Choose ‘High’ if you only
wish to use the camera within your own network and if no other cameras are present
in your network. If there are multiple cameras in your network, choose ‘Medium’. If you
wish to use the camera to send images over the Internet, choose ‘Low’.
If you want to share images of the camera over the Internet, it is important that the
image quality is set in such way that the amount of data traffic the camera generates
does not surpass the speed of your ADSL connection. That is why you can fine-tune
the quality settings. Apart from the settings we explained above you will also find the
10 | ENGLISH
following options:
Resolution:
Compression:
Maximum Frame Rate:
P-Frame / I-Frame Ratio:
This allows you to set the resolution of the image. You
can choose between VGA 640x480 (high quality) or
QVGA 320x240 (lower quality).
Here you can set the amount of image-compression.
The higher the compression is set, the less data traffic
the images will generate.
This allows you to set the maximum number of images
per second. The higher the number, the more data
traffic the camera will generate.
The higher you set this option, the less data traffic the
images will generate.
Save these settings by clicking ‘Save’. If you then click ‘Home‘ in the left menu, you
will see the image of the camera. On the bottom of this screen you will find the
‘FrameRate’ and the ‘BitRate’. The FrameRate stands for the number of images per
second, the BitRate stands for the amount of data traffic the images generate. If the
BitRate closely approaches the speed of your Internet connection, adjust the settings
above to lower the amount of data traffic.
4.2 Adjusting the sound quality
Because the EM4483 is equipped with a built-in microphone, it is also possible to
accompany the sent videos with sounds. This option is be enabled by default. To set
the quality of the audio signal you can click the tab ‘Audio’ in the right menu.
Enable:
Bit Rate:
Audio volume:
This option is checked by default. Uncheck this option if
you do not wish to send sound with the camera images.
This option allows you to set the quality of the audio
signal. Set the lowest possible quality by selecting 16
Kbps, the highest possible quality 40 Kbps.
This option allows you to set the volume of the audio
signal. Selecting ‘Small’ results in low volume, ‘Middle’
results in medium volume and ‘Large’ results in high
volume.
Click ‘Save’ to save the settings.
4.3 Setting and managing users
Because you do not want anyone who can view the images of the camera to also be
able to adjust the settings, you can set different types of users. Follow the instructions
below:
11 | ENGLISH
1.
2.
3.
4.
5.
6.
7.
Click ‘User’ in the left menu.
Click ‘Add’ under the header ‘User List’. A number of new options will appear.
Enter a made-up username in the ‘User Name’ field.
Enter a made-up password in the ‘Password’ field.
Re-enter the same password in the ‘Confirm Password’ field.
Choose the type of user in the ‘User Group’ field. If you choose ‘User’, the user
can only view the images of the camera after logging in to the page. If you
choose ‘Administrator’, the user can also adjust the settings of the camera after
logging in.
Click ‘Save’. The new user will now appear in the field under ‘User List’.
The new user can now access the camera from within the network as described in
chapter 3.4, steps 1 through 4 and through the Internet as described in chapter 3.6.
5.0 Using motion detection
The EM4483 is equipped with built-in motion detection which allows the device to be
used as a security camera. It is possible to let the camera send an image to an FTP
server or e-mail address the moment a movement is detected. Follow the steps below:
5.1 Enabling motion detection
1.
2.
Open your Internet browser (for instance Internet Explorer, Netscape or Firefox).
Enter the IP address you set in chapter 3.3 in the address bar of the browser (for
instance 192.168.0.100).
3. Press the enter button or click ‘Go to’.
4. The opening screen is shown.
5. Click the third button from above, depicting a wrench (Settings).
6. Enter ‘admin’ in the ‘Username’ field.
7. Enter the password you set in chapter 3.3, step 12 in the ‘Password’ field.
8. Click ‘Ok’.
9. Click ‘Advanced’ in the left menu.
10. Click ‘Alarm’.
11. Check ‘Enable Motion Detection’.
12. Click ‘Save’ to save the settings.
The motion detection is now enabled. That means the camera can now detect motion
within its point of view and therefore can act as a security camera. It is possible to let
the camera send an image to an FTP server or e-mail address the moment the
camera detects movement. Follow the instructions below to use this option:
5.2 Sending an image to an FTP server
1.
Open your Internet browser (for instance Internet Explorer, Netscape or Firefox).
12 | ENGLISH
2.
3.
4.
5.
6.
7.
8.
9.
10.
11.
12.
13.
14.
15.
16.
17.
18.
Enter the IP address you set in chapter 3.3 in the address bar of the browser (for
instance 192.168.0.100).
Press the enter button or click ‘Go to’.
The opening screen is shown.
Click the third button from above, depicting a wrench (Settings).
Enter ‘admin’ in the ‘Username’ field.
Enter the password you set in chapter 3.3, step 12 in the ‘Password’ field.
Click ‘Ok’.
Click ‘Advanced’ in the left menu.
Click ‘Alarm’.
Check ‘Send images to FTP server’.
Click ‘Save’ to save the settings.
Click ‘FTP’ in the left menu.
Enter the address of the FTP server to which you want to send the image in the
‘FTP Server’ field (for example ftp://example.nl).
The default setting of ‘FTP Server Port’ is 21. You do not need to change this
setting.
Enter the username of your FTP account in the ‘User ID’ field.
Enter the password of your FTP account in the ‘Password’ field.
Click ‘Save’ to save the settings.
The moment the camera detects motion, an image will be send to the specified FTP
server.
5.3 Sending an image to an e-mail address
1.
2.
3.
4.
5.
6.
7.
8.
9.
10.
11.
12.
13.
14.
15.
16.
17.
Open your Internet browser (for instance Internet Explorer, Netscape or Firefox).
Enter the IP address you set in chapter 3.3 in the address bar of the browser (for
instance 192.168.0.100).
Press the enter button or click ‘Go to’.
The opening screen is shown.
Click the third button from above, depicting a wrench (Settings).
Enter ‘admin’ in the ‘Username’ field.
Enter the password you set in chapter 3.3, step 12 in the ‘Password’ field.
Click ‘Ok’.
Click ‘Advanced’ in the left menu.
Click ‘Alarm’.
Check ‘Send e-mail’.
Click ‘Save’ to save the settings.
Click ‘Mail’ in the left menu.
Enter the address of the concerning mail server in the ‘Mail Server’ field.
Enter the e-mail address from which the mail will be sent in the ‘Mail Sender’
field.
Enter the e-mail address to which the mail will be sent in the ‘Mail Receiver’ field.
You can skip the other fields.
13 | ENGLISH
18. Click ‘Save’ to save the settings.
The moment the camera detects motion, an image will be send to the specified e-mail
address.
6.0 Saving images
The EM4483 allows you to make screenshots of the view of the camera. You can also
record images and sound to a video file. This makes it possible to see what happened
at the location where the camera is mounted, after the events took place. Be warned
that recording video takes up a lot of hard disk space and that the actual recording will
continue until you yourself interrupt the recording or until hard disk of the computer is
full.
Hint: If you want the camera to make recordings at specific times, follow the
instructions as described in chapter 7.1.
Follow the instructions below to make screenshots or to record videos.
6.1 Making, saving and viewing a screenshot
First you will need to make clear where you wish to save the screenshots to. Follow
the instructions below:
1.
2.
Open your Internet browser (for instance Internet Explorer, Netscape or Firefox).
Enter the IP address you set in chapter 3.3 in the address bar of the browser (for
instance 192.168.0.100).
3. Press the enter button or click ‘Go to’.
4. The opening screen is shown.
5. Click the third button from above, depicting a wrench (Settings).
6. Enter ‘admin’ in the ‘Username’ field.
7. Enter the password you set in chapter 3.3, step 12 in the ‘Password’ field.
8. Click ‘Ok’
9. Click ‘Video’ in the left menu.
10. In the lower right part of the screen you will see the ‘Snapshot Path’ field. Enter
the location where you wish to save the snapshots to. For example ‘C:\Camera’.
11. Click ‘Save’ to save the settings.
Now that you specified a location, you can start making screenshots:
1.
2.
Click ‘Home’ in the left menu. You will now return to the opening screen of the
camera.
Click the photo camera icon in the left menu (Snapshot). The edges of the image
temporarily change color to indicate that a screenshot has been made.
14 | ENGLISH
To view the new screenshot, use Windows Explorer to browse to the location you
specified in step 10 (for example C:\Camera). Here you will find the new file. Double
click the file to view the contents.
6.2 Recording, saving and viewing videos
First you will need to specify the location where you wish to save the recorded videos
to. Follow the instructions below:
1.
2.
Open your Internet browser (for instance Internet Explorer, Netscape or Firefox).
Enter the IP address you set in chapter 3.3 in the address bar of the browser (for
instance 192.168.0.100).
3. Press the enter button or click ‘Go to’.
4. The opening screen is shown.
5. Click the third button from above, depicting a wrench (Settings).
6. Enter ‘admin’ in the ‘Username’ field.
7. Enter the password you set in chapter 3.3, step 12 in the ‘Password’ field.
8. Click ‘Ok’
9. Click ‘Video’ in the left menu.
10. In the lower right part of the screen you will see the ‘Record Path’ field. Enter the
location where you wish to save the video to. For example ‘C:\Camera’.
11. Click ‘Save’ to save these settings.
Now that you specified a location, you can start recording a video:
1.
2.
3.
Click ‘Home’ in the left menu. You will now return to the opening screen of the
camera.
Click the video camera icon in the left menu (Record). The icon will turn red to
indicate the recording is in progress.
To stop recording, click the same icon again. The icon will turn back to green to
indicate that the recording has stopped.
To view the video file you will need to follow the instructions below:
1.
2.
3.
4.
5.
6.
Click the third button from above, depicting a wrench (Settings).
Click ‘Monitor’ in the menu.
Click ‘Browse’ in the lower right part of the screen. Windows Explorer will appear.
Browse to the location you specified in step 11.
Double click the video file you wish to view. You will then return to the previous
screen.
Click ‘Play’ to play the video file.
Click ‘Stop’ to stop playing the video.
15 | ENGLISH
7.0 Network Video Recorder software
The EM4483 camera is supplied with the so-called ‘Network Video Recorder’ (NVR)
software. This allows you to save the video images of the camera to the hard disk of a
computer, or to make permanent recordings to a hard disk.
7.1 Installing the NVR software
To be able to use the supplied NVR software you will first need to install this software
from the CD-ROM to your computer. Follow the instructions below:
1.
2.
3.
4.
5.
6.
7.
8.
9.
10.
11.
12.
Insert the supplied CD-ROM into the CD-ROM or DVD drive of your computer.
Select the preferred language.
Click ‘Next’.
Select ‘Install Network Video Recorder’.
Click ‘Next’.
Click ‘Next’.
Click ‘Next’.
Click ‘Close’ to finish the installation.
Click ‘Start’.
Click ‘All Programs’.
Click ‘NVR’.
Click ‘NVR’ again.
The NVR software opens. You will first need to couple the camera to the software.
Follow the instructions below:
1.
2.
3.
4.
5.
Click the mid button in the upper right part of the NVR software (camera with
magnifying glass).
The screen that now appears exists of two fields. The left field displays all the
cameras found in your network. If no cameras are displayed then click the
‘Search Camera(s]’ button.
Click the displayed camera.
Now click the arrow pointing to the right. The camera will now also be displayed
in the other field.
Click ‘Save’ to couple the camera to the software.
The main screen of the NVR will re-appear. You will now see the image of the camera
in the centre of the screen.
7.2 Schedule recordings
The NVR software allows you to let the camera make recordings at specific times.
Follow the instructions below to schedule recordings:
16 | ENGLISH
1.
2.
3.
4.
5.
Click ‘Start’.
Click ‘All Programs’.
Click ‘NVR’.
Click ‘NVR’ again. The NVR software will be started.
Click the fifth button from above (Schedule Settings). A new screen will appear.
This screen displays a calendar, divided in weekends (pink color) and week days
(yellow color). You can schedule recordings at different times for each type of day. As
an example we will schedule recordings in a random week. We will schedule a
recording on a Saturday from 9 o’clock in the morning untill 2 o’clock in the afternoon
and a recording on a random weekday from 10 o’clock in the morning until 3 o’clock in
the afternoon.
Before you start to schedule recordings you need to make sure the correct year is
selected under ‘Setting a Network Camera’ in the upper left menu. After selecting the
correct year, you need to click ‘Save Settings’, after which you can follow the
instructions below:
1.
2.
3.
4.
5.
6.
Click the tab ‘Recording Templates’. In the left part of the screen you will see a
yellow column ‘Regular Settings’ and a pink column ‘Holiday Settings’.
Click the fields behind ’10-11’, ‘11-12’, ’12-13’, ’13-14’ and ’14-15’ in the yellow
column. A ‘V’ will appear in each field.
Click the fields behind ‘9-10’, ’10-11’, ‘11-12’, ’12-13’ and ’13-14’ in the pink
column. A ‘V’ will appear in each field.
Click ‘Save Settings’.
Click the tab ‘Camera’s Recording’.
Click the ‘Trigger All’ in the upper part of the screen. All yellow and pink boxes
will turn white.
Hint: ‘Trigger All’ means no date has been set on which the camera will need to record
according to your specific time schedule. The camera will only start recording when
motion detection is enabled and motion is detected. If you want the camera to start
recording each day according to your time schedule, do not click ‘Trigger All’ or click
‘Default Value’.
7.
8.
Right click a random Saturday and choose ‘Holiday Settings’. The box will turn
pink. The camera will start recording on that specific Saturday, according to the
time schedule you specified in step 3.
Right click a random weekday and choose ‘Regular Settings’. The box will turn
yellow. The camera will start recording on that specific day, according to the time
schedule you specified in step 2.
Hint: If you right click any date of the calender, you will get 4 choices: Regular
Settings, Holiday Settings, Trigger Settings and Undo Change. If you choose ‘Trigger
17 | ENGLISH
Settings’, recording for this date will be triggered by motion detection instead of the
time schedule.
9.
In the left menu, in the field below ‘Apply Settings To’, you will need to choose
the camera to which this schedule will be applied. Then click the ‘Apply Settings
To’ button.
10. If you want all cameras in your network to use this schedule then click the
‘Settings to ALL’ button.
After setting the schedule you will need to activate the recording settings and specify
where the NVR software should save the images to.
1.
2.
3.
4.
5.
6.
Click the ‘Recording Storage’ tab.
In the field on the left you need to choose the location where you want to save
the images to.
Check ‘Enable Recording’.
Enter the amount of disk space the camera may use when saving images in the
‘Largest Storage SPaceiG’ field.
If motion detection is enabled, the ‘Alarm’s Recording SpaceiG’ field lets you
specify how long the camera needs to continue recording after motion has been
detected.
Click ‘Save Settings’ to save the settings.
8.0 Frequently asked questions
Q. The CD-ROM does not start automatically.
A. You can start the installation wizard by clicking “Start”, then “Run”. Type
“X:\wizard\wizard.exe” in the field ‘Open’ (X is the drive letter of your CD-ROM or DVD
station) and click “OK”.
Q. The image is unclear. How do I improve the image?
A. You can adjust the focus by carefully turning the lens of the camera.
Q. I unchecked ‘Allow Anonymous Users’ in the web page of the camera and
now almost nobody can view the image of the camera over the Internet. Why is
that?
A. When this function is enabled anybody can access the main page which contains
the image of the camera. All other options will be available only when logged in
with a username and password. When unchecked, you will be asked for a
username and password as soon as you try to access the page of the camera,
meaning that only the users you specified can view the image of the camera.
Q. The lights on the camera are not lit, is this correct?
A. These are infrared LED’s. Infrared light is virtually invisible. When the infrared
18 | ENGLISH
light is activated images can still be viewed, but within a limited range (ca. 3
meters)
Q. How do I reset the camera to its defaults settings?
A. Turn the camera on. Push the button under the connection of the power adaptor
using a pen or paperclip. Keep it pushed for about 15 seconds. The camera
has now been reset.
Q. Can the camera function behind a firewall or router?
A. The camera can be made externally reachable by forwarding port 80 in the router
or firewall. Consult the manual of your router for more details.
Q. What are the screw holes underneath the camera for?
A. You can use these to mount the camera to (for instance) the wall or the ceiling.
9.0 Service and Support
This users manual has been carefully written by Eminent’s technical experts. If you
have problems installing or using the product, please contact [email protected]
Declaration of Conformity
To ensure your safety and compliance of the product with the directives and laws
created by the European Commission you can obtain a copy of the Declaration of
Conformity concerning your product by sending an e-mail message to: [email protected]. You can also send a letter to:
Eminent Computer Supplies
P.O. Box 276
6160 AG Geleen
The Netherlands
Clearly state ‘Declaration of Conformity’ and the article code of the product of which
you would like to obtain a copy of the Declaration of Conformity.
EM4483 | 12-2007