1
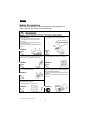
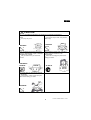
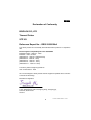
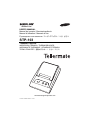
USER’S MANUAL Manual del usuario / Benutzerhandbuch Manuel d’utilisation / Manuale d’Uso / 䮭䯃䭽䯃䮥䮒䮬䭩䮲 / ㇠㟝G ㉘⮹㉐ STP-103 THERMAL PRINTER IMPRESORA TÉRMICA / THERMODRUCKER IMPRIMANTE THERMIQUE / STAMPANTE TERMICA / ᗵᾲᑼ䮞䮱䮺䮆䯃 / ᵄ㜨㐑G 䘸⫤䉤 PO WE R ER R OR FE E D ON LIN E www.samsungminiprinters.com UUG English Safety Precautions When using this appliance, please follow these safety regulations in order to prevent any hazard or material damage. WARNING Not following instructions can cause serious injury or death. Do not plug several products in one multi power extension. Only use the supplied adapter. It is dangerous to use other adapters. This can cause over-heating and fire. If the plug is wet or dirty, dry or wipe it before use. If the plug does not fit perfectly with the outlet, do not plug in. Be sure to use only standardized multioutlets. ONLY SUPPLIED ADAPTER PROHIBITEDG Do not pull the cable to unplug it. Keep packaging out of children’s reach. Plastic bags cause danger of suffocation. This can damage the cable, which can then cause a fire or a breakdown of the printer. PROHIBITEDG PROHIBITED Do not plug in or unplug with wet hands. If you notice unusual smoke, odor or noise from the printer, unplug it and then take the following actions : You can be electrocuted. PROHIBITEDG Switch off the printer and unplug the set from the mains. After the smoke disappears, call your dealer to repair it. Do not bend the cable by force or leave it under any heavy object. Damaged cables can cause a fire. PROHIBITEDG TO UNPLUG UUG 1 PRINTER Englishٻ CAUTION Not following instructions can cause injury or damage the appliance. Keep the desiccant out of children’s reach. If not, they may eat it. Install the printer on the stable surface. If the printer drops or falls, it may break or cause injury. PROHIBITED PROHIBITEDG PRINT.ER Only use approved accessories and do not try to disassemble, repair or remodel the printer for yourself. Do not use the printer when it is out of order. This can cause fire or an electrocution. Call your dealer when you need these services. Switch off and unplug the printer before calling your dealer. DISASSEMBLING PROHIBITEDG PRINTER TO UNPLUG PRINTER DEALER Do not let water or other foreign objects in the printer. If this happens, switch off and unplug the printer before calling your dealer. PROHIBITEDG PRINTER UUG 2 English Warning – U.S.A This equipment has been tested and found to comply with the limits for a Class A digital device, pursuant to Part 15 of the FCC Rules. These limits are designed to provide reasonable protection against harmful interference when the equipment is operated in a commercial environment. This equipment generates, uses, and can radiate radio frequency energy and, if not installed and used in accordance with the instruction manual, may cause harmful interference to radio communications. Operation of this equipment in a residential area is likely to cause harmful interference in which case the user will be required to correct the interference at his own expense. This equipment has been tested and found to comply with the limits for a Class B digital device, pursuant to Part 15 of the FCC Rules. These limits are designed to provide reasonable protection against harmful interference in a residential installation. This equipment generates, uses and can radiate radio frequency energy and, if not installed and used in accordance with the instructions, may cause harmful interference to radio communications. However, there is no guarantee that interference will not occur in a particular installation. If this equipment does cause harmful interference to radio or television reception, which can be determined by turning the equipment off and on, the user is encouraged to try to correct the interference by one or more of the following measures: - Reorient or relocate the receiving antenna. - Increase the separation between the equipment and receiver. - Connect the equipment into an outlet on a circuit different from that to which the receiver is connected. - Consult the dealer or an experienced radio/TV technician for help. Notice - Canada This Apparatus complies with class "A" limits for radio interference as specified in the Canadian department of communications radio interference regulations. WEEE Marking This marking shown on the product or its literature, indicates that it should not be disposed with other household waste at the end of its working life. To prevent possible harm to the environment or human health from uncontrolled waste disposal, please separate this from other types of wastes and recycle it responsibly to promote the sustainable reuse of material resources. Household users should contact either the retailer where they purchased this product, or their local government office, for details of where and how they can take this item for environmentally safe recycling. Business users should contact their supplier and check the terms and conditions of the purchase contract. This product should not be mixed with other commercial wastes for disposal. UUG 3 Englishٻ Declaration of Conformity BIXOLON CO.,LTD Thermal Printer STP103 Reference Report No. : DR501203012AA The above product has successfully demonstrated that its product is in compliance with Electromagnetic Compatibility Directive 89/336/EEC EN55022 Class A : 1998+A 1 : 2000 EN55024 : 1998 :+A1:2001 (EN61000-4-2 : 1995+A1 :1998+A2:2001) (EN61000-4-3 : 1996+A1 :1998+A2:2001) (EN61000-4-4: 1995+A1 : 2001) (EN61000-4-5 : 1995+A1 : 2001) (EN61000-4-6 : 1996+A1 : 2001) (EN61000-4-11 : 1994+A1 : 2001) The above product’s beginning Serial No. Year of manufacture : 2004 We. The undersigned. Hereby declare that the equipment specified above conforms to the above Directive(s) Manufacturer Signature BIXOLON Co.,Ltd A-502, Digital Empire, 980-3 Yeongtong-dong, Yeongtong-gu, Suwon-si, South Korea 443-813 UUG 4 English Introduction The main features of the printer are as follows: 1. High speed printing 2. Low noise thermal printing 3. RS232 serial interface 4. Data buffer allowing the unit to receive print data even during printing. Please be sure to read the instruction in this manual carefully before using your new STP-103. NOTE The socket-outlet shall be near the equipment and it shall be easy accessible. UUG 5 Englishٻ Table of Contents Chapter 1. Unpacking ...........................................................7 1-1. Checking the contents of the Printer ........................................................7 1-2. Locating the Printer ..................................................................................7 1-3. Printer Part names ...................................................................................8 1-4. Operating Control Panel ..........................................................................9 Chapter 2. Connecting the cable ........................................10 2-1. Connecting the AC adapter to your printer .............................................10 2-2. Connecting the Printer to your computer ...............................................11 Chapter 3. Installing the Paper Roll ...................................12 Chapter 4. Setting the DIP Switching ................................13 Chapter 5. Running the Self Test .......................................15 Appendix A. Connector .......................................................16 Appendix B. Specification ..................................................16 Appendix C. Spares and Consumables ............................17 Appendix D. Contact Numbers ...........................................18G UUG 6 English Chapter 1. Unpacking 1-1. Checking the contents of the Printer The items illustrated below are included with your printer. If any items are damaged or missing, please contact your dealer for assistance. Unpacking Roll paper Printer Power cord Adaptor Cable 1-2. Locating the Printer Avoid direct sunlight or excessive heat. Avoid storing the printer in the places subject to excessive moisture. Avoid places subject to intense vibration or shock. Make sure that there is enough space around the printer so that it can be used easily. UUG 7 Englishٻ 1-3. Printer Part Names (9) (1) Cover top (2) Case top (3) Case bottom (4) Control panel (5) Roller (6) Power switch (7) Interface connector (male) (8) DC Jack (9) Paper roll (10) Detector switch (5) (1) Rear View (10) (2) (4) (3) Rear View (6) (7) (8) STP-103 Control Panel POWER ERROR FEED ON LINE UUG 8 English 1-4. Operating Control Panel The control panel has two buttons and two lights. POWER ERROR FEED ON LINE Buttons The control panel buttons allow paper feed and on line activation. ON LINE This button is not active in the custom firmware in this printer. FEED Press the FEED button once to advance paper one line. You may also press the FEED button continuously to feed paper continuously. The FEED button is always active. Indicator Lights The control panel lights provide information on printer conditions. POWER (green) The POWER light is on when printer power is on. ERROR (red) 1) The error LED blinks quickly when paper is out. 2) The error LED blinks when the Near End Sensor (paper low) is triggered . UUG 9 Englishٻ Chapter 2. Connecting the Cable 2-1. Connecting the AC adapter to your printer To power up the printer, only use the AC adapter, NH36-240150-I1. WARNING Using an incorrect power supply may cause fire or electrocution and is at the customers’ risk. CAUTION When connecting or disconnecting the power supply from the printer, make sure that the power supply is not plugged into an electrical outlet ; otherwise you may damage the power supply or the printer 1. Make sure that the printer's power switch is turned off, and that the power supply's power cord is unplugged from the electrical outlet. 2. Check the label on the power supply to make sure that the required voltage matches that of your electrical outlet. 3. Plug the power supply's DC cable connector into the printer's power connector as shown below. 4. Plug the AC adapter's power cord into an electrical outlet. NOTE To remove the DC cable connector grasp the connector at the inlet to the supply and pull it straight out. Make sure that the main unit's power cord is unplugged before you disconnect the DC cable connector. UUG 10 English 2-2. Tellermate Product – refer to your Tellermate Operation manual for details You need an appropriate serial interface cable to connect your Tellermate to the printer's built-in interface. 1. Make sure that both the printer and TY are turned off : then plug the cable connector securely into the printer's interface connector. 2. Tighten the screws on both sides of the cable connector. 25 Pin Female Type 3. Plug the other end of the cable into the Tellermate equipment. UUG 11 Englishٻ Chapter 3. Installing Paper Rolls Use a paper roll that matches the specifications – See Appendix C. NOTE The printer must be turned off before installing the paper roll. 1. Open the printer cover and remove the used paper roll core if there is one. 2. Insert the paper roll as shown below. 3. Pull out the paper roll until the paper comes out from the top of the printer. Then close the printer cover using both hands, one on either side of the printer. Both sides of the printer lid must be pressed down so they click into place. 4. Turn the printer on. UUG 12 English Chapter 4. Setting the DIP Switches CAUTION The DIP switch settings control the operation of the printer, changing the settings may mean that the printer will not communicate correctly to your Tellermate equipment. Only change these settings as directed by your Tellermate Customer Care Representative or Tellermate Authorised Distributor. Turn off the printer while setting the DIP switch to prevent an electrical short, which may damage the printer. 1. Make sure the printer is turned off. 2. Remove the rubber bung covering the DIP switches. 3. There is a row of switches on the bottom of the printer. Notice that ON position is marked on each set of switches. Use tweezers or some other narrow tool to move the switches. 1 4. Use the following table to set the DIP switches. 5. Replace the rubber bung. UUG 13 Englishٻ DIP Switch Functions No 1 2 3 4 5 6 7 8 Function On Off * Serial Baudrate Setting Hand-Shaking DTR/DSR Xon/Xoff ** Default Code Page Setting Off Reserved * Baud rate 2400bps 4800bps 9600bps 19200bps 38400bps 57600bps 115200bps 1 On Off Off On On Off On 2 Off On Off Off On On On 3 Off Off On On Off On On ** Code Page CP1250 CP1251 CP1252 CP1253 CP1254 T. E. Eur T. Japan T. Int’l 5 Off Off Off Off On On On On 6 Off Off On On Off Off On On 7 Off On Off On Off On Off On T. Eur is Tellermate Eastern European font T. Japan is Tellermate Japan font T. Int’l is Tellermate International font UUG 14 English Chapter 5. Running the Self-test 1. Self-test printing 1) Starting the self test To start printing the self-test on a paper roll, hold down the PAPER FEED button and turn on the printer with the cover closed. The self-test prints the current printer settings, which provide the following information : - control software version - dip switch state 2) Standby state After printing the current printer status, the printer prints the message "Please press the FEED BUTTON.". The LED indicator blinks and the printer enter the test printing standby state. Press the FEED BUTTON to start test printing. 2. Ending the self-test After a number of lines are printed, the printer indicates the end of the self-test by printing " ** TEST COMPLETED ** ". If the self-test is not completed, then you must turn your printer OFF and ON. UUG 15 Englishٻ Appendix A. Connector Serial Interface Connector Printer 18 RTS 19 RXD 23 GND 25 Pin Male ‘D’ Host 8 CTS 3 TXD 5 GND RJ 45 MOD 8-8 ---------------------------------------------- Tellermate part number: 805 064P Appendix B. Specification Printing method Thermal line printing Dot density 200 x 200 Dpi (8 dot/mm) Printing width 48mm Paper width 58mm Characters per line 42 (Font B) (9x24) Printing Speed Approximately 1.97 inches / sec 50 mm/sec at 25/printing duty 12.5% Receive buffer size 15K bytes Supply voltage DC 24V 1.5A o 0 ~ 40 (operating) -10 ~ 50o (storage) Temperature Environmental conditions MCBF Paper Humidity 30 ~ 80% RH (operating) 10 ~ 90% RH (storage) Mechanical 15,000,000 line Head 50 million pulse (about 50km) Thickness 0.06 ~ 0.09mm Roll size Ø60 ~ 57 (w) Roll spool diameter Inside : Ø12mm (0.47”) Outside : Ø18mm (0.71”) UUG 16 English Appendix C. Spares and Consumables Spares for the printer may be purchased from Tellermate or your Tellermate Distributor. Part Number 805 064P Description STP-103 Serial Cable G 904 155W Power Adaptor NH36-240150-I1 621 533W Printer Plastic Cover Top 805 151C 805 152P 805 188E 805 148A 805 189R 805 190V Mains Lead – GB Mains Lead – Europe Mains Lead – Japan Mains Lead – USA Mains Lead – Republic South Africa Mains Lead – Australia / New Zealand 904 801A Printer user manual 650 062J Dip Switch Rubber Bung 950 224R Print head cleaning pen 904 149K Approved paper rolls are supplied in boxes of 20 and may be purchased from Tellermate or your Tellermate Distributor. See Appendix D for contact numbers UUG 17 Englishٻ Appendix D. Contact Details Country USA UK FRANCE GERMANY Contact 1-800-TELMATE (835-6283) 0870 78 77 087 0899 70 10 72 0180 58 35 537 SWITZERLAND 0848 83 55 37 AUSTRIA 0810 00 12 50 SPAIN RSA 900 50 58 99 011 467 44 90 Internet: www.tellermate.com UUG 18