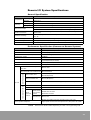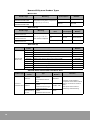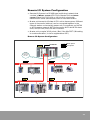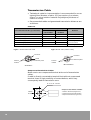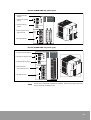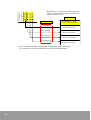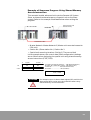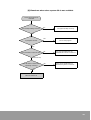
1
SM
Maximum Value for OEMs
NX Remote I/O
(NX-MASTER,
NX-SLAVE, NX70-SLAVE)
User Manual
Important User Information
Solid state equipment has operational characteristics differing from those of
electromechanical equipment. Because of these differences, and also because
of the wide variety of uses for solid state equipment, all persons responsible
for applying this equipment must satisfy themselves that each intended
application of this equipment is acceptable.
In no event will OE MAX Controls be responsible or liable for indirect or
consequential damages resulting from the use or application of this
equipment.
The examples and diagrams in this manual are included solely for illustrative
purposes. Because of the many variables and requirements associated with
any particular installation, OE MAX Controls cannot assume responsibility or
liability for actual use based on the examples and diagrams.
No patent liability is assumed by OE MAX Controls with respect to use of
information, circuits, equipment, or software described in this manual.
Reproduction of the contents of this manual, in whole or in part, without
written permission of OE MAX Controls is prohibited.
Throughout this manual, when necessary we use notes to make you aware of
safety considerations.
WARNING
IMPORTANT
ATTENTION
Identifies information about practices or circumstances
which may lead to serious personal injury or death, property
damage, or economic loss.
Identifies information that is critical for successful
application and understanding of the product.
Identifies information about practices or circumstances that
can lead to minor personal injury, property damage,
economic loss, or product malfunction. However, depending
on the situation, failure to follow the directions
accompanying this symbol may also lead to serious
consequences.
Contents
1. System Configuration and Specifications.................. 9
Remote I/O System Features......................................................................... 9
Remote I/O System Specifications.............................................................. 11
Remote I/O System Configuration .............................................................. 13
Transmission Cable...................................................................................... 16
Remote I/O System Configuration Restrictions ......................................... 17
2. External Diagram and Functions .............................. 19
Remote Master Unit ..................................................................................... 19
Remote Slave Unit ....................................................................................... 22
3. Connection Method .................................................. 25
Remote I/O System Connection Procedure................................................ 25
Remote I/O System Connection Pattern..................................................... 26
Connection Setting Procedure .................................................................... 28
4. Remote System I/O Allocation (Map)........................ 39
Remote System I/O Allocation (Map) ......................................................... 39
Current Value I/O Map and Registered Value I/O Map.............................. 44
5. Remote System Operation Mode.............................. 51
Operation Mode Change (System Register Setting) ................................. 51
Remote I/O Control on Errors...................................................................... 53
Slave Station Connection Check Mode ...................................................... 60
Remote I/O Refresh Timing ......................................................................... 62
6. Remote System Functions........................................ 65
Remote I/O Control....................................................................................... 65
Shared Memory Access............................................................................... 66
Example of Sequence Program Using Shared Memory
Access Instruction ........................................................................................ 73
Remote Programming (For N700 PLC only)............................................... 80
3
7. Troubleshooting ....................................................... 81
Identifying Error Causes .............................................................................. 81
Self-diagnosed Errors Related to Remote System .................................... 82
Remote I/O Error Code (DT90136. DT90137).............................................. 83
Identifying the Slave System Where Error Has Occurred (DT90131 to
DT90135) ....................................................................................................... 85
Troubleshooting Flowchart ......................................................................... 88
LED Status Check ....................................................................................... 101
Transmission Time..................................................................................... 103
Precautions for Remote I/O System.......................................................... 105
8. External Dimensions............................................... 106
N700 PLC Unit............................................................................................. 106
NX700 PLC Unit .......................................................................................... 107
NX70 PLC Unit ............................................................................................ 108
I/O Link Unit ................................................................................................ 108
4
Safety Instructions
Please read this manual and the related documentation thoroughly
and familiarize yourself with product information, safety instructions
and other directions before installing, operating, performing
inspections and preventive maintenance. Make sure to follow the
directions correctly to ensure normal operation of the product and
your safety.
WARNING
• If this product is used in a situation that may cause
personal injury and/or significant product damage,
implement safety measures such as use of fault-safe
equipment.
• Do not use this product under any conditions
exposed to explosive gases. It may cause an
explosion.
ATTENTION
• Please fasten cables with terminal bolts.
• Do not use the product under conditions that do not
meet correct environmental standards.
• Make sure you connect grounding cables.
• Do not touch terminals when electric current is
flowing.
5
NX Series Remote I/O System (Master Unit, Slave Unit)
Installation Environment
ATTENTION
• Make sure to turn off the power when mounting or
removing Remote I/O System units.
• Make sure all Remote I/O System units are firmly
mounted on the backplane.
• Be careful not to leave any cable residues in the unit
while wiring.
• Do not touch or directly contact the terminals on the
bottom of Remote I/O System unit. Otherwise,
element can be destroyed by contact defects or
electrostatic.
• Make sure not to drop or shock the plastic cases of
Remote I/O System units or dedicated I/O link.
• Use the unit under conditions defined in the general
specifications to enhance product performance.
• Separate units from high-voltage cables, highvoltage equipment, power cables and power
equipment as far as possible.
• Make sure to separate the power wires and
transmission cables or operate in different ducts if
possible.
ATTENTION
Do not install your unit if any of the following
conditions are present:
• Ambient temperature outside the range of 0 to 55 °C
(32 to 131 °F).
• Direct sunlight.
• Humidity outside the range of 30% to 85%
(non-condensing).
• Chemicals that may affect electronic parts.
• Excessive or conductive dust, or salinity.
• High voltage, strong magnetic fields, or strong
electromagnetic influences.
• Direct impact and excessive vibration.
ATTENTION
Precautions for Electrostatic
• Excessive static electricity can be generated in dry
condition, so please make sure to discharge
electrostatic with other materials like grounded
metal bars before contacting unit
ATTENTION
Cleansing Unit
• Do not use thinners, which can damage or degrade
PCB circuit board.
6
I/O Allocation for Remote I/O System Use
Unit type setting for slave system when using Remote I/O System.
Remote I/O Map registered in PLC can be read in on-line monitoring
mode.
NX700/N700 PLC CPU units can be used with Remote I/O System. (But,
NX700 PLC, NX-CPU700 and NX-CPU700p models cannot be used
with Remote I/O System.)
• Please activate programs (top front display) to be allocated for
Remote I/O.
• For Remote I/O allocation, select [Option] => [Remote I/O Map
Setting] from the Menu bar.
OFFLINE
ONLINE
Reference Manuals
System Manual
Included in the N700, NX700 CPU product package box.
Programming Manual I (For NX70 CPU70, NX700, CPU700,
N70, N700 PLC)
Included in NX70 PLC (NX70-CPU70), NX700 PLC (NX-CPU700), N70
PLC (CPL9211A), N700 PLC (CPL7211A) product package box.
Programming Manual II (For NX70 CPU750, N700a, N700H, NX700 PLC)
Included in NX70 PLC (NX70-CPU750), N700H PLC (CPL6215A), NX700
CPU unit (CPU750A, CPU750B, CPU750C, CPU750D) product package
box.
7
8
1
System Configuration and Specifications
Remote I/O System Features
I/O signals can be transmitted via twisted-pair cable to the remote control
system. For one master unit, two wiring systems (4 for N700) are enabled,
improving efficient management of distributed I/O devices. In addition, 32
slave units can be connected to one master unit.
Master Unit
Slave Unit
NX70
(NX70-SLAVE)
NX700
(NX-MASTER)
NX700
(NX-SLAVE)
* CPL9741 (Slave Unit for N70) must be
mounted on the N70 backplane.
I/O LINK Unit
N700
(CPL7740)
N700
(CPL7741)
Features
Remote Control of I/O Data with 2 Wiring System
For convenient wiring, one master unit supports up to two
transmission paths. (4 for N700) In addition, up to 4 master units can
be mounted to 1 CPU, enabling 8 I/O control systems on 1 CPU.
Therefore, easy configuration and wiring path design have been
enabled.
High-speed - Long-distance Transmission
Transmission speed of 0.5 Mbps and total 700m of transmission
distance is supported. Twisted-pair cable is allowed for wiring, which
helps save costs.
9
Up to 1,024 Points I/O Control per One Master Unit
Maximum 32 local stations (slave and I/O Link unit) can be connected to
one master unit, providing control over up to 1,024 I/O points. (For
N700a, NX700 CPU750C, CPU750D units enable 4,096 points)
All-in-one Type I/O Link Series (Slave Unit)
For small sized equipment with I/O control, 16-points, 32-points, and
mixed I/O Link are provided. Narrow place set-up and low-cost precise
I/O installations, which were not supported by conventional Remote I/
O Slave, are enabled.
Remote I/O System Pointer
●
Remote I/O system provides control over distributed I/O with
twisted-pair cable.
●
Up to 4 wiring paths are provided, enabling support for complicated
slave system layout.
●
Recommended for networks that require remote control box or
distributed I/O units. (For high-speed processing, expansion
backplane is recommended.)
10
Remote I/O System Specifications
General Specification
Item
Temperature
Humidity
Specifications
Operating
0 to 55 °C
Storage
-25 to 70 °C
Operating
30 to 85% RH (Non-condensing)
Storage
30 to 85% RH (Non-condensing)
1500V AC for 1 minute between I/O terminal (ac) and frame ground (power unit)
Withstand voltage
500V AC for 1 minute between I/O terminal (dc) and frame ground (power unit)
Isolation resistance
100 MΩ or more at 500 mega V DC between I/O terminal and frame ground
(power unit)
Vibration immunity
10 to 55 Hz, 1 cycle/minute: double amplitude of 0.75mm, 10 minutes on 3 axis
(X, Y, Z)
Shock immunity
Peak acceleration and duration 15g/11 ms, 3 times in each X, Y, Z direction
Noise immunity
1500Vp-p with 50ns to 1 µs pulse width (generated by noise simulator)
Ambience
No corrosive gas, no excessive dust
Performance Specification (Common to Remote Systems)
Item
Specifications
Communication method
Twisted-pair half duplex
Synchronization method
Start-stop synchronization
Transmission distance (note 1)
700m (Total length)
Transmission speed
0.5 Mbps
Transmission Path
2 Transmission paths (Network) , Twisted-pair cable
(4 paths(Network) for N700)
Interface
Multi-drop (RS-485)
Transmission error check
Max. 4 units
Number of slave units that can
be connected to one master unit
Max. 32 stations
Control I/O points Number of control slots
I/O unit
CRC (Cycle check: Cyclic Redundancy Check) Method
Number of master units per
one CPU
Per one CPU unit
Max. 2,048 points (For NX-CPU750C, NX-CPU750D, N700a CPU,
Max. 8,192 points)
Per one master unit
Max. 1,024 points (For NX-CPU750C, NX-CPU750D, N700a CPU,
Max. 4,096 points)
I/O unit
9 I/O Link unit models including for 32 points and 16 points
Per one CPU unit
Max. 128 I/O units can be controlled.
Per one master unit
Max. 64 I/O units can be controlled.
Slots
per each
station
NX70,
NX700, N700
Local (Slave)
system
NX70: Max. 12 slots
I/O Link unit
Max. 1 slot
Units that cannot be mounted on the local
(slave) system backplane
NOTE 1
NX700: Max. 25 slots
N700: Max. 32 slots
Master unit, MW-link, W-link, Optical link unit, CCU unit
High-speed counter with interrupt function (4CH), Pulse I/O (4CH)
Transmission distance differs depending on cable or unit types being used.
11
Remote I/O System Product Types
Master Unit
Product Type
NX700
REMOTE MASTER UNIT
NX700
REMOTE MASTER UNIT
Current
Consumption
Mounting
Mountable on any basic or expansion
backplane (up to 4 units)
Catalog
Number
450 mA
NX-MASTER
450 mA
CPL7740
Slave Unit (1)
Product Type
Communication
Port
Mounting
NX700
Remote Slave Unit
NX70
Remote Slave Unit
Mounting on CPU unit
slot on basic backplane
N700
Remote Slave Unit
Current
Consumption
Catalog
Number
N/A
400 mA
NX-SLAVE
N/A
400 mA
NX70-SLAVE
RS232/422, 1 port
200 mA
CPL7741
Slave Unit (2)
Product Type
I/O Link Unit
(Slave Unit)
Number of
Points
Catalog
Number
Specifications
16 points
DC 24V IN, terminal block type
CPL57441
32 points
DC 24V IN, connector type
CPL57442
32 points
DC IN/ TR OUT mixed type, connector type
CPL57443
8 points
RELAY OUT, terminal block type (4 points/COM)
CPL57444
16 points
RELAY OUT, terminal block type (8 points/COM)
CPL57445
16 points
TR OUT, terminal block type
CPL57446
16 points
AC OUT, terminal block type
CPL57447
32 points
TR OUT, connector type
CPL57448
16 points
AC IN, terminal block type
CPL57449
Solenoid Valves Connectable with Slave Units
Product Type
Company
Name
SMC Inc.
Electronic
Solenoid valve
CKD Inc.
Type
Serial transmission
system
S1 Manifold Solenoid
Valve
Reduced wiring valve
system
Catalog
Number
IN313-PA2
M4LB2□ -T66
Serial transmission type
小金井 (Cognei)
Manufacturing
Co. Inc.
12
Serial transmission
system
Manifold Solenoid valve
Remarks
Electronic valves made by
companies on the left list can be
directly connected as slaves to
units.
Multi-point valve control is
enabled by reduced wiring.
FIT-MS
Remote I/O System Configuration
●
Remote I/O System is a RS-485 type (multi-drop) network that
consists of Master system (CPU Unit + Master Unit) and Slave
system (Slave Unit + I/O Unit) or I/O Link Unit, along with
transmission cables (twisted-pair) that connect each station.
●
Master unit transmits I/O data of CPU unit to slave system. Different
types of slave units (stations) can be connected together in the
network station connected by master unit. For example, on NX700
or N700 master network, NX700 slave units, NX70 and N700 slave
units, and I/O Link (local) can be connected.
●
Master unit occupies 16 I/O points. (But, if the WinFPST S/W setting
is random allocation, it can be registered as 0SE.)
Remote I/O System Configuration
Master System
NX-MASTER
Slave System
Simple
wiring with
RS-485 twistedpair cable
Max. 32
slave stations
can be connected
to one master.
N70 Series
I/O Link
Slave Unit
NX70 Series
NX700 Series
NX700 Series
N700 Series
I/O Link
Slave Unit
SMC Inc.
I/O Link
Slave Unit
Slave Unit
13
Preparing Components
Prepare each component product for Remote I/O system. The
following are descriptions on system configuration, installation
environment and installation method.
Remote Master Unit
Remote master unit is tuned for using with NX700 PLC (NX-MASTER)
and N700 PLC (CPL7740), and 4 units can be mounted to one CPU unit.
Mounting Condition
●
Remote I/O Master unit can be mounted to any I/O slot on basic or
expansion backplane.
●
Max. 4 units can be mounted.
●
System configuration conditions (expansion number, power limits,
total length) are same with that for normal cases.
Remote Slave Unit
Remote I/O Slave unit is tuned for using with NX700 PLC (NX-SLAVE),
N700 PLC (CPL7741), NX70 PLC (NX70-SLAVE), and I/O Link unit. It can
be mounted to only CPU unit slot on the PLC system. Slave unit can be
controlled as slave to master unit.
Mounting Condition
14
●
Slave unit must be mounted to CPU unit slot on the basic
backplane. (In that case, CPU unit cannot be mounted together.)
●
General I/O units or special units can be mounted to I/O unit slots.
(However, MW-link, W-link, Optical-Link, CCU unit, High-speed
counter with interrupt function (4CH) and Pulse I/O units cannot be
mounted to slave system.)
●
Refer to the unit specifications on the previous page for the number
of expansible slots. Other configuration specifications, such as
current consumption limits, are the same as those in general cases.
Make sure to use expansion cable shorter than 1.2m.
Simple Check Flowchart
This flowchart is for troubleshooting configurations of each station to
see if they match the specifications and requirements for system
setting.
Checking for slave unit connected to master network.
First, check for each master unit.
Start checking
Does the number of
slaves exceed 32?
Do not use more than 32 units.
Consider using other master
units for the remaining slots.
Does the number of I/O
units exceed 64?(Note 1)
Do not use more than 64 units.
Consider using other master
units for the remaining slots.
Does the number of I/O
points exceed 1024?
Do not use more than 1,024
points. (Note 2)
NOTE 1
The number is a total of the
numbers of I/O and I/O link
units on each station.
NOTE 2
When using NX-CPU750C,
CPU750D or N700a CPU, max.
4,096 points can be used.
NOTE 3
By default, 256 to 512 points are
set to use in each area.
For I/O points, the number of base words
of each master area can be modified with
WinFPST S/W. (Note 3)
Checking For The Overall Remote System With 1 CPU Unit
Configuration.
Start checking
Does the number of
master units exceed 4?
Does the number of I/O units
exceed 128?
Does the number of I/O
points exceed 2048?
Do not use more than 4 units.
NOTE 4
When using NX-CPU750C,
CPU750D or N700a CPU, max.
8,192 points can be used.
Do not use more than 128 units.
NOTE 5
Up to 2,048 points are
available, including area for
general I/O and remote I/O.
Do not use more than 2,048
When using NX-CPU750C,
CPU750D or N700a CPU, max.
8,192 points can be used.
For I/O points, area for general I/O can be
limited with WinFPST S/W. (Note 5)
15
Transmission Cable
●
Twisted-pair cable for instrumentation is recommended for use as
transmission (Number of pairs: 1P, Cross section of conductor:
0.5mm2 or more, Isolation material: Polyethylene [thickness of
0.4mm or more]).
●
Recommended cables and guaranteed transmission distances are
as follows:
Cable List
Guaranteed Transmission Distance
Recommended Cable (specification)
When I/O Link is
not Included
When I/O Link is
Included
LG Cables, UL Style No. 2919 24AWG
Maximum 500m
Maximum 300m
LG Cables, UL Style No. 2092-SB 20AWG
Maximum 400m
Maximum 200m
LG Cables, UL Style No. 2405 2C*28AWG
Remarks
Other recommendations
Hitachi Cables (Japan) KPEV-S 1P x 0.5mm2
2
Hitachi Cables (Japan) KPEV-S 1P x 1.25mm
Maximum 600m
Maximum 300m
Maximum 700m
Maximum 350m
General cable (VCTF Cable)
Not available
Figure 1 Twisted cable with shield
Refer to Figure 1 below
(Recommended)
Refer to Figure 2 below.
Figure 2 VCTF cable (General cable)
Conductor
Conductor
Shield
External jacket
Isolation
material
External jacket
Isolation
material
<Not available>
<Available>
Compressed Terminal for Cables
Make sure to use compressed terminal at the end of transmission
cables.
If cable is directly connected to terminal block without compressed
terminal, there is high possibility of contact defects, which may
consequently lead to transmission error.
Φ 3.7 to Φ 4.3 holes
7.2mm
or less
16
Compressed terminals available
1. Volition Terminal (O-type LUG)
2. Solution Terminal with Isolation
3. Open-end terminal (Y-type LUG)
Remote I/O System Configuration
Restrictions
Units that cannot be used on slave systems
●
Special units listed below cannot be used on slave system.
●
If restricted special units are mounted, banned unit mounting error
(E35) occurs, and CPU unit stops working. ALARM LED on master
and slave units flickers.
Restricted Advanced (special) Units
●
Remote I/O Master Unit
●
MW-Link Unit, W-Link Unit, Optical-Link Unit
●
Interrupt Unit
●
CCU Unit (Computer Communication Unit)
Remote system cannot be configured in following cases:
●
When master unit is mounted on slave system, remote I/O system
cannot be configured together.
I/O
I/O
I/O
SLAVE
Power
I/O
MASTER
I/O
SLAVE
Power
I/O
I/O
I/O
I/O
CPU
Link Unit
Power
I/O
Link Unit
I/O
SLAVE
Power
I/O
I/O
MASTER
CPU
Interrupt unit or units with interrupt function cannot be mounted on
slave system.
I/O
Interrupt
I/O
SLAVE
Power
I/O
CPU
I/O
MASTER
Power
●
CPU
No network can be configured when link unit is mounted on slave
system.
Power
●
MASTER
Power
●
It is not possible to communicate with external devices by
mounting CCU unit on slave system.
I/O
CCU
I/O
SLAVE
Power
I/O
I/O
CPU
MASTER
Power
Computer
17
18
2
External Diagram and Functions
Remote Master Unit
NX700 PLC MASTER UNIT (NX-MASTER)
24
8
16 32
17 1
25 9
MASTER
NX-MASTER
COM ERR FLK TERM
c Station No. and
Operation Status Display
1 ~ 16
17 ~ 32
e Station No. Display
Selection switch
g RS-485 Interface
3
2
1
ON
f
ON
(Bottom)
(Front)
N700 PLC MASTER UNIT (CPL7740)
MASTER
1/17
9/25
c Station No. Display
8/24
16/32
SLAVE UNIT No.
d Operation Status Display
L
H
e Station No. Display Selection switch
MODE
SW
8
7
6
5
4
3
2
1
f Operation Mode Setting switch
+
I
Port I
FG
g RS-485 Interface
+
II
-
Port II
(Front)
19
External Diagram and FunPLC Master Unit)
c Station No. Display
MASTER
1/17
9/25
8/24
16/32
•
LEDs of slave units No. 1 to 32 which are connected to master unit.
•
Station No. Check for lights by changing display range from 1 to 16
or 17 to 32 with display selection switch.
SAVE UNIT No.
d Operation Status Display
COMM.
ALAR M
LED that displays communication and operation status.
LED
○
Display
(On): Stand-by
○
Fast flickering (0.2sec interval)
COMM.
(Communica
tion Status)
(Fast flickering): Transmitting in normal operation
(Slow flickering): Transmitting in stop mode
(Off): Transmission error
Slow flickering (1.0sec interval)
(On): Unit malfunction
(Fast flickering): Slave Station No. Configuration error
ALARM
(Error)
: Restricted unit mounting error
(Off): Normal
e Station (Slave) No. Display
Selection switch
Dip Switch
Station (Slave) No. Set display range to either 1 to
16 or 17 to 32 with this switch.
L (1 ~ 16)
H (17 ~ 32)
Select mode setting when choosing transmission path, setting end station,
or communication error.
SW.
f Operation mode setting switch
MODE
SW.
7
6
5
4
3
2
OFF
ON
Operation stop
mode
Operation
continue mode
5, 6
Selecting end
station (Port II)
Not an end station.
An end station.
3, 4
Selecting end
station (Port I)
Not an end station.
An end station.
1, 2
Select port
Using port I only.
Using both port I
and port II
7
8
Operation
Communication
error mode
1
OFF
ON
All set to OFF by factory default.
g RS-485 Interface
20
ATTENTION
• Settings of SW1 and SW2 must be the same. The
same applies to SW3 and SW4, and SW5 and
SW6.
• Factory default setting is all OFF and SW8 unused.
• Settings are recognized only when power turns
on.
Connection terminal for network transmission cable. There are two ports on the
terminal.
External Diagram and Functions (NX700 PLC Master Unit)
c Station No. Display and Operation
Status Display
17
25
24
1
8
9
16
MASTER
NX-MASTER
COM ERR FLK TERM
•
LEDs of slave units No. 1 to 32 which are connected to master unit.
•
Checking for lights by changing display range either 1 to 16 or 17 to
32 with display selection switch.
"COM", "ERR" LED: Communication and operation status.
LED
Display
32
(On): Stand-by
COMM.
(Communica
tion Status)
Light on
(Fast flickering): Transmitting in normal operation
(Slow flickering): Transmitting in stop mode
(Off): Transmission error
Fast flickering (0.2sec interval)
(On): Unit malfunction
Slow flickering (1.0sec interval)
(Fast flickering): Slave Station No. Configuration error
ALARM
(Error)
Light off
: Restricted unit mounting error
(Off): Normal
(On): Using Remote I/O
(On): End Station
(Off): Not an end station.
Dip Switch
Station (Slave) No. Set display range to either 1 to 16 or
17 to 32 with this switch.
1∼ 1 6
e Station (Slave) No. Display
Selection switch
17 ∼ 32
f Operation mode setting switch
Select mode setting when choosing transmission path, setting end station, or
communication error.
SW.
3
MODE
SW.
3
2
1
1, 2
Operation
OFF
ON
Communication
error mode
Operation stop
mode
Operation continue
mode
Select end station
Not an end terminal
An end station.
ON
ATTENTION
Factory default setting is all OFF.
g RS-485 Interface
• Settings of SW1 and SW2 must be the same.
• Factory default setting is all OFF.
• Settings are recognized only when power turns
on.
Connection terminal for network transmission cable. 1 port on the terminal.
21
Remote Slave Unit
NX700 PLC SLAVE UNIT (NX-SLAVE)
COM
ALARM
c Operation
Status Display
NX70-SLAVE
SLAVE
SLAVE
NX-SLAVE
NX70 PLC SLAVE UNIT (NX70-SLAVE)
COM
ALARM
c Operation Status Display
00
00
Station No.
d Station No.
Setting switch
Station No.
0
d Station No.
Setting switch
0
4
3
2
1
OFF ON
e Operation
Mode Switch
4
3
2
1
0N
+
+
-
g RS-485 Interface
g RS-485 Interface
FG
FG
(Bottom)
(Front)
(Front)
e Operation Mode Switch
N700 PLC SLAVE UNIT (CPL741)
COMM. 0
c Operation Status Display
ALARM. 0
00
d Station No. Setting switch
Station No.
63
MODE SW
OFF
ON
RS422
RS232C
3
Output
OFF
Output
ON
1, 2
Not an
end station
An end
station
SW
4
4
3
2
1
e Operation Mode Switch
f RS422/ 232C Compatible
Communication Port
+
FG
22
g RS-485 Interface
I/O Link SLAVE UNIT (32 points type)
c Operation Status
Display
POWER
Station No.
COMM.
0
ALARM
4
3
2
1
e Operation Mode
Switch
DC IN
00
d Station No. Setting
switch
NX70-X32D
MODE SW
OFF ON
+
h External Power (24V)
Input Terminal
24 DVC
INPUT
+
-
g RS-485 Interface
LINE
FG
I/O Link SLAVE UNIT (16 points type)
c Operation Status Display
NX70-Y16R
d Station No. Setting switch
POWER
COMM.
Station No.
ALRAM
0
e Operation Mode Switch
RY OUT
00
4
3
2
MODE SW
1
OFF
ON
+
h External Power
(24V) Input Terminal
24 DVC
INPUT
+
g RS-485 Interface
LINE FG
NOTE
Product size corresponds to NX70 PLC standard. Particularly, 9 types of I/O units
are the same size as NX70 I/O unit.
23
External Diagram and Functions (SLAVE UNIT)
c Operation Status Display
COMM.
○
ALARM
○
Communication and operation status.
LED
Display
(On): Stand-by
COMM.
(Communica
tion Status)
Light on
(Fast flickering): Transmitting in normal operation
(Slow flickering): Transmitting in stop mode
Fast flickering (0.2sec interval)
(Off): Transmission error
Slow flickering (1.0sec interval)
Light off
(On): Unit malfunction
(Fast flickering): Slave Station No. Configuration error
ALARM
(Error)
: Restricted unit mounting error
(Off): Normal
❈ I/O Link module has a separate "POWER" LED which turns on when
external 24V DC input is in normal status.
d Station No. Setting switch
(Rotary switch)
the tens
column
Setting station No. for Remote I/O System. (Turn the dial and align the
arrow ( ) with the number you want. In addition, the numbers in tens
and ones columns should be set separately.)
the ones
column
ATTENTION
Station No.
e Operation Mode Setting Switch
M ODE
SW.
End station setting, mode setting for communication error
SW.
4
3
OFF
ON
RS422
RS232C
3
Output on
communication error
Output OFF
Output ON
1, 2*
End station setting
Not an end terminal.
An end station.
ATTENTION
24
OFF
RS422/RS232C
Selection Switch
ON
Factory default setting is all OFF.
Operation
4*
2
1
• When No. outside the range is set, setting error
(ALARM LED flickering) occurs and transmission
fails.
• Refer to Step e of Remote I/O connection.
• Settings are recognized on power input.
• Settings of SW1 and SW2 must be the same.
• Settings are recognized only when power turns
on.
• SW4 is communication connector for
programming tools. (Only for N700)
(But SW4 is not used on NX700, NX70, and I/O
Link Slave units.)
f RS422/232C
Communication Connector
Available only on N700 SLAVE unit. Used for programming tool
functions (ladder generation, monitoring), WinFPST S/W (computer
connection) and connection to programming devices such as HandyLoader.
g RS-485 Interface
Connection terminal for network transmission cable.
h External Power (24V)
Input Terminal
Power supply for I/O Link unit operation.
(Connect DC 24V power supply from outside.)
3
Connection Method
Remote I/O System Connection Procedure
This chapter describes the connection setting method when
configuring new Remote I/O system. Connection setting should match
with the connection pattern or operation. Here are some precautions
for configuring new system.
• Connection pattern (Look at the next page)
• I/O allocation of remote system (See "Chapter 4")
• Troubleshooting (See "Operation Mode Change (System Register
Setting)" in Chapter 5)
• Remote I/O refresh timing (See "Remote I/O Refresh Timing" in
Chapter 5)
Connection Setting Procedure
See "Connection Setting Procedure" in Chapter 3 for details.
Turn off power of all devices.
Install devices like master unit, slave
unit and I/O link unit, and configure
systems of each station.
Change or register I/O allocation mode.
• Remote I/O Map (I/O Allocation) (Note 1)
• Select operation mode on errors
Set up transmission wiring.
• Change I/O Refresh timing
If no registration or modification is made,
factory default settings will apply.
Configure each station according to
connection pattern.
• Select transmission path to use
• Remote I/O Map (I/O Allocation)
-> Base word No.
-> Current value mode
• Slave Station No.
• Is that End station or not?
• Select operation mode on errors
-> Stop CPU unit
• Operation mode on errors (Note 1)
• Change I/O Refresh timing
-> Synchronization to general I/O refresh
Check if CPU unit is in PROG mode, and
turn the power on.
Connection - Finish setting
NOTE 1
Operation mode on errors should be configured separately for each station and
CPU unit. See "Remote I/O Control on Errors" in Chapter 5 for details including
configuration and operation status.
25
Remote I/O System Connection Pattern
Below are two patterns (A, B) of connection method between master
unit and slave unit or I/O link unit. (Six patterns (A to F) are available
for N700 master unit.)
• Do not use connection patterns other than the below
two patterns (A, B). (Six patterns for N700)
ATTENTION
• Transmission cable connection and grappling should
be done in order starting from master unit.
• No branch line wiring is allowed.
• See "Connection Setting Procedure" in Chapter 3 for
details about connection and configuration.
Master Unit
Slave Unit
Connection
pattern A
○ : Connection mode
● : Connection mode (For end station)
1 Transmission path (Using port I only) . 1 Network
• The end stations are master unit and end slave unit.
MASTER UNIT
Port I
Slave Stations (Total 32 Stations)
Connection
pattern B
1 Transmission path (Using port I only) . 2 Networks
• The end stations are slave units at each end of the network.
MASTER UNIT
Port I
Port I
Slave Stations (Total 32 Stations)
Connection
pattern C
2 Transmission paths (Using port I and II) . 1 Network for each
The end stations are master unit (Common for PORT I and II) and slave unit
(PORT I and PORT II).
Port I
MASTER UNIT
26
Port II
Slave stations (Total 32 stations:
including PORT I and II)
* Only for N700 Master module
Connection
Pattern D
2 Transmission paths (Using port I and II)
2 Networks for each
The end stations are slave units at each end of the transmission path.
MASTER UNIT
Port I
Port I
Port II
Port II
Slave stations (Total 32 stations: Including port I, port II)
* Only for N700 Master module
Connection
Pattern E
2 Transmission paths (Using ports I and II) - 1 network for port I and 2
networks for port II
End stations for port I are master unit and slave unit at the end; for transmission
path using port II, the two slave units at both ends.
MASTER UNIT
Port I
Port I
Port II
Port II
Slave stations (Total 32 stations: Including Port I, port II)
* Only for N700 Master module
Connection
Pattern F
2 Transmission paths (Using ports I and II) 2 networks for port I and 1
network for port II
End stations for port I are slave units at both ends; for transmission path using
port II, master unit and slave unit at the other end.
MASTER UNIT
Port I
Port I
Port II
Slave stations (Total 32 stations: Including Port I, port II)
27
Connection Setting Procedure
The following example describes the connection setting procedure when
configuring new Remote I/O system.
Preparation
• Turn off power of all devices.
• Prepare and install devices for master unit and each slave unit.
Bellows are examples of preparation procedure for 4 system types.
(One master and 3 slaves)
Master System
Mounting master unit
16 points
output
16 points
output
MASTER
CPU
Power Unit
Master Unit: 1 unit
General I/O: 48 points (Including master unit)
Slave System
c Slave Unit
d 2 I/O Link Units
Slave unit is
mounted in CPU slot
32 points
output
1 slot
I/O : 32 points
III
SLAVE
3 slots
I/O : 64 points
32 points
input
II
SLAVE
32 points
input
16 points
output
16 points
input
SLAVE
Power Unit
I
1 slot
I/O : 32 points
• Install each slave system at proper location. As illustrated above,
2 slave units are connected to 1 master unit, which consists of a
system that controls remote I/O with 128 points. Therefore, this CPU
unit controls total 176 points, including general I/O area (48 points)
and remote I/O area (128 points).
ATTENTION
• If configuration is incorrect, an error occurs on power
input.
• [E34]: Incorrect unit mounting on slave system.
• [E34]: This unit cannot be mounted on slave system.
• [E34]: The number of slots or I/O points exceeds the
permitted range.
28
Step c Transmission Cable Wiring
Wire each slave unit installed with twisted-pair transmission cables.
• Recommended for transmission cable: Hitachi (Japan) KPEV-S 1P x
0.5mm2 compatible twisted-pair
• Use transmission cables not longer than the maximum
transmission distance (end station to end station) of each path.
Connection Method
• Cable connection and grappling should be done in order starting
from master unit.
• Each station should be connected with wiring cables.
• Connect positive side of RS-485 interface of each slave unit to
positive side of another unit, and negative to negative. (As
illustrated below)
• Connect F.G terminal to one end of transmission cable shield wire,
and ground the terminal. (As illustrated below)
+
+
Transmission cable
Transmission cable
+
-
F.G
[RS-485 Interface]
Shield
-
Shield
F.G
F.G
[RS-485 Interface]
[RS-485 Interface]
• See "Transmission Cable" in Chapter 1 for details on max.
transmission distances.
• See "Remote I/O System Connection Pattern" in Chapter 3 for details
on normal wiring.
Wiring Example
Normal Case
(This example
corresponds to
“Connection Pattern B”)
Abnormal Example
Slave (I)
Master
SLAVE
MASTER
Slave (I)
SLAVE
Master
MASTER
Slave (II)
SLAVE
Slave (II)
SLAVE
Master (III)
SLAVE
Slave (III)
SLAVE
No branch line wiring is allowed.
Master
MASTER
Slave (I)
Slave (II)
SLAVE
SLAVE
Slave (III)
SLAVE
No branch line wiring is allowed.
29
Step d Master Unit Setting
Configure settings for master unit.
End Station Setting
When the station is connected at the end of network transmission
path, set it as end station.
• See "Remote I/O System Connection Pattern" in Chapter 3 for details
on end station.
• In the example in Step c master unit is not an end station. Consider
that when setting end switch.
Setting
• See "Remote I/O System Connection Pattern" in Chapter 3 for details
on end station.
• See "Remote Master Unit" in Chapter 2 for details on end station
switch settings.
• When end station settings are incorrect, the ERROR LED on CPU
unit turns on. (Self-diagnosed error E51), Turn on the power again
after reset.
Operation Mode Selection on Communication Error
• Choose whether to stop or continue remote control networked to
master unit when communication error occurs.
• Configure the switch settings.
(NX700: Dip S/W No.3, N700: Dip S/W No.7)
• Operation mode on communication error has relation to CPU unit
settings where master unit is mounted. See "Remote I/O Control on
Errors" in Chapter 5 for details on operation status.
OFF........................ Operation stop mode
ON......................... Operation continue mode
Transmission Port (path) Selection
Only for CPL7740
• These settings apply only to N700 Master module (CPL7740).
• Select transmission port to use and configure the settings.
Operation mode setting switch SW1 and SW2 settings are
interrelated.
• See "Remote I/O System Connection Pattern" in Chapter 3 for details
on normal wiring.
• Wiring example of Step c has only one transmission path. Set SW1
and SW2 to OFF.
30
Step e Slave Unit Setting
Configure settings of slave unit.
Station No. Setting
Be careful of the following when setting Station No. for slave units.
• Up to 32 slave units can be connected to 1 master unit. (Station No.
Setting range: 01 to 32) Total number of I/O points cannot exceed
1,024. (For N700a, NX700 CPU module (NX-CPU750C, NXCPU750D), up to 4,096 points control is available.)
• Be careful not to set same Station No. for slave units networked and
connected to a same master unit. (Slave units connected to different
master units can use same Station No.)
• I/O numbers are allocated in order from low to high Stations No.
(The order of slave unit connections is not taken into account.)
• See "Remote System I/O Allocation (Map)" in Chapter 4 for details
on I/O number allocation.
Connection Methd
• Turn the Station no. setting switch (rotary switch) to set the Station
no.
the ones
column
the tens
column
Use screw driver or
other tools to turn.
●
Station No.
Station No.
Setting switch
3
Example setting “3”
• Station No. has no relation with the order of slave unit connections.
• There also can be missing numbers among Station No.
Setting Example
• In Step c, Slave unit (I) is set as Station No.1, (II) as Station No.3,
and (III) as Station No.4.
No.1
Master
SLAVE
MASTER
Slave(I)
No.4
No.3
SLAVE
SLAVE
Slave(II)
Slave(III)
• I/O numbers are allocated in an order of Slave (I), (II), and (III). See
Step f for I/O number allocation. Do not turn the Station No.
setting switch after power input. It causes no problem during
operation because I/O number allocation on power input gives
control, but error can occur on next power-on.
31
End Station Setting
When the station is connected at the end of network transmission
path, set it as end station.
Setting
• In the wiring example of Step c Slave (I) and Slave (III) are the end
stations. Set both SW1 and SW2 to ON. (Slave and I/O Link units of
all PLC use SW1 and SW2 for end stations setting, and those two
are interrelated.)
• Set SW1 and SW2 to OFF for slave units that are not end stations.
• See "Remote I/O System Connection Pattern" in Chapter 3 for details
on end station.
• See "Remote Master Unit" in Chapter 2for details on end station
switch settings.
• When end station settings are incorrect, the ERROR LED on CPU
unit turns on. (Self-diagnosed error E51) Turn on the power again
after reset.
End station
Not an end station
SW1
SW1
SW2
SW2
OFF
ON
OFF
ON
Operation Mode Selection on Communication Error
• Choose whether to stop or continue remote control networked to
master unit when communication error occurs.
• Configure the switch settings.
(NX700: Dip S/W No.3, N700: Dip S/W No.7)
• Operation mode on communication error has relation to CPU unit
settings where master unit is mounted. See "Remote I/O Control on
Errors" in Chapter 5 for details on operation status.
OFF........................... Operation stop mode
ON............................ Operation continue mode
32
RS-232/ 422 Connector Communication Method Setting (For N700
Slave Unit only)
Only for CPL7741
• These settings apply only to N700 slave module (CPL7741).
• This functions is used for "Remote Programming”, and sets
communication specifications when connecting to programming
tools such as Handy-Loader and WinFPST S/W (computer). (It
corresponds to N700 PLC SW4.)
• Setting is not needed when not using remote programming
function.
OFF........................... RS422 Mode
ON............................ RS232 Mode
Step f Turn on the PLC Power.
Turn on the PLC power when master and slave unit installation,
transmission wiring, Station No. setting and end stations setting are
finished. Remote I/O control and operation check are available after
power input.
Power Input, Remote I/O Control Check
Basic steps for starting Remote I/O System.
Steps
• Turn on the power of all slave systems controlled by Remote I/O
system.
• Turn on the power of master system (where the master unit is
mounted).Check
• Set CPU unit of master system to RUN mode.
(At this point, Remote I/O control starts over all slave units turned
on.)
Basic steps are described as above, but steps after startup can be
different depending on the configuration.
Remote I/O Allocation (map) Registration, Slave Connection Check Mode
• If there is any slave system that is registered to Remote I/O Map but
has no power input, operation does not start until power comes into
the slave system (even if master system is set ON and in RUN
mode). (CPU unit PROG.LED flickers during check.)
• That is, control starts only after turning on the powers of all
registered slave systems (and master system is started in RUN
mode.
Remote I/O Allocation (map) Registration, Slave Connection No Check Mode
• Remote I/O control starts on slave systems with power input at the
moment of master system startup (step e above).
• If a slave system is registered in Remote I/O Map, but was not ON at
the moment of master system startup, it can be controlled after
power is on itself.
33
Remote I/O Allocation (Map) Non-Registration (Current Value I/O MAP)
• Remote I/O control starts on slave systems with power input at the
moment of master system startup (step e above). (Current value I/O
MAP)
• In this case, I/O numbers of slave systems that are turned on later
than master system are ignored, which may lead to a malfunction.
• Therefore, make sure to start up the slave systems to be controlled
by Remote I/O before master system starts up.
• This mode is recommended only for system set-up.
When actually operating equipment, make sure to register Remote
I/O allocation (Map) to control “Registration I/O Map”.
Checking
Remote I/O System can be automatically allocated to an I/O No. for
slave systems currently running, even when the user has not allocated
I/O No. (That is, it is operated as Current value I/O Map.)
NOTE •
When power is on at master system, COM.LED on each slave unit flickers fast.
Check the LEDs.
•
If CPU unit PROG.LED is flickering, it means Remote I/O allocation Map is
already registered.
See "Slave Station Connection Check Mode" in Chapter 5.
•
See "Remote System I/O Allocation (Map)" in Chapter 4 for details on I/O
number allocation.
Remote I/O No. Allocation
Remote I/O Allocation (Map) Non-Registration (Current Value I/O MAP)
If the system starts up as described on the previous pages, the I/O
numbers in Current Value I/O Map (Automatic Mode) are allocated as
follows: (Refer to System Configuration in “Preparation”)
Master System
Mounting Master unit
MASTER
16 points
output
16 points
output
CPU
Power unit
0
∫
F
Y10 Y20
∫
∫
Y1F Y2F
Slave System
c Slave unit
Station
No.4
32 points
output
X680
∫
X69F
III
SLAVE
Station
No.3
32 points
input
Y650 X660
∫
∫
Y65F X67F
II
SLAVE
16 points
output
X640
∫
X64F
32 points
input
16 points
input
34
SLAVE
Station
No.1
Power unit
I
d I/O Link units (2 units)
Y700
∫
Y70F
Write ladder program for CPU unit of master system, or start forced I/O
and turn ON and OFF the I/O numbers of each station for operation
check.
NOTE I/O number of slave unit on Master Network1 starts at 640.
(Master Network1 Base Word No.: 64)
Remote I/O Allocation (Map) Registration (Registered Value I/O MAP)
Remote I/O System I/O number allocation is registered and used in
CPU unit. This method is generally used. I/O Map is saved
permanently once it is registered.
Remote I/O Allocation (Map) Registration, (Current Value Registration Mode)
• Even slave systems without power can be controller with registered
I/O numbers. (There are no missing numbers among I/O numbers.)
• Program start up can be delayed until all slave systems are ON.
Remote I/O Allocation (Map) Registration, (Random Allocation Registration
Mode)
• Random allocation mode with WinFPST S/W. This mode is used
when reserving I/O points for later use, additional slave systems are
to be installed.
• When there are many Remote I/O points, memory areas for Remote
I/O use can be expanded.
Setting
Registering with WinFPST S/W programming tool.
Press option (O) bar on the screen top, and select “Remote I/O Map
Registration (R)…” in the menu.
35
I/O Allocation Example
• Allocation when Station No.2 is to be used later. (See the diagram
below.)
Slave System
I/O Link Unit
Slave Unit
Slave Unit
I/O 80 points (Preallocation
X730
∫
X74F
32 points
output
(680∼72F)
Station
No.4
SLAVE
X640 Y650 X660
∫
∫
∫
X64F Y65F X67F
Station
No.3
32 points
input
Station
No.2
(III)
(II)
SLAVE
32 points
input
16 points
output
16 points
input
SLAVE
Power unit
Station
No.1
(I)
Y750
∫
Y76F
• The example above describes random I/O allocation.
See "Remote System I/O Allocation (Map)" in Chapter 4 for details.
• Base Word No. (Default: 64) can be modified. Also, 680 to 72F
(Reserved for Station No.2 to be added) are not used, and Station
No.4 I controlled as Y750 to Y76F.
CPU Unit Setting
• Remote I/O control operation can be configured by CPU unit system
register settings (parameter settings). Configure the setting based
on operation.
• System register settings are backed up once they are configured.
System Register Items Related to Remote I/O System
System Register
No.
36
Event
No.27
CPU unit operation continues/stops on communication errors
No.28
CPU unit operation continues/stops on system unit
malfunctions
No.35
Slave station connection check/no-check (Valid only for I/O Map
registration)
No.36
Remote I/O refresh timing
• Select Option (O) bar on WinFPST top screen menu, and select PLC
System Register Setting (P). (See the windows below.)
Setting For Operation On PLC Malfunction (WinFPST S/W), No.20 to No.28
See "Remote I/O Control on Errors" in Chapter 5 for details on No. 27
and No. 28.
Configuration Of Remote I/O Settings (WinFPST S/W), No.35 to No.36
See "Remote System I/O Allocation (Map)" in Chapter 4 and "Slave
Station Connection Check Mode" in Chapter 5 for details on No. 35
setting.
See "Remote I/O Refresh Timing" in Chapter 5 for details on No. 36
setting.
37
38
4
Remote System I/O Allocation (Map)
Slave systems in remote system configuration are controlled with I/O
No. like general system I/O. Remote system I/O No. allocation is
referred to as Remote System I/O Allocation.
Remote System I/O Allocation (Map)
Each slave system I/O number is allocated as follows:
• Allocation starts from the highest word number already registered.
This word number is referred to as Base Word No. (Word unit
setting)
Up to 4 master units can be mounted on 1 CPU unit. They are called
Master Network1, Master Network2, Master Network3 and Master
Network4, starting from the master unit nearest to the CPU unit.
• I/O numbers are allocated from the lowest to the highest Station
No. Station No. is not necessarily allocated in the order of
connection. (That is, I/O No. is allocated not in order of connection
but Station No.)
Remote I/O MAP Registration
There are 3 methods of
Remote System I/O allocation
as described on the right.
Current value I/O MAP
c Auto Mode
d Current value Mode
Registered value I/O MAP
e Random allocation
registration Mode
39
Memory area
*1
●
●
●
MASTER4
MASTER2
●
MASTER3
MASTER1
CPU
Power Unit
Base word No. is an initial value. Slave system I/O
numbers available for each master network are as
follows: (For initial value)
0
Base word No. Initial value
Base word No.64
Base word No.96
Usual I/O area
0~63F
(Control over 1,024 points)
63
64
Master Network 1 640~95F
(Control over 512 points)
96
Master Network 2 960~111F
(Control over 256 points)
11 2
Base word No.112
Base word No.120
Master Network 3 1120~119F
(Control over 128 points)
12 0
Master Network 4 1200~127F
(Control over 128 points)
12 7
*1. When using NX-CPU750C, NX-CPU750D, or N700a CPU, up to 4,096 points
for 1 master unit can be controlled. If using 4 units, up to 8,192 points)
40
Cautions for I/O No. Allocation for Each Slave System
(Station)
1. When using NX700 CPU750C, CPU750D modules or N700a PLC, up
to 8,192 points are available for remote I/O. (For example, 2,048 or
4,096 points can be allocated to Master Network1.)
2. In addition, Base word No. can be modified with WinFPST S/W,
which expands the available area of master network that needs
more I/O numbers. Areas for other master network can be reduced.
• These are registered as "Remote I/O Map Random Allocation" in
WinFPST S/W as described below. See "Control by Random
Allocation Registration Mode" in Chapter 4.
Remote I/O Allocation (Map) Registration, (Random Allocation Registration
Mode)
• Random allocation mode with WinFPST S/W. When more slave
units are to be added, or reserving I/O points for later use, this
mode can be selected.
• When there are many Remote I/O points, memory areas for
Remote I/O use can be expanded.
Setting
Registering with WinFPST S/W programming tool.
Press option (O) bar on the screen top, and select "Remote I/O Map
Registration (R)…" in the menu.
3. The first I/O number of slave system starts with the number right
after the last I/O number of the Station No. connected to the
previous system.
4. The last I/O number of slave system differs depending on the
number of occupied I/O points.
5. The system with the least Station No. will be the first number of
Base word No.
6. As usual, I/O numbers are allocated differently according to the
occupied I/O points of installed I/O and advanced units.
7. See “I/O Number Allocation” in Chapter 3 of each PLC system
manual.
41
I/O Allocation Example (I)
NOTE •
Master system I/O allocation can be modified with WinFPST S/W.
Master unit setting can also be changed from 16 points occupied --> to 0 point
occupied (0SE).
Empty slots can be set as 0 point occupied.
Changes in I/O allocation of master units do not affect the I/O allocation of slave
units at all. (N700 PLC system configuration example is as illustrated below.)
•
Slave System
MASTER System
0
2
3
4
Master Network 1
I/O 16points
Empty slot(16)
50
∫
5F
(60 ∼8F)
Empty slot(16)
I/O 32points
30
∫
4F
Empty slot(16)
I/O 16points
10 20
∫
∫
1F 2F
MASTER 2(16)
MASTER 1(16)
CPU
Power unit
0
∫
F
1
Slave
I/O range available:
640 to 95F
Master Network 2
Base word No.64
Slave
I/O range available:
960 to 111F640 to 95F
Slave
I/O range available:
1120 to 119F
(Expansion)
Base word No. 96
Empty slot(16)
Empty slot(16)
I/O 16points
Empty slot(16)
3
Empty slot(16)
2
I/O 16points
MASTER 3(16)
Power unit
1
I/O 16points
0
Master Network 3
90
∫
9F
100 110 120
∫
∫
∫
10F 11F 12F
(130∼ 16F)
Base word No.112
(Expansion)
1
2
3
4
I/O 32points
I/O 16points
MASTER 4(16)
I/O 32points
I/O 16points
Power unit
0
170 190 200 210
∫
∫
∫
∫
18F 19F 20F 22F
42
Master Network 4
230
∫
23F
Slave
Base word No.120
I/O range available:
1200~127F
I/O Allocation Example (II)
NOTE •
Below is an example of 1 Master Network, showing the Remote I/O allocation of
Master Network1. Master system I/O allocation can be modified with WinFPST
S/W.
Master unit setting can also be changed from 16 points occupied --> to 0 point
occupied (0SE).
Empty slots can be set as 0 point occupied.
•
Changes in I/O allocation of master units do not affect the I/O allocation of slave
units at all. (NX700 PLC system configuration example is as illustrated below.)
Slave System
Master System
2
3
4
I/O 16 points
I/O 32 points
I/O 16 points
MASTER 1
1
I/O 16 points
0
(For 5 slots)
S tation N o.2
Empty slot(16)
Empty slot(16)
670 680 690 710
∫
∫
∫
∫
67F 68F 70F 71F
Empty slot(16)
I/O 16 points
SLAVE
Power unit
660
∫
66F
(720∼ 74F)
Expansion cable
I/O 32 points
I/O 32 points
I/O 32 points
I/O 32 points
X640 to X65F
I/O 32 points
32 points
input
SLAVE
S tation N o.1
Power unit
I/O Link Unit
750 770 790 810 830
∫
∫
∫
∫
∫
76F 78F 80F 82F 84F
Empty slots or not-existing
slots are automatically
allocated with 16 points
(when using 5 slots) on
connection. (WinFPST S/W
can force 0 point allocation
to those slots.)
I/O Link Unit
16 points
input
SLAVE
S tation N o.3
X850 to X85F
I/O Link Unit
32 points
output
SLAVE
S tation N o.4
Y860 to Y87F
43
Current Value I/O Map and Registered Value I/O Map
Remote I/O Map is the slave system I/O number allocation input to
CPU unit on system start-up.
Remote I/O control starts according to the allocation I/O Map.
Control by Current Value I/O Map (Auto mode)
Operating with I/O Map that is automatically allocated to running slave
system on power input to CPU unit of master system.
Control by Registered Value I/O Map (Registration Mode)
Operating by I/O Map that is pre-registered to master system CPU unit.
There are 3 ways of Remote I/O Map registration as follows:
Current value I/O MAP
c Auto Mode
d Current value
registration Mode
Registered value I/O MAP
e Random allocation
registration Mode
When actually running devices, it is recommended to use “d Current
value registration Mode” in usual cases among these Registered value
I/O Maps.
44
Control by Current Value I/O Map (Auto Mode)
• When Remote I/O Map is not registered on CPU unit, I/O control
starts according to automatically configured Remote I/O Map only
over slave systems that already have power. (Base word No. is set
to basic settings.)
• Therefore, in current value Map mode, CPU operates based only on
the I/O Map of slave system that is running on power input to
master system. (That is, slave systems that were turned on after the
power input are ignored.)
ATTENTION
• Remote I/O Map is not registered at the time of CPU
unit release. See "Control by Current Value
Registration Mode" on the next page for details on
registration.
• When system register of CPU unit is reset, Remote
I/O Map is initialized even if Remote I/O Map is
already registered.
• Initialization methods of I/O Map and system register
are controlled by programming tools.
- Handy-Loader: Operated by [ACLR]-[OP]-[51]. (Only
for N700 PLC)
- WinFPST S/W (Computer): Press Option (O) bar on
the top screen of WinFPST S/W, and select "Remote
I/O Map Selection (R)..." and press "Initialization (I)"
bar.
❈ Remote I/O Map registration cannot be initialized
alone. Be careful that other system register settings
are initialized together when "Initialization (I)" bar is
pressed. Base word No. is also initialized.
Master System
S ta t io n N o .1
0
1
2
S ta t io n N o .2
S ta t io n N o .3
32 points
input
SLAVE
32 points
input
SLAVE
32 points
input
16 points
output
16 points
input
SLAVE
Power unit
16 points
input
16 points
output
MASTER
CPU
Power unit
X680 to X69F
X20 to X2F
Y10 to Y1F
0 to F
X660 to X67F
Y650 to Y65F
X640 to X64F
Power OFF
(Not operating)
• In the above example, Station No.2 power is OFF, and Remote I/O
Map is configured with only Station No.1 and Station No.3 in auto
mode. Station No.2 is not registered as Remote I/O Map even if it is
started later.
• Even during establishing system, Remote I/O control can be started
with partial connections.
45
ATTENTION
• When operating in current value I/O Map (Auto
mode), make sure to turning on the power of slave
systems to be controlled before turning on the
master system power.
1) Slave systems that are turned on later are not
registered into Remote I/O Map.
2) The I/O points of such slave systems are skipped
when allocating I/O numbers.
• In addition, if end station is not configured on master
system power input, End Station Error occurs.
(Broken wire or delayed power input). In that case,
turn off the power first, take troubleshooting steps
such as configuring end stations, and restart the
system.
Control by Current Value Registration Mode
When actually operating devices, it is recommended to use current
value registration mode.
When Remote I/O Map is registered to CPU unit, the I/O Map settings
are backed up in the memory and applied to every I/O control. (Base
word No. is set to basic settings.)
• When turning on the master system power, the I/O numbers are
maintained as the same and continue on the next slave system,
even when there are slave units not turned on.
• Slave systems that are not turned on during the master system
power input are controlled by pre-registered I/O number after
they are turned on later.
• If Slave Station Connection Check Mode is on (System register
No. 35 is set to 1), operation starts after all registered slave
systems start up. (Note 1)
NOTE 1 See "Slave Station Connection Check Mode" in Chapter 5 for details on that
mode.
[Registration]
Registering currently mounted I/O into Remote I/O System (including
all slave systems). All Remote I/O Systems should be turned on. Once
I/O is registered when installing or modifying system for the first time,
the settings are backed up in the CPU memory.
• WinFPST S/W (Computer): Press option (O) bar on the top screen of
WinFPST S/W, select "Remote I/O Map Registration (R)…" in the
menu, and press "Register Mounting (M)" bar. (PLC and WinFPST
should be on-line.)
46
Master System
S ta t io n N o .1
0
1
2
S ta t io n N o .2
S ta t io n N o .3
32 points
input
SLAVE
32 points
input
SLAVE
input
32 points
16 points
output
16 points
input
SLAVE
Power unit
16 points
input
16 points
output
MASTER
CPU
Power unit
X700 to X71F
X20 to X2F
Y10 to Y1F
0 to F
X660 to X67F
Y650 to Y65F
X640 to X64F
Power OFF
(Not operating)
X680~X69F
• In the above example, Station No.2 is not operating (No power or
no connection, etc.). Station No.2 I/O number is registered, and
even if slave system is started later, it is recognized by the
registered number and can be controlled.
• WinFPST S/W registration is necessary before applying Current
value registration mode to register Remote I/O Map.
ATTENTION
• When using Current value registration mode,
incorrect registration can lead to system
malfunction.
• If there is no registered slave system, the Station No.
is recognized as empty and connection standby
mode is applied. (In Slave station connection
checking mode)
47
Control by Random Allocation Registration Mode
I/O Map is randomly generated and registered on CPU regardless of
currently mounted I/O status of Remote I/O System (including all slave
stations). System operates based on the registered Remote I/O System
I/O Map.
ATTENTION
When using “Random allocation registration mode,”
and there are changes in unit configuration during
system use, new registration is necessary. If not, the
changed unit settings are not recognized and can lead
to I/O Verify error.
Registration
Registering with WinFPST S/W programming tool.
Press option (O) bar on the screen top, and select "Remote I/O Map
Registration (R)…" in the menu. See "Remote System I/O Allocation
(Map)" in Chapter 4.
Base Word No. Setting
Remote I/O Base word No. can be registered freely for each master unit.
With this method, I/O points needed for each Master Network can be
secured, or allocations for Remote I/O area and General I/O area
(Master system I/O) can be modified. (See "Remote System I/O
Allocation (Map)" in Chapter 4 for details on factory defaults.
[Setting Range]
For each master unit, 0 to 127 word units are allocated (For N700a, and
CPU750C and CPU750D, 0 to 511 words allocated.)
(Ex) If the Base word No. of Master Network3 is changed from 112 to
104, 256 points from 1040 to 119F on Master Network3 can be
controlled.
To do that, the following conditions should be satisfied.
[Setting Conditions]
The last I/O number of general I/O area < Base word No. of Master
Network1
Base word No. of Master Network1 < Base word No. of Master Network2
Base word No. of Master Network2 < Base word No. of Master Network3
Base word No. of Master Network3 < Base word No. of Master Network4
< Condition 1 >
Base word No. must set from the master unit mounted the nearest to
CPU unit. A unit cannot be set to a Base word No. lower than that of
another unit nearer to CPU unit than itself.
Memory area
Base word No. 0
48
General I/O Map
Changeable
Master Network 1
Changeable
Master Network 2
Changeable
Master Network 3
Changeable
Master Network 4
No duplicate allowed.
< Condition 2 >
I/O cannot be duplicated between the following pairs: General I/O area
and Master Network 1 area; Master Network 1 and Master Network 2;
Master Network 2 and Master Network 3; Master Network 3 and
Master Network 4.
❈ If duplicated, Remote I/O Map Duplicate Error (E37) occurs.
< Condition 3 >
When Master Network 1 Base word No. is set to 0, all memory area are
used for Remote I/O. In that case, I/O units or advanced units cannot be
used on master system. Set the I/O type points of each unit mounted
on master system (including master unit) to 0SE (advanced unit) or 0E
(I/O unit).
Base word No. 0
0
MASTER 4
MASTER 3
MASTER 2
MASTER 1
Master Network 3
CPU
Power unit
Master Network 2
I/O 16 point
Master Network 1
This I/O unit
cannot be used.
Master Network 4
127
0SE
0E
Setting Occupied Slot Number
Setting occupied slot number for each slave system.
• Up to 64 occupied slots can be used for one unit.
• On slave systems consisting of slave units, up to 32 slots are
available for N700, up to 25 for NX700 series, and up to 12 slots for
NX70 series. Configure both used and empty slots. (In this case, the
3-slot and 5-slot backplane of N700 PLC are not needed to operate
as 8 slots. The same applies for NX700 PLC.)
I/O Type, Points Setting
Setting the I/O type and occupied points being used or to be used for
each slot. If not to set empty slots, set them as 0E. There will be no
missing numbers among I/O numbers of currently mounted units.
NOTE
PLC N-series allocates 16 points (16E) to empty slots.
16 X
[Occupied points]
16
32
64
128
0
NOTE
[Type]
X: Input
Y: Output
E: Empty and unused slot
SX: Advanced unit, input
SY: Advanced unit, output
SE: Link related unit, no I/O
Up to 1,024 I/O points can be allocated to one master unit.
(For 700a, NX-CPU750C, and NX-CPU750D units, up to 4,096 points can be
allocated.)
49
50
5
Remote System Operation Mode
Remote I/O System control operation mode can be changed according
to the usage.
This chapter describes the operations and modification methods of
operation modes.
Operation Mode Change (System Register Setting)
Changeable Operation Mode
Remote I/O Control On Errors (See "Remote I/O Control on Errors" in
this Chapter)
Selecting operations when transmission cable breaks or out-offunction of a slave unit.
• Decision on whether to stop operation or continue on remaining
Remote I/O.
• Setting LED check options on errors.
Slave Station Connection Checking Mode (See "Slave Station
Connection Check Mode" in this Chapter)
When Remote I/O Map is already registered, Remote I/O control can
start after all registered slave systems are powered on.
Remote I/O Refresh Timing (See "Remote I/O Refresh Timing" in this
Chapter)
Setting whether or not to synchronize Remote I/O control refresh
(control processing) timing to refresh of general I/O control of master
system. If there are many Remote I/O control points, the time for 1
scan can be long. If No synchronization is selected, the scan time of
general I/O control can be shortened.
51
Changing Operation Mode
Operation mode of Remote I/O System control can be changed with
system register settings, the parameter setting of CPU unit. System
register settings can be modified with WinFPST S/W as described
below.
Registering with WinFPST S/W programming tool.
Press Option (O) bar on the top screen of WinFPST
S/W, and select PLC System Register Setting….
The screen on the right appears when "Operation
on Errors" is pressed in PLC System Register
Setting mode. (Set No.27 and No.28.)
The screen on the right appears when "Remote I/O
Setting" is pressed in PLC System Register Setting
mode. (Set No.35 and No.36.)
❈ Set CPU unit of master system to PROG.mode
when configuring with WinFPST S/W
System Register List about Remote I/O Control
Address
(No.)
52
Description
Initial Value
(Default)
Set Value and Specification
27
CPU unit operation on Remote I/O errors
(Transmission error, circuit error)
0
0: Stop operation
1: Continue operation
28
CPU unit operation on Slave system I/O unit errors
0
0: Stop operation
1: Continue operation
35
Setting slave stations connection checking mode for
registered value I/O MAP.
1
0: No check.
1: Check.
36
Remote I/O refresh setting
0
0: Scan synchronization
1: No scan synchronization
Remote I/O Control on Errors
Operation can be selected for Remote I/O System errors. There are two
types of errors that occur during Remote I/O control as follows:
Communication Error
When communication fails between master and slave units due to
slave system power off or broken transmission cable, Communication
error occurs.
Malfunction of Units Connected to Slave System
When there is malfunction of I/O or advanced units connected to slave
system, such as excessive load, Malfunction of units on slave system
occurs.
• Those errors described above can be addressed by modifying
settings of CPU unit system register and/or master unit operation
mode switch. Configure settings of operations on both
communication errors and unit malfunctions in a comprehensive
way.
Setting Location
Settings
System Register No.27
Operation on communication errors
System Register No.28
Operation on malfunction of units connected to
slave systems
Master Unit
Setting switch, NX700: SW3
(N700: SW7)
Remote I/O Control on Communication Errors
Slave unit
Setting switch, SW3
Retentive output or non-retentive output (OFF) on
communication errors
CPU unit
53
Operation on Communication Errors
• Communication error means communication between master and
slave units fails due to power off of slave systems or broken
transmission cables.
• If error occurs, Remote I/O communication error (Self-diagnosed
error code 46) is indicated. Slave systems unreachable can be
verified with special data register DT90131 to DT90137.
(See "Identifying the slave system where error has occurred" in
Chapter 7.)
Slow
flickering
of COM
SW3:ON
(Retentive output)
Slow
flickering
of COM
Power OFF
Station No.2
Station No.1
Station No.3
Slave
System
Slave
System
Station No.4
Slave
System
Slave
System
Master
System
SW3:OFF
(Output OFF)
Breaking of cable
On the slave system described above, communication is not available
for Station No.2 to No.4.
Normal Operation of Slave Systems
In the case of communication error, 4 operation types are available for
normal slave systems.
Operation
Modes
System
Register
Master Unit
SW3
*1
Operations on
Communication Errors
General
I/O
Slave
System I/O
Recovering after
Troubleshooting
No.27
No.28
I/O operation
stops [1]
0
-
OFF
X
X (COM.
changing)
Restart of Master unit
I/O operation
stops [2]
0
-
ON
X
X (COM. not
changing)
Initialize
Remote I/O
operation stops
alone
1
-
OFF
O
O (COM.
changing)
Restart of Master unit
I/O operation
continues
1
-
ON
O
O (Removal of
broken
station)
Automatic recovering
after removing error causes
*2
O: Operation continues, X: Operation stops
*1. Set master units for NX700 to SW3, master units for N700 to SW7.
*2. Slave systems unreachable can be controlled again after recovering from
communication errors (re-wiring of cables or power input).
In case of communication errors
Remote I/O control is set to stop, output on slave systems
communicating is OFF. It has no relations with slave unit operation
mode setting switch SW3 (retentive output/non-retentive output).
54
The following are descriptions on the 4 operation modes on
communication errors when slave units are normally started.
1. I/O Operation Stops [1]
• CPU unit System register No.27 : 0 (Operation stop mode)
• Master unit setting switch SW3 (SW7 for N700): OFF (Operation
stop mode)
[Operation Description]
• All I/O operations are stopped.
• On normal master unit, the COM.LED flickers slower than usual
case (1sec interval), which indicates communication errors.
[Troubleshooting]
• Reconnect master system power after removing the error causes
(broken transmission cables).
2. I/O Operation Stops [2]
• CPU unit System register No.27 : 0 (Operation stop mode)
• Master unit setting switch SW3 (SW7 for N700): ON (Operation
continue mode)
[Operation Description]
• All I/O operations are stopped.
• COM.LED on master unit and slave unit are same as normal cases.
(flickering with 0.2 sec. interval)
[Troubleshooting]
• Initialize master system in RUN mode after removing error causes.
(broken transmission cables)
3. Remote I/O Operation Stops alone
• CPU unit System register No.27 : 0 (Operation continue mode)
• Master unit setting switch SW3 (SW7 for N700): OFF (Operation
stop mode)
[Operation Description]
• Only Remote I/O operation is stopped. Master system I/O operation
continues.
• COM.LED on master unit and slave unit are flickering slower than
normal cases (1sec interval), which indicates communication errors.
[Troubleshooting]
• Reconnect master system power after removing the error causes
(broken transmission cables).
55
4. I/O Operation Continues
• CPU unit System register No.27 : 1 (Operation continue mode)
• Master unit setting switch SW3 (SW7 for N700): ON (operation
continue mode)
[Operation Description]
• Operation continues on normal master and slave system I/O,
excluding unreachable slave systems.
• COM.LED on master unit and slave unit are same as normal cases.
(flickering with 0.2 sec interval)
[Troubleshooting]
• Communication to slave systems is reestablished after removing
error causes (broken transmission cable). ERROR LED of CPU unit is
still turned on, so turn on the initialize switch of CPU unit to turn off
the ERROR.LED.
Output of Unreachable Slave Systems
• Output status of slave systems unreachable from master units can
be maintained. Turn ON setting switch SW3 of slave unit.
• If output is ON at the moment of communication errors, it is
maintained as ON. When slave unit setting switch SW3 is OFF and
communication error occurs, all outputs turn OFF.
• CPU unit settings (System register No.27 and master unit setting
switch SW3 *1) have no relations. (*1. SW7 for N700 Master unit)
56
Operation On Malfunction Of Units Connected To Slave
System
• Setting of whether to stop or continue I/O operations when
malfunctions such as excessive load occur on I/O units or advanced
units connected to slave system is enabled by this function.
• When error occurs, Remote I/O slave unit malfunction (selfdiagnosed error code E47) is indicated. Slave systems mounted
with malfunctioning units also can be verified with special data
register DT90131 to DT90137
Advanced unit unusable (Ex)
Slave System
Master System
I/O Link
I/O Link
16 points
output
SLAVE
32 points
input
SLAVE
Input
SCU
Input
SLAVE
Power Unit
MASTER
CPU
Power Unit
Station No.2
Station No.1
Station No.3
On the above slave system, there is a malfunction of SCU mounted in
slot 1 of Station No.1 of slave system. If operation continues, normal
I/O control is possible on Station No.2, Station No.3 and Station No.1.
When error occurs on units on slave systems, there are 3 operation
modes available.
Operation Modes
I/O operation stops
I/O operation stops [1]
I/O operation continues [2]
System
Register
Master
Unit
No.27
No.28
-
0
-
0
1
-
1
1
OFF
1
1
SW3
OFF
*1
Operations on
Communication Errors
Recovering after
Troubleshooting
General
I/O
Slave System I/O
X
X
(COM. not changing)
Restart of Master unit
O
O
Restart of Master unit
O
Restart of slave
systems with
malfunctioning
units.
O
O: Operation continues, X: Operation stops
*1. Set master units for NX700 to SW3, master units for N700 to SW7.
57
Descriptions on the 3 operation modes in the case of communication
errors.
1. I/O Operation stops
• CPU unit System register No.28 : 0 (Operation stop mode)
❈ System
register No.27 and master unit setting switch location make
no difference.
[Operation Description]
• All I/O operations are stopped.
• COM.LED of normal slave units connected is the same as LED status
in normal operation. (flickering with 0.2 sec interval)
• Output on slave system turns OFF.
[Troubleshooting]
•
Reconnect master system power after replacing the malfunctioned
unit with normal one.
2. I/O Operation Continues [1]
• CPU unit System register No.28 : 1 (Operation continue mode)
• Master unit setting switch SW3 (SW7 for N700): OFF (Operation
stop mode)
❈ System
register No.27 can be set to any location. In addition, when
No.27 is set to 0, Master unit setting switch SW3 (SW7 for N700) can
be set to ON.
[Operation Description]
•
•
I/O operations on slave and master system continue.
I/O operations on normal I/O and advanced units continue even if
the slave system has malfunctioned units.
[Troubleshooting]
• Reconnect CPU unit power after replacing the malfunctioned unit
with normal one.
3. I/O Operation Continues [2] (Auto Recovery)
• CPU unit System register No.28 : 1 (Operation continue mode)
• CPU unit System register No.27 : 1 (Operation continue mode)
• Master unit setting switch SW3 (SW7 for N700): ON (operation
continue mode)
[Operation Description]
•
•
I/O operations on slave and master system continue.
I/O operations on normal I/O and advanced units continue even if
the slave system has malfunctioned units.
[Troubleshooting]
•
58
System automatically recovers when the power is reconnected to
the slave system after the malfunctioned unit is replaced with
normal one. ERROR.LED of CPU unit is turned on, so turn on the
Initialize switch on CPU unit in RUN mode to turn off the light.
ATTENTION
The operation mode on errors can be set as a
combination of system register settings and operation
mode setting switch as shown in the example below:
[Ex]
When communication error occurs, stop only the
Remote I/O control. But when the output on
unreachable slave system is ON, the control continues.
Operation also continues when error occurs on units
on slave system.
[Settings]
• System register No.27: 1
• System register No.28: 1
• Master unit operation mode setting switch SW3
(SW7 for N700): OFF
Slave unit setting switch SW3: ON
59
Slave Station Connection Check Mode
Set to slave station connection checking mode on the start-up of
Remote I/O System (power input to master system). Operation starts
after all slave systems registered on Remote I/O Map are powered on.
•
•
•
•
Slave station connection checking mode is a factory default setting.
CPU unit System register No.35 settings apply to this
configuration.
Remote I/O Map registration is necessary for slave stations
connection checking mode.
When there is no Remote I/O Map registered, the slave station
connection checking mode settings are invalid. (See "Current Value
I/O Map and Registered Value I/O Map" in Chapter 4.)
Slave Station Connection Checking Mode
Setting
System register No. 35: 1
Operation
If there is a registered system not started when master system is in
RUN mode with power input, system goes into slave system
connection standby mode and operation does not start. (CPU unit
PROG. LED flickers in this status. Also, COM.LED of master unit and
each running slave unit flickers fast, which indicates a normal
operation. Actual control starts after all slave units registered in
Remote I/O Map are powered on.
Master System
Slave System
I/O Link
16 points
output
Station No.3
CPU unit LED
RUN
PROG.
SLAVE
CPU unit LED
32 points
input
SLAVE
Input
SLAVE
Power Unit
MASTER
CPU
Power Unit
Station No.2
Station No.1
I/O Link
Station No. 2
Power input
(connection)
RUN
Lit (ON)
PROG.
Out (OFF)
Delayed power input
flickering
ATTENTION
Connection standby usually occurs in the following
cases:
• No power input to slave unit.
• There is a broken transmission cable.
• Slave unit with a certain Station No. on the
registered I/O Map does not exist on the actual
wiring.
• Station No. setting does not appear on the registered
I/O Map.
❈ In the case of (3) or (4), reset the Station No. and
reconnect the power.
60
Slave Station Connection No Check Mode
Setting
System register No. 35: 0
Operation
Actual control starts on already running slave systems, at the time
when master system is powered on and in RUN mode. Slave units
registered on Remote I/O Map can be controlled from the power input
moment, even when they are powered on later than master system
power input.
61
Remote I/O Refresh Timing
During Remote I/O control, if refresh (control processing) is performed
when both general I/O (master system I/O) scan and slave I/O scan are
finished (scan synchronization), remote I/O scan can take more time
and stanby time for general I/O scan can increase, where there are
many slave units and controlled I/O points.
In such cases, set Remote I/O refresh to Scan no synchronization, and
general I/O refresh is performed without waiting until I/O scan on slave
system finishes, reducing the standby time of scanning.
•
Factory default is Scan synchronization.
•
CPU unit System register No.36 settings apply to this
configuration.
•
Scan no synchronization mode can be effective when Remote scan
takes even more time than general scan. When slave system I/O
scan time is shorter than general scan time, refresh is performed
synchronized to general scan even when Scan no synchronization
is selected.
Scan No Synchronization Mode
Setting
System register No. 36: 1
Operation
When general I/O scan finishes, refresh starts on general I/O even if
slave system I/O scan is still on going.
Remote I/O refresh is performed at the moment of general I/O refresh,
after slave system I/O scan finished.
General I/O scan < Remote I/O scan (Slave system I/O scan)
General I/O scan
Scan time
I/O refresh
Remote I/O scan
62
Standby time
Scan Synchronization Mode
Setting
System register No. 36: 0
Operation
General I/O refresh and Remote I/O refresh begin at the time when
both general I/O and Remote I/O scans finish.
When Remote I/O scan takes a longer time, the total scan time can be
longer.
General I/O scan < Remote I/O scan (Slave system I/O scan)
General I/O scan
Scan time
I/O refresh
Standby time
Remote I/O scan
Note
When Remote I/O scan time is even shorter than general I/O scan, the
refresh time is the same as that in Scan synchronization mode, even if
scan synchronization is selected.
General I/O scan < Remote I/O scan (Slave system I/O scan)
Scan time
I/O refresh
Standby time
63
64
6
Remote System Functions
Remote I/O System provides the following functions:
• Remote I/O control
• Shared memory access
• Remote programming function
NOTE •
Shared memory access can be used to read/write to the shared memory of
advanced units (locating, SCU, high-speed counter, analog) that are mounted
to slave systems.
•
Remote programming function enables the use of programming tools
(WinFPST S/W) via slave unit communication ports. (This function is available
only for N700 PLC SLAVE units (CPL7741).
Remote I/O Control
This is the most basic function of Remote System, which enables
control over I/O of slave system (system with slave units mounted),
from the master system (system with master units mounted). This
operation is called Remote I/O control.
NX-MASTER
Master system
Master station Master System
Slave station
Slave System
Simple wiring
with twisted-pair
cables
Master Station
X680
Y80F
( )
Slave station
Slave station
Slave station
[Ladder program]
Slave System
S ta tio n N o.2
16 points
output
16 points
input
16 points
input
SLAVE
X640 X680 X720 Y740 Y760
∫
∫
∫
∫
∫
X67F X71F X73F Y75F Y77F
Slave System
Power unit
S ta tio n N o.1
32 points
output
32 points
output
32 points
input
64 points
input
64 points
input
SLAVE
Y80F turns ON when
X680 turns ON.
Power unit
❈ In the above example,
X780 X790 Y800
∫
∫
∫
X78F X79F X80F
65
Shared Memory Access
• This function enables reading and writing data in the shared
memory of advanced unit (locating, SCU, high-speed counter, and
analog) from master system CPU unit.
• Using ladder program advanced instructions F152(RMRD) and
F153(RMWT). (To read or write data to shared memory is done by
shared memory access.
• The illustration below shows an example of data setting or
monitoring on high-speed counters with shared memory access
function.
Advanced unit with
shared memory
NX-SLAVE
NX-MASTER
F153 (RMWT)
Write instruction
■ Initial value
■ Target value
SLAVE System
MASTER System
F152 (RMRD)
Read Instruction
■ Current Value
ATTENTION
Motor
Motor
Drive
• Up to 32 words of data can be transmitted by one
instruction.
• During running shared memory access instruction
(R9035:OFF), another shared memory access instruction
cannot be executed.
• Shared memory access instructions F152 and F153 on
advanced units on slave system run differently than
general shared memory access instructions F150 and
F151.
• Be careful about the following when executing F153.
For F152 and F153
When execution requirements are met and instructions are
executed, the actual request (sending and receiving) is
applied only to slave systems. Actual accesses (sending and
receiving) starts on the point of "END" instruction execution,
it takes several scans to finish accesses after execution
requirements are met.
Therefore, when accessing shared memory of advanced
units on slave systems, it is necessary to monitor the
following relay and special data registers and check the
operation status.
• R9035: Memory access instruction available flag
• R9036: Memory access instruction completion flag
• DT90036: Memory access instruction completion code
(DT9036 for N700).
For F150 and F151
Actual share memory access is performed and completed at
the moment when execution requirements are met and
instructions are executed. (Access completed by one scan.)
66
F152 (RMRD)
Read data from advanced units on
Remote slave systems
P152 (PRMRD)
Steps: 9
Read data from shared memory of advanced unit installed on slave
system and write in CPU unit.
Mnemonic Marks
Ladder Marks
Address
X0
10
[ F152
RMRD, DT0,
K 0,
K 10,
DT10 ]
S1
S2
n
D
Instructions
10
ST X 0
11
F152 (RMRD)
DT
0
K
0
K
10
DT
10
Word operand (memory area) types that can be defined (Processing unit: word)
(O: Available -: Not available)
I = I0 to ID
Description (F152, RMRD)
WX
WY
WR
WL
SV
EV
DT
Ld
FL
I
Constant
K
H
f
Index
Formula
S1
Word operand containing
control data (2 words)
O
O
O
O
O
O
O
O
O
-
-
-
-
O
S2
Word operand or constant
data that contains the initial
address of special unit
shared memory
O
O
O
O
O
O
O
O
O
O
O
O
-
O
n
Word operand or constant
data that contains the
number of words to read
O
O
O
O
O
O
O
O
O
O
O
O
-
O
D
Initial word operand to save
data read from CPU unit
-
O
O
O
O
O
O
O
O
-
-
-
-
O
Operation Description
First, n words of data are read from the address assigned as S2. The
data is stored in the shared memory of advanced unit on the Remote
and Slave systems that are assigned as S1 and S1+1. Then, the data is
stored, starting from word operand assigned as D at CPU unit.
Assigning Each Item
• Control data [S1]
Assign Master unit no., slave unit no. and shared memory of
advanced unit.
• Initial address [S2] in the special unit shared memory (Read the
shared memory data and send it to CPU module).
Refer to the shared memory list of the special unit.
Ex) When assigning address "2", write "K2".
• Number of words to read [n]
Assign "K" constant.
Ex) When reading 10 words of data, write "K10".
67
Flag Operation
ON when index formula used exceeds memory area.
ON when control data is out-of-range.
R9007, R9008
(Error flag)
ON when master unit does not exist.
ON when the data read exceeds D area.
Description on the Program on the Previous Page
When X0 is ON, 10 words of data from address 0 to 9 on the Remote I/
O Slave system that are assigned by DT0 and DT1 is read, and then
stored in CPU unit DT10 to DT19.
No.5
0 1
2
3
4
Advanced
unit
SLAVE
Power Unit
MASTER 2
MASTER 1
CPU
Power Unit
DT0 = H105
DT1 = H0
MASTER 1
Advanced Unit
(Shared memory)
CPU Unit
0
1
2
3
4
DT10
DT11
DT12
DT13
DT14
8
9
DT18
DT19
Control Data Setting [S1] [S1+1]
Set Master Unit No. and Slave Unit No. as S1, and set the advanced
unit slot No. as S1+1.
15
(Upper byte)
7
(Lower byte)
0
[S1]
SLAVE Unit No.: H01~H20 (1~32)
MASTER Unit No.: H1~H4(1~4)
15 (Upper byte)
7
(Lower byte) 0
[S1+1]
H00
68
Slot No.: H00~H1F (0~31)
Configuration Example of the Program on the Previous Page
In the program example on the previous page, when assigning
Advanced unit mounted in slot 0 of Slave No.5 in the path of Master
No.1, write program as follows:
X10
F0 MV, H0105, DT0
F0 MV, H 0, DT1
F152 RMRD, DT0, K 0, K10, DT10
NOTE Control data settings are as follows:
DT0 = H0105 (Master No.1, Slave No.5)
DT1 = H 0 (Slot 0)
Precautions for Programming
Multiple RMRD instructions (F152) or RMWT instructions (F153) cannot
be executed at the same time. Write program to be executed when
execution permission flag R9035 is ON.
R9035
0: Not executable (RMRD/ RMWT instruction is running)
1: Executable
RMRD instruction performs receiving request only, but the actual
processing starts after [ED] instruction runs. Check if execution is
completed using RMRD /RMWT instruction completion flag R9036.
R9036
DT90036
0: Normal completion
1: Termination (Error code on DT90036)
On termination (R9036:ON), error specifications are stored
into the error code.
NOTE Lists of Error codes stored in DT90036
Code(HEX)
Error Specification
5B
Time Out:
No correspondent.
Unable to send.
68
No access area:
Assigned memory area or address does
not exist.
71
Time-out with sending answer standby
72
Time-out with empty sending buffer standby
73
Time-out with response standby
NOTE Error codes H71 to H73 indicate communication time error. Time-out can be
configured in the range of 10.0ms to 81.9s (unit: 10ms) at the system register No. 32
settings. Default is 2s.
69
F153 (RMWT)
Write data to advanced unit on
Slave system.
P153 (PRMWT)
Steps: 9
Write CUP unit data to shared memory of advanced unit installed on
remote slave.
Mnemonic Marks
Ladder Marks
Address
X0
[ F153
10
RMWT, DT0,
DT250,
S1
K 20,
S2
n
K500 ]
Instructions
10
ST X 0
11
F153 (RWMT)
DT
0
DT
250
D
K
20
K
500
Word operand (memory area) types that can be defined (Processing unit: word)
(O: Available -: Not available)
I = I0 to ID
Description (F153, RWMT)
WX
WY
WR
WL
SV
EV
DT
Ld
FL
I
Constant
K
H
f
Index
Formula
S1
Area containing control
data (2 words)
O
O
O
O
O
O
O
O
O
-
-
-
-
O
S2
Initial word operand of
CPU unit that contains
data to write
O
O
O
O
O
O
O
O
O
-
-
-
-
O
n:
Word operand or constant
data that contains the
number of words to write
O
O
O
O
O
O
O
O
O
O
O
O
-
O
D
Word operand or constant
data that contains the
initial address of shared
memory inside the
advanced unit
O
O
O
O
O
O
O
O
O
O
O
O
-
O
Operation Description
On the CPU unit, write n words of data starting from word operand
assigned as S2 to the advanced unit shared memory on the slave
system of Remote I/O system, from address assigned as D.
Assigning Each Item
• Control data [S1]
Assign Master unit no., slave unit no. and shared memory of
advanced unit.
• Initial address of special unit shared memory [S2]
Refer to the shared memory list of the special unit.
Ex) When assigning address “2”, write “K2”.
• Number of words to write [n]
Assign “K” constant.
Ex) When writing 10 words of data, write “K10”.
70
Flag Operation
ON when index formula used exceeds memory area.
R9007, R9008
(Error flag)
ON when control data is out-of-range.
ON when master unit does not exist.
ON when the data range to write exceeds S2 area.
Description on the Program on the Previous Page
When X0 is ON, 20 words of data (assigned as DT0 and DT1) from
DT250 to DT269 on the CPU unit are written to the shared memory
addresses 500 to 519 on the special unit on the Remote I/O Slave
system.
No.10
0 1 2
3
4
Advanced
unit
SLAVE
Power Unit
MASTER 2
MASTER 1
CPU
Power Unit
DT0 = H20A
DT1 = H2
MASTER 2
Advanced Unit
(Shared memory)
CPU Unit
DT250
500
DT251
DT252
501
502
DT253
DT254
503
504
DT267
DT268
518
DT269
519
517
Control Data Setting [S1] [S1+1]
Set Master Unit No. and Slave Unit No. as S1, and set the special unit
slot No. as S1+1.
15
(Upper byte)
7
(Lower byte)
0
[S1]
SLAVE Unit No.: H01~H20 (1~32)
MASTER Unit No.: H1~H4(1~4)
15 (Upper byte)
7
(Lower byte)
0
[S1+1]
H00
Slot No.: H00~H1F (0~31)
71
Configuration Example of the Program on the Previous Page
In the program example on the previous page, when assigning
advanced unit mounted in the slot 2 of Slave No. 10 connected to
Master Unit No.2, write program as follows:
X10
F0 MV, H020A, DT0
F0 MV, H2,
DT1
F153 RMWT, DT0, DT250, K20, K500
NOTE Control data settings are as follows:
DT0 = H020A (Master No.2, Slave No.10)
DT1 = H 2 (Slot 2)
Precautions for Programming
Multiple RMRD instructions (F152) or RMWT instructions (F153) cannot
be executed at the same time. RMRD /RMWT instructions Write
program to be executed when execution permission flag R9035 is ON.
R9035
0: Not executable (RMRD/ RMWT instruction is running)
1: Executable
RMRD instruction performs receiving request only, but the actual
processing starts after [ED] instruction runs. Check if execution is
completed using RMRD /RMWT instruction completion flag R9036.
R9036
DT90036
0: Normal completion
1: Termination (Error code on DT90036)
On termination (R9036:ON), error specifications are stored
into the error code.
List of error codes stored in DT90036
Code(HEX)
Error specification
5B
Time Out:
No correspondent.
Unable to send.
68
No access area:
Assigned memory area or address does
not exist.
71
Time-out with sending answer standby
72
Time-out with empty sending buffer standby
73
Time-out with response standby
NOTE Error codes H71 to H73 indicate communication time error. Time-out can be
configured in the range of 10.0ms to 81.9s (unit: 10ms) at the system register No. 32
settings. Default is 2s.
72
Example of Sequence Program Using Shared Memory
Access Instruction
This example installs advanced unit onto the Remote I/O System
Slave, accesses the shared memory of special unit on the slave
system. Refer to the example illustrated below when writing the
program.
NX-MASTER
Advanced unit with
shared memory
NX-SLAVE
Station No.1
Master System
SLAVE system
Twisted-Pair Cable
• Master Network: Master Network 1 (Master unit mounted nearest to
CPU unit)
• Station No. (Slave station No.): Station No.1
• Special unit mounting location: Slot No.1 (The second slot)
In the example above, the control data (32bit configuration) settings
are as follows when assigning the special unit using shared memory
access instructions (F152, F153).
15
(Upper)
(Lower)
S1
A
B
S1+1
C
D
0
A: Master Unit Network Selection..... 01H (Master Network 1)
B: Station No. (Station No.) setting....01H (Station No.1)
C: Bank No......................... 00H (Unit without bank)
D: Slot No.......................... 01H (Slot N0.1)
Control data: S1 = “0101H”
S1+1 = “0001
ATTENTION
For example, store S1 data to data register DT0, and S1+1 to
data register DT1. Assign only the initial DT0 when using
shared memory access instruction.
73
Ex 1. Simple Memory Access
• Write the data in DT100 to D114 (15 words) to the shared memory of
special unit of slave system.
• Then, read the 15 words of data written to special unit and store it to
DT200 to DT214 of CPU unit. Writing the program of the process
above. Here are some precautions for programming.
Make sure the R9035 (execution permission flag) is ON when
executing shared memory access instruction.
Flowchart
Set initial value setting condition to ON
Set memory access start condition to ON
NO
R9035: ON?
YES
Execute memory write instruction
Process 0
R9035: ON?
NO
YES
Execute memory read instruction
Process 1
NO
R9035: ON?
YES
To process 2
74
Program Example
Initial value setting condition
Control data setting (advanced unit assignment)
DT0 : 101H
DT1 : 01H
R9010
〔F0 MV, H101, DT0 〕
〔F0 MTV, H
1, DT1 〕
X1 R9035
(NSTP 0)
Memory access start condition
(SSTP 0)
Write data to shared memory (Process 0)
• F153 execution
R9015
〔F153 RMWT, DT0, DT100, K15, H500 〕
R9035
Write 15 words of data from DT100 to shared
memory address 500.
• R9035: To process 1 at ON (F153 execution
(NSTP 1)
(SSTP 1)
R9015
completed).
Read data from shared memory (Process 1)
• F152 execution
〔F152 RMRD, DT0, H500, K15, DT200〕
R9035
(NSTP 2)
(NSTP 2)
ATTENTION
Read 15 words of data from shared memory
address 500, and store it from DT200 of CPU
unit.
• R9035 : To process 2 at ON (F152 execution
completed).
• In the program example above, R9015 serves as a special
relay that turns ON only 1 scan of operation start from
SSTP instruction.
• In the program example above, R9010 (special relay
always ON) is used for initial setting condition.
75
Ex 2. Memory Access with HandShake
In this example, self-loop communication is performed using RS-232C
CH.1 of SCU unit on the slave system. SCU performs HandShake using
X contact and Y contact while sending or receiving. (Refer to SCU Unit
Manual for details on SCU unit usage, such as transmission data
setting.)
• Send the data in CPU unit DT100 to DT114 (15 words) to SCU unit
CH.1 on the slave system.
• Data received at CH.1 is again received at the same CH.1.
• Read data to receive from CH.1, and save it to CPU unit DT200 to
DT214.
NX-MASTER
NX-SLAVE
Station No.1
Master System
Twisted-Pair Cable
Advanced unit with
shared memory(SCU)
SLAVE system
Sending data(RS232C)
(X640~X64F)
(Y650~X65F)
Here are some precautions for programming the operations above.
1.
When executing shared memory access instruction, make sure
that R9035 (execution permission flag) is ON.
2. When programming for reading/writing SCU data on Remote
System Slave, take into account the operation status of shared
memory access instructions (F152 and F153) and communication
status, as well as the ON/OFF timing of X and Y contacts.
(Ex) Program for facilitating HandShake program operation
Using F152 and F153 Advanced Instructions
Actual access (transmission) starts on execution of "END"
instruction. When HandShake program (Y contact: ON) of the
moment when transmission data is completely stored is written
after shared memory access instruction, access instruction and Y
contact: 0 is executed at the same time.
In that case, Y contact turns ON even if access is not completed,
and the communication to SCU unit on slave system cannot be
properly established. In that case, write program to make sure the
Y contact turns ON after the access is finished (R9035 is ON).
3. Right before executing the shared memory access below, insert
the following "Shared Memory Access Instruction Execution
Condition Establishment Standby Step" (Refer to Process 1 and 3
in the example).
76
Flowchart
Set initial value setting condition to ON
Set memory access starting condition to ON
NO
R9035: ON?
YES
Execute memory write instruction
NO
R9035: ON?
Process 0
YES
Turn Y650 ON after the memory write instruction is finished.
NO
OK to go to the
next instruction?
Process 1
YES
Execute memory read instruction
NO
R9035: ON?
Process 2
YES
Turn Y651 ON after the memory read instruction is finished.
NO
OK to go to the
next instruction?
Process 3
YES
77
Ladder Program Example
Initial value setting condition
HandShake contact
For sending at X640, Y650 CH1
For receiving at X641, Y651 CH1
R9010
〔 F0 M V, H101 , DT0〕
〔 F0 M V, H 1 , DT1〕
X1
R9035
(NS TP 0)
Memory access start condition
(S S TP 0)
X640
Y650
R9015
R0
〔
X64 0
Write data to shared memory
(Process 0)
Y650
〕
F153 execution
Write 15 words of data from
DT100 to shared memory
address 1
R1
〔
〕
R0
〔 F15 3 RM WT, DT0, DT100, K15 , K1 〕
R0
R100
〔
〕
R100
R100
R1
R9035
Y650
〔
Program for
facilitating
HandShake
execution
〕
Y650
R1
R9035
(NS TP 1)
(S S TP 1 )
R9035
R9015
Y641
(D F)
Go on to the next page
78
(NS TP 2)
Execution condition establishment standby
step of the following shared memory access
instruction
Continued
(S S TP 2)
X641
Y651
R9015
R2
〔
X64 1
Y651
〕
R3
〔
〕
Read data with shared memory
(Process 1)
R2
〔 F15 3 RM RD, DT0, K251, K15, DT200 〕
R2
R101
〔
〕
R101
R101
R3
R9035
Y651
〔
Program for
facilitating
HandShake
execution
F152 execution
Read 15 words of data from
shared memory address 251,
and store it from CPU unit
DT200.
〕
Y651
R3
R9035
(NS TP 3)
(S S TP 3 )
R9035
R9015
Execution condition establishment standby
step of the following shared memory access
instruction
Y640
(D F)
(NS TP 0)
(S TTE
( E D
)
)
• R9015 in the above example is a special relay that turns only 1 scan
ON with 1 process start-up.
• In the program example above, R9010 (special relay always ON) is
used for initial setting condition.
79
Remote Programming (For N700 PLC only)
• By remote programming function, program or register setting on
CPU unit of remote master system using programming tool for
N700 PLC slave unit (CPL7741). Such operations are called "Remote
Programming".
• Remote program is executed in the same way as programming tool
on the CPU unit.
• Remote programming function is only available on N700 PLC slave
unit (CPL7741).
• When using remote programming, connect programming tool to
slavRS232/ 422 connector. Program becomes available on
connection.
Slave Unit
CPU Unit
N700 PLC
Programming
[Setting]
Set the communication baud-rate for connecting programming tools
(Handy-Loader, WinFPST S/W) to N700 slave unit RS232/ 422
connector.
N700 Slave unit
operation mode
setting switch
4
4
3
ON : RS-232
■
■
1
Handy-Loader connection (CPL5119)
WinFPST S/W (Computer connection)
1
OFF
ATTENTION
ON
• Per 1 CPU unit, only 1 programming tool can be
connected. Do not connect more than 2 tools at the
same time. (Busy Error occurs.)
• Even in the case of communication error, remote
programming for normally connected slave systems
is available.
80
7
Troubleshooting
This chapter gives guidelines on error identification and
troubleshooting measures during Remote System use.
Identifying Error Causes
Follow the steps below to identify the cause of errors and address
problems.
LED Status Checking
Check the status of ALARM and COM. LEDs of master, slave, and I/O
Link units.
LED Items
Status
ALARM
On
COM.
Errors
Troubleshooting
An error has occurred on the unit.
Replace
Check the transmission path
Slow flickering Communication error (Broken cables or power
and locations and take
(1sec interval) OFF on slave units) has occurred on other station.
troubleshooting steps.
There is an transmission error (on cables or end
Identify the cause and take
Off
station settings) that blocks the communication
troubleshooting steps.
between slave and master units.
Identifying Errors
Error causes can be identified with CPU unit self-diagnosis.
Error specifications are also stored in special registers DT90136 and
DT90137. (DT9136 and DT9137 on N700)
See "Self-diagnosed Errors Related to Remote System" in Chapter 7 and
"Remote I/O Error Code (DT90136. DT90137)" in Chapter 7 for details.
Identifying Transmission Paths (Master Network1 to Master
Network4) Where Error Has Occurred
Identify the transmission path where the error has occurred.
Errors can be also identified with special data registers DT90136 and
DT90137, or special internal relays R9058 to R905B.
See "Remote I/O Error Code (DT90136. DT90137)" in Chapter 7 and
"Identifying the Slave System Where Error Has Occurred (DT90131 to
DT90135)" in Chapter 7 for details.
Identifying the Station No. of Slave System Where Error Has
Occurred.
Identify the slave system location where error has occurred.
Errors can also be identified with special data registers DT90131 to
DT90135.
See "Identifying the Slave System Where Error Has Occurred (DT90131 to
DT90135)" in Chapter 7 for details.
81
Self-diagnosed Errors Related to Remote
System
When error has occurred on Remote I/O System, it can be identified
with CPU unit self-diagnosis.
Identification method: Select “Status (T)…” from the main menu on
the top screen of WinFPST S/W.
Remote I/O System Self-diagnosis List
Code
Event
CPU
Operation
35
Prohibited unit is mounted on slave
system.
Stop
A unit that cannot be mounted on slave system
has been found. Remove the prohibited unit.
36
Remote I/O use restriction
Stop
The number of slots or I/O points of Remote I/O
are out-of-range. Do not exceed the limit.
37
Remote I/O Map duplicate error or
out-of-range error
Stop
Re-configure the Remote I/O Map to remove the
duplicate.
38
I/O Link registration error
Stop
Troubleshooting
Set correct values in I/O Map of I/O Link.
Slave system power is OFF, or transmission path
cable is broken. Restore the communication.
46
Remote I/O communication error
(*1)
Selection
(*2)
For identifying the slave system where error has
occurred, see "Identifying the Slave System
Where Error Has Occurred (DT90131 to DT90135)"
in Chapter 7. (From “On-Line (L)” on the top
screen of WinFPST S/W," select “Register
monitoring (E)…” and check DT90131 to DT90137.)
Verify error, broken fuse or excessive load on
special unit. Check the mounted units.
47
51
Remote I/O end station error
Transmission
52
Remote I/O refresh synchronization
error
Transmission Contact us.
ATTENTION
Selection
(*2)
For identifying the slave system where error has
occurred, see "Identifying the Slave System
Where Error Has Occurred (DT90131 to DT90135)"
in Chapter 7. (From “On-Line (L)” on the top
screen of WinFPST S/W, select “Register
monitoring (E)…” and check DT90131 to DT90137.)
Unit malfunction on slave system
(*1)
Error on Remote I/O end station settings.
Re-configure setting correctly.
*1. Errors on units can be identified by using special data
register from programming tools. From “On-Line (L)” on
the top screen of WinFPST S/W, select “Register
monitoring (E)”, and check DT90131 to DT90137.
See "Identifying the Slave System Where Error Has
Occurred (DT90131 to DT90135)" in Chapter 7.
*2. CPU unit stop or transmission can be selected based on
system register settings. (0: transmission, 1: Stop)
Remote I/O communication error: System register No.27
Remote I/O Slave system I/O settings error: System
register No.28
See "Operation Mode Change (System Register Setting)"
in Chapter 5 and "Remote I/O Control on Errors" in
Chapter 5.
82
Remote I/O Error Code (DT90136. DT90137)
When error has occurred on Remote I/O System, it is stored to the CPU
unit special data register DT90136 and DT90137. (DT9136 and DT9137
on N700)
Identification Method: From “On-Line (L)” on the top screen of
WinFPST S/W, select “Register monitoring (E)…”, and check DT90131 to
DT90137.)
Data in Special Data Register DT90136 and DT90137
Data of 8 bit for each of Master Network 1 to 4 represents each type.
15
DT90136
14
13
12
11
10
9
8
7
6
4
3
2
1
0
(bit)
j i h g f e d c j i h g f e d c
Master Network 2
15
DT90137
5
14
13
12
11
10
Master Network 1
9
8
7
6
5
4
3
2
1
0
(bit)
j i h g f e d c j i h g f e d c
Master Network 4
Master Network 3
If an error occurs, c to j bits corresponding to the errors are assigned
to “1”.
[Ex] If DT90137 is “8H”, an end station error has occurred on MASTER
Network3. (“8H”=”00000000 00000000”; bit 3 (f) = “1”)
CPU
Operation
Code
Event
c
Remote I/O communication error (*1)
(There is an unreachable slave
station.)
Selection
d
Transmission error (*1)
(There is a transmission error.)
Selection
e
Prohibited unit is mounted on slave
system.
f
Remote I/O end station error
g
Total slot number for 1 master unit
exceeded the range
Stop
Do not exceed the limit. (Max. 64 slots)
h
Total I/O points for 1 master unit
exceeded the range
Stop
Do not exceed the limit. (Max. 1,024 points)
(Max. 4,096 points for N700a, NX-CPU750C, D)
i
Instantaneous power failure on slave
unit (*1)
j
Unit malfunction on slave system
(*1)
(*2)
Troubleshooting
Check for power OFF (slave) or broken
transmission cable.
(*2)
Check for broken transmission paths or incorrect
settings of Station No.
Stop
Remove the prohibited unit.
Transmission
Error on Remote I/O end station settings. Reconfigure settings correctly.
Transmission Check the power supply.
Selection
(*2)
Verify error, broken fuse or excessive load on
special unit. Check the I/O status.
*1. The range of possible error slave stations can be narrowed down. See "Identifying the
Slave System Where Error Has Occurred (DT90131 to DT90135)" in Chapter 7.
*2. CPU unit stop or transmission can be selected based on system register settings.
See "Operation Mode Change (System Register Setting)" in Chapter 5 and "Remote I/O
Control on Errors" in Chapter 5.
83
Identifying the Slave System Where Error Has
Occurred (DT90131 to DT90135)
When errors like communication error, transmission error,
instantaneous power failure on slave system, or unit malfunction of
slave system occur, error location (Master Network and Station No.)
can be identified by monitoring special data register.
Identification Contents
1. Station No. of the slave system with current error (Current value)
2. Station No. of the slave system with history of error (Accumulated
value)
3. Station No. of slave system where error (broken fuse, excessive
load) has occurred on the mounted unit
4. Station No. of slave system where instantaneous power failure has
occurred
Identification
From “On-Line (L)” on the top screen of WinFPST S/W, select and
check “Register monitoring (E)…”,. Refer to the description below for
the meaning of stored values.
Identification Process
Identify the transmission path where error is occurring.
●
If error occurs on Remote I/O transmission path, the following
special internal relays R9058~R905B that correspond to the path
turn ON.
Relay No.
●
Event
R9058
When error occurs on Master Network1: ON
R9059
When error occurs on Master Network2: ON
R905A
When error occurs on Master Network3: ON
R905B
When error occurs on Master Network4: ON
The transmission path with error can be identified by monitoring
special data register DT90136 and DT90137. (See "Remote I/O Error
Code (DT90136. DT90137)" in Chapter 7)
[Ex] R9059 turns ON in the illustration below. (Error on Master
Network2)
Error occurs.
S ta t io n N o .1
32 points
input
Slave System
S ta t io n N o .3
SLAVE
32 points
input
Slave System
SLAVE
32 points
input
16 points
output
16 points
input
SLAVE
Power unit
84
MASTER 2
MASTER 1
CPU
Power unit
Master System
S ta t io n N o .2
Configure the identification settings.
Select the events to be identified, and set the corresponding code to
special data register DT90131. Setting should be formatted in H
constant (Hex).
DT90131:
Identification settings
Selecting transmission path
00H: Master Network 1
01H: Master Network 2
02H: Master Network 3
03H: Master Network 4
00H: Station No. of slave system where error has occurred
(Current value, accumulated value) (See 3-1 below)
01H: Station No. of slave system where error has occurred on
mounted units. (See 3-2 below)
Station No. of slave system where instantaneous power
failure has occurred (See 3-3)
[Ex] When unit malfunction of slave system has occurred on Master
Network 2, the Station No. of the unit can be identified with the
following settings.
DT90131: 0101H
Check the number of locations of errors [Identifying the station no. where
error occurs]
Set 00H to the upper 8 bits to identify the slave system with errors. In
that case, it is as follows: Special data register DT90132 to DT90135
DT90132
15
14
13
12
11
10
9
8
7
6
5
4
3
2
1
0
16
15
14
13
12
11
10
9
8
7
6
5
4
3
2
1
Station No.
DT90133
DT90134
32
31
30
29
28
27
26
25
24
23
22
21
20
16
15
14
13
12
11
10
9
8
7
6
5
4
(bit)
Current value
19
18
17
3
2
1
Accumulated value
DT90135
32
31
30
29
28
27
26
25
24
23
22
21
20
19
18
17
The bit corresponding to Station No. of slave system with error is set to 1.
[Ex] When DT9131 = “0101H”, (see Step 2 example above), and
DT90133 is 4000H, an error is occurring at Master Network 2
Station. (“4000H“ = “01000000 00000000”: Bit 14 (No.31) = “1”).
85
Check the number of locations of errors. [Identifying the slave system where
unit malfunction occurs]
Set 01H in the upper 8 bits of DT90131 to identify the system where
errors such as broken fuse (TR) or excessive load occur.
In that case, it is as follows: Special data register DT90132 to
DT90133
DT90132
15
14
13
12
11
10
9
8
7
6
5
4
3
2
1
0
16
15
14
13
12
11
10
9
8
7
6
5
4
3
2
1
19
18
17
(bit)
Station No.
DT90133
32
31
30
29
28
27
26
25
24
23
22
21
20
The bit corresponding to Station No. of slave system when error is set to 1
[Ex] When DT90131 = “0101H”, (see Step 2 example above), and
DT90133 is 2H, an error occurs at Master Network 2 Station No.18.
(“2H” = “00000000 00000010: Bit 1 (No.18) = “1")
Check the error location. [Identifying the slave system where instantaneous
power failure has occurred]
Set 01H in the upper 8 bits of DT90131 to identify the slave system
where instantaneous power failure has occurred. In that case, it is as
follows: Special data register DT90134 to DT90135
DT90134
15
14
13
12
11
10
9
8
7
6
5
4
3
2
1
0
16
15
14
13
12
11
10
9
8
7
6
5
4
3
2
1
19
18
17
(bit)
Station No.
DT90135
32
31
30
29
28
27
26
25
24
23
22
21
20
The bit corresponding to Station No. of slave system with error is set to 1.
[Ex] When DT90131 = "0101H", (see Step 2 example above), and
DT90134 is 2H, an error occurs at Master Network 2 Station No.2.
(“2H” = “00000000 00000010”: Bit 1 (No.2) = “1”)
86
Troubleshooting methods for Remote I/O System.
Troubleshooting Flowchart
[Main Flowchart]
Error
Is the power unit correctly
mounted on the
backplane?
NO
Correct the mounting.
YES
Is CPU unit ALARM LED
ON?
YES
Refer to “Troubleshooting” of
N700, NX700 PLC System
Manual.
NO
Is master unit ALARM LED
ON?
YES
NO
Is slave unit ALARM LED
ON?
YES
To flowchart [1] when
ALARM LED is ON
NO
Is master unit
COMM.LED flickering
fast (0.2sec interval)?
YES
NO
To flowchart [2] when master unit
is not operating normally.
1
87
1
Is slave unit COMM.LED
flickering fast (0.2sec
interval)?
NO
To flowchart [3] when slave unit is
not operating normally.
YES
Programming tool on
master unit does not
work.
YES
To flowchart [4] when remote
programming is not available.
NO
CPU unit does not run.
YES
To flowchart [5] when CPU unit
cannot run.
NO
I/O not available.
YES
To flowchart [6] when I/O is not
available.
NO
YES
Memory access not available.
NO
Contact us.
To flowchart [7] when memory
access to special unit on slave
system is not available
88
[1] Flowchart when ALARM LED is ON
ALARM LED ON
Check with power on/off.
Is it frequent?
YES
If you have a spare unit, replace the
troubled one. If the same condition
continues after replacing, contact us.
NO
Considered as temporary
condition caused by noise. Try
restarting the system, and
monitor the status for a while.
89
[2] Flowchart when master unit is not operating normally.
COM.LED does not flicker
fast (0.2sec interval).
YES
Is COM.LED OFF?
To flowchart [2-1] when master
unit COM.LED is OFF
NO
YES
Is COM.LED ON?
To flowchart [2-2] when master
unit COM.LED is ON
NO
NO
Is COM.LED flickering slowly
(1sec interval)?
Contact us.
YES
Is master unit operation
mode setting switch SW3
set to ON?
YES
*SW7 on N700
NO
Contact us.
90
There is a communication error. Check
for errors (broken cable, slave system
power OFF), and check with "2-1.
Flowchart when slave unit COM. LED is
OFF” on the next page.
[2-1] Flowchart when COM.LED is OFF
COM.LED is OFF
Is power unit
POWER LED OFF?
YES
Refer to “Troubleshooting” of
N700, NX700 PLC System Manual.
NO
NO
Is slave unit operating?
Connect slave unit and restart it.
YES
Is transmission cable
connected correctly?
NO
Connect transmission cable
correctly, and restart.
NO
Configure end station settings
correctly, and restart.
YES
Are end stations
settings correct?
YES
Contact us.
91
[2-2] Flowchart when COM.LED is ON
COM.LED is OFF
Is ALARM LED flickering?
YES
Station No. Setting error or
prohibited unit mounting error.
Configure Remote I/O Map
correctly and restart.
NO
Are there more than 5
master units connected
to 1 CPU?
NO
Contact us.
92
YES
Do not use more than 4 master
units with 1 CPU.
[3] Flowchart when slave system is not operating normally
COM.LED is OFF
COM.LED does not flicker
fast (0.2sec interval).
YES
Is COM.LED OFF?
To flowchart [3-1] when slave
unit COM.LED is OFF
NO
Is COM.LED ON?
YES
To flowchart [3-2] when
slave unit COM.LED is ON
NO
Is COM.LED flickering
slowly (1sec interval)?
NO
Contact us.
YES
Is master unit operation
mode setting switch
*SW3 set to OFF?
YES
*SW7 on N700
NO
Contact us.
There is a communication error on a
slave unit.
Identify the slave unit with error, and
check the unit using the 3-1. flowchart
when slave COM.LED is OFF.
93
[3-1] Flowchart when COM.LED is OFF
COM.LED is OFF
Is transmission cable
connected correctly?
NO
Connect the transmission cables
correctly and restart the Remote
System.
YES
Isn’t Station No.
duplicated?
NO
Configure the Station No.
correctly and restart the Remote
System.
YES
Is the slave unit registered?
NO
Register.
YES
Are end station settings
correct?
YES
Contact us.
94
NO
Configure the end station setting
correctly, and restart the Remote
System.
[3-2] Flowchart when COM.LED is ON COM.LED is ON
COM.LED is OFF
Is ALARM LED flickering?
Station No. Setting error.
Configure end station settings
correctly, and restart.
YES
NO
Is transmission cable
connected correctly?
Connect the transmission cables
correctly and restart the Remote
System.
NO
YES
Are master unit
port settings
correct?
Configure the master unit port
setting correctly, and restart the
Remote System. (Only for N700
PLC Master unit)
NO
YES
Is Remote I/O Map
registered?
NO(Current value mode)
YES(Regisger mode)
Is the power input
procedure correct?
YES
Is the slave unit
registered?
NO
Follow correctly the
power input procedure
for master and slave
unit. (Refer to “Power
Input Procedure”)
Contact us.
NO
Use registered slave unit.
YES
Contact us.
95
[4] Flowchart when CPU unit does not run
CPU unit does not run.
CPU unit is set to RUN
mode.
NO
Set the CPU unit to RUN mode.
YES
Is CPU unit PROG.LED
flickering?
NO
Refer to “Troubleshooting” of
N700, NX700 System Manual.
YES
Is Remote I/O Map
registered?
NO
YES
Is slave station
connection checking
mode activated?
NO
YES
Are all registered slave
units operating?
NO
Start all registered slave systems.
YES
Is transmission cable
connected correctly?
YES
Contact us.
96
NO
Connect the transmission
cables correctly, and restart.
[5] Flowchart when slave system I/O is not available
Slave system I/O is not
available.
Are I/O Map settings correct?
NO
Configure I/O Map correctly.
YES
NO
Correct the program
Is program correct?
YES
Is I/O available on I/O Link unit?
NO
There can be malfunction on
dedicated I/O Link unit. Contact us.
YES(Slave unit)
Are I/O units in other slots
operating correctly?
NO
There can be malfunction on
Remote I/O System. Contact us.
YES
There can be malfunction on
I/O unit. Contact us.
97
[6] Flowchart when shared memory on special unit on slave
systems is not accessible
Shared memory access is
not available.
Is special unit
mounted correctly?
NO
Correct the mounting.
YES
Is control data for shared
memory access instruction
configured correctly?
YES
If you have spare special unit,
replace the old one. If memory
access is not available after
replacing, contact us.
98
NO
Correct the settings.
[7] Flowchart when remote programming is not available
(For N700 PLC only)
Handy-Loader or WinFPST
S/W is not operating.
NO
Are Baud-Rate settings correct?
Set the baud-rate correctly with
N700 Slave unit (CPL7741)
operation mode setting switch.
YES
Is RS-232 port settings
of the computer using
WinFPST S/W correct?
NO
Correct the settings.
YES
Contact us.
99
LED Status Check
Check the LED, as well as the transmission path status, each
component settings, and operation status.
LED Status when CPU Unit is in "PROG" Mode
* Start the CPU unit on master system after setting it to PROG. mode.
CPU Unit
PROG.
(On)
PROG.
(Slow
flickering)
ERROR
(On)
Master
Unit
Slave Unit
COM.
(Fast
flickering)
COM.
(Fast
flickering)
COM.
(Fast
flickering)
COM.
(Fast
flickering)
ERR
(On)
*N700:
"ALARM "
Indication
Troubleshooting
Normal
There is a registered slave
unit that is not started yet.
•
Connect power to the slave unit
that is not operating.
(Slave station connection
standby. Operation does not
start after changing to RUN
mode, but it is not a
malfunction.)
•
Check if the transmission cables
are connected correctly.
•
Check if slave unit exists at the
registered Station No. Check the
registration and settings, and
restart.
Temporary condition caused
by noise.
Restart.
There is a malfunction on
Contact us.
master unit.
(Self-diagnosis code E41)
ALARM
(Off)
ALARM
(On)
Temporary condition caused
by noise.
Restart.
There is a malfunction on
Contact us.
slave unit.
COM.
(On)
COM.
(Fast
flickering)
ALARM
(Slow
flickering)
COM.
(Fast
flickering)
100
There are more than 5
master units mounted.
Install up to 4 master units and restart.
There is a unit that is not
available as Remote I/O
System but is mounted on
slave system.
Remove the prohibited unit on the
slave system, and re-configure the
settings.
There is an error in the end
station settings. (Selfdiagnosis code E51)
Set the 2 slave units on the both ends
of transmission path as end stations.
CPU Unit
Master
Unit
ERROR
(On)
Slave Unit
COM.
(Off)
COM.
(On)
COM.
(On)
Indication
Troubleshooting
Transmission cables are not
correctly wired.
Check the transmission cable
connection.
Slave unit Station No. is
duplicated.
Re-configure the duplicate Station No.
There is an error in the end
station settings.
The 2 units at both ends of
transmission path as end stations.
Transmission cables are not
correctly wired.
•
Check if the transmission cables
are correctly wired.
•
Check the master unit ports.
and allocate I/O. Restart system after
setting Station No.
This slave unit is not
registered.
Restart after registration.
Station No. settings exceed
the range of 1 to 32.
Set the Station No. within the range.
ALARM
(Slow
flickering)
LED status when CPU unit is in “RUN” mode
CPU Unit
Master
Unit
Slave Unit
Indication
Troubleshooting
ERROR
(On)
COM.
(Fast
flickering)
COM.
(Fast
flickering)
Normal
ERROR
(On)
COM.
(Fast
flickering)
COM.
(Fast
flickering)
There is a malfunction on
units on slave system.
Replace with a normal unit. Restart
method differs depending on
operation modes. (*1)
There is an error in the end
station settings. (Selfdiagnosis code E51)
Set the 2 units at both ends of
transmission path as end stations.
ERROR
(On)
COM.
(Fast
flickering)
COM.
(Off)
This slave unit cannot
establish communication
with master unit.
(Communication error)
Remove the cause of error, such as
broken transmission cables, and
restart the master system. Restart
method differs depending on
operation modes. (*1)
COM.
(Slow
flickering)
COM.
(Slow
flickering)
This slave unit cannot
establish communication
with master unit. Slave units
with (COM.LED) flickering
are normal.
Remove the cause of error, such as
broken transmission cables, and
restart the (*1)
COM.
COM.
(Slow
flickering)
(Off)
This slave unit cannot
establish communication
with master unit. Slave units
with (COM.LED) flickering
are normal.
Remove the cause of error, such as
broken transmission cables, and
restart the master system. (*1)
*1. See "Remote I/O Control on Errors" in Chapter 5 for details.
101
Transmission Time
The transmission time required for controlling REMOTE I/O systems.
Remote I/O Scan Time [TR]
Remote I/O SCAN Time for each slave system connected to master
system is the time from sending the output data set in the unit buffer
to setting the input data received from each slave system into the unit
buffer.
TR = 0.8 + (0.85 x n) + (0.55 x N) + (0.13 x W) (ms)
n: Number of I/O Link
N: Number of slave units
W: Number of words used for Remote I/O
Example 1
When 10 I/O Link units (Input 16 points, output 16 points) and 1 slave unit
(4 units with input 32 points, 4 units with output 32 points) are connected:
TR = 0.8+(0.85x10)+(0.55x1)+0.13x
(32x10)+(32x4)+(32x4)
16
= 14.53 ms
Remote I/O Memory Access Time [TRM]
Remote I/O memory access time is the period from master system's
receiving memory access request from CPU unit to receiving memory
access completion message from slave system.
TRM = TR x 2 + (0.7 + 0.17 x WRM) (ms)
TR : Remote I/O SCAN Time
WRM: Number of Memory ACCESS words
Example 1
When 5 I/O Link units (input 32 points, output 32 points) and 1 slave
system (NX700) (2 units with input 32 points, 2 units with output 32
points, and special unit (32 points)) are connected, and 32 word
memory access is requested to the special unit:
T RM = 0.8+(0.85x5)+(0.55x1)+0.13 x
= 8.2 x 2 + 6.14
= 22.54 msec
102
(32x5)+(32x2)+(32x2)+32
16
x2+(0.7+0.17x32)
Remote I/O Response Time [TRES]
Remote I/O response time is the period from the moment when input
signal to slave system is transmitted to CPU unit via master system, to
the moment when the output signal from operation is transmitted to
slave system and actually sent out.
TRES = TIRES + TC + TORES
TRES: Remote I/O response time
TIRES: Remote I/O input response time
TORES: Remote I/O output response time
TC : CPU unit SCAN Time
The maximum Remote I/O response time can be calculated as follows:
TRES.MAX = TIRES.MAX + TC + TORES.MAX
TIRES.MAX = TIDLY + TR + Tα
TORES.MAX = TR x 2 + TODLY
TIDLY: Input delay time
TR: Remote I/O SCAN Time
Tα: In synchronization mode
Tα: In no synchronization mode
1) TC<TR, Tα=TR
2) TC>TR, Tα=TC
1) TC<TR, Tα=TC + TR
2) TC>TR, Tα=TC
NOTE See "Remote I/O Refresh Timing" in Chapter 5 for details on synchronization/no
synchronization modes.
CPU SCAN TIME
TC
CPU unit
Operation
delay
I/O delay
TR
TC
Master unit
Max. TR
Tα
Slave unit
Max. TR
Max. TR
Input signal
Output signal
TODLY
103
Precautions for Remote I/O System
Please follow the instructions below when operating Remote I/O
System.
104
●
Make sure to turn off the power when mounting or removing
Remote I/O System units.
●
Make sure all Remote I/O System units are firmly mounted on the
backplane.
●
Be careful not to leave any cable residues in the unit while wiring.
●
Do not touch or directly contact the terminals on the bottom of
Remote I/O System unit. Otherwise, element can be destroyed by
contact defects or electrostatic.
●
Make sure not to drop or shock the plastic cases of Remote I/O
System units or dedicated I/O link.
●
Use the unit under conditions defined in the general specifications
to enhance product performance.
●
Separate units from high-voltage cables, high-voltage equipment,
power cables and power equipment as far as possible.
●
Make sure to separate the power wires and transmission cables, in
different ducts if possible.
105
106
8
External Dimensions
N700 PLC Unit
N700 PLC MASTER UNIT (CPL7740)
113mm
34.5mm
150mm
N700 PLC SLAVE UNIT (CPL7741)
113mm
53mm
150mm
106
NX700 PLC Unit
NX700 PLC MASTER UNIT (NX-MASTER)
35.0mm
104mm
COM ERR FLK TERM
8 24
16
32
17 1
25
9
1
MASTER
NX-MASTER
6
17 32
115.5mm
+
FG
NX700 PLC SLAVE UNIT (NX-SLAVE)
35.0mm
104mm
COM
ALARM
Stat
ion No.
107
SLAVE
NX-SLAVE
NX70 PLC Unit
NX70 PLC SLAVE UNIT (NX70-SLAVE)
35mm
88mm
SLAVE
NX70-SLAVE
COM
ALARM
Station No.
105mm
4
3
2
1
OFF
ON
I/O Link Unit
88mm
70.5mm
105mm
108
109
NX Remote I/O User Manual
www.oemax.co.kr
www.oemax.com
Publication NX700-UM011A-EN-P - September 2006
Trademarks not belonging to OE MAX Controls
are property of their respective companies.
Copyright © 2006 OE MAX Controls