1
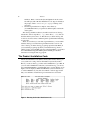
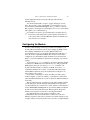
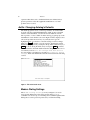
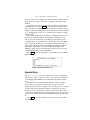
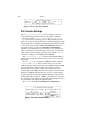
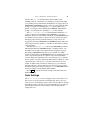
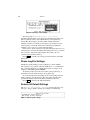
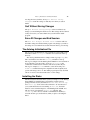
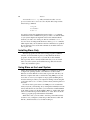
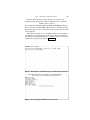
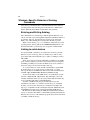
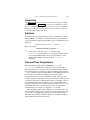
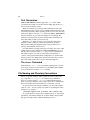
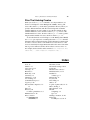
Aut olog
Inst allat ion
and
Pl a t f o r m Gu i d e
Wi n d o w s
Copyright © 1997, 2001 Robert P. Rubendunst. All rights reserved.
Printed in the United States of America
First printing, May 1997
Electronic revisions 2001, 2002
Soft Machines
PO Box 14
Sidney, IL 61877
(217) 688-3317
[email protected]
This manual is protected by U.S. copyright statutes and may not be
reproduced or transmitted in any form or by any means without the
express written permission of the copyright holder.
Use of the programs described herein is governed by an End User License
Agreement. Refer to the End User License Agreement for terms,
conditions, and limited warranty information.
The trademarks and servicemarks referred to in this manual are the
trademarks and servicemarks of their respective holders. Soft Machines
has made every attempt to indicate such trademarks and servicemarks
with initial capital letters.
Contents
Installing Autolog.....................................................................................5
The Product Installation Code................................................................6
Configuring the Modem ..........................................................................7
Autfix: Changing Autolog’s Defaults .....................................................8
Modem Dialing Settings.................................................................8
Special Keys ....................................................................................9
File Transfer Settings...................................................................10
Color Settings ...............................................................................11
Phone Log File Settings................................................................12
Restore All Default Settings ........................................................12
Quit Without Saving Changes.....................................................13
Save All Changes and End Session .............................................13
The Autolog Initialization File..............................................................13
Installing the Dialer ...............................................................................13
Installing Slave Only..............................................................................14
Using Slave on the Local System ..........................................................14
Windows–Specific Behavior of Autolog Commands...........................16
Entering and Exiting Autolog .....................................................16
Linking to serial devices...............................................................16
Cancel Key ....................................................................................17
Switches.........................................................................................17
Date and Time Comparisons .......................................................17
Text Conversion ...........................................................................18
The abort Command .................................................................18
File Naming and Directory Conventions .............................................18
Files That Autolog Creates ..........................................................19
iii
Autolog Installation
and Platform Guide
Installing Autolog
Autolog for Windows is a WIN32 based console application that works
on Windows 95, 98, 2000, and XP. To install Autolog, follow these steps:
1.
2.
3.
4.
5.
6.
Insert the Soft Machines CDROM, or get the downloadable package
from /http://www.softmach.com/down.htm.
Execute the download file, or execute the setup.exe file in the
Win32 directory of the CDROM. The install program will ask you
what type of installation you are making; select Typical or Slave
only.
The Install program will then ask you to supply information about
your Autolog installation. You will be prompted to enter the drive
and directory in which to install Autolog.
You will be asked if you want to create a Start Menu program
group. If you answer yes, you’ll also be prompted to enter the name
to give the program group.
You will be asked to enter the default communications port, baud
rate, flow control method, and modem type for Autolog to use. You
can also choose not to set defaults for these settings. We
recommend that you select the fastest baud rate your modem and
port can support and that you use hardware flow control (see the
later sections on “Configuring the Communications Port” and
“Configuring the Modem” for more details about flow control). For
the modem type, you should select “AT compatible modem” if your
modem supports the AT command set. Otherwise, select “no
modem.”
Answer yes when asked if you would like to install the Product
Installation Code. You’ll need to call Soft Machines to get a
Product Installation Code (PIC). If you’re unable to call at the time
when you’re installing Autolog, answer no: You can install the PIC
later with the command autfix/i.
A screen like the one in Figure 1 will be displayed. Email Soft
Machines ([email protected]) or call Soft Machines at (217)
688-3317. Email or tell us that you would like to install Autolog for
5
6
Windows
7.
Windows. Read or send us the System Signature from the screen.
We will reply with a Product Installation Code. Type it carefully at
the prompt, and also write it on a piece of paper and keep it in a
safe place.
The Autolog installation is complete. A new directory
(C:\AUTOLOG unless you specified a different path) contains the
Autolog files.
The Autolog installation directory should be used for most Autologrelated files, such as script files (*.ago), macro files (*.amf), files for
the dialer menu system, and so on. This directory is where Autolog will
look for its resources unless a different path is specified when indicating
resource files.
There are several ways to start Autolog: In Windows, you can doubleclick the Autolog icon in the Autolog installation folder. You also can
select “ Autolog” from the Autolog program group in the Start Menu (if
you created this program group when you installed Autolog). From a
"DOS" prompt or from the Run selection of the Start Menu, you can enter
the command autolog. The Autolog User’s Guide gives detailed
instructions for using the Autolog program.
The Product Installation Code
The Product Installation Code (PIC) is the key that activates Autolog on
your system. It is a string of letters and numbers separated by dashes.
Before you can use Autolog, you must call Soft Machines to get a PIC. If
you can’ t call Soft Machines at the time you install Autolog, you can use
the command autfix/i to install the PIC later. A screen like the one in
Figure 1 will be displayed. Email Soft Machines ([email protected])
or call Soft Machines at (217) 688-3317. Email or tell our support staff
that you would like to install Autolog for Linux. Read or send us the
Figure 1 Entering the Product Installation Code.
Autolog Installation and Platform Guide
7
System Signature from the screen. We will reply with a Product
Installation Code.
You should write the PIC on a piece of paper and keep it in a safe
place. If you forget to write down the PIC, you can display it on your
screen with the command autfix/pic. It is a good idea to write the
PIC on paper, even though you can redisplay it, in case of a system failure
that requires you to reinstall Autolog.
You usually won’ t need to get a new PIC when you update Autolog.
)
If you have trouble using Autolog after replacing a hard drive on
your system, email or call Soft Machines at [email protected] /
(217) 688-3317 for assistance.
Configuring the Modem
In order to take advantage of Autolog’ s modem-control features, your
modem cable should include connections for hanging up (DTR), carrier
detect (DCD), and hardware flow control (RTS and CTS). We
recommend that you buy a good-quality, full-featured modem cable, or
have one made by a qualified technician. Be sure that your modem is
configured to use the hardware signals available in your modem cable.
Refer to your modem manual for instructions on changing your modem’ s
settings.
To use Autolog’ s hangup command, your modem cable must include
a connection for DTR and your modem must be set to hang up when the
DTR signal is pulsed. To use Autolog’ s carrier command, your
modem cable must include a connection for DCD. To use the flow
command for hardware flow control, your modem cable must include
CTS and RTS connections and your modem must be configure to use
these signals for flow control.
If you will be connecting to a device other than a modem (such as
another computer or a bar code scanner), you should use a null modem
cable that includes hardware flow control connections (RTS and CTS) for
best results.
The most important part of setting up your modem is making sure that
your modem passes all 8-bit characters transparently. If at all possible,
you should disable any “ software flow control” features so that characters
such as XON/XOFF and ENQ/ACK are passed intact. Make sure that the
modem does not discard any characters. This precaution will prevent
frustration if you plan to use any error-correcting file transfers!
Note that function keys may present a problem for some
communication devices. Not all modems or other devices can send
multibyte sequences (such as those generated by a function keypress) fast
enough for them to be detected by the remote system as a single multibyte
8
Windows
sequence rather than a series of individual characters. If function keys
present a problem, contact the equipment manufacturer to see if the
problem can be resolved.
Autfix: Changing Autolog’s Defaults
The Autfix program is used to set Autolog’ s defaults. To run the Autfix
program, enter the command autfix at the "DOS" prompt or the Run
selection of the Start Menu, or double-click on the Autfix icon in the
Autolog folder, or select “ Autfix” from the Autolog program group on the
Start Menu. A screen similar to the one in Figure 2 will be displayed. You
can use the up and down arrow keys of your keyboard or type the
highlighted letter of a selection to select the setting you want to change.
Then press Enter to display a pop-up screen for adjusting that setting.
Within each pop-up screen, you can press the up and down arrow keys (or
Enter ) to move among the fields, and you can press ESC to exit that
screen and return to the main Autfix menu. The changes you make are not
stored until you select Save All Changes And End Session.
You can abandon your changes by selecting Quit Without Saving
Changes. Each of the main menu selections is discussed in the following
sections.
Figure 2 The main Autfix menu.
Modem Dialing Settings
The Modem Dialing Settings screen (see Figure 3) is used to
create special dialing macros that can be used in Autolog’ s dial
command. You can store up to four dialing macros, $L0 through $L3. The
dialing macros can be password protected, if you wish. The dialing
Autolog Installation and Platform Guide
9
macros can be used, for example, for a phone card access number, for the
prefix necessary to get an outside line, or simply for frequently called
numbers.
At the first prompt, enter a password if you want to password-protect
the dialing macros, or press Enter to leave the password empty. If you
enter a password, you will need to enter the same password if you want to
change or display the dialing macros. Note that a password is not required
to use the dialing macros in a dial command, only to display or change
them in Autfix.
In the next four fields, enter the numbers or dialing characters to store
in each macro, $L0 through $L3. After defining a dialing macro, any
Autolog user can use that macro by including $Ln in an Autolog dial
command, where n is the number 0 to 3. For instance, if you enter 9W (to
get an outside line and wait for a second dial tone) in the $L1 field, an
Autolog user can dial an outside phone number by using the command
dial $L1 555-1212. If you enter 1-217-351-7411 (Soft
Machines’ update system) in the $L3 field, an Autolog user can use the
command dial $L3 to call Soft Machines.
Press ESC to exit the dialing macros screen and return to the Autfix
main menu.
Figure 3 Modem dialing macros.
Special Keys
The Special Keys selection (see Figure 4) is used to set the default
characters for Autolog’ s special “ hot keys.” See Section 2.6 in Chapter 2
of the Autolog User’s Guide for more information about these special
keys.
In each field, you can enter the character that you want to assign to
each of Autolog’ s special keys. The character you type will be the
character used for each key each time a user starts Autolog. You can enter
a control character by preceding it with the ^ character (or the “ meta”
character if it’ s not currently the ^ character). For instance, enter ^B for
control-B (the ASCII STX character, decimal value 2). If you don’ t want
a key to have a default, enter ^@ (the ASCII null character, decimal value
0).
Press ESC to exit the special keys screen and return to the Autfix
main menu.
10
Windows
Figure 4 Autolog’s special key defaults.
File Transfer Settings
The File Transfer Settings screen (see Figure 5) is used to
select default settings that affect Autolog’ s file transfer commands.
The first two fields, Packet timeout and Re-trys before
abort, affect all error-correcting protocols. The packet timeout is the
number of seconds that Autolog will wait for an acknowledgment of a file
transfer packet before attempting to retransfer the packet. A timeout value
of 10 seconds will work well for SMT and ZMODEM file transfers. A
longer timeout may be required for YMODEM and XMODEM file
transfers (we recommend 30 seconds for these protocols). The timeout
value you specify here is the default value. Autolog users can adjust the
timeout value at any time during an Autolog session with the timeout
command (see Chapter 3 in the Autolog User’s Manual).
The Re-trys before abort field sets the maximum number of
times a packet is retransferred before Autolog aborts an error-correcting
file transfer.
The SMT Transfer fields affect the SMT file transfer commands
transmit and receive. These two fields allow you to select the
smallest and largest packet Autolog will use for SMT file transfers. SMT
protocol dynamically adjusts the packet size for the most efficient
transfers. The “ factory default” settings of 64 to 4,096 bytes are the
absolute range for the SMT packet size and, in general, allow the greatest
efficiency for SMT file transfers. However, if you use a pseudo-duplex
modem (a half-duplex modem that simulates full-duplex operation, such
as the DataRace Race I, Race II, or BMX), a fixed packet size works best.
You can enter the same number for the smallest and largest packet sizes to
use a fixed packet size with pseudo-duplex modems.
The X/Y/MODEM fields affect XMODEM and YMODEM file
Figure 5 File transfer default settings.
Autolog Installation and Platform Guide
11
transfers. The Use CRC field determines whether CRC (cyclic
redundancy check) or checksum error checking is used by default. CRC
error checking is more reliable than checksum but is not supported by all
XMODEM and YMODEM programs you may encounter. Enter Y at this
prompt to use CRC error checking (the xcrc option is turned on by
default—see Chapter 3 in the Autolog User’s Manual). Enter N at this
prompt to use checksum error checking (xcrc is off by default).
The Use 1024 byte blocks field determines whether the x1k
option (see Chapter 3 in the Autolog User’s Manual) is on or off by
default. In other words, it determines whether X- and YMODEM transfers
use standard 128-byte packets or larger 1-kilobyte (1,024-byte) packets.
The larger packet size may make file transfers go faster, but it is not
supported by all remote XMODEM and YMODEM programs. Enter Y to
use the larger 1,024-byte packets, or enter N to use the smaller, standard
128-byte packets.
The final field, Window size, affects only ZMODEM file transfers.
This field determines the ZMODEM transfer “ streaming window” size,
the number of bytes that can be sent but unacknowledged at any given
time during a ZMODEM transfer. The “ factory default” is 0, which
disables an upper limit on the ZMODEM window for maximum speed. In
other words, an entire file may be sent before any acknowledgment is
received. When data frequently needs to be retransferred. (e.g., when the
remote system is very busy, with an unreliable modem connection, or with
some bursty types of line noise), you should set the window size to be
smaller. A smaller window means less efficiency on good connections,
but better efficiency on bad connections. An Autolog user can override
the default setting entered here by using the window ZMODEM transfer
switch (see Chapter 3 in the Autolog User’s Guide).
Press ESC to exit the file transfer settings screen and return to the
Autfix main menu.
Color Settings
The Color Settings screen (see Figure 6) lets you select the colors
Autolog uses for foreground (text) and background. Autolog also uses
other colors for certain displays (such as lines or the bar chart for showing
file transfer progress), but these are not user definable; they are selected
automatically for the best contrast with the selected foreground and
background colors.
12
Windows
Figure 6 Autolog’s color settings.
The first prompt, Allow Autolog to set colors?,
determines whether Autolog uses the foreground and background colors
that are currently used by your terminal when you start up Autolog.
Answer N to this prompt to ignore the Autfix settings and use the
terminal’ s current colors when you start Autolog. You will not see the
other fields if you answer N. Answer Y to make Autolog change the
terminal’ s colors to those you select in the next fields.
In the next two fields, enter the foreground and background colors you
want Autolog to use. Enter the number that matches the color you want in
the “ Color key.” The small sample display shows what your color
selections will look like in Autolog.
Press ESC to exit the color settings screen and return to the Autfix
main menu.
Phone Log File Settings
The Phone Log File Settings screen (see Figure 7) controls whether
Autolog keeps a log of phone calls placed with the dial command and
lets you specify the file. For a sample phone log file, see Figure 1.3 in
Chapter 1 of the Autolog User’s Manual.
At the first prompt, answer Y to have Autolog keep a phone log, or
answer N if you don’ t want Autolog to keep a phone log.
If you answered Y at the first prompt, at the second prompt enter the
name you wish to give the phone log file. If no path is specified, the
specified file will be created in the Autolog installation directory.
Press ESC to return to the Autfix main menu.
Restore All Default Settings
The Restore All Default Settings selection will restore all
Autolog’ s “ factory default” settings. If you change your mind after
Figure 7 Phone log file settings.
Autolog Installation and Platform Guide
13
restoring the factory defaults, select Quit Without Saving
Changes to return the settings to what they were when you started
Autfix.
Quit Without Saving Changes
The Quit Without Saving Changes selection will undo any
changes you made during this Autfix session. The settings will be returned
as they were before you started Autfix, and you will exit the Autfix
program.
Save All Changes and End Session
The Save All Changes And End Session selection will save
the Autfix settings and end the Autfix program. Any changes you made to
the settings are saved and will be used the next time Autolog is started up.
The Autolog Initialization File
Autolog can use an initialization script each time it is started. This script
file must be called autolog.ini and must be located in the Autolog
directory.
The Autolog initialization file is simply an Autolog script, or go, file
that is used when a user enters the autolog command to start up
Autolog. See Chapter 4 in the Autolog User’s Guide for more information
about script files. You may wish to create an autolog.ini that
contains the commands users will enter each and every time they use
Autolog, for example, a link command to select the modem port, a
modem at command if using AT-compatible modem, frequently used
options and settings, and so on. The Autfix program previously described
can also be used to select the default value of some settings.
Installing the Dialer
The files needed for the dialer menu system (see Chapter 5 of the Autolog
User’s Guide) are installed when you install the complete Autolog
package. The files used by the dialer are dialer.dat, dialer.ago,
and autset.ago. Some of these files will need to be customized for
your system. Instructions for customizing dialer.dat, the dialer
database, can be found in Chapter 5 of the Autolog User’s Guide. You
will also need to customize the autset.ago script file. The
autset.ago file is used to establish a communication channel (i.e.,
select the modem, port, and baud rate) when you place a call using the
dialer.
14
Windows
You can edit autset.ago with your usual text editor or word
processor, but be sure to save it as a text-only file. This script contains
three Autolog commands:
link port
baud number
modem at
You need to replace the argument that appears in the link command
with the name of the communications port you want to use with the dialer
on your system. Replace the argument of the baud command with the
baud rate you want to use on this port. The last command, modem at,
does not need to be changed. The dialer uses Autolog’ s dial command,
which requires that your modem honor the AT command set as specified.
If your modem does not use the AT command set, the dialer will not be
able to place calls.
Installing Slave Only
The Slave program is the remote file-serving program for SMT file
transfers. As a licensed Autolog user, you may distribute the Slave
program to as many remote sites as you wish. If you have installed
Autolog locally, Slave is already installed and ready to use. To install
Slave on a remote system, just install the Autolog disk, and select the
"Slave only" installation option.
Using Slave on the Local System
Unlike other platforms that support SMT protocol, Windows is designed
as single-user operating systems, so the method to use Slave under
Windows is a little different. A remote Autolog user who calls into your
Windows computer and wants to transfer files using SMT protocol will
not be able to control your computer or run programs (including Slave)
from the modem port, unless your computer is running software designed
to allow the caller to do so or unless you have already started up Slave for
the caller.
If a remote Autolog user wants to use SMT protocol to transfer files
with your system, you must help out by starting Slave manually before the
remote caller dials in. To start Slave, you can enter the command slave
at the "DOS" prompt or in the Start Menu’ s Run box, double-click on the
Slave icon in the Autolog folder in Windows, or select “ Slave” from the
“ Autolog” program group in the Windows Start Menu.
When Slave starts, you’ ll be asked to enter the port and the baud rate
for Slave to use (see Figure 8). Enter the port that the remote caller will
dial into, and the baud rate to use for that modem port.
Autolog Installation and Platform Guide
15
From the "DOS" prompt or using a shortcut, you can give both
parameters using switches in the single command you use to start Slave:
slave /pport /bbaud
For example, the command slave /pcom6 /b115200 will instruct
Slave to use the port called COM6 at the baud rate of 115,200. Note that
there must be a space before each switch, but no space between the switch
and its argument.
When Slave is running on your communications port, a screen like the
one in Figure 9 will be displayed on your monitor. This screen indicates
that Slave is up and running and ready for a remote caller to use. You can
end the Slave program by pressing the cancel key .
Figure 8 Entering the communications port and baud rate for Slave.
Figure 9 Slave running on COM2 at 115,200 baud.
16
Windows
Windows–Specific Behavior of Autolog
Commands
Some Autolog commands behave somewhat differently under different
operating systems. The following sections describe the commands that
behave differently under Windows than under other platforms.
Entering and Exiting Autolog
The command used to start Autolog is autolog under Windows. You
can also start Autolog by entering autolog in the Start Menu’ s Run box,
by selecting “ Autolog” from the Autolog program group on the Start
Menu, or by double-clicking the Autolog icon in the Autolog folder.
When you use Autolog’ s system command to temporarily access the
operating system, Autolog will use the COMMAND.COM shell. To exit
the shell and return to your Autolog session, type the command exit.
Linking to serial devices
You use the link command to use serial devices in Autolog, and the
Windows version of Autolog offers two distinct ways to link to serial
ports and modems. The traditional way is to link to a COM port, such as
link COM2.
There are two known problems with linking to COM ports: the COM
ports of devices change as you add or remove items from your computer,
and linking to COM ports can cause the Windows fax server software to
quit if it is trying to use the same modem as Autolog.
To overcome these two issues, the link command has a special TAPI
mode that allows you to specify ports by product name, or to share
Autolog'
s modem use with Windows Fax software. The command syntax
is link tapi:modem-name-which-could-be-long.
To find out the names of the TAPI devices on your Windows system,
enter the command link tapi:list. This will display a list of the
currently available modems on your system. Old modems and O/Ses may
not be compatible with Autolog 2.0 TAPI interface.
To link to a TAPI modem, just give it'
s full name. If you can'
t
remember it exact name, or you wish to select from a pool of identical
modems, you can use the * character as a wildcard. For example, link
tapi:zoop* would link to the first available modem who TAPI name starts
with ZOOP. Notice that case doesn'
t matter in naming TAPI devices.
Modems that are linked using the TAPI subcommand will be deemed
as busy or otherwise unavailable to other TAPI-compatible clients like the
Windows fax server. No other Windows program can use the modem until
you unlink or finish in Autolog.
Autolog Installation and Platform Guide
17
Cancel Key
The cancel key is used to stop the execution of an Autolog command.
Under Windows, the cancel key is control-C. For instance, if you use
the dial command to place a call, you can press control-C to terminate
dialing before the remote modem answers. Or you can press control-C to
abort a file transfer that is in progress.
Switches
You can use the same switch format for Autolog commands as you do for
Windows DOS box commands: a slash plus the letter(s) that specify the
option. The switch should come immediately after a command, before any
arguments:
command/switch1/switch2 . . . arguments
Here’ s an example:
)
ztransmit/hash/q myfile.*
An exception to this rule is the fixed switch for the
packetsize command. The fixed switch must always use this
exact format: packetsize number/f. (See Chapter 3 of the
Autolog User’s Guide for details about the packetsize
command.)
Date and Time Comparisons
Many file transfer switches (such as ZMODEM’ s newer and
longernewer switches) allow comparisons of file dates and times.
Because Windows stores more than one date-and-time stamp for files, the
date and time used for comparisons is the last-modification date and time.
Some operating systems (including Windows and UNIX) take the local
time zone into account when comparing dates and times. When
transferring files with a remote system that is capable of doing so, date
and time comparisons take place as if both local and remote time had been
converted to Universal Coordinated Time (UTC). For example, a file on a
system in the United States’ Central time zone created at 10:00 A.M. is
one minute newer than one created the same day at 8:01 A.M. on a system
in the Pacific time zone. Your system’ s TZ (time zone) environment
variable must be set correctly for comparisons to be accurate.
Other operating systems (such as AMOS) do not account for the local
time zone. Time stamps for files on these systems are compared as if they
were in UTC, even though they probably are in local time rather than
UTC. This means that date and time comparisons are rather meaningless
when transferring files with such systems.
18
Windows
Text Conversion
SMT and ZMODEM file transfers support the text switch, which
converts the line endings of a file into the line ending appropriate for a
text file on the destination system.
Windows normally uses a carriage return and linefeed (control-M
[ASCII decimal value 13] plus control-J [ASCII decimal value 10]) at the
end of lines in text files. Other operating systems, however, may use other
character(s). When you use the text switch in an SMT or ZMODEM file
transfer command, outgoing files’ line endings are not changed. The
destination system should convert the carriage return–linefeed into the
native line ending for that system, if necessary.
When the text switch is used for an incoming file, linefeeds by
themselves will be changed to carriage return–linefeed, the native
Windows line ending. Incoming files using carriage return alone or
carriage return–linefeed will be left as is.
Note that different operating systems may use many other types of line
endings. However, the assumption by SMT and ZMODEM protocols is
that the remote software uses the text option as well so that whatever
line ending is native to the remote system will be translated into a
“ generic” carriage return–linefeed line ending when you download files
and the “ generic” line ending will be translated into the remote system’ s
native line ending by the remote software when uploading files.
The abort Command
Under Windows, abort 2 does not terminate pending shell or systemlevel scripts. See Section 4.2 in Chapter 4 of the Autolog User’s Guide
for more information about the abort command.
File Naming and Directory Conventions
Unless you specify otherwise, Autolog will look for its resources files
(e.g., script files, autolog.ini, etc.) in the Autolog installation
directory or folder (usually C:\AUTOLOG). When transferring files,
unless you specify otherwise, Autolog will look for files to send and will
place received files in the current directory or folder that you’ re in.
To specify files in a file transfer command, you can use the wildcard
symbols * and ?. You can specify a list of files by separating the names
with spaces, for example:
transmit myfile.txt yourfile.txt ourfile.txt
To specify files that contain a space, multiple periods, or other strange
punctuation, surround the filename in "quotation marks". Keep in mind
that quotation marks disable wildcard matching, however!
Autolog Installation and Platform Guide
19
Files That Autolog Creates
When you use the key save command to save key translations (see
Section 2.3 in Chapter 2 of the Autolog User’s Guide), Autolog will
create a file called keys in the Autolog installation directory unless you
specify a different file name. The file extension depends on whether
terminal emulation was active when you save the key translations. If no
terminal emulation is active, the file is called keys.ago. If one of the
VT100 emulations is active, the file is called keys.an1. If the “ generic”
Autgen terminal emulation is active, the file is called keys.am1.
As described in Section 3.2 in Chapter 3 of the Autolog User’s Guide,
the rename option prevents overwriting files with zreceive when the
file names must be truncated. The first 27 files that must be renamed will
be called auxnnnnn, where x is the number 0 or a letter from a to z and
nnnnn is an arbitrary five-digit number that will be the same for the entire
Autolog session. The next 27 files will be called buxnnnnn, and so on.
For example, the first 29 files will be renamed au010718, aua10718,
aub10718, . . . , auz10718, bu010718, bua10718, . . . .
Index
abort, 19
Autfix, 8–13
autolog.ini, 13–14
autset.ago, 14
Baud rate, 5
Break key, 9–10
Cancel key, 18
Change key, 9–10
Color settings, 12
Communications port, 5
Copy key, 9–10
Date and time comparison, 18–
19
dialer, 14
Directory, 20
for Autolog installation, 5, 6
EOF character, 9–10
Error correction
for XMODEM and
YMODEM, 11
File name, 19–20
File transfer settings, 10–12
Folder, 20
Hardware flow control, 5
Initialization file, 13–14
Installation
of Autolog, 5–7
Interrupt key, 18
key save, 20
Line ending, 19
link, 17–18
Log file of phone calls, 12–13
Macro, dialing, 9
Meta character, 9–10
Modem
configuring, 7–8
type of, 5
Naming convention, 19–20
Packet size
for SMT protocol, 10–11
20
Windows
for XMODEM and
YMODEM, 11
for ZMODEM, 11
Path, 20
Pause key, 9–10
Phone call log, 12–13
PIC. See Product Installation
Code
Product Installation Code (PIC),
5–7
Put key, 9–10
rename, 20
Retries, 10
Screen colors, 12
Settings
default, 8–13
Slave
running, 15–16
SMT protocol, 10–11
Special keys, 9–10
Starting Autolog, 6, 17
Start-up script, 13–14
Switch, 18
system, 17
TAPI linking, 17–18
Terminal emulation
and key translation, 20
text switch, 19
Time zone, 18–19
timeout, 10
Wildcarding, 20
window, 11
x1k, 11
xcrc, 11
XMODEM, 11
YMODEM, 11
ZMODEM, 11