1
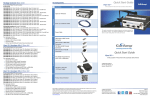
Pedigree Technologies Installation Manual 4776 28th Avenue South, Suite 101 IM-FMLx—C3030 Fargo, ND 58104 Fleet Manager, CalAmp C3030 OBDII (701) 293-9949 Installation Manual: OneView Fleet Manager w/Diagnostics Calamp LMU 3030 Document ID: IM-FMLx-C3030 Last Updated: November 13, 2014 Revised: November 13, 2014 Page 0 Installation Manual IM-FMLx—C3030 Fleet Manager, CalAmp C3030 OBDII Pre-Requisites Required Information Name of asset (ex: Propane Truck #20) Detailed information about the asset (year, make, model etc) State, area organization or group the asset belongs to (ex: North region, Minnesota tankers etc) ESN of each device to be installed (Indicated on a white label marked “ESN” 4xxxxxxxxx) Current odometer reading of the vehicle Required Parts (1) 14” narrow cable tie Required Tools Panel removal tool or plastic pry-bar General hand tools Installation Steps 1. The LMU 3030 is a self-contained GPS tracking and diagnostic device; there is no need to do any complicated wiring or installation! For basic installation, all that is required is for the installer/user to plug the LMU 3030 fleet tracker into the OBDII diagnostic port of the vehicle and perform a basic operational test. See below for these steps. a. Locate the vehicles OBDII diagnostic port, this is usually located on the drivers side of the vehicle under the dash, or hidden behind a coverplate under the dash or on the side of a center console. b. c. i. ii. Some foreign vehicles such as Toyota, Honda, BMW etc have a slightly different variation of the standard OBDII plug and/or have the plug hidden in a non-standard location. If you have a foreign vehicle, and cannot find your OBDII port, please consult your user manual or local dealership to help locate it. Once located, plug the LMU 3030 GPS device into the OBDII port, lights on the side of the device should light up and start to flash Pull your vehicle outside and let it run for 5 minutes, at this time, all three lights (green, red and orange) should be lit solidly on your device. Revised: November 13, 2014 Page 1 Installation Manual d. e. IM-FMLx—C3030 Fleet Manager, CalAmp C3030 OBDII i. If the previous test completes successfully, you may proceed with the installation steps ii. If the previous test does NOT complete successfully, please contact technical support Using a narrow-width cable tie, run the cable tie around the OBDII connector and the LMU 3030 device to secure it from becoming dislodged from the connector. i. As an alternative, it is suggested to place a serialized cable tie on each installation to deter tampering and also indicate if the tie has been removed and later replaced. These devices can be special ordered from companies such as Panduit. Replace all dash panels, screws and other vehicle parts removed during installation LMU3xxx Indicator Lights: Testing/Confirmation Steps 1. The final test after installation requires the vehicle to be outside with clear view of the sky 2. Start the vehicle and observe the LED indicator lights on the side of the LMU. Within 5 minutes, all three lights should stop blinking and stay solid. If the lights continue to blink, reconfirm all connections have been made as instructed above. Once the lights are solid, call your Pedigree Technologies Installation Support representative to confirm and finalize the installation. Installation Support: (701)-499-0022 Revised: November 13, 2014 Page 2