1
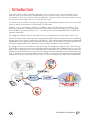
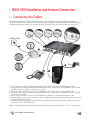
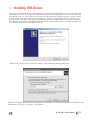
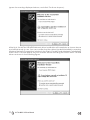
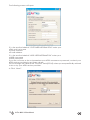
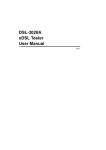
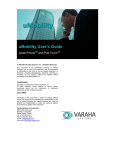
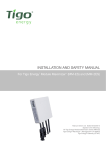
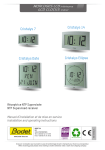
Wireless ADSL2+ VoIP Router (1 VoIP Line, 1 Ethernet) WAV-140 This document is prepared by AirTies Wireless Networks Corporation. All rights reserved. Overview This manual guides you through the steps necessary for installing and configuring the AirTies WAV-140 Wireless ADSL2+ VoIP Router. Please read this manual carefully before beginning the installation process. The Warranty does not cover failure or damage resulting from not following the instructions in the manual. Retain this manual for future reference. Safety and Maintenance · In order to prevent damage to your device, be sure to keep it in its original box during transportation. · The device must be used solely with its original power adapter. Please note that the adapter is 220V only. Do not use with 110V AC. · Do not insert a PSTN (phone) plug into the LAN port. · If you encounter any problems, do not open or disassamble the device. Instead, call AirTies Technical Support. · In order to prevent electric shock, do not operate the device in wet or damp areas. Do not use the phones connected to the device during lightening storms. · In the event of a gas leak, do not use the device. Do not turn the device on or off. Do not plug or unplug the power cord. · Avoid using the device in dusty environments. If dust buildup should occur, use a dry cloth to remove the dust. · To clean the exterior of the device use a dry cloth. Do not attempt to clean the interior. There are no user serviceable components inside. · For further information regarding the installation and configuration of the device consult the remainder of this manual. · The average usage life of the device is 7 years as determined by the Authority of Industry and Trade. 1 AirTies WAV-140 User Manual 1. Introduction The AirTies WAV-140 is a wireless gateway that connects your home or office to the Internet over your ADSL line and enables you to make phone calls over this Internet connection. You can call at a discounted rate using any VoIP service provider, and/or have free phone calls with up to 10 WAV-140 users. It functions as an ADSL2+ router, VoIP gateway, and wireless access point. You can also have a wired connection to its Ethernet or USB ports. ADSL2+ has a download speed of 24Mbps and upload speed of 4Mbps. The Ethernet interface is 100Mbps full dublex. The wireless speed can get up to 125 Mbps with the 802.11g standard and G++ . It is also backward compatible with the 802.11b wireless standard. The diagram below shows a typical home use configuration of the AirTies WAV-140. The AirTies WAV-140 comes with an integrated Quality of Service (QoS) feature combining Router and VoIP phone functions in one device. QoS allows data packets from selected applications to be given priority during Internet transfer. For the WAV-140, VoIP applications are given higher priority by default, thus providing excellent voice quality. By using a phone connected to the WAV-140, it is possible to place VoIP calls through your ADSL connection as well as making regular land line calls. Depending on how your WAV140 is programmed, your long distance, international, and GSM phone calls are placed over the Internet, and your local phone calls are placed over your fixed phone line. In the event of a power failure or loss of ADSL connection, your calls are automatically redirected over your fixed phone line. Thus, you do not experience any service interruption. AirTies WAV-140 User Manual 4 1.1 Main Features · All-in-one solution: ADSL2+ Router, VoIP Gateway with PSTN backup, 802.11b/g 54Mbps Wireless Access Point, 2 port Switch and Firewall · Router: ADSL2+ Router (24Mbps download/ 4Mbps upload) optimized for your local ADSL service provider; DHCP server, NAT, NAPT, RIPv1/v2 specified, VPN pass-through · Firewall: Advanced anti-DoS SPI Firewall; URL, IP and MAC address based filtering, DMZ · High speed wireless with 802.11g: 54Mbps wireless access point backward compatible with 11Mbps 802.11b. · Wireless range and AirTies Mesh Technology: Ranges of up to 400 meters outdoors and 100 meters indoors standard. Extendible with AirTies Mesh Network technology using additional wireless access point devices such as AirTies AP-300. · Wireless security: WPA, WPA2-AES, 64/128 bit WEP and 802.1x standards · Wired device support: You can also connect any wired device to your local network via the 10/100Mbps Ethernet or USB 1.1 slave port · VoIP Gateway: with 1 FXS and 1 FXO port supporting SIP protocol (RFC 3261/3264) · High Voice Quality : With the full duplex QoS feature · ADSL Usage Monitor: Especially useful for limited quota ADSL subscribers. Reports monthly total download and upload amounts and current download rate. · Robust against voltage fluctuations: Specially designed to withstand wide voltage fluctuations · Easy setup and management: Universal Plug and Play (UPnP), Easy Setup CD (with animated instructions), user-friendly ADSL Utility Program and User Manual · Easy Update: Firmware (software) upgrade via the Advanced Settings Web interface. · Remote Management: SNMP based remote inspection and management · 24x7 technical support by a highly trained AirTies support team and backed up by the AirTies R&D team 5 AirTies WAV-140 User Manual 1.2 Minimum System Requirements · ADSL service on your phone line must be activated and working properly (ADSL speeds of 512K or more recommended for VoIP), · For wired use: a computer with an Ethernet adapter that supports TCP/IP, · For wireless use: 802.11b or 802.11g wireless adapter or a computer with wireless capabilities, · Any version of Windows or Unix, Linux, Mac operating systems, · For the AirTies Utility Program: Windows 98/ME/2000/2003 or XP operating system 1.3 Package Contents Please check that your AirTies WAV-140 contains all of the items listed below: · AirTies WAV-140 Wireless ADSL2+ VoIP Router · Power adapter and power cord · CAT-5 Ethernet cable · Standard telephone/ADSL cable (2 long and 1 short) · Telephone/ADSL line splitter · AirTies Easy Setup CD · User Manual · Warranty Card WAV -140 8 AirTies WAV-140 User Manual 6 Front Panel 1.4 The LED indicators on the front panel of the modem give you a visual overview of the modems activity. When the modem is configured and working correctly, all LED indicator lights turn to solid green. The following table shows the possible states indicated by the LEDs. LED LIGHT STATE Power Green Off The AirTies WAV-140 is powered ON. The AirTies WAV-140 is OFF. Status Yellow Yellow flashing Off A problem has occurred. The WAV-140 is coming up or software update taking place The WAV-140 is functioning properly Green Green flashing Off LAN connection is established LAN port is active and data transfer is taking place No LAN connection Green Green flashing No VoIP service active Phone call over the FXO port is taking place Green Green flashing Off The WAV-140 is registered with the SIP proxy A VoIP phone call is taking place The WAV-140 is not registered with a SIP proxy Ethernet Line VoIP Green flashing slowly ADSL Green Off An ADSL connection is being negotiated ADSL connection is established No ADSL connection Internet Green Off Green flashing PPP connection is established No PPP connection Data exchange over the PPP connection USB Green Green flashing Off USB port connected USB port is active and data exchange taking place No connection on the USB port Green Green flashing Off Wireless network is active Wireless network is active and data exchange is taking plac Wireless network is not active WLAN 7 AirTies WAV-140 User Manual 1.5 Back Panel Interfaces for data and power (ports) are located on the back panel of the AirTies WAV-140. Number Interface Property 1 2 3 Power On/Off Reset 4 5 6 7 8 ADSL Ethernet USB Line Phone 15V DC inlet, to be connected to the power adapter Button to turn the device on and off Button that restarts the device or resets it, i.e. returns it to default settings Port to be connected to the ADSL (phone) line 10/100 BaseT Ethernet port to be connected to the local network Port to be connected to any USB-compatible device RJ-11 port to be connected to the phone port of the splitter RJ-11 port to be connected to the phone device AirTies WAV-140 User Manual 8 2. 2.1 WAV-140 Installation and Internet Connection Connecting the Cables The following figure shows how to connect your router using the cables provided. How to connect the cables is also explained in detail by the animated instructions that automatically start when you insert the Easy Setup CD into the CD drive of your PC. ADSL Hattý 6 1 ADSL 2 Line Phon e Ethern et ON USB Rese t OFF Powe r 3 7 4 Güç 5 1. Connect your ADSL telephone plug to the LINE port of the splitter provided. 2. Using the short telephone/ADSL cable provided, connect the MODEM port of the splitter with the ADSL port of your router. 3. Connect the PHONE port of the splitter to the LINE port of your WAV-140. 4. Connect the phone device you would like to use (corded or cordless) to the PHONE port of your router. 5. You can connect your PC to the Ethernet or USB port of the AirTies WAV-140. 6. Alternatively, you can connect your PC wirelessly to the local wireless network set up by the AirTies WAV-140. 7. Plug the power adapter provided into the 220V wall outlet and the other end of the power cord to the WAV-140. Make sure all cabling is done properly before turning the power on. Turn your router on. 9 AirTies WAV-140 User Manual 2.1.1 Installing USB Drivers The steps in this section are only necessary if your computer does not have an ethernet port and you want to use your computer's USB port to surf Internet, or you have a second computer that you would like to connect to the network. Should neither of these apply in your case, you can skip to the next section.After you connect the USB cable to the back panel of the WAV 140, plug the other end to an available USB port on your computer. The Windows hardware wizard will automatically automatically try to install the driver for the device as shown in the figure below. Select 'No, not this time' and click 'Next>'. The following dialog will follow. Mark the 'Include this location in the search' checkbox, and enter the driver location on the installation CD (e.g. D:\driver). Click 'Next>'. AirTies WAV-140 User Manual 10 Ignore the warning displayed above, and click 'Continue Anyway'. After that, the AirTies USB NDIS Network driver installation will complete as shown above and will be ready to use. You can confirm that the driver is indeed installed by opening Windows 'Network Connections' window in the 'Start->Control Panel->Network Connections' menu tree. It should display all your network drivers including the AirTies WAV 140 USB driver as shown in the following figure. 11 AirTies WAV-140 User Manual 2.2 Installation Settings Completing the hardware connections in the previous section is necessary before modifying the installation settings. After the hardware setup is complete, turn the WAV140 on and wait about 30 seconds for the router to initialize. You can modify the installation settings in one of two ways: 1. By using the Easy Setup CD with animated instructions, or, 2. By using the Web User Interface Both methods are described in the following sections. 2.2.1 AirTies WAV-140 ADSL Settings Using the Easy Setup CD The AirTies ADSL Utility Software provides you with the easiest way to complete the installation of your router and activation of its ADSL access. Once the cabling is completed, insert the Easy Setup CD into the CD drive of your PC. The AirTies ADSL Utility Software Installation program will start automatically. If it does not start automatically, please run the program installation.exe (or kurulum.exe) on the CD. A sequence of animated instructions will guide you through the cabling of your WAV140 router. Please verify that you have connected the cables as shown in this presentation. You can skip this animation at any time and proceed with setup by clicking the Setup link in the upper right hand corner of the window. 1. Click Next> in the AirTies ADSL Utility Setup Wizard window. AirTies WAV-140 User Manual 12 The following screen will open. 2. In the section labeled CUSTOMER INFORMATION enter your · First and Last name · Phone number · E-mail address 3. In the section labeled ADSL USER INFORMATION enter your · ADSL username · ADSL password If you do not know or do not remember your ADSL username or password, contact your ADSL service provider to get these values. Do not change the value in the Protocol field (PPPoE) unless you are specifically advised to do so by your ADSL service provider. 4. Click Next. 13 AirTies WAV-140 User Manual 5. In the window that appears select a Security level and enter an encryption key in the password field. If you do not enter a key, the AirTies ADSL Utility will assign a random key and save it automatically in the Router. Please note down the password, as you will be required to enter for the other computers that connect to the modem wirelessly. After that, click Next to complete the setup. The following window will remind you once again the wireless key The basic installation settings of your WAV-140 are now complete. Please wait until the ADSL and Internet LEDs on the front panel light up in solid green You can check the status of your Internet connection by clicking the Status button on the left menu bar of the AirTies ADSL Utility window. If you cannot connect to Internet even though the LEDs are all green, contact your ADSL service provider. AirTies WAV-140 User Manual 14 2.2.2 ADSL Settings using the AirTies WAV-140 Web Interface Once you connect the WAV-140 to your PC, you can enter the initial ADSL settings using any web browser (e.g.Internet explorer, Mozilla Firefox, Netscape). You dont need to be connected to the Internet to do this. 1. Open your web browser (e.g. Internet Explorer) 2. In the Address bar enter 192.168.2.1, the default IP address of your router, and press Enter. This will launch the web interface of your AirTies WAV-140. 3. You will be prompted for a password to login. Initially, leave this field blank and continue by clicking Submit. 15 AirTies WAV-140 User Manual 4. Go to ADSL Settings under the ADSL main menu on the left menu bar. 5. WAV-140 has the ability to communicate with the DSLAM on 8 different channels. However, a single channel is enough to establish an ADSL connection. The vc1 entry on your screen is the default channel for the ADSL connection. Click vc1 to proceed with the ADSL configuration. 6. Enter your ADSL Username and Password. If you do not know or do not remember your ADSL username or password, contact your ADSL service provider to get these values. AirTies WAV-140 User Manual 16 Also, please check with your ADSL service provider to make sure the values for PVC settings (VPI=8 and VCI=35) are compliant with your ADSL service providers infrastructure. Click Save. Basic installation settings of your WAV-140 are now complete. Please wait until the Internet and ADSL LEDs on the front panel light up in solid green. You should now be connected to the Internet. If you are not connected to the Internet even though the lights are green, contact your ADSL service provider. 2.3 Resetting the AirTies WAV-140 To reset your AirTies WAV-140 settings to the default values, press and hold the Reset button on the back panel for several seconds with the tip of a pencil or a similar pointed object. If you press the Reset button for 5 seconds, all settings (ADSL, NAT, etc.) except the VoIP settings will be reset. If you press the Reset button for 20 seconds all settings will be reset. 17 AirTies WAV-140 User Manual 3. VoIP Settings VoIP settings of the WAV-140 can only be done through the Web interface. Once you complete these settings, you can make phone calls over the Internet using any VoIP service provider, using the telephone you have connected to the PHONE port on the back panel of the WAV-140. Go to the VoIP menu on the left menu bar. In the window titled VoIP Service State, check the Enable voice over Internet box and click Save. 3.1 VoIP Service Provider Selection To make long distance or international calls over the Internet, you need to have an account with an alternative phone operator, i.e. a VoIP Service Provider of your choice. WAV-140 has a few default VoIP service providers defined. You can select one of these VoIP service providers or mark the Other option to use a different VoIP service provider. Refer to for help with the VoIP service provider selection and their tariffs. These service providers are included for your convenience and their settings are already adjusted. (Some service providers may require you to open an account.) AirTies is not responsible for the quality of VoIP services offered by these providers. To enter your own VoIP (SIP) settings, select the Other option. If you had previously selected a service provider, all settings for that service provider will be deleted! If you have selected one of the predefined VoIP service providers, you will need to enter only the username and password. All other values will already be set. If you choose Other, it will be necessary to enter all connection information. Click Save after you enter all the necessary values. If you select one of the predefined VoIP service providers, you dial the same way you always do for your local, long distance and international calls. Since the WAV-140 is already setup for these service providers, your calls will be placed correctly over either the VoIP or the regular phone line (FXO). AirTies WAV-140 User Manual 18 If you select Other as the VoIP service provider and make your own settings, all your calls will be placed over the VoIP line unless you make the necessary changes in the Dial Plan.You could still make phone calls over the regular phone line (FXO) by dialing 9 first.In either case, you can make emergency calls by dialing only the three-digit numbers. After saving your settings, you will be redirected to the main page of the Web interface. After logging in again, go to the VoIP menu on the left menu bar. You will now be on the VoIP Service State page. At this stage, it is necessary to save the settings for the VoIP provider selected in the WAV140. Click on SIP Settings under the VoIP menu. Wait for the SIP Settings window to come up. 19 AirTies WAV-140 User Manual 3.1.1 Sample VoIP Service Providers Below is a list of some free VoIP service providers that allow user registry over the internet. For details on how to register and use these services visit the corresponding websites. For a more current list and set-up details visit http://www.airties.com/VoIP. SIPPhone: http://www.sipphone.com VoIP Buster: http://www.VoIPbuster.com Internet Calls: http://www.internetcalls.com VoIP Talk: http://www.VoIPtalk.org 3.1.2 Registering with SIPPhone VoIP Service Provider If you select one of the VoIP service providers listed in the provider selection field, you will be guided to their registration page. AirTies WAV-140 User Manual 20 If you select SIPPhone and have not yet registered with SIPPhone, click the link in the upper right-hand corner on the window to go to SIPPhone Account Creation page. Follow the few easy steps below to open a SIPPhone account immediately. Scroll down the page to where your name and email address will be entered. Fill in the following fields: Security Image Text: Enter the handwritten digits you see in this field. First Name: Enter your first name. Last Name: Enter your last name. Email Address: Enter your email address. It is important that you enter your email address correctly since your account details will be sent to this email address. Click Register. The next screen will show that you have successfully registered. 21 AirTies WAV-140 User Manual Check your email for the VoIP account number and password that will be sent to you shortly by SIPPhone. You will have to enter these values in the WAV-140 settings.SIPPhone will first email you a confirmation link. When you click on the confirmation link, you will see the message that your account has been activated and that the account information to configure your VoIP device will be emailed to you. The second email you receive from SIPPhone will include your account details. The information that is needed in the WAV-140 configuration is as follows: · Username/SIP number (17476969696 in the example below) · Password (867867 in the example below) · SIP Proxy (proxy01.sipphone.com in the example below) AirTies WAV-140 User Manual 22 3.2 SIP Settings In this section, how to make the SIP settings is shown using the account information obtained in the preceding SIPPhone registration example. The account information (from the email) is entered in the SIP Settings window under the VoIP menu of the WAV-140 Web interface. 23 AirTies WAV-140 User Manual After you click Save, you will be asked to confirm that you would like the information to be saved in the device. After clicking OK, the VoIP LED on the front panel of the WAV140 will turn on. In addition, SIP Server Registration State will become Registered in the VoIP Service State window. When you are done with the SIP settings, you can place your first call through SIPPhone. Call SIPPhones test number 001 747 474 5000 (a USA number) for a test call. After two short beeps which indicate that the call is placed using VoIP, you will be connected and hear the Welcome to SIPPhone message. 3.3 Dial Plan To configure how your phone calls are directed by the WAV-140, go to Dial Plan under the VoIP menu on the left menu bar. You can enter your own Dial Plan rules in the Dial Plan-Advanced Settings window. For each rule, enter the starting digits of the number to be dialed, the minimum and maximum number of digits in the number to be dialed, how to direct the phone calls (over VoIP or FXO), the number of digits to be erased from the beginning of the number, and the number of digits to be added in front of the number. Then click the Add button. To delete a rule, select the rule and click the Erase button. To delete all the rules, click the Clear button. At the end, click Save to store your changes. In the below screenshot you can find a sample dial plan made for an international VoIP service provider such as SIPPhone or VoIPBuster. These rules are defined based on the following assumptions: 1. To dial a long distance number within your country (countrys code taken as 30) you have to dial 0+area_code 2. To dial international numbers you have to dial 00+country_code 3. Your VoIP service provider requires all numbers to be dialed as international numbers With the above rules defined you can continue dialing long distance numbers and international numbers as you are used to, i.e. no need to dial long distance numbers within your country as international numbers! AirTies WAV-140 User Manual 24 3.4. P2P Calling: free of charge for up to 30 numbers With the AirTies WAV-140, you can call up to 30 numbers over the Internet (ADSL line) free of charge without using any VoIP operator. To do this, the parties being called must also have their phones connected to a WAV-140.You can configure P2P settings either through Web interface or the AirTies Utility Program. 3.4.1.Configuring P2P using the AirTies Utility Program For each entry, the P2P list contains three pieces of information each of which can be edited in place when the mouse is clicked on the corresponding field. Each row in the list denotes a phonebook entry that identifies a person/place where calls will be placed using a short dialcode. The entry contains three basic information: the name of the person, short dialcode, and the MAC or IP address of the remote device. Domainname can also be entered instead of the IP address of the remote device. Up to 30 such entries can be populated. When the fields are tabbed through beyond the existing list, a new row is automatically created (like a Microsoft Word table behavior). Furthermore, when the right mouse button is clicked, a pop-up menu is displayed letting users add or delete entries. These can also be achieved using the 'Add' and 'Delete' buttons above the list. The contacts can be searched by typing into the 'Search by name' field. The search is incrementally done as you type characters into the text box. The 'Phone No' and 'Name' fields are used to transmit calling party name and number for devices capable of decoding CLIP/CNAME service. 25 AirTies WAV-140 User Manual 3.4.2 Configuring P2P using the Web User Interface Click on P2P Calling under the VoIP menu. On the P2P Calling screen, check the Activate P2P calling box. Enter the phone number and the name you would like people you call to see in the corresponding fields. You can enter your ADSL phone number as the calling number. You can define the other WAV-140 users that you will be calling using P2P (i.e. without a VoIP service provider) by the default short cuts (#0 - #9). You can also enter a regular phone number (e.g. 3186200) for the same purpose. Then, for each number, enter the following information: · ADSL MAC address of the WAV-140 or · Static IP address if any or · Domain name After entering all the information, click Save. While making P2P calls, it is sufficient to dial the numbers as entered in this screen (no prefixes needed).These numbers can be local, long distance or international, but each of them must be using a WAV-140. When you click Save, the format of the IP addresses, MAC addresses, and Internet domain names you have entered will be corrected in a way that the WAV-140 can understand and save. From now on, you can talk to the WAV-140 users at these numbers completely free of charge. You will know that your call is a VoIP call when you hear two short beeps right after you dial the number. AirTies WAV-140 User Manual 26 4. Wireless Settings Functioning as a wireless access point, the WAV-140 enables you to set up a wireless hotspot with ranges reaching 400 meters for outdoor environments and 100 meters for indoor environments. Using the G++ wireless technology wireless access point can work at speeds of up to 125Mbps. To achieve speeds of 125Mbps the other wireless devices (reveivers) must be using USB adapters supporting 125Mbps (e.g. AirTies WUS-300). Additionally, WAV-140 is backward compatible with the 802.11b/g standard. When you click the WIRELESS menu on the left menu bar of the WAV-140 web interface, you will be in the Wireless Connections screen that lists all the wireless clients connected to the WAV-140. You can block the access of any client to the WAV-140 by checking the Block box next to the MAC Address of the client. This prevents that client machine from joining the WAV-140 wireless network. To configure your wireless network, go to Wireless Settings under the WIRELESS menu on the left menu bar of the AirTies WAV-140 Web interface. In the Wireless Settings screen, verify that the wireless network feature is activated. Wireless network is active by default. You can assign a name to your wireless network by entering the name in the Wireless Network Name (SSID) field. If you check the Hide Wireless Network Name (SSID) box, the WAV-140 will hide your SSID during broadcast. You can enter a broadcast channel number (from 1 to 13) in the Channel field.It is recommended that you choose one of 1,6, or 11 as the channel number. The same channel should be selected on all devices in the wireless network. The 125Mbps G++ feature can be activated by checking the G++ box. Note that a wireless USB adapter supporting 125Mbps (e.g. AirTies WUS-300) is necessary on the receiver side to provide wireless communication at 125Mbps. Click " Save" to store your settings. 27 AirTies WAV-140 User Manual 4.1 Wireless Security Settings It is not necessary to configure wireless security to enable wireless communication. However, due to growing importance of data security, it is recommended that you choose a suitable security protocol and configure the WAV-140 to use it. Wi-Fi Protected Access (WPA) and Wired Equivalent Privacy (WEP) are wireless encryption protocols used to encrypt the data traffic within the wireless network. MAC Address Filtering allows you to control which network cards can connect to the AirTies WAV-140 and share your internet access. For your wireless network security, it is recommended that both MAC address filtering and one of the wireless encryption protocols WAP or WEP be activated. The AirTies WAV-140 supports both encryption standards. WPA is the latest and most advanced wireless encryption standard and provides you with the highest level of data protection. All AirTies wireless products and the newly introduced 802.11g wireless communication devices support WPA. WEP is an earlier wireless security protocol. If any of the devices in your wireless network does not support WPA, it is recommended that you choose WEP encryption. The AirTies WAV-140 supports 802.1x Identity inspection as well. For detailed information about how to setup 802.1x security, please check the AirTies Website www.airties.com. AirTies WAV-140 User Manual 28 4.1.1. WPA Security Settings Go to Security under the WIRELESS menu on the left menu bar of the WAV-140 Web interface. To enable WPA encryption, click on the WPA button in the Wireless Security screen.Click on the PSK button and enter a network key that is 8 to 63 characters long (use a combination of letters and digits) in the password field. Make sure you choose a key that is not easy to guess. Click Save.You must activate WPA and set the same network key in all the devices that will communicate with the WAV-140. 802.1x is a port-based access control in which the wireless clients are authenticated by a central RADIUS server. If you have a RADIUS server in your network, WAV 140 can defer the authentication function to this server at the IP address you provide. Otherwise, it should be left alone. Group interval is the re-key period expressed in seconds. In WPA-PSK, initial key is automatically changed after the group interval duration. You can leave it as is. 29 AirTies WAV-140 User Manual 4.1.2. WEP Security Settings Go to Security under the WIRELESS menu on the left menu bar of the WAV-140 Web interface. To enable WEP encryption, click on the WEP button in the Wireless Security screen.Three levels of WEP encryption exists. 64-bit encryption uses a key of 10 hexadecimal digits. A hexadecimal digit is A-F and 0-9. 128-bit encryption uses 26 digits, and 256-bit encryption uses 58 digits. A key with more digits is more secure. After selecting the key length, enter the appropriate number of hexadecimal digits, any combination of (0-9, A-F), for the key Click Save. You must activate WEP encryption and set the same network key in all the devices that will communicate with the WAV-140. AirTies WAV-140 User Manual 30 4.1.3. MAC Address Filtering Click on MAC Address Filtering under the WIRELESS menu on the left menu bar of the WAV-140 Web interface. To activate MAC Address filtering, check the Enable MAC Filtering box. To add the devices that will be permitted to access the WAV-140: · Click the Allow button. · For each device to be allowed access, enter the wireless MAC address of the device (e.g.00-14-38-15-60-DD) in the ADD field and then click the ADD button. To add devices that will be blocked from accessing the WAV-140: · Click the Block button. · For each device to be blocked, enter the wireless MAC address of the device in the ADD field and then click the ADD button. Click Save. 31 AirTies WAV-140 User Manual 4.2. MESH Network Settings Click WIRELESS then MESH on the left menu bar in the WAV-140 Web interface. All access points detected by the WAV-140 will be listed. Select the access point(s) you would like to include in the Mesh network by checking the corresponding box(es). Only access points that use the same channel can be selected to join the MESH Network. Click Save. To add new access points that are not already listed, enter the MAC in the Access Point to be Connected field and click Add. You can refresh the list of access points detected by clicking Scan for Access Points. AirTies WAV-140 User Manual 32 5. Other Settings 5.1. ADSL Settings 5.1.1. DNS Setup Domain Name Service (DNS) is an Internet service that translates domain names into IP addresses. For example, when you try to go to the www.airties.com address, first your Internet service provider's DNS will try to translate it to the corresponding IP address. The DNS system is, in fact, its own network. If one DNS server doesn't know how to translate a particular domain name, it asks another one, and so on, until the correct IP address is returned. Most service providers will provide Domain Name services for security and speed.Your WAV-140 may have some DNS values set as defaults. Go to DNS Setup under the ADSL menu of the WAV-140 Web interface to see these values. If you prefer to use a different DNS server, enter its IP address in the DNS 3 field. 5.1.2.ADSL Mode You can specify the ADSL standards to be used for your ADSL connection in the ADSL Mode screen under the ADSL menu of the WAV-140 Web interface. Check the MULTI_MODE box for your router to find out from the DSLAM the most appropriate standard to use. The WAV-140 has all modes checked by default. Unless you need a special setting, it is recommended that you leave the choices as they are. 33 AirTies WAV-140 User Manual 5.2. LAN Settings When you click on the LAN menu of the WAV-140 Web interface, you will see the IP and MAC addresses of all the devices that are on the WAV-140's local network (wired or wireless) and are assigned IP addresses by your router. 5.2.1. IP Setup and DHCP You can configure the local IP address of your router and the DHCP server settings by going to the IP Setup and DHCP screen under the LAN menu of your router. DHCP server assigns IP addresses to the clients in the local network.WAV-140 automatically assigns IP addresses to the clients on the local network starting with the number following its own IP address. The Start IP Address and Last IP Address can be modified by entering the desired values in the appropriate fields in this window. If you have a different DHCP server on your local network that you would like to use, check the Enable DHCP Relay box and enter the local IP address of this DHCP server in the Relay IP Address field. AirTies WAV-140 User Manual 34 5.2.2. LAN Clients To define a computer as a client in your local network go to LAN Clients under the LAN menu of the WAV-140 Web interface. Enter the client's IP address, client name and MAC Address in the corresponding fields.Checking the Reserve box for a client in the existing clients list will ensure that the IP address corresponding to this physical address will not change dynamically. 5.3. Firewall Settings A firewall is the primary method for keeping a computer secure from intruders. A firewall allows or blocks traffic into and out of a private network or the user's computer. One of the methods used by the AirTies WAV-140 firewall to protect your network is SPI, Stateful Packet Inspection. SPI monitors the protocol and packet addresses being received to determine if the information should be passed through the firewall to the connected computers. The Internet addresses that are a source of malicious attacks are permanently blocked from accessing your network.In the WAV-140 Firewall menu, you can also define advanced rules to limit or block the Internet access of any local user.To activate the frewall, go to FIREWALL under the left menu bar of the WAV-140 Web interface. Click the Enable Firewall button and click Save. The following sections describe the actions to be taken in the submenus under the FIREWALL menu. 35 AirTies WAV-140 User Manual 5.3.1. Access Control You can allow or block a user's access to certain Internet services by setting MAC or IP address filters. To do this, go to Access Control under the FIREWALL menu in the left menu bar of the Web interface. After checking the Enable LAN Access Control box, click New to define a new access rule. This will take you to the IP Filters window. The following sections describe the actions to be taken in the submenus under the FIREWALL menu. AirTies WAV-140 User Manual 36 Enter a name for the access rule you would like to define in the Rule Name field. Access control can be defined based on local IP or MAC address (uniquely identifies the network adapter of the device). If an access rule is defined by MAC address, the rule defined for the device will be valid even if the local IP address changes. It is possible to enter the MAC or IP addresses individually or choose them from the list of client devices in the local network. Clicking the Add button next to MAC Address or IP Range, will add the device to the restricted clients list. 5.3.2 Applications In this window, you can add/remove definitions of applications (special programs, games, P2P software) that can be used by the IP filters, or you can change the port numbers of the existing applications. For your convenience, definitions of a number of frequently used applications have already been added to your router by AirTies. To define a new application, click New. Enter a name for the rule you are defining in the Application Name field. Enter the external port number(s) used by the application on the Internet side in the Actual Ports field.Enter the corresponding internal port number(s) of the application in the LAN Ports field. Click Save. If you're not sure of the TCP vs. UDP ports use the same port numbers for both. 37 AirTies WAV-140 User Manual 5.3.3. MAC Address Filtering MAC Address Filtering allows you to permit network access based on MAC addresses. When this feature is enabled, you can specify the MAC addresses of the computers that will be allowed access to the Internet. Enter a new MAC address or choose from the list of clients in the system and click Add. 5.3.4. Web Filters With web wilters, you can block some possibly risky web based application features and features of your web browser that may be open to abuse before they reach the computers in your network. For example, cookies can cause your personal information to be obtained since they contain website entry information. To define web filters, go to Web Filters under the FIREWALL menu on the left menu bar of the AirTies WAV-140 web interface. For each web feature you would like to block (proxy, cookie, java applet, activeX, pop-up), check the corresponding Filter Active box. AirTies WAV-140 User Manual 38 5.3.5. URL Filters You can block access of any computer in your local network to the websites of your choice. To define the websites that you do not want users to access, go to URL Filters under the FIREWALL menu on the left menu bar of the Web interface. Specify the URL or any keyword that is part of the URL of the website you would like to block access to in the URL Filters window. To block access of a computer in your local network in this manner, check Http with URL Filters box for the rule that you created for this computer in the Access Control window. 5.3.6. DMZ DeMilitarized Zone (DMZ) opens up all the ports of a single local network host for unrestricted access from the Internet. Although it's a risky method, you can open and forward all the ports for a certain client at once with DMZ to resolve access problems resulting from firewall or NAT settings. WARNING: It is not recommended to keep all the ports open for any client for an extended period. To enable DMZ, go to DMZ under the FIREWALL menu on the left menu bar of the Web interface. Check the Enable DMZ box. Enter the local IP address of the client that you would like traffic to be forwarded to in the Select your local IP Address field and click Save. This way, all data packets directed to the global IP address of your WAV140 (i.e. your legal IP address on the Internet) will be forwarded to this local client, regardless of the port number. 39 AirTies WAV-140 User Manual 5.3.7. Anti-DOS Anti-DOS feature prevents Denial of Service attacks that aim to disable your router by establishing an extreme number of connections. In this window, you can set the number of connections that will be allowed from the Internet at a given period of time for each protocol. 5.4. NAT (Network Address Translation) and Port Forwarding Settings Network Address Translation (NAT) is a way to map an entire network (or networks) to a single IP address. NAT allows multiple users in your local network to access the Internet through a single public IP address (the global or legal IP address) assigned to you by your Internet service provider. While your WAV-140 bears the global IP address, local IP addresses (like 192.168.2.4) are assigned to hosts on your local network. For a host outside your local network to access a machine on your local network, Port Forwarding is used. Data packets sent from the Internet to your global IP address arrive at a certain port of your router. If Port Forwarding is defined for that port, the incoming traffic is redirected to a machine inside the local network that has only a local IP address. Some popular peer-to-peer applications (e.g. E-mule, Kazaa, VPN, Remote desktop) rely on this technology. To enable Port Forwarding on a port, go to NAT menu on the left menu bar and click on Port Forwarding AirTies WAV-140 User Manual 40 In the window titled Port Routing: · In the Application field, assign a name for the Port Forwarding rule you are creating. · Enter the local IP address of the client that is to be accessible from the Internet in the Target IP Address field. · Select the protocol that the application uses from the list of protocols in the Protocol box. If you are unsure of the protocol, select TCP&UDP. · Enter the real port number used by the application in the Wan Ports field. · Enter the local port number for the application in the Target LAN Ports field. (can be the same as the Real Port) · To forward a range of ports instead of a single port, use a dash (-) sign in between. For example to forward all ports between 23 and 80, enter 23-80. · Check the Enable box. Click Save. 5.5. Routing Routing defines the rules determining how IP packets reach their destination on the Internet. You can either define static routing where you determine the target IP addresses, or use RIP dynamic routing protocol which updates the routing tables automatically. 5.5.1. Static Routing Static routing rules define which gateway is to be used to reach a particular IP address on the Internet. A complete network can be defined using static routing. However, with this method it is not possible to recover from a failed route automatically. Fill in the Target IP Address and Network Gateway fields and click Save. The rule you have defined will show up in the Routing Table. 41 AirTies WAV-140 User Manual 5.5.2. Dynamic Routing Dynamic Routing eliminates the delivery risk that is present in Static Routing if the defined route to a destination has problems. Depending on the routing protocol selected (e.g. RIPv2 as in the examle below), routing tables are automatically updated and packets can be sent over alternate routes. Therefore, communication is not affected if a route has problems. 5.6. Management You can access your router remotely by using telnet, or the Web interface, or you can retrieve information from your router via the SNMP protocol. 5.6.1. SNMP Simple Network Management Protocol (SNMP) is a remote management protocol. In this window set the necessary values to access your router via SNMP. AirTies WAV-140 User Manual 42 5.6.2. Remote Access You can set the values for remote management of your router in this Access Control window. If you like to manage your router from another computer on the Internet, you should enter the IP address of this computer here. To manage your router from any computer connected to the Internet, check the Any IP box. (Since this is a serious security hole, it is recommended that you protect your router with a password.) 5.7. Tools In this page you can restart your router or reset it to factory defaults. The Restart button lets you turn your router off and then on remotely. The Restore Factory Defaults button allows you to set your router back to factory defaults remotely. During either operation, the connection to the router will be lost. You can reconnect after the router comes back up. 43 AirTies WAV-140 User Manual 5.7.1. Firmware Update In order to update the software in the router click Browse and locate the most recent router firmware file on your computer through the pop-up window. (You can download the most recent firmware file from the AirTies website www.airties.com ). Then click Update. After the firmware is successfully installed, the system will automatically be restarted. For this reason, your connection to the device will be lost and you will need to reconnect to make the installation settings. 5.7.2. Password Setup You may want to set a password for the WAV-140 Web interface to restrict access to the router. Password protection is especially recommended if you have a multi-user local network, and/or you allow remote management of your router. This prevents unauthorized people from accessing your router settings. AirTies WAV-140 User Manual 44 5.7.3. Time and Date Setup Your router gets the current time and date from time servers on the Internet using the NTP protocol. Some time servers have been set as your WAV-140 factory defaults. If you would like to use a different server, enter the necessary values in the Time Setup window. 5.8. Report You can view your ADSL connection status, connection statistics, and other information about your WAV-140 device and its firmware by clicking on the REPORT menu on the left menu bar of the WAV-140 Web interface. 45 AirTies WAV-140 User Manual 6. WAV-140 Special Applications 6.1. ADSL Usage Monitor The ADSL Usage Monitor reports monthly broadband usage (download and upload) and displays your current download rate. Click Counter on the left menu bar of the AirTies ADSL Utility Program to view the monthly usage summary for a 12-month period as well as the current download rate. The ADSL Usage Monitor can be displayed on any of the PCs in your local network regardless of whether the PC is connected directly (via the Ethernet port) or remotely (by a switch, hub or access point) to the AirTies WAV-140. The download and upload totals are for all Internet traffic that goes through the WAV-140. AirTies WAV-140 User Manual 46 7. Frequently Asked Questions What do I need to do to call other WAV-140 users free of charge? Go to P2P Calling menu under the VoIP menu of the WAV-140 Web interface. Check the Activate P2P Calling box. Define the WAV-140 users you wish to call as explained in the 4.4. P2P Calling: Free Calls to up to 30 numbers. Can I make international calls using the WAV-140 if my PSTN line is closed for international calls? YES. If you register with a VoIP service provider, you can place your international calls using the WAV-140 even if your regular phone line is closed for international calls. What should the minimum speed of my ADSL connection be? You can use WAV-140 with with ADSL speeds of 256 Kbps or more. For good voice quality, the minimum connection speed recommended is 512 Kbps. How do I buy prepaid minutes? How do I pay? You pay your VoIP service provider separately from your regular phone operator. You can find payment instructions for your VoIP operator on their related web page. Check the information on your VoIP operator's website for prepaid minutes. What is the difference between WAV-140 and other VoIP services? The main difference between most of the other VoIP services and WAV-140 is that you can call anywhere with the WAV-140 once you complete the VoIP settings. Many VoIP products allow only peer to peer communication. With the WAV-140, you do not need a microphone or headphones, you do not even need to have your computer on. You call using your regular phone. Can I use my parallel phone line? Yes, you can use your parallel phone line. However, to be able to make VoIP calls on the parallel line, all parallel connections must be made from Phone output of the WAV-140. In an ADSL failure, will I still be able to use my phone? Yes, when an ADSL failure or power outage occurs, the WAV-140 will automatically direct your calls over the regular phone line. How will I know whether the phone call is placed over the regular phone line or Internet? If the phone call is placed over the Internet, you will hear two short beeps when you dial the number and as you talk, the VoIP LED on the front panel of the WAV-140 will be flashing. If the phone call is placed over the regular phone line, you will hear a warning tone of three short beeps after you dial the number and during your call the Line LED on the front panel of the WAV-140 keeps flashing. Is the voice quality as good as a normal phone's? Yes, with the QoS feature of the WAV-140, the voice quality is as good as it is on the traditional phones. 47 AirTies WAV-140 User Manual What is QoS? How different is the QoS feature in the WAV-140? QoS (Quality of Service) gives priority to certain types of data packets being transferred between a local network and the Internet. If both Internet access and a phone call is taking place on the ADSL line simultaneously, WAV-140 gives priority to your phone call and transmits voice packets before any other packet types (such as web, ftp, or mail). QoS on the WAV-140 is designed to be duplex where it also gives priority to the incoming voice packets. Is it secure to make phone calls over the Internet? What kind of security is provided while my voice is being transmitted over the Internet? It is secure to make phone calls with WAV-140 over the ADSL line. Since the WAV-140 is an allin-one solution (ADSL router and Voice gateway ), the phone call is transmitted directly to the VoIP service provider's backbone over the Telecom ATM backbone. How do I reset the WAV-140 to factory settings? To reset your AirTies WAV-140 settings to the default values, press and hold the Reset button on the back panel for several seconds with the tip of a pencil or a similar pointed object. If you press the Reset button for 5 seconds, all settings (ADSL, NAT, etc.) except the VoIP settings will be reset. If you press the Reset button for 20 seconds all settings will be reset. In this case, you will need to reenter the VoIP settings. What is the bandwidth required and used for each call? WAV-140 supports the G.729 codec for voice calls and uses 24Kbps of bandwidth. How many simultaneous calls can be made? With the WAV-140, only one call can be made at a time (either over the Internet or the regular phone line). Is it possible to use the WAV-140 with PBXes? Yes, you can connect the WAV-140 to a PBX and have the internal users make outgoing phone calls using the WAV-140. For this, you must have an outside line with an active ADSL service. Make the WAV-140 connections as follows: 1.Plug in the outside line to the LINE port of your splitter. 2.Connect the PHONE port of the splitter with the LINE port of the WAV-140. 3.Connect the MODEM port of the splitter with the ADSL port of the WAV-140. 4.Connect the PHONE port of the WAV-140 with an outgoing line port of your PBX. 5.Configure the PBX to send the local, long distance and international phone calls to the outgoing line port connected to the WAV-140. I use limited quota ADSL. Will voice calls lead to exceeding my quota? When you make phone calls over the ADSL line, you will be downloading 24 Kbps. This amount is too small to fill your quota. In a one hour phone call, you will be downloading approximately 10 MB. Can I do port forwarding with the WAV-140? Yes, you can do port forwarding with the NAT (Network Address Translation) feature of the WAV140. Data packets sent from the Internet to your global IP address arrive at a certain port of your router. With Port Forwarding, the incoming traffic is redirected to a machine inside the local network that has only a local IP address. AirTies WAV-140 User Manual 48 8. Technical Features VoIP (Voice over Internet Protocol) Features Echo cancellation SIP (RFC 3261/3264) Automatic prioritization of audio packets and high audio quality (bidirectional QoS) Automatic call routing plan Life-line Support: Automatic switch over to FXO-line (PSTN backup) during power or ADSL connection loss or when SIPserver is unreachable Class5 Phone Services: Caller ID G711, G723, G729AB codec support DTMF Relay: RFC2833 and SIP INFO support T38U IP fax protocol support 802.11e protocol compliant WLAN QoS Preconfigured firewall for both VoIP and audio protocols Different dial- and confirmation-tones when making VoIP calls Peer-to-peer VoIP connection with other WAV-140 users (up to 10) Technical Specifications ADSL properties: G.992.1 Annex A (G.DMT), G.992.2 (G.Lite), G.992.3 (ADSL2), G992.4 (G.Lite.bis), G.992.5(ADSL2+), Rate Adaptive DSL (RADSL), READSL, Traffic shaping UBR/CBR, OAM (I.610), support for 8 PVC channels Connection protocols: PPPoE, PPPoA, RFC1483 Bridging, RFC1483 Routing, Classical IP over ATM, PAP/CHAP, RFC 2364 PPP over AAL5, RFC2366 Multicast over ATM, IP multicast IGMP v1&v2, snooping 802.11b/g and wireless networks: 1, 2, 5.5, 6, 9, 11, 12, 24, 36, 48, 54 Mbps data rates (automatic speed adjustment) Frequency interval: ETSI 2400 MHz(min)- 2483.5 MHz(max) (13 channels with 3 not overlapping) Operating Voltage Range: 170V AC to 260V AC LEDs: Power, ADSL, Ethernet, VoIP, USB, Status, Internet, WLAN, Line Ports: 1 WAN (RJ-11 for ADSL), 1 FXO (PSTN backup, RJ-11), 1 FXS (telephone device, RJ-11), 1 LAN (RJ45), 1 USB (USB 1.1) Reset button to return to factory settings for ADSL or VoIP Antenna power: 19 dBm EIRP Wireless security specifications: WPA (802.1x, TKIP, PSK) ; WPA2 (AES); 64/128 bit WEP, wireless MAC address filtering, SSID hiding UPnP : Universal Plug&Play Router and Firewall: Anti-DoS SPI firewall; URL, IP and MAC address filtering; Port forwarding; DMZ; VPN Pass Through (PPTP, L2TP, IPSec); Static and dinamic (RIPv1/v2) routing; DNS Proxy; DHCP server and client; NAT/NAPT; PPP (PAP/CHAP/MSCHAP); up to 1024 NAT sessions Compatible with Windows 98, ME, 2000, 2003, XP, UNIX, Linux, MAC OS Certificates and Standards: CE; ADSL-Forum, ITU, ETSI, ANSI, ATM-Forum Physical Specifications Dimensions: 180mm x 125mm x 25mm Weight: 450 g Power: 15V DC, 1.2A Adapter operating voltage: Between 170V and 260V Operating Temperature: 0 ~ 40 C Storage Temperature: -20 ~ 70 C Operating Humidity: 10 ~ 90% Designed by AirTies Wireless Networks Büyükdere Caddesi Þarlý Ýþ Merkezi No:103 Kat:5 Mecidiyeköy/Istanbul Turkey Tel.: +90 212 444 0239 Fax: +90 212 318 6298 Maintenance & Repair Services Provided By AirTies Wireless Networks Büyükdere Caddesi Þarlý Ýþ Merkezi No:103 Kat:5 Mecidiyeköy/Istanbul Turkey Tel.: +90 212 444 0239 Fax : +90 212 318 6298 AirTies WAV-140 User Manual 50 YM.WR.140.UM.EN.D00Rev.13062007