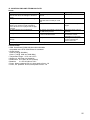
1
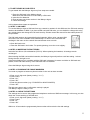
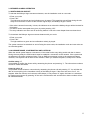
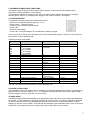
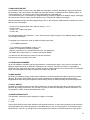
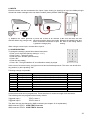
Manual i200 Mobeye Argos SW version 6.n Attention! Very important This user manual contains important guidelines for the installation and usage of the Mobeye Argos. Please read these thoroughly before you start using the Mobeye Argos! In case of damage caused by disregarding the guidelines, the warranty becomes void. The user must regularly check the proper functioning of the Mobeye Argos. The manufacturer cannot be held liable for any damage or loss caused by any incorrect use or incorrect functioning of the Mobeye Argos. Safety guidelines • The permitted ambient temperature during operation may not be exceeded (not lower than -10°C and not higher than 55°C). • The device is intended for use in dry and clean places. • Protect the device from moisture, heat and water splashing. Not intended for external use. • The guidelines for the battery usage must be regarded. • Do not expose the device to strong vibrations. • Do not let it fall from height. • Do not use in an environment where any inflammable gases, vapours or dust are present or could be present. • Repair of the device may only be carried out by people, trained for Mobeye® repair. • If the device must be repaired, only original replacement components may be used. The use of different parts may lead to damage of the Mobeye Argos. Use in accordance with the regulations The purpose of this device in accordance with the regulations is the generation of SMS text messages and telephone calls after detection of motion by the motion detector, if the measured temperature outreaches the programmed limits, after the activation of one of the inputs, or after an internal trigger; switching the outputs after an alarm or via incoming call/SMS. Other uses are not permitted. Table of Content 1. Introduction 2. 2.1 2.2 2.3 2.4 3. 3.1 3.2 4. 4.1 4.2 4.3 4.4 4.5 4.6 4.7 4.8 4.9 4.10 4.11 4.12 4.13 4.14 4.15 4.16 5. 5.1 5.2 5.3 5.4 5.5 6. 6.1 6.2 6.3 6.4 6.5 7. 8. 8.1 8.2 8.3 8.4 8.5 8.6 8.7 9. 9.1 9.2 9.3 9.4 9.5 4 To get ready in four steps Step 1: SIM Card Step 2: inserting the batteries Step 3: Program the phone numbers Step 4: Check the settings Intruder alarm: operation Switching on and off Alarm message, confirmation and listen-in Intruder alarm: basic functions Configuration Installation code User code SMS custom text Telephone numbers SMS ON/OFF CALL ON/OFF Sensor sensitivity Entry delay Entry indication Siren Exit indication Interval test message Set actual time and date Automatic time-based arm/disarm Inactive time after a movement detection Temperature alarm Configuration Monitoring the temperature limits Adjusting the temperature Delay time Alarm repeat Advanced options Request the list of settings Reset to factory settings Leave the menu Position of Mobeye Argos Test GSM network strength Connecting sensors, devices and external power 5 5 5 5 5 6 6 6 7 7 7 7 8 8 8 8 8 9 9 9 9 9 9 9 9 10 10 10 10 10 10 11 11 11 11 11 12 13 Inputs Configuration Alarm text Input type Input delay time Inactive time PIR sensor on/off Alarm repeat External power supply Configuration 16 Sensitivity PIR Power failure message Power failure delay time 14 14 14 15 15 15 15 15 16 16 17 17 17 2 9.6 Authorisations and remote control 17 10. 10.1 10.2 10.3 10.4 11. Outputs Configuration Duration of outputs: Switch or pulse times Switch behavior Authorising telephone numbers Mobeye Internet Portal 18 18 19 19 19 20 12. 12.1 12.2 13. 14. 14.1 14.2 14.3 15. Programming via SMS text messages Program mode How to Program by SMS Complete list of settings Reports and lists Status request List of settings Authorisation list Issue solving and technical data 21 21 21 22 24 24 24 24 25 3 1. INTRODUCTION The Mobeye Argos is an easy to install alarm system that will notify you about an activation using the built-in GSM communication module. To use the Mobeye Argos you will need a SIM-card from any network. Typical applications are the security of places without any power supply or the temporary security of properties. The Mobeye Argos has the following features: Alarm notifications after movement detection In case of the detection of an intruder, the Mobeye Argos will send an SMS text message to your phone(s). The Mobeye Argos will also call the phone numbers in order to be sure the message is not missed. It is also possible to set on the siren sound. After an alarm the Mobeye will be in standby status for about 5 minutes. Following the standby period, the Mobeye will resume alerting you to new movement. Alarm notifications after detection of out of range temperature It is possible to program a minimum and/or maximum temperature alert in to the Mobeye Argos. The system will monitor the actual temperature of its environment and send an alert as soon as the temperature reaches the limit. Battery operated or using the mains Although the Mobeye Argos is designed to run on batteries, it is possible to use an external power supply. When powering the Mobeye Argos with mains, it notifies the first set telephone number if the power fails and that it has switched to battery backup. It is also possible to remotely control the system when using mains power. Connecting external sensors and devices In addition to the integrated movement sensor and temperature sensor, external sensors can be connected. The Mobeye Argos can also switch external devices connected to it via the outputs when an event triggers it (like an alarm or incoming call). Private numbers or Mobeye Internet Portal The Mobeye Argos sends alarm messages to a maximum of five telephone numbers. As an option the Mobeye Argos can be connected to the Mobeye Internet Portal, which is explained in chapter 11. Low battery message The Mobeye Argos will send an SMS text message when the batteries need to be replaced. When receiving this message, you need to change the batteries as soon as possible, although the Mobeye Argos remains functioning for a short time following the message. Even when the Mobeye Argos is unset, it will measure the battery strength and send the message. 4 2. TO GET READY IN FOUR STEPS To get started with the Mobeye Argos only four steps are needed. 1. Place the SIM card in the Mobeye Argos. Make sure this SIM card is not secured by a PIN code. 2. Insert the four batteries. 3. Enter at least one phone number in the Mobeye Argos. 4. Check the settings In this chapter these steps are explained. 2.1 STEP 1: SIM CARD To use the Mobeye Argos a SIM card from any network is needed. On this SIM card, the PIN code security needs to be disabled or 0000. If you have a SIM card with PIN code, you can disable or change this using any mobile phone and change the PIN code security. Please consult the manual for that mobile phone for the procedure. The SIM card needs to be inserted before the batteries. When using a prepaid SIM card, take note of the available credit. Additionally it is wise to set a recurrent test message in the menu so the card will be used at least once a month. Open the back cover Insert the SIM card in the holder. For opening/closing, move the cover slightly. 2.2 STEP 2: INSERTING THE BATTERIES Insert the four lithium 3,0 volt batteries (CR123). When replacing the batteries, all settings remain unchanged. After inserting the SIM card and the batteries, the Mobeye Argos will perform a self test taking 1 minute. During the test, the light is red. If the light is flashing red, a problem with the SIM card is detected. A reason could be no SIM card was placed, or the PIN code security of the SIM card was not disabled. Close the Mobeye Argos using the 4 screws. 2.3 STEP 3: PROGRAM THE PHONE NUMBERS You need to program at least one phone number in the unit as alarm number. Enter your 4 digit code (factory setting: “1111”) Press “menu” Enter “101” Press “OK” Enter the phone number (e.g. 0712345678 or 0044712345678) Press “OK” The light turns green and a confirmation melody is played. The Mobeye Argos is ready to use. 2.4 STEP 4: CHECK THE SETTINGS The settings can be sent to the programmed telephone number as SMS text message. In this way you also check the correct working of the SIM card. Enter your 4 digit code (factory setting: “1111”) Press “menu” Enter “10” Press “OK” Within ca. 30 seconds the programmed phone number will receive the list with settings. 5 3. INTRUDER ALARM: OPERATION 3.1 SWITCHING ON AND OFF To activate the Mobeye Argos movement detector, use the installation code or user code. Enter your code Press “OK” The light turns red shortly and an indication tone is started. This repetitive tone will last during the exit delay of 60 seconds. As soon as the acoustic signal stops, the Mobeye Argos is active. - If the code is entered incorrectly 3 times, the indicator turns red and the Mobeye Argos will be blocked for 10 minutes. - The action can be interrupted at any time, by twice pressing “OK”. - The entry indication and siren are off as factory default. Look at the next chapter how to activate them. To de-activate the Mobeye Argos movement detector with your code. Enter your code Press “OK” The light switches to green and a confirmation melody is played. The system needs to be switched on and off using the same code; the installation code and user code are not interchangeable. 3.2 ALARM MESSAGE, CONFIRMATION AND LISTEN-IN When the armed system detects a movement, it first waits for the entry delay period and then it alarms. During the entry delay the GSM module starts to establish a connection to the network. If the system was not disarmed, the alarm messages follow. First an SMS text message is sent to all programmed alarm numbers; next a phone call is made to the numbers. When you answer the phone, a beep tone is heard. Confirm using “1” It is possible to confirm the phone call by answering the phone and pressing “1“. The other alarm numbers will not be called afterwards. Listen-in using “9” It is possible to start a listen-in connection by answering the phone call and pressing “9”. You will then be able to hear anything in the immediate vicinity of the Mobeye Argos. If the siren was set to “loud”, it is stopped. After two minutes one hears two short beeps; if one presses “9” again, the listen-in is extended by another two minutes. By pressing “9” the call is confirmed as well and the other alarm numbers will not be called afterwards. 6 4. INTRUDER ALARM: BASIC FUNCTIONS The Mobeye Argos settings can be changed via the keypad. First the method of programming is discussed, next the explanation of the settings. This chapter describes the settings for the ‘all-in-one’ basic system. Advanced options like using the external inputs, outputs, or external power supply can be found in chapter 7 and further. 4.1 CONFIGURATION To change the settings, please follow these instructions: Enter your 4-digit code (factory setting is “1111”) Press “menu” - light turns green Enter the menu number (see list below) Press “OK” Enter the new setting Press “OK”. The light switches off, a confirmation melody is played In the event of an incorrect entry, the light turns red and a short beep sounds. The menu can be left from any position, by twice pressing “OK”. Following settings are possible: Menu nr. Description Options Factory settings 00 101 102 103 104 105 03 04 05 07 Installation code 1st tel. number 2nd tel. number 3rd tel. number 4th tel. number 5th tel. number Sensitivity PIR Entry delay Interval test message Entry indication 4-digit code Tel. number 1111 - 08 09 12 13 50 60 61 Siren Exit indication SMS on/off Call on/off User code Actual time Actual date 62 63 79 Automatic arming time Automatic disarming time Inactive time PIR (0 to delete) 1,2 1, 15, 30, 45 or 60 0-30 (days) 0 (off), 1 (beep on), 2 (LED on) 0 (off), 1 (on) 0 (off), 1 (on) 0 (off), 1 (on) 0 (off), 1 (on) 4-digit hhmm (e.g.1530) yyyymmdd (e.g. 20140331) hhmm (0 to delete) hhmm (0 to delete) 00..60 <min> 1 15 0 (no message) 0 0 1 1 1 8888 0 (empty) 0 (empty) 5 The menu can be left from any position, by twice pressing “OK”. 4.2 INSTALLATION CODE The installation code is the 4-digit code for switching on/off and programming the settings or activating the special functions. Factory default is “1111”. It is possible to change the user code to any 4-digit number. Please change the code to make the unit more secure. 4.3 USER CODE The Mobeye Argos offers the possibility to set a personal 4-digit user code, for just arming and disarming the system. It is not possible to change the settings with the user code. The system needs to be switched on and off using the same code; the installation code and user code are not interchangeable. Factory settings for the user code is “8888”. This code can be changed by the installation code or user code (menu number 50). We recommend that you change this code to make the unit more secure. 7 4.4 SMS CUSTOM TEXT It is possible to add a custom text in the SMS text messages, to identify the Mobeye Argos unit that sent the message. The second part of the SMS text message contains a standard text like ‘Mobeye alarm’, or ‘Test message OK’. The custom text will be written before the standard text. This custom text (max. 20 characters) is programmed by sending an SMS to the Mobeye Argos. Changing the custom text cannot be done via the keypad, only via sending an SMS text message. Switch the Mobeye Argos into the programming mode. In this mode the GSM module is switched on and is able to receive messages. Enter your 4-digit personal code. (factory setting: “1111”) Press “menu” Press “21” -> light turns green Press “OK” First the light flashes red (interval ca. 1 sec). As soon as the light turns green, the Mobeye Argos is able to receive SMS-messages. To program the custom text, send an SMS in following structure: 1111 NAME:myowntext - ‘1111’ stands for the installation code (1111) - ‘NAME’ is a standard command (capitals) - Replace ‘myowntext’ by a self-defined text (max. 20 characters) - Be aware of the space after 1111 and the colon after NAME You will hear two short beeps in case of a correct command. Leave the menu by pressing “OK” twice. 4.5 TELEPHONE NUMBERS Up to five telephone numbers can be programmed in to the Mobeye Argos. In the event of an alarm the Mobeye Argos first sends an SMS text message to all numbers, next they are called. It is possible to confirm the call, after which the other numbers will not be called anymore. Or to start a listen-in connection. Note: The first telephone number is required, the others are optional. 4.6 SMS ON/OFF By default, the Mobeye Argos sends alarm notifications via text message and calls to the preset contact persons. By turning off the SMS, the unit will only call after the movement sensors sends an alarm. Regardless of this setting the temperature alarm always sends an SMS including the actual temperature. 4.7 CALL ON/OFF By default, the Mobeye Argos sends alarm notifications via text message and calls to the preset contact persons. By turning off the CALL, the unit will only send an SMS text message as alarm notification. It is not possible to switch off both the SMS and the call. 4.8 SENSOR SENSITIVITY The detectors’ sensitivity can be changed to a high or low value. 1= High 2 = Low In the high sensitivity mode each detection will generate an alarm. In the lower sensitivity mode the alarm will be generated only when the detector is activated twice in any 15 second period. This mode prevents false alarms in case of e.g. draught and is most suitable if the sensor is directed towards an open space. 8 4.9 ENTRY DELAY It is possible to choose from 5 entry delay times (1,15, 30, 45 and 60 seconds). The entry delay is the time between the moment of detection and the moment of sending the first SMS text message. Important note: If the GSM network has low signal strength, the time can be longer as the network connection may not be established within the time of the entry delay. 4.10 ENTRY INDICATION No entry indication is set as the factory default. It is possible to hear an indication beep during the entry delay. This can be used as a reminder that the Mobeye is in active mode. It is also possible to just let the LED indicator flash a few times, as an indication for the user. 4.11 SIREN After the entry delay, the siren can sound for two minutes. At the same time the SMS text messages and telephone calls will be sent. At soon as the Mobeye is switched off, the siren will stop. The siren is set to silent as the factory default. 4.12 EXIT INDICATION Upon arming the system, you have one minute to leave the room. The PIR is not active yet and an exit indication sounds. It is possible to change this to a silent exit time. A short beep is heard and the LED flashes red during the exit time. 4.13 INTERVAL TEST MESSAGE The Mobeye Argos can send test messages. Through these ‘keep alive’ reports you will be informed about the status of your Mobeye Argos. You can set the interval between the test reports.This is adjustable between 0 (no test reported) and 30 (every 30 days a test message). Note: the interval of 1 day will result in a daily test message; the exact time between the messages will be about 24 hours. The smaller the interval between the test reports, the shorter is the battery life. The test message only works if the system is on or a temperature limit is set. 4.14 SET ACTUAL TIME AND DATE If the system is to be armed automatically, the internal clock time needs to be correct. Some Telecom providers offer this in the network, to be synchronised by the Mobeye Argos during the start-up and after sending test messages. It is possible to set the time and date manually. To view the clock time, send a list of the settings to the first programmed phone number (CODE MENU 10 OK). 4.15 AUTOMATIC TIME-BASED ARM/DISARM The Mobeye Argos can be armed and/or disarmed based on a daily time schedule. If the exit indication was set to ‘silent’, the system makes no noise during arming and disarming. The first telephone number needs to be set before the arming and/or disarming time can be set. 4.16 INACTIVE TIME AFTER A MOVEMENT DETECTION The “PIR inactive time” is the time the movement sensor is inactive after having seen and reported movement. If the time is set to “5” (minutes), the sensor will only report new movements after a minimum of 5 minutes after the previous movement. The inactive time can be set in minutes from 0 to 999. As factory default the inactive time is set to “5”. 9 5. TEMPERATURE ALARM 5.1 CONFIGURATION To change the settings, please follow these instructions: Enter your 4-digit code (factory setting is “1111”) Press “menu” - light turns green Enter the menu number (see list below) Press “OK” Enter the new setting Press “OK”. The light switches off, a confirmation melody is played In the event of an incorrect entry, the light turns red and a short beep sounds. The menu can be left from any position, by twice pressing “OK”. Following settings are possible: Menu nr. Description 41 Minimum temperature limit 000-050 (0 to 50ºC) 110 -101 (-10 to -1ºC) 999 = off Maximum temperature limit 000-050 (0 to 50ºC) 110-101 (-10 to -1ºC) 42 Options Factory setting 999 (off) 999 (off) 49 Correction factor temperature 999 = off 01-09 (+1 to +9ºC) 11-19 (-1 to -9ºC) 78 Delay temperature alarm 00 (no correction) 00..60 <min> 1 84 Repeat time 0..99 <hours> 4 00 5.2 MONITORING THE TEMPERATURE LIMITS The Mobeye Argos is able to send a temperature alarm as soon as the actual temperature reaches a programmed min. or max. level. This function can be used independently of the motion detection. As soon as the temperature is too high or too low, an SMS text message is sent, followed by a telephone call. As long as the out of range temperature remains, the report will be repeated every four hours (factory default). Once the temperature is back to normal, the Mobeye Argos confirms this to you. This function is active as soon as a temperature limit is programmed. By resetting the limits, the function becomes inactive. 5.3 ADJUSTING THE TEMPERATURE The built-in temperature sensor may have a standard deviation of the actual temperature. In this case, the deviation will be similar at all temperatures. It is possible to correct the temperature deviation in the Mobeye Argos. In the SMS setting summary, you see the reported temperature. If a correction is specified, it is processed in the displayed temperature; the correction factor itself is displayed separately. Example: Mobeye temperature: 13 °C. Actual temperature: 14 °C. To correct this deviation, one degree should be added. 5.4 DELAY TIME The temperature delay time defines the duration a temperature limit is exceeded before an alarm is initiated. If the temperature returns to the non-alarm status within the delay time, no alarm is sent. The delay time can be set between 0 and 999 minutes. As default, the temperature delay time is set to 0 minutes. 5.5 ALARM REPEAT In order to emphasize the urgency of the alarm messages, the temperature alarm (and alarms on the inputs 1 and 2) can be repeated. As long as the alarm status has not returned to the inactive status, the SMS alarm will be repeated after the ‘alarm repeat time’ (as long as the alarm SMS is “ON”). In the repeated temperature alarm message the actual temperature is mentioned as well, to follow the temperature development. The time can be set between 0 and 24 hours. As default the alarm repeat time is set to 4 hours. 10 6. ADVANCED OPTIONS 6.1 REQUEST THE LIST OF SETTINGS The settings can be sent to the set telephone number as SMS text message. In this way you also check the correct working of the SIM card. Enter the 4 digit installation code (factory setting: “1111”) Press “menu” Enter “10” Press “OK” Within ca. 30 seconds the programmed phone number will receive the list of settings. The advanced settings are listed in the ‘advanced setting list’: Enter your 4 digit installation code (factory setting: “1111”) Press “menu” Enter “11” Press “OK” Within ca. 30 seconds the programmed phone number will receive the list with advanced settings. 6.2 RESET TO FACTORY SETTINGS It is possible to reset the Mobeye Argos to factory settings. Enter your 4 digit installation code (factory setting: “1111”) Press “menu” Enter “99” Press “OK” After several seconds a short confirmation tone is heard. The installation code is also reset to 1111. 6.3 LEAVE THE MENU The menu can be left from any position, by twice pressing “OK”. 6.4 POSITION OF MOBEYE ARGOS The built-in motion sensor has a 360º detection pattern and has a range of about 8 meters. The Mobeye Argos can be positioned both vertically as horizontally. It can be mounted to the wall, put down on its side in a cabinet, put down with its sensor upward or downward. In case you wish to hang the Mobeye Argos, the pre-punched holes can be opened, in order to hang it on screws. In order to check the positioning of the sensor, a sensor test can be executed. Enter the installation code Press “menu” Press “511” Press “OK” A confirmation beep is heard. First the green light will be flashing. After about 30 seconds the light will be on continuously. In this mode the sensor test can be done; each time the sensor detects a movement, a repeating beep will sound. 11 Leave the test by entering OK twice. 6.5 TEST GSM NETWORK STRENGTH Before using the Mobeye Argos is it advised to test the GSM signal strength at the location. Enter the installation code Press “menu” Press “512” Press “OK” The Mobeye Argos now switches on the GSM module and searches for all available networks. It also checks the network strength of the SIM card provider in the device. As soon as the GSM network is found, the light will turn green. The GSM signal strength for the network your SIM is using can be gauged from the LED indicator: LED Green during 30 seconds Flashing green Red Flashing red Description Signal is very good Signal is good Signal is weak Searching, no valid SIM card or SIM card is not pin code free or no signal The telephone number at memory position 01 will receive an SMS text message, containing all existing GSM networks, sorted by provider. It also tells the strength of each network. This search function can take a few minutes. If you want to leave the function before it is ready, please press “OK” twice. Warning In the event of a weak signal, the Mobeye Argos can still be used, but there is a risk that messages cannot be sent or will be received with a delay. In case of no signal, it is advised to try a different network. 12 7. CONNECTING SENSORS, DEVICES AND EXTERNAL POWER In addition to the integrated movement sensor and temperature sensor, external sensors can be connected as alarm input. The Mobeye Argos can also switch external devices connected to it via the outputs when an event triggers it (like an alarm or incoming call). And although the Mobeye Argos is designed to run on batteries, it is possible to use an external power supply in order to report power failure and to remotely control the system. In following chapters the inputs, outputs and external power settings are explained. Please find below the architecture of the main unit. 13 8. INPUTS External sensors can be connected to the inputs. Upon closing (or opening) an input, the Mobeye Argos will send an alarm message to the set alarm numbers (factory default: SMS and call). 1) Replace the white grommet 2) Insert the 2 wires of an external with the rubber ring (using a tool) sensor through the hole to the inside and in to the two connectors of input 1 (press the orange pins). 3) Be sure the wires are laid between the tapped holes and the wall of the casing before closing. When using a second input, connect this to input 2. 8.1 CONFIGURATION To change the settings, please follow these instructions: Enter your 4-digit code (factory setting is “1111”) Press “menu” - light turns green Enter the menu number (see list below) Press “OK” Enter the new setting Press “OK”. The light switches off, a confirmation melody is played In the event of a incorrect entry, the light turns red and a short beep sounds. The menu can be left from any position, by twice pressing “OK”. Following settings are possible: Menu nr. 71 72 73 74 79 70 75 76 84 Description Input type input 1 Input type input 2 Inactive time input 1 Inactive time input 2 Inactive time PIR PIR on/off Delay input 1 Delay input 2 Repeat time Options 0 (off), 1 (normally closed), 2 (normally opened) 0 (off), 1 (normally closed), 2 (normally opened) 0..999 (min) 0..999 (min) 00..60 <min> 0 (off), 1 (on) 00..999 <sec> 00..999 <sec> 0..99 <hours> Factory setting NO NO 5 5 5 On 1 1 4 8.2 ALARM TEXT Custom alarm texts can be programmed. These texts have a maximum length of 20 characters. The following texts are programmed as factory default: Triggered input 1 Triggered input 2 TEXT1: alarm 1 TEXT2: alarm 2 The alarm text can be changed by SMS command (see chapter 12 for explanation): SMS command TEXT1: CODE TEXT1:free text SMS command TEXT2: CODE TEXT2: free text 14 8.3 INPUT TYPE The input type defines the character of the inputs IN1 and IN2. This can be Normally Open (NO) or Normally Closed (NC). If an input is set to NO, the alarm will be triggered as soon as the terminals of the input are closed. If the input is set to NC, the alarm is triggered if the connection between the input terminals is broken. The default input type is set to NO. 8.4 INPUT DELAY TIME The input delay time defines the time that the inputs are triggered before an alarm is initiated. If the input returns to the non-alarm status within the delay time, no alarm is sent. The delay time can be set between 0 and 999 seconds. As default, the input delay time is set to 1 second. 8.5 INACTIVE TIME The “inactive time” defines the time the movement sensor, input 1 or input 2 is not active after an activation. If the time is set to “0” (minutes), the input is active again immediately after returning to the nonalarm status. If the time is set to e.g. 30 minutes, the input remains inactive for the first 30 minutes. If the input is again (or still) activated after these 30 minutes, a new alarm message is sent. The inactive time can be set between 0 and 60 minutes. As default, the inactive time is set to “5” for all inputs. 8.6 PIR SENSOR ON/OFF If the inputs are in use, it could be useful to de-activate the integrated movement sensor (PIR). The Mobeye Argos will then cease activating alarms when movement is detected until this function is reinstated. As factory settings the PIR is ON. 8.7 ALARM REPEAT See 5.5 for explanation. 15 9. EXTERNAL POWER SUPPLY Although the Mobeye Argos is designed to run on batteries, it is possible to use an external power supply (9-24VDC). In this mode the module is always in connection with the GSM network. The advantage of external power is the longer battery lifetime, to receive power failure messages and the possibility to perform remote actions, like arm/disarm, switch the outputs, ask status reports and to program it via SMScommands. Be aware: the PIR sensor will be slightly less sensitive when using external power supply. 1) Replace the white grommet 2) Insert the 2 wires through the hole with the rubber ring (using a to the inside part and in to the two tool) connectors (press the orange pins): V+ to “+” “Ground” to “-“ 3) Be sure the wires are laid between the tapped holes and the wall of the casing before closing. Article 10027: black wire with white line is “+”, black wire is “-“ 9.1 CONFIGURATION To change the settings, please follow these instructions: Enter your 4-digit code (factory setting is “1111”) Press “menu” - light turns green Enter the menu number (see list below) Press “OK” Enter the new setting Press “OK”. The light switches off, a confirmation melody is played In the event of an incorrect entry, the light turns red and a short beep sounds. The menu can be left from any position, by twice pressing “OK”. Following settings are possible: Me nu nr. 86 77 201 …2 10 Description Options Factory setting Power failure message Power failure delay time Authorise telephone number 0 (off), 1 (on) 00..60 <min> Telephone number (0 to delete) 1 1 9.2 16 9.3 SENSITIVITY PIR Using an external power source, the internal PIR sensor will react slight slower after detecting movements, even when the sensitivity is set to ‘high’. Be sure the sensor is positioned well, so the intruder can be seen while walking or working. Please test the PIR positioning to ensure the PIR detects you in the areas you are trying to secure. 9.4 POWER FAILURE MESSAGE Upon a power outage the batteries take over functioning. A ‘power failure’ SMS text message is sent to the first telephone number. The GSM module turns to the low power status, meaning it closes and only establishes network connection in case it needs to send a message (alarm, test, battery low). The power failure message can be deactivated (OFF). As factory default the power failure message is set to ‘ON’. 9.5 POWER FAILURE DELAY TIME The power failure delay time defines the time that the power fails before an alarm is initiated. If the power is restored within the delay time, no alarm is sent. The delay time can be set between 0 and 60 minutes. As default, the delay time is set to 1. 9.6 AUTHORISATIONS AND REMOTE CONTROL When connected to an external power, the GSM module is active all the time, able to receive SMS commands. This enables both programming and remote control. Remote control actions are: arming, disarming and switching the outputs. As prerequisite for remote control the ‘controlling telephone number’ needs to be authorised. . A maximum of ten numbers can be authorised via keypad or SMS command. If it is not clear what memory positions are available, it is possible to add a new number by the SMS command ‘ADDTELA’ . The new number takes the first free position. To receive a list with the authorised numbers, please refer to paragraph 14.3. SMS-commands for remote control (no code is necessary, but numbers need to be authorised): Arm: ARM Disarm: DISARM Switch on output 1: O1ON Switch off output 1: O1OFF 17 10. OUTPUTS The Mobeye Argos has two outputs (O1 and O2).These relay outputs can switch external devices. The maximum load is 2A/30V per output. Output 1 is free to use for an external device. Switching the relay can be done in several ways: after an alarm, upon arming, upon disarming or remote (via SMS or call). Output 2 (O2) is configured for an external siren. This output reacts similar to the internal siren; if this is set to ‘silent’, O2 does not react. Upon a (loud) alarm, it switches for 2 minutes. 1) Replace the white grommet with the rubber ring (using a tool) 2) Insert the 2 wires through the hole 3) Be sure the wires are laid in to the terminal connectors (press between the tapped holes and the orange pins): the wall of the casing before closing the casing. 10.1 CONFIGURATION To change the settings, please follow the instructions: Enter your 4-digit code (factory setting is “1111”) Press “menu” -> light turns green Enter the menu number (see list below) Press “OK” Enter the new setting Press “OK”. The light switches off, a confirmation melody is played In the event of an incorrect entry, the light turns red and a short beep sounds. The menu can be left from any position, by twice pressing “OK”. Following settings are possible: Me nu nr. 81 82 201 …2 10 83 Description Options Factory setting Duration of output 1 Duration of output 2 Authorised telephone number 1..9999 (sec) 1..9999 (sec) Telephone number (0 to delete) 0 120 Behavior output 1 1 (RC), 2 (ARMED), 3 (DISARMED), 4 (INTRUDER), 5 (TEMP) 1 18 10.2 DURATION OF OUTPUTS: SWITCH OR PULSE TIMES If an output is used, the time this output is activated can be set between 1 and 999 seconds. If the setting is set to 0, the output does not return to its previous state automatically. An authorised number can switch it back by the SMS command O1OFF (see 9.6). In the factory settings the duration of the pulse time for output 1 is “1” and for output 2 “120”. 10.3 SWITCH BEHAVIOR The reason why output 1 is switched can be configured. Choices are: switch by remote control (RC), switch when arming the Mobeye Argos (ARMED), switch when disarming the Mobeye Argos (DISARMED), switch upon an intruder alarm (alarm on PIR, IN1 or IN2), switch upon a temperature alarm (temp). For remote control (switch via SMS-commands, please refer to 9.6), the senders’ telephone number needs to be authorised. In the factory settings the switch behavior of output 1 is set to ‘RC’. 10.4 AUTHORISING TELEPHONE NUMBERS For remote control by telephone (arm, disarm, switch outputs), the telephone numbers need to be ‘authorised’. A maximum of ten numbers can be authorised via keypad or SMS command. In case it is not clear which memory position is free, it is possible to add a new number by the SMS command ‘ADDTELA’ . The new number takes the first free position. To receive a list with the authorised numbers, please refer to paragraph 14.3. 19 11. MOBEYE INTERNET PORTAL The Mobeye Argos sends GSM messages to the pre-set contact persons. It is also possible to connect the system to the Mobeye Internet Portal. In this secured internet environment the Mobeye Argos systems can be administered. The portal offers various functions: 1) the portal dispatches alarm messages to contact persons (SMS and/or mail), which are set in the portal. Different persons can be set for alarm messages versus technical message. 2) The name and location can be set in the portal. This name is used in SMS and mail messages. 3) the portal will check the receipt of test messages (‘keep alive’); in case the message was not received on time, it sends an exception message. Please contact Mobeye for more information. It is also possible to connect the Mobeye Argos to an alarm receiving centre (ARC), if this ARC has an SMS receiver. Please contact Mobeye for more information. 20 12. PROGRAMMING VIA SMS TEXT MESSAGES Almost all options can be set via the keypad. It is also possible to program by sending SMS commands to the SIM cards’ telephone number in the Mobeye Argos. 12.1 PROGRAM MODE If the unit runs on external power, it is always in program mode, ready to receive SMS commands. For programming a battery operated Mobeye Argos, first switch to the program mode:: Enter your 4-digit code Press “menu” -> light turns green Enter “21” Press “OK” First the light flashes red (interval ca. 1 sec). As soon as the light turns green, the Mobeye Argos is able to receive SMS-messages. After five minutes there is a time-out and a beep is heard. Leave the program mode earlier by pressing “OK” twice. 12.2 HOW TO PROGRAM BY SMS - Be sure the unit is in program mode - Send an SMS message with following content: CODE COMMAND:OPTION - The CODE stands for the installation code. Factory setting is “1111”. Do not forget the space between CODE and COMMAND. The complete scheme with SMS commands is listed chapter 13. The commands are case sensitive. Several commands may be combined in one SMS message (with a maximum of 160 characters) by placing a # between the commands. CODE COMMAND:OPTION#COMMAND:OPTION#COMMAND:OPTONE A confirmation melody is played to indicate a correct command. In the event of an incorrect command, a beep is heard. Examples (code is 1111): To switch off exit indication 1111 EXITBEEP:OFF To set the minimum temperature (lower limit) to 5 degrees: 1111 LTL:+05 Or: both commands in one message: 1111 EXITBEEP:OFF#LTL:+05 21 13. COMPLETE LIST OF SETTINGS Setting Keypad SMS Keypad Sensitivity PIR SMS Keypad Entry delay SMS Keypad Interval test message SMS Keypad Entry indication SMS Keypad Sirene SMS Keypad Exit indication SMS Keypad SMS on/off SMS Keypad CALL on/off SMS Keypad Select ARC SMS Keypad ARC client number. SMS Keypad ARC telephone number SMS Installation code Change minimum temperature Change maximum temperature Correction efactor temperature User code Actual time Actual date Automatic arming time Automatic disarming time PIR on/off Menu/ command 00 INSTCODE 03 SENS 04 ENTRYDELAY 05 TEST 07 ENTRYBEEP 08 SIREN 09 EXITBEEP 12 SMSALARM 13 CALLALARM 30 ARC 31 ARCCLIENTNR 32 ARCCALLERID 41 Keypad SMS LTL Keypad 42 SMS HTL Keypad 49 SMS Keypad SMS Keypad SMS Keypad SMS Keypad SMS Keypad SMS Keypad SMS Keypad TEMPOFFSET 50 USERCODE 60 SETTIME 61 SETDATE 62 TIMEARM 63 TIMEDISARM 70 PIR 71 SMS Keypad TYPEIN1 72 SMS Keypad SMS Keypad SMS TYPEIN2 73 INACTIVEINP1 74 INACTIVEINP2 Input type input 1 Input type input 2 Inactive time Input Inactive time input 2 Options Factory default 4 digits 1111 1 (high) of 2 (low) 1 (low) 1, 15, 30, 45 or 60 15 0, 1, 2, 3, … or 30 (days) 0 (off), 1 (on), (LED) ON, OFF, LED 0 (off), 1 (on) ON, OFF 0 (off), 1 (on) ON, OFF 0 (off), 1 (on) ON, OFF 0 (off), 1 (on) ON, OFF 00 (no), 01 (general) 00,01 0 0 (OFF) 0 (OFF) 1 (ON) 1 (ON) 1 (ON) 00 5 digit client number Tel. number - 000-050 (0 to 50ºC) 110-101 (-10 to -1 ºC) off 999 = off -10 to +50 000-050 (0 to 50ºC) 110-101 (-10 to 1ºC) off 999 = off -10 to +50 01-09 (+1 to +9ºC) 11-19 (-1 to -9ºC) 00 (no correction) -9 tot +9 0 4 digits 8888 hhmm yyyymmdd hhmm hhmm (delete by “0”) hhmm hhmm (delete by “0”) 0 (off), 1 (on 1 (ON) ON, OFF 0 (off), 1 (NO), 2 (NC) NO OFF, NO, NC 0 (off), 1 (NO), 2 (NC) NO OFF, NO, NC 0..999 (min) 5 0..999 (min) 5 22 Setting Menu/ command 75 DELAY1 76 DELAY2 77 DELAYPOW 78 DELAYTEMP 79 INACTIVEPIR 81 TO1 82 TO2 84 REPEAT 86 POWERSMS 101 TEL1 102 TEL2 103 TEL3 104 TEL4 105 TEL5 101…105 DEL1….DEL5 201…210 TELA1 ...TELA10 of ADDTELA 201…210 DELA:1..DELA:10 Keypad SMS Keypad Delay time input 2 SMS Power failure delay Keypad time SMS Delay temperature Keypad alarm SMS Keypad Inactive time PIR SMS Keypad Pulse time output 1 SMS Keypad Pulse time siren/output 2 SMS Keypad Repeat SMS Keypad Power failure message SMS TEL1 Keypad SMS TEL2 Keypad SMS TEL3 Keypad SMS TEL4 Keypad SMS TEL5 Keypad SMS Delete telephone Keypad number SMS Keypad Authorise telephone number SMS Delay time input 1 Delete authorised number Keypad SMS Keypad 83 SMS OUTPBEHAVIOR Behavior output 1 Identification text Alarm text input 1 Alarm text input 2 Keypad SMS Keypad SMS Keypad SMS Options 0..999 <sec> 0..999 <sec> 00..60 <min> 00..60 <min> Factory default 1 1 1 1 0..999 (min) 5 1..9999 (sec) 0 1..9999 (sec) 120 0..99 <hours> 4 0 (off), 1 (on) ON / OFF 1 (ON) Tel. nummer Tel. nummer Tel. nummer Tel. nummer Tel. nummer 0 Tel. nummer 0 1 (RC), 2 (ARMED), 3 (DISARMED), 4 (INTRUDER), 5 (TEMP) 1 (RC) RC, ARMED, DISARMED, INTRUDER, TEMP NAME 20 characters Mobeye TEXT1 20 characters Alarm 1 TEXT2 20 characters Alarm 2 Program method using the keypad: CODE menu menu nr. OK option OK Program method via SMS (in program mode): CODE COMMAND:OPTION Or several commands at once: CODE COMMAND:OPTION#COMMAND:OPTION#COMMAND:OPTION 23 14. REPORTS AND LISTS The programmed settings and the Mobeye Argos status can be requested as SMS-text message via the keypad or SMS-command (for SMS: be sure the unit is in program mode). 14.1 STATUS REQUEST The status can be requested via ‘CODE menu 501 OK’ or by sending an SMS with the content: CODE STATUS? The originator of the request receives the armed/not armed status, the status of the inputs, power and batteries as SMS text message. 14.2 LIST OF SETTINGS The basic settings can be requested via ‘CODE menu 10 OK’ or by sending an SMS with the content: CODE SET? The originator of the request receives the list of basic settings. The advanced settings can be requested via ‘CODE menu 11 OK’ or by sending an SMS with the content: CODE SETA? The originator of the request receives the list of advanced settings. 14.3 AUTHORISATION LIST The list with authorised numbers for remote control can be requested via ‘CODE menu 200 OK’ or by sending an SMS with the content: CODE ANL? The originator of the request receives the authorised numbers as list. 24 15. ISSUE SOLVING AND TECHNICAL DATA Issues Error Possible reason Mobeye Argos cannot be switched on. You hear an error tone, the red light is turned on shortly. The light is flashing red during switching on. It is impossible to change the settings. After entering your personal code, followed by menu, the error tone is played and the light turns red. No GSM signal during the GSM test The light remains red. You do not receive an SMS with the settings. Oplossing No valid Telephone number was entered. Enter a valid number. No valid SIM card was entered or the SIM card was not made pin code free. Mobeye is activated. Check the SIM card. No network is available, belonging to the SIM cards provider. You entered an incorrect installation or user code three times. Choose another network provider. Wait 10 minutes and then re-enter the correct installation or user code. Re-program the telephone number Change the menunr.06 to ‘01’. Telephone number is not correct. Switch off the Mobeye Argos. For other questions, please refer to the site www.mobeye.eu Technical data • GSM: Quad Band EGSM 850/900/1800/1900 MHz compatible to the ETSI GSM Phase 2+ standard • Output power: Class 4 (2W @ 900 MHz) Class 1 (1W @ 1800 and 1900 MHz) • Temperature range: -10°C until +55°C • Weight: ca. 290 gram incl. batteries • Dimensions: 161 x 90 x 35 mm (LxWxH) • Batteries: 4 x CR123 Lithium 3.0 V • Power, battery operated: 50 μA, short peaks of max. 2 A • Power, ext. powered: 50 mA, short peaks of max. 2 A 25 Declaration of Conformity Herewith we, Mobeye, declare that the product Mobeye i-200 is in compliance with the essential requirements of the following European standards / EU Directives: Directive 73/23/EEC (low voltage directive) Directive IEC/EN 50130 Electromagnetic compatibility Directive 1995/5/EC R&TTE (Radio & Telecommunications Terminal Equipment) The conformity with the essential requirements of 1995/5/EC has been verified against: ETSI EN 301 489-1 V1.5.1 ETSI EN 301 489-7 V1.2.1 ETSI EN 301 511 V9.0.2 CENELEC EN 60950:2001 Mobeye B.V. Poeldonkweg 5 5216 JX ‘s-Hertogenbosch The Netherlands Name: J.P.K. van de Vijver Position: Managing Director Signature: Date: 1 Augustus 2012 Support For support on technical problems regarding Mobeye Argos please contact [email protected]. This manual is published by Mobeye. All rights, the translation included are reserved. Any reproduction, either photocopy, microfilm or saved in an automated data dictionary, only after written approval of the Publisher. Reprinting, even in summary, is prohibited. This user manual meets the technical requirements at the moment of printing. Changes in technology and equipment are reserved. © Copyright 2014 by Mobeye, version i200NL140303 26