1
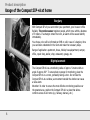
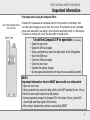
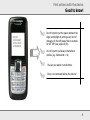
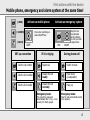
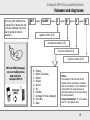
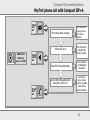
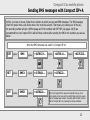
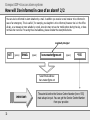
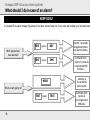
Compact IIP+A1 Ver. 1.9xP User manual www.mobi-click.com 20.03.2015 Contents 2 Product description: General information about the Mobi-Click Compact IIP+A Usage of the Compact IIP+A at home 4 6 First actions with the device: Important information Good to know! Change the PIN-code Switching on and off of the device Mobile phone, emergency and alarm system at the same time! 7 9 11 13 15 Compact IIP+A as a mobile phone: Saving of the three phone numbers Volumes and ring tones Keypad lock and unlock My first phone call with Compact IIP+A Sending SMS messages with Compact IIP+A 17 19 20 21 23 Compact IIP+A as an alarm system: Usage of the Compact IIP+A as an alarm system Saving of personal alarm messages Usage of the Compact IIP+A as an alarm system in diagnose mode Changing of time and date How will I be informed in case of an alarm? I am well! Security zone and localization of people or objects What should I do in case of an alarm? 25 26 27 28 29 32 33 35 Functions of different sensors: Which sensors should I choose in alarm situations? How do I set the sensitivity of sensors? How can I detect the disappearing of vibrations? Warning actions of the device in case of vibrations How can I connect external sensors? Additional features of the device: PIN-code – how to protect against outside access? How can I control external device? How can I operate external device? How can I monitor temperature variation? How can I change the quantity of alarm notifications and time? How can I change the duration of eavesdropping? How can I activate the alarm at a definite time? How can I programme the monitoring time, when the time starts after midnight? Return to factory settings How can I test, if everything is set correctly? Further product information: Safety information Technical Data Declaration of Conformity 37 38 39 40 41 42 43 44 45 46 47 48 49 50 51 52 53 54 3 Product description General information about the Mobi-Click Compact IIP+A Compact IIP+A works nearly like a usual mobile phone, just much more easier! You can receive any calls and call three pre-programmed phone numbers directly. 1. Alarm system As an alarm system it protects you in various situations: Burglary: With Compact IIP+A you can protect your vehicle against theft or your apartment, your house or your office against burglary. In case of alarm you are going to receive up to six SMS or phone calls on your preprogrammed numbers. You have the possibility to contact undetected Compact IIP+A from any phone and so listen in the room quietly (see page 36, HEAR and page 46). You can set many different, individual functions to protect better moving objects (as cars, motorbikes, etc.). You can also protect your Compact IIP+A with a PIN-code, so that only you or any allowed person can communicate with Compact IIP+A quietly. 2. Temperature monitoring Compact IIP+A is suitable also for temperature monitoring in server rooms, computer rooms, weekend cottage, data processing centre etc.. The temperature range of the sensor is from -40ºC to +100ºC. If the minimum value or maximum value is exceeded, Compact IIP+A will send an alarm message to all the saved phone numbers. After reception of an alarm message you can send an SMS command SET (space) RELAIS and switch by use of our output relays cable (R-115) air condition or other systems on or off. It is also possible to use our external cable (Z 101-12) as input in the external contact. You can switch a system off also by sending an SMS command SET (space) EXTERN. Besides you can control and monitor by use of this monitoring and control system following real estates or systems e.g. holidays cottage, boats, heating systems, air conditions and solar systems. 4 Product description General information about the Mobi-Click Compact IIP+A 3. Time switch Compact IIP+A has a time switch. Thank to this time switch you can programme alarm times for the whole week before (see page 47). Compact IIP+A has an external contact. You can connect to this contact either the Commander CO-116 or the external motion sensor PIR (Z 101-10) with a cable of 2 meters. 4. Commander (option) By use of the Commander CO-116 you can connect further 10 radio sensors, e.g. smoke detector, motion sensor, remote control, window or door contact, siren etc.. 5. Battery Pack (option) By use of our battery pack B-121 you can lengthen the standby time many times over. Far from any socket you are always provided with electrical energy thanks to our battery pack. 6. Siren (option) Siren SI-126 is helpful, when it is necessary to discourage the burglar from his intention or to force him to run away. 5 Product description Usage of the Compact IIP+A at home Burglary With Compact IIP+A you can monitor your apartment, your house or office Reliably. The motion sensor registers people, which move within a distance of 5 meters. If a stranger enters the room, an alarm will be caused silently immediately. You choose, who will be informed per SMS or call in case of a burglary. Now you can listen undetected in the room and make the necessary steps. Range of application: apartment, house, holiday house/apartment, camper, office, repair shop, atelier, shop, restaurant, garage, etc. Right placement The Compact IIP+A has a monitoring radius of approx. 5 meters with an angle of approx. 80°. To ensure best coverage for monitoring, place the Compact IIP+A in a corner, preferably facing a door. Do not face the Compact IIP+A at a window, as movement outside the window can cause a false alarm. Attention! In order to ensure the most effective monitoring possible over the greatest area, position the Compact IIP+A in a place that allows common access to all rooms (e.g. hallway, stairway, etc.). 6 First actions with the device Important information First steps before using the Compact IIP+A View of the Compact IIP+A from the rear: Compact IIP+A possesses an integrated circuit for the protection of the battery from over and under charging as well as from short-circuit. This protective circuit is activated with a small slide switch (see design). Ensure that the small slide switch is in ON position. The device is working only, when the slide switch is moved to ON. To set the Compact II P in operation (if necessary): Open the rear cover Open the SIM-card caddy Using a pointed tool, move the slide switch to the ON position Insert the SIM-card Close the SIM-card caddy Close the rear cover Connect the battery charger A beep signal indicates that the device has successfully started RESET: Important information: How to RESET device with rear slide switch Open the rear cover Using a pointed tool, move the slide switch to the OFF position for min. 20 sec. Move the slide switch back to the ON position Connect operating charger to Compact IIP+A for about 20 sec. (green LED should light and beep signal will be heard) After charger disconnecting device is successfully RESET 7 First actions with the device Important information Important information: 1. Leave the Compact IIP+A connected to the battery charger for a minimum of 40 minutes to ensure that the battery is fully charged. 2. When switching on the Compact IIP+A (with the ON/OFF key) the battery charger can be disconnected. Once Compact IIP+A is switched on, the battery charger can be connected or disconnected as required, or be permanently connected. This way a temporally unlimited working time of Compact IIP+A can be guaranteed (e.g. monitoring during a vacation). 3. The Compact IIP+A allows the user a variety of programming options and adjustments of the device functions to suit individual requirements of the user. If during the programming you did something wrong and it seems nothing is going on anymore, it is possible to RESET Compact IIP+A by moving the RESET switch (located under the rear cover) to the OFF position for a minimum of 5 seconds, and then to ON again. This does not erase previous settings, but sets the Compact IIP+A ready to receive new commands. Restart the Compact IIP+A after resetting. 4. When charger is connected to Compact IIP+A, battery will be kept charged all the time. 5. When charger is not connected and battery level falls under 20%, Compact IIP+A will send LOW BATTERY ALARM only by SMS (see pages 30-31). 6. When Compact IIP+A doesn’t respond to any action (i.e. when it was unused for a long time), please RESET the device with rear slide switch (see previous page) and apply full charging process. 8 First actions with the device Good to know! for example: SET KEY +41791234567 +41781112345 +41762223344 Do not forget to put the spaces between the single words/digits by writing every kind of message. On the left please find an example for SET KEY (see pages 18/19). Do not forget to put always international prefixes (e.g. Switzerland: +41) You can use capital or small letters. Every new command deletes the old one! 9 First actions with the device Good to know! for example: SMS commands consist of 2 words: RESET AUTO 1. word: what do I want to do? SET RESET TEST = = = switch on switch off test 2. word: determine situation or sensors AUTO = vibration sensor - car monitoring HOME = motion sensor - room monitoring BABY = noise sensor - baby phone We will explain further commands in detail gradually. 10 First actions with the device Change the PIN-code As Compact IIP+A has only 3 keys and a ON/OFF power key, some settings have to be done on a second "normal" mobile phone at the first use. These settings have to be done just once! Changing of the PIN-code: For the use of Compact IIP+A you also need a SIM-card which is like the SIM-cards you need for other mobile phones. It does not matter which SIM-card you choose, a prepaid-card or a SIM-card with subscription with an operator. Put the SIMcard, which you are going to use for Compact IIP+A later, in a "normal" mobile phone first. Every SIM-card has a PIN-code. Since Compact IIP+A utilises its own PIN system to guard against unauthorised access by SMS, therefore the original PIN-code of the SIM-card must be changed (see your mobile phone handbook for changing PIN instructions). For changing PIN you can use any mobile phone. Place the SIM-card intended for use in the Compact IIP+A into the mobile phone. Using the mobile phone’s menu, navigate to the changing PIN-code option (see you mobile phone handbook for changing PIN command) and change the PIN-code to 1513 In case of any problems read the manual of your operator or manual of your mobile phone manufacturer. After changing the PIN-code of your SIM-card, remove the SIM-card from your mobile phone and place it into Compact IIP+A. Open the small cover at the bottom of the device and place the SIM-card into the SIM-card caddy. Carefully replace the cover. 11 u Put the new SIM-card into the "normal" mobile phone. Ready to start! SIMcard v Enter the original PIN-code. w Change the PIN-code (see previous page). x Take the SIM-card out of the mobile phone again. 12 SIMcard Bottom Compact IIP+A y Place SIM-card with the changed PIN into Mobi-Click Compact IIP+A. First actions with the device Switching on and off of the device Switch on u Press the ON/OFF key for about 3 seconds. v w Yellow LED blinks and green LED is ON (looking for network) . When ready a single beep is issued. only green LED x Status normal:blinks. The full initiation phone we y most wait (20 – 60 seconds). Ready for use! Press the ON/OFF until beep. Mobi-Click Compact IIP+A works only if.. ... it is switched on and the battery is loaded. ... the PIN-code of the SIM-card has been changed. ... the SIM-card is put in correctly. ... a sufficient GSMreception is given. Should the green LED not start to light, turn off the device using the ON/OFF key and check to ensure the SIM-card has been inserted correctly. Also ensure that you are in good mobile phone network’s reception area. 13 You need 1 Mobi-Click Compact IIP+A. 1 SIM-card. 1 mobile phone for changing the PIN-code of the SIM-card and to program further functions. Connect Compact IIP+A Ensure the Compact IIP+A is turned OFF and connect the battery charger to ensure that the battery is fully charged.You will hear a short beep tone when the charging cycle begins. Orange LED is blinking: the battery is not charged. Switch on your device as described on the left page. An integrated protection circuit is built into the Compact IIP+A to ensure that the battery delivers optimal supply to the Compact IIP+A. What to do if… For switching off the device, also press the power ON/OFF key (red and yellow LED are on during this process). 14 …there is no short beep and the green LED does not light? Is the device switched on? Does the battery have enough power? Is the PIN-code changed and is the SIM-card inserted correctly? Otherwise it is possible to RESET the Compact IIP+A (see page 8/9) First actions with the device Mobile phone, emergency and alarm system at the same time! (=RED) Activate as mobile phone (=GREEN) (=BLUE) Activate as emergency system Press when switching on power ON/OFF key. GREY SET up connection RED If it is ringing ON/OFF Keep the two keys pressed when switching on until you hear a signal tone! During phone call Dial the 1st number Reject call Switch to mute Dial the 2nd number Answer the call loudly Hear loudly (Loudspeaker) Dial the 3rd number Answer the call normally Hang up Emergency mode: The call will be answered automatically after 1 ring – more security for elderly people. Emergency mode: Hear the call automatically loudly (free speaker). 15 Activate as alarm system BLUE ON/OFF Keep the two keys pressed when switching on until you hear a signal tone! Activate test mode GREEN Switch on alarm standby In the test mode AUTO Car monitoring VIBRA Testing the vibration sensor HOME Protection against burglary MOVE BABY Baby phone VOICE Testing the acoustic sensor Alarm mode: Press the key until the countdown starts (beep...beep...). You now have 15 seconds to leave of the room. To switch off: You have 15 sec. to turn off alarm by pressing the key again before an alarm will be released 16 ON/OFF Keep the two keys pressed Green and ON/OFF (drawing OK) when switching on until you hear a signal tone! Test mode: Testing the move sensor Switch on: press the chosen key for testing (see above). With the test mode you can test the different sensors. In case of an alarm you hear a siren. To switch off: press the key again. Compact IIP+A as a mobile phone Saving of the three phone numbers As easy as SMS... With Compact IIP+A you can call 3 different numbers, without the tiring typing of the phone numbers: just press one of the three coloured keys and you are connected directly to the number you have chosen! Before you can profit from this short dialling, you have to save those three numbers first. (You can change them easily at any time). Therefore you need a mobile phone. At first you have to choose a number for each coloured key. These settings can be done in any mode (see page 16/17). Write a SMS (message) on your mobile phone and send it to Compact IIP+A! message (SMS) After you have saved these numbers, they will be always informed in alarm situations. Further information about alarm messages, see pages 26-35. 17 SET KEY For saving numbers 13 (red, green, blue) SET KEY2 For saving numbers 12 (green, blue) SET KEY (space) SET +41791234567 You receive a confirmation per SMS. (space) KEY2 (space) SET KEY3 For saving number 1 (blue) Number saved under the red key. Write an SMS command: +41781112345 Send this command to Mobi-Click Compact. (space) You receive a confirmation per SMS. Number saved under the blue key. SET KEY3 +41762223344 Attention! It is also possible to save all three numbers together by sending one SMS command: SET (space) KEY (space) +41791234567 (space) +41781112345 (space) +41762223344 (see an example on the page 10) Don’t forget spaces between every single number or words! 18 Number saved under the green key. You receive a confirmation per SMS. Compact IIP+A as a mobile phone Volumes and ring tones As in any other mobile phone, Compact IIP+A allows the user to choose individual ring tones and do personal volumes selections. SET (space) AUDIO (space) 2 (space) 0 (space) 3 (space) 9 speaker volume [0-9] microphone volume [0-9] ring tone number [0-9] ring tone volume [0-9] Write a SMS (message) on your mobile phone and send it to Compact IIP+A! message (SMS) 0 1 2 3 4 5 6 7 8 9 = = = = = = = = = = Mystery Hymn of Germany Mozart Strauss Puccini Vici fast Bee Compact IIP tone (standard) short Bee Wale Notes: The selection of the volumes for the speaker and the microphone should be done very carefully; it is not advisable to choose both high values because of abnormal behaviours of the voice during the communication! General information: "0" is the lowest, and "9" is the highest value. 19 Compact IIP+A as a mobile phone Keypad lock and unlock Keypad lock KEYPAD LOCK AND UNLOCK: FOR ALL KEYS, INCLUDING ON/OFF KEY! 20 Keypad unlock For this function, Compact IIP+A must be switched on. When the device is ready, do the following: For unlock the keypad again, do the same as for locking: -press the red key -press the blue key -press the red key -press the blue key -now you hear a triple tone which indicates that the keypad is locked. -now you hear a triple tone which indicates that the keypad is unlocked. Compact II as mobile phone My first phone call with Compact IIP+A PRESS RED KEY Switch the device on (see p. 14/15). Short beep after pressing. Yellow LED is on. The Compact II is dialling the chosen number. Red LED blinks alternately. The Compact II is establishing connection. PRESS GREEN KEY Green LED blinks alternately and yellow LED is on. PRESS BLUE KEY The Compact II is going to call the chosen number. Connection done, chosen number is called (also during communication). 21 Reject the call If it’s ringing: Switch to mute during the phone call: Loudspeaker (free speaker) Hang up 22 Answer the call loudly Answer the call normally Answer a call automatically: Elderly and handicapped people are often living alone. Especially this group of people is often exposed to dangerous situations: a fall or an unexpected collapse could have bad consequences. When the call is answered automatically you can contact your beloved person directly whenever you want: Compact IIP+A answers automatically and put the hear- and speaking settings to "loud" (free speaker), thus the person do not have to pick up the telephone. For this, the device must be started as emergency system (see page 16). Compact II as mobile phone Sending SMS messages with Compact IIP+A At first, you have to choose further three numbers to which you can send SMS messages. The SMS messages inform the person that a call will be done in the next few seconds. That means, by pressing one of the key, the according number will get a SMS message and if the numbers with SET KEY (see pages 18/19) are programmed too, the Compact IIP+A will call these numbers after sending the SMS to the numbers you save as below: Write the SMS command and send it to Compact IIP+A: SET (space) SMS (space) +4179123… (space) +4178111… SET (space) SMS2 (space) +4178111… (space) +4176222… SET (space) SMS3 (space) +4176222… (space) +4176222… When the Compact IIP+A receives commands from you, there will be heard a triple tone and the red LED blinks shortly to ensure that the message was received. The yellow LED will blink to inform that the Compact IIP+A is preparing the chosen command. 23 PRESS RED KEY Short beep after pressing. The Compact IIP+A is processing the SMS that will be sent to the SMS-Number. Yellow LED is on. The Compact IIP+A is sending the SMS and dialling the KEY number. PRESS GREEN KEY message sent to receiver. Red LED blinks alternately. The Compact IIP+A is establishing connection with KEY number. Receiver gets the message. PRESS BLUE KEY 24 Green LED blinks alternately and yellow LED is on (also during calling). Connection done, chosen KEY number is called. Phone call between KEY receiver and Compact IIP+A. Compact IIP+A as an alarm system Usage of the Compact IIP+A as an alarm system The usage of the alarm system is very simple: you just have to chose, in which kind of alarm situations you want to use your Compact IIP+A: for protection of the car, for protection against burglary or as baby phone! Activation of the alarm system on the Compact IIP+A: + = Activation of the device as alarm system car monitoring protection against burglary (see also page 17) microphone Activation of the alarm system with your mobile phone: Write the SMS command: SET (space) SECURITY (activation of the alarm system) and afterwards please choose your way of use SET (space) HOME Information*): In alarm mode (security) the Compact is absolutely silent. The loudspeaker and LED’s are off. It is recommended to use the alarm mode, in order to avoid a false alarm. (for protection against burglary) SET (space) AUTO (for car protection) SET (space) BABY (for microphone) Send the command to Compact IIP+A: The alarm is activated, you receive confirmation on your mobile phone for successful activation. *) This command is possible only in the case of Compact IIP und Compact IIP+A. 25 Compact IIP+A as an alarm system Saving of personal alarm messages Personal texts are used to describe an alarm which had happened more exactly, especially if the alarm message goes to a third person or if there are several Compact IIP+A devices in order. Changing name of the Compact IIP+A: SET (space) NAME (space) FERRARI The Compact IIP+A is named as FERRARI now. Notice: Maximum length for Compact IIP+A name is 20 characters You can choose these alarm message texts also for other sensors by doing in the same way as described above. You only have to write instead of ALARM the name of the sensor. More about the names of different sensors you can find on page 38. 26 Compact IIP+A as an alarm system Usage of the Compact IIP+A as an alarm system in diagnose mode Diagnose mode is extended test mode for all sensors available in Compact IIP+A. In this mode user can activate sensor without alarm message from Compact IIP+A. When sensor is exited only short beep sound will be heard. DIAGNOSE Send the command to Compact IIP+A: The test system mode is activated, you receive confirmation on your mobile phone for successful activation. RESET (space) DIAGNOSE Send the command to Compact IIP+A: The test system mode is desactivated, device back to phone mode. You receive confirmation on your mobile phone for successful activation. SET (space) To activate each sensor for test you do not need to touch any button in Compact IIP+A. It is enough to send SMS, for example: SET MOVE MID (for more information see page 39). In return you will get status information from Compact IIP+A about active sensors. It is useful when device is hidden proper or installed in position where user do not have access to the device. In this mode you can also test special sensor connected to external port like EXTERN NO (or EXTERN NC), EXTERN PIR and EXTERN RELAY. Information: When Compact IIP+A is switched back to ALARM (SECURITY) mode, all sensor settings from diagnose mode are saved. 27 Compact IIP+A as an alarm system Changing of time and date Compact IIP+A provide simple SETtings of date and time with weekday calculation. When time and date is SET the weekday is count automatically. To SET date and time send SMS as in example below (format: hh mm yy mm dd): SET (space) TIME (space) 13 (space) Hour (0 - 23) 24 (space) 08 Minute (0 - 60) Year (0 – 95) (space) 11 (space) 28 Month (1 – 12) Day (1 – 31) The time can be also SET in short format without date (format: hh mm): SET TIME 13 24 After SMS command, in reply you receive time status of Compact IIP+A with name of the device, time, date, weekday, Status report hour, Care hours (see page 33) and Idlealarm time (see page 46) SET (space) STATUS (space) 13 Hour (0 - 23) Each day at full 13. hour TEST STATUS report will be sent to predefined numbers assigned as „S” (see next page) 29 Compact IIP+A as an alarm system How will I be informed in case of an alarm? 1/2 You can choose by yourself in which kind you and the other people (saved numbers under the three keys) have to be informed in alarm situations. For the numbers you have saved with the commands SET KEY/2/3, you can choose the way of information as below, for the further three SMS-numbers you have saved (see page 24) please consider the steps on next page. SET (space) ALARM (space) Now, the way of the alarm information is saved. C0S You can choose any individual row of the letters resp. digits. First letter is the way of information for number 1 (red key), the second letter is for the number 2 (green key) and the third letter is for the number 3 (blue key). SMS with low battery alarm and status alarm will be send only to numbers assigned as „S” C means calling the accordingly number in alarm situation for max 3 minutes. S means sending an SMS to the accordingly number in alarm situation. C = letter S = letter 30 0 means that the accordingly number wont be informed in alarm situation. 0 = zero (not a letter)! This command allows you to install further three numbers to be informed per SMS in alarm situations. That means, totally 6 numbers can be informed. First three numbers, please see on previous page, and for the further three numbers, please consider the following steps: SET (space) SMSALARM (space) 101 Now, the numbers are activated/deactivated. As you have saved these three SMS numbers yet (see page 24), you can activate or deactivate them. That means you can choose if they should also be informed in alarm situation or not (the information can only happen per SMS, calling in this function is not possible). 1 means that the accordingly number will be informed. 0 means that the accordingly number wont be informed Notice: SMS with low battery alarm and status alarm will be send only to numbers assigned as „S” in command SET ALARM or „1” in SET SMSALARM. When all numbers in SET ALARM are SET as „C”, SMS with low battery alarm will not be send. 31 Compact IIP+A as an alarm system How will I be informed in case of an alarm? 2/2 You can also be informed in alarm situation by e-mail. In addition you need an e-mail receiver to be informed in case of an emergency. This is useful if, for example, you daughter is to be informed, however she is in the office all day, so a message is more suitable by e-mail, since she may not use her mobile phone during the day, or does not have her own one. For saving the e-mail address, please consider the descriptions below. maximally 24 signs! SET (space) EMAIL (space) [email protected] (space) *555 Saved Email-address: [email protected] IMPORTANT: 32 The asterisk before the Service-Centre-Number (here: 555) must always be put. You can get the Service-Centre-Number from your provider. Compact IIP+A as an alarm system I am well! SET (space) CARE beep tone activated The command “ Test CARE invokes CARE procedure." The command SET Care is a quite important function, which puts the Mobi-Click at the owners disposal. You can determine at which times (max. 4 clock times) you would like to hear a beep tone. Enter to the following command: TEST TIME command reports device , CARE and system features times . Now you will hear a beep at 08:00, 12:00, 16:00 and 20:00 o'clock. As soon as this sounds, you must immediately press any key to confirm that you are well. For example, the emergency centre or your dearest ones wish to be informed that everything is normal. The device sounds three times in one minute with each a longer warning tone, which you must confirm by depressing any key. In the case that you do not press the key after these warning tones, the Compact automatically sends a notification of emergency to the emergency or family contact (depending upon the saved numbers). So the necessary measures can be initiated. u u u Please remember the spaces between words when composing commands e.g. SET(space)Care(space)... Single digit numbers, e.g. 1, 2, 3, 4, are to be written as follows: 01, 02, 03, 04, etc. For midnight use 00 (not 24!) For the use of the command SET Care, the time in the Compact IIP+A must be SET. This happens by sending a simple command: SET(space)TIME(space)13(space)45 The time would be SET to 13:45h then. 33 Compact IIP+A as an alarm system Security zone and localization of people or objects With Compact IIP+A a protected zone, (e.g. the areas in which the user is most often present) can be defined. In principle Compact IIP+A saves automatically and permanently the last 28 zones you crossed with Compact IIP+A in a table. How you have to save these zones, please see below: SET (space) ZONE This command you must send to Compact IIP+A by crossing the areas which you want to save in the table. You can save up to 28 zones. It can happen that not all cells can be reached immediately in the learning process (you should go by car) of the security zones because some cells are working to capacity at the moment and therefore the cells cannot be registered by the device. That is why it is advisable for urban areas to cross a security zone slowly or more than once if possible. This allows for every possible cell to be registered by the Compact II. To stop the registering of the zones, you only have to write TEST ZONE and send it as SMS to Compact IIP+A (further information, see next page). 34 Defining protected zones. Activation of SET ZONE SET (space) Activation of the monitoring. AREA Special function: This command activates all the zones you have saved in your table (max. 28 zones). If you make this activation, you will get an alarm message in which you can see where the present location of the protected object or person is. TEST (space) CELL Asking for present location. With this command you have the possibility to check the present location of the Compact IIP+A. This feature is named as Cell Broadcast and is dependent on GSM operator, which not always allows the user to gain benefits of it. Ask your SIM provider or your present GSM operator about support for that feature. 35 Compact IIP+A as an alarm system What should I do in case of an alarm? KEEP COOL! A Compact IIP+A alarm message has always to be taken serious! Keep cool in any case and consider your next steps exac TEST (space) KEY TEST (space) SMS Which people have been alarmed? What is really going on? 36 (space) Command which reports 3 previously programmed SMS numbers . Listening in the protected place quietly. HEAR TEST Reports 3 previously programmed phone and alarm numbers. TEXT Command which reports all pre-programmed SMS texts . Protection of privacy is the constitutional right of citizens of many countries. A Compact IIP+A user should not, and is not, allowed to abuse Compact IIP+A for unauthorized monitoring purposes! Now you know, who has been informed and you can do next steps. After you have sent this command, Compact IIP+A will call you immediately back, but quietly. Important: do not hang up, you can listen in the alarm place! If you might have more devices of Compact IIP+A in your family, it is advisable to send this command to have more information about the present person in the alarm situation. 37 Functions of different sensors Which sensors should I choose in alarm situations? For every single sensor that is integrated in the Compact IIP+A, you can choose a personal text which is allowed to consist of max. 21 signs. See the different sensor functions below: SET (space) VOICE TEXT Acoustic-sensor (microphone): The hyper-sensitive microphone reacts on voices or sounds in the monitored room. SET (space) MOVE TEXT Motion-sensor (PIR): Registers every move within a distance of about 5 meters. Put your with the sensor in direction of the corridor or the door but never in direction of the window. SET (space) VIBRA TEXT Vibration-sensor: Reacts on smallest vibrations and is suitable for monitoring of vehicles of each kind. SET (space) EXTERN SET (space) ALL TEXT Locating: For protecting individuals and localizing children and elder people but also for transporting values and demonstration cars etc. All sensors are activated at the same time A combination of the sensors is also possible, e.g. "SET vibra move". 38 Functions of different sensors How do I SET the sensitivity of sensors? All integrated sensors of Compact IIP+A are SET in the factory optimal for the appropriate monitoring situation. The sensitivity can be adjusted with a simple command and so can be SET to be more or less sensitive. Choose one of the sensors mentioned on previous page and complete this sensor with a further command which influence the sensitivity. LOW MID HIGH Usage for low sensitivity. Default use, for middle sensitivity. Usage for high sensitivity. or any other sensors (see previous page) for example: SET (space) VIBRA (space) HIGH Sensitivity of the vibration sensor SET to high. With the command SET VIBRA you can detect moving respective vibrations of the device. After the device has recognized this command, this function starts within 10 seconds and the vibrations are going to be detected with the selected sensitivity. During this 10 seconds you have the possibility to put the device at any place and in horizontal position, without causing an alarm. In case of an alarm the alarm numbers are going to be informed. To avoid that the device gives alarm information every second when it is moving, there is a time of approx. 7 minutes between the alarm events. 39 Functions of different sensors How can I detect the disappearing of vibrations? With the command below you can detect if the vibrations of the device die out, disappear or decline. As soon as the device recognizes this command, this function starts within 10 seconds and the vibrations are going to be detected with the selected sensitivity. During this 10 seconds you have the possibility to put the device at any place and in any position without causing an alarm. The usage is as following: As soon as the device recognizes that there is no more vibration, the timer is going to start. This timer is active until the device detects new vibrations. In this case, the timer will be RESET and no alarm message will be caused. But there will be given alarm message in case that no more vibrations are detected during this timer option. LOW MID HIGH Usage for low sensitivity and time of investigation of 5 seconds. Usage for med sensitivity and time of investigation of 20 seconds. Usage for high sensitivity and time of investigation of 45 seconds. for example: 40 SET (space) REVERSE (space) HIGH Sensitivity SET to high, time of investigation: 45 seconds. Functions of different sensors Warning actions of the device in case of vibrations After the device recognizes this command below, this function starts in 10 seconds and the vibrations are going to be detected with the selected sensitivity (LOW/MID/HIGH). During this 10 seconds it is possible to put the device at any place and in horizontal position without causing an alarm. In case of an alarm, the accordingly numbers will be informed. Additionally a time of 7 seconds is added to deactivate the alarm function. The idea of the protection is as follows: After the vibration sensor detects moving, the timer starts. The timer is active until there will be new moving. In this case a RESET will be done and no alarm will be caused. If the timer reaches the configured time in the parameter (see description on previous page) (LOW/MED/HIGH) and no vibration is detected, three warning tones will be given. In case that the buttons will be pressed in the warning time, or if no vibration is detected (any time), the timer will be RESET. If there is no more moving and the buttons are not pressed yet, the device begins to count a new period time. If there is further no moving, a second action warns: 6 warning tones will be given. If the buttons will be pressed during this warning action or if there is no moving detected, the timer will be RESET. In case that there is no more detected moving and the buttons are not pressed yet, the device begins to count a new period time and if during this time no vibrations are detected, a third warning action begins: 12 warning tones will be given. After this third action, the Mobi-Click Compact IIP+A is causing immediately a warning message! for example: SET (space) GUARD (space) HIGH Sensitivity SET to high, time of investigation: 45 seconds. 41 Functions of different sensors How can I connect external sensors? You can also connect external sensors to Compact IIP+A. The connected sensor must operate with standards NO or NC. You can connect as well simple short/open detectors. The defined mode allows you to choice type of the external equipment between normally opened and normally closed. There is a time as well to redirect application to give alarm when the sensor is active for longer than programmed time. The time field must be left blank when you want to have immediately alarm for any sensor activity. Please find more information below. From 1 up to 360 seconds! SET (space) EXTERN (space) NO Operational mode of the sensor, loop attached: NO or NC (space) 156 Extern sensors activated. Request time for closing (NO) or opening (NC) of the external circuit for the alarm. This command will program MC to give alarm when the external contact will be closed for longer than 156 seconds (f. ex.) stereo plug, 2.5mm 2-wire cable max. 2 meters SET (space) EXTERN (space) PIR (space) MID The command SET EXTERN NC will program MC to give alarm when the external contact will be opened for short period of time (500 ms typical) This command will provide service of external motion sensor (PIR). In this mode external connector is SET only for PIR. Sensitivity of PIR sensor can be adjusted at three levels (low/mid/high). Note: Please use only original Compact IIP+A motion sensor. 42 Additional features of the device PIN-code – how to protect against outside access? With this function Compact IIP+A can be protected against outside access. The PIN-code consists of the word "PIN" and a code. The code is always 4-digit and cannot contain any signs, but just digits (e.g. "1234"). IMPORTANT: If you have saved your own Compact IIP+A text responses, then all commands which you transmit to Compact IIP+A must have the same text and PIN-code at the end, e.g. "SET auto pin 1234". Without the code the command will not be fulfilled. If you forgot to attach the PIN-code or attached a false PIN, you get a message with "Access denied!". (To save costs, Compact IIP+A sends you this message only once). for example: SET PIN <new pin> <old pin> SET PIN 1234 #1513 This changes SIM PIN number and introduces PIN to all the commands ex: SET AUTO # 1234 or TEST VIBRA TEXT # 1234 ATTENTION! Lost PIN-Code? What to do? It is possible to do a general RESET to factory default SETtings when you start the Compact IIP+A in alarm mode (see page 48). This will also RESET the PIN-Code: PIN lost recovery procedure: Switch the device OFF, Remove SIM card, Change PIN to 1513 or change to another SIM card with PIN 1513 , Insert the SIM card again, While pressing green and blue keys , switch the device ON. After a long beep the device SETtings are erased and must be programmed again. 43 Additional features of the device How can I control external device? (only with special adapter) With Compact IIP+A You can also control some external device for example camera, light relay. It is only one condition: device must have digital input. For this purposes it is possible to use external port connector. Please find more information below. Special adapter! A – Voltage Supply B – Signal (normal 1) C – Ground SET Please do not use external connector for device witch current consumption is over 15 mA, because of battery life time! (space) RELAY This command will SET low state (logic 0) on Signal line marked as B on scheme RESET (space) RELAY This command will SET high state (logic 1) on Signal line marked as B on scheme External device controlled by Compact IIP+A can be also combined with sensors build into Compact IIP+A like move, vibra or voice. When sensor is exited the state on Signal output will change to logic 0 and activate external device. SET (space) RELAY (space) ALARM (space) 14 The time for how long device must work (for example video camera). Range is from 1 to 180 minutes! Note: SET Relay and SET Relay Alarm can work parallel. External device will work when relay alarm clock will count down (after sensor was exited) or relay was activate manually by SET Relay. When relay alarm time is out and SET Relay was sent external device works still before you send RESET Relay. 44 Additional features of the device How can I operate external device? To RESET controlling external device in alarm situation by Compact IIP+Ayou must send RESET Relay Alarm. RESET (space) RELAY (space) ALARM Notice: When Relay function is active external sensors like EXTERN PIR or EXTERN NO or EXTERN NC can not be used. 45 Additional features of the device How can I change the quantity of alarm notifications and time? The temperature range of the sensor is from -40° C to +100° C. If the min. or max. value is exceeded, Compact IIP+A send an alarm message to all the saved phone numbers. To SET the function use the following command: SET TEMPERATURE <temp1> <temp2> #1513 Temp1 = lower limit Temp2 = upper limit The value of "Temp2" must be higher than "Temp1" Example: SET TEMPERATURE -5 35 #1513 By temperature lower than -5° C or higher than +35° C triggers the Compact an alarm. The adjustable range is from 40 to 100. If it is SET as "Temp1" = -40, turns off the lower limit If it is SET as "Temp2" = 100, turns off the upper limit If the value of "Temp1" is higher than "Temp2, send the device a message about this error. Delete the SET limits To delete the SET limits, use the command: TEMPERATURE RESET #1513 Check SETtings To check the existing SETtings, use the command: TEST TEMPERATURE #1513 46 Additional features of the device How can I change the quantity of alarm notifications and time? Frequency of appearing alarms of the same type can be customized. This function is useful especially, when user wants reduce number of notifications from any triggered sensor. When any alarm is released Compact II send a notification with cause. If sensor still detect monitored event, for ex. a person still moves in move sensor area, second notification will be sent after the time defined in command SET IDLEALARM. from 0 to 99 minutes! SET (space) IDLEALARM (space) 15 Next notification about releasing active alarm will be sent after 15 minutes Notice: The time between possible notifications about monitored event is affect only alarm of the same type! How change default 3 minutes time of alarm call? SET (space) LONGHEAR All calls from Compact II in alarm situation will go on as you want until you disconnect. 47 Additional features of the device How can I hold alarm system for definite time and weekday? Active alarm can be hold in any time for definite time and weekday. When any of sensor is active (see page 17, 26, 38, 39), command SET HOLDALARM causes holding alarm system from the time between first and second parameter (Stop hour and minute) and the time defined by third and fourth parameter (Start hour and minute). In addition it is possible to SET which weekdays an alarm must be hold (week schedule). Stop hour and minute Start hour and minute SET (space) HOLDALARM (space) 16 (space) 10 (space) 23 (space) 30 (space) Mo (space) Th Su: off Mo: 16:10 – 23:30 Tu: off We: off Th: 16:10 – 23:30 Fr: off Sa: off After SMS Compact II P send hold alarm status table Weekdays when alarm must be held or parameter ALL for whole week Alarm system in Compact IIP+A is inactive from 16:10 to 23:30 on Monday and Thursday Notices: • Any changing of active sensor by pressing button (see page 17) or sending message, for ex. SET AUTO (see pages 26, 39) will not cause cancel hold alarm table for alarms. • To test Holdalarm table please send SMS: TEST HOLDALARM • Hold time for alarms could be delayed max. 1 minute. Please SET clock and date in the device before (see page 29) 48 Additional features of the device Return to factory SETtings + + RESET System: When the device is switched off, while pressing red, green, blue keys, switch the device ON. After a long beep the device SETtings is erased. The same could be done by SMS with special service command RESET SYSTEM 12345678 + You can also make a general RESET by switching the little slide switch (see page 8/9) to off. The simplest way to RESET a function, is to send a SMS message to Compact IIP+A which consists the word RESET instead of the word SET. This you can use for any saved functions to RESET them. Please see the following examples: RESET BABY RESET HOME RESET GUARD RESET TEXT RESET AUTO RESET REVERSE RESET EMAIL RESET NAME RESET VIBRA RESET SMS SMS, SMS2, SMS3 RESET AUDIO 49 Additional features of the device How can I test, if everything is SET correctly? General information: To test the savings, always write the word TEST instead of the seen messages as SET or RESET. After sending a text message, you will get a message which contains information about the present Status of the device. TEST STATUS is also possible to write directly. Here you are some examples: TEST MOVE TEXT TEST TIME TEST EXTERN TEXT TEST NAME TEST STATUS TEST VIBRA TEST SMS 50 TEST KEY TEST EMAIL TEST AUDIO Further product information Safety information Mobi-Click Compact II was produced by keeping to the strict manufacturing and quality controls. Thus your device works correctly and to prevent that the guarantee expires, there has to be considered the following security councils: Take care of your Compact IIP+A. Mobi-Click is full of electronics and sensitive sensors. Therefore do not drop Compact IIP+A, do not expose Compact IIP+A any hard hit as the electronic printed Circuit board could get any defect because of this. Moisture, heat or cold could influence the perfect work of the device strongly and lead to damages. Do not try to open the Compact IIP+A device. Thus you damage the housing and you loose the guarantee services. 51 Further product information Technical Data Temperature range: Weight: Dimensions: Operating Voltage: Recharge time: Standby-Time: Module: Battery: Talk time: SIM-Card: Frequency band: GSM-Class: Data Service: working range –10°C to +55°C saving range –25°C to +80°C 78g (including battery) 106 mm x 38 mm x 19 mm (LxWxH) 3,45 Volt to 4,2 Volt (nominal 3,6 Volt) approx. 40 Min. (for a fully discharged battery) up to 200 hrs. (telephone mode) up to 160 hrs. (monitoring mode) Wavecom Q24 BAK 063448S2 Lithium Ion up to 120 min. 3 Volt EGSM900 (880 to 960 MHz) DCS1800 (1.710 to 1.880 MHz) Class 4 (2 Watt) as per EGSM900 Class 1 (1 Watt) as per DCS1800 SMS Mobi-Click is designed to the following standards: GSM 03.03: “Digital cellular telecommunications system GSM 03.13: “Digital cellular telecommunications system GSM 04.02: “Digital cellular telecommunications system GSM 04.03: “Digital cellular telecommunications system GSM 04.04: “Digital cellular telecommunications system GSM 04.05: “Digital cellular telecommunications system GSM 04.07: “Digital cellular telecommunications system GSM 04.08: “Digital cellular telecommunications system 52 (Phase 2+); (Phase 2+); (Phase 2+); (Phase 2+); (Phase 2+); (Phase 2+); (Phase 2+); (Phase 2+); numbering, adressing and indentification“. Version 6.6.0. Discontinuous Reception (DRX) in the GSM system“. Version 6.0.0. GSM Public Land Mobile network (PLMN) access reference configuration“. Version 6.0.0. Mobile Station- Base Station System (MS-BSS) interface Channel structures and access capabilities“. Version 6.0.0. Layer 1 General requirements“. Version 6.0.0. Data Link (DL( layer General aspects“. Version 6.0.1. Mobile radio interface signalling layer 3 General aspects“. Version 6.5.1. Mobile radio interface layer 3 specification“. Version 6.11.0. Further product information Declaration of Conformity We, MOBI_CLICK AG; Pfad 1 A; CH-6330 Cham/ZG declare under sole responsibility that the product: Mobile Phone and Security System Mobi-Click Compact IIP+A (suitable for GSM/E-GSM 900 MHz and PCN 1800 MHz) To which this declaration relates, is in conformity with the following essential requirements of the Directive 1999/5/EC: Article 3.1 a), 3.1 b) and 3.2 The product has been tested against the following standards: EN 301 511 Harmonised Standard for Mobile Stations in the GSM900/1800 Bands EN 301 489-01 Electro Magnetic Compatibility Standard for Radio Equipment and Services EN 301 489-07 Specific (EMC) Conditions for Mobile Radio Equipment, GSM 900/1800 EN 60950/IEC 950 Safety of Information Technology Equipment EN 50360 Product Standard to demonstrate the Compliance of Mobile Phones with the Basic Restrictions related to Human Exposure to Electromagnetic Fields EN 50361 Basic Standard for the measurement of Specific Absorption Rate related to Human Exposure to Electromagnetic Fields from Mobile Phones 1999/519/EC Council Recommendation on the Limitation of Exposure of the General Public to Electromagnetic Fields The product is marked with the CE marking and Notified Body number according to the Directive 1999/5/EC: Identification mark: CE 1466 Place of Issue: Cham/ZG Date of Issue: 30.05.2005 53 Your notes... 54