1
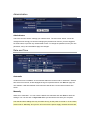
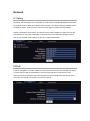
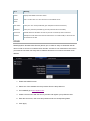
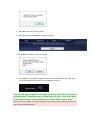
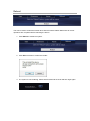
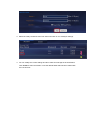
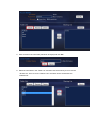
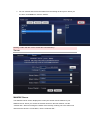
NAS103 Product User Manual System Information ........................................................................................................ 2 Identification .......................................................................................................... 2 Administration ....................................................................................................... 3 Date and Time ........................................................................................................ 3 Network ......................................................................................................................... 5 IP Setting ................................................................................................................ 5 PPPoE ..................................................................................................................... 5 DDNS ...................................................................................................................... 6 Portal Service ......................................................................................................... 7 Maintain ......................................................................................................................... 9 Disk ......................................................................................................................... 9 Firmware .............................................................................................................. 10 Reset..................................................................................................................... 12 Reboot .................................................................................................................. 13 Service .......................................................................................................................... 14 Share Management ...................................................................................................... 15 Account ................................................................................................................ 15 Adding and Modifying an Account............................................................... 15 Server ................................................................................................................... 18 WebDAV Server ............................................................................................ 18 FTP Server .................................................................................................... 19 Media Server ................................................................................................ 20 iTunes Playlist ............................................................................................... 20 Frequently Asked Questions ........................................................................................ 21 Login ..................................................................................................................... 21 File Access ............................................................................................................ 21 Miscellaneous ...................................................................................................... 22 System Information Identification Host Name By default, the host name is set to use the MAC address. This name is used to identify your device on the network. If you prefer a different name that is easier to remember, change the name and click Apply. When selecting a new host name, make sure to use a unique name and not one that has already been used on the local network. Also, the new host name must not begin with a number. Uppercase and lowercase letters are not distinguished. When applying the new name, it will check with the web portal at myisharing.com to see if the new name is still available and then register it for remote login at the same time. If the name has already been taken, the Portal Service will be disabled and you need to enter a new name if you want to use the web portal for remote login. If you are unable to mount the network drive on Linux, change the host name from the default MAC address to a name that starts with a letter and not a number. Group Name This should be the same name as your workgroup. In general, the default WORKGROUP will work, but if your workstation belongs to a different group, change it and click Apply to save it. Administration Administrator This is the account used to manage your network drive. The user name “admin” cannot be changed but we strongly recommend changing the password as soon as you have logged in for the first time, to prevent any unauthorized access. To change the password, enter your new password, verify it and click OK to apply the changes. Date and Time Automatic If internet access is available, we recommend setting the renew mode to “Automatic”. Select a time server from the list, enable daylight savings if required and then click Save to apply the new settings. It will automatically synchronize the date & time over the internet with a time server. Manually When set to “Manually”, you can enter the date & time manually and click Save to apply the settings. You can also click on Sync with PC to synchronize the time with your computer. The date and time settings are only accurate as long as the power is turned on. If the renew mode is set to “Manually” and you turn off or remove the power supply, the date and time are reset! If the renew mode is set to “Automatic” and a time server is selected, it will automatically synchronize the time at start up. Network IP Setting By default, the IP Setting is set to Automatic IP. This is the recommended setting and will allow the network drive to obtain its IP address automatically. If you prefer setting it manually, select the Static IP option, enter your own values and click Apply to confirm the new settings. Setting it manually is useful when you need to have a static IP address in order to mount the network drive or set up port forwarding. To find out the correct settings for a static IP setup, refer to your network router settings or ask your system administrator. PPPoE If you are using DSL or a cable modem to connect to the Internet and your network hub, switch or router does not dial-up automatically, enter the PPPoE (Point to Point Protocol over Ethernet) account information you have received from your provider here and all local users can share one PPPoE connection to access the Internet. Term Meaning Status Displays the PPPoE connection status. Service This is an ISP name or a class of service on the PPPoE server. Name User Name Enter your user name provided by your ISP (Internet Service Provider). Password Enter your password provided by your ISP (Internet Service Provider) Service On The PPP daemon will ONLY connect to your ISP on demand, when a LAN user Demand attempts to send data to the Internet. When there is no data traffic, it will close the connection to the ISP. DDNS DDNS (Dynamic Domain Name Service) allows you to create an easy-to-remember domain name in order to access your network drive remotely. It points to your network drive even when your Internet connection has a dynamic IP address and there is no need to remember an IP address. 1. Enable the DDNS function. 2. Select one of the available service providers from the drop-down list. 3. For DYNDNS go to www.dyndns.com. 4. Create a free account with the service provider and register your preferred name. 5. Enter the host name, user name and password into the corresponding fields. 6. Click Apply. 7. The network drive will connect to your DDNS account and update its IP address whenever it changes. 8. To establish remote access to your network drive when it is connected to a network router or switch, you need to configure port forwarding (e.g. Web UI port 8000 or WebDAV port 8080). For more info about how to set up port forwarding on your router, seehttp://portforward.com. 9. You are now ready to enter your newly registered domain name in the web browser and access your network drive remotely. Remote login is already enabled and setup by default. Go to http://myisharing.com, enter the MAC address (12 digits, all in one word). No further configurations are needed. The DDNS service for this NAS was designed to be used with a PPPoE connection. If your NAS is behind a network router and not connected directly to the external IP, this function will not work. Instead, please use our web portal at http://myisharing.com for remote login. Portal Service This service is required for remote logins to the web interface and for remote file access via WebDAV. The Host Name displays the server name for remote login. When the portal service is enabled and running, the status shows OK, otherwise it shows None. Do not disable the portal service if you want to login to your network drive via the web portal at http://myisharing.com. If you only use the device on the local area network, we recommend to disable the portal service for security reasons. UPnP Port Mapping This service automatically sets up port forwarding on your network router. Not all network routers support this function and some might not even have UPnP. If that is the case in your network, please set up port forwarding manually. To do so, login to your router and find the setting for “port forwarding”. For more details on how to use port forwarding, please refer to http://portforward.com. Assuming that you are using the default port numbers, for the web interface, set up a redirect for TCP traffic from WAN port 8000 to LAN port 8000. For file access via WebDAV, set up a redirect for TCP traffic from WAN port 8080 to LAN port 80. Because you have to redirect the network traffic to a certain IP address (the internal IP of your NAS), it's best if you set a fixed IP address for your NAS. Otherwise, it might change the next time you restart your router or your NAS and the port forwarding will not work anymore. Port Numbers By default, the administration port is set to 8000 and the WebDAV port is set to 8080. If you have more than one network drive installed in the same local network or if you run into conflicts with other network devices, change the port number to a different number and click Apply to save the settings. Remember to change the port forwarding if you make any changes to the port numbers here. For Windows XP users to mount the network drive, the port number for WebDAV has to be set to port 80. Make sure to set up port forwarding accordingly. Maintain Disk Sleep Time To save energy and keep the drive cool, we recommend setting the sleep time. Select a time from the list between 10 to 60 minutes. When the drive is idle for longer than the set time, it will automatically go into stand-by mode and spin down. If you need immediate access to the drive, set it to “Disable” and the drive will keep spinning at all times. Format Disk Use this tool to format your hard drive and prepare it for the network drive. When you format the hard drive using this disk utility, it will create a single partition using the exFAT file system. If you create other partitions or choose a different file system when connected through USB, keep in mind that the network drive is only able to recognize the first partition and it has to be exFAT! In order to access the exFAT partition when the device is connected via USB, Windows XP requires Service Pack 2 or later and Windows Vista requires Service Pack 1 or later. exFAT driver update for Windows XP and Server 2003 http://support.microsoft.com/kb/955704 exFAT driver update for Windows Vista is part of SP1 http://support.microsoft.com/kb/935791 Formatting the drive will erase all data and settings, as well as deleting the SMB folders and FTP accounts! Firmware Here you can update the firmware for your network drive. 1. Download the latest firmware and loader from your vendor’s website. 2. Store the files on your computer and decompress them if necessary. 3. Click Browse and locate the firmware (*.BIN file) on your computer. 4. Select and open the new firmware to start the update process. 5. Click OK to confirm the firmware update. 6. During the update process, take no other actions and make sure the power is left on! This might take a few minutes. 7. Once the update process is completed you will be prompted to reboot the system. 8. Click OK to close the pop-up window. 9. Go to Reboot and click Reboot to restart the system. 10. Click OK three times to confirm the restart. 11. The system is now restarting. Please wait for about 60 seconds and then login again to check if the firmware version has been uploaded correctly. If there is a new update available, the FW update LED lights up green and you can push the FW update button to update the firmware. The light turns off as soon as you push the button but wait about 30 seconds for the firmware update to complete and the system to restart. Never turn off your device or remove the power during the firmware update procedure as it may cause irreparable damage! Reset If you experience unexpected problems and after updating the firmware, we recommended to reset all settings. Resetting the device will set all settings, except the SMB and FTP accounts, back to its original factory default settings. 1. Click Reset. 2. Click OK three times to confirm and reset all settings. 3. Click OK to close the confirmation window and reboot the device. Resetting the device does not delete any of your media files that are stored on the network drive. Reboot This can be used to restart the network drive after a firmware update. Make sure all current operations are completed before rebooting the device. 1. Click Reboot to restart the system. 2. Click OK three times to confirm the restart. 3. The system is now restarting. Please wait for about 60 seconds and then login again. Service Services can be enabled and disabled according to your personal requirements. In general, when a service is not in use, we recommend to disable it. DHCP Server In most cases, the DHCP server should be disabled in order not to interfere with your existing DHCP server. At home, your router will be assigning the IP address or in the office, most likely a dedicated DHCP server is already running. When the network drive is connected directly to your computer via patch cable or if there is no other DHCP server on the local network, the DHCP server will be enabled automatically (IP 169.254.0.1, Mask 255.255.255.0, Gateway N/A). SMB/FTP/WebDAV Service By default, Samba, FTP and WebDAV services are enabled, allowing you to view files directly in your browser (WebDAV Service), transfer files with an FTP application (FTP Service) or by mounting the network drive via SMB (SMB Service). If you only use one of these services, we recommend disabling the others for security reasons. You can always enable it again later. Media Service The UPnP-AV media server can be used to share your photos, music and videos that are stored on the network drive with an Xbox 360, PlayStation 3 video game console, WMP12 or other DLNA compatible devices that are connected to the same local network as well as stream music to iTunes media players. Share Management Account You can create a maximum of 16 accounts. For folders and account names, use only the English alphabet, without any special characters or spaces. The default account is created automatically. The user name is “guest” and no password has been set. Like any other account, you can modify, delete or disable it. Only the folders on the sharing list will be accessible on the network. Click on an account and then use the arrow buttons to add and remove the folders from that list. Deleting a folder will also erase all the files that are stored inside that directory! Adding and Modifying an Account 1. To create a new account, click the green plus sign. 2. Enter a name and a password for the user of the new account. Define the access rights for the new user, Read Only or Read/Write, and click Add. 3. Select the newly created account from the list and click on it to modify its settings. 4. You can modify the current settings and also create and manage the shared folders. Click Create to add a new folder or use the default folder that has been created with the new account. 5. Enter a name for the new folder (maximum 64 bytes) and click OK. 6. Select the new folder in the “Folder List” and then click the arrow key to move it to the “Sharing List”. Once it is in the “Sharing List”, the folder can be accessed by the selected user. 7. You can rename and remove the folders from the sharing list at any time. When you are done, click Return to close the window. Deleting a folder will also remove all the files in that directory! Server WebDAV Server The WebDAV server section displays the current port number and IP address of your WebDAV server. When you access the network drive from the local network, use the “Internal URL”. When accessing the network drive remotely, meaning not in the same local network as the device is connected to, use the “External URL”. The “Folder” icon on the landing page is a shortcut to open the WebDAV connection, so you don't have to login to “Settings” just to find out the correct URL. On Windows, when mounting the network drive via WebDAV, the file size for a single file is limited to 50MB! This is a limitation of the Operating System and not the network drive. Use the web browser to download the files instead or see http://support.microsoft.com/kb/900900 for more information about how to modify the registry on your Windows machine. FTP Server The standard port for the FTP service is 21. If required, you can change it and use any port number from 1025-65500, however generally, we recommend using the default port 21. When you change the port number for the FTP server, remember to adjust your firewall, otherwise, the FTPaccess will likely be blocked. By default, the encoding is set to English. If you want to store or transfer files with a different encoding (different language), choose the corresponding language from the drop down menu list. Click Apply to confirm the selection and change the language setting. If you are unclear about which encoding to select, click help for further details. In order to transfer and store the files, it is important that you select the correct language! Central Europe (CP1250) shqipe, hrvatski, čeština, Magyar, polski, română, srpski, slovenčina, slovenski Cyrillic (CP1251) Азәрбајҹан, Беларускі, български, македонски јазик, Қазақ, Кыргыз, Монгол хэл, русский, српски, Татар, україньска, Ўзбек Latin I (CP1252) Afrikaans, euskara, català, dansk, Nederlands, English, føroyskt, suomi, français, galego, Deutsch, íslenska, Bahasa Indonesia, italiano, Bahasa Malaysia, norsk (bokmål), norsk (nynorsk), Português, Español, Kiswahili, svenska Greek (CP1253) ελληνικά Turkish (CP1254) Azәrbaycanılı, Türkçe, U'zbek Hebrew (CP1255) עברית Arabic (CP1256) Baltic (CP1257) eesti, latviešu, lietuvių Vietnam (CP1258) Ti ng i t Thai (CP874) ไทย , ف ا سى,ل ع ب ية am Japanese Shift-JIS (CP932) 日本語 Simplified Chinese (CP936) 中文(简体) Korean (CP949) 한국어 Traditional Chinese (CP950) 中文(繁體) Media Server The UPnP-AV media server can be used to share your photos, music and videos that are stored on the network drive with an Xbox 360, PlayStation 3 video game console, WMP12 or other DLNA compatible devices that are connected to the same local network as well as stream music to iTunes media players. 1. From the drop-down list of the corresponding list, select the folder where your media files (e.g. photos, music, videos) are stored. 2. Repeat the previous step for each media type (photo, music, video). Depending on the video game console, only certain media files can be accessed. For the Xbox 360, you can play JPG, MP3 and WMV files. For the PlayStation 3, you can play JPG, MP3, MPEG-1 and MPEG-2 files. iTunes will only be able to play MP3 music files. iTunes Playlist Whenever you add or remove MP3 files to the music directory, click Build to refresh the database. If for some reasons, iTunes lists files that no longer exist or some files are missing, click Remove to clear the database and then click Build to build a new database. Frequently Asked Questions Login I forgot my login, what do I do? If you lost the administrator’s password, press and hold the reset button, turn on the device and wait for 5 seconds. Release the button and the device will reset all settings back to its factory default setup. The default login is admin/admin. I cannot access the web configuration interface, what’s the correct IP? See How to Login. If none of these instructions help, reset your device. Which ports do I have to open on my firewall? Depending on the services that are used, the following TCP ports will have to be opened for the network drive: FTP port 21, SMB ports 137-139, HTTP port 80 and UDP port 14675 for the Nettool utility. Additionally, port 6881 is required for the BitTorrent client. File Access FTP access on my Mac doesn’t work properly! The FTP utility on the Mac is able to read the data on the network drive but cannot write new data to the drive. To upload files, please install a dedicated FTP application. Why can I not delete or modify the content via USB? If you encounter problems when accessing the drive via USB, please scan the disk for errors. For Windows users, right-click on the drive and select “Properties”. Go to “Tools” and under “Error-checking” click Check now. Select “Automatically fix file system errors” and click Start. Can I use the device as USB and network drive at the same time? No, it can only be used either as a USB drive or as a network drive but not both at the same time. When both cables are connected, the USB connection will have priority. I’ve connected the USB cable but it does not show up on my computer! If the device is currently used as a network drive, it has to be restarted first. How can I delete files in the Folder view? The Folder view only allows you to upload and view the files. To delete and manage the files, use an FTP client or mount the network drive via WebDAV or SMB. When mounting the drive, the main difference for SMB is that both the network drive and the computer have to be on the same local network, whereas for WebDAV it also works when done remotely (loading and transfer speed are usually slower when done outside the local network). For more details, see Mapping a Network Drive on a PC or see WebDAV on a Mac. Miscellaneous Does the device support SSH or Telnet access? No, it does not support SSH, Telnet or TFTP access. The NAS does not recognize my HDD. The network drive can only access the first partition and it has to be formatted using the exFAT file system. We recommend to always use the disk utility of the network drive to format the drive. I formatted the HDD via USB but the NAS does not work properly! The network drive is only able to recognize the first partition and for the NAS system, it has to be exFAT! If you intend to use the drive for your NAS and not only when it's connected via USB, we strongly recommend that you format the drive using the disk utility of the NAS. Login as administrator, go to “System settings” and select “Maintain”. Select “Disk” and click Format. This will erase all existing data on the hard drive and create a single partition using FAT64 (exFAT). Q: Why is there no PDF manual? Each product includes a quick installation guide, helping you to setup and familiarize yourself with the hardware. For the software, all information can be found on this Wiki. There is no PDF manual because the software is often updated and both features and functions may change with each update. A PDF manual would quickly be outdated and the information might no longer match the current product. However, the Wiki will always be kept up to date and you can access it any time you need to. If you like to read some of the information offline, please select the “export: odf” or “export: pdf” tab at the top of the Wiki to save the current page on your computer or use the “Book creator”, also on the top of the Wiki, to create a PDF booklet with multiple pages.