1
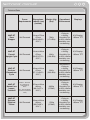
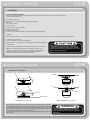
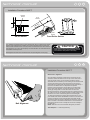
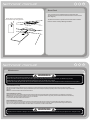
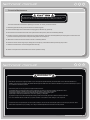
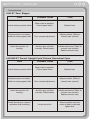
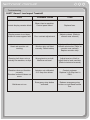
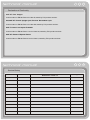
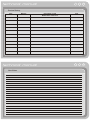
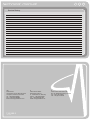
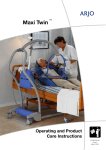
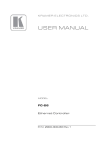
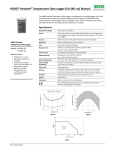
F-ST & F-T technical
TECHNICAL USER MANUAL
Technical
manual
01
Contents
P02
General Safety Precautions
P10
Maintenance
P03
Introduction
P11
Corrective Maintenance
P04
Technical Data
P12
Warranty
P05
Installation
P13-15
Troubleshooting
P06
Installation Procedure
P16-17
Declaration of Conformity
P07-08
Installation Procedure (260F-T)
P18-19
Service History
P09
Smart Card
Assembly manual
Technical
manual
02
GENERAL SAFETY PRECAUTIONS
The successful and safe operation of Pulse Fitness Equipment is dependent upon its proper handling, installation
operation and maintenance.
The following safety precautions are for your safety and guidance. Please read them carefully before proceeding to install and/or operate
Pulse Fitness Equipment. Specific safety notices are included in the text where appropriate.
!
Read through this operating handbook to familiarise yourself with the equipment.
!
Ensure that all users of the equipment are familiar with these safety precautions and operating procedures.
!
Persons who are generally unfit (i.e. have not taken regular exercise for some time) should seek expert advice before using this
equipment. Similarly, persons with known medical conditions (e.g. angina, asthma, high blood pressure, etc.) should seek
medical advice.
!
Always warm up by exercising gently before progressing to a full program of strenuous exercise. Similarly, reduce
your level of activity gradually towards the end of your exercise program.
!
NOT suitable for Medical/Therapeutic purposes.
!
If you feel light-headed, dizzy or suffering from any kind of pain whilst exercising, STOP IMMEDIATELY.
!
NEVER operate Pulse Fitness Equipment with the Side Panels removed.
!
Do not drink from bottles or cups with out a lid. Do not place cups / bottles anywhere on the machine except from in the supplied
bottle holder.
!
Keep an area of 1 metre clear around Pulse Fitness Equipment when operational.
!
WARNING, Excessive or incorrect training can be detrimental to your health.
!
Don’t allow children to train on Pulse Fitness Equipment.
!
Exchange faulty parts IMMEDIATELY with ONLY genuine Pulse Fitness parts. Do not use equipment until repaired.
Assembly manual
Technical
manual
03
Introduction
Pulse Fitness Equipment is sophisticated heavy duty
exercise machines, designed specifically for use in a Health &
Fitness type environment. All machines are suitable for both
aerobic/anaerobic exercise and general athletic fitness
training or weight-loss programs.
220
‘Pace’ Stepper
240
‘Pursuit’ Upright Cycle
250
‘Perform’ Recumbent Cycle
260
‘Ascent’ Low impact Treadmill
280
‘Extreme’ Elliptical Trainer
Features
1
User-friendly multi-language program control panel.
2
Large TFT Colour graphic display screen.
3
Six operating modes.
4
Microprocessor-controlled electronics for reliability and
accuracy of data.
5
Ergonomically-designed user position.
6
Low maintenance requirements.
7
Hand-Pulse sensors as standard, with a Heart Rate receiver
integrated into the console. A transmitter belt can be
supplied as an optional extra.
8
Data can be displayed in either imperial or metric units.
Technical
manual
04
Technical Data
Power
Dimensions
Requirements (LxHxW) (cm)
(inches)
220F-ST
'Pace'
Stepper
240F-ST
'Pursuit'
Upright Cycle
250F-ST
'Perform'
Recumbent
Cycle
260F-ST
'Ascent' low
Impact
Treadmill
280F-ST
'Extreme'
Elliptical
Trainer
Self Powered
Self Powered
Self Powered
UK/Euro - 220-240V
AC, 50/60Hz, 8A,
1.5kW (3HP) AC
Motor.
US - 120V AC@60Hz
1500W 20A (Dedicated
outlet)
Self Powered
101cmx175cm
x70cm
(39.8”x68.9”x
25.2”)
101cmx146cm
x70cm
(39.8”x57.5”x
25.2”)
145cmx125cm
x70cm
(57.1”x49.2”x
25.2”)
227cmx145cm
x82cm
(89.4”x57”x
32.3”)
230cmx160cm
x90cm
(90.6”x63”x
35.4”)
Weight (Kg)
(lbs)
78Kg
(171.6lbs)
62Kg
(136.4lbs)
92Kg
(202.4lbs)
260Kg
(572lbs)
170Kg
(374lbs)
Operational
Environment
Temperature:
-10deg to
+40deg.
Humidity: Up
to 95% relative
humidity, noncondensing
Temperature:
-10deg to
+40deg.
Humidity: Up
to 95% relative
humidity, noncondensing
Temperature:
-10deg to
+40deg.
Humidity: Up
to 95% relative
humidity, noncondensing
Temperature:
-10deg to
+40deg.
Humidity: Up
to 95% relative
humidity, noncondensing
Temperature:
-10deg to
+40deg.
Humidity: Up
to 95% relative
humidity, noncondensing
Displays
A/V Display:
185mm TFT
A/V Display:
185mm TFT
A/V Display:
185mm TFT
A/V Display:
185mm TFT
A/V Display:
185mm TFT
Technical
05
manual
Installation
Pulse Fitness Machine Package
Before commencing installation, check that all parts and accessories have been supplied. The complete package
should include the following:
1 - Pulse Fitness Machine
2 - Integral mains cable with moulded plug fitted. (F-T Models)
UK - 13A
Euro - Schuko CEE7
USA - 5-15p 15A
3 - Technical manual (This document)
4 - Assembly user manual
5 - Console user manual
Contact your supplier immediately if any of these components are missing.
Location
Select a suitable location for your fitness equipment before moving it. The site you choose should meet the following requirements:
!
!
!
!
A flat, level and clean surface.
Close to a suitable mains socket. (F-T Models)
Well away from sources of water (or other liquids) or in an area that is subject to
Condensation.
Away from direct sunlight (this can make it difficult to view the TFT screen).
NOTE: Your Pulse Fitness equipment is not suitable for outdoor use.
Once the location has been chosen, your Pulse fitness equipment can be
Situated in the desired location. If the chosen surface is carpet then
your equipment can be pushed to the desired position.
Technical
This equipment is heavy! We do not recommended
attempting to lift it without assistance, at least 4 people
should lift any Pulse Fitness equipment when neccesary.
NEVER attempt to lift any of the equipment by the control
panel or the plastic rear panels.
manual
06
Installation Procedure
Locknut
Locknut
Anti-Slip Pad
F-ST Range Feet Adjustment
Once your Pulse Fitness equipment has been sited you must ensure that it is stable. If
necessary, adjust the height of the feet to compensate for any unevenness in the floor.
Turn the feet to the left or right to increase or decrease the height as appropriate. (See
diagram) When satisfied, securely fasten the locknut up against the Feet Strut and
place the Rubber Anti-Slip Pads underneath the feet.
To protect the paintwork from sweat, wipe down the metal frame with a wax/siliconebased polish.
260 F-T Treadmill Feet Adjustment
WARNING
When installing or adjusting any piece of Pulse
Fitness equipment, DO NOT leave any adjustment
devices projecting which could cause injury to any
third party.
Technical
manual
07
Installation Procedure 260F-T
ON/OFF
Switch
Front
Wheels
Roller
Guides
On/Off Switch
Front Roller Guides
The Treadmill is delivered with a mains cable which has a moulded plug already
fitted. Plug the Treadmill into a suitable mains socket and then switch on the power.
Switch on the Treadmill via the on/off (I/0) switch mounted at the front of the machine.
(See diagram) The control panel display should illuminate. This indicates that the
Treadmill is now ready for use.
CAUTION
Ensure that the mains cable is routed in such a way
that it does not create a potential hazard to users of
the Treadmill or other persons in the vicinity.
Belt alignment should now be checked before use. (See diagram on next page)
Assembly manual
Technical
manual
08
Installation Procedure 260 F-T
Belt Tension / Alignment
Belt Alignment
Once the belt is aligned the overall tension of the belt can be
checked to make sure that it does not slip on the rollers, this is
done as follows; Firstly, run the machine at 5 kph/3 mph as
described above, and whilst you are walking on the machine hold
onto the side rails and try to stop the belt from moving using
reasonable force (Take great care when doing this procedure). If
the belt is not effected, then no adjustment is required.
However if the belt slips then use the Allen key to adjust both
tension bolts (see diagram), increase the tension of the bolts
equally by turning them no more than half a turn at a time.
Re-check the tension of the belt after each turn until the belt won’t
slip, (take care not to over tighten the belt as it may stretch). Once
the tension is correct, check the alignment of the belt again.
To check the belt alignment, firstly switch the machine on and
press START, then select QuickSTART and enter 10 min. Run the
machine at 5 kph/3 mph and with the Allen key adjust the left
hand tension bolt (as shown in diagram) turn the bolt 1/4 turn at a
time to increase or decrease the belt tension. The belt will move
either left or right and once correctly set should run centrally in
the walk way.
NOTE: Take care not to touch the belt during this procedure
Tools Required - 1 x Allen Key Allen Key.
Assembly manual
Technical
manual
09
Smart Card
Your Console can be updated using the Smart Card slot.
The Smart Card slot can be found at the bottom of the Console.
(See diagram).
Smart Card is to be inserted with
the information chip facing upwards.
Technical
The Smart Card will incorporate the new Performance Tracker,
Personal Trainer and Gym Manager Software.
manual
10
Maintenance
WARNING
This equipment contains hazardous voltages and controls hazardous rotating mechanical parts.
Switch off and disconnect the machine from the mains supply before carrying out any maintenance procedures. (F-T Models only, powered)
NEVER switch on any of the machines while the side panels are removed. (F-T Models only, powered)
ALWAYS replace faulty/damaged parts with new genuine Pulse Fitness parts and never use the Pulse equipment until the machine has been fully repaired.
Routine Maintenance - Daily
Wipe down the equipment’s side panels, foot mouldings, console and hand grips everyday using a mild soap solution on a damp cloth. Wipe
Dry with a soft cloth. In addition to this, spray the metal frame (but not the control panel) with a proprietary silicone-based polish and wipe off with a dry
soft cloth.
NOTE: Do not clean the frame with water-based solutions.
Routine Maintenance - Weekly
Thoroughly clean the entire machine using the same cleaning methods as for the Daily Clean. Inspect the frame for rust, bubbling or paint chips.
NOTE: This check is important as perspiration will corrode damaged or unpainted surfaces very quickly. Therefore this maintenance check will help
to maintain the clean and professional appearance of your machines.
Do not clean the frame with water-based solutions.
Routine Maintenance - Quarterly
Because of the amount of pressure which is exerted onto the trainers through heavy exercising, it is possible (although unlikely) for fasteners to
become loose. Therefore it is necessary to do a visual or tool check with the necessary spanners or allen keys that all following nuts and bolts are
Tight; Foot mouldings/Pedal Nuts & Bolts, Handlebar Bolts, Console Bolts, Condition of Handlebars.
WARNING
Regularly check the machine for damage, wear, general smooth and safe operation. DO NOT use the machine if any part appears worn, damaged or faulty.
Assembly manual
Technical
manual
11
Corrective Maintenance
The PCB contains components that are sensitive to static charges. Do not touch any of the
components on the PCB or the PCB itself when removing or refitting the connectors.
Corrective maintenance is limited to replacing the console. To do this, proceed as follows:
1 - Read through all the following instructions before commencing work.
2 - Ensure that the equipment is switched off and unplugged (F-T Models only, powered).
3 - Remove the four screws that secure the control panel to the bottom panel. (As shown in Assembly Manual).
4 - Hold the consoll in a vertical position (take care not to strain the cables, as shown in Assembly Manual) and unplug the connectors from the
printed circuit board (PCB). Lift the control panel away and store in a safe place.
5 - Attach the connectors to the new console as shown in Assembly Manual.
6 - Place the console onto the support post, taking care not to trap any of the cables and then press firmly into position.
7 - Refit the screws at back of console and tighten them securely.
8 - Switch on the power and check that the new console operates correctly.
Technical
manual
12
WARRANTY
!
!
!
!
!
!
!
!
Pulse Fitness warrants to the original purchaser only of new equipment purchased directly from Pulse Fitness or from authorised distributors or
resellers, for its own use not for resale, that all Pulse Fitness equipment shall be free from defects in materials for 2 years and workmanship for a period
of 12 months from the date of purchase.
This warranty does not cover any part of the equipment which has been:
(A) Modified, altered or subjected to abuse, misuse, negligence or accident, or improperly operated, maintained or stored.
(B) Improperly installed or installed in conjunction with any equipment for which it was not designed.
(C) Repaired or replaced by any party other than Pulse Fitness or its authorised service agents.
(D) Damaged or destroyed by disasters such as fire, flood, lightning or earthquake.
(E) Subject to usage or wear above that expected as being normal in the warranty period and classed as wear and tear items.
In no event shall Pulse Fitness be liable for any special, incidental, consequential or other damages, costs or expenses.
If a defect involves a components part or accessory that is already in service and can reasonably be replaced or serviced by the purchaser, Pulse
Fitness will be responsible only for providing, at no charge, a suitable replacement and instructions for the purchaser.
Technical
manual
13
Troubleshooting
220F-ST ‘Pace’ Stepper
Fault
Probable Cause
Cure
Control display remains blank
Blown fuse in machine.
Control panel failed.
Replace fuse.
Poor contrast adjustment
Adjust contrast. (Refer to
console user manual)
Display screen is not clear,
flickers or areas appear faint
Heart rate monitor not
working
Monitor strip not fitted
correctly. Failed battery
Adjust position of strip and/or
moisten electrodes. (Refer to
console user manual).
Replace monitor strip.
240/250F-ST ‘Pursuit’ Upright Cycle/’Perform’ Recumbent Cycle
Fault
Probable Cause
Cure
Control display remains blank
Blown fuse in machine.
Control panel failed.
Replace fuse.
Display screen is not clear,
flickers or areas appear faint
Poor contrast adjustment
Adjust contrast. (Refer to
console user manual)
Heart rate monitor not
working
Monitor strip not fitted
correctly. Failed battery
Adjust position of strip and/or
moisten electrodes. (Refer to
console user manual).
Replace monitor strip.
Loose crank bolt
Remove plastic cap from
centre of pedal crank and
tighten bolt.
Pedal 'knocking' or uneven
operation when pedaling
Technical
manual
14
Troubleshooting
260FT ‘Ascent’ Low Impact Treadmill
Fault
Probable Cause
Cure
Control display remains blank
Blown fuse in machine.
Control panel failed.
Replace fuse.
Poor contrast adjustment
Adjust contrast. (Refer to
console user manual)
Display screen is not clear,
flickers or areas appear faint
Adjust position of strip and/or
moisten electrodes. (Refer to
console user manual).
Replace monitor strip.
Heart rate monitor not
working
Monitor strip not fitted
correctly. Failed battery
Running belt does not run
centrally on machine, or slips
Wrong tension on belt.
Machine not level.
Adjust tension of belt or
adjust feet to level machine.
(Refer to technical manual)
Elevation does not function
correctly.
Elevation locks and does not
move.
Actuator not calibrated.
3.15 Amp fuse blown.
Contact engineer.
Replace 3.15 Amp fuse in
P.S.U
Emergency stop button
activated.
Release emergency stop
button on right hand handle
bar.
Belt does not run
Technical
manual
15
Troubleshooting
280F-ST ‘Extreme’ Elliptical Trainer
Fault
Probable Cause
Cure
Control display remains blank
Blown fuse in machine.
Control panel failed.
Replace fuse.
Display screen is not clear,
flickers or areas appear faint
Poor contrast adjustment
Adjust contrast. (Refer to
console user manual)
Heart rate monitor not
working
Monitor strip not fitted
correctly. Failed battery
Technical
Adjust position of strip and/or
moisten electrodes. (Refer to
console user manual).
Replace monitor strip.
manual
16
Declaration of Conformity
EC Declaration of Conformity Standards Route to Compliance
Directive
Test Name
Standard
Year
Low Voltage Directive
73/23/EEC
Safety requirements for
mains operated electronic
and related apparatus for
household and similar use
EN60065
1998
EMC Directive
89/336/EEC
Generic Emissions
EN50081-1
1994
Generic Immunity
EN50082-1
1998
Specification for safety of
household and similar
electrical appliances
EN60335-1
1995
Low Voltage Directive
73/23/EEC
and therefore is in conformity with the production requirements of council directives 73/23/EEC and 89/336/EEC
on the approximation of laws of the member states relating to Electrical Safety and Electromagnetic compatibility.
Technical
manual
17
Declaration of Conformity
220F-ST ‘Pace’ Stepper
Conforms also to EN 957 Part 8 for Class S, tested by TUV product services.
240/250F-ST ‘Pursuit’ Upright Cycle/’Perform’ Recumbent Cycle
Conforms also to EN 957 Part 5 for Class SA, tested by TUV product services.
260F-T ‘Ascent’ Low Impact Treadmill
Conforms also to EN 957 Parts 1 & 6 for Class SA, tested by TUV product services.
280F-ST ‘Extreme’ Elliptical Trainer
Conforms also to EN 957 Parts 5 & 9 for Class S, tested by TUV product services.
Technical
manual
18
Service History
Date
Machine
Description of fault
Maintenance carried out
Sign
Technical
manual
19
Service History
Date
Technical
User Notes
Machine
manual
Description of fault
Maintenance carried out
Sign
20
Technical
manual
21
Service History
GB
Pulse Fitness
The Bromley Centre, Bromley Road,
Congleton, Cheshire, CW12 1PT.
Tel: +44(0)1260 294600
Fax: +44(0)1260 299282
Email: [email protected]
135-398-3
Dc1170
D
Pulse Fitness GmbH
Rombacher Hütte 10
D - 44795 Bochum, Germany
Phone.: +49 (0)234-43623
Fax: +49 (0)234-9431330
Email: [email protected]
S
Pulse Fitness Scandinavia AB
Box 70, 25054 Helsingborg, Sweden
Tel: +46 (0) 42 164075
Fax: +46 (0) 42 164076