1
OSAS Web B2B
User’s Manual
OPEN SYSTEMS® Accounting Software
OSAS® Web B2B
User’s Manual
OSAS Web B2B User’s Manual
© 1998, 2001 Open Systems Holdings Corp. All rights reserved.
Document Number 2210.OW61
No part of this manual may be reproduced by any means without the written permission of Open Systems, Inc.
OPEN SYSTEMS and OSAS are registered trademarks and Resource Manager, Resource Manager for
Windows, and Report Writer are trademarks of Open Systems Holdings Corp. BBx is a trademark and PRO/5
and Visual PRO/5 are registered trademarks of BASIS International Ltd. Novell and NetWare are registered
trademarks of Novell, Inc. Microsoft, Windows, Windows 95, Windows 98, Windows NT, Windows 2000 and
MS-DOS are either trademarks or registered trademarks of Microsoft Corporation. Adobe and Acrobat are
registered trademarks of Adobe Systems, Inc. TrueType is a registered trademark of Apple Computer, Inc.
Printed in U.S.A. This manual is recyclable.
March 2001, Release 6.1
This document has been prepared to conform to the current release version of OPEN SYSTEMS Accounting
Software. Because of our extensive development efforts and our desire to further improve and enhance the
software, inconsistencies may exist between the software and the documentation in some instances. Call your
customer support representative if you encounter an inconsistency.
Open Systems, Inc.
1157 Valley Park Drive
Suite 105
Shakopee, Minnesota 55379
General Telephone
(952) 403-5700
General Fax
(952) 496-2495
Support Telephone
(800) 582-5000
Support Fax
(952) 403-5870
Internet Address
www.osas.com
OSAS Web B2B User’s Manual
Contents
Introduction
Welcome to OSAS®
The OSAS Web B2B System
Conventions
OSAS Graphical
OSAS Text
Reports
1-3
1-5
1-11
1-15
1-37
1-49
Installation and Setup
Installing The Web Server
Installing OSAS Web B2B
2-3
2-5
File Maintenance
Item Group Codes
Inventory Item Pictures
Internet Inventory Item Groups
Customer Internet Access Codes
Customer Groups
Tables
3-3
3-7
3-11
3-15
3-23
3-27
Set Up Web Components
Create Login Page
Install Web Server Components
4-3
4-5
Sales Order Processing
Transaction Journal
Build Sales Orders from Remote Files
Purge Log File
OSAS Web B2B User’s Manual
5-3
5-7
5-11
iii
Remote Access
Copy Data Files to Web Server
Copy OSAS Programs to Web Server
6-3
6-7
Master File Lists
Item Group Codes List
Inventory Item Pictures List
Internet Companies List
Internet Inventory Item Groups List
Internet Access Codes List
Customer Groups List
Tables List
7-3
7-7
7-11
7-15
7-19
7-23
7-27
The Web Interface
OSAS Web Login Page
Account Information
Aged Trial Balance
History Inquiry
Invoice Inquiry
Item Inquiry
Order Inquiry
Order Entry
8-3
8-7
8-9
8-11
8-13
8-17
8-25
8-29
References
System Messages
Common Questions
List of Files Copied
Editing Files
Files for Remote Access
Basic Web Utility Guide
Overview of the Basic Web Utility and CGI
Data Templates
Sample Program Reference
Suggestions and Tips
Standard Structure Options
HTTP Cookies
iv
A-1
B-1
C-1
D-1
E-1
F-1
F-3
F-17
F-21
F-37
F-39
F-41
OSAS Web B2B User’s Manual
Automatic Session Tracking
File Uploading Support
Global String Reference
Toolkit Program Reference Overview
Toolkit Program Functional Listing
F-43
F-45
F-47
F-51
F-55
Index
OSAS Web B2B User’s Manual
v
OSAS Web B2B User’s Manual
Introduction
Welcome to OSAS®
The OSAS Web B2B System
Conventions
OSAS Graphical
OSAS Text
Reports
OSAS Web B2B User’s Manual
1
1-3
1-5
1-11
1-15
1-37
1-49
1-1
Welcome to OSAS®
The OPEN SYSTEMS® Accounting Software (OSAS) product line consists of
several accounting applications. Each application addresses a different phase of
your financial operations. Together, they form a powerful accounting solution to
your daily and periodic accounting needs.
Customer Support
Open Systems has a strong commitment to customer service and product quality. If
you have difficulty in using Open Systems products, consult the user’s manual and
other OSAS reference materials. If you need more information, consult a customer
support representative.
OSAS Overview
Resource Manager
The Resource Manager application is the foundation or shell of OSAS; it provides
the operating environment that holds the other applications. Resource Manager
also includes three powerful business features: Global Inquiry, Executive
Information Summary (EIS) and Print Manager. With Global Inquiry, you can drill
around your accounting data to find selected information throughout your system.
With EIS, you can access company information quickly and view summaries of all
aspects of a company or a group of companies. With Print Manager, when you
print reports to file, your reports can be stored, sorted, printed, and searched for
specific text.
Base Applications
Base applications are designed and produced with the largest possible number of
industries in mind. They are most effective when you interface them with each
other. Base applications are usually named after common accounting operations.
Examples are: General Ledger, Accounts Payable, Purchase Order, Accounts
Receivable, Sales Order, Payroll, and Inventory.
OSAS Web B2B User’s Manual
1-3
Welcome to OSAS®
Introduction
OSAS Web B2B
The OSAS Web B2B application provides an interface between an Internet web
server and your OSAS data files. With OSAS Web B2B, your customers can access
their account information, order statuses and your inventory information using the
Internet. They can also place orders through the Web. You can control and limit
which of your customers can access your data, and the information to which each
customer has access.
OSAS Versions 6.1 and Higher
You can use OSAS versions 6.1 and higher in text (or character-based) mode on
any supported operating system.
In Windows environments, you have the choice to use either the text version or the
graphical version. While the interface is different in the two versions, the functions
in both versions are the same in screen layout and in function. The OSAS user’s
manuals show screens in the graphical format. You should be able to apply the
information shown in the graphical examples to the text version with ease.
For specifics on using the graphical version of OSAS, refer to page 1-15.
For specifics on using the text version, refer to page 1-37.
1-4
OSAS Web B2B User’s Manual
The OSAS Web B2B System
B2B is a software industry term that describes web-based systems that facilitate
business-to-business transactions. OSAS Web B2B is just such a system. You can
use the OSAS Web B2B application to allow your customers access to selected
information from your OSAS data files with any web browser. Your customers can
also use the OSAS Web B2B system to enter sales orders into your system through
the Internet.
You must have Internet access and Internet server software in addition to OSAS
Web B2B. The Internet server software you use must support Standard CGI
scripting in order to use it with OSAS Web B2B.
Note
CGI is an acronym for Common Gateway Interface, a method of communicating
information from one web page to another. There are two types of CGI scripting
standards: Windows CGI and Standard CGI. OSAS Web B2B uses Standard CGI.
A familiarity with HTML (Hypertext Markup Language) is recommended if you
want to modify the web pages constructed by the Create OSAS Web B2B Login
Page and Install Web Server Components functions.
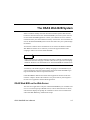
OSAS Web B2B is different from other OSAS applications because of the web
interface. It helps to think of the software as two pieces that are joined together—
the web server application and the OSAS application.
OSAS Web B2B on the Web Server
The web server application is the part of OSAS Web B2B that your customers will
see. It is a connected group of HTML screens, some of which function as menus,
and others that display and prompt for information. These screens communicate
with OSAS Web B2B using standard CGI scripts.
OSAS Web B2B User’s Manual
1-5
The OSAS Web B2B System
Introduction
Your Internet server software must be installed and configured on the web server
before you begin to use OSAS Web B2B. The web server can be located on the
same computer that you run OSAS on, or it can be located on a different computer.
If you choose to use a different computer for a web server, you must be able to
communicate between your OSAS system and the web server through a network or
modem connection.
The web server and OSAS must be able to communicate because OSAS Web B2B
provides several functions that move data files and programs from OSAS to the
web server and back again.
If you run your web server on a different system than OSAS, and the two systems
cannot communicate directly, you will need to move these files and programs
manually using software designed for that purpose, such as FTP (File Transfer
Protocol) software.
For details about the HTML screens used with OSAS Web B2B, see chapter 8.
OSAS Web B2B Functions in OSAS
The OSAS side of OSAS Web B2B includes several functions that you use to set
up and maintain the web server side, including:
•
•
•
•
1-6
creating your login page
determining which inventory items are accessible
granting access to your customers by assigning them passwords
moving information between your OSAS system and the web server
OSAS Web B2B User’s Manual
Introduction
The OSAS Web B2B System
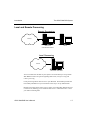
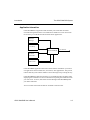
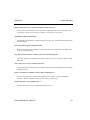
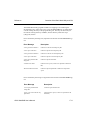
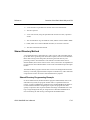
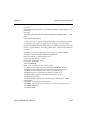
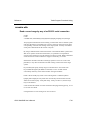
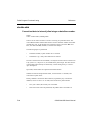
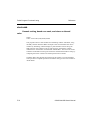
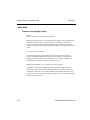
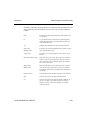
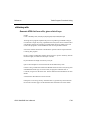
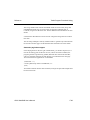
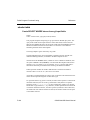
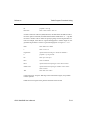
Local and Remote Processing
Remote Processing
Internet
Web Server
with Firewall Protection
OSAS
Local Processing
Internet
Web Server and OSAS
You can control how the data on your system is accessed when you set up OSAS
Web B2B. You have two options regarding data access, local processing and
remote processing.
Local processing allows direct access to your data files. This method provides the
most timely information to your customers and is easy to set up and maintain.
Remote processing allows access only to copies of your data files. Remote process
is more secure, allowing you to isolate the web server—and Internet users—from
your other accounting data.
OSAS Web B2B User’s Manual
1-7
The OSAS Web B2B System
Introduction
The method that you choose determines the tasks you need to perform to maintain
the OSAS Web B2B system.
OSAS Web B2B Menu Structure
The OSAS Web B2B menu structure is similar to the structure of other OSAS
applications: functions appear roughly in order of use.
Sales Order Processing
Use the Sales Order Processing functions to process and track the orders entered
through the web server. You can produce a list of new orders and purge the order
log. You can also copy the orders to your OSAS data files if you are using remote
processing.
Remote Access
Use the Remote Access functions to copy data files and programs to the web server
if you are using remote processing.
File Maintenance
Use the File Maintenance functions to establish groupings for Inventory item
display, to add references to graphical pictures of items, and to set up and establish
access to your item and customer information.
Setup OSAS Web B2B Components
Use the Setup OSAS Web Components functions to create your Web Login Page
based on the criteria you set up through File Maintenance, and to install the OSAS
Web components on your web server.
Master File Lists
Use the Master File Lists functions to produce listings of the information you
entered using the File Maintenance functions. Use the lists to verify your entries or
for future reference.
1-8
OSAS Web B2B User’s Manual
Introduction
The OSAS Web B2B System
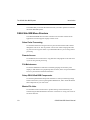
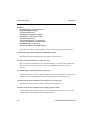
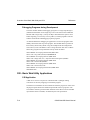
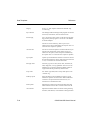
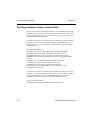
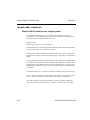
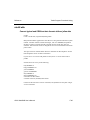
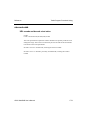
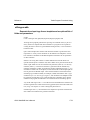
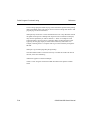
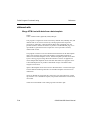
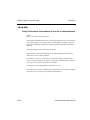
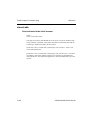
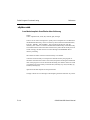
Application Interaction
OSAS Web B2B is an application that translates your OSAS data into fields
accessible through the Internet. The information available for access comes from
the Inventory, Accounts Receivable and Sales Order applications.
Resource
Manager
Inventory
The Internet
OSAS Web B2B
Accounts
Receivable
Sales Order
OSAS Web B2B’s application interaction means that the information you enter in
one application can be transferred to, and used in, other applications. This process
reduces data entry time and the number of errors that might creep in along the way.
OSAS Web B2B uses data from Inventory, Accounts Receivable, and Sales Order,
displaying this information to users on the Internet requesting the information from
your web server. In return, sales orders entered through OSAS Web B2B update
your Sales Order files.
You can control which files and data are available to Internet users.
OSAS Web B2B User’s Manual
1-9
Conventions
Your manual will help you install OSAS on any standard machine within many
popular operating systems and help you with your accounting software questions.
In the manual, we use the term “Conventions”, or standards, to help describe
complicated processes, new terms, and to help you use your OSAS applications.
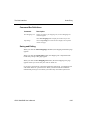
Manual Conventions
The Bank Reconciliation User’s Manual is divided into the following sections:
•
“Introduction” provides an overview of this application and the OSAS system,
and the basic functionality of the application including graphical and textbased application features, and function key references.
•
“Application functions” explains the functions within the application, where
each function fits within the application, and how to use each function to get
the most out of the application.
Mouse Conventions
The standard mouse has two buttons, left and right, each performing certain
functions. In this manual, we use these terms for using the mouse: click, right-click,
double-click, and deselect.
The click is a single press on the left mouse button. Place the cursor over the
desired function, and press the left button to enable, or “select”, that function.
A right-click is a single press of the right mouse button.
To double-click, move the cursor over the desired function, and quickly press the
left mouse button twice. If there is too long a pause between clicks, the computer
may interpret your action as two separate clicks and may not perform the desired
function.
OSAS Web B2B User’s Manual
1-11
Conventions
Introduction
To deselect an object, move the cursor off the icon or folder onto a blank space
within the window and press the left mouse button.
Note
Some mouse manufacturers allow you to change the function of the mouse
buttons for those who prefer (for example) to use the mouse with their left hand.
In this case, reverse the commands when you use them. For example, a click
refers to a single press of the right mouse button, while the term right-click refers
to a single press of the left button, and so on.
OSAS Conventions
Operations in OSAS follow conventions, or patterns. The conventions used in
OSAS applications are presented below.
Running OSAS
OSAS runs in an operating system supported by 150 megabytes of permanent
storage and 4MB of RAM. You may need additional space or memory, depending
on the size of your data files and the operating system you use. Consult your
reseller for more information.
Starting OSAS
To start OSAS on a computer running Windows, double-click the OSAS shortcut
on the desktop or in the appropriate folder.
To start OSAS on an operating system other than Windows, enter osas at the
operating system prompt.
The osas command can recognize three parameters: -t, -c, and -a.
1-12
OSAS Web B2B User’s Manual
Introduction
Conventions
The terminal ID (-t) is the identification code assigned to the terminal you are using
to run OSAS. On multiuser systems each terminal usually has a default ID that was
assigned to it when the terminals was added to the system. Use the -t parameter
only when you want to log on with an ID other than the default ID. The terminal
parameter is valid only if you are using Resource Manager for LANs.
The company ID (-c) is the identification code assigned to a company. If your
system carries two or more companies and you do not enter a company ID, the
menu of the company entered by the last person who used the terminal appears.
The access code (-a) is your personal password. Refer to the Resource Manager
User’s Manual for information about assigning passwords.
The most general expression for getting into OSAS takes all the parameters into
account. For example, if you are on terminal 2, you want to work with company B,
and the password is selena, specify that information to enter the system:
osas -t T2 -c B -a selena
In UNIX you can enter the parameters in any order, and you can use any
combination. You must leave a space between the parameter mark (-t, -c, or -a) and
the parameter itself.
In Windows you can click on the shortcut’s properties and, in the Target field, enter
your access code and your company ID. For example, using selena as your access
code and H as your company ID, enter
C:\osas\progRM\osastm.exe -m4096 -tT00 -nT00 - -aselena -cH
In the Windows icon properties, the parameter marks (-m, -t, or -n) can be entered
in any combination but must be before the separation dash. The access code and
company ID commands (-a and -c) must be entered after the separation dash.
GUI/Text Command Conventions
When you see the phrase “use the Proceed (OK) command” in the user’s manuals,
you can press the PgDn key in either text or graphical mode. In graphical mode,
clicking the OK button has the same effect as pressing the PgDn key.
OSAS Web B2B User’s Manual
1-13
Conventions
Introduction
Menu Conventions
When you start OSAS, the Main menu, which presents the applications you can
use, appears. If you are using the Resource Manager for UNIX or Linux, the Text
menu appears.
If you are using the Resource Manager for Windows, you can choose between the
Text menu, the Graphical menu, or the Start-style menu. In Windows, use the
Workstation Configuration Defaults function (see the Resource Manager User’s
Manual) to select the style of menu you want displayed by default, or you can press
Shift-F5 to toggle between the menu styles from any menu. You can use any of the
menus regardless of whether you use the text or graphical modes for the OSAS
functions.
Favorites Menu
The Favorites menu operates in any of the menu formats. The Favorites menu
allows quick and easy access to the OSAS functions you use most, allowing you to
add selections for entire menus or particular functions.
With the Favorites menu, you save time in no longer switching to and from
commonly accessed applications. For example, if you perform tasks in several
applications, such as Transactions and Cash Receipts in Accounts Receivable, GL
Account maintenance in General Ledger, and Price and Item Inquiry functions in
Inventory, you can set up a Favorites menu rather than moving between each
application’s menus. Once you have set up your Favorites menu, you can open a
function for use with one press of the Enter key or the click of a mouse button.
Favorites Menu: Graphical Style
For a sample of the Start-style favorites menu, see page 1-25. For a sample of the
text favorites menu, see page 1-39.
1-14
OSAS Web B2B User’s Manual
OSAS Graphical
In a Windows environment, you can choose from two types of graphical-style
menus. The standard Graphical menu features application selections that resemble
many Windows functions. The Start-style menu is named because of its functional
resemblance to the Start menu in Windows 95, 98, NT and 2000.
Both graphical menus provide pull-down menus, convenient tool buttons and easy
access to your installed applications and their functions using either the mouse or
keyboard. The two graphical menus provide you with a visual choice in your
interaction with OSAS and your data.
When you select an application in either graphical OSAS menu, the application’s
main menu, presenting several related functions, is displayed beside the OSAS
menu. Selecting a function leads you to either a function screen or another menu.
Several commands are available within the menu to perform various tasks such as
changing the system date, entering access codes, switching between sample data
and live data, and so on. You can perform these menu commands in these ways (if
a button or pull-down menu selection is muted or gray, it is not available for use):
•
•
•
click the appropriate graphical tool button
select the command from a pull-down menu
press the associated keyboard hot key
If you use the graphical menu, you can select application menus and functions by
clicking the function or menu name on the menu, or by highlighting your choice
and pressing Enter.
If you choose the Start menu you can select applications from the Main menu by
using the arrow keys to highlight your choice and pressing Enter, by clicking the
selection, or by holding the mouse cursor over the selection until the menu appears.
From any application menu, you can select a button from the previous menu to
move directly to that menu. If you are several menu levels away from the Main
menu, you can return to the Main menu by clicking items on the previous menus.
OSAS Web B2B User’s Manual
1-15
OSAS Graphical
Introduction
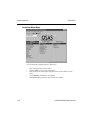
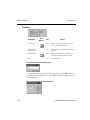
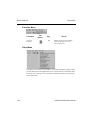
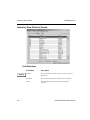
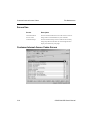
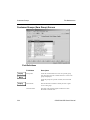
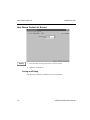
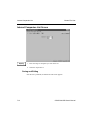
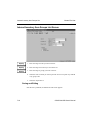
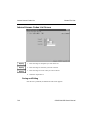
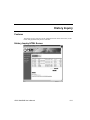
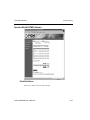
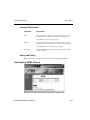
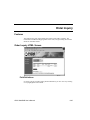
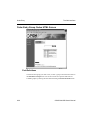
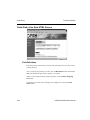
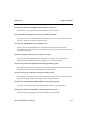
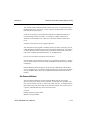
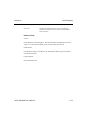
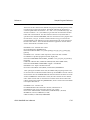
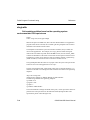
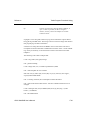
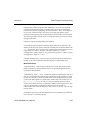
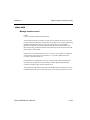
Graphical Main Menu
You can exit from a Graphical menu in these ways:
•
•
•
•
•
1-16
select a button from a previous menu
press the Tab key to go to the OSAS menu
click the Close box in the upper right hand corner of the window to close
OSAS
use the Exit (F7) command to close OSAS
select Exit from the pull-down File menu to close OSAS
OSAS Web B2B User’s Manual
Introduction
OSAS Graphical
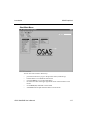
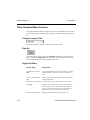
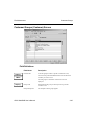
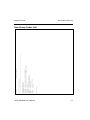
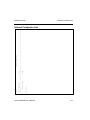
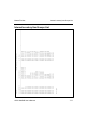
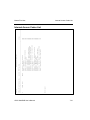
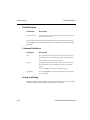
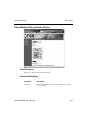
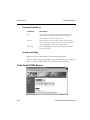
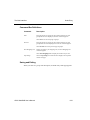
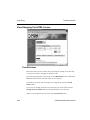
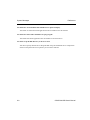
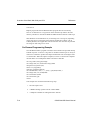
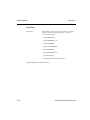
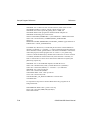
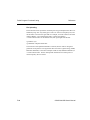
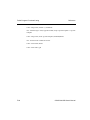
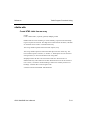
Start Main Menu
You can exit from a menu in these ways:
•
•
•
•
•
•
press the left arrow key to go to the previous menu (one menu up)
hold the mouse over a different menu choice
press the Tab key to go to the OSAS menu
click the Close box in the upper right hand corner of the window to close
OSAS
use the Exit (F7) command to close OSAS
select Exit from the pull-down File menu to close OSAS
OSAS Web B2B User’s Manual
1-17
OSAS Graphical
Introduction
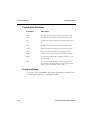
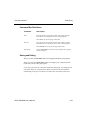
Special Commands in Graphical Menus
In either graphical menu, you can right-click on a menu selection to display the
Special Commands menu, which allows you to perform these special tasks:
From the standard menus:
•
•
•
•
•
add a function or menu to the Favorites menu
change to the Favorites menu
change from live to sample data and vice versa
display information about a function
perform special application setup
From the Favorites menu:
•
•
•
•
•
remove a function or menu
change to the Main menu
change from live to sample data and vice versa
display information about a function
perform special application setup
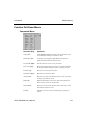
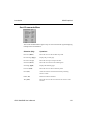
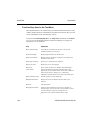
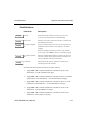
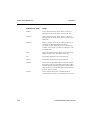
Menu Keys
Keyboards have a set of function keys (labeled with the letter F and a number),
which can be used to perform certain functions within OSAS. In OSAS menus,
these commands are assigned to the function keys.
1-18
Key (Command)
Operation
F1 (Key Help)
Displays the tool buttons and functions keys you can use.
F2 (Favorites Menu)
Displays or returns from the Favorites menu.
F4 (Access Code)
Displays the Access Code dialog box.
F5 (Live/Sample swap)
Switches between live and sample data.
F6 (Workstation Date)
Displays the current workstation date and allows you to
change it.
OSAS Web B2B User’s Manual
Introduction
OSAS Graphical
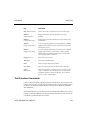
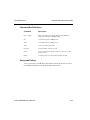
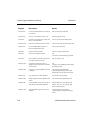
Key (Command)
Operation
F7 (Exit)
Exits from OSAS.
F9 (Application Setup)
Performs certain application setup tasks. For example, in
General Ledger, you can select the year with which you
want to work. If Setup is required in an application, the
application’s user’s manual will describe its usage.
F10
(Add/Remove Favorites)
Adds functions to and deletes functions from your
Favorites menu.
Shift-F2
(Application Info)
Displays information about the applications you have
installed.
Shift-F5
(Change menu style)
Switch between text and graphical menu styles without
going into Defaults.
Shift-F6
(Toggle GUI screens)
Toggles between graphical screens and text-based screens
for the functions you use.
Shift-F7
(Toggle GUI scaling)
Toggles screen scaling on and off. When scaling is off (the
default setting), the graphical screens become smaller when
you use higher monitor resolutions.
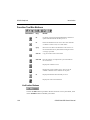
Pull-Down Menus
When using the graphical menus, you can use the pull-down menus and tool
buttons (buttons with graphical icons in a row below the pull-down menus) to
access functions without using the function keys. While the function keys work in
the graphical menus, the menu bar and tool buttons offer you a choice in accessing
these functions. Such a choice is common in graphical Windows applications.
Using the mouse, you can either move the cursor to the menu and click once, or
click on a tool button for the function desired. Below is a sample of the OSAS pulldown menu and tool buttons and a description of each.
OSAS Web B2B User’s Manual
1-19
OSAS Graphical
Introduction
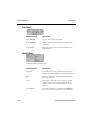
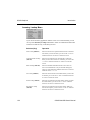
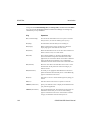
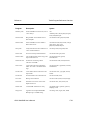
File Menu
Tool
Button
Key
Result
Access code
F4
Displays the Access Code dialog box. See
Access Code dialog box below.
Sample data set
or Live Data set
F5
Toggles between the Sample Data and the
Live Data.
Workstation date
F6
Displays the Workstation date dialog box.
See Workstation Date dialog box below.
Exit
F7
Exits from OSAS.
Command
Using the Access Code dialog box
To change the access code, enter the code in the field. Then click OK to save your
entry and return to the OSAS menu, or click Exit to abandon the dialog box and
return to the menu.
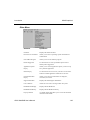
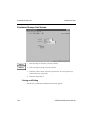
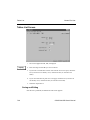
Using the Workstation Date dialog box
1-20
OSAS Web B2B User’s Manual
Introduction
OSAS Graphical
To set a new workstation date, enter the date in the field, use the up/down buttons
to increase/decrease the date displayed, or click System Date to change the date to
match the operating system date. Then click OK to change the workstation date,
Abandon to restore the original date displayed, or Exit to return to the Main menu.
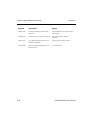
Modes Menu
Command
Tool
Button
Key
Result
GUI Functions
Shift-F6
Toggles between GUI function
screens and text function screens.
Scale GUI
Screens
Shift-F7
Toggles scaling of GUI screens on
and off. When scaling is off (the
default mode), the screen size is
smaller when you use higher monitor
resolutions.
Key
Result
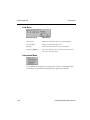
Tools Menu
Command
Calculator
OSAS Web B2B User’s Manual
Tool
Button
Displays the Windows calculator.
1-21
OSAS Graphical
Introduction
Favorites Menu
Command
Change to
Favorites
Tool
Button
Key
F2
Result
Displays the Favorites menu/Main
menu. See Graphical Favorites
Menu on page 1-25.
Other Menu
The Other menu contains a set of utilities. A calculator and Global Inquiry (which
presents data from several applications) are two of the utilities on the Other menu.
See the Resource Manager User’s Manual for information about all of the utilities
on the Other menu.
1-22
OSAS Web B2B User’s Manual
Introduction
OSAS Graphical
Help Menu
Tool
Button
Command
Help
Key
F1
About OSAS
Result
Displays descriptions of the
application menus and functions.
Displays the About OSAS dialog
box.
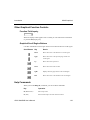
Tool Bar Icons
There are three icons on the tool bar that were not described above.
Tool Button
Key
Shift-F2
Result
Displays the Application Information dialog box.
Displays the pop-up calendar screen. You can use the
calendar to add and review reminders for any date.
Opens an MS-DOS prompt.
Displays a screen for calling any BBx program that does
not require variables to be passed to it. See Appendix F
the Resource Manager User’s Manual.
OSAS Web B2B User’s Manual
1-23
OSAS Graphical
Introduction
Other Graphical Menu Features
The graphical menus offer more than shortcuts to menu commands. You can also
switch between live and sample data, or change to another company and its data
set.
Change Company Field
Select the company to change to from the pull-down list box.
Data Set
On the Start menu, you can check the Live Data radio button to work with live
data, or check the Sample Data radio button to work with sample data. You can
also press F5 to change between sample and live data.
Right-Click Menu
1-24
Screen (Key)
Description
Add to/Remove Favorites
(F10)
Use the Add to/Remove Favorites menu button to add the
desired submenu or function to or from your Favorites
menu.
Change to Favorites/Main
(F2)
Toggles your display menu between your Favorites menu
and your Main menu.
Sample data/Live data (F5)
Switches between your sample data and your live data.
Setup (F9)
Performs certain application setup tasks. For example, in
General Ledger, you can select the year with which you
want to work. If Setup is required in an application, the
application’s user’s manual will describe its usage.
Function Information (F1)
Displays information about the selected function.
OSAS Web B2B User’s Manual
Introduction
OSAS Graphical
Graphical Favorites Menu
Your Favorites menu saves time in moving between applications, opening and
closing submenus and application menus, and allows easy access to your common
applications. By setting up your Favorites menu, you can access your most-used
functions or submenus by pressing the F2 key (or by selecting Favorites from the
pull-down menu).
Favorites Menu: Start Style
To add a function to the Favorites menu from the main OSAS menus, simply
highlight the function you want to add on the menu and press the F10 function key
to add it to Favorites.
To remove a function from the Favorites menu, highlight the function on the
Favorites menu and press the F10 function key to remove it from the menu.
You can also use the right-click menu to add a function to Favorites or to remove a
function from Favorites.
Graphical Function Commands
Once you select an OSAS application function from the menu, the function screen
appears. The way that you enter data on OSAS screens is consistent from function
to function. To move around the OSAS screens you use the function commands
described below.
In OSAS, commands are assigned to various keys on your keyboard, as well as to
certain tool buttons and pull-down menu selections. You can use these commands
to work with data entry screens. If a tool button or menu selection appears grayedout or muted, the command is unavailable at this time.
OSAS Web B2B User’s Manual
1-25
OSAS Graphical
Introduction
Function Tool Bar Buttons
Tool Button
Key
Result
F6
Go directly to the appropriate File Maintenance function to
update information about the field you are in.
F3
Delete the information on the screen. Since this command
can delete an entire record, use it with caution.
PgUp
Move the cursor back to the first field on the screen or to
the first field after the key field without erasing the entries
or changes you made.
Shift-F9
Copy the contents of the current field.
Shift-F10
Paste the contents you copied from a previous field into
the current field.
Displays the calculator screen.
Displays the pop-up calendar screen. You can use the
calendar to add and review reminders for any date.
F1
Displays information about the field you are in.
Displays the on-line documentation.
Verification Buttons
Click on the OK button to proceed to the next screen or to save your entries, click
on the Abandon button to abandon your entries.
1-26
OSAS Web B2B User’s Manual
Introduction
OSAS Graphical
Function Pull-Down Menus
Commands Menu
Selection (Key)
Operations
Inquiry (F2)
Use the Inquiry command to display a list of valid entries for the
current field, from which you can select a choice.
Maintenance (F6)
Go directly to the appropriate File Maintenance function to
update information about the field you are in.
Proceed/OK (PgDn)
Proceed to the next screen or save your entries.
Start Over (PgUp)
Move back to the first field on the screen or to the first field after
the key field without erasing the entries or changes you made.
Field Up (Up)
Move the cursor to the previous field.
Field Down (Down)
Move the cursor to the next field.
Abandon (F5)
Move the cursor back to the first field on the screen. Any entries
or changes you made are erased.
Delete (F3)
Delete the information on the screen. Since this command can
delete an entire record, use it with caution.
Jump (Ctrl-J)
Move the cursor to the next block of data on the screen or to the
next field that requires an entry.
Exit (F7)
Exit from a screen or a window and disregard everything you
entered.
OSAS Web B2B User’s Manual
1-27
OSAS Graphical
Introduction
Edit Menu
Selection (Key)
Operations
Copy (Shift-F9)
Copy the contents of the current field.
Paste (Shift-F10)
Paste the value you copied from a previous field into the
current field.
Undo (Ctrl-Z)
Restore the contents of the current field from before you
made changes to it.
Modes Menu
Check the options you want to use.
1-28
Selection (Key)
Operations
Verify Exit
If verification is turned on, you must press a key twice to
verify that you want to perform exit or abandon operations.
Bell
If the bell is turned on, it sounds at an error or when you
must verify a command.
Quick
If this option is turned off, the cursor stops at every field
possible. To make the cursor skip the fields that do not
require an entry in certain application functions, turn the
option on.
Verify PgDown
If verification is turned on, you must press the PgDn key
twice to proceed to the next screen or to save your entries.
OSAS Web B2B User’s Manual
Introduction
OSAS Graphical
Other Menu
Selection
Operations
Calculator
Displays the OSAS calculator.
Execute an OS Command
Allows you to enter an operating system command from
within OSAS.
Call a PRO/5 Program
Allows you to execute a PRO/5 program.
Product Suggestion
Use this function to create a printable report for future
OSAS product suggestions.
Application Options
Inquiry
Allows you to view the application options you have set up
for a particular application.
Global Inquiry
Use this function to search across your data. You can select
from the installed applications which data to search in.
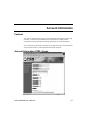
General Information
Inquiry
Allows you to search for information on employees,
customers, and vendors.
Support Information
Displays the OSAS Support Information.
User Comments
Allows the user to leave messages within the system.
EIS Dashboard Display
Displays the EIS Dashboard.
EIS Dashboard History
Displays the EIS Dashboard history.
Pop-Up Calendar
A reminder feature that allows you to create and read dated
reminders within OSAS.
OSAS Web B2B User’s Manual
1-29
OSAS Graphical
Introduction
Help Menu
Selection (Key)
Operations
About OSAS
Displays the information about your OSAS installation.
Command Help
Displays the OSAS Key Help screen.
Help (F1)
Get information about the field you are working on.
Online Doc (Shift-F1)
Opens your .PDF file viewer to display the documentation
for your particular application.
Information Menu
The Information menu appears on some function screens in certain applications.
The functions on the menu are determined by the applications installed.
1-30
OSAS Web B2B User’s Manual
Introduction
OSAS Graphical
Scroll Commands Menu
The Scroll commands menu appears only on screens with scroll regions displaying
multiple lines of information.
Selection (Key)
Operations
First Line (Home)
Moves the cursor to the first data entry field.
Previous Page (PgUp)
Displays the previous page.
Previous Line (Up)
Moves the cursor up to the previous line.
Next Line (Down)
Moves the cursor down to the following line.
Next Page (PgDn)
Displays the following page.
Last Line (End)
Moves the cursor to the last data entry field.
Insert (Ins)
Allows the insertion of characters between preexisting
entries in a field.
Delete (F3)
Deletes the selected characters.
Jump (Tab)
Moves the cursor to the next section of the screen in some
functions.
OSAS Web B2B User’s Manual
1-31
OSAS Graphical
Introduction
Inventory Lookup Menu
If you use the Inventory application and the cursor is in an Item ID field, you can
use any of the Inventory Lookup commands to search for information about items
and select an item for entry in the field you are in.
1-32
Selection (Key)
Operation
Alias Lookup (Shift-F3)
Search for items with a specified alias listed as an alternate
item. When you enter the alias, you can use the “*” and “?”
wildcard characters to restrict or widen the search.
Customer/Vendor Lookup
(Shift-F4)
Search for an item based on customer ID or vendor ID.
When you enter the customer or vendor ID, you can use the
“*” and “?” wildcard characters to restrict or widen the
search.
Detail Lookup (Shift-F5)
Search for detailed information about an item. You can
enter search information in any of the fields that appear,
using any of the following wildcard characters to restrict or
widen the search: * ? < > =.
Lot Lookup (Shift-F6)
Search for an item based on lot number. When you enter the
lot number, you can use the “*” and “?” wildcard characters
to restrict or widen the search.
Serial Lookup (Shift-F7)
Search for an item based on serial number. When you enter
the serial number, you can use the “*” and “?” wildcard
characters to restrict or widen the search.
Description Lookup
(Shift-F8)
Search for an item based on item description. When you
enter the description, you can use the “*” and “?” wildcard
characters to restrict or widen the search.
OSAS Web B2B User’s Manual
Introduction
OSAS Graphical
Other Graphical Function Controls
Function Field Inquiry
When the Inquiry button appears next to a field, you can either click on the button
or press the F2 (Inquiry) key.
Graphical Scroll Region Buttons
Use these commands in scroll region areas to move between the lines in the region:
Scroll Button
Key
Result
Home
Moves the cursor to the first line in a scroll region
PgUp
Moves the cursor to the previous page of lines in a
scroll region
Up
Moves the cursor up one line
Down
Moves the cursor down one line
PgDn
Displays the next page of lines in the scroll region
End
Moves the cursor to the last line in the scroll region
Help Commands
When you use the Help (F1) command, you can use these commands:
Key
Operation
F6 (Maintenance)
Edit a help screen.
F7 (Exit)
Exit from the help screen and close the window.
OSAS Web B2B User’s Manual
1-33
OSAS Graphical
Introduction
In-Field Editing Commands
When the cursor is in a field that contains information, you can use these keys and
commands:
1-34
Key
Operation
Right
Move the cursor to the right.
Left
Move the cursor to the left.
Del (Delete)
Delete the character the cursor is on.
Ins (Insert on/off)
Switch insert mode on and off. When the INS flag appears at
the bottom right corner of the screen on the status bar,
characters you type push characters after the cursor off to the
side. When insert mode is turned off (OVR appears on the
status bar), characters you type write over existing ones.
Home
Move the cursor directly to the beginning of the field.
End
Move the cursor directly to the end of the field.
Ctrl-Z (Undo)
Restore a field to the way it was before you changed it. You
can use this command only while you are in the field; once
you move past it, you must use the Abandon (F5) command
to clear the field.
Shift-F9
(Copy field contents)
Copy the contents of the current field.
Shift-F10
(Paste field contents)
Paste the value you copied from a previous field into the
current field.
OSAS Web B2B User’s Manual
Introduction
OSAS Graphical
Inquiry Commands
When you use the Inquiry command, several other commands become available
for you to use in the inquiry window.
The Inquiry windows operate in two modes: Search and Sort. You can toggle
between these modes within an Inquiry window by pressing the Ins (Insert) key.
You can also choose the default mode for the inquiry windows by using the
Defaults function on the Resource Manager Workstation Configuration menu.
•
In Search mode, you can move through the keys listed by typing progressively
larger portions of the key you want to find. For example, when you type C, the
window displays keys beginning with the letter C. When you next press A, the
window displays keys beginning with CA, and so on.
•
In Sort mode, you can change the order of certain inquiry windows by
pressing the letter key associated with the window sort. You can see the
available sorts in any inquiry window by selecting Command Help from the
Help pull-down menu in the inquiry window.
Note
You can also shorten your data search by entering a part of the key before you use
the Inquiry command. For example, if you know that the ID starts with JAR,
enter JAR in the ID field before you use the Inquiry command. The inquiry list
will start with JAR and run through the end of the list.
Scroll Button
Key
Result
Home
Moves the cursor to the first key in the inquiry
window.
PgUp
Displays the previous page of keys in the inquiry
window.
OSAS Web B2B User’s Manual
1-35
OSAS Graphical
Scroll Button
1-36
Introduction
Key
Result
Up
Moves the cursor up one line.
Down
Moves the cursor down one line.
PgDn
Displays the next page of keys in the inquiry
window.
End
Moves the cursor to the last key in the inquiry
window.
Ins
Toggle between Search mode and Sort mode.
F7 (Exit)
Close the inquiry window without selecting anything.
Enter
Select the item to which the cursor is pointing.
OSAS Web B2B User’s Manual
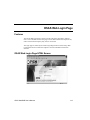
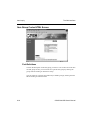
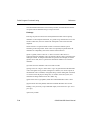
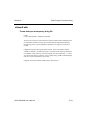
OSAS Text
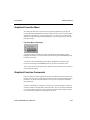
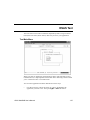
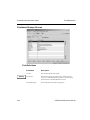
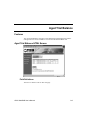
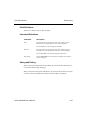
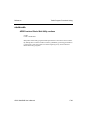
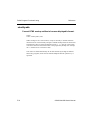
The Text menu can be used on all OSAS compatible systems. Using text-based
menus, the Text menu (shown below) offers easy access to your applications.
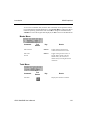
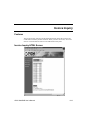
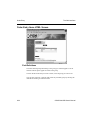
Text Main Menu
When you select an application, the application’s menu, which presents several
related functions, is superimposed over the Main menu. Selecting a function leads
you to a function screen or to another menu.
You can select applications from the Main menu in these ways:
•
Use the arrow keys to move the cursor up or down, highlighting the
application you want to use. Then press PgDn or Enter to select it.
OSAS Web B2B User’s Manual
1-37
OSAS Text
Introduction
•
Press the first letter of the application you want to use. The cursor jumps to the
first application beginning with the letter. Press the letter key or the down
arrow until the application you want is highlighted. When your choice is
highlighted, press PgDn or Enter to select it.
•
Position the mouse cursor over the application and click. The application will
briefly highlight and switch to the application screen.
•
To jump to the first application on the menu, press Home. To jump to the last
application on the menu, press End.
To select a function from an application menu, highlight and select your choices
the same way you do on the Main menu—with one exception: you can press PgDn
only when an option leads to another menu, and you must press Enter to select a
function.
On an application menu you can press PgUp to move to the menu immediately
above it. If you are several menu levels away from the Main menu, you can return
to the Main menu by pressing PgUp repeatedly or by pressing the Tab key.
You can exit from a menu in these ways:
•
•
•
1-38
Press the PgUp key to go to the previous menu (one menu up)
Press the Tab key to go to the Main menu
Use the Exit (F7) command to go to the operating system
OSAS Web B2B User’s Manual
Introduction
OSAS Text
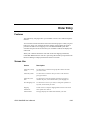
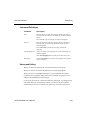
Text Favorites Menu
Your Favorites menu saves time in moving between applications, opening and
closing submenus and application menus, and allows easy access to your common
applications. By setting up your Favorites menu, you can access your most-used
functions or submenus by pressing the F2 key.
Favorites Menu: Text Style
To set up the text-style display follow these steps:
1. Move your cursor to the submenu or application that you want placed in the
Favorites menu.
2. Press F10.
You can press F2 to verify your selection was added to your Favorites menu.
To remove an application:
1. Press F2 to display the Favorites menu.
2. Move your cursor to the submenu or application you want removed.
3. Press F10.
OSAS Web B2B User’s Manual
1-39
OSAS Text
Introduction
Function Keys Used in the Text Menu
Most keyboards have a set of function keys (usually labeled with the letter F and a
number). Within the menu, commands are assigned to these function keys. You can
use the commands to work with data entry screens.
Except for the Command Help (Esc), the Jump (Tab) commands, and the Enter
key, you can use the Keyboard function in Resource Manager to reassign any
function key to any command.
1-40
Key
Operation
Esc (Command help)
Views the list of commands for the menu. (To close the
commands window, press any key.)
F1 (Function Help)
Displays help information for this function.
F2 (Favorites Menu)
Displays the Favorites menu or changes to the regular menu
from the Favorites menu.
F3 (Change Company)
Allows you to switch between companies.
F4 (Access Code)
Displays the Access Code prompt.
F4 (twice)
(Other Menu)
Opens a menu of utilities. A calculator and Global Inquiry
(which consolidates and presents information from other
applications) are some of the utilities on the Other Commands
menu. See the Resource Manager User’s Manual for
information about the utilities on the Other Commands menu.
F5 (Live/Sample swap)
Switches between live and sample data.
F6 (Workstation Date)
Displays the current workstation date and allows you to
change it.
F7 (Exit)
Exits from OSAS.
F9 (Application Setup)
Performs certain application setup tasks. For example, in
General Ledger, you can select the year with which you want
to work. If Setup is required in an application, the
application’s user’s manual will describe its usage.
OSAS Web B2B User’s Manual
Introduction
OSAS Text
Key
Operation
F10 (Add to Favorites)
Allows you to add to and delete from your Favorites menu.
Shift-F2
(Application Info)
Displays information about the applications you have
installed.
Shift-F5
(Change menu style)
Switch between text and graphical menu styles without going
into Defaults.
Shift-F6
(Toggle GUI screens)
If you are using the graphical version of OSAS, this command
toggles between graphical screens and text-based screens for
the functions you use.
Shift-F7
(Toggle GUI scaling)
If you are using the graphical function screens, this command
toggles screen scaling on and off. When scaling is off (the
default setting), the graphical screens become smaller when
you use higher monitor resolutions.
PgUp (Start over)
Move back one menu level.
Tab (Jump)
Move back to the Main menu.
Enter
Select a menu or function from a menu.
Up or Down
Move the cursor up or down through the menu selections.
Ctrl-G
(Bell on/off)
If the bell is turned on, it sounds at an error or when you must
verify a command. To turn off the bell, use this command or
the Defaults function in Resource Manager. To turn the bell
back on, use this command again.
Text Function Commands
Once you select an OSAS application function from the menu, the function screen
appears. The way that you enter data on OSAS screens is consistent from function
to function. To move around the OSAS screens you use the function commands
described below.
Most keyboards have a set of function keys (usually labeled with the letter F and a
number). In OSAS, commands are assigned to these function keys. You can use the
commands to work with data entry screens.
OSAS Web B2B User’s Manual
1-41
OSAS Text
Introduction
Except for the Command Help (Esc) and Jump (Tab) commands and the Enter
key, you can use the Keyboard function in Resource Manager to reassign any
function key to any command.
1-42
Key
Operation
Esc (Command help)
View the list of commands for the screen you are on and the
field you are in. (To close the window, press any key.)
F1 (Help)
Get information about the field you are working on.
F2 (Inquiry)
Make a selection from a range of entries for a field if the
Inquiry flag appears at the bottom of the screen.
F3 (Delete)
Delete the information on the screen. Since this command can
delete an entire record, use it with caution.
F4 (Other)
Open a menu of utilities. A calculator and Global Inquiry
(which consolidates and presents information from other
applications) are some of the utilities on the Other Commands
menu. See the Resource Manager User’s Manual for
information about the utilities on the Other Commands menu.
F5 (Abandon)
Move the cursor back to the first field on the screen or to the
first field after the key field. The entries and changes you
made are erased.
F6 (Maintenance)
Go directly to the appropriate File Maintenance function to
update information about the field you are in if the Maint flag
appears at the bottom of the screen.
F7 (Exit)
Exit from a screen or a window and disregard everything you
entered.
F8 (List)
Send the contents of the screen to a printer or a text file.
Shift-F1 (Online Doc)
Opens your .PDF file viewer to display the documentation for
your particular application.
Shift-F2 (Information)
Open an Information menu. Each selection on the menu is an
information window that you can access if the Info flag
appears at the bottom of the screen. Each window contains a
category of information about the field you are in.
OSAS Web B2B User’s Manual
Introduction
OSAS Text
Key
Operation
PgUp (Start over)
Move the cursor back to the first field on the screen or to the
first field after the key field without erasing entries you made.
PgDn (Proceed)
Approve the data on the screen, change the file accordingly,
and proceed to the next spot (field or screen).
Tab (Jump)
Move the cursor to the next block of data on the screen or to
the next field that requires an entry.
Enter or Down
Move the cursor to the next field and accept the data entered.
Up
Move the cursor up (or back) one field. If you changed the
information in the field you were in before you used this
command, the change is lost when you move the cursor up.
Ctrl-V
(Verification on/off)
If verification is turned on, you must press a key twice to
verify that you want to perform that operation.
Ctrl-G
(Bell on/off)
If the bell is turned on, it sounds at an error or when you must
verify a command. To turn off the bell, use this command or
the Defaults function in Resource Manager. To turn the bell
back on, use this command again.
Ctrl-F
(Quick on/off)
If this option is turned off, the cursor stops at every field
possible. To make the cursor skip the fields that do not require
an entry, use this command to turn the option on.
Ctrl-O
(Show function keys)
If this option is turned on, the applicable function keys are
displayed on the screen.
OSAS Web B2B User’s Manual
1-43
OSAS Text
Introduction
Help Commands
When you use the Help (F1) command, three commands become available for you
to use on help screens.
Key
Operation
F3 (Delete)
Delete the help screen contents. To recover a deleted screen,
copy the xxHELP file from the distribution media to the /
PROGxx subdirectory (xx is the application ID). The copying
process overwrites changes you made to other help screens.
F6 (Maintenance)
Edit a help screen.
F7 (Exit)
Exit from the help screen and close the window.
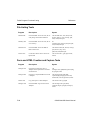
In-Field Editing Commands
When the cursor is in a field that contains information, you can use the following
keys and commands:
1-44
Key
Operation
Right
Move the cursor to the right.
Left
Move the cursor to the left.
Del (Delete)
Delete the character the cursor is on.
Ins (Insert on/off)
Switch insert mode on and off. When the Insert flag appears at
the bottom of the screen, characters you type push characters
after the cursor off to the side. When insert mode is turned off,
characters you type write over existing ones.
Home
Move the cursor directly to the beginning of the field.
End
Move the cursor directly to the end of the field.
F9 (Undo)
Restore a field to the way it was before you changed it. You
can use this command only while you are in the field; once
you move past it, you must use the Abandon (F5) command.
OSAS Web B2B User’s Manual
Introduction
OSAS Text
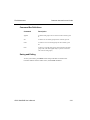
Key
Operation
F10
(Delete to end of line)
Delete the characters in the field to the right of the cursor. If
insert mode is turned off and you enter a character in the
field’s first position, everything in the field is deleted.
Shift-F9
(Copy field contents)
Copy the contents of the current field.
Shift-F10
(Paste field contents)
Paste the value you copied from a previous field into the
current field.
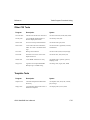
Inquiry Commands
When you use the Inquiry command, several other commands become available
for you to use in the inquiry window. The Inquiry windows operate in two modes:
Search and Sort. You can toggle between these modes within an Inquiry window
by pressing the Ins (Insert) key. You can also choose the default mode for the
inquiry windows by using the Defaults function in the Resource Manager.
•
In Search mode, you can move through the keys listed by typing progressively
larger portions of the key you want to find. For example, when you type C, the
window displays keys beginning with the letter C. When you next press A, the
window displays keys beginning with CA, and so on.
•
In Sort mode, you can change the order of certain inquiry windows by
pressing the letter key associated with the window sort. You can see the
available sorts in any inquiry window by pressing Esc (Command Help).
Note
To shorten your data search, use a partial-key inquiry to cut down the size of the
inquiry list. For example, if you know that the ID starts with JAR, enter JAR in
the ID field before you use the Inquiry command. The inquiry list will start with
JAR and run through the end of the list.
OSAS Web B2B User’s Manual
1-45
OSAS Text
Introduction
Key
Operation
PgUp
Display the previous page of the window.
PgDn
Display the next page of the window.
End
Move directly to the last item on file.
Home
Move directly to the first item on file.
Down
Move down one item.
Up
Move up one item.
Ins (Look up)
Toggle between Search mode and Sort mode.
F7 (Exit)
Leave the Inquiry window without selecting anything.
Enter
Select the item the cursor is pointing to.
Esc
(View commands)
Open a window that shows Inquiry window commands and
the window ID.
Inventory Lookup
If you use the Inventory application and the cursor is in an Item ID field, you can
use any of the Inventory Lookup commands to search for information about items
and select an item for entry in the field you are in.
1-46
Key
Operation
Shift-F3
(Alias Lookup)
Search for items with a specified alias listed as an alternate
item. When you enter the alias, you can use the “*” and “?”
wildcard characters to restrict or widen the search.
Shift-F4
(Customer/Vendor
Lookup)
Search for an item based on customer ID or vendor ID.
When you enter the ID, you can use the “*” and “?”
wildcard characters to restrict or widen the search.
OSAS Web B2B User’s Manual
Introduction
OSAS Text
Key
Operation
Shift-F5
(Detail Lookup)
Search for detailed information about an item. You can
enter information in any of the fields that appear, using
these wildcards to restrict or widen the search: * ? < > =.
Shift-F6
(Lot Lookup)
Search for an item based on lot number. When you enter the
lot number, you can use the “*” and “?” wildcard characters
to restrict or widen the search.
Shift-F7
(Serial Lookup)
Search for an item based on serial number. When you enter
the serial number, you can use the “*” and “?” wildcard
characters to restrict or widen the search.
Shift-F8
(Description Lookup)
Search for an item based on item description. When you
enter the description, you can use the “*” and “?” wildcard
characters to restrict or widen the search.
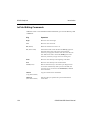
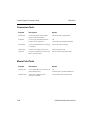
Report Commands
You can use the following commands when a report is displayed on the screen:
Key
Operation
PgUp
Move to the previous page of the report.
PgDn
Move to the next page of the report.
Home
Move directly to the top of a group of pages.
End
Move directly to the bottom of a group of pages.
F7 (Exit)
Exit to the menu from any point in the report.
Left
Move left one character.
Right
Move right one character.
Tab (Toggle)
Toggle between the left and right halves of a report.
Up/Down
Move a line up and down the screen to line up information
when you toggle between halves of a report.
OSAS Web B2B User’s Manual
1-47
OSAS Text
Introduction
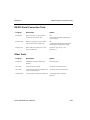
Scroll Region Commands
When the prompt (>) is in a line-item scroll region, you can use the following
commands:
1-48
Key
Operation
Down (Next Line)
Move down one line item.
Up (Previous Line)
Move up one line item.
PgUp (Previous Page)
Move to the previous screen or to the first line if you are on
the first screen.
PgDn (Next Page)
Move to the next screen or to the last line if you are on the last
screen.
Home (First Line)
Move to the first line item in the entire list.
End (Last Line)
Move to the last line item in the entire list.
F3
(Delete)
Delete the line item at the prompt (>).
Ins
(Insert)
Insert a line item at the prompt (>).
Enter
(Edit)
Edit the line item at the prompt (>).
OSAS Web B2B User’s Manual
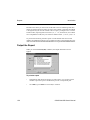
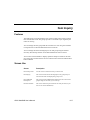
Reports
Selecting a Range of Information
To produce a report, you must specify the amount of information you want in the
report.
•
To produce a report that includes all the available information, leave the
From-Thru fields on the report function screen blank. For example, if you
want information about all the vendors to be in a report, leave the Vendor ID
From and Thru fields blank.
•
To limit the amount of information in the report, enter the range of
information in the From-Thru fields. For example, if you want a report to
include information only about vendor ACE001, enter ACE001 at both From
and Thru. If you want the report to include information only about vendors
that start with CO, enter CO at From and COZZZZ at Thru.
Each field where you enter information on a report function screen usually restricts
the overall output of the report. For example, if you leave the Vendor ID From and
Thru fields blank, the report will contain information about all the vendors. But if
you enter invoice 100 in the Invoice Number From and Thru fields, and invoice
100 is assigned only to vendor ACE001, the report includes information only about
vendor ACE001.
Sorting
Information for reports is sorted first by a space (_), then by characters, then by
digits, then by uppercase letters, and finally by lowercase letters. No matter what
you enter in the From and Thru fields, however, your entries are sorted in
alphabetical order (unless the function provides an option to sort the information
differently).
Sorting by alphabetical codes or IDs is easy. For example, the ID ACL comes
before the ID BB because A comes before B.
OSAS Web B2B User’s Manual
1-49
Reports
Introduction
But take notice when you enter codes or IDs that consist of something other than
letters; the order might not be what you expect. For example, if 20 items are labeled
1 through 20 and you want all of them to be in a report, you might enter 1 at From
and 20 at Thru, expecting them to be listed 1, 2, 3. . . 19, 20. However, since OSAS
sorts in alphabetical order, they are listed in a different order: 1, 10–19, 2, 20, 3–9.
To prevent that situation, pad extra spaces in codes and IDs with zeros so that
numbers in alphabetical order are also in numerical order. In the example above the
items would be labeled 00000000000000000001 through 00000000000000000020.
Output the Report
When you use the Proceed (OK) command, the Output Information screen
appears.
To print the report
1-50
•
Select Printer and choose the printer. On some reports, you can also choose
whether to print the report in standard-size print or in compressed print.
•
Click OK (or press Enter in text mode) to continue.
OSAS Web B2B User’s Manual
Introduction
Reports
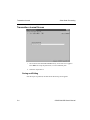
To view the report in Print Preview mode
•
Select Print Preview and choose the printer. On some reports, you can also
choose whether to print the report in standard-size print or in compressed
print.
•
Click OK (or press Enter in text mode) to continue.
To save the report as a File
If you want to save the report as a data file—for example, to include it in a wordprocessed report (in CR-LF format)—select File. The data path for the workstation,
including the default drive, appears if it is specified in the Defaults function. Enter
the filename and file extension, using no more than 35 characters overall.
OSAS Web B2B User’s Manual
1-51
OSAS Web B2B User’s
Manual
Installation and Setup
2
Installing The Web Server
Installing OSAS Web B2B
2-3
2-5
OSAS Web B2B User’s Manual
2-1
Installing The Web Server
Before you install and set up OSAS Web B2B, you must install and configure your
web server. OSAS Web B2B will work with most popular web servers. However,
the web server you use must have the ability to use Standard CGI.
You can install the web server on the same system that OSAS is installed on, or
you may choose to install it on a separate computer. If you choose to use a different
computer for a web server, you must be able to establish communications between
your OSAS system and the web server through a network or modem connection.
The web server and the OSAS system must be able to communicate because OSAS
Web B2B provides several functions that move data files and programs from
OSAS to the web server and back again.
When you set up your web server, you need a declaration in your CGI setup to
handle BBx programs and graphical images. You must specify these virtual
directories for
•
CGI scripts (“/osasweb”) with the path to the OSAS Web B2B programs
•
graphical images (“/image”) with the path to the graphical images
•
style sheets (“/style”) with the path to the OSAS Web B2B programs and style
sheets
If you have questions about setting up virtual directories, consult your web server
user’s manual.
The web server must have access to a BBx interpreter in order for OSAS Web B2B
to function. If your web server can access your OSAS Resource Manager directory
at all times, you can use the interpreter installed there for OSAS Web B2B. If not,
you must install a BBx interpreter on the web server itself before you install OSAS
Web B2B.
Once you have your web server installed and operational, you can proceed with
OSAS Web B2B installation.
OSAS Web B2B User’s Manual
2-3
Installing The Web Server
Installation and Setup
Security Procedures and Devices for OSAS Web B2B
Data security is a priority for many companies. OSAS Web B2B is designed to
secure your files, customer lists, and account information through use of integral
password checks which you setup during your OSAS Web B2B installation. To
enhance OSAS Web B2B’s built in security codes, you may install a firewall for
your web server.
A firewall is a generic name for a program or system that enforces access control
between two network systems. By requiring any user to enter a password, a firewall
acts as a buffer from unwanted access into your system. While they do not protect
against viruses, firewalls are recommended to protect sensitive data.
If you have questions and concerns, your reseller can supply you with answers and
suggestions.
Note
If you are using a Windows Web Server that accesses data through a UNIX Data
Server, see page 4-8.
2-4
OSAS Web B2B User’s Manual
Installing OSAS Web B2B
When you set up OSAS Web B2B, you can elect to allow access to your OSAS
data files directly from the Internet, or to allow access to copies of your files stored
on the web server (even if the web server is installed on the same machine). The
process of using copies of your files is known as remote processing.
If you elect to use remote processing, you must complete a few additional steps
after you complete the installation and setup checklist below.
OSAS Web B2B Requirements and Applications
You must have the Accounts Receivable application installed and set up on your
system to use OSAS Web B2B. OSAS Web B2B uses your Customer file as a basis
for the access codes that allow your customers to access the OSAS Web B2B
functions on the Internet.
You have control of which OSAS Web B2B functions can be run, and by which
customers. However, some of the functions require other OSAS applications in
order to work.
With Accounts Receivable installed, your customers can use the Account
Information, History Inquiry, Invoice Inquiry, and Aged Trial Balance functions.
If Inventory is installed on your system, your customers can access the Item
Inquiry function.
If Sales Order is installed, your customers can use the Order Inquiry function.
If you have both Inventory and Sales Order installed, your customers can use the
Sales Order Entry function.
OSAS Web B2B User’s Manual
2-5
Installing OSAS Web B2B
Installation and Setup
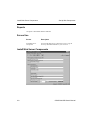
OSAS Web B2B Setup Checklist
Follow these steps to install and set up OSAS Web B2B on your computer:
Note
Many of the functions you use during the setup process will ask you for path (or
directory) names where certain web server files, programs and data files reside.
Read the instructions for these functions carefully. Some path names describe the
directory from the web server to the OSAS system, and others describe the
directory from the OSAS system to the web server.
1. Use Resource Manager to install OSAS Web B2B on your computer. See the
Resource Managers User’s Guide for installation instructions.
2. Use the Company Information function in Resource Manager (see the
Resource Manager User’s Manual) to set up each company for which you
want to provide web access.
3. Use the Customer Internet Access Codes function (page 3-15) to control
which of your customers can access the OSAS Web B2B functions, the
functions to which each customer has access, and the Inventory Location that
is used to calculate prices for this customer.
4. Use the Item Group Codes function (page 3-3) to set up item groups for item
inquiry and sales order entry web functions.
5. Use the Internet Inventory Item Groups function (page 3-11) to add items
or item subgroups to the groups you set up.
6. Use the Inventory Item Pictures function (page 3-7) to associate graphic
images with inventory items for display in the item inquiry and sales order
entry web functions.
2-6
OSAS Web B2B User’s Manual
Installation and Setup
Installing OSAS Web B2B
7. Use the Customer Groups function (page 3-23) to set up the item groups to
which each customer has access during the item inquiry and sales order entry
web functions.
8. Use the Tables function (page 3-27) to set up the EMAIL table, which stores
the E-mail address your customers will use to contact you if they encounter
problems using the web functions.
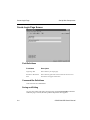
9. Use the Create Login Page function (page 4-3) to build your login page and
to copy it to your web server directory.
10. Use the Install Web Server Components function (page 4-5) to set up the
communication between the web server and OSAS, and to copy the OSAS
Web B2B programs and drivers to the web server.
Note
You may need to edit the CONFIG.BBX file created on the web server after
completing the Install Web Server Components function. Consult Appendix D for
more information on modifying the CONFIG.BBX file.
Follow these additional steps if you are using remote processing with OSAS Web
B2B:
11. Use the Copy OSAS Programs to Web Server function (page 6-7) to copy
certain special OSAS programs to the web server.
These programs perform tasks such as accessing inventory quantity and
pricing information, calculating balances, and so on. If your web server can
access the Resource Manager programs path directly at all times, you can skip
this step.
12. Use the Copy Data Files to Web Server function (page 6-3) to copy your
data files to the web server. You must copy the optional data files when
setting up OSAS Web B2B.
OSAS Web B2B User’s Manual
2-7
Installing OSAS Web B2B
Installation and Setup
Note
Using copies of your data files may provide a higher level of security, but it
requires you to update the files periodically on both the OSAS system and on the
web server. You can update files using the functions on the OSAS Web B2B
menus. See chapter 5 for more information about these periodic tasks.
2-8
OSAS Web B2B User’s Manual
OSAS Web B2B User’s
Manual
File Maintenance
Item Group Codes
Inventory Item Pictures
Internet Inventory Item Groups
Customer Internet Access Codes
Customer Groups
Tables
OSAS Web B2B User’s Manual
3
3-3
3-7
3-11
3-15
3-23
3-27
3-1
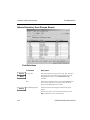
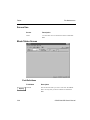
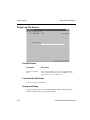
Item Group Codes
Features
You use item groups to group inventory items together for display and security
purposes on the Item Inquiry and Order Entry web pages. You can restrict access to
the items by the groups you set up.
Use the Item Group Codes function on the File Maintenance menu for the
following tasks:
•
•
add item groups
change the description of existing item groups
The groups you create are used to restrict access to your inventory files. You can
place the same inventory items in multiple groups, or exclude inventory items from
all groups, as you like. You can then specify the groups to which each customer has
access.
Reports
No report is associated with this function.
Screen Use
Screen
Description
Item Group Codes
Use the Item Group Codes screen to set up or change the item
groupings.
OSAS Web B2B User’s Manual
3-3
Item Group Codes
File Maintenance
Setup Item Group Codes Screen
Field Definitions
Field Name
Description
Group Code
Enter a 1- to 10-character code to identify this group of items.
Description
Enter a description of the group. This description will appear
in the selection window on the Item Inquiry and Order Entry
web pages.
Command Bar Definitions
3-4
Command
Description
Enter = edit
Move to the group you want to edit and press Enter.
OSAS Web B2B User’s Manual
File Maintenance
Item Group Codes
Command
Description
Append
Press A to add a new item group to the list.
Goto
To move to a specific item group code, press G and enter the
item group code. (This field appears only if you have more
than one screen of item group codes.)
Saving and Exiting
To save your entries, press Enter in the Description field. To exit to the File
Maintenance menu, use the Exit command.
OSAS Web B2B User’s Manual
3-5
Inventory Item Pictures
Features
Use the Inventory Item Pictures function on the File Maintenance menu to
associate a graphics file with your inventory items. The graphic image associated
with the item can be displayed using the Item Inquiry and Order Entry web pages.
You can use a variety of graphic image formats, including:
•
•
.JPG JPEG graphics files
.GIF graphics image format files
Not all graphics formats can be viewed with all browsers. Generally, .GIF and .JPG
images are recommended because most browsers can display them, and because
their small file size allows them to load faster.
Reports
No report is associated with this function.
Screen Use
Screen
Description
Inventory Item Pictures
Use the Inventory Item Pictures screen to enter or change the
graphic image associated with an inventory item.
OSAS Web B2B User’s Manual
3-7
Inventory Item Pictures
File Maintenance
Inventory Item Pictures Screen
Field Definitions
Inquiry
3-8
Field Name
Description
Item ID
Enter the ID of the item with which you want to associate a
graphics file.
Description
The item description appears from the Inventory Item file.
Picture
Enter the filename of the graphics file, including the
extension.
OSAS Web B2B User’s Manual
File Maintenance
Inventory Item Pictures
Command Bar Definitions
Command
Description
Enter = edit picture
Move to the item you want to edit and press Enter.
Append
Press A to add a picture for a new item.
Goto
To move to a specific item, press G and enter the item ID.
(This field appears only if you have more than one screen of
items.)
Saving and Exiting
To save your entries, press Enter in the Picture field. To exit to the File
Maintenance menu, use the Exit command.
OSAS Web B2B User’s Manual
3-9
Internet Inventory Item Groups
Features
Use the Internet Inventory Item Groups function on the File Maintenance menu for
the following tasks:
•
•
•
•
add inventory items to an item group
add subgroups to an item group
change the inventory locations included in an item group
remove inventory items or locations from an item group
Item Groups also groups inventory items together for display and security purposes
on the Item Inquiry and Order Entry web pages. You can restrict access to the items
by the groups you set up.
You can add groups to the system by using the Item Group Codes function on the
File Maintenance menu.
Reports
No report is associated with this function.
Screen Use
Screen
Description
Internet Inventory Item
Groups
Use this screen to setup and maintain item groups.
OSAS Web B2B User’s Manual
3-11
Internet Inventory Item Groups
File Maintenance
Internet Inventory Item Groups Screen
Field Definitions
Inquiry
Field Name
Description
Group Code
Enter the item group code you want to work with. To set up a
new group code, use the Item Group Codes function on the
File Maintenance menu, or use the Maintenance (F6)
command.
Sub
If this item is a subgroup, the box is checked (or YES appears
in text mode). If this item is an inventory item, the box is
unchecked (or NO appears in text mode).
Item ID/Subgroup ID
The ID of each item and subgroup included in this group
appears.
Maint
Inquiry
To exclude an item (or item location) from the list, use the
Delete command to remove it from the list.
3-12
OSAS Web B2B User’s Manual
File Maintenance
Internet Inventory Item Groups
Field Name
Description
Item Description
The description of the item or subgroup appears.
Loc. ID
The location ID for this item appears.
Image
If you have set up a picture for this item, the graphics filename
appears.
OSAS Web B2B User’s Manual
3-13
Internet Inventory Item Groups
File Maintenance
Command Bar Definitions
Command
Description
Append
Press A to add an item or subgroup to the group. The prompt
Is this item a subgroup? appears.
To add a subgroup to this group, check the box (or enter Y in
text mode) and then enter the Subgroup Code.
To add an item to this group, uncheck the box (or enter N in
text mode) and then enter the item ID. All locations for the
item are added to the list.
First
To look at the items in the first item group on file, press F.
Next
To look at the items in the next item group on file, press N.
Prev
To look at the items in the previous item group on file, press
P.
laSt
To look at the items in the last item group on file, press S.
aLl
To include all inventory items in this item group, press L.
nOne
To remove all inventory items from this group, press O.
Header
To select a different group code, press H.
add Range
To add a range of item IDs to the group, press R.
Goto item
To move to a specific item, press G. Then enter the item ID,
or exit to the Internet Inventory Item Groups screen. (This
field appears only if you have more than one screen of items.)
Saving and Exiting
To save your entries, press Enter at the Item ID or Subgroup Code field. To exit to
the File Maintenance menu, use the Exit command.
3-14
OSAS Web B2B User’s Manual
Customer Internet Access Codes
Features
You grant Internet access to your data for your customers through Internet access
codes. You can limit access for certain customers to particular web pages and item
groups.
You can set up multiple access codes for specified customers. This function allows
some of your customers’ employees access to limited data, while others can access
more extensive information.
You can also set up master access codes that are not associated with a particular
customer. For example, these access codes can be used by your sales
representatives, to allow them remote access to multiple customers’ data. Master
passwords cannot match any customer-specific passwords you have set up.
Use the Customer Internet Access Codes function on the File Maintenance menu
for the following tasks:
•
•
•
•
•
•
add access codes for a customer
change the information that a customer can access
set up additional access codes for a customer
set up master passwords for your staff
remove access for customers
set up the inventory location to use when calculating prices for a customer
Note
You must set up your customers with access codes before they will be able to
access the information on your web site.
Reports
No report is associated with this function.
OSAS Web B2B User’s Manual
3-15
Customer Internet Access Codes
File Maintenance
Screen Use
Screen
Description
Customer Internet
Access Codes
Use the Customer Internet Access Codes screen to enter or
change web access information for your customers.
Customer Groups
Use the Customer Groups screen to indicate the inventory
item groups that this customer can view through the Item
Inquiry and Order Entry web pages.
Customer Internet Access Codes Screen
3-16
OSAS Web B2B User’s Manual
File Maintenance
Customer Internet Access Codes
Field Definitions
Inquiry
Field Name
Description
Cust ID
Enter the ID of the customer you want to give access to.
To set up a master password, leave this field blank.
Inquiry
Inquiry
Access Code
Enter the access code you want to work with. A customer may
have multiple access codes.
Copy From Company
ID
If you are creating a new access code, you can copy the access
parameters from a customer in this company, or in another
company.
Enter the company from which you want to copy customer
access codes, or press Enter to set up a code without copying.
Inquiry
Inquiry
Copy From Customer
ID
Enter the customer ID from which you want to copy an access
code. The customer ID you specify must use the same access
code you specified in the Access Code field.
Location ID
Enter the ID of the inventory location you want to use to
calculate prices for this customer.
Set each of the access options for this access code as follows:
1. Toggle YES or NO to indicate whether this customer has access to the
Information—Account Information web page.
2. Toggle YES or NO to indicate whether this customer has access to customer
aging balances on the Information—Account Information web page.
3. Toggle YES or NO to indicate whether this customer has access to credit
information on the Information—Account Information web page.
4. Toggle YES or NO to indicate whether this customer has access to the
Information—Aged Trial Balance web page.
5. Toggle YES or NO to indicate whether this customer has access to the
Information—History Inquiry web page.
OSAS Web B2B User’s Manual
3-17
Customer Internet Access Codes
File Maintenance
6. Toggle YES or NO to indicate whether this customer has access to the Order
Entry web pages from within the Information—History Inquiry web page.
7. Toggle YES or NO to indicate whether this customer has access to the
Information—Invoice Inquiry web page.
8. Toggle YES or NO to indicate whether this customer has access to the
Inventory—Item Inquiry web page.
9. Toggle YES or NO to indicate whether this customer has access to additional
descriptions and pictures on the Inventory—Item Inquiry web page and the
Order Entry web pages.
10. Toggle YES or NO to indicate whether this customer has access to the Order
Entry web pages from within the Inventory—Item Inquiry web page.
11. Toggle YES or NO to indicate whether this customer has access to available
quantities on the Inventory—Item Inquiry web page.
12. Toggle YES or NO to indicate whether this customer has access to price and
quantity-break data on the Inventory—Item Inquiry web page.
13. Toggle YES or NO to indicate whether this customer has access to the
Orders—Order Entry web pages.
14. Toggle YES or NO to indicate whether this customer has access to the
Orders—Order Inquiry web page.
15. Toggle YES or NO to indicate whether this customer has access to the detail
information on the Orders—Order Inquiry web page.
16. Toggle YES or NO to indicate whether this customer has access to the Order
Entry web pages from within the Orders—Order Inquiry web page.
3-18
OSAS Web B2B User’s Manual
File Maintenance
Customer Internet Access Codes
Command Bar Definitions
Command
Description
Enter = toggle
Move to the option you want to change and press Enter to
toggle it (for example, from YES to NO).
aLl
To set all the options to YES, press L.
None
To set all the options to NO, press N.
Write
To save your settings, press W.
Customer
To select another customer, press C.
Group
To access the Customer Groups screen to set up access to item
groups, press G.
Delete
To remove this access code for this customer, press D.
Saving and Exiting
To save your entries, press W. Then enter another customer ID and access code or
use the Exit command to return to the File Maintenance menu.
OSAS Web B2B User’s Manual
3-19
Customer Internet Access Codes
File Maintenance
Customer Groups Screen
Field Definitions
Inquiry
3-20
Field Name
Description
Cust ID
The customer ID and name appear.
Group Code
Enter the item group code you want this customer to have
access to. To add additional item groups, use the Item Group
Codes function on the File Maintenance menu.
Group Description
The description for this Item Group appears.
OSAS Web B2B User’s Manual
File Maintenance
Customer Internet Access Codes
Command Bar Definitions
Command
Description
Append
To add an item group to the access list for this customer, press
A.
aLl
To add access to all item groups for this customer, press L.
nOne
To remove access to all item groups for this customer, press
O.
Goto
To move to a specific item group, press G and enter the item
group code. (This field appears only if you have more than
one screen of item groups.)
Saving and Exiting
To save your entries, press Enter at the Group code field. To return to the
Customer Internet Access Codes screen, use the Exit command.
OSAS Web B2B User’s Manual
3-21
Customer Groups
Features
Use the Customer Groups function on the File Maintenance menu for the following
tasks:
•
•
•
add customer access to an item group
change the customers that have access to an item group
remove customer access from an item group
You can work with customers and item groups in two ways. You can either:
•
•
specify a group and enter the customers that have access to it
specify a customer and enter the groups the customer has access to
Reports
No report is associated with this function.
Screen Use
Screen
Description
Customer Groups
Use the Customer Groups screen to add or change the
customers that have access to an item group, or to change the
groups to which a customer has access.
OSAS Web B2B User’s Manual
3-23
Customer Groups
File Maintenance
Customer Groups (Item Group) Screen
Field Definitions
Inquiry
Field Name
Description
Group Code
To list the customers that have access to a specific group,
enter the group code. The customers that have access to the
group are displayed.
Maint
To list the groups for a specific customer, leave this field
blank.
Inquiry
3-24
Customer ID
Enter the ID of the customer to whom you want to grant
access to this group.
Customer Name
The name of the customer appears from the Accounts
Receivable Customers file.
OSAS Web B2B User’s Manual
File Maintenance
Customer Groups
Customer Groups (Customer) Screen
Field Definitions
Inquiry
Field Name
Description
Customer ID
To list the groups to which a specific customer has access,
leave the Group Code field blank and then enter the ID of the
customer you want to view.
Maint
The item groups to which this customer has access are
displayed.
Inquiry
Group Code
Enter the ID of the group to which you want to grant this
customer access.
Group Description
The description of the group appears.
OSAS Web B2B User’s Manual
3-25
Customer Groups
File Maintenance
Command Bar Definitions
Command
Description
First
To display the first customer or item group on file, press F.
Next
To display the next customer or item group on file, press N.
Prev
To display the previous customer or item group on file, press
P.
laSt
To display the last customer or item group on file, press S.
Append
To add a customer or item group to the access list, press A.
aLl
To add access for all customers or item groups, press L.
nOne
To remove access for all customers or item groups, press O.
Header
To return to the header to select a different customer or item
group, press H.
Goto
To move to a specific customer or item group, press G and
enter the ID or code. (This field appears only if you have more
than one screen of customers or item groups.)
Saving and Exiting
To save your entries, press Enter at the Customer ID or Group Code field. To exit
to the File Maintenance menu, use the Exit command.
3-26
OSAS Web B2B User’s Manual
Tables
Features
Use the Tables function on the File Maintenance menu to set up and maintain the
OSAS Web B2B tables.
Tables store information used by the system and options.
OSAS Web B2B uses these tables:
•
The EMAIL table stores the address of the contact person for web problems.
•
The HOMEPATH table stores your entries when you use the Create OSAS
Web Login Page function.
•
The WEBPATH table stores your entries when you use the Install Web Server
Components function.
•
The COPYPATH table stores your entries when you use the Copy Programs
to Web Server and Copy Data Files to Web Server functions.
•
The IMGPATH table stores the path to the directory where you store you
image files for use by the web server.
Note
The HOMEPATH, WEBPATH, COPYPATH and IMGPATH tables are
automatically created and maintained by the functions described above. You
should not change these tables using the Tables function.
Reports
No report is associated with this function.
OSAS Web B2B User’s Manual
3-27
Tables
File Maintenance
Screen Use
Screen
Description
Tables
Use the Tables screen to maintain the tables in OSAS Web
B2B.
Blank Tables Screen
Field Definitions
Inquiry
3-28
Field Name
Description
Table ID
Enter the ID of the table you want to work with. The EMAIL
table is the only table you need to maintain in OSAS Web
B2B.
OSAS Web B2B User’s Manual
File Maintenance
Inquiry
Tables
Field Name
Description
Copy From?
This field appears if you entered a new table ID. Enter the ID
of the table you want to copy data from.
Description
Enter a description of the table.
Number of Cols
Enter the number of columns in the table.
Column Length
Enter the number of characters in each column.
Type
Enter the type of data to be stored—alphanumeric (A) or
numeric (N).
Column Headings
Enter the column headings for this table as described below
for the table you are working with.
Column Data
Enter the column data as described below for the table you are
working with.
Command Bar Definitions
This screen has no command bar.
Saving and Exiting
To save your entries, use the Proceed (OK) command. To return to the File
Maintenance menu, use the Exit (F7) command.
EMAIL Table
The EMAIL table stores the electronic mail address that will be shown on the web
pages as the customer’s contact if any problems occur while viewing information
on the web pages.
When you enter the table ID, the rest of the EMAIL table appears.
OSAS Web B2B User’s Manual
3-29
Tables
File Maintenance
EMAIL Table Screen
Column Data Definitions
3-30
Field Name
Description
Email Address
Enter the Email address of the person in your company who
should be contacted in the event of web problems.
OSAS Web B2B User’s Manual
OSAS Web B2B User’s Manual
Set Up Web Components
Create Login Page
Install Web Server Components
OSAS Web B2B User’s Manual
4
4-3
4-5
4-1
Create Login Page
Features
Use the Create Login Page function on the Set Up Web Components menu to build
the Login page for the web server. You must run this function to:
•
•
create your OSAS Web B2B Login page for the first time
change the title used on the Login page
Reports
No report is associated with this function.
Screen Use
Screen
Description
Create Login Page
Use the Create Login Page screen to create and modify your
OSAS Web B2B Login page.
OSAS Web B2B User’s Manual
4-3
Create Login Page
Set Up Web Components
Create Login Page Screen
Field Definitions
Field Name
Description
Login Page Title
Enter a title for your Login page.
Web Server Documents
Path
Enter a directory path name to the location on the web server
from which web pages are launched.
Command Bar Definitions
This screen has no command bar.
Saving and Exiting
To save your entries and create your login page, use the Proceed (OK) command.
When the page is created, the Set Up Web Components menu appears.
4-4
OSAS Web B2B User’s Manual
Install Web Server Components
Features
Use the Install Web Server Components function on the Set Up Web Components
menu to copy the components that are required for OSAS Web B2B to the web
server. This function copies the various OSAS Web B2B web pages and web
drivers.
The information copied to the web server is divided into three categories:
•
Web server programs, including the OSAS Web B2B programs, scripts, style
sheets, and batch files
•
Data files, including the OSAS Web B2B, Accounts Receivable, Sales Order
and Inventory files, copied by the Copy Data Files to Web Server function
•
Resource Manager programs, including the applications programs used in
calculating prices, aging customers, and so on, copied by the Copy Programs
to Web Server function
In this function you tell OSAS Web B2B where this information is stored. You
need to describe how to reach the web server from the OSAS system, and how to
access the information from the web server.
If you use local processing, the programs and data files will reside on the same
system where OSAS is installed. If you use remote processing, the programs and
data files will reside on the web server.
Note
If you are using a Windows Web Server that accesses data through a UNIX Data
Server, see page 4-8.
For a list of the files copied, see appendix C to this manual.
OSAS Web B2B User’s Manual
4-5
Install Web Server Components
Set Up Web Components
Reports
No report is associated with this function.
Screen Use
Screen
Description
Install Web Server
Components
Use the Install Web Server Components screen to copy the
necessary OSAS Web B2B files to your web server.
Install Web Server Components
4-6
OSAS Web B2B User’s Manual
Set Up Web Components
Install Web Server Components
Field Definitions
Field Name
Description
Web Server Programs Path
Enter the full path from the OSAS system to the web server
programs path.
Web Server Images Path
Enter the full path from the OSAS system to the web server
images path.
BBx Interpreter Path
Enter the full path from the web server to the location of the
BBx Interpreter.
Data File Path
Enter the full path from the web server to the OSAS data
files. If you use remote processing, enter the path where the
data file copies are kept.
System File Path
Enter the full path from the web server to the OSAS sysfil
path. If you use remote processing, enter the path where the
sysfil copies are kept.
Web Server Resource
Manager Path
Enter the full path from the web server to the location of the
Resource Manager programs.
Web Server
LocalProgramsPath
Enter the full path to the /osasweb directory on the web
server.
Web Server System
If the web server resides on a UNIX/Linux system, enter
U. If the web server resides on Novell or Windows 95/98 or
NT, enter D.
Command Bar Definitions
This screen has no command bar.
Saving and Exiting
To save your entries or begin the copy process, use the Proceed (OK) command.
When the copy process finishes, the Set Up Web Components menu appears.
OSAS Web B2B User’s Manual
4-7
Install Web Server Components
Set Up Web Components
Windows Web Server/UNIX Data Server
If you are using a Windows Web Server that accesses data through a UNIX Data
Server, you must set up a UNIX user ID on the UNIX Data Server.
On the UNIX computer accessing the OSAS Web B2B data files, set up “osasweb”
as a UNIX user ID.
Note
If you do not want to use osasweb as your user ID, you must change the userid
entries in the OW*.tmp files in the ProgOW directory. Edit the OW*.tmp files
before you use the Install Web Server Components function.
4-8
OSAS Web B2B User’s Manual
OSAS Web B2B User’s
Manual
Sales Order Processing
Transaction Journal
Build Sales Orders from Remote Files
Purge Log File
OSAS Web B2B User’s Manual
5
5-3
5-7
5-11
5-1
Sales Order Processing
Sales Order Processing on the Web
If you allow your customers access to the sales order processing functions on the
web, you use the functions on the Sales Order Processing menu.
When you set up OSAS Web B2B, you can elect to allow access to your OSAS
data files directly from the Internet, or to allow access to copies of your files stored
on the web server. The process of using copies of your files is known as remote
processing. See chapter 2 for more information about remote processing.
When your customers enter sales orders through the Internet, OSAS Web B2B
stores the orders as quotes in the Sales Order Header and Detail files. If you are
using remote processing, OSAS Web B2B uses the files kept on the web server. If
not, OSAS Web B2B uses the same files used in Sales Order Processing. In either
case, OSAS Web B2B keeps a log file of the orders that have been entered, and any
comments customers enter along with their orders.
Use the functions on the Sales Order Processing menu on a daily basis, as follows
(skip steps 2 and 4 if you do not use remote processing):
1. Print the Transaction Journal to list the orders that have been entered along
with any comments from the customers.
2. If you use remote processing, run the Build Sales Orders from Remote Files
function to transfer your customers’ orders from the remote data files to your
live OSAS data files.
3. Use the Purge Log File function to prepare the log file for the next day’s
entries.
4. If you use remote processing, run the Copy Data Files to Web Server function
on the Remote Access menu.
5-2
OSAS Web B2B User’s Manual
Transaction Journal
Features
The Transaction Journal produces a list of the orders entered on the web site. This
list serves as an audit trail of the transactions, as well as an edit register to check for
necessary changes or incomplete entries.
If you are using remote data files, you can print the Transaction Journal before
moving the orders to your live Sales Order files as an audit trail. When you use the
Build Sales Orders from Remote Files function, this report will reprint
automatically to show any order number changes that have been made in the copy
process.
Reports
A sample Transaction Journal is on page 5-5.
Screen Use
Screen
Description
Transaction Journal
Use the Transaction Journal screen to specify the location of
the log file.
OSAS Web B2B User’s Manual
5-3
Transaction Journal
Sales Order Processing
Transaction Journal Screen
1. The location of the OSAS Web B2B directory on the web server appears.
Press Enter to accept the path shown, or enter a different path.
2. Select the output device.
Saving and Exiting
After the report is produced, the Sales Order Processing menu appears.
5-4
OSAS Web B2B User’s Manual
Builders Supply
Transaction Journal
Page
1
02/12/2001
02/12/2001
02/12/2001
02/12/2001
02/12/2001
End of report
00000142
00000144
00000145
00000146
00000149
12:47
12:49
1:10
1:22
4:18
PM
PM
PM
PM
PM
Note Shipping Address Change.
May substitute standard window.
Please process promptly.
Order No. Date
Time
New Order No. Additional Comments
--------------------------------------------------------------------------------
02/12/2001
12:51 PM
Sales Order Processing
Transaction Journal
Transaction Journal Report
OSAS Web B2B User’s Manual
5-5
Build Sales Orders from Remote Files
Features
You can elect to allow access to your OSAS data files directly from the Internet, or
to copies of your files which have been placed on the web server. The process of
using copies of your files is known as remote processing. See chapter 2 for more
information about remote processing.
Use the Build Sales Orders from Remote Files function on the Sales Order
Processing menu to copy orders entered through the web to quotes in your OSAS
Sales Order data files.
Note
Do not use this function if you are not using remote processing with OSAS Web
B2B. When you elect not to use remote processing, the orders are entered as
quotes directly into your OSAS files.
Because remote processing uses a different set of Sales Order files, the order
numbers may change when you copy the orders to the live system. This function
reprints the Transaction Journal after the copy to show the new order numbers
assigned during the copy process.
Reports
A sample of the Build Sales Orders from Remote Files Log is on page 5-10.
OSAS Web B2B User’s Manual
5-7
Build Sales Orders from Remote Files
Sales Order Processing
Screen Use
Screen
Description
Build Sales Orders from
Remote Files
Use the Build Sales Orders from Remote Files screen to
provide the location of the order log file and the remote OSAS
data files, and to specify the batch ID to use when copying the
orders.
Build Sales Orders from Remote Files Screen
1. The Web Server Programs path you used in the Install Web Server
Components function appears. Press Enter to accept the path shown, or enter
a different path.
2. The Remote Data Files path you used in the Install Web Server Components
function appears. Press Enter to accept the path shown, or enter a different
path.
5-8
OSAS Web B2B User’s Manual
Sales Order Processing
Inquiry
Build Sales Orders from Remote Files
3. Enter the batch ID you want to use for the quotes that are created during the
copy process.
4. Select the output device.
Saving and Exiting
When the orders have been copied and the log prints, the Sales Order Processing
menu appears.
OSAS Web B2B User’s Manual
5-9
5-10
Builders Supply
Build Sales Orders from Remote Files
Page
1
02/12/2001
02/12/2001
02/12/2001
02/12/2001
02/12/2001
End of report
00000142
00000144
00000145
00000146
00000149
12:47
12:49
1:10
1:22
4:18
PM
PM
PM
PM
PM
00000155
00000156
00000157
00000158
00000159
Note Shipping Address Change.
May substitute standard window.
Please process promptly.
Order No. Date
Time
New Order No. Additional Comments
--------------------------------------------------------------------------------
02/12/2001
12:51 PM
Build Sales Orders from Remote Files
Sales Order Processing
Build Sales Orders from Remote Files Log
OSAS Web B2B User’s Manual
Purge Log File
Features
Use the Purge Log File function on the Sales Order Processing menu to clear the
log file for new orders. If you use remote processing, you should use this function
after you Build Sales Orders from Remote Files.
Note
You should print the Transaction Journal before you run this function to preserve
an audit trail of the orders that have been entered.
Reports
No report is associated with this function.
Screen Use
Screen
Description
Purge Log File
Use this screen to specify the path where the log file resides.
OSAS Web B2B User’s Manual
5-11
Purge Log File
Sales Order Processing
Purge Log File Screen
Field Definitions
Field Name
Description
Web Server Programs
Path
The web server programs path you used in the Install Web
Server Components function appears. Press Enter to accept
the path shown, or enter a different path.
Command Bar Definitions
This screen has no command bar.
Saving and Exiting
To begin the purge process, use the Proceed (OK) command. When the purge
finishes, the Sales Order Processing menu appears.
5-12
OSAS Web B2B User’s Manual
OSAS Web B2B User’s
Manual
Remote Access
Copy Data Files to Web Server
Copy OSAS Programs to Web Server
OSAS Web B2B User’s Manual
6
6-3
6-7
6-1
Remote Access
Remote Access
When you set up OSAS Web B2B, you can elect to allow access to your OSAS
data files directly from the Internet, or to allow access to copies of your files stored
on the web server. The process of using copies of your files is known as remote
processing. See chapter 2 for more information about remote processing.
You use the functions on the Remote Access menu to set up the programs and to
refresh your data files if you use remote processing.
Use the Copy OSAS Programs to Web Server function to set up remote processing.
Use the Copy Data Files to Web Server function regularly to refresh the data stored
on your web server. In addition, you should run this function every time you use
the Build Sales Orders from Remote Files function on the Sales Order Processing
menu.
6-2
OSAS Web B2B User’s Manual
Copy Data Files to Web Server
Features
Use the Copy Data Files to Web Server function on the Remote Access menu to
refresh the data that is stored on the web server if you have chosen remote
processing. This program copies the OSAS data files to the web server for the
inquiry and sales order entry functions.
This function copies the Inventory, Accounts Receivable, and Sales Order files for
use by OSAS Web B2B functions.
Note
You need run this function only if you are using remote processing. If you are not
using remote processing, your live OSAS data files are used for OSAS Web B2B
functions.
You must copy the optional files to the web server at least once if you want your
customers to be able to view history or inquire on invoices.
Reports
No report is associated with this function.
OSAS Web B2B User’s Manual
6-3
Copy Data Files to Web Server
Remote Access
Screen Use
Screen
Description
Copy Data Files to Web
Server
Use this screen to specify the location where the data files are
stored on the web server.
Copy Data Files to Web Server Screen
Field Definitions
6-4
Field Name
Description
Web Server Data Path
Enter the full path from the OSAS system to the data path on
the web server.
OSAS Web B2B User’s Manual
Remote Access
Copy Data Files to Web Server
Field Name
Description
Copy Optional Data
Files?
The AR Detail History file can be large and may take more
time to copy. You can choose to skip copying this file to speed
up the copy process.
To copy the file, check the box (or enter Y in text mode). To
skip the file, uncheck the box (or enter N in text mode).
Command Bar Definitions
This screen has no command bar.
Saving and Exiting
To begin the copy process, use the Proceed (OK) command. When the copy
process is finished, the Remote Access menu appears.
OSAS Web B2B User’s Manual
6-5
Copy OSAS Programs to Web Server
Features
Use the Copy OSAS Programs to Web Server function on the Remote Access
menu to set up the web server for remote processing. This program copies the
OSAS program files to the web server for the inquiry and sales order entry
functions.
You need run this function only during the installation process. Once the programs
have been copied, you do not need to copy them again, unless you change your web
server or update the OSAS Web B2B software.
Reports
No report is associated with this function.
Screen Use
Screen
Description
Copy OSAS Programs
to Web Server
Use this screen to specify the path where the programs reside
on the web server.
OSAS Web B2B User’s Manual
6-7
Copy OSAS Programs to Web Server
Remote Access
Copy OSAS Programs to Web Server Screen
Field Definitions
Field Name
Description
Web Server Resource
Manager Path
Enter the full path from your OSAS system to the Resource
Manager path on the web server.
Command Bar Definitions
This screen has no command bar.
Saving and Exiting
To begin the copy process, use the Proceed (OK) command. When the copy
process finishes, the Remote Access menu appears.
6-8
OSAS Web B2B User’s Manual
OSAS Web
B2B User’s
Manual
Master File Lists
Item Group Codes List
Inventory Item Pictures List
Internet Companies List
Internet Inventory Item Groups List
Internet Access Codes List
Customer Groups List
Tables List
OSAS Web B2B User’s Manual
7
7-3
7-7
7-11
7-15
7-19
7-23
7-27
7-1
Item Group Codes List
Features
The Item Group Codes List shows the item group codes that are on your system for
the range of group codes you select.
Reports
A sample Item Group Codes List is on page 7-5.
Screen Use
Screen
Description
Item Group Codes List
Use the Item Group Codes List screen to select the group
codes you want to list.
OSAS Web B2B User’s Manual
7-3
Item Group Codes List
Master File Lists
Item Group Codes List Screen
Inquiry
1. Enter the range of item group codes you want in the list.
2. Select the output device.
Saving and Exiting
After the list is produced, the Master File Lists menu appears.
7-4
OSAS Web B2B User’s Manual
Builders’ Supply
Item Group Codes List
Page
1
OSAS Web B2B User’s Manual
Appliances
Dishwashers
Heating and Air Conditioning Equipment
Interior Materials, Paint, Wallpaper, Supplies
Materials
Millwork Trim and Doors
Cabinet Replacement Parts
Refrigerators
Stoves and Ranges
Windows
End of report
APPLIANCE
DISHWASHER
HEAT/AIR
INTERIOR
MATERIALS
MILLWORK
PARTS
REFRIG
STOVE
WINDOWS
Group ID Group Description
--------------------------------------------------------------------------------
02/09/2001
5:45 PM
Master File Lists
Item Group Codes List
Item Group Codes List
7-5
Inventory Item Pictures List
Features
The Inventory Item Pictures List shows the image files that you have associated
with your inventory items for display on the web. You can select the range of items
you want to include in the list.
Reports
A sample Inventory Item Pictures List is on page 7-9.
Screen Use
Screen
Description
Inventory Item Pictures
List
Use this screen to select the items you want to list.
OSAS Web B2B User’s Manual
7-7
Inventory Item Pictures List
Master File Lists
Inventory Item Pictures List Screen
Inquiry
1. Enter the range of items you want in the list.
2. Select the output device.
Saving and Exiting
After the list is produced, the Master File Lists menu appears.
7-8
OSAS Web B2B User’s Manual
Builders’ Supply
Inventory Item Pictures List
Page
1
OSAS Web B2B User’s Manual
End of report
100
150
200
200100
200200
200300
200400
200500
200600
250
300
350
400
450
460
550
600
610
650
700
Electrical Package
Plumbing Package
Heating/Cooling Package
Furnace
Water Heater
Air Conditioner
Water Softener
Sump Pump
Humidifier
Exterior Panels
Interior Door
Entry Door
Interior Materials
Slide by Window 24” x 40”
Slide by Window 30” X 40”
Millwork Package
Standard Window 24” X 40”
Standard Window 30” X 40”
Steel Supports
Cabinets
elec.gif
plumb.gif
heatcool.jpg
furnace.jpg
waterhtr.jpp
aircond.jpg
watersft.jpp
sumppump.jpg
humid.jpg
panels.bmp
door1.bmp
door2.bmp
interior.gif
window1.bmp
window2.bmp
millwork.gif
window3.bmp
window4.bmp
support.bmp
cabinet.bmp
Item ID
Item Description
Image File
--------------------------------------------------------------------------------
02/10/2001
3:16 PM
Master File Lists
Inventory Item Pictures List
Inventory Item Pictures List
7-9
Internet Companies List
Features
The Internet Companies List shows the companies that you have set up for internet
access for the companies you select.
Reports
A sample Internet Companies List is on page 7-13.
Screen Use
Screen
Description
Internet Companies List
Use this screen to select the companies you want to list.
OSAS Web B2B User’s Manual
7-11
Internet Companies List
Master File Lists
Internet Companies List Screen
Inquiry
1. Enter the range of companies you want in the list.
2. Select the output device.
Saving and Exiting
After the list is produced, the Master File Lists menu appears.
7-12
OSAS Web B2B User’s Manual
Builders' Supply
Internet Companies List
Page
1
Builders' Supply
End of report
H
000001
Comp ID Company Name
Batch
-----------------------------------------------------------------------------------------------------------------------------------
03/15/2001
5:32 PM
Master File Lists
Internet Companies List
Internet Companies List
OSAS Web B2B User’s Manual
7-13
Internet Inventory Item Groups List
Features
The Internet Inventory Item Groups List shows the item groups and the items that
belong to them. The list can be printed for the items, locations, or group IDs you
select, and can be sorted by item ID or by group code.
Reports
A sample Internet Inventory Item Groups List is on page 7-17.
Screen Use
Screen
Description
Internet Inventory Item
Groups List
Use this screen to select the items, groups and locations you
want to list, and the order of the information on the list.
OSAS Web B2B User’s Manual
7-15
Internet Inventory Item Groups List
Master File Lists
Internet Inventory Item Groups List Screen
Inquiry
1. Enter the range of items you want in the list.
Inquiry
2. Enter the range of locations you want in the list.
Inquiry
3. Enter the range of groups you want in the list.
4. Select the order in which you want to print the list. You can print it by item ID
or by group code.
5. Select the output device.
Saving and Exiting
After the list is produced, the Master File Lists menu appears.
7-16
OSAS Web B2B User’s Manual
Builders’ Supply
Internet Inventory Item Groups List
Page
1
OSAS Web B2B User’s Manual
End of report
Group Code Item ID
Item Description
Loc ID Image
-----------------------------------------------------------------------------------------------------------------------------------HEAT/AIR 200
Heating/Cooling Package
CA0001 heatcool.jpg
HEAT/AIR 200
Heating/Cooling Package
MD0001 heatcool.jpg
HEAT/AIR 200
Heating/Cooling Package
MN0001 heatcool.jpg
HEAT/AIR 200
Heating/Cooling Package
TX0001 heatcool.jpg
HEAT/AIR 200100
Furnace
CA0001 furnace.jpg
HEAT/AIR 200100
Furnace
MD0001 furnace.jpg
HEAT/AIR 200100
Furnace
MN0001 furnace.jpg
HEAT/AIR 200100
Furnace
TX0001 furnace.jpg
HEAT/AIR 200200
Water Heater
CA0001 waterhtr.jpp
HEAT/AIR 200200
Water Heater
MD0001 waterhtr.jpp
HEAT/AIR 200200
Water Heater
MN0001 waterhtr.jpp
HEAT/AIR 200200
Water Heater
TX0001 waterhtr.jpp
HEAT/AIR 200300
Air Conditioner
CA0001 aircond.jpg
HEAT/AIR 200300
Air Conditioner
MD0001 aircond.jpg
HEAT/AIR 200300
Air Conditioner
MN0001 aircond.jpg
HEAT/AIR 200300
Air Conditioner
TX0001 aircond.jpg
HEAT/AIR 200400
Water Softener
CA0001 watersft.jpp
HEAT/AIR 200400
Water Softener
MD0001 watersft.jpp
HEAT/AIR 200400
Water Softener
MN0001 watersft.jpp
HEAT/AIR 200400
Water Softener
TX0001 watersft.jpp
HEAT/AIR 200500
Sump Pump
CA0001 sumppump.jpg
HEAT/AIR 200500
Sump Pump
MD0001 sumppump.jpg
HEAT/AIR 200500
Sump Pump
MN0001 sumppump.jpg
HEAT/AIR 200500
Sump Pump
TX0001 sumppump.jpg
HEAT/AIR 200600
Humidifier
CA0001 humid.jpg
HEAT/AIR 200600
Humidifier
MD0001 humid.jpg
HEAT/AIR 200600
Humidifier
MN0001 humid.jpg
HEAT/AIR 200600
Humidifier
TX0001 humid.jpg
02/10/2001
5:03 PM
Master File Lists
Internet Inventory Item Groups List
Internet Inventory Item Groups List
7-17
Internet Access Codes List
Features
The Internet Access Codes List shows the access codes that you have set up for
your customers for the companies, customers, or access codes you select.
Reports
A sample Internet Access Codes List is on page 7-21.
Screen Use
Screen
Description
Internet Access Codes
List
Use this screen to select the companies, customers and access
codes you want to list.
OSAS Web B2B User’s Manual
7-19
Internet Access Codes List
Master File Lists
Internet Access Codes List Screen
Inquiry
1. Enter the range of companies you want in the list.
Inquiry
2. Enter the range of customers you want in the list.
Inquiry
3. Enter the range of access codes you want in the list.
4. Select the output device.
Saving and Exiting
After the list is produced, the Master File Lists menu appears.
7-20
OSAS Web B2B User’s Manual
Builders' Supply
Internet Access Codes List
Page
1
OSAS Web B2B User’s Manual
ACE001 Test1
End of report
H
MN0001
Information - Account Information
Orders - Order Inquiry
Orders - Order Inquiry - Detail Information
Information - History Inquiry
Inventory - Item Inquiry
Inventory - Item Inquiry - Show On Hand Quantity
Inventory - Item Inquiry - Show Price/Qty Breakdown
Information - Account Information - Show Balances
Information - Account Information - Show Credit Limit
Orders - Order Entry
Inventory - Item Inquiry - Additional Description
Information - Aged Trial balance
Information - Invoice Inquiry
Inventory - Item Inquiry - Link to Order Entry
Information - History Inquiry - Link to Order Entry
Orders - Order Inquiry - Link to Order Entry
YES
YES
YES
YES
YES
YES
YES
YES
YES
YES
YES
YES
YES
YES
YES
YES
Company ID Cust ID Access Code
Location HTML Page Type
Access
------------------------------------------------------------------------------------------------------------------------------------
03/15/2001
5:38 PM
Master File Lists
Internet Access Codes List
Internet Access Codes List
7-21
Customer Groups List
Features
The Customer Groups List shows the item groups that you have set up for each
customer for the customer IDs or group codes you select. You can also choose to
organize the list by customer or by group code.
Reports
A sample Customer Groups List is on page 7-25.
Screen Use
Screen
Description
Customer Groups List
Use this screen to select the customers and group codes you
want to list.
OSAS Web B2B User’s Manual
7-23
Customer Groups List
Master File Lists
Customer Groups List Screen
Inquiry
1. Enter the range of customers you want in the list.
Inquiry
2. Enter the range of groups you want in the list.
3. Select the order in which you want to print the list. You can organize it by
customer ID or by group code.
4. Select the output device.
Saving and Exiting
After the list is produced, the Master File Lists menu appears.
7-24
OSAS Web B2B User’s Manual
Builders’ Supply
Customer Groups List
Page
1
OSAS Web B2B User’s Manual
APPLIANCE
HEAT/AIR
INTERIOR
MATERIALS
MILLWORK
WINDOWS
HEAT/AIR
HEAT/AIR
HEAT/AIR
HEAT/AIR
HEAT/AIR
HEAT/AIR
End of report
ACE001
ACE001
ACE001
ACE001
ACE001
ACE001
DAL001
GRE001
KAN001
LOS001
SUN001
TEN001
Appliances
Heating and Air Conditioning Equipment
Interior Materials, Paint, Wallpaper, Supplies
Materials
Millowrk Trim and Doors
Windows
Heating and Air Conditioning Equipment
Heating and Air Conditioning Equipment
Heating and Air Conditioning Equipment
Heating and Air Conditioning Equipment
Heating and Air Conditioning Equipment
Heating and Air Conditioning Equipment
Cust ID Group ID Group Description
--------------------------------------------------------------------------------
02/10/2001
5:40 PM
Master File Lists
Customer Groups List
Customer Groups List
7-25
Tables List
Features
The Tables List shows the tables that are on your system for the range of IDs you
select.
Reports
A sample Tables List is on page 7-29.
Screen Use
Screen
Description
Tables List
Use this screen to select the tables you want to list, and to
select the options for the list.
OSAS Web B2B User’s Manual
7-27
Tables List
Master File Lists
Tables List Screen
1. The current application ID, OW, is displayed.
Inquiry
2. Enter the range of table IDs you want in the list.
3. If you want to exclude lines with no text from the list to save space, check the
box (or enter Y in text mode); if not, uncheck the box (or enter N in text
mode).
4. If you want each table to print on its own page, check the box (or enter Y in
text mode); if not, uncheck the box (or enter N in text mode).
5. Select the output device.
Saving and Exiting
After the list is produced, the Master File Lists menu appears.
7-28
OSAS Web B2B User’s Manual
End of Report
Page
Description E-Mail Address in case of problems.
1 Column Length 50
Type A
Builders’ Supply
Tables List
OSAS Web
Email Address
-------------------------------------------------Webmaster@builders_supply.com
Table ID EMAIL
No. of Columns
02/10/2001
5:41 PM
1
Master File Lists
Tables List
Tables List
OSAS Web B2B User’s Manual
7-29
OSAS Web B2B User’s Manual
The Web Interface
OSAS Web Login Page
Account Information
Aged Trial Balance
History Inquiry
Invoice Inquiry
Item Inquiry
Order Inquiry
Order Entry
OSAS Web B2B User’s Manual
8
8-3
8-7
8-9
8-11
8-13
8-17
8-25
8-29
8-1
OSAS Web Login Page
Features
The OSAS Web Login Page is the first of the web pages presented to Internet
users. Your customers will use this page to enter their customer ID and password,
and to choose which company they want to work with.
The login page is created by the Create Login Page function on the Set Up Web
Components menu in OSAS. See chapter 4 for more information about this
function.
OSAS Web Login Page HTML Screen
OSAS Web B2B User’s Manual
8-3
OSAS Web Login Page
The Web Interface
Field Definitions
Field Name
Description
Customer ID
Enter your customer ID.
Password
Enter your password.
Company
Use the list box to select the company with which you want to
work.
Command Definitions
Command
Description
Submit
Click on the Submit button to proceed. The Account Information
screen appears.
Saving and Exiting
When you click on the Submit button, OSAS Web B2B checks the customer ID
and password and displays the Account Information screen for the customer
containing top and side menus based on the functions to which you have granted
them access.
If the customer ID is not set up or the password is incorrect, an error message
screen appears instead.
8-4
OSAS Web B2B User’s Manual
The Web Interface
OSAS Web Login Page
OSAS Web B2B Menus
There are three top level menu groups: Information, Inventory, and Orders. These
top level menus contain one or more side menu functions, as follows:
•
Information
•
Account Information
•
Aged Trial Balance
•
History Inquiry
•
Invoice Inquiry
•
Inventory
•
Item Inquiry
•
Orders
•
Order Inquiry
•
Order Entry
OSAS Web B2B User’s Manual
8-5
Account Information
Features
The Account Information web page on the Information menu displays data for the
customer’s account from the OSAS files. The information includes general
information, and can optionally include aging balances and credit information.
You can specify the information available on this page using the Customer Internet
Access Codes function on the File Maintenance menu in OSAS.
Account Information HTML Screen
OSAS Web B2B User’s Manual
8-7
Account Information
The Web Interface
Field Definitions
There are no fields to enter on this web page.
Command Definitions
Command
Description
Top of Page
Click on Top of Page to reset the browser display to the top of the
current web page.
Saving and Exiting
When you finish reviewing the information, you can close the browser to end your
session, or choose a different menu selection from the side or top menus.
8-8
OSAS Web B2B User’s Manual
Aged Trial Balance
Features
The Aged Trial Balance web page on the Information menu displays the balance
and aged invoices for the customer’s account from the OSAS ARINx file.
Aged Trial Balance HTML Screen
Field Definitions
There are no fields to enter on this web page.
OSAS Web B2B User’s Manual
8-9
Aged Trial Balance
The Web Interface
Command Definitions
Command
Description
Top of Page
Click on Top of Page to reset the browser display to the top of the
current web page.
Saving and Exiting
When you finish reviewing the information, you can close the browser to end your
session, or choose a different menu selection from the side or top menus.
8-10
OSAS Web B2B User’s Manual
History Inquiry
Features
The History Inquiry web page on the Information menu shows the invoice, credit
memo and payment history for this customer.
History Inquiry HTML Screen
OSAS Web B2B User’s Manual
8-11
History Inquiry
The Web Interface
Field Definitions
Field Name
Description
Search for Invoice
To find a specific invoice, enter the invoice number and click the
Search for Invoice button.
You can also click on an item ID to create a line item for that item in your order
entry shopping cart if you are permitted to do so based on your customer ID and
password.
Command Definitions
Command
Description
Next
This page shows ten history entries for this customer. If there are
more entries after the ones displayed, the Next command appears.
Click on Next to see the next page of history.
Previous
This page shows ten history entries for this customer. If there are
more entries before the ones displayed, the Previous command
appears.
Click on Previous to see the previous page of history.
Top of Page
Click on Top of Page to reset the browser display to the top of the
current web page.
Saving and Exiting
When you finish reviewing history, you can close the browser to end your session,
or choose a different menu selection from the side or top menus.
8-12
OSAS Web B2B User’s Manual
Invoice Inquiry
Features
The Invoice Inquiry web page on the Information menu shows the invoices and
credit memos in history for this customer. When you select an invoice, an invoice
form is re-created from the entries in the AR and IN history files.
Invoice Inquiry HTML Screen
OSAS Web B2B User’s Manual
8-13
Invoice Inquiry
The Web Interface
Field Definitions
There are no fields to enter on this web page.
Command Definitions
Command
Description
Top of Page
Click on Top of Page to reset the browser display to the top of the
current web page.
Saving and Exiting
When you select and invoice number from the list, the Invoice Detail screen
appears.
8-14
OSAS Web B2B User’s Manual
The Web Interface
Invoice Inquiry
Invoice Detail HTML Screen
Field Definitions
There are no fields to enter on this web page.
OSAS Web B2B User’s Manual
8-15
Invoice Inquiry
The Web Interface
Command Definitions
Command
Description
Top of Page
Click on Top of Page to reset the browser display to the top of the
current web page.
Saving and Exiting
When you finish reviewing invoices from history, you can close the browser to end
your session, or choose a different menu selection from the side or top menus.
8-16
OSAS Web B2B User’s Manual
Item Inquiry
Features
The Item Inquiry web page displays a list of the inventory item groups to which
this customer has access. The groups provide a convenient way to organize your
items for viewing.
You can change the item groups that this customer can view using the Customer
Groups function on the File Maintenance menu in OSAS.
You can change the items and subgroups in an item group using the Internet
Inventory Item Groups function on the File Maintenance menu in OSAS.
You can also choose whether to display quantities and price breaks on this web
page using the Customer Internet Access Codes function on the File Maintenance
menu in OSAS.
Screen Use
Screen
Description
Item Group Codes
Use this screen to select the items you want to list.
Item Inquiry
This screen lists the items and subgroups in the group that you
selected. The items are displayed in groups of 10.
Item Additional
Descriptions
This screen lists the additional description lines for an item and a
graphic image of the item, if you set one up.
Item Price Breaks
This screen shows the price breaks for an item you select (if you
have access to this information).
OSAS Web B2B User’s Manual
8-17
Item Inquiry
The Web Interface
Item Group Codes HTML Screen
Field Definitions
Click on the description of the item group you want to view. If there are more than
ten item groups on file, you can search for a specific item group by entering the
group code and clicking on Search for Group.
You can search for a specific item within any available group by entering the item
ID and clicking on Search for Item
8-18
OSAS Web B2B User’s Manual
The Web Interface
Item Inquiry
Command Definitions
Command
Description
Next
This page shows ten groups for this customer. If there are more
groups after the ones displayed, the Next command appears.
Click Next to see the next page of groups.
Previous
This page shows ten groups for this customer. If there are more
groups before the ones displayed, the Previous command appears.
Click Previous to see the previous page of groups.
Top of Page
Click on Top of Page to reset the browser display to the top of the
current web page.
Saving and Exiting
When you click on a group code description, the Item Inquiry page appears.
Item Inquiry HTML Screen
OSAS Web B2B User’s Manual
8-19
Item Inquiry
The Web Interface
Field Definitions
The items and subgroups that belong to the group you selected appear. Units of
measure, unit prices and quantities appear for items in the group.
You can search for a specific item within any available group by entering the item
ID and clicking on Search for Item
Command Definitions
Command
Description
Next
This page shows ten items and subgroups for this customer. If
there are more items after the ones displayed, the Next command
appears.
Click on Next to see the next page of items and subgroups.
Previous
This page shows ten items and subgroups for this customer. If
there are more items before the ones displayed, the Previous
command appears.
Click on Previous to see the previous page of items and
subgroups.
Top of Page
Click on Top of Page to reset the browser display to the top of the
current web page.
Saving and Exiting
When you click on a subgroup ID, you will see the items in that group.
When you click on an item ID, you add that item to your order entry shopping cart
if you are permitted to do so based on your customer ID and password.
When you click on a highlighted description, you see additional description
information and a graphical image of the item, if available.
When you click on the price of any item, you see a breakdown of quantity-break
pricing for this customer.
When you finish reviewing items, you can close the browser to end your session, or
choose a different menu selection from the side or top menus.
8-20
OSAS Web B2B User’s Manual
The Web Interface
Item Inquiry
Item Additional Descriptions Screen
Field Definitions
There are no fields to enter on this web page.
Command Definitions
Command
Description
Top of Page
Click on Top of Page to reset the browser display to the top of the
current web page.
OSAS Web B2B User’s Manual
8-21
Item Inquiry
The Web Interface
Saving and Exiting
When you finish looking at the additional descriptions, use your browser’s back
button to return to the Item Inquiry web page.
When you finish reviewing items, you can close the browser to end your session, or
choose a different menu selection from the side or top menus.
Item Price Breaks HTML Screen
Field Definitions
There are no fields to enter on this web page.
Command Definitions
8-22
Command
Description
Top of Page
Click on Top of Page to reset the browser display to the top of the
current web page.
OSAS Web B2B User’s Manual
The Web Interface
Item Inquiry
Saving and Exiting
When you finish looking at the price break information, use your browser’s back
button to return to the Item Inquiry web page.
When you finish reviewing items, you can close the browser to end your session, or
choose a different menu selection from the side or top menus.
OSAS Web B2B User’s Manual
8-23
Order Inquiry
Features
The Order Inquiry web pages display the orders on file from a customer. The
information includes the shipping status of the order, and, optionally, the line item
detail for individual orders.
Order Inquiry HTML Screen
Field Definitions
If you have access to Order Inquiry detail information, you can view it by clicking
on any highlighted order number.
OSAS Web B2B User’s Manual
8-25
Order Inquiry
The Web Interface
Command Definitions
Command
Description
Next
This page shows ten orders for this customer. If there are more
orders after the ones displayed, the Next command appears.
Click on Next to see the next page of orders.
Previous
This page shows ten orders for this customer. If there are more
orders before the ones displayed, the Previous command appears.
Click on Previous to see the previous page of orders.
Top of Page
Click on Top of Page to reset the browser display to the top of
the current web page.
Saving and Exiting
When you click on an order number, the Order Detail page appears.
When you finish reviewing the information, you can close the browser to end your
session, or choose a different menu selection from the side or top menus.
Order Detail HTML Screen
8-26
OSAS Web B2B User’s Manual
The Web Interface
Order Inquiry
Field Definitions
There are no fields to enter on this web page.
Command Definitions
Command
Description
Next
This page shows ten line items for this order. If there are more
lines after the ones displayed, the Next command appears.
Click on Next to see the next page of line items.
Previous
This page shows ten line items for this order. If there are more
lines before the ones displayed, the Previous command appears.
Click on Previous to see the previous page of line items.
Top of Page
Click on Top of Page to reset the browser display to the top of the
current web page.
Saving and Exiting
When you finish looking at the line item detail, use your browser’s back button to
return to the Order Inquiry web page.
When you finish reviewing the information, you can close the browser to end your
session, or choose a different menu selection from the side or top menus.
OSAS Web B2B User’s Manual
8-27
Order Entry
Features
The Order Entry web pages allow your customer to enter a sales order through the
Internet.
Your customer chooses the items he wants from the item groups to which you grant
him access. Next, your customer enters the quantity of the item that he wants to
purchase and adds it to his shopping cart. The OSAS Web B2B system then
calculates the price and tax for the items your customers ordered, and displays the
order total.
When your customer submits the order and verifies the shipping information,
OSAS Web B2B creates the order as a quote using the batch ID you specified in the
Resource Manager Company Information function in OSAS.
Screen Use
Screen
Description
Order Entry Group
Codes
Use this screen to select the item group that contains the items
you want to order.
Order Entry Items
Use this screen to select the item you want to order from the
group you selected.
Order Entry Line
Item
Use this screen to enter the quantity of the item you want, to
calculate the price, and to add the item to your shopping cart.
View Shopping Cart
Use this screen to review your order, to change the quantities on
any item, and to submit your order.
Shipping
Information
Use this screen to verify the shipping address for this order and to
enter special notes about it.
Order Number
This page displays the number that identifies your order.
OSAS Web B2B User’s Manual
8-29
Order Entry
The Web Interface
Order Entry Group Codes HTML Screen
Field Definitions
Click on the item group you want to list, or enter a group to search for and click on
the Search for Group button. You can also search for a specific item from all
available groups by entering the item ID and clicking the Search for Item button.
8-30
OSAS Web B2B User’s Manual
The Web Interface
Order Entry
Command Bar Definitions
Command
Description
Next
This page shows ten groups for this customer. If there are more
groups after the ones displayed, the Next command appears.
Click Next to see the next page of groups.
Previous
This page shows ten groups for this customer. If there are more
groups before the ones displayed, the Previous command appears.
Click Previous to see the previous page of groups.
View Shopping Cart
If there are items in your shopping cart, the View Shopping Cart
command appears.
Click View Shopping Cart to display the contents of your cart.
Top of Page
Click on Top of Page to reset the browser display to the top of the
current web page.
Saving and Exiting
When you click on a group code description, the Order Entry Items page appears.
OSAS Web B2B User’s Manual
8-31
Order Entry
The Web Interface
Order Entry Items HTML Screen
Field Definitions
The items and subgroups that belong to the group you selected appear. Units of
measure and unit prices appear for items in the group.
Click on the ID of the item you want to order, or the subgroup you want to list.
You can also search for a specific item within any available group by entering the
item ID and clicking on Search for Item
8-32
OSAS Web B2B User’s Manual
The Web Interface
Order Entry
Command Definitions
Command
Description
Next
This page shows ten items and subgroups for this customer. If
there are more items after the ones displayed, the Next command
appears.
Click on Next to see the next page of items and subgroups.
Previous
This page shows ten items and subgroups for this customer. If
there are more items before the ones displayed, the Previous
command appears.
Click on Previous to see the previous page of items and
subgroups.
View Shopping Cart
If there are items in your shopping cart, the View Shopping Cart
command appears.
Click View Shopping Cart to display the contents of your cart.
Top of Page
Click on Top of Page to reset the browser display to the top of the
current web page.
Saving and Exiting
When you click on a subgroup ID, you will see the items in that group.
When you click on an item ID, the Order Entry Line Item page appears.
When you click on a highlighted description, you see additional description
information and a graphical image of the item, if available (see page 8-21 for a
sample of the additional descriptions page).
If you close your browser or leave the Order Entry web pages, your shopping cart
will remain intact for a period of time. When you return to the site within the
allotted time period, you can resume your order entry from where you left off.
OSAS Web B2B User’s Manual
8-33
Order Entry
The Web Interface
Order Entry Line Item HTML Screen
Field Definitions
Enter the quantity of the item you want to order. Enter 0 (zero) if you do not want
to order this item.
After you specify the quantity you want, click the Recalculate button. OSAS Web
B2B will calculate the price for the quantity you ordered.
When you are satisfied with the quantity and price, click the Add to Shopping
Cart button.
To abandon your entire order and empty your shopping cart, click the Cancel
Order button.
8-34
OSAS Web B2B User’s Manual
The Web Interface
Order Entry
Command Bar Definitions
Command
Description
View Shopping Cart
If there are items in your shopping cart, the View Shopping Cart
command appears.
Click View Shopping Cart to display the contents of your cart.
Top of Page
Click on Top of Page to reset the browser display to the top of the
current web page.
Saving and Exiting
When you click the Add to Shopping Cart button, the Shipping Information page
appears.
When you click the Cancel Order button, the shopping cart is emptied and the
Order Entry Group Codes page appears.
When you click on View Shopping Cart button, the View Shopping Cart page
appears so that you can review your order or check out.
If you close your browser or leave the Order Entry web pages, your shopping cart
will remain intact for a period of time. When you return to the site within the
allotted time period, you can resume your order entry from where you left off.
OSAS Web B2B User’s Manual
8-35
Order Entry
The Web Interface
View Shopping Cart HTML Screen
Field Definitions
Review the items you have ordered. You can change the quantity of any line item,
or cancel a line item by changing the quantity to zero.
If you change the quantity of a line item, click the Recalculate button. OSAS Web
B2B will recalculate the order totals based on your changes.
To abandon your entire order and empty your shopping cart, click the Cancel
Order button.
If you are a tax-exempt customer, but you must pay tax on this order, click the
Change Order to Taxable button to calculate the sales tax for the order.
When you are satisfied with your order, click the Check Out button.
8-36
OSAS Web B2B User’s Manual
The Web Interface
Order Entry
Command Bar Definitions
Command
Description
Next
This page shows ten line items for this order. If there are more
lines after the ones displayed, the Next command appears.
Click Next to see the next page of line items.
Previous
This page shows ten line items for this order. If there are more
lines before the ones displayed, the Previous command appears.
Click Previous to see the previous page of line items.
Top of Page
Click on Top of Page to reset the browser display to the top of the
current web page.
Saving and Exiting
When you click the Check Out button, the Shipping Information page appears.
When you click the Cancel Order button, the shopping cart is emptied and the
Order Entry Group Codes page appears.
If you close your browser or leave the Order Entry web pages, your shopping cart
will remain intact for a period of time. When you return to the site within the
allotted time period, you can resume your order entry from where you left off.
OSAS Web B2B User’s Manual
8-37
Order Entry
The Web Interface
Shipping Information HTML Screen
Field Definitions
8-38
Field Name
Description
Name
Enter a company’s or individual’s name for the shipment.
Address
Enter 1-3 lines of address information for the shipment.
OSAS Web B2B User’s Manual
The Web Interface
Order Entry
Field Name
Description
City/State/Zip/
Country
Enter the city, state, zip code and country to which the shipment
will be sent.
Ship Method
Select a shipping method from the list presented.
Your P.O. Number
Enter your purchase order number, if necessary.
Your P.O. Date
Enter the date of your purchase order. Enter the month, day and
year in the appropriate fields.
Requested Ship Date
Enter the date by which you want to receive the shipment. Enter
the month, day and year in the appropriate fields.
Additional
Comments
Enter any additional information you want to pass along about
your order. You might use this field to specify alternative items,
to request a rush order, to request a phone call before the order is
shipped, and so on.
Command Bar Definitions
Command
Description
Top of Page
Click on Top of Page to reset the browser display to the top of the
current web page.
Saving and Exiting
When you are finished with the shipping information, click the Submit button to
process your order. When your order has been submitted, the Order Number Web
Page appears.
If you close your browser or leave the Order Entry web pages, your shopping cart
will remain intact for a period of time. When you return to the site within the
allotted time period, you can resume your order entry from where you left off.
OSAS Web B2B User’s Manual
8-39
Order Entry
The Web Interface
Order Number HTML Screen
Field Definitions
The number assigned to the order appears.
Note
If you use remote processing, this number may change when you run the Build
Sales Orders from Remote Files function on the Sales Order Processing menu.
Saving and Exiting
After you record the order number, you can close the browser to end your session,
or choose a different menu selection from the side or top menus.
8-40
OSAS Web B2B User’s Manual
References
OSAS Web B2B User’s
Manual
System Messages
A
Access code {access code} for company {company ID} and customer {customer ID} does not
exist.
The access code you are trying to copy from is not set up for the customer and company
entered. Check the access code and verify that it is set up correctly with the customer and
company you are trying to copy from.
Company is not set up for Internet Transactions.
You cannot use Build Sales Orders from Internet function for a company listed as Inactive.
Use the Internet Companies function on the File Maintenance menu to change the status to
Active.
Could not find {file name}. You may have problems running OSAS Web without this file.
A required file is missing. Without this file, some functions within OSAS Web B2B will not
work properly. Make sure the required file is in the data path and try again.
Could not find {file name}. You may have problems running OSAS Web without this
program.
A required program is missing. Without this program, some functions within OSAS Web B2B
will not work properly. Make sure the required program is in the Resource Manager path and
try again.
Could not find application information for Resource Manager.
The file OSAPPL is missing or corrupted. Make certain that OSAPPL is in your Resource
Manager path and try the function again.
OSAS Web B2B User’s Manual
A-1
System Messages
References
Customer {customer ID} already has internet access.
The customer is already set up within this group.
Destination directory cannot be the same as source directory.
The destination directory entered is the same as the source directory. Check for the correct
destination directory and reenter it.
Internet access for {customer ID} in company {company ID} will be completely removed.
Use the Delete command to remove all access codes for the customer and the company or
press Enter to abort this operation.
Internet access code {access code} will be removed.
Use the Delete to remove access code for the customer or press Enter to abort this operation.
Inventory must be installed to run the Print Inventory Item Groups list.
The OSAS Inventory application must be installed to use this function.
Inventory must be installed to run the Print Inventory Pictures list.
The OSAS Inventory application must be installed to use this function.
Item {item ID} is already set up.
The Item ID you entered already has Internet access. Either enter a new item or edit the
existing item entry.
Line Item error: &,?, #, +, or “, these are reserved for internet use.
The code or ID you entered contains an invalid character. Reenter the code or ID without these
reserved characters.
A-2
OSAS Web B2B User’s Manual
References
System Messages
Master access code {access code} for company xxx does not exist.
The access code you entered is not set up for the company that you entered. Check the code
and verify it is set up correctly for the company you are trying to copy from.
The filename cannot contain spaces.
The filename you entered for a graphic cannot have a space in it. Check the name of the picture
file and reenter it.
Thru value must be greater than from value.
When you specify a range of items for a report, the Thru value you enter must be greater than
or equal to the From value.
The code you want to use for a master password is already being used.
The master password you entered is already set up for one of your customers. Choose another
password.
Access code {access code} is a master password.
The password you are entering for the customer is already set up as a master password. Choose
another password.
There are no internet companies set up to make a login page for.
You must flag at least one company for Internet access using the Company Information
function in Resource Manager before you can create your login page.
The last character of your path must be a ‘/’.
The path entered is too long. The path name must end in a ‘/’.
OSAS Web B2B User’s Manual
A-3
System Messages
References
Unable to:
open data directory for the Web Server.
locate OWORDLOG log file.
open specified directory.
find SOTHxxx on Web Server Path.
find SOTDxxx on Web Server Path.
open specified directory.
open specified path for your home page.
open osasweb directory on the Web server.
open BBx directory to the server.
open osasweb directory on the Web Server.
The system was unable to find the path you entered. Find the correct path name and enter it.
You must have Sales Order installed to use Build Sales Orders.
The OSAS Sales Order application must be installed to use this function.
You must set up the data directory on the web server.
When you used the Install Web Server Components function, you did not enter the Data File
Path. You must set up this path before you can use the Build Sale Orders from Internet
function.
You cannot delete a group that has items set up for it.
The group code you are trying to delete has items set up for it. Use the Internet Inventory Item
Groups function on the File Maintenance menu to delete all the items from this group.
You must have Inventory installed for this company to use item groups.
The OSAS Inventory application must be installed to use this function.
You must set up internet companies before setting up internet items.
The company for which you are trying to set up items does not have Internet access. Set up
Internet access for the company before using this function.
A-4
OSAS Web B2B User’s Manual
References
System Messages
You must have Inventory installed for this company to use pictures.
The OSAS Inventory application must be installed to use this function.
You cannot delete a group that is currently set up under a customer.
The group code you are trying to delete has customers set up for it. Use the Customer Groups
function to delete all the customers from this group.
You must run ‘Install OSAS Web Components’ first.
You have not run the Install Web Server Component Function from the Set Up Web
Components menu. You must run this function before you can use any function on of the Sales
Order Processing Menu.
You must set up the osasweb directory on the server first.
When you used the Install Web Server Components, you did not enter the Web Server
Programs Path. This path needs to be set up before you can use this function.
You must set up internet companies before setting up customer groups.
The company for which you are trying to set up customer groups does not have Internet access.
Set up Internet access for the company before using this function.
You must set up group codes before setting up customer groups.
The company you are trying to set up customer groups for does not have item group codes set
up. Setup item group codes for the company before using this function.
You must have Accounts Receivable installed to set up customer groups.
The OSAS Accounts Receivable application must be installed to use this function.
You must have Sales Order installed to view the transaction journal.
The OSAS Sales Order application must be installed to use this function.
OSAS Web B2B User’s Manual
A-5
System Messages
References
You must have Accounts Receivable installed to set up this Company
The OSAS Accounts Receivable application must be installed to use this function.
You must have Sales Order installed to use purge log file.
The OSAS Sales Order application must be installed to use this function.
You must set up the BBx directory to the server first.
You did not specify the Web Server Programs Path using the Install Web Server Components
function. This path must be set up before you can use this function.
A-6
OSAS Web B2B User’s Manual
References
OSAS Web B2B User’s
Manual
Common Questions
Common Questions
B
Q: When I try to access the web, I get an error. Why?
A: A drive in your computer is mapped but not used by OSAS Web B2B and should be
excluded in the CONFIG.BBX file. Add this line to your CONFIG.BBX file:
dsksyn E:
Specify a dsksyn line for each drive mapped but not used by OSAS Web B2B. Read
Appendix D for more help on editing your CONFIG.BBX file.
Q: How many users can access OSAS Web B2B at the same time?
A: The number of customers OSAS Web B2B allows to access your data depends on two
things: your web server and the BBx interpreter. While the number of users depends on
the program’s limitations, you can control the number of users within certain
parameters.
The web server can be set to allow only a limited number of users, depending on the
server’s capabilities. Consult your web server’s guide for more help.
Your BBx interpreter can handle a given number of users, depending on your activation
key. If more than that number of users try to access functions in OSAS Web B2B at the
same time, the users that logged on last will receive an error.
Note
An interpreter session is only open for as long as it takes to load the HTML page.
When the page is finished loading, the session closes, allowing another user to
have access.
OSAS Web B2B User’s Manual
B-1
Common Questions
References
Q: I set up item pictures and they don’t show up. Why not?
A: In setting up your item pictures, you must set up the virtual paths linking the data to the
display function screens. Check these two items:
1.) You must set up a virtual path on the web server. The virtual path should be /image,
with the actual path going to the directory where the images are stored. See your
web server manual for more information.
2.) You need to copy the image files into the directory on the web server that the
virtual path is mapped to.
Q: Can I use WIN CGI scripting calls with OSAS Web B2B?
A: No. Currently OSAS Web B2B only supports standard CGI scripting calls.
Q: I run OSAS Web B2B at my Internet Solution Provider (ISP). How do I update my
files?
A: Follow these steps:
1.) Find out what directories the ISP is using for your OSAS Web B2B files. The
directories you need to check are:
•
The actual path that the /osasweb virtual directory is mapped to
•
The actual path that the /image virtual directory is mapped to
•
The actual path of the document directory where OPENHOME.HTM is
•
The directory where the data and OSAS programs are stored (if you do not
store them in the /osasweb virtual directory)
2.) Create a mirror web site. A mirror web site is a copy of your web site, including file
placement, that you may create on a separate computer at your location. Because it
matches your ISP web site, you can use the mirror web site to create what your
customers will see when you personalize your site. This saves potential down time
that happens when you testing various OSAS Web B2B functions, solve problems,
and make repeated web site modifications without constantly updating your ISP
web site. When you update your files and functions, make your modifications to
your mirror web site, check them, and then copy the updates to your ISP web site.
B-2
OSAS Web B2B User’s Manual
References
Common Questions
3.) To update your login page, use the Create Login Page function and enter the path
for the document directory on the mirror web site.
4.) To update all the OSAS Web B2B programs, use the Install OSAS Web
Components function, and set the paths to use the directories on the mirror web
site.
5.) To update the remote data files and remote programs, use the Copy Data Files to
Data Server and Copy OSAS Programs to Web Server functions. After completing
these functions, set the ISP path to match the mirror web site.
6.) To update the image files, copy them into the image directory on the mirror web
site.
7.) When you finish updating your files on the mirror web site, you can use FTP (file
transfer protocol) software to move all the files in each directory to the matching
ISP directory.
Q: I’m using .BMP file formats for my pictures and they don’t display correctly.
A: Many Internet browsers do not support the viewing of bitmap (.BMP) images. You
should try using .JPG or .GIF file formats instead. Files saved using these formats are
better quality, showing much more detail and, in addition to working better on browsers,
are able to load faster than a bitmap file.
OSAS Web B2B User’s Manual
B-3
References
OSAS Web B2B User’s
Manual
List of Files Copied
C
When you install the web server components, the following files are copied from
the OSAS progOW path to the destination you entered. Some files are stored with
different extensions to avoid duplication. These files are renamed to the correct
extension when they are copied.
BBX Programs
These programs use input from Internet users to look up data and create web pages:
OWPASSWD.BBX
Verifies passwords
OWMENU.BBX
Initialization program for the session
OWARMENU.BBX
Creates the Information menu
OWINMENU.BBX
Creates the Inventory menu
OWSOMENU.BBX
Creates the Orders menu
OWMNUBLD.PUB
Builds the side and top navigation menus
OWLOOKUP.BBX
Calls a BBx program based on your choice from the main
menu
OWCUST.BBX
Information—Account Information
OWAGE.BBX
Information—Aged Trial Balance
OWORDR.BBX
Order Inquiry—Information
OWORD2.BBX
Order Inquiry—Detail Information
OWHIST.BBX
Information—Detail History Inquiry
OWINVL.BBX
Item Inquiry—Group Code Breakdown
OSAS Web B2B User’s Manual
C-1
List of Files Copied
C-2
References
OWPASSWD.BBX
Verifies passwords
OWITEMS.BBX
Item Inquiry—Items for the group code you picked
OWPRCALC.BBX
Item price calculator
OWPBRK.BBX
Item Inquiry—Price Break Information
OWADDL.BBX
Additional Description/Picture
OWORDER.BBX
Order Entry—Group Code Screen
OWORDER2.BBX
Order Entry—Items for the Group Code you picked
OWORDER3.BBX
Order Entry—Line Item Entry
OWORDER4.BBX
Order Entry—Recalculate Prices and Submit Line into an
order
OWORDER5.BBX
Order Entry—View/Submit Order
OWORDER6.BBX
Order Entry—Recalculate Prices and/or Show Shipping
Information for submitting an order
OWORDER7.BBX
Order Entry—Move an order into Sales Order
OWPATH.BBX
Get the path of the BBx directory on the web server
OWSESS.PUB
Verify the SESSION ID
OWFILE.PUB
Set the template for the SESSION string
OWPURGE.PUB
Remove all entries from the SESSION file that are more
than 24 hours old
OWPC.BBX
Get period information from RMTB
UTHTMCON
Builds conditional hypertext links based on input provided
from the calling program
UTHTMFIL.BBX
Builds odd/even row coloration based on the stylesheet for
the web page
OSAS Web B2B User’s Manual
References
List of Files Copied
HTML Base Pages
These files contain the framework for the HTML pages displayed to Internet users.
The data requested by the users is merged into the framework by the programs
listed above.
OWPASSWD.TXT
Template text file for OWPASSWD.BBX
OWMENU.TXT
Template text file for OWMENU.BBX
OWCUST.TXT
Used by OWLOOKUP
OWAGE.TXT
Used by OWAGE.BBX
OWORDR.TXT
Used by OWLOOKUP
OWORD2.TXT
Template text file for OWORD2.BBX
OWHIST.TXT
Used by OWLOOKUP
OWINVL.TXT
Used by OWLOOKUP
OWPBRK.TXT
Template text file for OWPBRK.BBX
OWSESS.TXT
Invalid Session message
OWORDASK.TXT
Continue/New Order message
OWORDER.TXT
Template text file for OWORDER.BBX
OWORDER2.TXT
Template text file for OWORDER2.BBX
OWORDER3.TXT
Template text file for OWORDER3.BBX
OWORDER5.TXT
Template text file for OWORDER5.BBX
OWORDER6.TXT
Template text file for OWORDER6.BBX
OWORDER7.TXT
Template text file for OWORDER7.BBX
OWBADQTY.TXT
Invalid Quantity message
OWADDL.TXT
Template text file for OWPASSWD.BBX
OWITEMS.TXT
Used by OWLOOKUP
OWBUSY.TXT
Process Interrupted message
OWNOVIEW.TXT
No Items to View message
OSAS Web B2B User’s Manual
C-3
List of Files Copied
References
Standard CGI Executables
These programs accept user input, start the BBx interpreter, and run the necessary
OSAS Web B2B program. When the BBx program is finished, these programs load
the resulting web pages:
OWMENU.EXE
OWORD2.EXE
OWORDER3.EXE
OWARMENU.EXE
OWPBRK.EXE
OWORDER4.EXE
OWINMENU.EXE
OWADDL.EXE
OWORDER5.EXE
OWSOMENU.EXE
OWORDER.EXE
OWORDER6.EXE
OWLOOKUP.EXE
OWORDER2.EXE
OWORDER7.EXE
Files Copied and Function in OSAS Web B2B
When you copy files from OSAS Web B2B, files are automatically created,
renamed, and copied to in their destination drive. The tables below shows the
original file name, the temporary file that is created and the final file name.
For a UNIX/Linux-based system, the files are:
C-4
Original File
Temporary File
Destination File
owmenu.tm2
Builds owmenu.sh
owmenu.exe
owarmenu.tm2
Builds owarmenu.sh
owarmenu.exe
owinmenu.tm2
Builds owinmenu.sh
owinmenu.exe
owsomenu.tm2
Builds owsomenu.sh
owsomenu.exe
owlookup.tm2
Builds owlookup.sh
owlookup.exe
oword2.tm2
Builds oword2.sh
oword2.exe
owpbrk.tm2
Builds owpbrk.sh
owpbrk.exe
owaddl.tm2
Builds owaddl.sh
owaddl.ex
oworder.tm2
Builds oworder.sh
oworder.exe
oworder2.tm2
Builds oworder2.sh
oworder2.exe
oworder3.tm2
Builds oworder3.sh
oworder3.exe
OSAS Web B2B User’s Manual
References
List of Files Copied
oworder4.tm2
Builds oworder4.sh
oworder4.exe
oworder5.tm2
Builds oworder5.sh
oworder5.exe
oworder6.tm2
Builds oworder6.sh
oworder6.exe
oworder7.tm2
Builds oworder7.sh
oworder7.exe
For a Windows system, a temporary file is not created. The original file is copied
and renamed to the destination file.
Original File
Destination File
OWMENU.TMP
OWMENU.BAT
OWARMENU.TMP
OWARMENU.BAT
OWINMENU.TMP
OWINMENU.BAT
OWSOMENU.TMP
OWSOMENU.BAT
OWLOOKUP.TMP
OWLOOKUP.BAT
OWORD2.TMP
OWORD2.BAT
OWPBRK.TMP
OWPBRK.BAT
OWADDL.TMP
OWADDL.BAT
OWORDER.TMP
OWORDER.BAT
OWORDER2.TMP
OWORDER2.BAT
OWORDER3.TMP
OWORDER3.BAT
OWORDER4.TMP
OWORDER4.BAT
OWORDER5.TMP
OWORDER5.BAT
OWORDER6.TMP
OWORDER6.BAT
OWORDER7.TMP
OWORDER7.BAT
For both UNIX/Linux- and Windows-based systems, the CONFIG file is the same
and is not renamed.
CONFIG.TMP
OSAS Web B2B User’s Manual
config.bbx
C-5
List of Files Copied
References
BB Web Components
Many BB WEb components are copied directly to the Remote Access web server.
Below is a list of the files copied.:
BBWEB.DOC
GENSMPL1
GENSMPL2
GENSMPL3
BBWEB.CNF
BBWEB.SH
BBWEB2.SH
BBWEBNT.PL
DEMOBBW.BBX
DEMOCENT.BBX
DEMOCLST.BBX
DEMOCLST.TXT
DEMOCUPD.BBX
DEMOILST.BBX
DEMOILST.TXT
DEMOMENU.TXT
DOSCGI.BAT
LICENSE.TXT
README
RSREAD.WBB
RSREADM.WBB
RSTTYS.LCK
RSTTYS.TXT
RSWATCH.SH
RSWATCH.WBB
STDCGI.EXE
UTACTV.WBB
UTADDR.WBB
UTCDATE.WBB
UTCDTF.WBB
UTCGI.WBB
UTCGIACC.WBB
UTCGIWIN.WBB
UTCNUM.WBB
UTCPROP.WBB
UTCSTR.WBB
UTENCODE.WBB
UTENTITY.WBB
UTENV.WBB
UTERR.WBB
UTEXIT.WBB
UTFRMGEN.WBB
UTFRMGN2.WBB
UTFRMIN.WBB
UTFRMOUT.WBB
UTHTMFIL.WBB
UTHTMGEN.WBB
UTHTMKEY.WBB
UTHTMOUT.WBB
UTHTMSEL.WBB
UTISIP.WBB
UTMETA.WBB
UTMMOIN.WBB
UTMMOOUT.WBB
UTMORE.WBB
UTSELECT.WBB
UTSEND.WBB
UTSUB.WBB
UTTABLE.WBB
UTTAGS.WBB
UTTEMPFL.WBB
UTTPLBAS.WBB
UTTPLCP.WBB
UTWATCH.WBB
WINCGI.BAT
WINCGI.EXE
C-6
OSAS Web B2B User’s Manual
References
OSAS Web B2B User’s
Manual
Editing Files
D
You may need to edit certain files to set up remote processing or correct errors.
This appendix demonstrates how to edit your CONFIG.BBX file, DOS batch files,
and UNIX shell scripts.
Modifying CONFIG.BBX
If you are using multiple drives and Remote Processing you may need to modify
CONFIG.BBX to use the dsksyn command. If your data lies outside the current
directory, you must add the prefix command.
CONFIG.BBX
stblen=3072
fcbs=70
handles=70
cibs=70
USE_LIM
aliases=20
dsksyn a
dsksyn b
prefix /httpd/ /httpd/bbx/ e:/progrm/
There are two important settings to know about when you set up the CONFIG.BBX
file: prefix and dsksyn.
If you have the data files in a different path than the BBx directory, you should
specify this in the prefix by entering the full path name of the location where the
data files reside. Make sure that you use forward slashes and end the path with a
forward slash (‘/’). If the interpreter is on a different path than the BBx directory,
you will need to add that path to the prefix also. Separate multiple prefix entries
with a single space.
OSAS Web B2B User’s Manual
D-1
Editing Files
References
If a prefix refers to a different drive than the root drive, you must use the dsksyn
command. Dsksyn lets BBx know it can skip looking in a particular drive. For
example, if you use drives A, B, C, D, and E, and you keep your data files on drive
E and server information on drive C.You must use dsksyn for drives A, B, and D,
to avoid errors. When you enter multiple dsksyn settings, you must enter each
dsksyn on a separate line.
Modifying Batch and Script Files
If the interpreter is on a different path than the BBx directory, you will need to
change the four .BAT files on DOS; if you are using UNIX, you will need to
change the four .EXE scripts.
DOS Changes:
All of the DOS batch files in OSAS Web B2B are similar. The MENU.BAT file is
shown here. You can make similar changes to the other batch files.
OWMENU.BAT:
@echo off
rem This batch file will work under O’Reilly Website’s DOS CGI interface.
rem You can make copies under any name you want, and execute it via
rem http://cgi-dos/name.bat. Each copy can be associated with a BBx
rem program.
rem set BBPROG to be your BBx program, BBEXEC, BBCONFIG, and MEM for
rem BBx startup.
set BBPROG=owmenu.bbx
set BBEXEC=c:\server\bbx\vpro5.exe
Note
This line must contain the full path to the interpreter.
set BBCONFIG=config.bbx
set MEM=1024 -q
set BBTERM=IO
set USERID=osasweb
D-2
OSAS Web B2B User’s Manual
References
Editing Files
if “%os%”==”Windows_NT” goto NT:
rem Win 95 - Website uses OUTPUT_FILE
if “%REQUEST_METHOD%”==”POST” goto WIN95CONTENT
%BBEXEC% -m%MEM% %BBPROG% >%OUTPUT_FILE% - doscgi
goto DONE
:WIN95CONTENT
%BBEXEC% -m%MEM% %BBPROG% <%CONTENT_FILE%
>%OUTPUT_FILE%
goto DONE
:NT
rem Win NT - Website uses stdout
IF “%REQUEST_METHOD%”==”POST” goto WINNTCONTENT
%BBEXEC% -m%MEM% %BBPROG%
goto DONE
:WINNTCONTENT
%BBEXEC% -m%MEM% %BBPROG% <%CONTENT_FILE%
:DONE
UNIX changes:
All of the UNIX script files in OSAS Web B2B are similar. The MENU.EXE file is
shown here. You can make similar changes to the others script files.
OWMENU.EXE:
# Set PGM and MEM to desired values for the bbx program and start size.
# (these can be set in another script, that execs this one.)
PGM=OWCUST.BBX
MEM=512
# modify these values per your bbx configuration
MAXTRIES=5
ERRORLOG=/usr/local/etc/httpd/bbx/error.log
CONFIG=/usr/local/etc/httpd/bbx/config.bbx
BBXEXEC=/usr/local/etc/httpd/bbx/pro5
Note
This line must contain the full path to the interpreter.
OSAS Web B2B User’s Manual
D-3
Editing Files
References
MEM=${MEM:=512}
if [ “$PGM” = ““ ]
then
echo “Content-type: text/plain”
echo ““
echo “Invalid pgm argument”
exit
fi
umask 0
RETRIES=0
until [ $RETRIES -gt $MAXTRIES ]
do
$BBXEXEC -q -c$CONFIG -m$MEM $PGM - “$@” 2>/tmp/bberr.$$
if [ -s /tmp/bberr.$$ ]
then
RETRIES=‘expr $RETRIES + 1‘
sleep 1
read msg </tmp/bberr.$$
rm /tmp/bberr.$$ 2>/dev/null
else
RETRIES=99
rm /tmp/bberr.$$ 2>/dev/null
fi
done
if [ ! “$RETRIES” = “99” ]
then
echo ‘date‘ $msg >>$ERRORLOG 2>/dev/null
echo “Content-type: text/plain”
echo ““
echo “The database server is too busy. Sorry about that.”
echo “Please try again later.”
echo ““
echo “By the way, we have recorded this problem, and will add”
echo “capacity if it happens frequently.”
fi
D-4
OSAS Web B2B User’s Manual
Reference
OSAS Web B2B
Manual Manual
E
Files for Remote Access
Remote Access provides you greater security than the standard OSAS Web B2B
setup. By physically separating your company’s web server from the data storage,
your customers who use the Internet are allowed access to only the areas of
information that you specify. To do this, you must copy specific files from the main
computer—where the OSAS information is stored—to the remote terminal, where
the web server resides.
The information stored on the web server is separated into two groups. The first
group is the data files; the second group is the public programs.
Copy Data File to Web Server
To copy the data files needed by OSAS Web B2B, use the Copy Data Files to Web
Server function to copy these files to the remote server:
ARCDx
ARCTx
ARCUx
ARINx
INAIx
INCAx
INCLx
INGLx
INHSx
INLDx
INLOx
INLPx
INLTx
INPPx
INPSx
INQLx
INQTx
INSNx
INTB
INTXx
INUMx
INUPx
INVEx
OSAPPL
OSCN
OSCOMP
OSINFO
OSTPL
OWCC
OWCGx
OWICx
OWIIx
OWGCx
OWTB
RMGCx
RMTDx
RMTHx
SODEx
SOTB
SOTDx
SOTHx
OSAS Web B2B Manual Manual
E-1
Files for Remote Access
Reference
You also have the option to copy the ARHIx file, which stores the customer’s
detailed transaction history. During the initial installation, you must copy this file,
which is necessary for the History and Invoice Inquiry functions. Later, you can
skip copying this file, because it can grow quite large and, depending on your
computer system, can take quite a long time to copy.
Copy Programs to Web Server
Use the Copy Programs to Web Server function on the Remote Access menu to
copy these programs:.
E-2
GENGETOP.PUB
GENOPEN.PUB
GENTAX.PUB
INCALCPR.PUB
INUPD.PUB
INUPDSET.PUB
OSAS Web B2B Manual Manual
Referen
ce
Basic Web Utility
Basic Web Utility Guide
Overview of the Basic Web Utility and CGI
Data Templates
Sample Program Reference
Suggestions and Tips
Standard Structure Options
HTTP Cookies
Automatic Session Tracking
File Uploading Support
Global String Reference
Toolkit Program Reference Overview
Toolkit Program Functional Listing
rsread.wbb
rsreadm.wbb
rswatch.wbb, rswatch.sh
utaddr.wbb
utcdate.wbb
utcdtf.wbb
utcgi.wbb
utcgiwin.wbb
utcnum.wbb
utcprop.wbb
utcstr.wbb
utencode.wbb
utentity.wbb
utenv.wbb
uterr.wbb
utexit.wbb
utfrmgen.wbb
utfrmgn2.wbb
utfrmin.wbb
OSAS Web B2B User’s Manual
F
F-1
F-3
F-17
F-21
F-37
F-39
F-41
F-43
F-45
F-47
F-51
F-55
F-60
F-61
F-62
F-63
F-64
F-65
F-66
F-69
F-70
F-71
F-72
F-73
F-74
F-75
F-76
F-77
F-79
F-83
F-84
F-1
Basic Web Utility Guide
utfrmout.wbb
uthtmfil.wbb
uthtmgen.wbb
uthtmkey.wbb
uthtmout.wbb
uthtmsel.wbb
utisip.wbb
utmeta.wbb
utmmoin.wbb
utmmoout.wbb
utmore.wbb
utselect.wbb
utsend.wbb
utses.wbb
utsub.wbb
uttable.wbb
uttags.wbb
uttplbas.wbb
uttempfl.wbb
uttplcp.wbb
utwatch.wbb
F-2
Reference
F-85
F-88
F-90
F-93
F-94
F-98
F-100
F-101
F-102
F-103
F-104
F-106
F-108
F-109
F-110
F-111
F-112
F-114
F-115
F-116
F-117
OSAS Web B2B User’s Manual
Overview of the Basic Web Utility and CGI
The popularity of the Internet has led to the development of many software
products that take advantage of the capabilities of TCP/IP networking and
inexpensive graphical World Wide Web clients called “Browsers”. In addition to
use on the Internet, companies have found that these same software products can
also be used on their own networks, providing a less expensive alternative to
developing graphical applications. These internal networks are called “Intranets”.
Browsers interpret and display specially formatted text, called HTML, in a
graphical format. The document can include links to other documents or files, inline graphical images, and data input forms that can be used to send information to
a World Wide Web server. HTML documents consist of text and markup tags.
Examples of tags include <br> (line break), <p> (paragraph break), <h1> (highest
level heading), and <hr> (horizontal rule). HTML information is available on the
Internet and in many books.
The Web server software, or HTTP servers, respond to browser requests for
documents and files, and can also perform tasks for browsers through a standard
API known as a Common Gateway Interface (CGI). Through CGI, it is possible to
produce HTML documents dynamically from database information available on
the host system.
The Basic Web Utility provides an easy-to-use interface between the CGI API and
Business Basic programs, enabling quick development of Web-based applications
that read and write legacy data stored in Business Basic data files. There are a large
number of uses for this technology, both for internal networks and for businesses
that share data with other businesses. For example, a Web-based product catalog
that comes directly from a live inventory file, with up-to-the-second product
availability information, and always-current pricing information.
The Basic Web Utility is a set of CALLable Business Basic programs and
platform-specific scripts or programs that interface Business Basic programs using
the Basic Web Utility to various Web server platforms.
OSAS Web B2B User’s Manual
F-3
Overview of the Basic Web Utility and CGI
Reference
Before You Begin
Before using the Basic Web Utility, a Web server must be installed and operating
on the same system where Business Basic is operating. The Web server must also
be configured with a method of invoking CGI scripts (this is the default
configuration). An understanding of the naming conventions and directory
locations for CGI is essential.
Developers should be familiar with:
•
A Web browser, such as Netscape Navigator or Microsoft Internet Explorer.
•
HTML and how browsers display HTML documents.
•
Business Basic concepts of string templates and global variables or STBL()
values.
Basic Web Utility Contents
Toolkit Contents
F-4
•
UNIX shell scripts for launching Business Basic programs as CGI scripts.
Both on-demand and shared directory models are supported.
•
Visual PRO/5 version of Business Basic Windows executables for launching
either standard (console-based) CGI or WIN-CGI applications.
•
Business Basic programs (ut*.wbb) designed to simplify Business Basic CGI
programs. Most of these programs are CALLed.
•
Business Basic programs (rs*.wbb) to perform simple data transfer over a
dedicated serial line, facilitating safe data access to live data from a nearby
Web server.
•
Business Basic programs (rs*.wbb) to perform simple data transfer over a
dedicated serial line, facilitating safe data access to live data from a nearby
Web server.
OSAS Web B2B User’s Manual
Reference
Overview of the Basic Web Utility and CGI
Installing and Configuring the Basic Web Utility
UNIX
The Basic Web Utility works with PRO/5 on any version of UNIX and with any
Web server that supports standard CGI. All Web servers support standard CGI,
including NCSA, Cern, Apache, and Netscape.
To install the Basic Web Utility, copy bwu.sh to a CGI directory, or a name
recognized as a CGI script (.cgi.). Then, edit the script to start both PRO/5 and the
program to run.
Parameter
Description
PGM
The program to run when PRO/5 starts
MEM
An optional parameter defining the amount of memory to
start the application with. The default is 512.
MAXTRIES
The number of times the script attempts to start PRO/5 in
the event of an error, such as maximum users exceeded.
ERRORLOG
The file to store messages when MAXTRIES is exceeded.
CONFIG
The config.bbx file used by the application.
BBEXEC
The path to the PRO/5 executable.
Windows 95 and Windows NT
The Basic Web Utility for Windows 95 and Windows NT is more complicated to
set up and configure than for UNIX. As an overview, a windows executable is run
from the webserver’s scripting directory. This program reads in a configuration
file, and executes Visual PRO/5. Visual PRO/5 runs a program that creates the
desired webpage, and writes the resultant HTML source to a temporary file. The
windows executable then passes the contents of this file back to the browser, and
the web page is displayed.
OSAS Web B2B User’s Manual
F-5
Overview of the Basic Web Utility and CGI
Reference
Because the Windows operating system does not handle stdin and stdout in the
same manner as the UNIX operating system, Visual PRO/5 must be run in I/O
mode and must utilize temporary files to send information back to the browser.
These temporary files are created in the web server’s scripting directory, so Visual
PRO/5 must have WRITE permissions to that directory. Additionally, the
webserver’s home drive must not be DSKSYN’d, so that Visual PRO/5 can
manipulate these files.
Two separate executables, stdcgi.exe and wincgi.exe, are provided to manage the
process. The stdcgi.exe program supports the Standard CGI specification, and is
more commonly used. This program should be used when the webserver is running
Microsoft IIs or Microsoft Personal Web Server for Windows NT or Windows 95.
The wincgi.exe program is used for web servers that do not support the Standard
CGI specification, but rather support the Win CGI specification instead.
When Visual PRO/5 is run on the server, it is executed in the background. This
means that SYSWINDOW will not be available for debugging purposes. If Visual
PRO/5 encounters an untrapped error while running a program, it will stop running
the program and display the error in console mode. Since it is in the server’s
background, this window will not be visible and it will appear as though both the
Client and web server are hung. In reality, they are simply waiting for the Visual
PRO/5 session to complete. Because of this, it is very important that all of the
programs trap for unanticipated errors. This is typically done with the SETERR
verb.
The first step in configuring the utility set is to copy the appropriate cgi executable
(stdcgi.exe or wincgi.exe) to a scripting directory on the Windows web server,
typically called wwwroot/cgi or wwwroot/cgi-bin. The wwwroot directory is the
root directory of your web server and the cgi or cgi-bin directory contains scripts
and programs that are executed by the web server.
F-6
OSAS Web B2B User’s Manual
Reference
Overview of the Basic Web Utility and CGI
Two associated .bat files, stdcgi.bat and wincgi.bat, are text files designed to
contain configuration parameters used by the executables to specify howVisual
PRO/5 should be run. The .bat file extension is used for historical reasons, and
these files are never actually executed as a typical batch file. The appropriate .bat
file should be copied to the same directory as the .exe file mentioned above. Both
the .exe file and .bat file may be renamed to something more descriptive, such as
custquery.exe and custquery.bat. However, they must retain their original
extension and the root of the file name must be the same for both files. This allows
you to define multiple queries for use with the web server.
The next step is to edit the .bat file to modify the BBPROG, BBEXEC,
BBCONFIG, MEM, BBTERM, and USERID parameters. These parameters are
used to tell the cgi executable how to find Visual PRO/5 and what startup options
to pass to it. Note that when specifying paths for Visual PRO/5, the configuration
file, and the program file, all directories with spaces in their names should be
changed to reference the short name. For example, if Visual PRO/5 exists as
c:\program files\basis\vpro5\vpro5.exe, the BBEXEC should be set to
c:\progra~1\basis\vpro5\vpro5.exe.
Parameter
Description
BBPROG
Specifies the program that Visual PRO/5 will run. This
program will be responsible for creating the contents of the
resultant html page.
BBEXEC
Specifies the full path to the vpro5 executable.
BBCONFIG
Specifies the config.bbx file to be used by Visual PRO/5.
The configuration file should have an alias that matches the
BBTERM value below. It must also have proper
DSKSYN’s and a PREFIX that allows Visual PRO/5 to
load the Basic Web Utility programs and the program
specified by BBPROG above.
MEM
Specifies the amount of memory to start the Visual PRO/5
with.
OSAS Web B2B User’s Manual
F-7
Overview of the Basic Web Utility and CGI
Reference
Parameter
Description
BBTERM
Refers to a terminal alias in BBCONFIG. Often, this has an
invisible or minimized mode. Note that some web servers
will not allow a console mode window to activate,
regardless of this setting. In this case, debugging must be
done with error trapping and logging.
USERID
Specifies the userid value to use when connecting to a data
server. If no Data Server is required, use a dummy value.
Requisite Knowledge
Before using BB-Web, you must install and run a Web server on the same system
where Business Basic is operating. The Web server will need to be configured with
at least one way of invoking CGI scripts (this is always the default configuration
anyway, but an understanding of the naming conventions and directory locations
for CGI is essential).
You must be familiar with the use of a Web browser, such as Netscape Navigator
or Microsoft Internet Explorer.
You must have a basic understanding of HTML, and how browsers display HTML
documents.
There are scores of good books about HTML as well as many sources of
information on the Internet as well.
You must be familiar with Business Basic, and in particular the relatively new
concepts of string templates and global variables or STBL( ) values (new, that is,
relative to the age of the Business Basic language).
Configuration Requirements and Samples after Installation
To use Basic Web Utility, ensure the following are installed:
F-8
OSAS Web B2B User’s Manual
Reference
Overview of the Basic Web Utility and CGI
•
A Web Server such as Microsoft Personal Web Server (PWS), or IIS (Internet
Information Server)
•
Visual PRO/5 revision 2.x
•
The utility set BASIC WEB UTILITY
Configuration
Visual PRO/5 Configuration
The config.bbx file can be modified to contain only minimal information to get
Basic Web Utility to work. For example, assuming that Web Server, Basic Web
Utility, and Visual PRO/5 reside in different subdirectories on D:\, create a
WebConfg.bbx file:
ALIASES=100
FCBS=128
CIBS=128
STBLEN=4096
SETOPTS 00000060000000
PREFIX D:/BBW/ D:/BBW/progs/ D:/BBW/temp/
alias T0 syswindow
DSKSYN A:
DSKSYN B:
DSKSYN C:
DSKSYN E:
...
DSKSYN Z:
In the stdcgi.bat file that was copied to D:\wwwroot\cgi-bin, make the following
changes:
set BBPROG=Webtest.bbx
set BBEXEC=d:\basis\vpro5\vpro5.exe
set BBCONFIG=d:\basis\vpro5\WebConfg.bbx
set MEM=1024
set BBTERM=IO
OSAS Web B2B User’s Manual
F-9
Overview of the Basic Web Utility and CGI
Reference
set USERID=dummy
If a shortcut is created for testing purposes, set the Working Directory to
D:\wwwroot\cgi-bin because this is where the program will reside. Run Visual
PRO/5 with the following command line:
D:\basis\vpro5\vpro5.exe -tT0 -m1024 -cD:\basis\vpro5\WebConfg.bbx
Enter the following program and save it to D:\BBW\progs\ as Webtest.bbx:
0005 SETERR 50
0010 CALL "utcgi.wbb",ENV$,CGI$,ERRMSG$
0020 CALL "uttags.wbb","h1","My First Web Test Program",HTML$
0030 CALL "utsend.wbb",HTML$
0040 CALL "utexit.wbb",CGI$
0050 RELEASE
Executing the CGI Program/Script
Start the browser (Internet Explorer or Netscape), and point it to the web server’s
cgi-bin directory/stdcgi.exe. For example:
http://web_server/cgi-bin/stdcgi.exe
Once it finds the Web Server and executes the program saved above, the words
"My First Web Test Program" are displayed in a bold header font.
Troubleshooting
Errors can often occur when developing web-based applications, and the above
suggestions combined with the following troubleshooting guide can help get an
application working quickly.
Error Messages
Remember, all applications should include error trapping to handle any problems
that may arise. Errors that can be trapped include user escapes, missing files, and
end of file errors. These errors can occur outside the calls to the Basic Web Utility
set.
F-10
OSAS Web B2B User’s Manual
Reference
Overview of the Basic Web Utility and CGI
The BASIS Web Utility programs include error trapping as an aid during the
development cycle. If any errors occur, a log file (BWWERR.log) is created in the
current working directory of the program being run. This may not necessarily be
the current working directory of PRO/5, but the directory where the script
(stdcgi.exe) resides.
Errors returned by the stdcgi.exe (reported to the browser and the BWWERR.log)
are:
Error Message
Description
"Can’t generate work file 1"
Could not create the first temporary file.
"Can’t open work file 1"
Could not open the first temporary file.
"Can’t generate work file 2"
Could not create the second temporary file.
"Can’t open work file 2"
Could not open the second temporary file.
"Can’t open parameter file
stdcgi.bat"
Could not open the batch file.
"Couldn’t start task!"
Could not start vpro5.(or other exe specified in the batch
file).
"Result couldn’t be found"
Could not open temp file that contains the output from
vpro5.
Errors returned by the wincgi.exe (reported to the browser and the BWWERR.log)
are:
Error Message
Description
"Can’t open parameter file
wincgi.bat"
Could not open the batch file.
"Sorry: can’t start CGI task. Try
again later"
Could not start vpro5 (or other exe specified in the
batch file).
OSAS Web B2B User’s Manual
F-11
Overview of the Basic Web Utility and CGI
Reference
Debugging Programs during Development
The most common method of debugging a program is to single step through it.
(Additional information on the single step verb can be found in the Commands
Manual under ‘Single Step.’) Always set Byte 1 Bit $08$ of the options vector
before beginning, or errors may occur in public (or called) programs. This also
enables console mode and debugging in public programs.
An alternate method of debugging an application is to have the program create
dummy files before each step of the program. This method makes it possible to
know exactly which utility failed. Using the example from the Configuration
section above, a line was added to create a string file before each call to a Basic
Web Utility program to help determine exactly which call failed.
0005 STRING "d:/bwu/progs/bwustarted",ERR=0050
0010 CALL "utcgi.wbb",ENV$,CGI$,ERRMSG$
0015 STRING "d:/bwu/progs/bwu15",ERR=0050
0020 CALL "uttags.wbb","h1"," My First Web Test Program",HTML$
0025 STRING "d:/bwu/progs/bwu25",ERR=0050
0030 CALL "utsend.wbb",HTML$
0035 STRING "d:/bwu/progs/bwu35",ERR=0050
0040 CALL "utexit.wbb",CGI$
0045 STRING "d:/bwu/progs/bwuworked",ERR=0050
0050 RELEASE
CGI - Basic Web Utility Applications
CGI Application
A Web server receives a request for a document that is (through naming
conventions or directory mapping) an executable program.
The Web server establishes an environment and starts the program. In some cases
the program passes data to the standard input handle of the script process. The
environment variables, plus the format definition of the data sent on the standard
input channel to the executable, are defined by the CGI specification.
F-12
OSAS Web B2B User’s Manual
Reference
Overview of the Basic Web Utility and CGI
The program sends an HTML document back to the server on its standard output
handle and then exits. The server, in turn, sends the document back to the browser
that made the original request.
Some servers running in non-UNIX environments have additional methods of
communicating with the executable. An example is O’Reilly’s WebSite for
Windows NT and Windows 95, which uses a file-based interface called "WinCGI".
Netscape’s Fast Start server also supports Win-CGI.
The data passed to the program is normally made up of name=value pairs, passed
either through the document request itself or through an HTML form. The program
evaluates the names and associated values, performs an action based on the data,
and returns an HTML formatted document. An example follows:
http://www.yourcomp.com/cgi/showcust?custnum=5
In this example, the executable "showcust" is given the data "custnum=5", which is
used to find a customer record and format an HTML document showing customer
information.
Because Business Basic interpreters cannot directly communicate with the Web
server, a middle layer is provided by the Basic Web Utility. There are two methods
used by the Basic Web Utility: the on-demand method and the shared directory
method.
On-Demand Method
The most efficient method is to start a Business Basic task for each request.
Because requests are usually answered quickly, and the task exits, problems with
user count restrictions are few. A shell script, called "bwu.sh", is included with the
Basic Web Utility and can be used for this interface method. Also, bwu.sh can be
copied to a PATHed directory and CGI scripts written:
#!/bin/sh
PGM=program.bb; export PGM
MEM=512; export MEM
OSAS Web B2B User’s Manual
F-13
Overview of the Basic Web Utility and CGI
Reference
exec bwu.sh
Replace program.bb with the Business Basic program name to be started by
bwu.sh. An alternative is to copy bwu.sh to the desired script name in the CGI
directory and edit it to include the PGM and MEM variables internal to that script.
With Windows NT and Windows 95, use the stdcgi.exe or wincgi.exe, depending
on the web server’s CGI support. Most support standard CGI. Others, such as
O’Reilly Website, also support Win-CGI. Associated ".bat" files must be provided
for stdcgi.exe and wincgi.exe to work.
On-Demand Programming Example
Once the Business Basic program is started, it must read the CGI input and develop
a HTML response. A CALL to "utcgi.wbb" is needed to read the input. A variety of
routines are available to produce the output and should be sent out through CALLs
to "utsend.wbb". When the output is complete, a CALL to "utexit.wbb" completes
the task. Below is an example that builds a list from a small file:
call "utcgi.wbb",env$,cgi$,errmsg$
call "uttags.wbb","h1","Data File Listing",html$
dim tpl$:"id:c(5),name:c(30)"
line$="<li> [id] [name]"
chan=unt; open(chan)"data.fil"
call "uthtmfil.wbb", chan, "", "", 0,0,0,"", tpl$,line$,work$, ""
call "uttags.wbb","ul",work$,html$
call "utsend.wbb",html$
call "utexit.wbb",cgi$
release
This example was created with the following steps:
1. The CGI input is read.
2. A HTML heading is placed into the variable html$
3. A template is defined for reading data from "data.fil".
F-14
OSAS Web B2B User’s Manual
Reference
Overview of the Basic Web Utility and CGI
4. A line structure is specified to be used for each record from the file.
5. The file is opened.
6. A list of all records, using the specified line$ structure for each, is placed in
work$.
7. The "unordered list" tags are added to work$, and the result is added to html$.
8. html$, which now contains a HTML document, is sent back to the user.
9. The task is formatted and released.
Shared Directory Method
A second method uses a shared directory, with a script or other executable started
by the Web Server generating files that contain requests, and one or more Business
Basic tasks running in the background, monitoring the same directory and
producing results in associated files. This method is less efficient that the ondemand method, but it allows control of user counts, and can also be implemented
in environments where Business Basic cannot work with standard input and output
handles.
The Business Basic program "utwatch.wbb" can be in the background and watch a
directory or run other programs based on requests in that directory. The UNIX shell
script bwu2.sh can also be used to create shared directory requests.
Shared Directory Programming Example
In the on-demand mode, the Business Basic program is RELEASEd, while in the
shared directory mode, the program "utwatch.wbb" is repeated until the next
request. An option in BBx4/Pro5 installations uses the BACKGROUND directive
to start utwatch.wbb before completing the request. The program starts more
quickly to respond to other requests and takes advantage of the BASIS user count
logic of eight background slots per foreground slot. When BACKGROUND is
used successfully, the task running in background should RELEASE:
OSAS Web B2B User’s Manual
F-15
Overview of the Basic Web Utility and CGI
Reference
The first attempt to pass control back is with the "background" verb. If successful,
the current program is running under a different task, and it sets the bkg variable
flag to 1. The original task again runs utwatch.wbb. Note that utcgi.wbb must be
called before the background verb because if successful, standard input handles are
no longer available. This example is identical to the previous one, except that
control is passed back to the program "utwatch.wbb", rather than to the operating
system.
call "utcgi.wbb",env$,cgi$,errmsg$
rem "-- try background
bkg=0
background "utwatch.wbb",err=continue
bkg=1
continue:
call "uttags.wbb","h1","Data File Listing",html$
dim tpl$:"id:c(5),name:c(30)"
line$="<li> [id] [name]"
chan=unt; open(chan)"data.fil"
call "uthtmfil.wbb", chan, "", "", 0,0,0,"", tpl$,line$,work$, ""
call "uttags.wbb","ul",work$,html$
call "utsend.wbb",html$
call "utexit.wbb",cgi$
rem "-- if background worked, then release
if bkg then release
run "utwatch.wbb"
F-16
OSAS Web B2B User’s Manual
Data Templates
Many of the programs in the Basic Web Utility depend on data definitions found in
string templates for data formatting and conversion. HTML, however, is a text
format, with no provision to convert data to or from binary formats, or to filter
invalid data before it is passed to or received from the server.
The Basic Web Utility automatically performs translations to convert data between
HTML text and the internal format used by Business Basic. This is controlled with
the data templates, both through the data type included with each template data
field, and through user-defined attributes.
The following user-defined attributes may be used to allow the Basic Web Utility
to properly handle data stored in various formats:
Text Fields
case=upper
case=lower
case=proper
Force text case on input and output.
caption=phrase
This caption is used by default when generating forms or
HTML documents using the utfrmgen.wbb and
uthtmgen.wbb programs. Captions may not contain spaces
because of the way user attributes are accessed. Therefore,
the Basic Web Utility converts underscores to spaces
("Customer_Name" becomes "Customer Name").
mask=format
Use the STR(data:"format") for output, and utcstr.wbb
option to map input for text values such as zip codes or
phone numbers, where there is formatted external
presentation but unformatted internal storage.
passthru=y
If set to "y", then output data is NOT scanned for correction
of HTML entity markup characters. This allows HTMLformatted text to be included in the data.
OSAS Web B2B User’s Manual
F-17
Data Templates
Reference
image=y
If set to "y", then output is formatted as a HTML <img
src=data> tag.
keys=item-list
The uthtmgen.wbb and utfrmgen.wbb programs can format
check lists, radio buttons, and selection lists from
the formtype,
keys, vals and sep values. These can be placed in the field
tags parsed by these programs or can be set to the defaults
in the data template.
item-list is a list of items keys, with no spaces (use
underscores for spaces), delimited by the sepchar value or a
semicolon if no sepchar is specified.
F-18
vals=desc-list
desc-list is a list of descriptions associated with the keys in
item-list. The descriptions cannot contain spaces (use
underscores for spaces). Each description is delimited by
the sepchar value or a semicolon if no sepchar is specified.
sep=sepchar
sepchar species the delimiter character or characters used in
the item-list and desc-list. If the value begins and ends with
a "$", it is assumed to be a hexadecimal value.
formtype=form
form-entry-type can be text, memo, radio, checkbox, list,
mlist, image, file, or entry typehidden. This serves as the
default entry type in form generation. Hidden values are
suppressed from text generated by uthtmout.wbb.
wrap=value
For "memo" type fields, adds a wrap=value option to the
<textarea> tag.
multisep=sepval
If the data field can store multiple occurrences, sepval
defines the separator character used to delimit individual
occurrences. If sepval starts and ends with a "$", it is
assumed to be a hexadecimal value.
border=pixels
Specifies that a table used to format checkbox and radio
button columns and rows have a border around each cell.
cols=columns
Specifies the default number of columns when generating
checkbox, radio buttons, or memo fields in form generation.
OSAS Web B2B User’s Manual
Reference
Data Templates
rows=rows
Specifies the default number or rows when generating
checkbox, radio buttons, selection lists, or memo fields in
form generation.
Numeric Fields
scale=n
Scale number by n decimal places. The internal number 10000 becomes 100.00
when n is 2. The external number 10.01 becomes 1001 when stored.
mask=format
Use format for output. All numerics not interpreted as dates are processed with
utcnum.wbb on input.
Caption=phrase
See Text Fields, above.
OSAS Web B2B User’s Manual
F-19
Data Templates
Reference
Date Fields
date=format
Dates default to Julian integer format. If format is anything
other than a known format, Julian storage is assumed.
Custom formats include:
• mdy (MMDDYY)
• mdyy (MMDDYYYY)
• ymd (YYMMDD)
• yymd (YYYYMMDD)
• dmy (DDMMYY)
• dmyy (DDMMYYYY)
• jul (julian integer)
• dtm (julian date with time precision)
Caption=phrase See Text Fields, above.
F-20
OSAS Web B2B User’s Manual
Sample Program Reference
Sample Program Reference Overview
The sample programs provided with the Basic Web Utility can be used as learning
guides as well as the basis for practical CGI programs.
A UNIX shell script to start a specific Business Basic program, "demobbw.bbx,"
establishes the Basic Web Utility CGI environment. It then locates the CGI value
of "pgm" to determine which sample program to run. If no pgm value is specified,
a menu is presented.
The Customer Inquiry application uses the programs democlst.bbx and
demoilst.bbx. These in turn use the HTML document template files democlst.txt
and demoilst.txt.
The Customer Maintenance application uses the programs democent.bbx and
democupd.bbx. The democent.bbx links to the customer list program presented in
the Customer Inquiry application. These programs do not use HTML templates.
Source code and comments for each of the sample applications are presented on the
following pages.
CGI Startup Shell Script
The shell script "bwu.sh" is copied to a cgi directory and named "demobbw.sh".
Most servers contain a standard "cgi-bin" directory in the directory mapping
structure defined in the server configuration files.
#!/bin/sh
# Copyright (C) 1996 by Allen Miglore. All rights reserved.
# bwu.sh is a standard shell script that can be used to start a
# BBx/Pro5 task in a UNIX environment. This script can be copied
# to the cgi directory, given whatever name you need, or it can
# be used as is by other scripts that would set PGM and optionally
# MEM before exec’ing this script.
OSAS Web B2B User’s Manual
F-21
Sample Program Reference
Reference
# Set PGM and MEM to desired values for the bbx program and start size.
# (these can be set in another script, that execs this one.)
The PGM environment variable must be set to the name of the Business Basic
program (in this case, "demobbw.bbx"). If the
program requires more or less than 512 pages, the MEM variable can also be set.
The values for ERRORLOG , CONFIG , AND BBXEXEC must also be modified
to match the configuration. The file name
ERRORLOG stores messages related to problems starting Business Basic.
CONFIG points to the PRO/5 configuration file used
by Basic Web Utility programs, and BBXEXEC is the name of the PRO/5
executable.
The CONFIG file must be edited so the PREFIX contains the Basic Web Utility
installation directory.
PGM=demobbw.bbx
#MEM=512
# modify these values per your bbx configuration
MAXTRIES=5
ERRORLOG=/usr/lib/pro5/webb/error.log
CONFIG=/usr/lib/pro5/webb/bbweb.cnf
BBXEXEC=/usr/lib/pro5/pro5
MEM=${MEM:=512}
if [ "$PGM" = "" ]
then
echo "Content-type: text/plain"
echo ""
echo "Invalid pgm argument"
exit
fi
umask 0
RETRIES=0
This section starts PRO/5. If it fails, it retries, sends the user an HTML message,
and records the error to the
ERRORLOG file.
until [ $RETRIES -gt $MAXTRIES ]
do
$BBXEXEC -q -c$CONFIG -m$MEM $PGM - "$@" 2>/tmp/bberr.$$
if [ -s /tmp/bberr.$$ ]
then
F-22
OSAS Web B2B User’s Manual
Reference
Sample Program Reference
RETRIES=‘expr $RETRIES + 1‘
sleep 1
read msg </tmp/bberr.$$
rm /tmp/bberr.$$ 2>/dev/null
else
RETRIES=99
rm /tmp/bberr.$$ 2>/dev/null
fi
done
if [ ! "$RETRIES" = "99" ]
then
echo ‘date‘ $msg >>$ERRORLOG 2>/dev/null
echo "Content-type: text/plain"
echo ""
echo "The database server is too busy. Sorry about that."
echo "Please try again later."
echo ""
echo "By the way, we have recorded this problem, and will add"
echo "capacity if it happens frequently."
fi
Startup Program - demobbw.bbx
This program is started by the demobbw.sh shell script. It loads the CGI
environment with a CALL to "utcgi.wbb" and creates the data templates used by
the other sample programs.
0010 REM "demobbw.bbx - startup for Basic Web Utility demo programs
0020 REM "Copyright 1996 by Allen Miglore. All rights reserved.
0100 REM ^100 - Introduction
0110 REM "This is the startup routine used by the Basic Web Utility demo
0120 REM "program. It reads the CGI input stream, sets up the
0130 REM "data templates, loads a salesperson code table, and then runs
0140 REM "a specified program. The default program is a customer list.
0200 REM ^100 - get cgi inputs
0210 CALL "utaddr.wbb"
OSAS Web B2B User’s Manual
F-23
Sample Program Reference
Reference
0220 CALL "utcgi.wbb",ENV$,CGI$,ERRMSG$;IF ERRMSG$>"" THEN
GOTO LOADERROR
0300 REM ^100 Dim templates used by the files
0310 DIM
CUST$:"cust_id:c(5*),name:c(30*):case=upper:,addr1:c(30):caption=Address_1
case=upper:,
addr2:c(30*):caption=Address_2
case=upper:,city:c(20*):case=upper:,state:c(2*):case=upper:,zip:c(5*),
phone:c(10*):mask=(000)-0000000:,date_last_sale:c(8):date=yymd:,date_last_pmt:c(8*):date=yymd:,
class:c(2),slsp:c(3):keys={stbl_$SLSPID} vals={stbl_$SLSPNM} sep=\\\
formtype=list rows=1:,
terms:c(2*),credit_limit:n(8*):mask=###,##0:,ytd_sales:n(10*):mask=###,##0.00-:,
mtd_sales:n(10*):mask=###,##0.00-:,ytd_cost:n(10*):mask=###,##0.00:,mtd_cost:n(10*):mask=###,##0.00-:"
0320 DIM
INVOICE$:"cust_id:c(5),invoice:c(5),date:n(8):date=jul:,slsp:c(3),fill:c(2):formty
pe=hidden:,
amount:i(4):scale=2 mask=###,##0.00-:"0330 DIM
SLSP$:"slsp_id:c(3*),name:c(20*)"
In the CUST$ data template, a list of keys and descriptions are referred to by the
global string values $SLSPID and $SLSPNM. These lists are loaded here, and
when other routines generate selection lists or displays of salesperson values, the
ID’s and names are used.
0400 REM ^100 - load the STBL’s for $SLSPID and $SLSPNM
0410 REM "The CUST$ template references keys and vals for the slsp field.
0420 REM "This facilitates the default use of a select list object for
0430 REM "entry forms, and also will cause HTML merges to use the name
0440 REM "rather than the id for display purposes. Note that placing
0450 REM "these references in the template merely serves to provide
0460 REM "default formatting, and that can be overridden in any given
0470 REM "situation.
0480 LET SLSPCHAN=UNT;OPEN (SLSPCHAN)"GENSMPL2"
0490 LET IDS$="",NAMES$=""
0500 READ RECORD(SLSPCHAN,END=0520)SLSP$
F-24
OSAS Web B2B User’s Manual
Reference
Sample Program Reference
0510 LET
IDS$=IDS$+SLSP.SLSP_ID$+"\\\",NAMES$=NAMES$+SLSP.NAME$+"\\\";G
OTO 0500
0520 LET
X$=STBL("$SLSPID",IDS$),X$=STBL("$SLSPNM",NAMES$),IDS$="",NAM
ES$=""
0530 CLOSE (SLSPCHAN)
Now that the setup is complete, the program branches to the program specified in
the CGI input value "pgm". If no pgm value is specified, or an invalid pgm is
specified, the HTML document "demomenu.txt" is loaded and displayed. By using
the text "{include filename}" and calling "utmeta.wbb", a disk-based document can
be loaded.
0600 REM ^100 - Run the program specified in pgm, or default to the menu.
0610 RUN FIELD(CGI$,"pgm",ERR=0620),ERR=0620
0620 LET TEXT$="{include demomenu.txt}"
0630 CALL "utmeta.wbb","",TEXT$
0640 CALL "utsend.wbb",TEXT$
0650 DONE: RELEASE
1000 LOADERROR:
REM ^1000 - problem with utcgi - fatal problem
1010 REM "If we are here, there was a REAL BIG PROBLEM. Without
1020 REM "proper initialization, the DOS/WIN environment has no way
1030 REM "of contacting the browser of this, so the best thing is
1040 REM "just to leave gracefully but silently. On UNIX, with
1050 REM "stdout support, a notification of the error can be sent
1060 REM "to the browser.
1070 IF POS("DOS"=INFO(0,0))>0 OR POS("WIN"=INFO(0,0))>0 THEN
GOTO DONE
1080 PRINT "Content-type: text/html",$0A$
1090 PRINT "The following error message was returned by utcgi.wbb:<br>"
1100 PRINT ERRMSG$
1110 GOTO DONE
OSAS Web B2B User’s Manual
F-25
Sample Program Reference
Reference
Scrolling Customer Listing - democlst.bbx
This program is used by both sample applications and is the lead program in the
Customer Inquiry application in which customers are listed. Each customer has a
link to a detailed invoice page. It is also used to select a customer to edit in the
Customer Maintenance application.
The program reads up to 10 customer records, in name order, from the customer
master file, using key chain 1 (the Name sort key). If additional records are
available (there are about 30 in the file), a "More records..." link is provided to
continue the list.
0001 SETERR ERRTRAP
0010 REM "democlst.bbx - Basic Web Utility Customer Listing Demo
0020 REM "Copyright 1996 by Allen Miglore. All rights reserved.
0030 REM "Permission to derive programs from this is hereby granted,
0040 REM "provided said programs utilize licensed copies of the Basic Web
Utility.
0100 REM ^100 - If restarting this list, the CGI field "startwith"
0110 REM will contain the starting point. This can come
0120 REM either from the form contained at the end of the
0130 REM democlst.txt HTML template, or from the "more records"
0140 REM continuation link.
A CGI variable "startwith" is passed to this program in two cases. If the current
execution is a continuation of the list, then the "more records" URL will contain
this field In addition, at the bottom of the HTML display is a form with a
"startwith" entry field to allow the user to restart the list at any time.
0150 LET STARTWITH$="",
STARTWITH$=CVS(FIELD(CGI$,"startwith",ERR=0200),4)
F-26
OSAS Web B2B User’s Manual
Reference
Sample Program Reference
These lines set the values for the uthtmfil.wbb program, identifying the key chain,
records per page, and record structure. The HTML template file, democlst.txt,
contains a place marker between the "<ul>" and "</ul>" (unordered list) tags. The
structure includes a "<li>" (list element) tag so that each record becomes another
bullet item in the document. The name field is treated as a link, and the link is
specified in the variable LINKEXPR$, which is constructed to run a program with
the CGI value, "cust_id", set to the customer number of any given record. The
program defaults to the sample invoice list "demoilst.bbx" but can be specified in
the CGI value "linkto". The Customer Maintenance application uses the "linkto"
value to load and edit a customer record.
0200 REM ^100 - Initialize other values
0210 LET KNUM=1,MAXRECS=10
0220 LET STRUCTURE$="<li> [name @link] ([cust_id]), [city], [state] [zip],
[phone]"
0300 REM ^100 - Construct a link expression, used to link each customer
0310 REM to a specified program for further display/edit
0320 LET LINKEXPR$=ENV.SCRIPT_NAME$+"?cust_id=[cust_id @encode]"
0330 LET
LINKTO$="demoilst.bbx",LINKTO$=FIELD(CGI$,"linkto",ERR=0340)
0340 LET LINKEXPR$=LINKEXPR$+"&pgm="+LINKTO$
0400 REM ^100 - Open Customer Data File
0410 LET CUSTCHAN=UNT;OPEN (CUSTCHAN)"GENSMPL1"
After opening the customer master file, the uthtmfil.wbb program generates a list
of records in the CUSTLIST$ variable and lists up to MAXRECS records. The list
starts with the value in STARTWITH$ and continues until the end of the file. If the
variable CURKEY$ is returned with a value, the end of the file was not reached,
and a "More records" URL is constructed to continue where the list ended. This
URL is placed in the global string $MOREURL, which is referenced in the HTML
text template democlst.txt.
0500 REM ^100 - Construct List
0510 REM uthtmfil.wbb reads from a channel, and builds list of
0520 REM records, using a particular structure, into a string
0530 CALL "uthtmfil.wbb", CUSTCHAN, STARTWITH$, "", KNUM,
MAXRECS, COUNT, CURKEY$, CUST$,
STRUCTURE$, CUSTLIST$,LINKEXPR$
OSAS Web B2B User’s Manual
F-27
Sample Program Reference
Reference
0600 REM ^100 - If there are more records in the file, add a "more records"
0610 REM link URL to continue. curkey$ contains the key to the
0620 REM next record required. By placing this in a STBL, the
0630 REM uthtmout.wbb program that loads the HTML template can
0640 REM conditionally place it after the list.
0650 LET X$=STBL("$MOREURL","");IF CURKEY$="" THEN GOTO 0680
0660 CALL "utencode.wbb",0,CURKEY$,NEXT_STARTWITH$
0670 LET
MOREURL$=STBL("$MOREURL",ENV.SCRIPT_NAME$+"?pgm=democlst.b
bx&startwith="+NEXT_STARTWITH $)
The HTML file, democlst.txt, is loaded and parsed into the variable HTML$. In
that file is a comment "<!-- List Here -->", which is substituted with the contents of
the CUSTLIST$ variable, generated above. The full text of HTML$ is sent with the
utsend.wbb program, and the program exits. In version 1.1, two global string
values are created automatically by uthtmfil: $list contains the record list returned
in custlist$, and $moreurl contains either null (if the end of file is reached), or a
URL to continue the list. These can be referenced in democlst.txt as [$list] and
[$moreurl], respectively.
0680 REM ^100 - Load the HTML template, and add the list to it
0690 CALL "uthtmout.wbb",CGI$,"{include democlst.txt}",HTML$,""
0700 CALL "utsub.wbb",HTML$,"<!-- List Here -->",CUSTLIST$
0800 REM ^100 - Send it to the user
0810 CALL "utsend.wbb",HTML$
1000 DONE: REM ^1000 - Clean up and exit
1010 CALL "utexit.wbb",CGI$
1020 IF RETURN_TO_WATCH THEN RUN "utwatch.wbb"
1030 RELEASE
It is important to trap all errors because Basic Web Utility programs run in
background mode.
2000 ERRTRAP: REM ^1000 - generic error trap
2010 CALL "uterr.wbb",ERR,TCB(5),PGM(-2)
2020 GOTO DONE
F-28
OSAS Web B2B User’s Manual
Reference
Sample Program Reference
Customer Invoice History - demoilst.bbx
The customer invoice history display is used by the Customer Inquiry application
to show a listing of invoices associated with a given customer. The application uses
the Scrolling Customer Listing program, and each customer listed is linked to this
program through a URL containing the customer ID.
0001 SETERR ERRTRAP
0010 REM "demoilst.bbx - Basic Web Utility Customer Invoice Listing Demo
0020 REM "Copyright 1996 by Allen Miglore. All rights reserved.
0030 REM "Permission to derive programs from this is hereby granted,
0040 REM "provided said programs utilize licensed copies of the Basic Web
Utility.
As with the scrolling customer listing, a "startwith" value can be supplied to begin
the invoice listing at a particular point. A "more records" link, containing the
"startwith" value, is specified in this program where there are more than 10
invoices to display.
0100 REM ^100 - If continuing the invoice list, the CGI field
0110 REM "startwith" is used to indicate what invoice.
0120 LET STARTWITH$="",STARTWITH$=FIELD(CGI$,"startwith",
ERR=0130)
The invoices are presented in a HTML table structure, so each line from the
invoices file is formatted with table row tags. In addition, the table and column
heading tags are required above and below the invoice list and are stored in
TABLETOP$ and TABLEBOT$.
0200 REM ^100 - Initialize other values
0210 LET KNUM=0,MAXRECS=10
0215 LET TABLETOP$="<table border><tr><th>Invoice</th><th>Date</
th><th>Amount</th></tr>"
0220 LET STRUCTURE$="<tr><td>[invoice]</td> <td>[date]</td> <td
align=right>[amount]<br></td></tr>"
0225 LET TABLEBOT$="</table>"
0400 REM ^100 - Open Data Files
0410 LET CUSTCHAN=UNT;OPEN (CUSTCHAN)"GENSMPL1"
OSAS Web B2B User’s Manual
F-29
Sample Program Reference
Reference
0420 LET INVCHAN=UNT;OPEN (INVCHAN)"GENSMPL3"
The customer record is read into CUST$, and a table is built from a list of fields in
the CIST$ template. The HTML text for the table is placed in CUSTINFO$.
0450 REM ^100 - Get Customer Data and Create Display
0460 READ RECORD(CUSTCHAN,KEY=FIELD(CGI$, "cust_id",
ERR=NODATA), DOM=0470)CUST$
0470 CALL "uthtmgen.wbb",
CUST$,"cust_id,name,addr1,addr2,city,state,zip,phone,slsp", "", "table border", "",
"", CUSTINFO$ A list of invoices (up to MAXRECS at a time) is loaded into the
variable INVLIST$. The list begins with the customer ID, plus the invoice number
indicated in the STARTWITH$, and continues until all invoices for the customer
ID have been read. If there are more than MAXRECS invoices, the CURKEY$
contains that next one in line, after the customer ID is trimmed off. This is used to
construct the global string $MOREURL, which is referenced in the HTML text file
"demoilst.txt" to allow the user to continue the list. Note the use of the "startwith"
value in the URL.
The CGI environment variable SCRIPT_NAME contains the name of the cgi script
that launched this program. Because the same script is used for all the sample
programs, it provides a convenient way of building another URL.
0500 REM ^100 - Construct Invoice List
0510 REM uthtmfil.wbb reads from a channel, and builds list of
0520 REM records, using a particular structure, into a string
0530 CALL
"uthtmfil.wbb",INVCHAN,CGI.CUST_ID$+STARTWITH$,CGI.CUST_ID$,KN
UM,
MAXRECS,COUNT,CURKEY$,INVOICE$,STRUCTURE$,INVLIST$,""
0540 IF CURKEY$>"" THEN LET
CURKEY$=CURKEY$(LEN(CGI.CUST_ID$)+1)
0600 REM ^100 - If there are more records in the file, add a "more records"
0610 REM link URL to continue. curkey$ contains the key to the
0620 REM next record required. By placing this in a STBL, the
0630 REM uthtmout.wbb program that loads the HTML template can
0640 REM conditionally place it after the list.
F-30
OSAS Web B2B User’s Manual
Reference
Sample Program Reference
0650 LET X$=STBL("$MOREURL","");IF CURKEY$="" THEN GOTO 0680
0660 CALL "utencode.wbb",0,CURKEY$,NEXT_STARTWITH$
0670 LET MOREURL$=STBL("$MOREURL",ENV.SCRIPT_NAME$+"?pgm=
demoilst.bbx&startwith="+NEXT_STARTWITH$+"&cust_id="+CGI.CUST_ID$
)
Both the customer information and the invoice list are substituted into the
demoilst.txt file, using specific comments as place markers, with the result sent to
the user, and the program exits.
0680 REM ^100 - Load the HTML template, and add the list to it
0690 CALL "uthtmout.wbb",CGI$,"{include demoilst.txt}",HTML$,""
0700 CALL "utsub.wbb",HTML$,"<!-- Customer Info -->",CUSTINFO$
0710 CALL "utsub.wbb",HTML$,"<!-- Invoice Table -->",
TABLETOP$+$0A$+INVLIST$+TABLEBOT$
0800 REM ^100 - Send it to the user
0810 CALL "utsend.wbb",HTML$
1000 DONE: REM ^1000 - Clean up and exit
1010 CALL "utexit.wbb",CGI$
1020 IF RETURN_TO_WATCH THEN RUN "utwatch.wbb"
1030 RELEASE
2000 ERRTRAP: REM ^1000 - generic error trap
2010 CALL "uterr.wbb",ERR,TCB(5),PGM(-2)
2020 GOTO DONE
Customer Maintenance - democent.bbx
This program generates a customer maintenance form. By default, the form
contains no customer data and can be used to create a new customer record.
However, if the CGI field "cust_id" is filled in with a valid customer number, that
customer record can be edited and updated.
Unlike the prior examples, an HTML document template is not used. Instead, the
HTML text is created in the program.
0001 SETERR ERRTRAP
0010 REM "democent.bbx - Basic Web Utility demo customer entry form
0020 REM "Copyright 1996 by Allen Miglore. All rights reserved.
OSAS Web B2B User’s Manual
F-31
Sample Program Reference
Reference
0030 REM "Permission to derive programs from this is hereby granted,
0040 REM "provided said programs utilize licensed copies of the Basic Web
Utility.
0100 REM ^100 - Get customer record
If the CGI field, "cust_id" contains a valid customer number, and the customer
record is loaded into the data template CUST$. Otherwise, the template is
initialized from the startup program.
0110 LET CUSTCHAN=UNT;OPEN (CUSTCHAN)"GENSMPL1"
0120 READ RECORD(CUSTCHAN, KEY=FIELD(CGI$,"cust_id",ERR=0200),
ERR=0200)CUST$
An entry form is generated from the CUST$ data template. The cust_id field is
hidden and cannot be edited, though it is passed to the democupd.bbx program.
Fields indicated with a "show" option are display-only. The program utfrmgn2.wbb
constructs the complete form, including Submit, Reset buttons, and a form tag to
start the demobbw.sh script into the variable CUSTFORM$. The non-template
field "pgm" is specified as a hidden field. As in URL links, this must be specified
for the startup program to run the correct program. The democupd.bbx program is
used to update the customer file from the contents of the form.
0200 REM ^100 - create entry form, with update link to democupd.bbx
0210 LET FLDS$=FLDS$+"cust_id hidden, name, addr1, addr2, city, state,zip,
phone, slsp, date_last_sale show,
date_last_pmt show, credit_limit show, mtd_sales show, ytd_sales show, <input
type=hidden name=pgm
value=democupd.bbx>"
0220 CALL "utfrmgn2.wbb",CUST$,FLDS$, "", "table border", "",
ENV.SCRIPT_NAME$,"Update record", "Reset
form", 0, CUSTFORM$
Multiple calls to uttags.wbb build the HTML$ document body. Body tags are
added, a header is generated, and the complete document is generated into
DOCUMENT$. The result is sent to the user, and the program exits. In addition, it
is necessary to shuffle HTML$ values with a temporary variable to add
surrounding tags, such as <center> and </center> and not double up the text in
HTML$ because uttags.wbb always appends to the last argument.
F-32
OSAS Web B2B User’s Manual
Reference
Sample Program Reference
0300 REM ^100 - Use uttags.wbb to generate the rest of the document
0310 CALL "uttags.wbb","h1","Customer Entry Form",HTML$
0320 CALL "uttags.wbb","hr","Enter new customer information, or use the
Customer List link",HTML$
0330 CALL "uttags.wbb","","to select a customer record to edit.",HTML$
0340 CALL "uttags.wbb","p,href " + ENV.SCRIPT_NAME$ +
"?pgm=democlst.bbx&linkto=democent.bbx",
"Customer List", HTML$
0350 CALL "uttags.wbb",""," - ",HTML$
0360 CALL "uttags.wbb","href "+ENV.SCRIPT_NAME$,"Return to the Menu",
HTML$
0370 REM "msg$ can be sent from democupd.bbx if there is an error
0380 IF MSG$>"" THEN CALL "uttags.wbb","h3",MSG$,HTML$
0390 LET WORK$=HTML$,HTML$="";CALL
"uttags.wbb","center",WORK$,HTML$
0400 CALL "uttags.wbb","hr",CUSTFORM$,HTML$
0410 CALL "uttags.wbb","body bgcolor=#E8E8E8",HTML$,BODY$
0420 CALL "uttags.wbb","head,title","Basic Web Utility Demo Customer Entry
Form",HEADING$
0430 CALL "uttags.wbb","html",HEADING$+BODY$,DOCUMENT$
0500 REM ^100 - Send it to the user
0510 CALL "utsend.wbb",DOCUMENT$
1000 DONE: REM ^1000 - Clean up and exit
1010 CALL "utexit.wbb",CGI$
1020 IF RETURN_TO_WATCH THEN RUN "utwatch.wbb"
1030 RELEASE
2000 ERRTRAP: REM ^1000 - generic error trap
2010 CALL "uterr.wbb",ERR,TCB(5),PGM(-2)
2020 GOTO DONE
Customer Update - democupd.bbx
This program is launched from the Customer Maintenance form. It reads the CGI
input stream for form values and adds or updates the customer record accordingly.
0001 SETERR ERRTRAP
0010 REM "democupd.bbx - Basic Web Utility demo customer update from entry
form
OSAS Web B2B User’s Manual
F-33
Sample Program Reference
Reference
0020 REM "Copyright 1996 by Allen Miglore. All rights reserved.
0030 REM "Permission to derive programs from this is hereby granted,
0040 REM "provided said programs utilize licensed copies of the Basic Web
Utility.
0100 REM ^100 - Open customer file
0110 LET CUSTCHAN=UNT;OPEN (CUSTCHAN)"GENSMPL1"
For a new customer entry, the CGI value "cust_id" contains blanks, and the
program jumps to the new customer entry label. An existing customer, selected
from the customer list, will have a hidden value on the form that contains the ID,
and the current record is read into CUST$.
0200 REM ^100 - Get current record
0210 EXTRACT
RECORD(CUSTCHAN,KEY=CGI.CUST_ID$,DOM=NEW_CUSTOMER)CUS
T$
On an existing record, the contents of the form are updated into the contents of the
CUST$ record using the utfrmin.wbb program. The record is then updated, and the
program continues.
Concurrency issues are not addressed in the sample programs because the task that
loaded the maintenance form cannot retain a lock on the record. There are several
methods for managing records that cannot be locked during maintenance. One
method is to store a CRC value as a hidden field on the form, calculated from the
record used to generate the form. When the current record is loaded in the update
program, the CRC values can be compared to determine if a change was made to
the record after the form was displayed, and appropriate action can be taken.
0300 REM ^100 - Fill in form data
0310 CALL "utfrmin.wbb",CGI$,CUST$
0400 REM ^100 - Update record
0410 WRITE RECORD(CUSTCHAN)CUST$
When the customer is updated or added, a message is stored in MSG$, indicating
success. The customer entry program is run, which builds a new form for the
customer, showing their changes, and also displays the MSG$ value so the user can
see that the last update was successful.
F-34
OSAS Web B2B User’s Manual
Reference
Sample Program Reference
0500 CONTINUE: REM ^100 - redisplay form to show updated data
0510 LET MSG$="Updated "+CVS(CUST.NAME$,3)+"
("+CUST.CUST_ID$+")."
0520 DIM CUST$:FATTR(CUST$)
0530 RUN "democent.bbx"
When the CGI value "cust_id" does not contain a valid customer number, a new
customer is added. The CUST$ data template is filled in from the form CGI data by
calling utfrmin.wbb. The customer ID is generated by adding 1 to the last key in the
file and formatting a new 5-digit key. Once successful, the program continues.
0 6 0 0 N E W _ C U S T O M E R : R E M ^ 1 0 0 - G e t n e w c u sto m e r I D b y a d d i ng 1 t o h i g h est
c u rre n t ID
0610 CALL "utfrmin.wbb",CGI$,CUST$
0620 LET LASTKEY$=KEYL(CUSTCHAN,KNUM=0)
0630 L ET
C U S T.C U S T _ ID $ = S T R (N U M (L A S T K E Y $)+ 1 :F IL L (L E N (C U S T.C U S T _ ID $ ),"0 "))
0640 WRITE RECORD(CUSTCHAN,DOM=NEW_CUSTOMER)CUST$
0650 GOTO CONTINUE
Although a normal exit from this program runs utcent.bbx, the error routine may
need to exit this way.
1000 DONE: REM ^1000 - Clean up and exit
1010 CALL "utexit.wbb",CGI$
1020 IF RETURN_TO_WATCH THEN RUN "utwatch.wbb"
1030 RELEASE
2000 ERRTRAP: REM ^1000 - generic error trap
2010 CALL "uterr.wbb",ERR,TCB(5),PGM(-2)
2020 GOTO DONE
OSAS Web B2B User’s Manual
F-35
Suggestions and Tips
There are a variety of ways to write a given program. The following are some basic
steps to make CGI programs more portable and easier to maintain.
•
Use a single point of entry for CGI applications. Rather than multiple CGI
directories with many scripts, a single script to start a single Business Basic
program can be used to determine where to go based on a flag passed through
the URL or hidden form fields. The benefits to this method include The
startup routine performing the initialization, such as calling utcgi.wbb,
creating templates, and loading code tables.
Parameterize the script name (using ENV.SCRIPT_NAME$) because all
routines use the same script. The application becomes more portable to other
sites and platforms that may have a different CGI directory structure.
•
Use a single point of exit. By using a single exit program, code becomes
portable between dynamic and shared-directory methods, as well as other
interface methods that may be developed. Ensure that all exits, including error
trapping logic, exit through the single routine.
•
For tracking large volumes of information between CGI programs, store it in a
file rather than a URL and hidden field. Instead of many individual fields,
assign and track only a session ID. Keep date and time stamps on session
records and periodically clear out old ones. If the application supports
cookies, use the automatic session tracking support built into Basic Web
Utility 1.1.
•
HTML can be generated in programs; however, for complex documents, it is
often easier to create HTML files. There are a number of HTML editing
programs available that function as word processors. The tags needed by
uthtmout.wbb and utfrmout.wbb can be embedded in the file, and the file
referred to by a single "include" phrase in any uthtm* or utfrm* program:
text$="{include filename.txt}"
call "uthtmout.wbb", tpl$, text$, html$, ""
OSAS Web B2B User’s Manual
F-37
Standard Structure Options
In most Web sites it is important to maintain a consistent appearance on all pages,
including those generated by CGI. This can include a consistent background color,
tiled image, or a standard header and footer on each page.
The Basic Web Utility looks for the the following case-sensitive global strings:
$title
A required global string that acts as a trigger. All the other global strings are
optional. If the string does not exist, the standard structure is not invoked. If it does
exist, the following tags are added on the first call to "utsend.wbb".
<html>
<head>
<title>$title</title>
$otherhead
<body $bodyopt>
$stdhead
When "utexit.wbb" is called, and if this global string exists, the following text is
added to the document:
$stdfoot
</body>
</html>
$othe
rhead
A global string to add additional HTML heading elements to the document. A
common example would be a <META ...> tag, such as <meta name="keywords"
content="sdsi;bbweb">. To improve viewing of the HTML source, place a linefeed between each header element in the global string.
OSAS Web B2B User’s Manual
F-39
Standard Structure Options
Reference
$bod
yopt
A global string that, if present, is appended to the <body> tag inside the closing
bracket. Establishes default colors or background tile images.
$stdh
ead
A global string to reference a physical disk file that is loaded at the top of each
document, just below the <body> tag.
$stdf
oot
A global string references a physical disk file that is loaded at the end of each
document by a call to "utexit.wbb".
To invoke the standard structure, the first call to "utsend.wbb" should be the first
body text of the document. It is possible to call "utsend.wbb" with a "Location:" or
"Content-type:" header. The Basic Web Utility does not interfere with control of
the output or the inclusion of the standard structure elements.
If disk files are used as the page source, and standard structure features are also
used, eliminate all heading and closing codes generated by the authoring tool.
These codes become redundant and appear in the body of the document.
F-40
OSAS Web B2B User’s Manual
HTTP Cookies
Netscape Corporation introduced the concept of a "cookie" into their Navigator
browser, prompting the specification to be incorporated into other browsers.
Cookies provide a mechanism for the server to instruct the browser to retain certain
data elements, and to pass those data elements back to the server on demand.
Detailed information about cookies can be found on Netscape Corporation’s web
site: http://home.netscape.com
Cookies are implemented in the Basic Web Utility via global strings. If on the first
call to "utsend.wbb", a global string named "$cookies" is defined, it is assumed to
be a comma-separated list of cookie names. Cookie names refer to other global
strings, with names and values passed to the browser through "Set-Cookie:
headers.
For example, if the global string "$cookies" is set to "fe,fi,fo,fum", the Basic Web
Utility looks for four global strings and instructs the browser to store their values.
In the Netscape cookie specification, there are additional elements other than data
values, such as expiration dates and valid domain and path names. These can be
added to the value of the global string if desired, and the Basic Web Utility issues
the header "Set-Cookie: name=global-string.
The cookie values are returned automatically by the browser in the CGI input
stream, and "utcgi.wbb" looks for these and sets the global string values
appropriately.
An example of cookie use would be as a session tracking mechanism. If after
calling utcgi.wbb, there is no global string "ses_id", a unique code can be generated
and placed into a global string "ses_id", and that name can be placed in the global
string "$cookies". From that point, whenever that page is loaded, until the browser
is closed on the user’s system, the ses_id string will be maintained. Using the
"expires", "domain", and "path" data in the cookie specification, it would be
possible for the session ID to be tracked across an entire application for any length
of time.
OSAS Web B2B User’s Manual
F-41
Automatic Session Tracking
The Basic Web Utility 1.1 automatically manages session information using a
single HTTP cookie called $sesid. The format of the session information is defined
by creating a global string (STBL) named $sestpl that contains the string template
definition for the session. This string must be defined before the application
CALLs utcgi.wbb and triggers the internal session management.
x$=stbl("$sestpl","name:c(30*),custid:c(10*),items[100]:c(20*)")
call "utcgi.wbb",env$,cgi$,errmsg$
In the above example, the session tracks name, custid, and items array fields. Any
input from a form or URL that appears in cgi$ is automatically updated in the
session values.
To retreive the session record, do one of the following:
dim session$:stbl("$sestpl")
session$=stbl("$sesrec")
or
call "utses.wbb",0,session$,errmsg$
Use the utses.wbb program to store any manipulated session data as follows:
session.custid$="1234"
call "utses.wbb",1,session$,errmsg$
Session expiration and deletion is handled automatically based on a 24 hour session
lifespan; however, this can be controled with the global string $sesage, which
stores a numeric value of hours. This does two things:
•
Records stored on the server are automatically purged when the numeric value
is reached. This purge takes place each time utcgi.wbb is called with session
management triggered. If the value of $sesage is 0 or less, it defaults to 24.
OSAS Web B2B User’s Manual
F-43
Automatic Session Tracking
•
Reference
The cookie used for the session, which is stored on the client (browser)
machine, is given an expiration time in hours. If it is set to 0 or less, the
browser has no expiration time and expires by default when the user exits the
browser.
A session can be manually deleted from the server using the utses.wbb program:
call "utses.wbb",2,"",errmsg$
For session tracking to work, the user account CGI tasks run under must have write
rights to the "utses.dat" file. In addition, if the file is not present the first time
session tracking is used, the Basic Web Utility creates the file in the Basic Web
Utility directory, and, therefore, must have permission to create the file.
F-44
OSAS Web B2B User’s Manual
File Uploading Support
Newer browsers such as Netscape 3 support a new form posting protocol that
allows data files to be uploaded to a web server. For the browser to send the form
using a protocol that supports file uploads, the <form> tag must have the option
"enctype=multipart/form-data" added. When the form is submitted, it is formatted
differently. In Basic Web Utility 1.1, utcgi.wbb detects this type of form post and
loads the cgi$ template accordingly. The only difference is that file fields are
loaded with a file name, indicating the location of the uploaded file on the server.
The name used is a unique generated name that retains the original extension
uploaded by the user. The original filename is stored in the stbl $filename-x, where
x is the name of the field on the HTML form. The files are stored in the system
temp directory, or in a directory named in the stbl $tempdir.
See the utcgi.wbb reference section for more details.
OSAS Web B2B User’s Manual
F-45
Global String Reference
Global String (STBL)
Usage
$arraysep
Delimits field names from array element numbers. If
$arraysep is "__", then a cgi name of amount__5 would be
interpreted as cgi.amount[5]. The default separator is a
hyphen (-), but because this conflicts with Javascript code,
it may be necessary to use another value valid in Javascript
variable names but one that does not conflict with names
used in the application. If the value is changed, it must be
set before utcgi.wbb is CALLed.
$bbweb-version
Stores the version of the Basic Web Utility.
$bodyopt
Use in standard structure options added to the <body> tag.
$cgi
Stores the data of cgi$ for use in programs that do not have
access to cgi$.
$cgitpl
Stores the string template definition for $cgi.
$commdir
Points to the shared directory used by utwatch.wbb and
bwu2.sh, if the shared directory model is used by the
application. Used by utwatch.wbb and should match the
value used by bwu2.sh.
$cookies
Triggers the placement of cookies on the browser. This
must be set to a comma-delimited list of names that
reference global string values to be stored as cookies. This
must be set before the first CALL to utsend.wbb.
$cr
The carriage-return portion of a text file line termination.
Null on UNIX and ASCII, 13 on Windows.
$env
Stores the data of env$ to use in programs without access to
env$.
$envtpl
Stores the string template definition for $env.
OSAS Web B2B User’s Manual
F-47
Global String Reference
F-48
Reference
Global String (STBL)
Usage
$errdesc-errnum
The uterr.wbb program reports the description "An error
occurred" for any error value passed to it. It does, however,
look for this global string for the description. For example,
setting $errdesc-0 to "A locked file or record was
encountered" would report that message for an error 0.
$filename-fieldname
Stores the user-entered file name when a file upload field is
posted from a HTML form. When stored on the web server
file system, the Basic Web Utility retains the file extension
but renames the file uploaded to a run-time defined name.
The original name is stored in this global string.
$imagelib
Provides a path to the physical location of image files. Any
data field with a user attribute of image=y is interpreted by
the Basic Web Utility to be an image file. In creating the
HTML <img src=> tag, the Basic Web Utility attempts to
open the file. If the file cannot be located by a PREFIX
search, define $imagelib as the physical path to open the
file. The Basic Web Utility can then determine the width
and height of both .gif and .jpg images and create a <img>
tag that is rendered faster by most browsers.
$imageurl
This is added to the beginning of any <img src=> tags
generated by the Basic Web Utility. If $imageurl is "/home/
images/", and a data field with a user attribute of image=y is
"1001.gif", the Basic Web Utility defines the tag as <img
src="/home/images/1001.gif">. Note the $imagelib can also
help in determining the width and height for the tag.
$infile
An internally maintained value used by utwatch.wbb and
utcgi.wbb.
$list
Stores the result of uthtmfil.wbb, uthtmkey.wbb, and
uthtmsel.wbb. Use this to merge the results into HTML
documents as "[$list]".
$mailerror
Can be defined on a UNIX system with the mail command
to notify an administrator of an error reported by uterr.wbb.
It should be set to an email address reachable by the web
server. It should not be set on a non-UNIX system.
OSAS Web B2B User’s Manual
Reference
Global String Reference
Global String (STBL)
Usage
$memospacer
If the utmmoout.wbb program tries to retain leading spaces,
set this global string to "y" to have the Basic Web Utility
add <spacer size=cols> to the text. Browsers that support
the <spacer> tag will then render the indents.
$memotable
As with the $memospacer, this attempts to retain leading
spaces on lines, but uses a <table> structure, with <td
colspan=cols> tag to control the spacing. Set this global
string to "y" to trigger this behavior.
$moreurl
Stores a URL suitable for continuation of a list generated by
uthtmfil.wbb, uthtmkey.wbb, or uthtmsel.wbb. All values
sent in CGI$ are retained. Suitable for use in HTML text as
<a href="[$moreurl]">More records&ldots;</a>.
$otherhead
Used in standard structure options, added before the
<body> tag. Use this tag to add <meta> tags or other tags
that go between the <head> and </head> tags (except
<title>.)
$outchan
An internally maintained value used by utsend.wbb.
$outfile
An internally maintained value used by utwatch.wbb.
$sesage
If session tracking is turned on (with the $sestpl global
string), this value determines the age in hours a session
cookie lasts. The default is 24. Setting it to 0 results in the
session expiring when the browser is closed.
$sesid
An internally maintained value if session tracking is turned
on.
$sesrec
Stores the current session record, whose structure is defined
with $sestpl.
$sessioncookie
An internally used value for cookie management.
$sestpl
Stores the string template definition for session state
management. If defined before utcgi.wbb is CALLed, the
Basic Web Utility manages a session record using this as
the record definition.
OSAS Web B2B User’s Manual
F-49
Global String Reference
F-50
Reference
Global String (STBL)
Usage
$stdfoot
Used in standard structure options. Points to a file to be
appended to the end of all output. Used by utexit.wbb.
$stdhead
Used in standard structure options. Points to a file to be
placed just after the <body> tag is printed by the first call to
utsend.wbb.
$tempdir
Points to a directory to be used for temporary files. If it is
not defined, the Basic Web Utility looks for the
environment variable TEMP. Then, use the /tmp directory
on UNIX, or the current (cgi) directory on Windows. Used
by uttempfl.wbb.
$title
Triggers the standard structure options and is placed in the
document header inside <title>&ldots;</title> tags.
$url
An internally maintained value used in Win-CGI.
$urltpl
An internally maintained value used in Win-CGI.
$usechan
Used to force the Basic Web Utility to search for available
channels above this value. If the Basic Web Utility conflicts
with other programs used in an application, set this value to
a high number to prevent the Basic Web Utility from using
the UNT value to open files.
$waitsec
Used by utwatch.wbb to pause a specified number of
seconds between directory scans. The default is one second.
OSAS Web B2B User’s Manual
Toolkit Program Reference Overview
The Basic Web Utility toolkit consists of a number of Business Basic programs and
operating system executables. Some of the programs are considered high-level
programs and they CALL lower-level programs to perform a task. Some routines
may CALL other high-level programs to provide a more complete encapsulation of
a task.
Toolkit Program Alphabetical Listing
Program
Description
Syntax
rsread.wbb
Read a record by way of an RS-232
serial connection (UNIX only)
call “rsread.wbb",filename$,mode$,
ky$,knum,rec$,errmsg$
rsreadm.wbb
Read a record range by way of an RS232 serial connection (UNIX only)
call
rsreadm.wbb",filename$,key1$,key2$,kn
um,ky$[all],rec$[all],count,errmsg$
rswatch.sh
Watch a RS-232 serial port on a target
system (UNIX only)
rswatch.sh -d tty-device -s "stty
parameters" -v
utaddr.wbb
ADDR low-level Basic Web Utility
Routines
call "utaddr.wbb"
Utcdate.wbb
Convert Text Date to Internal Julian
Integer or Date/Time Number
call "utcdate.wbb",strdate$,juldate
Utcdtf.wbb
Convert Typical and OEM Text Date
Formats to/from Julian Date
call
"utcdtf.wbb",tojul,format$,text$,juldate
Utcgi.wbb
Set Template Variables Based on the
Operating System Environment and CGI
Input Stream
call "utcgi.wbb",env$,cgi$,errmsg$
Utcgiwin.wbb
Win-CGI Support
(Used internally by the Basic Web
Utility when the Win-CGI environment
is detected and should never be CALLed
directly.)
OSAS Web B2B User’s Manual
F-51
Toolkit Program Reference Overview
Reference
Program
Description
Syntax
Utcnum.wbb
Convert Formatted Numeric Text String
to a Number
call "utcnum.wbb",text$,value
Utcprop.wbb
Convert a Text String to Proper Case
call "utcprop.wbb",text$
Utcstr.wbb
Unmask a String, Based on a Mask, and
Return an Internal Value
call "utcstr.wbb",text$,mask$,result$
Utencode.wbb
URL Encode and Decode a Text Value
call "utencode.wbb",decode,text$,result$
Utentity.wbb
Convert HTML Markup Entities to
Browser-Displayable Format
call "utentity.wbb",text$
Utenv.wbb
Get Environment Variable
call "utenv.wbb",name$,value$
Uterr.wbb
Generic Error Display Routine
call
"uterr.wbb",errnum,linenum,progname$
Utexit.wbb
Clean Up Basic Web Utility Work Files
in the Win-CGI Environment
call "utexit.wbb",cgi$
Utfrmgen.wbb
Generate Form Input Tags from a
Template and an Optional List of Fields
and Parameters
call
"utfrmgen.wbb",tpl$,flds$,captions$,flag
s$,captags$,work$
Utfrmgn2.wbb
Generate a Complete HTML Form from
a Template
call "utfrmgn2.wbb",tpl$,flds$,
captions$,flags$,captags$, actionval$,
submitval$, resetval$, placement,work$
Utfrmin.wbb
Copy CGI Input to a Data Template
call "utfrmin.wbb",cgi$,tpl$
Utfrmout.wbb
Merge Template Data Into HTML Form
Output
call "utfrmout.wbb",tpl$,text$,work$
Uthtmfil.wbb
Generate HTML List from a File, Given
a Key Range and Format Definition
call "uthtmfil.wbb", chan, first$, last$,
keynum, maxrec, count, curkey$, tpl$,
text$, work$, linkexpr$
Uthtmgen.wbb
Generate HTML Tags and Text from a
Template
call "uthtmgen.wbb",tpl$, flds$,
captions$, flags$, captags$, linkexprs$,
work$
F-52
OSAS Web B2B User’s Manual
Reference
Toolkit Program Reference Overview
Program
Description
Syntax
Uthtmkey.wbb
Generate HTML List from a File, Given
a List of Keys
call
"uthtmkey.wbb",chan,keys$,keylen,tpl$,
text$,work$,linkexpr$
Utfrmout.wbb
Merge HTML Text with Data from a
Data Template
call "utfrmout.wbb",tpl$,text$,work$
Uthtmsel.wbb
Generate HTML List from a BBx or
PRO/5 Select Verb
call "uthtmsel.wbb",fl$, where$, sortby$,
opt$, maxrec, skip, count,
tpl$,text$,work$,linkexpr$
Utisip.wbb
Verify if the Remote Client Address Is in
a List of Valid Addresses
call "utisip.wbb",env$,iplist$,valid
Utmeta.wbb
Scans Text For Special Substitutions
call "utmeta.wbb",tpl$, text$
Utmmoin.wbb
Convert Memo Field (text area tag) CGI
Input to Blocked Text
call "utmmoin.wbb",cgitext$,
blocked$,block
Utmmoout.wbb
Format Text Containing CR-LF
Characters As HTML
call "utmmoout.wbb",textin$,textout$
Utmore.wbb
Create "More Records" Information,
Either As a URL or As Hidden Form
Tags
call "utmore.wbb",cgi$, flds$, moreurl$,
morehidden$
Utselect.wbb
Create Select Where Clause from CGI
Input Fields
call "utselect.wbb", cgi$, tpl$, where$,
andor$
Utsend.wbb
Send Text Back to the Client Browser
call "utsend.wbb",text$
Utses.wbb
Manage Session Record
call "utses.wbb",mode,sesrec$,errmsg$
Utsub.wbb
Substitute Occurrences of Text with
Replacement Text
call "utsub.wbb", text$, from$, to$
Uttable.wbb
Create HTML Table from an Array
call "uttable.wbb", caption$, options$,
dat$[all], work$
Uttags.wbb
Append Text with Specified HTML
Markup Tags to a HTML String
call "uttags.wbb", tags$, text$, html$
OSAS Web B2B User’s Manual
F-53
Toolkit Program Reference Overview
Reference
Program
Description
Syntax
Uttplbas.wbb
Load Data Template from Basis Data
Dictionary
call "uttplbas.wbb", dict$, fl$, control$,
tpl$, errmsg$
Uttempfl.wbb
Create and Open a Temporary String File
call "uttempfl.wbb", tempfile$,
tempchan
Uttplcp.wbb
Copy Matching Values from Source to
Destination Templates
call "uttplcp.wbb",source$, dest$
Utwatch.wbb
Interface with a Shared Directory CGI
Request Process
run "utwatch.wbb"
F-54
OSAS Web B2B User’s Manual
Toolkit Program Functional Listing
CGI Processing Tools
Program
Description
Syntax
Utcgi.wbb
Set Template Variables Based on the
Operating System Environment and CGI
Input Stream
call "utcgi.wbb",env$,cgi$,errmsg$
Utsend.wbb
Send Text Back to the Client Browser
call "utsend.wbb",text$
Uterr.wbb
Generic Error Display Routine
call "uterr.wbb",errnum,linenum,
progname$
Utexit.wbb
Clean Up Basic Web Utility Work Files
in the Win-CGI Environment
call "utexit.wbb",cgi$
Utwatch.wbb
Interface with a Shared Directory CGI
Request Process
run "utwatch.wbb"
Data Merging Tools
Program
Description
Syntax
Uthtmout.wbb
Merge HTML Text with Data from a
Data Template
call "utfrmout.wbb",tpl$,text$,work$
Utfrmout.wbb
Merge Template Data Into HTML Form
Output
call "utfrmout.wbb",tpl$,text$,work$
OSAS Web B2B User’s Manual
F-55
Toolkit Program Functional Listing
Reference
File Listing Tools
Program
Description
Syntax
Uthtmfil.wbb
Generate HTML List from a File, Given
a Key Range and Format Definition
call "uthtmfil.wbb", chan, first$, last$,
keynum, maxrec, count, curkey$, tpl$,
text$, work$, linkexpr$
Uthtmkey.wbb
Generate HTML List from a File, Given
a List of Keys
all
"uthtmkey.wbb",chan,keys$,keylen,tpl$,
text$,work$,linkexpr$
Uthtmsel.wbb
Generate HTML List from a BBx or
PRO/5 Select Verb
call "uthtmsel.wbb",fl$, where$, sortby$,
opt$, maxrec, skip, count,
tpl$,text$,work$,linkexpr$
Utselect.wbb
Create Select Where Clause from CGI
Input Fields
call "utselect.wbb", cgi$, tpl$, where$,
andor$
Form and HTML Creation and Capture Tools
Program
Description
Syntax
Utfrmgen.wbb
Generate Form Input Tags from a
Template and an Optional List of Fields
and Parameters
call
"utfrmgen.wbb",tpl$,flds$,captions$,flag
s$,captags$,work$
Utfrmgn2.wbb
Generate a Complete HTML Form from
a Template
call "utfrmgn2.wbb",tpl$,flds$,
captions$,flags$,captags$, actionval$,
submitval$, resetval$, placement,work$
Utfrmin.wbb
Copy CGI Input to a Data Template
call "utfrmin.wbb",cgi$,tpl$
Uthtmgen.wbb
Generate HTML Tags and Text from a
Template
call "uthtmgen.wbb",tpl$, flds$,
captions$, flags$, captags$, linkexprs$,
work$
F-56
OSAS Web B2B User’s Manual
Reference
Toolkit Program Functional Listing
Other CGI Tools
Program
Description
Syntax
Utencode.wbb
URL Encode and Decode a Text Value
call "utencode.wbb",decode,text$,result$
Utentity.wbb
Convert HTML Markup Entities to
Browser-Displayable Format
call "utentity.wbb",text$
Utmeta.wbb
Scans Text For Special Substitutions
call "utmeta.wbb",tpl$, text$
Utmore.wbb
Create "More Records" Information,
Either As a URL or As Hidden Form
Tags
call "utmore.wbb",cgi$, flds$, moreurl$,
morehidden$
Utses.wbb
Manage Session Record
call "utses.wbb",mode,sesrec$,errmsg$
Utsub.wbb
Substitute Occurrences of Text with
Replacement Text
call "utsub.wbb", text$, from$, to$
Uttable.wbb
Create HTML Table from an Array
call "uttable.wbb", caption$, options$,
dat$[all], work$
Uttags.wbb
Append Text with Specified HTML
Markup Tags to a HTML String
call "uttags.wbb", tags$, text$, html$
Template Tools
Program
Description
Syntax
Uttplbas.wbb
Load Data Template from Basis Data
Dictionary
call "uttplbas.wbb", dict$, fl$, control$,
tpl$, errmsg$
Uttplcp.wbb
Copy Matching Values from Source to
Destination Templates
call "uttplcp.wbb",source$, dest$
OSAS Web B2B User’s Manual
F-57
Toolkit Program Functional Listing
Reference
Conversion Tools
Program
Description
Syntax
Utcdate.wbb
Convert Text Date to Internal Julian
Integer or Date/Time Number
call "utcdate.wbb",strdate$,juldate
Utcdtf.wbb
Convert Typical and OEM Text Date
Formats to/from Julian Date
call
"utcdtf.wbb",tojul,format$,text$,juldate
Utcnum.wbb
Convert Formatted Numeric Text String
to a Number
call "utcnum.wbb",text$,value
Utcprop.wbb
Convert a Text String to Proper Case
call "utcprop.wbb",text$
Utcstr.wbb
Unmask a String, Based on a Mask, and
Return an Internal Value
call "utcstr.wbb",text$,mask$,result$
Memo Field Tools
Program
Description
Syntax
Utmmoin.wbb
Convert Memo Field (text area tag) CGI
Input to Blocked Text
call
"utmmoin.wbb",cgitext$,blocked$,block
Utmmoout.wbb
Format Text Containing CR-LF
Characters As HTML
call "utmmoout.wbb",textin$,textout$
F-58
OSAS Web B2B User’s Manual
Reference
Toolkit Program Functional Listing
RS-232 Serial Connection Tools
Program
Description
Syntax
Rsread.wbb
Read a record by way of an RS-232
serial connection (UNIX only)
call
"rsread.wbb",filename$,mode$,ky$,knu
m,rec$,errmsg$
Rsreadm.wbb
Read a record range by way of an RS232 serial connection (UNIX only)
call
"rsreadm.wbb",filename$,key1$,key2$,k
num,ky$[all],rec$[all],count,errmsg$
Rswatch.wbb
Watch a RS-232 serial port on a target
system (UNIX only)
rswatch.sh -d tty-device -s "stty
parameters" -v
Program
Description
Syntax
Utaddr.wbb
ADDR low-level Basic Web Utility
Routines
call "utaddr.wbb"
Utenv.wbb
Get Environment Variable
call "utenv.wbb",name$,value$
Utisip.wbb
Verify if the Remote Client Address Is in
a List of Valid Addresses
call "utisip.wbb",env$,iplist$,valid
Uttempfl.wbb
Create and Open a Temporary String File
call "uttempfl.wbb", tempfile$,
tempchan
Other Tools
OSAS Web B2B User’s Manual
F-59
Toolkit Program Functional Listing
Reference
rsread.wbb
Read a record by way of an RS-232 serial connection
Syntax
CALL "rsread.wbb",filename$,mode$,ky$,knum,rec$,errmsg$
This program communicates with a running "rswatch.wbb" task on another system.
It scans the file for an available port to issue a request on. Each serial port has a
corresponding "rswatch" task running on the target system. A library of available
serial ports is maintained in the text file "rsttys.txt"
By using a dedicated serial connection between a live Business Basic system and a
Web server system connected to the Internet, potential security issues of having a
TCP/IP connection to the live system can be avoided. While a dedicated serial
connection is slower and doesn’t support concurrency, it is secure.
filename$ is the name of the file on the target system to access. It can be a full
pathname, or any name accessible to the task running rswatch.wbb on the target
system.
•
•
•
•
mode$ is the read mode used to access the desired record:
n retrieves the key after that specified in ky$ (ky$ need not exist).
p retrieves the key before that specified in ky$ (ky$ need not exist).
any other value looks for ky$ specifically.
ky$ is the key to access, or a positioning value for the "n" and "p" modes. This
returns the actual key of the record returned.
knum is the key chain number to use in a multi-keyed file. If the keys are not
unique, the use of ky$ for repeated requests may return the same record. It may be
necessary to use the "rsreadm.wbb" program to get a range of duplicate secondary
keys.
rec$ returns the data record, with trailing $00$ (hex 00) values removed.
errmsg$ returns an error message if an error occurs. An "Error 2" detects an end-offile condition when using modes "n" and "p".
F-60
OSAS Web B2B User’s Manual
Reference
Toolkit Program Functional Listing
rsreadm.wbb
Read a record range by way of an RS-232 serial connection
Syntax
CALL
"rsreadm.wbb",filename$,key1$,key2$,knum,ky$[all],rec$[all],count,errmsg$
This program communicates with a running "rswatch.wbb" task on another system
and scans the file for an available port to issue a request on. Each serial port has a
corresponding "rswatch" task running on the target system. A library of available
serial ports is maintained in the text file "rsttys.txt".
By using a dedicated serial connection between a live Business Basic system and a
Web server system connected to the Internet, it is possible to avoid potential
security issues of having a TCT/IP connection to the live system. While a dedicated
serial connection is slower and doesn’t support concurrency, it is secure.
filename$ is the name of the file on the target system to access. It can be a full
pathname, or any name accessible to the task running rswatch.wbb on the target
system.
key1$ and key2$ specify the key range to read and return. All records from
key1$+$00$ through key2$+$FF$ are included, so "001" for both would
successfully return key values from "001001" through "001ZZZ".
knum is the secondary key chain to use if the target file is a multi-keyed file.
ky$[all] and rec$[all] are arrays that store returned keys and associated records.
Values are stored in ky$[1..count] and rec$[1..count]. If count is 0, the the arrays
may not be defined.
count contains the number of records returned in the ky$[] and rec$[] arrays, or 0 if
no records were found.
errmsg$ returns an error message if an error occurred.
OSAS Web B2B User’s Manual
F-61
Toolkit Program Functional Listing
Reference
rswatch.wbb, rswatch.sh
Watch a RS-232 serial port on a target system
This program communicates with requests for records issued by CALLs to
"rsread.wbb" and "rsreadm.wbb". Each rswatch task communicates through one
serial port and uses one Business Basic user slot.
Syntax (UNIX)
rswatch.sh -d tty-device -s "stty parameters" -v
rswatch.sh may be run in background and started by UNIX at boot time by placing
a startup script in the "/etc/rc" directory structure.
The tty device must be a disabled (logins are not allowed) tty device connected to
the Web server system. If it does not start with "/dev/", this prefix is automatically
added.
The stty parameters must be enclosed in quotes if any white space is included and
are used to set the baud rate and other communication parameters needed to match
the parameters on the Web server serial ports, as specified in the "rsttys.txt" file in
the Basic Web Utility directory. The "raw" device mode for the stty command must
be included.
The default setting if no "-s" option is specified is "9600 raw cs8 ixon ixoff -ixany".
The "-v" option, if specified, causes logging to take place for each transaction and
error processed. This can be redirected to a log file running in background.
Note: The rswatch.sh script requires editing to correctly start BBx. Modify the
values of lines beginning with "bbexec=", "bbcnf=", and "bbweb=" accordingly.
F-62
OSAS Web B2B User’s Manual
Reference
Toolkit Program Functional Listing
utaddr.wbb
ADDR low-level Basic Web Utility routines
Syntax
CALL "utaddr.wbb"
Many Basic Web Utility programs make repeated use of several low-level routines.
By making those routines resident in memory (ADDR’d), processing performance
is improved. CALL this routine once at the beginning of any session that uses
Basic Web Utility programs.
OSAS Web B2B User’s Manual
F-63
Toolkit Program Functional Listing
Reference
utcdate.wbb
Convert text date to internal julian integer or date/time number.
Syntax
CALL "utcdate.wbb",strdate$,juldate
This low-level routine is used to convert a text string to a julian date value. The
current Business Basic default date format is used to determine whether the format
is month-day-year, or day-month-year, and the text string is parsed. In BBx and
Pro5, the value of STBL("!DATE") is used for this analysis.
The following steps are performed:
•
If strdate$ is blank, a julian number of 0 is returned.
•
If strdate$ is "@", today’s date and time are returned.
If a time is found at the end of strdate$, it is analyzed and converted to a fraction of
a day (noon is .5, 6:00 pm is .75) to be added to the julian integer. The time must be
in the format h:mm and may be followed by a word starting with "p" to force a
"pm" assumption.
If possible, month names are replaced with month numbers.
strdate$ is tested for simple numeric dates, such as 030196 or 11301995, and
converted to a julian value.
Finally, strdate$ is scanned for three numerics, separated by any non-numeric
delimiter, such as 3/1/96 or 11-30-1995, and converted to a julian number.
F-64
•
If no year is found, the current year is assumed.
•
If the conversion cannot be performed, the juldate value is returned as 0.
OSAS Web B2B User’s Manual
Reference
Toolkit Program Functional Listing
utcdtf.wbb
Convert typical and OEM text date formats to/from julian date
Syntax
CALL "utcdtf.wbb",tojul,format$,text$,juldate
Many Business Basic applications store dates in a string format rather than a julian
number. Common formats include fixed digits, such as YYMMDD, and packed
decimal, requiring a special formula to unpack into the month, day, and year
elements. This low-level routine is designed to convert various formats to and from
julian values.
The legal values for format$ match those for date fields in data templates. See the
Data Templates section for more information.
tojul is set to 0 to convert from juldate to text$, and 1 to convert from text$ to
juldate.
format$ can be set to any of the following:
mdy MMDDYY
mdyy MMDDYYYY
ymd YYMMDD
yymd YYYYMMDD
dmy DDMMYY
dmyy DDMMYYYY
aon ADD+ON date format
soa State of the Art (MAS90) date format
text$ stores the stored text version of the date, and juldate stores the julian integer
version of the date.
OSAS Web B2B User’s Manual
F-65
Toolkit Program Functional Listing
Reference
utcgi.wbb
Set template variables based on the operating system
environment and CGI input stream
Syntax
CALL "utcgi.wbb",env$,cgi$,errmsg$
With the exception of utaddr.wbb, this is the first Business Basic CGI application
program called. Once executed, the env$ and cgi$ string templates can be used to
determine environment and CGI values.
The template env$ holds the system environment variables, many of which are
used in CGI applications. For example, env.script_name$ contains the logical
name of the executable script that started the BBx session, and env.remote_addr$
contains the IP address of the client browser that sent the request to the host server.
In addition to creating env$ values for each environment variable, a global string
(STBL on PRO/5) is created for each environment variable as well.
The cgi$ template holds the values of any input values set by the CGI input stream.
These are sent to the CGI application in two ways:
The first is through the URL, where name=value pairs are present following a "?"
character in the URL. For example, the URLwould set four values in the cgi$ string
template:
"http://abc.com/cgi-bin/
runapp?state=CA&type=A+B&zip=&name=A%26P+Market"
The following identifies the cgi$ string template:
cgi.state$="CA"
cgi.type$="A B"
cgi.zip$=""
cgi.name$="A&P Market"
The second method is through an HTML form "post", where input form values are
passed to the CGI input stream on the stdin file handle (though the Win-CGI
specification passes values through a file).
F-66
OSAS Web B2B User’s Manual
Reference
Toolkit Program Functional Listing
In both methods, the data sent into the CGI application is URL-encoded, All
nonprintable and some special characters are converted to hex notation, and spaces
are replaced with "+" characters. utcgi.wbb decodes these values before placing
them in the cgi$ template.
In the Win-CGI environment, large values are stored in temporary disk files. If any
cgi$ variable value begins with a $FF$, the balance of the value contains a disk file
name to store the value sent by the browser. This also makes it important to CALL
"utexit.wbb" before exiting the Business Basic environment to remove any
temporary files that may have been created.
Names used in both the env$ and cgi$ string templates are fixed to be valid variable
names, if necessary, by replacing any nonletter, nondigit character with an
underscore, and by trimming long names to 32 characters. Sequences of more than
one underscore are changed to a single underscore. In addition, any names that do
not start with a letter are prefixed with an "X_".
If any CGI input value is in the format name-n, then an array element is created in
cgi$. All high-level routines understand arrays, and the format name-n, when
moving data to and from the CGI environment. For example, if a CGI input stream
name is "keywords-1", the cgi$ string template variable would be referenced as
cgi.keywords$[1].
The global string "$arraysep" may be specified before calling utcgi.wbb to override
the use of a single dash "-" as the element delimiter. For example, setting
STBL("$arraysep","__") causes the name "keywords__1" to be treated as
described above. This is important to scripting languages, such as Javascript, that
cannot work with elements named with dashes.
This program stores two global strings for use by another program or application, if
necessary: $cgi stores the cgi$ string, and $cgitpl stores the template definition. To
recreate cgi$:
dim cgi$:stbl("$cgitpl")
cgi$=stbl("$cgi")
OSAS Web B2B User’s Manual
F-67
Toolkit Program Functional Listing
Reference
File Uploading
Forms that have been specified as "method=post enctype=multipart/form-data" are
handled by utcgi.wbb. Any field types of "file" are stored in a temporary file, and
the file name is stored in the cgi$ field. For example, if a form contains a file field
named "datafile", a text field named "name", and the user filled in
"c:\files\customers.dat" for the datafile field, then cgi$ might look like this:
cgi.name$="xyz"
cgi.datafile$="/tmp/bw123999.dat"
The extension of the uploaded filename is retained, but the name is changed to
guarantee its uniqueness. The original file name is stored in a global string (STBL)
$filename-fieldname, so the above example would set stbl("$filename-datafile") to
"c:\files\customers.dat". See the uttempfl.wbb information for a description of
where temporary files are stored.
F-68
OSAS Web B2B User’s Manual
Reference
Toolkit Program Functional Listing
utcgiwin.wbb
Win-CGI support
This program is used internally by the Basic Web Utility when the Win-CGI
environment is detected and should never be CALLed directly.
OSAS Web B2B User’s Manual
F-69
Toolkit Program Functional Listing
Reference
utcnum.wbb
Convert formatted numeric text string to a number.
Syntax
CALL "utcnum.wbb",text$,value
This low-level routine converts a text string to a number, ignoring currency
symbols and other nonnumeric characters. In PRO/5, it is also sensitive to the
OPTS byte 6 position for the decimal character.
The characters "(" and "-" are both interpreted to indicate that the number is
negative.
text$ contains the text to be converted, and value returns the numeric value, or 0 if
the conversion fails.
F-70
OSAS Web B2B User’s Manual
Reference
Toolkit Program Functional Listing
utcprop.wbb
Convert a text string to proper case.
Syntax
CALL "utcprop.wbb",text$
This routine is used by various high-level Basic Web Utility programs when a user
attribute "case=proper" is specified in a string template.
text$ contains the text to be reformatted and returns the formatted text.
OSAS Web B2B User’s Manual
F-71
Toolkit Program Functional Listing
Reference
utcstr.wbb
Unmask a string, based on a mask, and return an internal
value.
Syntax
CALL "utcstr.wbb",text$,mask$,result$
This program returns a value suitable for reformatting with the same mask, using
the STR() function. Business Basic developers often store formatted text values
without any formatting, and then display or print formatted versions using the
STR() function. For example, a US zip code stored as "957625555" could be
reformatted as "95762-5555" with the mask "00000-0000". This low-level routine
examines a formatted text$ string and returns the unformatted result$ text string by
comparing characters in text$ to the format specification in mask$.
The Basic Web Utility high-level programs use this routine to convert formatted
CGI input when a template specifies a nonnumeric data type and a user attribute of
"mask=mask".
F-72
OSAS Web B2B User’s Manual
Reference
Toolkit Program Functional Listing
utencode.wbb
URL encode and decode a text value.
Syntax
CALL "utencode.wbb",decode,text$,result$
The CGI specification requires that certain characters be specially coded to avoid
ambiguous usage. This low-level routine may be used to both encode and decode
text based on the CGI requirements.
decode is set to 0 to encode text$, returning the result in result$
decode is set to 1 to decode a previously encoded text$, returning the result in
result$.
OSAS Web B2B User’s Manual
F-73
Toolkit Program Functional Listing
Reference
utentity.wbb
Convert HTML markup entities to browser-displayable format.
Syntax
CALL "utentity.wbb",text$
When sending text to a client browser, it may be necessary to include characters
that the browser would normally interpret as HTML markup characters but should
be displayed as they are stored. Examples include "<", ">", and "&". This routine
converts occurrences of these characters to the proper entity markup. For example,
the "<" characters are converted to "<".
This routine is called automatically for all data elements by the high-level Basic
Web Utility programs, unless the user-defined template attribute "passthru=y" is
specified.
F-74
OSAS Web B2B User’s Manual
Reference
Toolkit Program Functional Listing
utenv.wbb
Get environment variable
Syntax
CALL "utenv.wbb",name$,value$
This low-level routine can be used to access an operating system environment
variable. It can be used whether or not utcgi.wbb has been called.
name$ is a case-insensitive environment variable name.
value$ returns the value of the environment variable.
OSAS Web B2B User’s Manual
F-75
Toolkit Program Functional Listing
Reference
uterr.wbb
Generic error display routine
Syntax
CALL "uterr.wbb",errnum,linenum,progname$
Handling unexpected errors in CGI applications is different from terminal-based
applications because there is no direct channel to the end-user. This routine
provides an simple method of notifying the user of a problem. Typically, after
CALLing this routine, the program exits Business Basic. To call this in PRO/5 use:
CALL
"uterr.wbb",err,tcb(5),pgm(-2).
The routine generates a simple HTML page, displaying a heading and error
specifics. The heading displayed for specific error codes can be controlled by
creating global string values called "$errdesc-n". For example, in PRO/5, the
following creates a valid message for a missing file error:
dummy$=stbl("$errdesc-12","A missing file error occurred!")
In addition to displaying an HTML page, uterr.wbb also attempts to mail an
administrator user a message about the error. To do this, the global string value
"$mailerror" should be set to the email address of the administrator.With a host
running UNIX, this feature opens a pipe to the UNIX "mail" command and sends a
message detailing the error.
F-76
OSAS Web B2B User’s Manual
Reference
Toolkit Program Functional Listing
utexit.wbb
Clean up Basic Web Utility work files in the Win-CGI
environment.
Syntax
CALL "utexit.wbb",cgi$
OSAS Web B2B User’s Manual
F-77
Toolkit Program Functional Listing
Reference
When the Basic Web Utility operates in a Win-CGI environment, it may create
work files to store large CGI input values. Before exiting, these work files should
be erased. This routine examines the CGI string template produced by utcgi.wbb
and erases any files. It should be CALLed before exiting the Business Basic
environment in any Win-CGI installation.
F-78
OSAS Web B2B User’s Manual
Reference
Toolkit Program Functional Listing
utfrmgen.wbb
Generate form input tags from a template and an optional list of
fields and parameters
Syntax
CALL "utfrmgen.wbb",tpl$,flds$,captions$,flags$,captags$,work$
This high-level program generates the input tags for an HTML form (or part of a
form), based on a template and other information. It program is also capable of
creating the form as loose text, preformatted and aligned text, or as a bordered or
borderless table.
tpl$ is a data tempate that contains both the fields and data to generate the form
input fields. A variety of user-attributes can be defined in the template to control
how field data is handled. See the Data Templates information for an explanation
of these attributes.
flds$ is a text string that contains a comma-delimited list of field names and
optional format options. If flds$ is null, then a default list is generated from all the
fields in tpl$. flds$ can refer to individual array elements (name-n) or to all array
elements (name-*), in which case the form is generated with all defined array
elements separated by a <BR> tag within the column. If flds$ begins with "*,", it is
assumed to contain a list of exceptions, so that all the fields in the template tpl$ are
used to generate the HTML output. Those found in flds$ are referenced with the
formatting tags included in flds$ (for example, if flds$ contained the data "*,type
checkbox keys="1;2" vals="Type 1;Type 2"", then all fields in the template would
be generated, and the field "type" would be treated as a checkbox input.) See the
utfrmout.wbb program documentation for information about formatting options.
Any "field" that begins with "<" is assumed to be fixed HTML that is added to the
document generated. If a table format is being generated, the field is allocated a full
row, using "<td colspan=2>" when creating that particular row.
If flds$ begins with "!,", then all fields in the template except those listed after the
first comma are included in the generated document.
OSAS Web B2B User’s Manual
F-79
Toolkit Program Functional Listing
Reference
captions$ is a string template that contains captions for any field to be included in
the form (any in flds$, or if flds$ is null, then any field in tpl$.) The data for any
field found in captions$ is used as the caption for the field. If a field to be used on
the form is not present in captions$, and the user attribute "caption" is not present
in the template, a default caption is generated from the field name by converting
underscores to spaces and formatting the name with proper case. A null field in
captions$ results in no caption for that field.
flags$ is a text string containing various formatting controls, each separated by at
least one space, in any order. The supported flags include:
F-80
table
Formats the captions and input fields in table columns, one
row per field.
pre
Use pre-format tags to format the form, allowing perfect
column alignment without relying on table structures but
using fixed pitch fonts.
<p>
Indicates there should be extra space between each row.
align=left, center, right
Sets horizontal alignment for table captions.
cellalign=left, center, right
Sets the horizontal alignment for table data cells.
valign=top, bottom
Sets vertical alignment to "top" or "bottom" for tables.
border
border=n
For table forms, there should be a border around each cell.
hdropt=options
cellopt=options
Adds options to the <th> and <td> tags, respectively. No
spaces are allowed, but underscores can be used for
multiple options. "hdropt=bgcolor=red_align=right", for
example, generates <th bgcolor=red align=right>.
font=fontopts
hdrfont=fontopts
Adds a <font fontopts> tag to each data cell and caption
cell, respectively. Use underscores for spaces. For Example,
"size=4_color=black" adds <font size=4 color=black> and
</font> tags to the data.
right
Captions are placed to the right of the input fields.
OSAS Web B2B User’s Manual
Reference
Toolkit Program Functional Listing
top
Captions are placed above the input fields. In addition, if
"pre" or "table" is specified, the data is arranged in
columns, and array values in the template are scrolled
within the column.
captags$ is a text string that contains any tag used to format the captions before
being placing in HTML form. This string is used in a CALL to uttags.wbb. Refer to
that program page for more information.
work$ is a text string that returns the HTML version of the form. This form is
incomplete as returned and needs a submit button and the <form> </form> HTML
tags. It may be necessary to use this feature to build a form from several data
templates.
The following code creates a simple form:
CALL "utcgi.wbb",env$,cgi$,errmsg$
rem - generate heading
CALL "uttags.wbb","h1","Customer Update Form",html$
rem - create template for new customer
dim rec$:"id:c(5), name:c(40), street:c(40), city:c(30), state:c(2):case=upper:,
zip:c(9):mask=00000-0000:"
rem - if existing customer, the rec$ template could be filled here
rem - create form fields in table format - note ID is a hidden field and can’t be
changed
CALL "utfrmgen.wbb",rec$,"id hidden,name,street,city,state,zip","","table
border","",formhtml$
rem - add submit button
OSAS Web B2B User’s Manual
F-81
Toolkit Program Functional Listing
Reference
CALL "uttags.wbb","submit","",formhtml$
rem - add form tags to form, append to html$; script to perform update is "/cgi-bin/
custupdt"
CALL "uttags.wbb","form /cgi-bin/custupdt",formhtml$,html$
rem - send out form in html$ to browser
CALL "utsend.wbb",html$
CALL "utexit.wbb",cgi$
F-82
OSAS Web B2B User’s Manual
Reference
Toolkit Program Functional Listing
utfrmgn2.wbb
Generate a complete HTML form from a template
Syntax
CALL "utfrmgn2.wbb",tpl$,flds$,captions$,flags$,captags$, actionval$,
submitval$, resetval$, placement,work$
This program uses the utfrmgen.wbb program to create a form and adds the submit
and reset buttons and form action tags to create a complete HTML input form.
For the tpl$, flds$, captions$,flags$, captags$, and work$ variables, refer to the
"utfrmgen.wbb" documentation.
actionval$ contains the name of the script to execute when the submit button is
pressed. All forms contain a tag similar to <form method="post"
action="actionname">. The text in actionval$ is used for actionname.
submitval$ contains the caption used on the submit button(s). If this is null, the
browser places its own caption on the button.
resetval$ contains the caption used on the reset button(s). If this is null, no reset
button is created on the form.
placement is used to determine where to place the submit and reset buttons. The
following values are valid:
1 = Below form
2 = Above form
3 = Both above and below form
Add 100 to these values for a horizontal rule and to separate the buttons from the
form body.
If utfrmgn2.wbb recognizes any field types of "type=file", the <form> tag is
created with the enctype=multipart/form-data option to support file uploading.
utcgi.wbb is compatible with this attribute, but only modern browsers support it
(i.e., Netscape Navigator 3.0 or above, Microsoft Internet Explorer 3.0 or above.)
OSAS Web B2B User’s Manual
F-83
Toolkit Program Functional Listing
Reference
utfrmin.wbb
Copy CGI input to a data template
Syntax
CALL "utfrmin.wbb",cgi$,tpl$
This is a high-level program to copy data from the CGI input template to a data
template. It is sensitive to the user-defined format attributes for defining date,
number, and string formats. This is typically used to copy data into a data template
for storage in a file from either a form being updated, or from a URL that contains
CGI input fields.
cgi$ is the string template generated by utcgi.wbb.
tpl$ is a data template that can incorporate user-defined format attributes. For more
information, see the Data Templates section.
F-84
OSAS Web B2B User’s Manual
Reference
Toolkit Program Functional Listing
utfrmout.wbb
Merge template data into HTML form output
Syntax
CALL "utfrmout.wbb",tpl$,text$,work$
This high-level program merges BBx data with HTML text and produces a result in
work$. The intent is to produce an HTML form with the default handling of data
fields as input fields. It is sensitive to the user-defined format attributes in the data
template tpl$, as well as format tags in the text$ template. The template attributes
are discussed in the Data Templates section.
The HTML text string text$ may contain any text, meta instruction, or field tag
reference. It is evaluated and copied, with possible substitutions and insertions, into
work$.
Meta Instructions
{include filename} - loads the text file filename into text$. This method creates
HTML template files and incorporates them into an application. filename must be
accessible to Business Basic through a physical path or prefix search.
{if datafield opr value} ... {end} - evaluates the expression datafield opr value. If it
fails, it suppresses any text between the if and end tags. If the expression is valid,
the tags are removed, but the text between them is retained.
datafield can be either a field in the data template or a global string variable name.
The operator opr can be >, <, =, >=, <=, <>, in, or !in. The "in" and "!in" operators
("in" or "not in") perform position checks on text fields and values.
If datafield is numeric in the template, the value must be a simple number. If
datafield is defined with a user attribute of "date=format", the value should be a
text date, such as "11/30/95". {if}{end} tags may be nested.
If datafield is not found in the data template and is not a global string variable, the
meta instruction is retained in the text.
OSAS Web B2B User’s Manual
F-85
Toolkit Program Functional Listing
Reference
Note that datafield should not be enclosed by brackets, and there must be at least
one space between datafield and opr, and opr and value.
Field tags
Field tags are placed in text$ in the format [dataname type options].
type is optional, and if not specified, defaults to "text". If dataname is not found in
the data template tpl$, and a global string variable is found by that name, it is used
as simple text output rather than input.
type can be any of the following words: text, hidden, password, radio, checkbox,
memo, list, mlist, show, image, or encode. These are inserted as form input fields in
the following formats: text boxes, hidden fields, password input boxes, radio
button group, checkbox group, textarea entry, listbox, multi-selection list box,
display-only, image tags, and URL-encoded display-only, respectively. URLencoded display-only format is useful if the insertion is being placed in the middle
of a URL link.
The "show" type provides display-only fields in the form.
Radio, checkbox, and list boxes produce groups of selections based on the "keys",
"vals", and "sep" options.
Note this regarding image types: unlike uthtmout.wbb, this program does not look
for the "image=y" user attribute.
Therefore, by default, a form displays the field as a text entry box for maintenance
of the data contents. The global string "$imagelib" may be used to specify the
physical path to the image files and is prepended to the data from the template to
find the image file and calculate pixel dimensions for ".gif" files. Also, the global
string "$imageurl" is prepended to the image src tag: <image src=" +
STBL("$imageurl") + data-value + ">"options may include:
keys="item1;item2;...;itemn"
vals="desc1;desc2;...;descn"
sep="char" or $hex$
cols=columns
F-86
OSAS Web B2B User’s Manual
Reference
Toolkit Program Functional Listing
rows=rows
alt="alternate image description"
wrap=value
The "sep" option defines the separator character in "keys" and "vals". By default, it
is a semicolon but may be set to any value, including nonprintable values, except a
quote.
The options are used in different ways by the different field input types.
For radio and checkbox groups, "keys" generates the returned value for each group
item, and "vals" is used as a caption for each item. In addition, if columns is less
than 2, items are positioned vertically. If columns is between 2 and 98, items are
placed in a table of the specified number of columns across. If columns is over 98,
items are placed horizontally, and the browser breaks the lines in an unpredictable
manner.
For list and mlist groups, keys and vals are combined to form each listbox item in
the format of "itemn - descn". In addition, if rows is specified, then the list box is
defined as the specified number of rows high.
For memo fields, columns and rows is used to define the textarea dimensions. If
unspecified, then 60 columns and 15 rows is assumed. Also, the wrap=value adds a
wrap option to the textarea tags.
For image tag displays, the alt= option can be used to specify the alternate
description browsers use if the image cannot be displayed.
OSAS Web B2B User’s Manual
F-87
Toolkit Program Functional Listing
Reference
uthtmfil.wbb
Generate HTML list from a file, given a key range and format
definition
Syntax
CALL "uthtmfil.wbb", chan, first$, last$, keynum, maxrec, count, curkey$, tpl$,
text$, work$, linkexpr$
This high-level program simplifies the process of producing an HTML listing of
records from a single file, using traditional Business Basic commands to read the
file channel for a specified key range, supporting multi-keyed files throughtheir
key chain numbers, and supporting a maximum record count, so that the resulting
HTML page size can be controlled.
chan is the channel that the file to be read is opened on and must be opened before
CALLing this program.
first$ and last$ are text strings that indicate the key range of records to process. In
particular, if the user is to "scroll" through the file, first$ should be set to the value
of curkey$ from the last page scrolled through. The program processes all records
from first$ forward (whether or not first$ exists as a key in the file) until a record is
read with a key greater than last$ + $FF$. If first$ or last$ are null, the records are
processed from the first through the last records, respectively. first$ and last$ apply
to the key chain specified in keynum.
keynum is the key chain number used when processing the file.
maxrec indicates the maximum number of records to include in the HTML output.
count returns the actual number of records included in the HTML output.
curkey$ is returned as null if the end of the file is reached. Otherwise, it contains
the value of the key after the last one included in the HTML output. This variable
can be used to indicate a starting key value (first$) for the next page in a "scrolling"
type of application. Typically, it must be URL encoded before including it in a
"more records" URL to continued scrolling. URL encoding is performed by
utencode.wbb.
F-88
OSAS Web B2B User’s Manual
Reference
Toolkit Program Functional Listing
tpl$ is a data template used to read records from the file indicated by chan.
text$ is a string variable that contains the HTML format for each record, along with
embedded data name tags, so that a list format or paragraph breaks are generated
between records. For each record, the program "uthtmout.wbb" is CALLed, using
this as the format text. See the uthtmout.wbb information for more details.
work$ returns the HTML text for the records. The global string $list also stores this
value and can be used in CALLs to uthtmout.wbb, which can use text containing
[$list] to merge the value of work$ automatically.
linkexpr$ is a text string used by "uthtmout.wbb" to generate any href links from
the records to another page. See the uthtmout.wbb information for more details.
Automatic pagination support
If the first$ argument is null, the cgi$ variable bbweb_s is checked, and, if present,
is used as the starting point for the list. On exit, if more records are available, the
program generates a global string (STBL) $moreurl that contains the full URL,
with any cgi$ fields retained and with bbweb_s incremented for the next page. This
can be used in a hyperlink for a continuation:
{if $moreurl > ""}
<a href="[$moreurl]">More records&ldots;</a>
{end}
OSAS Web B2B User’s Manual
F-89
Toolkit Program Functional Listing
Reference
uthtmgen.wbb
Generate HTML tags and text from a template
Syntax
CALL "uthtmgen.wbb",tpl$, flds$, captions$, flags$, captags$, linkexprs$, work$
This high-level program generates a data page in HTML format, based on a
template and other information. It is capable of creating data as loose text,
preformatted and aligned text, or as a bordered or borderless table.
tpl$ is a data tempate that contains both the fields and data to generate the didsplay
fields. Various user attributes can be defined in the template to control how field
data is handled. See the Data Templates information for a discussion of these
attributes.
flds$ is a text string that contains a comma-delimited list of field names and
optional format options. If flds$ is null, a default list is generated from all the fields
in tpl$. flds$ can refer to individual array elements (name-n), or it can refer to all
array elements (name-*), in which case the form is generated with all defined array
elements separated by a <BR> tag within the column. If flds$ begins with "*,", it is
presumed to contain a list of exceptions, so that all the fields in the template tpl$
are used to generate the HTML output. Those found in flds$ are referenced with
the formatting tags included in flds$ For example, if flds$ contained the data
"*,giffile @image", then all fields in the template would be generated, and the field
"giffile" would be treated as an image reference. If flds$ begins with "!,", then all
fields in the template, except those listed after the first comma, are included in the
generated document. See the uthtmout.wbb information for formatting options.
captions$ is a string template that can contain captions for any field to be included
in the form. Specifically, any in flds$, or if flds$ is null, then any field in tpl$.The
data for any field found in captions$ is used as the caption for the field. If a field to
be used on the form is not present in captions$, and a "caption" user attribute is not
present in the template string, a default caption is generated from the field name by
converting underscores to spaces and formatting the name with the proper case.
F-90
OSAS Web B2B User’s Manual
Reference
Toolkit Program Functional Listing
Note that a null field in captions$ results in no caption for that field.flags$ is a text
string containing various formatting controls in any order. The flags supported
include:
table
Formats the captions and input fields in table columns, one
row per field.
tre
Use pre-format tags to format the form, allowing perfect
column alignment without relying on table structures but
using fixed pitch fonts.
<p>
Indicates there should be extra space between each row.
align=value
cellalign=value
For tables, sets horizontal alignment of the caption or cell to
value, typically left or right.
valign=value
For tables, sets vertical alignment to value, such as top or
bottom.
font=value hdrfont=value
Add <font value> and </font> tags to the text in cells and
captions, respectively. Because there can be no spaces in
value, use underscores for multiple options. For example:
font=size=4_color=blue.
cellopt=value
hdropt=value
When the table option is used, add value to the end of the
<td> and <th> tags, respectively. No spaces are allowed.
For multiple options, these are separated with an underscore
(see above.)
border border=n
For table forms, there should be a border around each cell.
right
Captions are placed to the right of the input fields.
top
Captions are placed above the input fields. In addition, if
the "pre" or "table" is specified, the data is arranged in
columns, and array values in the template are scrolled
within the column.
OSAS Web B2B User’s Manual
F-91
Toolkit Program Functional Listing
Reference
The text string captags$ contains any tag used to format the captions before placing
them in the HTML form. This string is used in a CALL to uttags.wbb. Refer to that
program page for more information.
linkexpr$ may contain one or more link definitions to use if any data field contains
the @link lead-in option. If multiple link expressions are contained in linkexpr$,
they must be separated by an ASCII character 1 - $01$. An example of a link
expression links a record in a list to a full-page display of that particular record.
Typically, the full-page display is based on the record’s key field. Here is an
example, assuming there is a script that will be given the records key through the
ID field:
linkexpr$="/cgi-bin/showpage?ID=[ID @encode]"
Note that uthtmout.wbb is CALLed recursively to format the actual URL used in
the link, so the same formatting
information applies to text$ and linkexpr$.
work$ is a text string that returns the HTML document with captions and data
fields.
F-92
OSAS Web B2B User’s Manual
Reference
Toolkit Program Functional Listing
uthtmkey.wbb
Generate HTML list from a file, given a list of keys
Syntax
CALL "uthtmkey.wbb",chan,keys$,keylen,tpl$,text$,work$,linkexpr$
This high-level program simplifies the process of producing an HTML listing of
records from a single file, using a predefined list of keys that can be iterated with a
specified key length. The CALLing program builds the list of primary keys and
CALLs this program to create HTML for each record specified in that list.
chan is the channel that the file to be READ is opened on must be opened before
CALLing this program.
keys$ is a string variable that contains the list of keys to process. Each key must be
the same length, as indicated in the keylen variable.
keylen indicates the length of each key in keys$
tpl$ is a data template to read records from the file indicated by chan.
text$ is a string variable that contains the HTML format for each record, along with
embedded data name tags. For each record, the program "uthtmout.wbb" is
CALLed, using this as the format text. See the uthtmout.wbb information for more
details.
work$ returns the HTML text for the records.
linkexpr$ is a text string used by "uthtmout.wbb" to generate any href links from
the records to another page. See the uthtmout.wbb information for more details.
OSAS Web B2B User’s Manual
F-93
Toolkit Program Functional Listing
Reference
uthtmout.wbb
Merge HTML text with data from a data template
Syntax
CALL "uthtmout.wbb",tpl$,text$,work$,linkexpr$
This program is a high-level routine CALLed by uthtmfil.wbb, uthtmkey.wbb, and
uthtmsel.wbb. It can also be CALLed by custom programs when single-file
processing is inadequate. It merges Business Basic data with HTML text and
produces results in work$. The intent is to produce a standard HTML page, so no
input fields are generated as with an input form. If an input form is desired,
utfrmout.wbb is used.
The program is sensitive to the user-defined format attributes in the data template
tpl$, as well as format tags in the text$ template. The template attributes are
discussed in the Data Templates section. The data template specified can be filled
by the CALLing program using data from a number of sources. In applications
where multiple data templates do not share data field names, this program can be
CALLed multiple times to produce a final HTML output, with different data
merged on each CALL.
tpl$ is a data template used as the source for data field names. It contains data types
and user-defined formatting attributes. See the Data Templates section for more
information.
text$ is an HTML text string that may contain any text, meta instruction, or field
tag reference. It is evaluated and copied, with possible substitutions and insertions,
into work$.
work$ returns the HTML result of merging text$ with data in tpl$.
F-94
OSAS Web B2B User’s Manual
Reference
Toolkit Program Functional Listing
linkexpr$ may contain one or more link definitions to be used if any data field
contains the @link lead-in option. If multiple link expressions are contained in
linkexpr$, they must be separated by an ASCII character 1 - $01$. An example of a
use for a link expression links a record in a list to a full-page display of that
particular record. Typically, the full-page display is based on the record’s key field.
The following example assumes there is a script that will be given the records key
through the ID field:
linkexpr$="/cgi-bin/showpage?ID=[@encode ID]"
If any link expression contains an ASCII 2 ($02$) character, the data before the
$02$ is used as the "href" portion of the link, and data after the $02$ is added to the
<a ...> tag after the "href=" element. This is helpful when specifying things such as
target frames in a link. For example, if the link expression is "/cgi-bin/
showpage?id=1"+$02$+"target=A", the generated tag would be "<a href="/cgi-bin/
showpage?id=1" target=A>...</a>".
Note that uthtmout.wbb is CALLed recursively to format the actual URL used in
the link, so the same formatting information applies to text$ and linkexpr$.
Meta Instructions
{include filename} - loads the text file filename into text$. This method creates
HTML template files and incorporates them in an application. filename must be
accessible to Business Basic.
{if datafield opr value} ... {end} - evaluates the expression datafield opr value. If it
fails, any text between the if and end tags is suppressed. If the expression is valid,
the tags are removed, but the text between them is retained. datafield can be either
a field in the data template or a global string variable name. The operator opr can
be >, <, =, >=, <=, <>, in, or !in. The "in" and "!in" operators perform position
checks on text fields and values. If datafield is numeric in the template, then value
must be a simple number. If datafield is defined with a user attribute of
"date=format", then value should be a text date, such as "11/30/95". {if}{end} tags
may be nested.
If datafield is not found in the data template and is not a global string variable, the
meta instruction is retained in the text.
OSAS Web B2B User’s Manual
F-95
Toolkit Program Functional Listing
Reference
Note that datafield should not be enclosed by brackets, and there must be at least
one space between datafield and opr, and opr and value.
Field tags
Field tags are placed in text$ in the format [dataname format-control options].
dataname is a data template field name, or a global string variable name. If it is not
found in either form, then it is retained for subsequent CALLs with other data
templates.
format-control is an optional format control word used to indicate special
formatting of the merged data. These values can optionally be placed before the
dataname for compatibility with earlier releases.Valid values are:
@link or @linkn, used to create an "<a href="url-value">data-value</a>
expression from the dataname value. The format of the url-value is specified in the
linkexpr$ variable. If multiple link formats are specified in linkexpr$, the format
@linkn can be used, where n specifies the link format number to use with this
dataname.
@encode forces the dataname value to be URL encoded.
@image causes an <img src="data-value"> tag to be generated from the dataname
value. If the global string variable "$imageurl" is defined, it is used as a prefix to
the dataname value. In addition, if the global string variable "$imagelib" is defined,
it is used to locate the physical image file, if it resides on the host system, and
determine the image dimensions for the <IMG> tag.
@pad ensures that a right padded, rather than trimmed dataname value is used.
@lpad ensures that a left padded, rather than trimmed dataname value is used.
Padding is only necessary on pre-formatted output (such as between <pre> and </
pre> tags.)
options may include:
F-96
OSAS Web B2B User’s Manual
Reference
Toolkit Program Functional Listing
keys="item1;item2;...;itemn"
vals="desc1;desc2;...;descn"
sep="char" or $hex$
alt="image-altname"
passthru=y or n
The "sep" option is used to define the separator character used in "keys" and "vals".
By default, it is a semicolon, but may be set to any value, including nonprintable
values, except a quote.
If keys and vals are specified, then the dataname value is compared to the list of
item values, and the corresponding desc value is merged, rather than the dataname
value itself.
If the @image lead-in option is specified, the image-altname is used to specify the
"alt=name" in the HTML image tag. The default name is "image".
Normally, any dataname value that comes from the data template is modified for
HTML markup entities. If passthru=y is specified, the utentity.wbb routine is not
CALLed, allowing HTML text to be stored in the data template. The "passthru"
user-defined attribute in the data template is overridden by any value specified in
the options here.
OSAS Web B2B User’s Manual
F-97
Toolkit Program Functional Listing
Reference
uthtmsel.wbb
Generate HTML list from a BBx or PRO/5 SELECT verb
Syntax
CALL "uthtmsel.wbb",fl$, where$, sortby$, opt$, maxrec, skip, count,
tpl$,text$,work$,linkexpr$
This high-level program simplifies the process of producing an HTML listing of
records from a single file, using the BBx/Pro5 SELECT verb. It supports a
maximum record count and skip record count to control the resulting HTML record
set.
The text string fl$ contains the name of the file to issue the SELECT from.
The text string where$ contains the optional WHERE clause (without the word
"WHERE") for use in the SELECT statement.
The text string sortby$ contains the optional SORTBY clause (without the word
"SORTBY") for use in the SELECT statement.
The text string opt$ is used in the SELECT statement’s MODE="opt" clause. A
common use of opt$ would be to control the optimization performed by BBx or
Pro5, such as "opt=nosort".
maxrec indicates the maximum number of records to include in the HTML output.
skip indicates the number of records to skip before including records in the HTML
output. Because the SELECT statement does not provide a reliable means of
starting a list at a specific point in the file, scrolling applications must know how
far the previous page had read through the file. This variable is typically transferred
in a "more records" URL. It is automatically incremented by the number of records
read or returns 0 if the end of the SELECT is reached.
count returns the actual number of records included in the HTML output.
The data template tpl$ reads records from the file indicated by chan.
F-98
OSAS Web B2B User’s Manual
Reference
Toolkit Program Functional Listing
The string variable text$ contains the HTML format for each record, along with
embedded data name tags. For each record, the program "uthtmout.wbb" is
CALLed, using this as the format text. See the uthtmout.wbb information for more
details.
work$ returns the HTML text for the records. The global string $list also contains
this value.
The text string linkexpr$ is used by "uthtmout.wbb" to generate any href links from
the records to another page. See the uthtmout.wbb information for more details.
Automatic pagination support
If the skip argument is null, the cgi$ variable bbweb_s is checked. If present, it is
used as the starting point for the list. On exit, if more records are available, the
program generates a global string (STBL) $moreurl that contains the full URL,
with any cgi$ fields retained, and with bbweb_s incremented for the next page.
This can be used in a hyperlink for a continuation:
{if $moreurl > ""}
<a href="[$moreurl]">More records&ldots;</a>
{end}
This feature assumes that the value of where$, sortby$, and opt$ will be duplicated
between executions.
OSAS Web B2B User’s Manual
F-99
Toolkit Program Functional Listing
Reference
utisip.wbb
Verify if the remote client address is in a list of valid addresses
Syntax
CALL "utisip.wbb",env$,iplist$,valid
One method of implementing security in an Internet application is to verify that the
client request appears to be coming from a valid IP address or domain. This lowlevel routine checks the validity and includes support for wildcards and multiple
addresses.
The string template env$ is returned by utcgi.wbb.
iplist$ contains a semi-colon delimited list of valid IP addresses and/or domain
names. The list may contain wildcards.
For example, "192.0.0.*" would return as valid any IP address that starts with
"192.0.0." Another example: "localhost; *.acme.com" would allow any "localhost"
access, plus any systems in the "acme.com" domain.
valid returns 1 if the client address is in iplist$, or 0 if not.
Not all Web servers return a domain name, and those that can are often configured
not to. However, most servers provide the client IP address.
F-100
OSAS Web B2B User’s Manual
Reference
Toolkit Program Functional Listing
utmeta.wbb
Scans text for special substitutions
Syntax
CALL "utmeta.wbb",tpl$, text$
This program is CALLed by the uthtmout.wbb and utfrmout.wbb programs and can
also be called directly. The purpose of this program is to allow easy file inclusion
in text strings and to provide some conditional control over the content of HTML
text without resorting to in-line Business Basic coding.
The data template tpl$ is used when evaluating conditional suppression. See the
Data Templates section for more information.
The text string text$ contains the meta commands and also returns the result after
substitutions are performed.
{include filename} - loads the text file filename into text$. This method creates
HTML template files and incorporates them in an application. filename must be
accessible to Business Basic.
{if datafield opr value} ... {end} - evaluates the expression datafield opr value, and
if it fails, suppresses any text between the if and end tags. If the expression is valid,
the tags are removed, but the text between them is retained.
datafield can be either a field in the data template or a global string variable name.
The operator opr can be >, <, =, >=, <=, <>, in, or !in. The "in" and "!in" operators
perform position checks on text fields and values. If datafield is numeric in the
template, value must be a simple number. If datafield is defined with a user
attribute of "date=format", value should be a text date, such as "11/30/95".
{if}{end} tags may be nested. An example follows:
{if ytd_sales > 0} <td>Sales: [ytd_sales]</td> {end}
If datafield is not found in the data template and is not a global string variable, the
meta instruction is retained in the text.
Note that datafield should not be enclosed in brackets, and there must be at least
one space between datafield and opr, and opr and value.
OSAS Web B2B User’s Manual
F-101
Toolkit Program Functional Listing
Reference
utmmoin.wbb
Convert memo field (textarea tag) CGI input to blocked text
Syntax
CALL "utmmoin.wbb",cgitext$,blocked$,block
Business Basic applications typically store variable length text fields in multiple
records, blocked to a certain size.
Often, the maintenance of these blocks is performed one line at a time within the
Business Basic application itself.
This routine simplifies the conversion of free form text entry in an HTML form
into a format suitable for storage using blocking techniques.
The string variable cgitext$ contains data from a <textarea> input tag in a HTML
form. This information is sent to the server with CR-LF characters wherever the
user pressed the Enter key while editing the data.
The string text blocked$ returns a version of the text passed in cgitext$, blocked
based on the block size specified in block.
block indicates the block size to use when constructing blocked$
cgitext$ is analyzed for paragraph boundaries, and all other line breaks are
suppressed. The paragraphs are word-wrapped on block boundaries and appended
to the blocked$ variable. Paragraph breaks are indicated by blank line in blocked$.
F-102
OSAS Web B2B User’s Manual
Reference
Toolkit Program Functional Listing
utmmoout.wbb
Format text containing CR-LF characters as HTML
Syntax
CALL "utmmoout.wbb",textin$,textout$
Web browsers ignore white space when formatting HTML output. To force data
output that contains CF-LF line breaks to retain the breaks, include <P> and <BR>
tags in the HTML output. This low-level routine performs this function by
analyzing textin$ and substituting the appropriate line- or paragraph-breaks.
The string variable textin$ contains the data with CR-LF line breaks.
textout$ returns a HTML version of the text with <P> and <BR> tags where
appropriate.
This routine is not a mirror of "utmmoin.wbb".
OSAS Web B2B User’s Manual
F-103
Toolkit Program Functional Listing
Reference
utmore.wbb
Create "more records" information, either as a URL or as
hidden form tags
Syntax
CALL "utmore.wbb",cgi$, flds$, moreurl$, morehidden$
When developing record scrolling applications, it may be necessary to provide a
link or button to a subsequent set of records through a "more records" link. Often,
this type of link only requires one or two fields to be passed to the subsequent task.
This information can be easily created manually in Business Basic code. However,
if many fields of information passed to the current task must be passed on to
subsequent tasks, this routine can simplify the task of creating the HTML text
required.
The string template cgi$ is generated by utcgi.wbb.
flds$ is an optional, comma-separated list of field names. If specified, only the field
names specified are used to generate moreurl$ and morehidden$ from cgi$. If flds$
begins with "!,", then all fields in the template, except those listed after the first
comma, are included in the generated document.
moreurl$ is returned as a text string that contains URL-encoded field=value pairs
from the values stored in cgi$. For example, if cgi.state$="CA" and
cgi.slsp$="100", then moreurl$ would contain "state=CA&slsp=100". This can
then be appended to the end of a cgi link URL, such as "/cgi-bin/
listrecs?state=CA&slsp=100".
morehidden$ is returned as a set of hidden field input tags, for inclusion in a
HTML form. The above example would produce the following text:
<input type="hidden" name="state" value="CA">
<input type="hidden" name="slsp" value="100">
This can then be embedded in an HTML form, along with a submit button, to
provide another version of a link to a subsequent list.
F-104
OSAS Web B2B User’s Manual
Reference
Toolkit Program Functional Listing
This routine is sensitive to the presence of two cgi$ variables, "bbweb_count" and
"bbweb_skip". If bbweb_count is present, bbweb_skip is automatically
incremented by the value of bbweb_count when added to moreurl$ and
morehidden$.
OSAS Web B2B User’s Manual
F-105
Toolkit Program Functional Listing
Reference
utselect.wbb
Create SELECT WHERE clause from cgi input fields
Syntax
CALL "utselect.wbb", cgi$, tpl$, where$, andor$
This program simplifies the parsing of cgi input from an HTML query form. The
query form would contain input fields for certain data fields, and once the user
filled in and submitted the form, this program would create the WHERE clause of a
SELECT statement based on the user entries. It is sensitive to user-defined
formatting attributes in the data template.
The string template cgi$ is returned by utcgi.wbb.
The data template tpl$ is used in the SELECT statement and can include userdefined formatting attributes, as defined in the Data Template section.
where$ returns the WHERE clause, suitable for use in a SELECT statement, with
the syntax "WHERE CPL(WHERE$)". The assumed data template name used in
where$ is "rec": rec.state$="CA". For example: if "rec" is not the right name, a
substitution should be performed before executing the SELECT statement.
andor$ specifies whether the AND or OR boolean is used between fields in
where$. If this is not set to "or", then "and" is assumed.
Any field in cgi$ and tpl$ that isn’t null in cgi$, is evaluated. The field name for the
where clause expression fragment is taken from cgi$.
If a cgi$ field called "opr_name" is found, the where clause operator is taken from
that field. Otherwise, the text of the cgi field itself is analyzed for an operator.
Operators can be <, >, =, <=, >=, <>, in, like, and between. If there is no operator,
but the data in cgi$ contains *, ?, or [ characters, and the tpl$ definition for the field
is character rather than numeric, the "like" operator (wildcard) is used. Otherwise,
text fields must start with the characters entered, and numeric fields must be equal
to the number entered.
F-106
OSAS Web B2B User’s Manual
Reference
Toolkit Program Functional Listing
If the operator is "between", there must be exactly two occurrences of the same
field name, and the where clause will be formed as field >= first-value and field <=
second-value.
If the same field occurs multiple times in cgi$ (as can happen with checkboxes,
multiple selection lists, or intentionally created duplicate named tags), multiple
where clause expressions are created with OR boolean logic (other than the
between operator case noted above), distinct from the AND or OR booleans used
between unique field names.
OSAS Web B2B User’s Manual
F-107
Toolkit Program Functional Listing
Reference
utsend.wbb
Send text back to the client browser
Syntax
CALL "utsend.wbb",text$
This high-level routine sends HTML text to the client. It works on all Basic Web
Utility platforms, regardless of the output destination, and automatically adds the
Content-type: header as needed to the first output.
On the first CALL to utsend.wbb, if text$ begins with "Location:", text$ is sent
with a trailing blank line.
On the first CALL to utsend.wbb, if text$ begins with "Content-type: ", a header is
not added by utsend.wbb, and the application is responsible for the header and
trailing blank line. This enables the application to send any MIME data type to the
browser.
F-108
OSAS Web B2B User’s Manual
Reference
Toolkit Program Functional Listing
utses.wbb
Manage session record
Syntax
CALL "utses.wbb",mode,sesrec$,errmsg$
This program provides an interface to read, write, and delete the session record, if
present. Session tracking can be initiated in the program by creating a global string
(STBL) $sestpl before CALLing utcgi.wbb. This string is a string template
definition to describe what session data the Basic Web Utility should store. The
Basic Web Utility generates an HTTP cookie ($sesid) to retain the session ID code
that the data is stored under.
mode can be 0 to read the session record, 1 to write it, or 2 to delete it. If mode is 0,
sesrec$ returns the session record If mode is 1, it is used to update the session
record. It is ignored if mode is 2.
errmsg$ returns a description if any error occurred. If this value is not blank on
exit, there was a problem in session tracking, and the application should take
measures to display and/or work around the error.
This program uses the file utses.dat, stored in the Basic Web Utility directory and is
created automatically if not found. It has a key size of 22 and a record size of 512.
OSAS Web B2B User’s Manual
F-109
Toolkit Program Functional Listing
Reference
utsub.wbb
Substitute occurrences of text with replacement text
Syntax
CALL "utsub.wbb", text$, from$, to$
This low-level routine substitutes all occurrences of from$ with to$ in text$. It is
nonrecursive, so to$ may contain from$, or conversely, from$ may contain to$.
F-110
OSAS Web B2B User’s Manual
Reference
Toolkit Program Functional Listing
uttable.wbb
Create HTML table from an array
Syntax
CALL "uttable.wbb", caption$, options$, dat$[all], work$
HTML tables are time consuming to create manually, in part because the markup
tags are required for each cell. This high-level routine reduces the effort, if the data
for the table can be stored in a 2-dimensional array.
The string variable caption$ ontains the table caption, if any.
The string variable options$ contains the table options for the <table> tag. The
most common option is "border", or "border=1". Table options are not consistent
among browsers, so care must be taken when using them.
dat$[all] contains the data to be converted to table cells. This must be a 2dimensional array with columns as the first dimension and rows as the second. If
row 0 exists, it is used for column headings; column 0 is similarly used for row
headings. All other data is used as regular cells.
work$ is returned as the HTML table definition.
OSAS Web B2B User’s Manual
F-111
Toolkit Program Functional Listing
Reference
uttags.wbb
Appends text with specified HTML markup tags, to a HTML
string
Syntax
CALL "uttags.wbb", tags$, text$, html$
This high-level routine is used to add HTML markup tags to text. When there are
no structure conflicts, multiple tags can be added with a single CALL by separating
the tags with commas. In all cases, tags are applied to text$, and the result is
appended to html$, along with a CR-LF sequence. If there are no tags, text$ is
appended to html$, along with a CR-LF sequence to aid readability.
tags$ is a comma-separated list of tags, some of which may contain options. In
many cases, a tag causes both a pre- and a post-tag to be added to text$ because
there are many HTML tags with both opening and closing parts.
The tags supported are:
F-112
b
adds <b> and </b>
body options
adds <body options> and </body>
br
appends <br>
center
adds <center> and </center>
Comment
adds <!-- and -->
form action
adds <form action="action" method=post> and </form>
form-up
Adds <form action="action" method=post
enctype=multipart/form-data> and </form>
h1..6
adds <hn> and </hn>
head
adds <head> and </head>
Hidden name
replaces text$ with <input type="hidden" name="name"
value="text$">
OSAS Web B2B User’s Manual
Reference
Toolkit Program Functional Listing
Hr
prepends a <hr> tag
Href name
adds <a href="name"> and </a>
If name contains an ASCII 2 ($02$) character, the data before the $02$ is used as
the "href" portion of the link, and data after the $02$ is added to the <a ...> tag after
the "href=" element. This is useful for specifying things such as target frames in a
link. For example, if the name is "/cgi-bin/showpage?id=1"+$02$+"target=A", the
generated tag would be "<a href="/cgi-bin/showpage?id=1" target=A>...</a>".
Html
adds <html> and </html>
I
adds <i> and </i>
Img altname
replaces text$ with <img src="text$" alt="altname">
P
prepends a <p> tag to text$
Pre
adds <pre> and </pre>
Rem
same as comment
Reset
replaces text$ with <input type="reset" name="text$">
Submit value
replaces text$ with <input type="submit" value="value"
name="text$">
Title
adds <title> and </title>
text$ receives pre- and post- html tags in the order listed in tags$, except where
text$ is replaced.
html$ returns its original value, plus the formatted value of text$.
OSAS Web B2B User’s Manual
F-113
Toolkit Program Functional Listing
Reference
uttplbas.wbb
Load data template from Basis data dictionary
Syntax
CALL "uttplbas.wbb", dict$, fl$, control$, tpl$, errmsg$
This low-level routine is designed to quickly return a template for a file defined in
the BASIS data dictionary, which is a directory that contains the BASIS data files,
LOCAT.1, FIELD.1, and TYPDEF.1. This program works directly with the
dictionary files. There is no need to initialize the extended utility or data dictionary
environmentsdict$ contains the name of the directory where the dictionary files are
stored. If empty, the files must be accessible through normal PREFIX-based
directory searching.
fl$ contains the name of the file of the dictionary to be loaded.
control$ is used internally to track open file channels used by this program. It
should be null when this routine is first called, and passed unchanged to additional
calls of this program. To close the channels manually, the channel values are stored
in control$ in the 2-byte binary increments dec(control$(1,2)), dec(control$(3,2)),
and dec(control$(5,2)).
tpl$ returns the data template for the specified file.
errmsg$ contains an error message if the template generation failed for any reason.
F-114
OSAS Web B2B User’s Manual
Reference
Toolkit Program Functional Listing
uttempfl.wbb
Create and open a temporary string file
Syntax
CALL "uttempfl.wbb", tempfile$, tempchan
This low-level routine is used in the Win-CGI environment where temporary files
are sometimes needed. It can also be used when files are uploaded and parsed
through utcgi.wbb, or by the application developer, if a temporary string file is
needed.
tempfile$ returns the name generated for the file. If the environment variable
"TEMP" is defined, it is assumed to point to a temporary file directory. Otherwise,
in UNIX the "/tmp" directory is used, and finally, the current directory "." is used.
To override this directory selection, create a global string (STBL) called $tempdir,
and set its value to the directory to be used.
tempchan returns the channel number used to open the file.
OSAS Web B2B User’s Manual
F-115
Toolkit Program Functional Listing
Reference
uttplcp.wbb
Copy matching values from source to destination templates
Syntax
CALL "uttplcp.wbb",source$, dest$
This low-level routine simplifies the task of copying data from one template to
another. It scans the destination template, and any matching field names and array
elements in the source template are copied.
F-116
OSAS Web B2B User’s Manual
Reference
Toolkit Program Functional Listing
utwatch.wbb
Interface with a shared directory CGI request process
Syntax
RUN "utwatch.wbb"
This program continuously scans a directory for files that contain CGI requests.
The request file, which must follow the name convention of "filename.in", will
contain the name of a Business Basic program to RUN, along with the environment
and CGI data. The specified program is RUN and must use "utsend.wbb" for all its
HTML output When it is finished, it must CALL "utexit.wbb" and RUN
"utwatch.wbb".
Typically, this program runs from one or more background tasks. The more tasks,
the more likely that CGI requests will be responded to quickly.
The global variable "$commdir" should be set to the name of the shared directory
before utwatch.wbb is run. If it is not set, the current directory is used.
Normally, utwatch.wbb scans the shared directory completely and pauses for one
second before scanning again. The number of seconds, from 0 to any value allowed
by the WAIT directive, can be specified in the global variable "$waitsec".
The format of a request file is:
program-name
env-1=val-1
env-2=val-2
...
env-n=val-n
<blank line>
CGI standard input stream (with line-feed appended)
---EOF---
OSAS Web B2B User’s Manual
F-117
Toolkit Program Functional Listing
Reference
The first line is the Business Basic program that utwatch.wbb should RUN. The
next lines, up to a blank line, contain the environment variables and their values.
Following the blank line is the CGI input stream that the CGI script received on its
standard input handle, with a line feed appended to force an additional line. The
last line is the text string "---EOF---".
The UNIX shell script bwu2.sh provides the interface mechanism for UNIX CGI
requests.
F-118
OSAS Web B2B User’s Manual
OSAS Web B2B User’s Manual
References
Index
A
Abandon
function key, 1-27, 1-42
pull-down menu command, 1-27
verification button, 1-26
About OSAS
pull-down menu command, 1-30
Access Code
function key, 1-18, 1-40
tool button, 1-20
access code
entering in graphical menus , 1-20
entering in text menus, 1-40
Access Codes
parameter , 1-13
Add/Remove Favorites
function key, 1-19, 1-41
Alias Inventory Lookup
function key, 1-32, 1-46, 1-47
pull-down menu command, 1-32
Application Information
function key, 1-19, 1-41
tool button, 1-23
Application Setup
function key, 1-19, 1-40
Application setup, 1-24
B
base applications
defined, 1-3
bell
turning on or off, 1-41, 1-43
Bell mode
function key, 1-43
pull-down menu command, 1-28
OSAS Web B2B User’s Manual
IX
Build Sales Orders from Remote Files
function, 5-7
screen, 5-8
Build Sales Orders Log
sample, 5-10
C
Calculator
tool button, 1-21, 1-26
CGI
defined, 1-5
Change Company
function key, 1-40
Change Menu Style
function key, 1-19, 1-41
change to/from Favorites
tool button, 1-22, 1-24
change to/from Favorites Menu
function key, 1-18, 1-40
changing companies
graphical menus, 1-24
text menu, 1-40
click
defined, 1-11
Command Help, 1-40
closing window, 1-40
pull-down menu command, 1-30
Command help, 1-42
closing window, 1-42
commands
graphical functions, 1-25
graphical menus, 1-18
in-field editing, 1-34, 1-44
OK, 1-13
Proceed, 1-13
IX-1
Index
report, 1-47
scroll region , 1-48
Common Questions, B-1
companies
changing, 1-24, 1-40
company parameter, 1-13
conventions
report, 1-49
user’s manual, 1-11
Copied Files, C-1
BBX Programs, C-1
Copy
function key, 1-28, 1-34, 1-45
pull-down menu command, 1-28
tool button, 1-26
Copy Data Files to Web Server
function, 6-3
screen, 6-4
Copy OSAS Programs to Web Server
function, 6-7
screen, 6-8
Create Login Page
function, 4-3
screen, 4-4
Ctrl-F function key, 1-43
Ctrl-G function key, 1-43
text menu , 1-41
Ctrl-J function key, 1-27
Ctrl-O function key, 1-43
Ctrl-V function key, 1-43
Ctrl-Z function key, 1-28, 1-34
cursor
moving down or forward one field, 1-27, 1-43
moving up or back one field, 1-27, 1-43
selecting item, 1-36, 1-46
Cursor end
function key, 1-34, 1-44
Cursor home
function key, 1-34, 1-44
Cursor left
function key, 1-34, 1-44
Cursor right
function key, 1-34, 1-44
Customer Groups
customer screen , 3-25
function, 3-23
IX-2
References
item group screen, 3-24
screen, 3-20
Customer Groups List
function, 7-23
sample, 7-25
screen, 7-24
Customer History Lookup
HTML screen , 8-11, 8-13, 8-15
web function, 8-11, 8-13
Customer Internet Access Codes
function, 3-11, 3-15
screen, 3-12, 3-16
Customer Lookup
HTMLscreen, 8-7, 8-9
web function, 8-7, 8-9
Customer Order Detail Lookup
HTML screen , 8-26
Customer Order Lookup
HTML screen , 8-25
web function, 8-25
Customer/Vendor Inventory Lookup
function key, 1-32, 1-46
pull-down menu command, 1-32
D
Del function key, 1-34, 1-44
Delete
function key, 1-27, 1-42
pull-down menu command, 1-27
tool button, 1-26
delete
information on a screen, 1-27, 1-42
line item, 1-31, 1-48
Delete character
function key, 1-34, 1-44
Delete Line command
function key, 1-31, 1-48
pull-down menu command, 1-31
Delete to End of Line
function key, 1-45
Description Inventory Lookup
function key, 1-32, 1-47
pull-down menu command, 1-32
deselect
defined, 1-12
OSAS Web B2B User’s Manual
References
Detail Inventory Lookup
function key, 1-32
double-click
defined, 1-11
Down Arrow
inquiry command, 1-36, 1-46
report command, 1-47
scroll region command, 1-31, 1-48
Down Arrow function key
text menu , 1-41
Down-arrow function key, 1-43
E
edit line item, 1-48
Editing Files, D-1
modifying batch and script files, D-2
modifying the config.bbx, D-1
EIS
defined, 1-3
EMAIL Table, 3-29
screen, 3-30
EMAIL table, 3-27
End
inquiry command, 1-36, 1-46
report command, 1-47
scroll region command, 1-31, 1-48
End function key, 1-44
Enter
inquiry command, 1-36, 1-46
scroll region command, 1-48
Enter key , 1-43
text menu , 1-41
error messages, C-1, D-1
Esc
Command help, 1-40, 1-42
inquiry command, 1-46
Executive Information Summary
defined, 1-3
Exit
function key, 1-27, 1-42
pull-down menu command, 1-27
exit
from inquiry window, 1-36, 1-46
from report to menu, 1-47
from screen or window, 1-27, 1-40, 1-42
OSAS Web B2B User’s Manual
Index
Exit from OSAS
function key, 1-19, 1-40
F
F1 function key, 1-18, 1-30, 1-40, 1-42
graphical menus, 1-18
text menu, 1-40
F10 function key, 1-45
graphical menus, 1-19
text menu, 1-41
F2 function key, 1-27, 1-42
graphical menus, 1-18
text menu, 1-40
F3
function key, 1-26
scroll region command, 1-31, 1-48
F3 function key, 1-27, 1-42
text menu, 1-40
F4 function key, 1-42
graphical menus, 1-18
text menu, 1-40
F5 function key, 1-27, 1-42
graphical menus, 1-18
text menu, 1-40
F6
function key, 1-26
F6 function key, 1-27, 1-42
graphical menus, 1-18
text menu, 1-40
F7
inquiry command, 1-36, 1-46
report command , 1-47
F7 function key, 1-27, 1-42
graphical menus, 1-19
text menu, 1-40
F8 function key, 1-42
F9 function key, 1-44
graphical menus, 1-19
text menu, 1-40
Favorites Menu, 1-14
adding items to, 1-24
benefits of , 1-14
changing to/from, 1-24
graphical sample, 1-14
Start-style sample, 1-25
IX-3
Index
text sample , 1-39
Favorites Menus
removing items from, 1-24
Field Down
function key, 1-27, 1-43
pull-down menu command, 1-27
Field Up
function key, 1-27, 1-43
pull-down menu command, 1-27
File Maintenance menu structure, 1-8
First Line command
function key, 1-31, 1-48
pull-down menu command, 1-31
scroll button , 1-33
Function Help
function key, 1-40
Function help, 1-24
function keys
Ctrl + G, 1-41
Ctrl-F, 1-43
Ctrl-G, 1-43
Ctrl-J, 1-27
Ctrl-O, 1-43
Ctrl-V, 1-43
Ctrl-Z, 1-28, 1-34
Del, 1-34, 1-44
Down Arrow, 1-27
End, 1-34, 1-44
Esc, 1-40, 1-42
F1, 1-30, 1-42
F10, 1-28, 1-45
F2, 1-27, 1-33, 1-42
F3, 1-27, 1-42
F4, 1-42
F5, 1-27, 1-42
F6, 1-27, 1-42
F7, 1-27, 1-42
F8, 1-42
F9, 1-44
graphical menus , 1-18
Home, 1-34, 1-44
Ins, 1-34, 1-44
Left, 1-34, 1-44
PgDn, 1-27, 1-43
PgUp, 1-27, 1-41, 1-43
Right, 1-34, 1-44
IX-4
References
Shift-F1, 1-30, 1-42
Shift-F10, 1-34, 1-45
Shift-F2, 1-42
Shift-F3, 1-32, 1-46
Shift-F4, 1-32, 1-46
Shift-F5, 1-32, 1-47
Shift-F6, 1-32, 1-47
Shift-F7, 1-32, 1-47
Shift-F8, 1-32, 1-47
Shift-F9, 1-28, 1-34, 1-45
Tab, 1-41, 1-43
Up Arrow, 1-27, 1-43
G
Global Inquiry
defined, 1-3
graphical menu
exiting from, 1-16
features of , 1-15
keyboard commands, 1-18
right-click menu, 1-18
sample screen, 1-16
graphical menus
right-click menu, 1-24
graphical mode
defined, 1-4
H
Help, 1-24
function key, 1-30, 1-42
pull-down menu command, 1-30
tool button, 1-23, 1-26
help commands
F3, 1-44
F6, 1-33, 1-44
F7, 1-33, 1-44
Home
inquiry command, 1-35, 1-46
report command , 1-47
scroll region command, 1-31, 1-48
Home function key, 1-34, 1-44
HOMEPATH table, 3-27
HTML, 1-5
OSAS Web B2B User’s Manual
References
I
Information
function key, 1-42
Information menu
accessing, 1-42
Inquiry
function key, 1-27, 1-33, 1-42
graphical, 1-33
partial-key, 1-45
pull-down menu command, 1-27
inquiry commands
Down Arrow, 1-36, 1-46
End, 1-36, 1-46
Enter , 1-36, 1-46
Esc, 1-46
F7, 1-36, 1-46
Home, 1-35, 1-46
Ins, 1-36, 1-46
PgDn, 1-36, 1-46
PgUp, 1-35, 1-46
Up Arrow, 1-36, 1-46
Ins
inquiry command, 1-36, 1-46
scroll region command, 1-31, 1-48
Ins function key, 1-34, 1-44
Insert Line command
function key, 1-31, 1-48
pull-down menu command, 1-31
Insert line item, 1-31, 1-48
Insert mode
function key, 1-34, 1-44
Install OPEN Web Server Components
function, 3-27
Install Web Server Components
function, 4-5
screen, 4-6
interfaces with Accounts Receivable, 1-9
Internet Access Codes List
function, 7-19
sample, 7-21
screen, 7-20
Internet Companies List
function, 7-11
sample, 7-13
screen, 7-12
OSAS Web B2B User’s Manual
Index
Internet Inventory Item Groups List
function, 7-15
sample, 7-17
screen, 7-16
Inventory Additional Descrption
HTML screen , 8-21
Inventory Information Lookup
HTML screen , 8-19
web function, 8-17
Inventory Item Pictures
function, 3-7
screen, 3-8
Inventory Item Pictures List
function, 7-7
sample, 7-9
screen, 7-8
Inventory Lookup
commands, 1-32, 1-46
Inventory Lookup commands, 1-32
alias lookup, 1-32
customer/vendor lookup, 1-32
description lookup, 1-32
detail lookup, 1-32
lot lookup, 1-32
serial lookup, 1-32
Shift-F3, 1-32
Shift-F4, 1-32
Shift-F5, 1-32
Shift-F6, 1-32
Shift-F7, 1-32
Shift-F8, 1-32
Inventory lookup commands
alias lookup, 1-46
customer/vendor lookup, 1-46
description lookup, 1-47
detail lookup, 1-47
lot lookup, 1-47
serial lookup, 1-47
Shift-F3, 1-46
Shift-F4, 1-46
Shift-F5, 1-47
Shift-F6, 1-47
Shift-F7, 1-47
Shift-F8, 1-47
Inventory Price Break Lookup
HTML screen , 8-22
IX-5
Index
inventory search commands, 1-46
Shift + F6, 1-47
Item Group Codes
function, 3-3
HTML screen, 8-18
Item Group Codes List
function, 7-3
sample, 7-5
screen, 7-4
item groups
defined, 3-3
J
Jump
function key, 1-27, 1-43
pull-down menu command, 1-27
Jump command
function key, 1-31
pull-down menu command, 1-31
Jump function key, 1-41
K
Key Help
function key, 1-18
L
Last Line command
function key, 1-31, 1-48
pull-down menu command, 1-31
scroll button , 1-33
Left Arrow
report command, 1-47
Left Arrow function key, 1-34, 1-44
List
function key, 1-42
to printer or file , 1-42
live data
changing to, 1-20, 1-24, 1-40
Live/Sample Data
function key, 1-18, 1-40
Lot Inventory Lookup
function key, 1-32, 1-47
pull-down menu command, 1-32
IX-6
References
M
Maintenance
function key, 1-27, 1-42
pull-down menu command, 1-27
tool button, 1-26
manual
conventions, 1-11
master access codes
setting up, 3-15
Master File Lists menu structure, 1-8
Menu styles, 1-14
Menus
conventions, 1-14
Information, 1-42
Other Command, 1-40, 1-42
menus
structure in OPEN Web, 1-8
messages, A-1, C-1, D-1
mouse commands
click, 1-11
deselect, 1-12
double-click, 1-11
right-click, 1-11
MS-DOS prompt
tool button, 1-23
N
Next Line command
function key, 1-31, 1-48
pull-down menu command, 1-31
scroll button, 1-33
Next Page command
function key, 1-31, 1-48
pull-down menu command, 1-31
scroll button, 1-33
O
OK (Proceed)
function key, 1-27
pull-down menu command, 1-27
verification button, 1-26
OK command, 1-13
Online Documentation
function key, 1-30, 1-42
pull-down menu command, 1-30
OSAS Web B2B User’s Manual
References
tool button, 1-26
Online help
function key, 1-43
turning on or off, 1-43
OPEN Web
description, 1-5
installation checklist, 2-6
interfaces, 1-9
menu structure, 1-8
Requirements and Applications, 2-5
OPEN Web Login Page
web function, 8-3
OPEN Web Login page
HTML screen, 8-4
Order Entry for Group
HTML screen, 8-32
Order Entry for Line Item
HTML screen, 8-34
Order Number
HTML screen, 8-40
OSAS
conventions, 1-12
running, 1-12
system requirements, 1-12
OSAS graphical version
menu choices, 1-15
Other
function key, 1-42
Other Command menu
accessing, 1-40, 1-42
output device
printer, 1-50
P
parameters
access code, 1-13
command to start OSAS, 1-12
company ID, 1-13
general expression , 1-13
terminal ID , 1-13
partial-key inquiry, 1-45
Paste
function key, 1-28, 1-34, 1-45
pull-down menu command, 1-28
tool button, 1-26
OSAS Web B2B User’s Manual
Index
PgDn
inquiry command, 1-36, 1-46
report command , 1-47
scroll region command, 1-31, 1-48
PgDn function key, 1-27, 1-43
text menu, 1-41
PgUp
function key, 1-26
inquiry command, 1-35, 1-46
report command , 1-47
scroll region command, 1-31, 1-48
PgUp function key, 1-27, 1-43
Pop-Up Calendar
tool button, 1-23, 1-26
Previous Line command
function key, 1-31, 1-48
pull-down menu command, 1-31
scroll button, 1-33
Previous Page command
function key, 1-31, 1-48
pull-down menu command, 1-31
scroll button, 1-33
Print Manager
defined, 1-3
printing
screen contents, 1-42
PRO/5 Command
tool button, 1-23
Proceed
function key, 1-43
Proceed (OK)
function key, 1-27
pull-down menu command, 1-27
verification button, 1-26
Proceed command, 1-13
pull-down menu
functions
commands, 1-27
Edit, 1-28
Help, 1-30
Information, 1-30
Inventory Lookup, 1-32
Modes, 1-28
Other, 1-29
Scroll Commands , 1-31
graphical functions, 1-27
IX-7
Index
graphical menus , 1-19
Favorites, 1-22
File, 1-20
Help, 1-23
Modes, 1-21
Other, 1-22
Tools, 1-21
Purge Log File
function, 5-11
screen, 5-12
References
Menu List, 7-3, 8-3
selecting information for, 1-49
Resource Manager
features of , 1-3
Right Arrow
report command , 1-47
Right Arrow function key, 1-34, 1-44
right-click
defined, 1-11
S
Q
Quick entry
turning on or off, 1-43
Quick mode
function key, 1-43
pull-down menu command, 1-28
R
reminders
Pop-Up Calendar, 1-29
Remote Access, E-1
Remote Access functions
overview, 6-2
Remote Access menu structure, 1-8
remote processing
defined, 2-5, 5-2, 6-2
files copied, C-1
function of files copied in OPEN Web, C-4
report commands, 1-47
Down Arrow, 1-47
End, 1-47
Exit, 1-47
F7, 1-47
Home, 1-47
PgDn, 1-47
PgUp, 1-47
Right Arrow , 1-47
Tab, 1-47
Up Arrow, 1-47
Reports
conventions, 1-49
including all information, 1-49
Item Group Codes List , 7-3
limiting information, 1-49
IX-8
Sales Order Processing
checklist, 5-2
Sales Order Processing menu structure, 1-8
sample data
changing to, 1-20, 1-24, 1-40
scroll region buttons
First Line command, 1-33
Last Line command, 1-33
Next Line command, 1-33
Next Page command, 1-33
Previous Line command, 1-33
Previous Page command, 1-33
scroll region commands, 1-48
Down Arrow , 1-31, 1-48
End, 1-31, 1-48
Enter, 1-48
F3, 1-31, 1-48
Home, 1-31, 1-48
Ins, 1-31, 1-48
PgDn, 1-31, 1-48
PgUp, 1-31, 1-48
Tab, 1-31
Up Arrow, 1-31, 1-48
Security Procedures and Devices
Firewalls, 2-4
Serial Inventory Lookup
function key, 1-47
pull-down menu command, 1-32
Set up application, 1-24
Setup Item Group Codes
screen, 3-4, 5-4
Setup OPEN Web Components menu structure, 1-8
Shift-F1 function key, 1-30, 1-42
Shift-F10 function key, 1-28, 1-34, 1-45
OSAS Web B2B User’s Manual
References
Shift-F2 function key, 1-42
graphical menus , 1-19
text menu , 1-41
Shift-F3 function key, 1-46
Shift-F4 function key, 1-46
Shift-F5 function key, 1-47
graphical menus , 1-19
text menu , 1-41
Shift-F6 function key, 1-32, 1-47
text menu , 1-19, 1-41
Shift-F7 function key, 1-32, 1-47
text menu , 1-19, 1-41
Shift-F8 function key, 1-32, 1-47
Shift-F9 function key, 1-28, 1-34, 1-45
Start Over
function key, 1-27, 1-43
pull-down menu command, 1-27
tool button, 1-26
Start Over function key, 1-41
Start-style menu
exiting from, 1-17
features of, 1-15
keyboard commands, 1-18
right-click menu, 1-18
sample screen, 1-17
System Messages, A-1
T
Tab
report command, 1-47
scroll region command, 1-31
Tab function key, 1-43
text menu , 1-41
Tables
EMAIL, 3-29
screen, 3-28
tables, 3-27
Tables List
function, 7-27, 8-29
sample, 7-29
screen, 7-28
terminal
parameter , 1-13
Text menu
keyboard commands, 1-40
OSAS Web B2B User’s Manual
Index
text mode
defined, 1-4
toggle
between halves of reports , 1-47
Toggle GUI Functions
function key, 1-19, 1-41
Toggle GUI Scaling
function key, 1-19, 1-41
tool bar
graphical functions, 1-26
graphical menus, 1-23
tool button
Access Code, 1-20
Application Information, 1-23
Calculator, 1-21, 1-26
change to/from Favorites, 1-22
Copy, 1-26
Delete, 1-26
Help, 1-23, 1-26
Maintenance, 1-26
MS-DOS prompt, 1-23
Online Documentation, 1-26
Paste, 1-26
Pop-Up Calendar, 1-23, 1-26
PRO/5 Command, 1-23
Start Over, 1-26
Workstation Date, 1-20
Transaction Journal
function, 5-3
sample, 5-5
U
Undo
function key, 1-28, 1-34, 1-44
pull-down menu command, 1-28
Up Arrow
inquiry command, 1-36, 1-46
report command , 1-47
scroll region command, 1-31, 1-48
Up Arrow function key
text menu, 1-41
Up-arrow function key, 1-43
user’s manual
conventions, 1-11
IX-9
Index
References
V
verification button
Abandon, 1-26
OK (Proceed), 1-26
Proceed (OK), 1-26
verificationl
turning on or off, 1-43
Verify-exit mode
function key, 1-43
pull-down menu command, 1-28
Verify-PgDn mode
pull-down menu command, 1-28
View inquiry command, 1-46
View/Submit Current Order
HTML screen, 8-36, 8-38
W
web page
Customer History Lookup, 8-11, 8-13
Customer Lookup, 8-7, 8-9
Customer Order Lookup, 8-25
OPEN Web Login Page, 8-3
Welcome to Order Entry
HTML screen, 8-30
Workstation Date
function key, 1-18, 1-40
Workstation date
tool button, 1-20
workstation date
entering in graphical menus , 1-20
entering in text menus, 1-40
IX-10
OSAS Web B2B User’s Manual