1
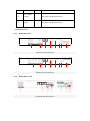
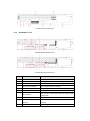
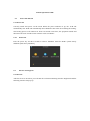
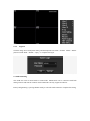
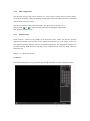
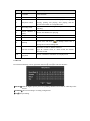
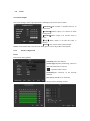
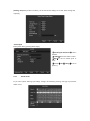
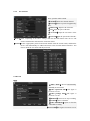
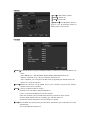
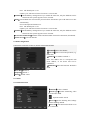
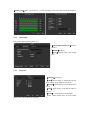
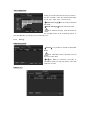
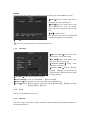
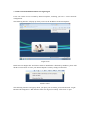
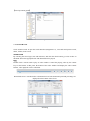
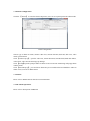
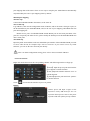
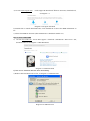
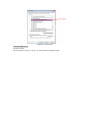
The Manual of Network Video Recorder 2013.Mar Directory 1 Precautions ..................................................................................................................................... 4 2 Declaration ..................................................................................................................................... 4 3 Product Introduction ...................................................................................................................... 4 3.1 Product Overview ............................................................................................................... 4 3.2 Feature................................................................................................................................. 5 4 Installation...................................................................................................................................... 5 4.1 Unpacking Inspection ......................................................................................................... 5 4.2 Installation Preparation ....................................................................................................... 6 4.3 Installation of the burner ..................................................................................................... 6 4.4 The Front Panel ................................................................................................................... 6 4.4.1 DVR7000N/DVR7100EN/NVR200 Series ............................................................. 6 4.4.2 DVR9000N/DVR9000EN/NVR800 Series ............................................................. 7 4.5The Rear Panel ..................................................................................................................... 9 4.5.1 DVR7000N Series .................................................................................................... 9 4.5.2 DVR7100EN Series ................................................................................................. 9 4.5.3 DVR9000N Series .................................................................................................. 10 4.5.4 DVR9000EN Series ............................................................................................... 11 4.5.5 NVR200 Series....................................................................................................... 12 4.5.6 NVR800 Series....................................................................................................... 12 4.6 The Alarm Cable ............................................................................................................... 13 4.7 The Connection of POE .................................................................................................... 13 5 Basic Operations Guide ............................................................................................................... 14 5.1 Power On and Off ............................................................................................................. 14 5.1.1 Power On................................................................................................................ 14 5.1.2 Power Off ............................................................................................................... 14 5.2Preview and Login in ......................................................................................................... 14 5.2.1 Preview................................................................................................................... 14 5.2.2 Login In .................................................................................................................. 15 5.3 Mode Switching ................................................................................................................ 15 5.4IP Camera ........................................................................................................................... 16 5.4.1 Add IP Camera ....................................................................................................... 16 5.4.2 Status Display......................................................................................................... 17 5.5 PTZ Control ...................................................................................................................... 17 5.5.1 PTZ configuration .................................................................................................. 18 5.5.2 Quick location ........................................................................................................ 18 5.6 Search ................................................................................................................................ 18 5.7 Record ............................................................................................................................... 19 5.8 Alarm ................................................................................................................................ 20 5.8.1 Alarm Output.......................................................................................................... 20 5.8.2 Alarm Configuration .............................................................................................. 20 5.8.3 Alarm Status ........................................................................................................... 21 5.9 Color Setting ..................................................................................................................... 22 5.10 The Input Method............................................................................................................ 22 6 Parameter Settings........................................................................................................................ 23 6.1 Introduction Of Main Menu .............................................................................................. 23 6.2 Video Settings ................................................................................................................... 23 6.2.1 Basic ....................................................................................................................... 23 6.2.2 Encoding settings ................................................................................................... 24 6.2.3 Snapshot ................................................................................................................. 24 6.2.4 Net Channel............................................................................................................ 25 6.3 Record ............................................................................................................................... 25 6.4 Network............................................................................................................................. 26 6.5 PTZ Configuration ............................................................................................................ 28 6.6 Alarm ................................................................................................................................ 28 6.6.1 Video Detection ...................................................................................................... 28 6.6.2 Alarm input ............................................................................................................ 29 6.6.3 Alarm out ............................................................................................................... 29 6.7 System ............................................................................................................................... 30 6.7.1 Base ........................................................................................................................ 30 6.7.2 Display ................................................................................................................... 30 6.7.3 Storage.................................................................................................................... 31 6.7.4 Abnormity .............................................................................................................. 32 6.7.5 Status ...................................................................................................................... 32 6.7.6 Maintain ................................................................................................................. 32 6.7.7 Account .................................................................................................................. 33 6.7.8 RS232 ..................................................................................................................... 34 7 Web and Client ............................................................................................................................. 34 7.1 Web Operation .................................................................................................................. 34 7.1.1 Network Connection .............................................................................................. 34 7.1.2 The control installation and the user login logout .................................................. 35 7.1.3 The Interface of Web Operations ........................................................................... 36 7.1.4 The Real-time Monitoring ...................................................................................... 36 7.1.5 PTZ Control ........................................................................................................... 38 7.1.6 Configuration ......................................................................................................... 38 7.1.7 Search Record ........................................................................................................ 39 7.1.8 Alarm Configuration .............................................................................................. 40 7.1.9 About ...................................................................................................................... 40 7.2 The Client Operations ....................................................................................................... 40 8Appendix ....................................................................................................................................... 41 8.1 Expansion function............................................................................................................ 41 8.1.1 DDNS Function...................................................................................................... 41 8.1.2 PTZ Control ................................................................................................................... 44 8.2 HDD Capacity Calculation................................................................................................ 45 8.2.1 Reference of HDD Capacity Calculation ............................................................... 45 8.2.2 Hard disk problem .................................................................................................. 45 8.3 Common Faults ................................................................................................................. 47 1 Precautions The following content is about use of the product, the prevention of danger as well as preventing property from the loss. Please be sure to comply. 1、Please placed NVRs within the permissible range of temperature and humidity. 2、Do not install the NVRs in a damp, dust or soot place. 3、Place the product horizontally and pay attention to preventing it from falling. 4、Installed in a well-ventilated place and do not block the vent. 5、Do not place containers filled with on the device. 6、Do not place other equipments above the product. 7、Do not disassemble this product. 8、Please select the hard disk recommended by manufacturers and suitable for the requirements of the NVR. 2 Declaration Please prevail in kind. The manual is for reference only. This manual may contain inaccurate data or printing error. The products described in this manual may be updated at any time. Screenshots of the manual is not in a machine and only for display. If in doubt, obtaining a copy of the latest procedure or the additional document, please contact with the company's after-sales department. 3 Product Introduction 3.1 Product Overview This product is designed specifically for the field of video surveillance and adopts H.264 video compression, hard disk recording, TCP/IP transmission and a Linux based OS in addition to some of the advanced technology in the information technology industry. This enables a more stable, reliable and high picture quality. This product complies with standards of GB 20815-2006《video security surveillance digital video recording》promulgated by the State. At the same time, the product supports the ONVIF protocol(base on《ONVIF ™ Core Specification》Version 2.2) and is compatible with the network cameras which supports ONVIF protocol. This product can realize the switching of NVR mode or mixed mode (Mixed mode can both connect with analog channels and network cameras when the NVR modes only connect with network cameras) ,recording, playback, monitoring, synchronization of audio and video. Besides, the products support advanced control technology and strong network data transmission capacity. 3.2 Feature Real-time monitoring Have a composite video signal interface and support TV, VGA or HDMI output simultaneously. Compression function Use H.264 video compression standard and G.711 audio compression standard and have high definition, low code rate of the video coding and the storage. Recording function Support timing, linkage alarm, motion detection, SATA hard and local hard disk , DVR data backup and network backup. Video playback function Achieve searching videos by a variety of conditions, playback in local and network. Support multiple videos playback, fast playing, slow playing and frame-by-frame playback. Video playback can display the exact time of the incident. Provide timeline retrieving page for quick searching. Camera control and alarm Be controlled by the remote camera and equip many alarm input interfaces. Be connected to various types of alarm devices. Dynamic detection, video loss, video block, multiple alarm output and scene lighting control can be realized. Communication Interface Equip USB 2.0 high-speed interface or ESATA interface and allow many backup devices. Equip standard Ethernet interface. Plug and play in a variety of network conditions, Network functions Support TCP / IP, UDP, RTP / RTSP, DHCP, PPPOE, DDNS, NTP etc. Support real-time network monitoring, video playback, control and management functions; built-in WEB Server, you can directly access through a browser. Mode of operation You can operate by the front panel or the mouse. Equip a simple, intuitive graphical interface. 4 Installation 4.1 Unpacking Inspection When you receive a product, check it according to the packing list inside the box. 4.2 Installation Preparation Preparation Prepare a Cross Screwdriver. Steps Remove the metal top cover by removing two screws from the sides of the cover. Place the hard disks on a flat table and tighten the screws. Connect the power and the data lines to the HDD. Reinstall the metal top cover and tighten the screws. Caution Only use the HDD specified by the manufacturer. The HDD will be formatted automatically during booting and it may cause data loss. The total duration of video data saved is decided by the HDD’s capability and the DVR’s parameters (recording setup, encoding setup). Please refer to 9.3. 4.3 Installation of the burner Preparing for Installation You need a Phillips screwdriver. The burner installation steps Unscrew the screw on the side of the chassis and open the case cover. Use a screwdriver to remove the bracket fixed in middle of the disk. Open the front panel door and remove the baffle inside. Connect the burner data cable and the power cord. Fix the chassis cover. Precautions The installation of the built-in burner is only for specific DVR and affects disk space for installation and interfaces. 4.4 The Front Panel 4.4.1 DVR7000N/DVR7100EN/NVR200 Series Enter Fn 5 6 ESC 1 Index Name 2 3 4 Function 7 8 1 1 2 LCD 3 4 1、 IP address of the device, the clock, the external alarm channel, error status code of the machine, remote address, internal temperature of the chassis is displayed. 2、Network Connection status. 3、HDD status and numbers. “E” and flash label refer HDD error. 4 、 Cycling display the recording status and motion detection (distinguish by “REC” and “MOVE”). 2 IR Receive the remote control signal. 3 Esc Back to previous menu, operation cancel; Back to live view when playing back records. 4 Direction 5 4.4.2 Up/Down: Move up or down. Change the settings and increase or decrease the digital. Left/Right: Control the playback control bar of the records. Confirm the operations. Jump to the default button. Enter the menu. Enter The button displays PTZ control and image color when in a single-screen monitoring. Simultaneously press the Fn key and the direction key to complete the settings with the dynamic monitoring area. Press the Fn key to empty all contents of the edit box. Press the key to switch between the digital case in English, Chinese input. Special with the function of each menu page prompts. 6 Fn 7 USB 8 ON/OFF To connect the mouse and HDD. Power on/off. DVR9000N/DVR9000EN/NVR800 Series 2 PWR 1 PWR HDD LAN DATA ALARM 3 4 5 6 7 8 9 0 ■ +10 CH1 CH2 CH3 CH4 CH5 CH6 CH7 CH8 CH9 CH10 CH11 CH12 CH13 CH14 CH15 CH16 Fn Digital Video Recorder 1 3 2 4 10 7 6 Index Name Status 1 The power Power 5 8 6 ▶ ● 11 9 Function Power on/off 12 13 2 3 Shift Numeric area ↑ Switch the TAB page. Press 3 seconds to switch into the panel input status. When activate the input box, activate the input method and switch the state of the input method. 1~9 Digital input Text input Image switching 4 Figure +10 The input of numbers more than 10:press the key and input two number to produce a 2-digit numeric. 5 The up and down keys ↑↓ Up/Down: Move up or down. Change the settings and increase or decrease the digital. 6 The left and right keys ←→ Left/Right: Control the playback control bar of the records. 7 Cancel/Exit ESC Close the control window or back to the previous menu. ENTER Confirm operations. Jump to<confirm> options. Bring up the main menu in the real-time monitoring screen. ● Bring up the video control menu in the real-time monitoring screen. Enter to set the preset in the PTZ control menu. Fn The button displays PTZ control and image color when in the state of the single-screen monitoring. Simultaneously press the Fn key and the direction key to complete the settings with the dynamic monitoring area. Press the Fn key to empty all contents of the edit box. Press the key to switch among figure, English, Chinese input. Special with the function of each menu page prompts. ▶ Play. Come to normal when rewind. Resume playback when pause. Enter into inquiry menu when real-time monitoring. 8 Firm key 9 The recording key 10 11 The function auxiliary key The play / pause key PTZ control: Zoom +. 12 the shuttle outside The same with the direction key 13 the shuttle inside The same with the direction key 4.5The Rear Panel 4.5.1 DVR7000N Series 1 2 3 8 5 4 6 7 5 4 6 7 7004N Rear Panel Interfaces 1 2 3 8 7008N Rear Panel Interfaces 4.5.2 DVR7100EN Series 7104EN Rear Panel Interfaces 7108EN Rear Panel Interfaces 7116ENRear Panel Interfaces Index Name Description 1 The video input The input interface of CVBS 2 The video/audio output The input interface of the audio signal 3 The audio output The output interface of the audio signal and CVBS 4 The network interface The network interface of RJ-45 5 The interface The output interface of the VGA video signal 6 The power 12V DC power 7 the terminals Interfaces of the alarm input, the alarm output and RS-485 8 The interface The output interface of the HDMI video signal 9 The power 4.5.3 VGA HDMI The power switch DVR9000N Series 9008N Rear Panel Interfaces 9016N Rear Panel Interfaces 4.5.4 DVR9000EN Series 9008EN Rear Panel Interfaces 9016EN Rear Panel Interfaces Index Name Description 1 The video input The input interface of CVBS 2 The video/audio output The input interface of the audio signal 3 The audio output The output interface of the audio signal and CVBS 4 The network interface The network interface of RJ-45 5 The VGA interface The output interface of the VGA video signal 6 The power 12V DC power 7 the terminals The interface of the alarm input, the alarm output and RS-485 8 The HDMI interface The output interface of the HDMI video signal 9 The interface Share the input video signal with other devices required. 10 the peripheral interface Loop-through The ESATA interface and the 232 serial port. 4.5.5 NVR200 Series NVR208/216 Rear Panel Interfaces NVR232 Rear Panel Interfaces 4.5.6 NVR800 Series NVR832 Rear Panel Interfaces Index Name Description 1 The video/audio output The input interface of the audio signal 2 The network interface The network interface of RJ-45 3 The VGA The output interface of the VGA video signal interface 4 The input 5 the terminals power The power input interface The interface of the alarm input, the alarm output and RS-485 6 The HDMI interface The output interface of the HDMI video signal 7 The switch The power switch 8 the peripheral interface power The ESATA interface and the 232 serial port. 4.6 The Alarm Cable Examples of alarm input connections The alarm input is the switch quantity input. If the alarm input signal is not switch quantity signal but voltage signal, refer to the following connection. 继电器 报警器 硬盘录像 机 In (电压输出) 开关量 输入 G ALM(+) ALM(-) Examples of alarm output connections When the alarm output connect with DC and AC load, please refer to the connection. 直流负载 硬盘录像 机 硬盘录像 机 G G 开关量 输出 DC OUT 交流负载 开关量 输出 器 电 继 AC OUT 4.7 The Connection of POE Step 1: Supply the NVR with the 12V DC power. Step 2: Connect the POE module with 48V directly power. Note: 48V voltage is not safe, please pay attention to the use of electricity. Step 3: The side of the network cable is connected to the POE network interface and the other side is connected to the network camera. The distance of POE power i s not more than 100 m theoretically. 5 Basic Operations Guide 5.1 Power On and Off 5.1.1 Power On Correctly install and power on the NVR. When the power indicator lit up, the VCR will automatically start. NVR will automatically detect hardware state of the device during the starting. The booting process will continue for about 30 seconds. After boot, the equipment sounds and then enters the state of multi-screen real-time video surveillance. 5.1.2 Power Off Press the power key for three seconds to achieve shutdown. Enter the NVR’s [main menu]shutdown] and select [shutdown]. 5.2 Preview and Login in 5.2.1 Preview After the device is turned on, you will enter the real-time monitoring interface. Right click and the following interface will pop up. 5.2.2 Login In Click the image above with [main menu], and then input the user name(default:admin)and the password of the NVR(default:empty)to complete the login. 5.3 Mode Switching The NVR can work in mixed mode or NVR mode. Mixed-mode can be connected with both analog cameras and network cameras while NVR mode can only support IP cameras. Enter [configuration]- [system]-[channel mode] to select the mode. Restart to complete the setting. 5.4 IP Camera 5.4.1 Add IP Camera Network channels are used to display remote IPCs. The addition of IPCs shows as the following interface. Enter [video]-[net channel]. First open [OPEN]. [Channels]Choose a local channel to display. [Protocol]It is selected according to the type that the IPC supports. [IP] Input the IPC’s IP address. [Port]Fill in the ONVIF port of the IPC. [Username]Fill in the user name of the IPC. [Password] Fill in the password of the IPC. [Remote Detect]After completing the above parameters, click the detect button to return the connection status. [Search]Select the appropriate protocol and search. The IPCs and the device should in the same LAN. Double click the search results and it will add the IPC automatically and return to the previous page. Fill in the user name and password to complete. 5.4.2 Status Display Right click in the real-time monitoring screen and select [net channel] to view the status of the network channels. 5.5 PTZ Control When connect with a network ball, right click the corresponding network channel and select [PTZ] to enter into the PTZ interface. If access to a simulated ball machine, enter [Main Menu] - [PTZ] to modify the PTZ protocol, the baud rate and address bits. Then right click in the corresponding channel and select [PTZ].The PTZ control interface is shown as the following interface. Click to enter the PTZ configuration page. Refer to 8.2 about more details. 5.5.1 PTZ configuration The direction of PTZ, steps, zoom, focusing, iris, preset points, cruising between points, patrols, sweeping the boundary, calling an auxiliary switch, light switch, horizontal rotation are controlled with the usage of the arrow keys. The [Step] is mainly used to control directions. The figure can be set from 1 to 8. Directly click or to adjust zooming, sharpness and brightness adjustment. PTZ supports eight directions. 5.5.2 Quick location Quick location: <SIT>is in the middle of the direction arrows. Make sure that the protocol supports this function. PTZ will turn to the clicked point and move it to the centre of screen. It also supports zooming. Drag the mouse in the quick location page. The dragged box supports 4 to 16 times zooming. Hold the mouse and drag it up to complete zoom of the box. Drag it down to narrow the box. Refer to 7.1.5 about more details. 5.6 Search In real-time monitoring screen, right click and select【search】to enter the searching interface. Index Type Description 1 Calendar Date and time 2 Choose the time Input the date and time of records searched. 3 Playback control It can achieve a full screen, circle playback, stopping / playing, pausing, fast playing, slow playing and the previous/next frame on a suspended state . 4 Recoding mode There are alarm recording and regular recording for selecting. 5 Select channels to query Choose the channels for querying. 6 Playback controls It can achieve a full screen and circle playback. 7 Search Click the button to search. 8 Backup Choose files and click “ ”to backup. Then select a storage device and recording files. 9 The list of records 128 video records are shown in the list. Type: R—normal record, A—alarm record, M—motion detection record. 10 The channel playback Choose a channel in which the record plays back. for 5.7 Record In real-time monitoring screen, right click and select【record】to enter the interface. 【Manual】It has the highest priority and corresponding channels will record for whole days after chosen. 【Schedule】Record according to recoding configuration. 【Stop】Stop recording. 5.8 Alarm 5.8.1 Alarm Output This menu manages alarm output parameters and displays the current state of alarm. 【Channels】The number of channels that are in alarm status. 【Schedule】Alarm output is in control of alarm configuration. 【Manual】Alarm output is on and the status is active. 【 Stop 】 Alarm output is off and the status is inactive. 【Status】The current status of alarm output. Notice: Some models don’t have the local alarm, please refer to the products descriptions. 5.8.2 Alarm Configuration Detect Enter [main menu]-[detect]. [Channel] Select the channel. [Alarm type] Dynamic monitoring, video loss and video blind can be selected. :Open the enable switch. [Sensitivity]Set sensitivity of the network channels. [Set area] It should be set in the IPC. [Process] Click the button to set the alarming time, linkage and the handling method. [Linkage Set]When produce an alarm, you can activate the linkage of records, PTZ, touring and capturing. Alarm Input Enter [main menu]-[alarm]-[alarm input]. 【Alarm input channel no.】Select a channel. 【Enable】Select the enable switch. 【Type】It can be normal open or close. 【Process】and 【Linkage】Refer to [Detect]. 5.8.3 Alarm Status If you select [Show Message] in linkage settings, the following message will pop up when the alarm occurs. 5.9 Color Setting Adjust the specified screen (single screen) image color hue, brightness, contrast, saturation, gain and white-level parameters set two time periods according to the local environment difference between day and night for each adjustment period set, the device will automatically switch to the best video quality. 【Period】Two periods can be set according to ambient light during the day and night, device will automatically switch configuration time. Need to select the Enable box. 【Hue】Adjust according to color cast of image. 【Brightness】Visual image brightness, according to the environment, reduces or increases the brightness of the image brightness to make the image relatively clear. 【Contrast】Adjust image of black and white in proportion, the greater ratio, the brighter image. 【Saturation】Image color purity, the greater value, the more colorful images. 【Gain】Enlarge the image signal to improve signal quality. 【White Level】Change the white level reference value, to improve the brightness of the image display. Note: Only analog channels support the function. 5.10 The Input Method In the input box, you can select figures, symbols, English capitalization and the input of Chinese. Click the mouse to complete the input.”← “represents the backspace and “_ “represents a space. The input interface of English The input interface of Chinese figures 6 Parameter Settings 6.1 Introduction Of Main Menu The main menu is shown in the following interface. 【Search】Search records by types, channels, time and playback records. 【Video】Set basic, encoding, snaps and net channels. 【Record】Set basic and record plan. 【Network】Set base, advanced and apply network. 【PTZ】Set parameters of PTZ. 【Alarm】Set alarm information. 【System】Set basic, display, storage, abnormity, status, maintain, account and RS232. 【shutdown】It includes menu logout, shutdown and restart of the system. 6.2 Video Settings This menu contains the basic video settings, video encoding settings, the capture channel access and network settings. 6.2.1 Basic 【Channel】Select the desired channel. 【Channel name】Select the channel name. 【Channel display】Set the position of the channel title. 【Time display】The position of the time title in the screen. 【 Time Synchronization 】 Time synchronization of network channels and the device. 【 Video cover 】 Set protected area of previewing and recording. 6.2.2 Encoding settings 【Channel】Select the desired channel. 【Compression】H.264 【Resolution】The resolution of main stream can be D1 or CIF. Different channels correspond to different resolutions. Frame rate setting range is also different. The channel extension stream resolution can support CIF / QCIF. Frame Rate : P system: a / s -25 frames / sec. N system: a / s -30 frames / sec. Note:Resolution and frame rate are vary depending on DVR model. 【Bit Rate】Constant Bit rate or Variable Bitrates. Bit rate can be set in Constant Bit rate. There are 6 levels for image quality in Variable Bit rate, 6 is the best but it is fixed in Constant Bit rate. 【Audio】Choose channels record sound or not. 6.2.3 Snapshot 【Channel】Select a channel. 【Mode】Trigger: Crawl images when alarm. 【Image Size】CIF capture 【Image Quality】There are 6 levels of quality. 【 Snapshot frequency 】 set highest capture rate for single channel,1s/pc 2s/pc 3s/pc 4s/pc 5s/pc 6s/pc 7s/pc 8s/pc. 6.2.4 Net Channel First, open the enable switch. 【Channel】Select the desired channel. 【Protocol】Choose a protocol supported by IPCs. 【Address IP】Input the IP of the IPC. 【Port】Input the port of the IPC. 【User name】Input the user name of the IPC. 【Password】Input the password of the IPC. 【Detect】After completing of the above settings, click the detection button. The dev ice will connect with the IPC and return the connection status. 【Search】Select a appropriate protocol and search. Double click the search results, and then the device will automatically be added and return to the network channel interface. You need to fill in the user name and the password. 6.3 Record Basic 【 Video mode 】 Record automatically, manually or not record. 【Video expiration time】The figure is between 0 to 365. 【 Video package time 】 The figure is between 5 to 120. 【HDD full】Overwrite or stop recording. 【Channel】Select a channel. 【Video redundancy】Open or close the redundant recording. 【Prerecorded】The figure is between 0 to 30. Record Plan 【Channel】Select a channel. It uses green, yellow and red to show motion detection, alarm and regular records correspondingly. 【 Copy 】 Copy the settings to other channels. Click the set button to enter the following interface. 【Time 】Recording time.6 periods can be set every day. 【Normal】Normal record 【Moving Detection】Moving detection 【Alarm】Alarm record 6.4 Network Base 【DHCP】Enable the DVR to obtain an IP address automatically. If it is enabled, the DVR will reboot and search for a DHCP server, and then assign a dynamic IP address. The dynamic IP address will be displayed in the menu. Enter a static IP address if there is no DHCP service available. If you are using the advanced feature PPPOE, then the IP/mask/gateway and DHCP are unable to be changed. 【IP Address】Use()or input numbers to modify IP, then set 【subnet mask】 and 【default gateway】for this IP. 【First DNS Server】DNS server IP 【Alternate DNS Server】DNS alternate IP 【Physical Address】physical address of current net port Advance 【TCP】default: 8000, variable 【HTTP】default: 80 【UDP】default: 8001 【Multicast】tick ‘Multicast’ and set a group in ‘Set’, IP should be limited as follow picture, port no limit. Net Apply 【DDNS】Enable the DVR to registered a DDNS hostname, which runs on a fixed IP address web client. Select DDNS type(NO-IP DDNS, Dyndns DDNS, FNT DDNS and so on). Input the registered server’s IP, port, username and password. Once completed, you can login in the Web client by inputting the domain name in IE. Refer to 6.1 about more details. 【Email】Enable the function. Set the SMTP server’s port, username, password, the sender’s mailbox and receiver’s mailbox. 【FTP】 Choose to upload records or images. Set FTP server’s IP address and port(Default:21) . Create a account in FileZilla Server in the computer. Fill in the username, password and remote directory which have been created. Set file length, channel, time for recording, type and date and so on. Tick alarm, motion and general records or images to upload. 【NTP】On/Off NTP. The network time protocol allows the DVR to sync with NTP server time automatically. Server IP: Input IP of NTP server. Port:The default port is 123. Update cycle: The interval time is between 1 to 65535 min. 【IP Filter】DVR authority management. If you enable the white list, only the filled IPs can be connected. This system supports a max of 64 IPs. 【NTP】On/Off NTP. The network time protocol allows the DVR to sync with NTP server time automatically. Server IP: Input IP of NTP server. Port:The default port is 123. Update cycle: The interval time is between 1 to 65535 min. 【IP Filter】DVR authority management. If you enable the white list, only the filled IPs can be connected. This system supports a max of 64 IPs. 【Network Transmission】Transfer modes and the number of network connections, downloads. 【Alarm server】reserved interface 6.5 PTZ Configuration Confirm the connection of PTZ A, B lines in the DVR and PTZ. 【Channel】Select the channel. 【Protocol】Select a associated protocol (e.g. PELCOD) 【Address】Set address. Default: 1. Note: this address has to correspond with dome address, or the dome will not be controlled. 【Baud Rate】Select the baud rate. Default is 9600. 【Data Bits】default: 8 【Stop Bits】default: 1 【Parity】default: None 6.6 Alarm 6.6.1 Video Detection 【Channel】Select a channel. 【Alarm type】Dynamic monitoring, video loss and video blind. :Open the enable switch. 【Process】Set the alarming time, linkage and the handling method. 【Area Set】The function should be set in the remote IPC. 【Linkage Set】When a alarm occurs, you can set linkage of records, PTZ, touring and snapshot. 6.6.2 Alarm input Enter [main menu]-[alarm]-[alarm out]. 【Alarm input channel No.】Select a channel. 【Enable】Select it. 【 Type】 Normal Open and normal close 6.6.3 Alarm out 【Channel】Alarm port 【Auto】Alarm output is determined by the alarm output menu, while in auto mode. 【Manual】Alarm output is on and the status is active. 【Stop】Alarm output is off and the status is inactive. 【Status】Current status of alarm output Notice: Some models have no local alarm, please refer to the products descriptions. 6.7 System 6.7.1 Base 【System Time】Set the current time Note: Click to save the time modification. 【Daylight Saving Time (DST) 】Click “DST” to enable the function, and enter the local DST starting and ending time. 【 Date Format 】 Modify the date display format 【Date Separator】Select the separator for date 【Time Format】24 hr or 12 hr display mode 【Language】Select language. 【DVR No.】Number more than one DVR, click “Ad” button on remote control and input a number to select the corresponding DVR to operate. 【Video Standard】PAL/NTSC. 【Auto Logout】This ranges from 0-60 minutes. 0 means no setting. DVR will automatically let user quit after standby time’s vacancy. 【Channel mode】The selection of local channels and network channels. 6.7.2 Display Output mode 【Menu Transparency】Adjust transparency. 【VGA Output】Select VGA resolution. The default is 1024×768@60Hz. Tour configuration Setting tour mode and interval between rotation , the time is within 5-120s,the mode include single screen, four-, eight-, nine-, sixteen-screen. 【Motion Tour Type】Set the motion detection tour mode 【Alarm Tour Type】Set the alarm tour mode Note: Shortcut Setting: click the button at the top right corner of the monitoring picture or press the Shift Key to switch, you can control the tour. 6.7.3 Storage HDD Management 【Format】It is possible to format an individual HDD. Note: Hard disk format operation result in the loss of video data 【 Set】 Set HDD as read-write, read only or redundancy mode. In read only mode, video data cannot be covered. HDD Record Backup Connect an External USB device with the USB port to backup in the “Record Backup” menu. 【Detect】Identify external USB device and display the device information. 【Backup】Tick the external device and click 【 Backup 】 to enter the backup menu .Select the record start-stop time and click 【Add】Add files in list. Tick the record you want and click【Start】 to backup and display time remaining. 【Delete】delete all data in USB backup device Note: this operation probably cause permanent data loss 6.7.4 Abnormity 【Disk low Space】Alarm when hard disk capacity is lower than setting. 【No Disk】Alarm when HDD is not present or can not be detected. 【 Network Failure 】 Alarm when network is not connected. 【 Process Mode 】 includes 【 Alarm Output】, 【Display On Screen】 and 【Send Email】,【pushed to phone】and recording linkage. 【IP Conflict】Alarm when IP address conflict. 【Process Mode】 is same as 【No Disk】’s 【Process Mode】 【Disk Error】Alarm when there is error in reading and writing hard disk. 【Process】includes:【Alarm Output】, 【show message】,【Send Email】 ,【linkage record】, 【snapshot】and 【buzzer】. 6.7.5 Status You can see the BSP and on-line users. 6.7.6 Maintain You can see logs of the system, product information, default settings and maintain information in the following interfaces. 6.7.7 Account Note: Group and user names can be from 1-6 characters in length. Valid characters include letter, numbers, and limited symbols: underline, subtraction sign, dot, you may not use a space as a leading or ending character. There is no limit to the number of groups or users. By default there are two different group levels: admin and user. User management determined upon two levels: the group and the user level. Group and user names cannot be duplicated, and each user can only belong to one group. 【Add users】add group member information and set authorities. Default users are: “admin”, “user” and hidden “default”, the password of first two username is 123456. “admin” has advanced authorities; “user” only has surveillance and playback authority. Hidden default: operate in password-less login mode, cannot delete, DVR login in this name automatically if “no user login”,user can revise limits of power then operate some without login. Enter【Add users】input username, password and select group and reusable options. Reusable allows the account to be used by multiple logins. A user can only belong to one group. User rights cannot exceed group rights. 【Modify users】modify existing group member information and authority. 【Add group】add group and set group authorities Set a group and authorize 60 items including control panel, shut down, live view、 playback, record, record backup, PTZ control, account, system information, alarm in /out setting, system configuration, search log, log delete, upgrade, operation authority, etc. 【Modify group】modify existing group information. 【Modify Password】change password Select a username input the old password and new password twice. Click【Save】to confirm Password can be in 1-6 numbers, letters or symbol; blank in beginning and end is invalid. The account with management authority could change others’ password. 6.7.8 RS232 【Function】Select the appropriate the serial 【Baud Rate】Set baud rate. 【Data Bit】Default: 8 【Stop Bit】Default: 1 Note: Some models are without an RS-232 port, please see Specifications. 7 Web and Client 7.1 Web Operation 7.1.1 Network Connection H&M Series Check network connection by LCD on front panel, “ ” refers connection error. P Series Check B-Lamp on front panel, light indicates connection. Set IP, subnet mask and gateway for computer and DVR. Please assign the same segment IP address without router, need to set the appropriate subnet mask and gateway with router. The detail of DVR network configuration please see【Configuration】→【Network Setting】 Ensure the IP is correct and check whether the DVR is on the network by using the Windows command “ping”. 7.1.2 The control installation and the user login logout Users can remote access to DVR by Internet Explorer, assuming you have a correct network configuration. The following interface will pop up when you access the IP address in Internet Explorer. Login screen Install ActiveX: Right click and choose install. If installation is blocked by Windows, please add the IP as a trusted site or lower your Internet Explorer security settings to allow this. Install Control The following interface will popup when you input your username, password and click “Login”. Interface like Diagram 5-3 Web Interface when user login successfully. Click “Exit” to quit. 7.1.3 The Interface of Web Operations WEB Interface Description Index Name Description 1 Channel Channel selection 2 Function key Local playback: playback local record Open all: play live views in surveillance window 3 Surveillance window Change window layout 4 Image color & other saturation Image color: modify brightness, contrast and Other: set capture path, record download path and reboot 5 PTZ control PTZ control menu 6 Menu System configuration, record search, alarm setting, exit, etc. 7.1.4 The Real-time Monitoring Into the WEB interface, select the focus window in live window, the focus window has a light blue border. From the left channel column select channel, as shown in the following interface. Channel Choices Click on 2 area in upper right corner can choose open / close the channel of the main stream or secondary stream, shows the current DVR's IP and rate information. Stream information Lower left corner shows the current video channel name. Upper right corner shows the current video time information. Click “ ”(Lower left corner of the display window)to switch between single screen and multi-screen. Lower right corner of the display window is function keys, as the following interface. Refer to area zoom, switching multi screens, local records, capturing and so on. Function Key Area zoom: Video images can be enlarged. Multi-screen switch: switch from single screen to multi-screen and vice versa. Local record: save and record video to a local HDD while in a live view. Set recording path in configuration. Capture: capture of the present channel, set the path in “other. Sound: on/off sound. Off video: off the focus window video. 7.1.5 PTZ Control Set protocol(see【Setting】→【PTZ】 ) Control PTZ direction, step size, zoom, IRIS, preset, tour, pattern, border scan, light, wiper, auto pan, etc. Step size controls PTZ direction and speed, e.g. step size 8 is moved faster than step size 1. Eight direction rotations: up, down, right, left, up-left, up-right, lower left, lower right. PTZ control Border scan Operation: select the camera line scan of the left/right margin by direction button, and click the Settings button in the left /right margin position to determine the left border. Preset Operation: modify preset position by direction button and inputting a preset number, then click “Add” to save. Tour Operation: select “Tour”; Point between the first cruise line cruise input box value. And input numbers in “Path” and “preset”. Click【Add Preset】to add one preset in the cruise path, and repeat to add additional presets. Click 【Clear Preset】to delete a preset, repeat to delete more. Pattern Operation: Click “Pattern” in order to record an automated pattern. Then, go back to the PTZ controls in order to modify the zoom, focus and IRIS, etc. Stop recording in “Pattern” setting to save the pattern. AUX On/off one of AUX Wiper On/off wiper under protocol 7.1.6 Configuration Access DVR local configuration menu by click “System Setting”, the further details please refer 【Local operation guide】 Configuration 7.1.7 Search Record Click “Search record” to open the search interface (Diagram 0-10 ), can search and operate record, alarm, motion, local record Search record By selecting the record type, start and end times, and click the check button, get a list of files on the DVR. Select the appropriate file and download can be played Play Double click a search result to play in video window. Control the playing video by the control keys on the bottom. At this point, the bottom of the video window will display the video control buttons, video playback can be controlled. Download: select a searched video to download to local. The download speed and percentage are displayed on the bottom of the screen. Searching 7.1.8 Alarm Configuration Click the 【Alarm】 to enter the alarm setup menu, users can set up and operate the alarm mode. Alarm configuration Choose type of alarm on menu, monitor video loss, motion detection, disk full, disk error, video mask, external alarm. Click 【Video Pop-up】, open the video loss, motion detection, hard disk full, hard disk failure, video block, video encoder alarm pop-up linkage. Click 【prompt】open the prompt: When an alarm occurs in real-time monitoring will popup alarm window menu. Click 【Sound Pop-up】, you can choose alarm tone pre-recorded on the local hard drive when an alarm occurs, tone file in WAV format. 7.1.9 About Please refer to WEB controls related version information. 7.2 The Client Operations Please refer to description of IMS 200. 8Appendix 8.1 Expansion function 8.1.1 DDNS Function FNT DDNS FNT DDNS is built-in professional dynamic DNS service in our network DVR. You can register directly in the device .Specific steps are as following. 1:Select FNT DDNS and check Enable. 2:Input a username 3:Input the password. 4 : Click the Register button. If the domain name is not registered, it will pop up the message that connect DDNS server successfully otherwise it will prompt that the registration is failed. 5:Click [OK] to complete the settings. CN99(www.3322.org) Register Register New Users or Login at www.3322.org.Click “My Control Panel” at the navigation bar. Click the left side, “new” under the DDNS. Fill in the name of the host machine, IP address will automatically detect in the current internet. Leave the Mail Servers blank, and then click the “OK” button. Embedded DVR Setting Open 【Main Menu】→【Configuration】→【Network】→【Advanced】→【DDNS】→Enable Name Configuration DDNS CN99 DDNS IP Members.3322.org Port 80 Domain name xxx.3322.org Username xxx Password xxxxxx After setting up the information as above, you can access the Embedded DVR via XXX.3322.org Notice: The main machine’s IP should refer to the information of the website. NO-IP(www.no-ip.com) Register Register new username at no-ip, click 【Create Account】. Create domain name, click 【Add a Host】. Embedded DVR Setting Open 【Main Menu】→【Management】→【Network】→【Advanced】→【DDNS】→【Enable】 Name Configuration DDNS NO-IP DDNS IP dynupdate.no-ip.com Port 80 Domain name xxx.xxx.org Username xxx Password xxxxxx Dyndns DDNS(www.dyndns.com) Register To login at dyndns, register an account. Click on the confirmation link, login the account, click 【Add Host Services】 at [My Services], set your own realm name, and then operate according to the procedure. Configuration of the Embedded DVR Open 【Main Menu】→【Management】→【Network】→【Advanced】→【DDNS】→【Enable】 Name Configuration DDNS Dyndns DDNS IP Members.dyndns.org Port 80 Domain name xxx.xxx.com Username xxx Password xxxxxx Test and verify DDNS After setting the Embedded DVR, wait for a few minutes, analysis records will update. Click Operation in the Menu of computer, input “cmd”, click “OK” to open a window. As the Diagram 0-1 Run Command Line Program shows. Run Command Line Program Input “ping+ Domain name” then presses Enter, as the Diagram 0-2 DNS shows. Diagram 0-1 DNS The computer will analyze the domain name which is set in the DVR and return to the current IP, as the picture shows underlined in red. When the IP correspond to the embedded DVR’s IP in Public internet, it means the DDNS is setting right. If they are not, please check the network connection of embedded DVR and DDNS information. Port Mapping Port mapping is mapping a port of outside web host’s IP address to a machine inside web, and provide the service. When user connects to the port of the IP, the server will automatically map the request to the corresponding machine inside LAN. With the function of port mapping, we can map many ports of a machine’s IP address to different machines’ different ports inside web. The port mapping can also have other special agent functions, like POP, SMTP, TELNET, etc. Theoretically, it can provide more than sixty thousand ports. For example, if we want to map a web server which has an IP address of 192.168.111.10, we just need to input the IP address and TCP port 80 into the port mapping chart of the router. There are two ways to map the port: UPnP function automatically map and modify the router’s port mapping chart by manual. Manual port mapping The first step Connect the Embedded DVR to the Router, set the static IP. The second step Log in Router, enter into the configuration menu of Router, and set the menu. Then get to port, set the IP distributed by the Embedded DVR, and set the rule of port mapping, add HTTP and TCP port into mapping list. Default access ports of Embedded DVR include HTTP port 80 and TCP port 8000, if the ports are occupied by the other devices, please modify the default port of the Embedded DVR into other vacant ports. The third step Input the public net IP address in the IE, and add the port number of the Embedded DVR you want to access after the IP, for example: http://155.157.12.227:81. If you want to access by Client Software, you can use the outer net TCP port directly. Notice: for detail configuration setting, please refer to the user manual of Router. 8.1.2 PTZ Control Right click and select PTZ in the corresponding channel. The following interface will pop up. 【Preset】Input the preset point and click the preset button to call the function. 【Tour】Input the number and click “tour” to call the function. 【pattern】Input the path and click “pattern” to call the function. Click “ ” to switch to the interface of preset or pattern. Preset Choose preset and input a figure in the input box. Click [Add Preset] to save. Or input the desired preset value in the preset input box and click [delete preset] to delete. Pattern You can begin the desired path or end a path by filling the figure in the box. 8.2 HDD Capacity Calculation 8.2.1 Reference of HDD Capacity Calculation The first time install DVR, please check if the HDD has installed. The capacity of the HDD There is no limitation of capacity of single HDD to DVR, please choose the HDD according to the saving time. The choose of the Capacity Computational formula of HDD Capacity: Whole HDD Capacity = number of the channels × time in need (hour) × spent of HDD Capacity per hour (MB/hour) Similarly we can have the formula of recording time: Recordingtime(hour)= TotalHDDCapacity(MB) CapacityOccupationperHour(MB/hr)× AmountofChannel Note: 1GB=1000MB, not 1GiB=1024MiB, so HDD capacity shown in Base Configuration under HDD Management less than real marked. File size per hour (CBR). Form 7-1 record file size Bit Rate File Bit Rate File Bit Rate File 96k 42M 320k 140M 896k 393M 128k 56M 384k 168M 1.00M 450M 160k 70M 448k 196M 1.25M 562M 192k 84M 512k 225M 1.50M 675M 224k 98M 640k 281M 1.75M 787M 256k 112M 768k 337M 2.00M 900M File size is more unpredictable when VBR style, please refer to the real size of recording file. 8.2.2 Hard disk problem Use Detection Tool provided by the HDD manufacturer to detect the Function of HDD to solve data problem. We recommend Seagate and Western Digital. How to detect Seagate HDD a) Get into www.seagate.com, Click Support & Downloads choose Sea Tools, download tool, as Diagram 7-1: Diagram 7-2 Seagate download b) Double-click to install downloaded file, click installed file to detect the HDD information on PC. c) Choose the HDD for detection (other manufacturer’s hard disk suitable too). How to detect WDC HDD a) Get into www.wdc.com , choose WD support / download / SATA&SAS / WD Caviar / GP, download software as Diagram 7-2 WD Download Diagram 7-3 WD Download b) Click Icon to hard disk detection after downloading. c) Double click hard desk in device list, as Diagram 7-3 WD Detection: Diagram 7-4 WD Detection 8.3 Common Faults DVR startup failure or continuously reboot Possible reasons: 1. The system has been damaged from a bad DVR update. 2. There is a problem with the DVR main board error, please contact supplier. 3. There is an HDD error. Replace faulty HDD. Remote control does not work Possible reasons: 1. Check for batteries in remote control, especially positive and Negative. 2. Check for batteries’ power. 3. Check if remote receiver is obscured. 3 Check if DVR address corresponds to the remote address. DVR cannot control PTZ Possible reasons: 1. RS-485 cable connection error, A, B ports are inversely connected; 2. PTZ decoder, protocol, baud rate, address are incorrect; 3. Parallel connect a 120Ω resistance to resolve signal reflex caused by too many PTZs on the line. 4. The RS-485 on the DVR is defective Blurred screen in preview mode Possible reasons: Please make sure your cameras match your video format selected in the General menu. E.g. camera is NTSC standard but the DVR is PAL standard, the preview would be blurred. Blurred screen in playback mode or failure to playback records Possible reasons: 1. Procedure error, reboot the DVR 2. HDD error, test or change out the HDD 3. DVR hardware failure, contact your local supplier Fail to connect DVR through network Possible reasons: 1、check the physical network connection is correct. 2、check the DVR network configuration parameters. 3、check whether IP conflicts exist in network. Download records can’t be played Possible reasons: 1 、Player installation error. 2 、The USB or HDD device has an error. 3 、Do not install graphic software later than DX8.1. Internet Explore Crash Possible reasons: Close IE explore, enter into the tool bar Diagram 7-4 IE tool bar Internet Explorer 9.0 Possible reasons: Internet Explore9.0 above version visit: Please choose compatible mode.