Transcript
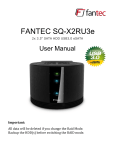
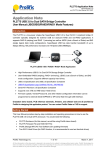
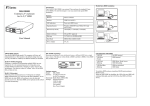
1. Getting Started
Kit Contents
Minimum System Requirements
●
●
●
●
●
●
●
●
●
●
●
ME-580J Dual Bay Enclosure
USB Cable
eSATA Cable
Power Cord
Installation CD
Screw Pack
QIG
Available OHCI-compliant USB port
Serial ATA equipped PC (eSATA) , WIN 2000 / XP / VISTA , Win7
Serial ATA equipped MAC (eSATA) , MAC OS 10.3.x or higher
Computer embedded Serial ATA host with the support of port multiplier function.
Product Overview
1. Case Lock
2. Power / RAID1 Backup LED
3. Hard Drive 1 Ready / Access LED
4. Hard Drive 1 Error LED
5. Hard Drive 2 Ready / Access LED
6. Hard Drive 2 Error LED
7. Front Door
8. Power Cord Socket
9. Power Switch
10. RAID Switch
11. RAID Mode LED
12. USB2.0 Connector
13. eSATA Connector
14. Vent for FAN Cooling
15. RAID Mode Indication
2. Assembling the 3.5" SATA HDD
1. Open the casing door and pull out the hard drive tray.
2. Insert SATA HDD to hard drive tray and put on the screws and tighten SATA HDD.
3. Exactly put the hard drive tray into the casing then lock the casing door.
3. Hardware RAID Setting
TERA ME-580J offers 4 modes Individual (default setting) , JBOD, RAID 0, RAID 1. Before using these
services, you have to adjust firstly the RAID Switch (on the rear of ME-580J) in order to choose the preferred
RAID configuration. Please see the reference on the right.
Notes:Any RAID mode swap will cause possible data loss, always remember to backup your files
before changing RAID mode.
Please follow below steps before re-build the RAID mode of ME-580J.
1.
Backup data from the HDD to others.
2.
Power off ME-580J.
3.
Properly select the operation mode you prefer by the RAID Switch.
4.
Power on ME-580J.
5.
Plug in USB cable or eSATA cable.
Notes: If you want to use RAID0 or RAID1 Mode, you must insert two hard drives otherwise the
enclosure will not work.
4. Remarks
1. The detailed installation manual can be found in the "User Manual" of the CD.
2. The product is compliant with CE/FCC/UL/RoHS/WEEE.