1
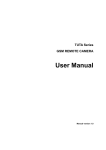
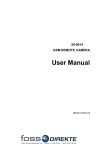
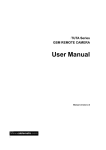
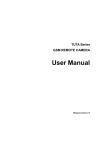
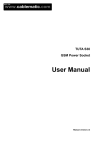
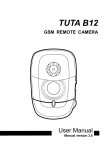
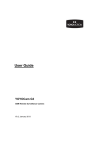
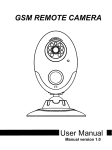
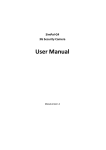
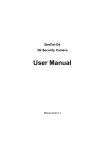
TUTA Series GSM REMOTE CAMERA User Manual Manual version 3.0 TUTA-B2 GSM REMOTE CAMERA USER MANUAL TUTA Series GSM Remote Camera Thank you for purchasing the TUTA camera. This camera is a remote controlled image-capturing device consisting of a microphone, infrared lights and a high quality 300,000-pixel camera lens. The TUTA camera can capture images according to a pre- programmed remote command and then send it to your multimedia messaging (MMS) enabled mobile phone with color display, or to an e-mail address. You can control and change the camera settings via SMS command. The MMS sent by the TUTA camera can be viewed on your mobile phone. You also can opt to view a slide of consecutive photos taken by the GSM Remote camera. The built-in high-light infrared LED allows the camera to capture clear images even in dark environment. The TUTA camera is compatible with standard 433MHz wireless sensors such as PIR-, door magnet- and smoking sensors. As soon as the wireless sensor triggers the camera alarm, you or your families and/or your guards can thus receive the alarm message via SMS, MMS or standard calls, according to the pre-programmed. However, the camera can perform its duty well without any wireless sensor too. The TUTA has an integrated infrared body detector. It will therefore detect any unauthorized entry into your house and notify you via SMS, MMS, standard calls or E-mail. All services and functions need to be supported by the GSM network and a SIM card. This brochure suits for TUTA-B2 model. Details of the functioning and advanced operation of this camera are described in this instruction manual. 2 TUTA-B2 GSM REMOTE CAMERA USER MANUAL CONTENTS For your safety..........................................................................................................................................5 Exception clause........................................................................................................................................5 Chapter 1 Structure instruction.........................................................................................................................6 1.1 Package contents.................................................................................................................................6 1.2 Products features.................................................................................................................................6 1.3 Mounting bracket...............................................................................................................................7 1.4 Remote control instruction..................................................................................................................7 1.5 Light indicator ....................................................................................................................................8 Chapter 2 Installation........................................................................................................................................9 2.1 Install the SIM card.............................................................................................................................9 2.2 Install the host mounting bracket........................................................................................................9 2.3 Connecting to power adapter............................................................................................................10 2.4 Mounting the TUTA camera.............................................................................................................10 2.5 Power on/ off.....................................................................................................................................10 Chapter 3 Define the user and basic settings..................................................................................................11 3.1 User authorization level....................................................................................................................11 3.2 Setup master number.........................................................................................................................12 3.2.1 Add a master number to the camera.......................................................................................12 3.2.2 Change the master number.....................................................................................................13 3.2.3 Change password...................................................................................................................13 3.3 Define family user.............................................................................................................................13 3.3.1 Add a family number.............................................................................................................13 3.3.2 Delete family number............................................................................................................13 3.4 Define Guest user..............................................................................................................................14 3.5 Network parameter settings..............................................................................................................14 3.6 Camera language...............................................................................................................................14 Chapter 4 Operations and settings..................................................................................................................15 4.1 Call the camera to listen in................................................................................................................15 4.2 Capture images..................................................................................................................................15 4.2.1 Capture images to mobile phone...........................................................................................15 4.2.2 Capture images and send to user’s E-mail address................................................................16 4.2.3 Timing send images to mobile phone....................................................................................16 4.3 Arming or disarming TUTA camera.................................................................................................17 4.3.1 Arming TUTA camera............................................................................................................17 4.3.2 Camera alarm.........................................................................................................................17 4.3.3 Disarming TUTA camera.......................................................................................................17 4.3.4 Timed arming the camera.......................................................................................................18 4.4 Emergency alarms.............................................................................................................................18 4.5 Remote control..................................................................................................................................18 4.5.1 Pairing remote control............................................................................................................18 3 TUTA-B2 GSM REMOTE CAMERA USER MANUAL 4.5.2 Remote control instruction.....................................................................................................19 4.5.3 Removing remote control from the camera...........................................................................19 4.6 Infrared body detector.......................................................................................................................19 4.7 Wireless sensor..................................................................................................................................20 4.7.1 Loading sensor onto the camera............................................................................................20 4.7.2 Removing sensor....................................................................................................................21 4.8 Image size setting..............................................................................................................................21 4.9 Warning tone upon alarm triggering.................................................................................................21 4.10 SMS notification upon alarm triggering.........................................................................................21 4.11 Call notification upon alarm triggering...........................................................................................22 4.12 Turn on/off LED indicator on the camera.......................................................................................22 4.13 Check status....................................................................................................................................22 4.14 Getting help.....................................................................................................................................22 4.15 Resetting the camera.......................................................................................................................22 Chapter 5 General Troubleshooting................................................................................................................23 Chapter 6 Main technical parameters..............................................................................................................24 Appendix: SMS commands list.......................................................................................................................24 4 TUTA-B2 GSM REMOTE CAMERA USER MANUAL 1. Purchase a GSM SIM card (mobile phone card) from GSM network service and install it in the camera. This SIM card number is referred as TUTA camera number on this brochure. 2. The user needs to activate the MMS function and Caller ID Presentation function of SIM card, and deactivate PIN code of the SIM. Contact with GSM network service for support. 3. Change the original password at the beginning use. Be sure to keep the password and SIM card number secret. Do not disclose this information to anyone other than the authorized users in order to ensure your safety. For your safety λ This product is a wireless signal transmission device. Keep it away from electronic equipment likely to interfere with the wireless signals, in order to avoid signals interference. λ Switch off your TUTA and mobile phone when entering areas marked "Explosive", "Might explode", "Closed wireless transceiver devices" etc. λ Do not cast this product in a fire, as this may cause the battery to explode. λ This product should only be operated from power approved by the product manufacturer. The use of any other types of power may damage the product. λ Keep the product and its accessories out of the children reach. Exception clause 1. We operate on a policy of continuous development. We reserve the right to make changes and improvements to any of the products described in this document without prior notice. 2. For the latest product information, please visit: http://www.i-tuta.com. We don’t guarantee for the document veracity, reliability or any content except regulate in proper laws. Including no guarantee for product suitable market or suitable area promise. 3. Use only this product according to the law. Respect one another’s privacy. Neither monitor another’s home nor private. We hold no responsibility for the 5 TUTA-B2 GSM REMOTE CAMERA USER MANUAL illegal use of this product. 4. We hold no responsibility for any loss of data or income; or any special, incidental, consequential or indirect damages howsoever caused. 5. The contents of this document are provided “as is”. Except as required by applicable law, no warranties of any kind, either expressed or implied, including, but not limited to the accuracy, reliability or contents of this document. We reserve the right to revise this document or withdraw it at any time without prior notice. Chapter 1 Structure instruction 1.1 Package contents 1. Remote camera 1 unit 2. Power adapter(5.5V/2A) 3. Remote control 2 units 4. User manual 5. 1 unit 1 unit Mounting bracket 1 set 1.2 Products features Figure 1: TUTA camera instructions 1. Power switch 2. Infrared body detector 8. Set key 9. Mini USB(rubber cover) 6 TUTA-B2 GSM REMOTE CAMERA USER MANUAL 3. Indicator 10. Hanging hole 1 4.Camera 11. Power Interface 5. Infrared lights(12 pcs) 12. Back board (SIM card slot inside) 6. Mirror and Microphone 13. Hanging hole 2 7. Reset key Tip: Keep the camera lens clean to insure best imaging quality. 1.3 Mounting bracket 1.4 Remote control instruction Figure 2: Remote control Instruction 1. Antenna 3. Arm the camera button 7 TUTA-B2 GSM REMOTE CAMERA USER MANUAL 2. Remote control indicator 4. Disarm the camera button 5. Emergency button Battery: One 27A/12V battery. Note: There is battery holder on the rear of the remote control. When this battery is running out of power, TUTA camera will emit “Beep, beep” warning tone and then send a SMS notification message to Master user. 1.5 Light indicator Color Red Green Action Status Flash slowly Searching the network. Flash quickly Sensor alarm, infrared body detector alarm. Constant Light Not installed SIM card, or the remote camera damaged. Constant Light Armed status. Flash twice per Arming command received. TUTA camera will enter 2 seconds arming mode after 20 seconds. The camera is at the alarm-suspension situation. Flash slowly Disarmed status. Flash quickly Processing data. Light 2 seconds Successfully reset factory setting, or loading sensor. Orange Flash Loading remote control status. Red Two color lights Loading sensor Green and alternately Note: Slow flash 1 time per second, quick flash 2 times per second. 8 TUTA-B2 GSM REMOTE CAMERA USER MANUAL Chapter 2 Installation 2.1 Install the SIM card • Remove the back board from the rare of TUTA camera. • Insert the SIM card into the slot. • Get back the back board of TUTA camera. 2.2 Install the host mounting bracket 9 TUTA-B2 GSM REMOTE CAMERA USER MANUAL 2.3 Connecting to power adapter • Connect the adapter to an AC power, and connect the plug to the power interface of the TUTA camera .(See Figure 1 TUTA camera Instruction) • This camera has a built-in rechargeable Lithium battery. • The camera will notify the user when the power changes. For example, if the power adapter is disconnected or failure of the AC power occurs, TUTA camera will notify the user “External power cut. The device is operating on battery.” • If TUTA camera is again connected to the external power, or the AC power is available again, the notification will be sent to the user, i.e.” The device is now resuming the use of external power source.” • Low battery: The configure setting can not be saved when TUTA camera is operating on low battery. 2.4 Mounting the TUTA camera TUTA camera can be mounted on a wall (vertically with the screws) or put down on any suitable horizontal surface. How to choose the Installing place: λ In order to capture better image quality, avoid any areas where bright light will be irradiated directly into the lens of the camera on the camera. λ In order to avoid backlighting photography, it is suggested that the camera is located at the place where can look down the monitoring place with the minimum angel 30°. λ The GSM network’s signal strength may affect the image, live voice quality and MMS transmission speed. Therefore, upon installation, the user should ensure that TUTA camera is located in an area with a strong network signal. λ After installation, the user should perform a test-run by taking several images and sending it to the user’s mobile phone. This allows the user to check the image quality of the camera. The position of TUTA camera can then be adjusted until a satisfactory image quality level is reached. 2.5 Power on/ off Power on: Operation Turn the power Indicator light Red light is on for 3-5 seconds. 10 Status TUTA-B2 GSM REMOTE CAMERA USER MANUAL switch to “On” position. Red light flashing slowly for about 35 seconds. A “Beep…” tone will be heard. Green light flash slowly, or TUTA camera is green light be on constantly. disarmed, or armed. Power off: Turn the power switch to downside “Off” position. Chapter 3 Define the user and basic settings 3.1 User authorization level There are three levels, each with a different authorization level, namely Master, Families and Guest. Table 3.1 the difference in authority for Master, Families and Guests users: User Type Master Families Guests Change authority, password YES NO NO Automatic Receive SMS YES NO NO Alarm Receive MMS YES NO NO Receive alarm calling YES YES NO Get images by E-mail YES NO NO Emergency Receive SMS YES NO NO alarm Receive MMS YES NO NO Receive emergency calling YES YES NO Call the camera to listen in live voice YES YES NO Get work status, images, help and instruction by sending SMS command YES YES YES(Password) Get images by E-mail YES YES NO Set remote camera by SMS command YES YES NO Add, modify or delete sensor YES YES NO Camera language setting YES NO NO Set infrared body detect function YES YES NO Functions 11 TUTA-B2 GSM REMOTE CAMERA USER MANUAL Note • Any MMS enabled mobile phone can receive the images captured by TUTA camera by sending SMS command with password. • Any SMS enabled mobile phone can control TUTA camera with the password command. All the settings of TUTA camera can be set or adjusted via a SMS command. About the SMS Command: 1) Master and families users’ SMS command format: #code#content#. 2) Guest users’ SMS command format: #code#password#content#. 3) The password must be a four-digit number. 4) The original password is 1234. 5) The maximum digits that are allows for the phone number is sixteen. 6) TUTA camera will reply to the user after it receives the SMS command. Note • The “#” symbol must not be ignored when typing an SMS command. • No allow any space within the commands. 3.2 Setup master number Master user has all the rights of changing camera settings and receives alarm messages from camera. In order to enable all the functions on the camera, the Master user must store his/ her mobile number in the camera’s memory. Only one Master’s mobile number (Master number) is allowed for a camera. 3.2.1 Add a master number to the camera Authority: Master user. Description If TUTA camera is being used for the first time, or TUTA camera has been reset, the master user’s number must be programmed into the camera, in order to ensure activation. The following methods can be used: Method The user must edit and send the following SMS (text message) to camera from mobile phone (the phone number will be the Master number) to: 12 TUTA-B2 GSM REMOTE CAMERA USER MANUAL Setup master number: #00#SIMnumber# (1) The SIMnumber is the camera installed SIM card number, it need to add country code in front of the SIM number, for example #00#+49123456789# (+49 is the country code of Germany, 123456789 is SIM number). If the camera reply master number already exists, please refer the Reset Factory Setting parts to delete old master number. 3.2.2 Change the master number Master user sends following SMS message in order to: Change the master user’s number: #14#NewMasterNumber# (2) 3.2.3 Change password In order to ensure your privacy and safety during the use of this camera, change the password once start to use TUTA camera. Master user sends following SMS message to: Change the password: #04#oldpassword#newpassword# • The password is a four digit number. • The original password is 1234. (3) 3.3 Define family user Family users have the authority to listen in on the camera, receive images, load the sensors and remote controls to the camera, and receive notification when the integrated infrared body detector be triggered. The family user’s mobile numbers are set by the Master user. The family users should remember and safeguard the camera’s SIM number. 3.3.1 Add a family number Master user sends following SMS message in order to: Add a family number: #06#FamilyNumber# (4) Add several family numbers: #06#FamilyNumber#...#FamilyNumber# • Up to 10 family users’ number can be stored on one camera. 3.3.2 Delete family number Master user sends following SMS message in order to: 13 (5) TUTA-B2 GSM REMOTE CAMERA USER MANUAL Delete a family number: #113#FamilyNumber# (6) Delete several family numbers simultaneously: (7) #113#FamilyNumber#…#FamilyNumber# Delete all family numbers: #113# (8) 3.4 Define Guest user Any selected person can operate in the Guest category if they know the password and the SIM number. The Guest user(s) can then use their mobile phones to send a SMS command including password to TUTA camera in order to obtain an MMS image. 3.5 Network parameter settings Normally the camera will preset local operator MMS settings on the firmware. Users needn’t to setup the MMS parameters. But if the GSM operator changes the MMS parameters or the local MMS settings do not preset on the firmware, users will receive SMS when they request MMS images: Sorry, the network is busy, MMS sending failed. Master number can setup the MMS parameters manually by following method. Six MMS parameters be requested on the camera. Master user send two SMS commands to the camera as follow. Set MMS center: #124#MMScenter# Set APN parameters: (9) (10) #125#Proxy IP#WAPProxyPort#HTTPProxyPort#APN#Username#Pssaword# Check the current operative network parameter settings: #55# (11) • The MMScenter should be the MMS center address of GSM provider. • For example: #124#http://mmsc.monternet.com# #125#10.0.0.172#9201#80#cmwap#wap#wap# 3.6 Camera language Each camera supports two default languages, English and Spanish. The user can send following SMS command to switch language: Spanish language: #127#0# (12) English language(Default): #127#1# (13) 14 TUTA-B2 GSM REMOTE CAMERA USER MANUAL Chapter 4 Operations and settings 4.1 Call the camera to listen in Master and family user calls TUTA camera after which it will answer automatically. The user can then listen in the live audio in the monitoring area. Only one line can be connected to TUTA camera at a time. 4.2 Capture images Authority: Master/ family / guest send SMS to the camera to get the MMS image or send the image(s) to an appointed mobile or E-mail address. Master/ family member call the camera to get the images. Master/ family send SMS command to the camera to send MMS image to an E-mail address (Need to pre-set E-mail address). 4.2.1 Capture images to mobile phone Method 1: • Master or family user calls the camera and hand up upon hearing the ringing tone (within 10 seconds). • TUTA camera will reply SMS notification: “Image capturing request received. The camera is busy sending the MMS messages.” • The user will then receive the MMS message momentarily. Method 2: The user sends following SMS message in order to: Capture one image and send to the user mobile: For master and family users: #03# (14) For guest users: (15) #03#password# Capture images and send to the user mobile: For master and family users: #03#ImageQuantity# (16) For guest users: (17) • #03#Password#ImageQuantity# Image quantity should be in the range of 1-8 when the image size is set at 160×128 or 320×240, be in 1-2 when 640×480. (Refer 4.4 image size setting.) The default image size is 320×240(QVGA). 15 TUTA-B2 GSM REMOTE CAMERA USER MANUAL 4.2.2 Capture images and send to user’s E-mail address This function should be supported by the local network provider. The E-mail address must be set at first. Each user number can set only one E-mail address to receive images. The user sends following SMS message in order to: Setup/modify E-mail address: #108#EmailAddress# (18) Capture image(s) and send to pre-set E-mail: #03#ImageQuantity#1# • (19) Image quantity should be in the range of 1-8 when the image size is set at 160×128 or 320×240, be in 1-2 when 640×480. The default image size is 320×240(QVGA). 4.2.3 Timing send images to mobile phone The user sends following SMS message in order to: Enable timing sends MMS images: #115#1# Set time period to auto-send MMS image: (20) (21) #116#WorkDay#StartTime1#EndTime1#IntervelTime1#...#StartTime3#EndTi me3#IntervelTime3# Disable timing send MMS image: • #115#0# (22) Max allow 3 periods per workday. Each period time should set by start time, end time and interval. • WorkDay: one digit, the values lie in the range of “0” to “9”. The following table contains the descriptions of each value: Value Corresponding day 0 Sunday 1 Monday 2 Tuesday 3 Wednesday 4 Thursday 5 Friday 6 Saturday 7 Everyday 8 Monday to Friday 9 Monday to Saturday • • StartTime and EndTime: Be consists of 4 digits (hh:mm) and works on a 24 hour clock. For example: 0000 means time 00:00(hh:mm), 2359 means time 23:59(hh:mm). The StartTime and EndTime should be in the same day, and 16 TUTA-B2 GSM REMOTE CAMERA USER MANUAL the EndTime must be later than StartTime. • IntervalTime: This consists of 2 or 3 digits and has values in the range of “10” to “480” minutes. 4.3 Arming or disarming TUTA camera 4.3.1 Arming TUTA camera • When user arm the TUTA camera, the built-in infrared body detector (PIR) will start working and detecting body heat. TUTA camera will automatically send alarm message or making a phone call once it be triggered. • TUTA camera has 20 seconds alarm-suspension period after it be armed. The user can leave the camera place during this time to avoid misalarm. Method 1: The user sends following SMS message in order to: Arming TUTA camera manually: #01# (23) Method 2: Press on the remote control, whilst pointing it in the direction of TUTA camera. TUTA camera will emit a “Beep” tone, to indicate that arming TUTA camera is successfully. (Refer remote control instruction parts) 4.3.2 Camera alarm Once the camera be triggered, the LED will flash fast in green, then turn red and flash fast. It will sending alarm SMS, MMS or make voice calling according to the setting. After it finish alarm process, camera will enter 20 seconds alarm-suspension period and then it can alarm again. 4.3.3 Disarming TUTA camera When user disarm the TUTA camera, all loaded wireless sensor, integrated infrared body detector could not work. But it can send alarm only when the remote control is pressed. Method 1: The user sends following SMS message in order to: Disarming TUTA camera manually: #02# Method 2: 17 (24) button on TUTA-B2 GSM REMOTE CAMERA USER MANUAL Press the button on the remote control, the camera will emit a BEEP tone and the indicator light will flashing green to show the TUTA disarm successfully. (Refer remote control instruction parts.) 4.3.4 Timed arming the camera Master and family users send following SMS message in order to: Enable timing arms the camera: #128#1# Set time period to arm the camera: (25) (26) #129#WorkDay#ArmTime1#DisarmTime1#...#ArmTime3#DisarmTime3# Disable timing arm the camera: #128#0# (27) • WorkDay: The value description is same with command 21. • Up to 3 periods be allowed per workday. Each period time should set by ArmTime, DisarmTime. • ArmTime and DisarmTime: Be consists of 4 digits (hh:mm) and works on a 24 hour clock. For example: 0000 means time 00:00(hh:mm), 2359 means time 23:59(hh:mm). The ArmTime and DisarmTime should be in the same day, and the DisarmTime must be later than ArmTime during the same period. 4.4 Emergency alarms The user press the remote control emergency button to make TUTA camera alarm. TUTA camera will stop any other operation once it receive emergency alarm signal, and start emergency alarm process. TUTA camera will dial the Master number not more than 3 times until someone answers. If, after 3 attempts, there is no answer, TUTA camera will automatically stop dialing and revert to its preset mode. Master can listen in the live audio by answering the call. (Refer remote control instruction parts.) 4.5 Remote control 4.5.1 Pairing remote control Normally the remote control was paired in factory. if the remote camera can not work with TUTA camera, user should pair the remote control separately. A camera can pair up to 5 remote controls. Camera indicator Operations 18 Status TUTA-B2 GSM REMOTE CAMERA USER MANUAL Green, flashing or 1. Press and hold the Set key Indicator light turns to orange constantly light. Orange, flashing for 2 seconds (Learning mode) 2. Press any button on the TUTA will emit a “Beep” tone remote control (with battery and indicator will turn green for inside) to send a signal to 2S. (Added successfully.) Orange, flashing TUTA. 3. Repeat step2 to load Orange, flashing another new remote control. 4. Press the Set key to exit Indicator the learning mode or waiting flashing or constantly light. (Exit for 15 seconds to auto-exit. learning mode) light turns green, 4.5.2 Remote control instruction There are three buttons on the remote control: A. Arm TUTA camera :When is pressed, the indicator light on TUTA camera will turn green. This indicates that TUTA camera is in armed mode. B. Disarm TUTA camera :When is pressed, the indicator light on TUTA camera will slowly flash green. This indicates that TUTA camera is in disarmed mode. C. Emergency button :When is pressed, the indicator light on TUTA camera will rapidly flash green. Then TUTA camera will dial the master user’s number. Live audio stream can be heard upon answering the emergency call. 4.5.3 Removing remote control from the camera Master or family user sends following SMS message in order to: Remove all remote controls from the camera: #111# (28) 4.6 Infrared body detector Master or family user sends following SMS message in order to: Activate infrared body detector (default): Deactivate infrared body detector: #118#1# #118#0# 19 (29) (30) TUTA-B2 GSM REMOTE CAMERA USER MANUAL 4.7 Wireless sensor Standard 433MHz wireless sensor, such as infrared body sensor, wireless door magnet, wireless smoke detector etc. can be set as an alarm sensor of the camera. Up to 15 wireless sensors and wireless panic buttons can be loaded onto one TUTA camera. There are two modes for wireless sensor: Arming-alarm mode: sensor only alarm when the camera in arm mode, normally, door sensor, infrared sensors work with this mode. Always-alarm mode: sensor will always alarm once the sensor triggered even the camera disarm, normally smoke detector, gas detector, panic button work with this mode. 4.7.1 Loading sensor onto the camera 1. Power on the wireless sensor. 2. Master or family user sends following SMS message to make TUTA camera enter loading mode: Arming-alarm mode: #05#SensorDescription# (31) Always-alarm mode: #196#SensorDescription# (32) • SensorDescription is used for identify different sensors affiliated with each camera. It can be numbers and letters. • SensorDescription could be empty. For #05#, TUTA camera will name the sensors with Sensor and number such as: Sensor1, Sensor2, Sensor3. For #196#, TUTA camera will name the sensors with SOS and number such as SOS1, SOS2, SOS3. • Up to 9 characters can be included in the SensorDescription • Sensor alarm default only send SMS, if user want the camera sending SMS & MMS of this sensor alarm, it need to add * in front of sensor description, such as #05#*door#. 3. When TUTA camera received the SMS command, it will emit a BEEP tone and the indicator will flash red and green alternately. TUTA camera will then send a notification SMS to the user: Camera pairing sensor, activate sensor then wait for confirmation SMS. 4. The user needs to make the sensor work and transmit signal to be studied by TUTA camera. 5. When TUTA camera receives the sensor signal, it will emit a Beep tone and 20 TUTA-B2 GSM REMOTE CAMERA USER MANUAL send a notification message via SMS: Sensor*** successfully paired. 6. To exit the loading mode manually, press the set key of the camera, TUTA camera will emit a Beep tone and exit the loading mode. 4.7.2 Removing sensor Master and family user sends following SMS message to TUTA camera: Remove a sensor: #112#SensorDescription#...#SensorDescription# Remove all wireless sensors: • #112# (33) (34) Sensor description should be the existing sensor which the user wants to remove. 4.8 Image size setting The master or family user sends following SMS message to TUTA camera in order to: Change the image size: #32#value# • (35) If the value is 1, the image size is 160 ×128(pixels). It’s for a standard small screen mobile phone. The size of one MMS image file is 4K. • If the value is 2, the image size is 320×240(QVGA default). The size of one MMS image file is 9K. • If the value is 3, the image size is 640 × 480 (VGA). The size of one MMS image file is 33K. 4.9 Warning tone upon alarm triggering TUTA camera will emit a Beep tone upon alarm activation. The master or family user sends following SMS message to TUTA camera in order to set: Warning tone upon alarm triggering: #130#1# No warning tone upon alarm (Default): #130#0# (36) (37) 4.10 SMS notification upon alarm triggering The master or family user sends following SMS message to TUTA camera in order to set: No SMS notification upon alarm triggering: SMS notification upon alarm (Default): #11#0# #11#1# 21 (38) (39) TUTA-B2 GSM REMOTE CAMERA USER MANUAL 4.11 Call notification upon alarm triggering The master or family user sends following SMS message to TUTA camera in order to set: No call notification upon alarm triggering(Default): Call notification upon alarm: #13#0# #13#1# (40) (41) TUTA camera will call the master and the family user’s numbers for not more than 3 times. If it is still no one answers the call, TUTA camera will then exit dialing mode automatically. 4.12 Turn on/off LED indicator on the camera If the LED indicator is on, it will display in different ways to show the working status. If it turns off, it can make TUTA camera private and avoid to be found easily. The Master or family user sends following SMS message in order to: Turn off indicator: #143#0# Turn on indicator(Default): (42) #143#1# (43) 4.13 Check status The user sends following SMS message in order to: Check the present settings and work status of TUTA camera: • For master and family users: #07# (44) • For guest users: #07#password# (45) 4.14 Getting help The user sends following SMS message in order to: Getting normal command list via SMS: • For master and family users: #09# (46) • For guest users: #09#password# (47) 4.15 Resetting the camera User can reset the camera to factory setting if the user forgot the master number or camera do not work normally. After reset factory setting, camera will delete all setting numbers and setting values, user need to setup master number from beginning. 22 TUTA-B2 GSM REMOTE CAMERA USER MANUAL Method 1: Reset via the camera • Switch TUTA camera off. It must remain off for a minimum of 20 seconds. • Press and hold the Reset button and then switch TUTA camera back on. • The indicator light will be green for 2-4 seconds after which it will flash red. • If the resetting of TUTA camera is successful, a “Beep …” tone will be emitted. Method 2: Reset via SMS command The user sends following SMS message to TUTA camera in order to: Reset the camera: #08#password# (48) Chapter 5 General Troubleshooting No. 1 2 General Trouble Can’t start camera Possible Reason Solution Other master is already set in the Recover to factory default (Indicator is working) camera. setting. All functions disable Caller ID presentation or MMS Contact network provider to (Indicator is working) functions of the SIM card do not active SIM card function. Pay active, insufficient fee of the SIM for the card. card. 3 Indicator constant light Can’t find or identify the SIM card. in red color. SIM card no install properly: Power off the camera and check it again. 4 5 Camera didn’t TUTA camera work abnormally. Switch off the power, check response of any SIM card, or reset factory operation. setting. After starting the Network signal weak or network Place the camera at other camera, indicator busy. place with strong signal and flashed in red color and can not turn to try again. SIM card PIN code actives. Close the PIN code. SIM card invalid. Contact with local operator to green. check of it. 6 Remote control can’t Camera low power. Connect external power to work. Or action slowly. Or control distance recharge the battery. Remote control low power. Change remote control range shortened. battery. Two remote controls work Try only one remote control. simultaneously. 7 Can’t add new remote The control already studies successfully. sensor or wireless remote control or sensor The sensor quantity is already 23 Exit the loading status. Delete old sensors before add TUTA-B2 GSM REMOTE CAMERA USER MANUAL No. General Trouble Possible Reason Solution reaches its max number. new sensor. Didn’t set master user number Set master number before add sensor. 8 Can’t start the camera Battery runs out of power. Connect the camera to after long time supply external AC power with the battery. charge for at least one hour, and then, restart camera. Note: If the problem can’t be solved with above guidelines, contact to your local distributor or after service center. Chapter 6 Main technical parameters Power adaptor Input: 100V~240V/50Hz Output: 5.5V DC Operating temperature -10℃~+45℃ Store temperature -20℃~+60℃ Relative humidity 10-90%,without condensation Working band EGSM900,DCS1800 (GSM850,PCS1900 Optional) Communication protocols GSM PHASE 2/2+ (including data operation) Wireless sensor receiving code ASK Wireless sensor receiving band 433MHz Max. wireless sensors 15 units Remote control receiving band 433MHz Effective distant of the remote control Image format 6 meters (wide area) JPEG Image resolution 160×128,QVGA320×240,VGA640×480 Camera pixel 300K pixel Camera Shooting angel 68 degree Best shooting distance at night ≤8 meters Detect distance of build-in PIR sensor Listen in distance ≤9 meters ≤6 meters Lithium battery (Inner) 800mAh Battery standby time 12 hours(Affected by network) Appendix: SMS commands list Category Function Define the Add a master number to the user Command (1) #00#+CountryCodeSIMNumber# camera 24 User Master TUTA-B2 GSM REMOTE CAMERA USER MANUAL Category Function Change the master user’s Command User (2) #14#NewMasterNumber# Master Change the password (3) #04#oldpassword#newpassword# Master Add a family number (4) #06#FamilyNumber# Master Add several family numbers (5) #06#FamilyNumber#...#FamilyNumber# Master Delete a family number (6) #113#FamilyNumber# Master Delete several family (7) #113#FamilyNumber#…#FamilyNumber# Master Delete all family numbers (8) #113# Master Set MMS center (9) #124#MMScenter# Master Set APN parameters (10)#125#ProxyIP#WAPProxyPort#HTTPProxy Master number numbers simultaneously Network parameter settings Port#APN#Username#Password# Check the current operative (11) #55# Master (12) #127#0# Master English version (13) #127#1# Master Capturing Capture one image and (14) #03# Master images send to the user mobile network parameter settings Language setting The user’s first language (or Spanish) version Capture images and send to Family (15) #03#password# Guest (16 #03#ImageQuantity# Master the user mobile Setup/modify E-mail address Family (17) #03#Password#ImageQuantity# Guest (18) #108#EmailAddress# Master Family Capture image(s) and send (19) #03#ImageQuantity#1# Master (20) #115#1# Master Set time period to auto-send (21)#116#WorkDay#StartTime1#EndTime1#Int Master MMS image ervelTime1#...#StartTime3#EndTime3#Intervel to pre-set E-mail Timing send images Enable timing sends MMS images Time3# Disable timing send MMS (22) #115#0# Master (23) #01# Master image Arming or Arming TUTA camera disarming manually TUTA camera Disarming TUTA camera Family (24) #02# manually Enable timing arms the Master Family (25) #128#1# camera Master Family Set time period to arm the (26)#129#WorkDay#ArmTime1#DisarmTime1# Master camera ...#ArmTime3#DisarmTime3# Family 25 TUTA-B2 GSM REMOTE CAMERA USER MANUAL Category Function Disable timing arm the Command (27) #128#0# camera Remote Remove all remote controls control from the camera Infrared Activate infrared body body detector (28) #111# sensor Make TUTA camera enter Master Family (29) #118#1# Master Family (30) #118#0# detector Wireless Master Family detector (default) Deactivate infrared body User Master Family (31) #05#SensorDescription# loading mode and set Master Family corresponding alarm mode Make TUTA camera enter (32) #196#PanicDescription# loading “wireless pacnic Master Family button” mode Remove a wireless sensor Remove all wireless sensors (33)#112#SensorDescription#...#SensorDescri Master ption# Family (34) #112# Master Family Image Image size (35) #32#value# Master Family Alarm settings Warning tone upon alarm (36) #130#1# triggering No warning tone upon alarm Family (37) #130#0# (Default) No SMS notification upon (38) #11#0# (39) #11#1# Master Family (40) #13#0# alarm (Default) Call notification upon alarm Master Family (Default) No call notification upon Master Family alarm SMS notification upon alarm Master Master Family (41) #13#1# Master Family Indicator Turn off indicator light (42) #143#0# light Master Family Turn on indicator light (43) #143#1# Master Family Check Check the present settings status and work status of the camera Getting help Getting normal command list (44) #07# Master Family (45) #07#password# Guest (46) #09# Master via SMS Family (47) #09#password# 26 Guest TUTA-B2 GSM REMOTE CAMERA USER MANUAL Category Resetting Function Resetting the camera Command (48) #08#password# Xiamen Youthnet Co., Ltd. Add: 10F, No.56 Guanri road, Software park II, Xiamen, Fujian, China. 361009 http://www.i-tuta.com. TEL: +86-592-6300656 FAX: +86-592-6022220 27 User Master