1
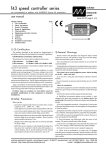
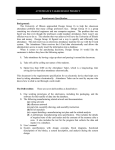
Education Platform End-User Manual
1
Table of Contents:
Introduction
Overview of the Process
Functional Details:
How do I get set up as a Professor?
Launching the Application
Logging Into the Application
Log-out of the Application
Main Menu
Add Class (Create a Classroom)
Edit Classroom
Add a Student to Classroom
Accept Student Request to be Added to a Class
Reject Student Request to be Added to a Class
Remove a Student From Classroom
Manage Classroom Assignments
Add an Assignment: No Assignments Set Previously
Add an Assignment: Assignments Set Previously
Edit an Assignment
Associate Assignment with Student(s)
Manage Problem Sets
View Problem Set Details
View Reports
View Detailed Student Report
View Detailed Assignment Report
View Problem Details from Reports Screen
Appendix 1: Arena View
Appendix 2: What Students See?
4
4
4
4
5
6
9
10
11
15
17
21
21
23
24
26
29
30
31
33
34
35
37
40
2
Introduction:
The Education Platform adapts the TopCoder Algorithm Arena Practice Room (AAPR) application for special use by college
professors, to aid them in teaching computer science and programming at their respective Universities.
Overview of the Process:
•
A Professor signs up to use the Service. He or she is required to indicate their University when signing up.
•
A TopCoder Administrator approves the Professor to use the system
•
The Professor sets up a class(es) (see Manual Entry #7: Add a Class) as desired.
•
The Professor lets his students know about the class and assignments that are available
•
Interested students sign up for one or more of the classes being offered by the Professor. Note: the Professor has the
option to decide whether a class or assignment is optional or required (see Appendix 2).
•
The Professor sees a notification when he or she logs into the system that there are students interested in joining his
or her class
•
Professor approves student(s) for the class. Professor also has the option to reject students.
•
Professor creates assignment(s) for that class.
Advantages of the System:
For Professors:
• Add excitement to assignments by using the world famous TopCoder arena as a dynamic teaching tool to augment
your existing Computer Science courses
•
Receive accurate feedback on individual students’ skill sets in the form of progress reports
•
Your students will learn valuable coding skills, focused on time and accuracy
•
The platform is both low maintenance and free
For Students:
• Access to the powerful TopCoder library of more than 3,000 problem sets including complete tutorials and solutions
•
A self-paced program
•
Detailed analysis of individual progress
•
Real world skill development
•
Resume builder
Functional Details
1. How do I get set-up as a Professor
• You must be set-up by a TopCoder Administrator as a Professor. Please contact : [email protected]
3
2. Launching the Application
• Open your Internet browser and go to http://www.topcoder.com/education
•
Click on the link to “Launch Education Platform”
Image 2.A: Main Application Screen
3. Logging into the Application
• Enter the user id and password that you were given by TopCoder personnel. If you do not have a user id and
password, you will need to contact a TopCoder Administrator at: [email protected]
•
If you enter your user id and/or password incorrectly, you will be prompted to re-enter your user id and password.
You can use the “Forgot Password” feature to have the password sent to the registered email address on file for
you.
4. Logout of the Application
• Once you have logged into the application, you may logout at any time by clicking on the “Logout” link that is
available on the top-right corner of every page.
5. Main Menu
• After logging into the application, you will be presented with the “Manage Classes” page. In addition, the main
menu at the top that allows you to Launch the Arena, View Reports or View Help is also available.
•
The classrooms you have created will be listed before you sorted by their title. From this page you can also
access a list of reports and if you forget you can always click on the Help option.
4
Image 5.A: View of Main Menu Showing Summary Class Information (Professor View)
6. Add Class (Creating a New Classroom)
•
To begin creating a new classroom click on the ‘Add Class’ button located in the middle bottom of the main
Administration page.
•
You will be taken through the “Add a Classroom” Wizard
•
Enter required data (fields are mandatory) and click Continue.
5
Image 6.A: Add Classroom Details (Professor View)
•
You will now be able to indicate which students will be in your class using a simple check box list. The list is based
on the existing students. Press Continue to make your final confirmation. If there are no existing students who
have signed up for classes previously, then this option will not be presented.
Image 6.B: View and Register Past Students (Professor View)
6
•
Review and confirm changes. You will be notified if your actions are successful or prompted to re-enter missing
information and re-submit it.
•
Your class will then be added to the list of classes on the main screen (main screen view in Image 5.A)
Image 6.C: Main Classes Page Showing Newly Added Class (Professor View)
7
7. Edit Classroom:
•
Click on the “Edit” button for a particular classroom from the Main Screen (see Image 5.A)
•
View the details of that Classroom and make text changes as desired (see Image 7.A below)
8
•
Click on “Continue” to submit the changes
Image 7.A: Editing a Classroom (Professor View)
•
Review and confirm changes. You will be notified if your actions are successful or prompted to re-enter missing
information.
8. Add A Student to Classroom
•
From the Main menu (see image 6.A) you can manage the students who are attending your course. You can click
on the “Students” button to work with the list of students in the class.
•
Click on the “Students” button.
9
•
You will see a list of students who have requested that they be added to your classroom. You have the choice to
activate (i.e. accept) or reject their request.
Image 8.A: Main Manage Students Page (Professor View)
8.1 Accept Student Request to be Added to a Class
•
You will be asked to confirm or reject students’ requests to join your class. You must confirm each student to add
them to your class (or you may reject them if you do not wish them to join the class)..
Image 8.1B: Accept a Student’s Request to be Added to a Class (Professor View)
10
•
After confirming the addition of the students to the classroom, the students will now show as being “Active”
students on the main Students Management Page.
Image 8.1C:View Active Students After Addition to Class (Professor View)
11
Screen-Shot 8.1D: After Requesting to be Added to a Course (Student View)
12
•
A student can drill-down to see the details about the class by clicking on the Class Link or he or she may choose to
see any Assignments associated with this class by clicking on “Assignments”
13
Screen-Shot 8.1E: View of Course Details after clicking on Class Link (Student View)
8.2 Reject Student Request to be Added to Class
•
A Professor can also choose to reject a Student’s request to be added to a class.
14
•
The Professor will be required to confirm the rejection before it is finalized.
Screen-Shot 8.2.A: Reject a Student (Professor View)A
•
After confirming the rejection, viewing the Main Student Management page shows that the rejected student no
longer is on the list of students awaiting approval
15
Screen-Shot 8.2.B: Post-Rejection of Student (Professor View)
•
If a Student is rejected he or she will no longer see the rejected class in their list of courses that have been
approved or are waiting to be approved. Note: If a student has registered for a course and then has been rejected
for that course, the student will NOT be allowed to re-register for the same course.
9. Remove a Student from Classroom
•
•
•
Click on the “Students” button
You will see a list of “Active” Students who have already joined your class.
You may click on the “select” box to the right of the student(s) name(s) and click “Remove” to remove them from
your class. When removing a student, you will be prompted to confirm the request.
16
Image 9.A: Selecting Active Students to be Removed (Professor’s View)
•
Confirm the removal and you will be taken back to the main “Manage Students” page, where the student will longer
appear under the list of “Active Students” for that classroom.
Image 9.B: Student Removed from Classroom (Professor View)
17
•
After a student has been removed from a class, that student no longer sees the class in his or her list of available
classrooms.
Image 9.C: View of Classroom Prior to Student Being Removed from Class (Student View)
18
•
Class is no longer visible after Student has been removed from class (in the Student’s view)
Image 9.D: View of Classroom After Student is Removed from Class (Student View)
19
10.
Manage Classroom Assignments
•
To work with the assignments for a given classroom click on the Assignment button under the classroom name from
the main Administrative menu (Image 6 A).
20
•
The subsequent screen depends on whether there have already been assignments associated with this classroom or if
there are none associated as yet.
10.1 Add an Assignment: No Assignments Set Previously
• If there are no Assignments already set for that classroom you will see the class name and an option to “Add
Assignment”.
Image 10.1.A: Add Assignment when No Assignments Set Previously (Professor View)
•
Click on the “Add Assignment” button.
•
You will be prompted to fill in the details for the Assignment: Title, Start Date, End Date, Length of coding period (i.e.
time allotted to complete the assignment if less than the time period from start date to end date), score type (options
are: TC Score based on time, # passed/failed test cases, success/failure), languages (Java, C++, C#, VB) and problem
set details. Note: “Share Status and Scores” is a property that, when checked, allows students in a class to see each
other’s scores on the assignment. If you do NOT want students to see the scores of others in their class, leave the box
unchecked.
21
Image 10.1.B: Add Assignment Details (Professor View)
•
Review the Information and click “Continue” if you are satisfied or “Back” if you wish to edit any of the information
•
Confirm the information if you are satisfied or click “Back” to change. You will be notified as to whether you have
successfully added the assignment.
Add an Assignment: Assignments Set Previously
•
If there are already assignments set for this classroom, in addition to the School, Classroom, Academic Period and
Description details, you will see a summary of all the assignments set already to this class as well as the option to “Add
Assignment”.
22
•
The “Add Assignment” functionality works in the same manner as for classrooms in which no assignments were set
previously (see section 11.1).
Image 10.2.A: Add Assignment when Assignments Set Previously (Professor View)
10.3 Edit an Assignment
•
After an Assignment has been created, you may edit it at any time. Go to the Assignments main page (Image 10.2.A).
•
Click on the “Edit” button. You will be taken to the Edit Assignment screen
23
•
Modify any field or combination of fields and then click “Continue”
Image 10.3.A: Edit Assignment Screen (Professor View)
•
You will be required to review and confirm your changes before getting a success notification or error message.
•
Returning to the main Assignments Page will show you the modified Assignment information (see Assignment title
modified in example below)
24
Image 10.3.B: Main Assignment Screen (showing updated Assignment) (Professor View)
11. Associate Assignment with Student(s)
•
You may associate a specific assignment with an individual student or group of students by going to the main
Assignments page (Image 10.2.A) and clicking on “Assign To”.
•
Click on the student(s) names that you wish to associate with the particular Assignment. Note: If there are no students
that are in the class, you will not be able to associate an assignment with a student(s). To do so will first require that
students be added to your class (by having students request access, and you confirm access via the “Manage
Students” functionality).
25
Image 11.A: Error Screen If No Students in Class to Associate With Assignment (Professor View)
•
If your class has students in it already, or after you have gone through the process of adding students, you will be
presented with a list of students in that class. Click on the names of the students that you would like to have work on
the assignment or click on “Select all” to have all the students in the class work on the assignment. Note: If students
are added
Image 11.B: Associate a Student with an Assignment (Professor View)
26
•
Click on Continue and Confirm buttons. You will be provided with a success or failure message as appropriate.
•
Students will see the assignment that has been added to their profile when they log into the system.
Image 11.C: View After Assignment Added to a Student’s Profile (Student View)
27
12. Manage Problem Sets
• Professors have a library of Problem Sets available to them. Each problem set consists of series of problems and
Professors have to option to select one of the problem sets when creating an assignment.
Image 12.A: Main Assignment Details screen
28
12.1 View Problem Set Details
• Clicking on any of the titles of the problems (displayed in the column marked “Problem(s) above) will take you to a
detailed description of the problem. For example, clicking on “Case Changer” in the screen-shot above brings up
details about the Case Changer problem.
Image 12.1.A: Problem Statement Details
29
13. View Reports
•
Professors can access reports that show the progress of Students. Click on the “Reports” tab on the Main Menu
bar at the top.
•
You will be taken to the Main Reports Page that shows all of your classes and links to access the reports
associated with those classes
30
Image 13.A: Main Report Page
•
Click on the link to access reports associated with a particular classroom.
•
There are two main options on the Classroom Reports Page: Student Reports and Assignment Reports. The
column under “Students” shows all of the students in the class (first name, last name, handle) and the column
under “Assignments” shows the Assignments that are associated with that classroom and the status of each one.
31
Image 13.B: Detailed Classroom Reports Page
13.1 View Detailed Student Report
•
Clicking on the name of any student in your class shows a detailed report of that student’s performance on a
particular assignment. The professor will see the student’s name, score, number of tests passed or % of tests
passed depending on the criteria for judgment selected when the assignment was first created.
Image 13.1.A: Detailed Student Report Page (Professor View)
32
13.2 View Detailed Assignment Report
•
From the Detailed Classroom Reports Page (Image 13.B), you can view Assignment Reports showing
performance of students on a particular problem within an Assignment.
•
Clicking on the name of any assignment (Operating Systems_Assignment Modified in this example) in your class
shows a detailed report of the students who are associated with that assignment. For each student, their score,
number and percentage of test cases that have passed is displayed so that is easy to compare performance
across students.
33
Image 13.2.A: Detailed Assignment Report Page (Professor View)
12.3 View Detailed Problem Report Screen
•
From the Detailed Assignment Report (Image 13.2.A), you can click on the hyper-linked Problem to view a Report
showing details of how students are performing on a particular problem. Again (similar to Assignment report) it is
possible to easily compare performance across students in a class on a particular problem within an assignment.
In the example below, the report shows the performance of students on a specific problem, CommonChar (from
the general problem set assignment called: Operating Systems_Assignment_Modified).
Image 13.3.A: Detailed Problem Report (Professor View)
34
12.4 View Problem Details From Report Screen
•
From the Detailed Problem Report screen (Image 13.3.A), you can click on the hyper-linked Problem title to review
the particular problem, on which students’ performance is being evaluated.
Image 12.4.A: Problem Details Page
35
Appendix 1: Arena:
The Educational Platform arena shares many of the basic functionality of the regular TopCoder Arena. Common functionality
includes the ability to chat to other members, move between different areas of the area, configure personal options and visit
practice rooms. As well, the arena features an “Active Contest” link where users can see upcoming Active Contests and
register for them. The Education Platform arena extends the functionality of the basic TopCoder arena, by including the ability
for authorized users (professors and students) to access additional active contests than those available to regular members.
The added contests are the classes and assignments that have been set by the Professor.
36
Image A: Educational Platform TopCoder Arena (Professor View)
•
Students who are registered for classes or assignments with a particular professor at a University will have access to
those assignments via the “Active Contests” button, when they log into the system.
•
For example, the student (JHayden) below only has access to CSC201 course being taught by the Professor (polgara)
even though the professor is teaching multiple courses. JHayden is only associated with a particular assignment for
CSC201.
Image B: Educational Platform TopCoder Arena: Specific Classroom (Student View)
37
Appendix 2: What Students See
•
Students must first sign-up for an account at www.topcoder.com
•
They can then log into the Educational Platform website and register to use the system, if they are taking a class or are
authorized by a Professor using the application.
•
Note: Professors will need to notify their students when they have created classes and assignments in the system via
a communication method outside of the Education Platform.
•
Students logging into the Education Platform for the first time are presented with a “Welcome” Screen that outlines the
overall sign-u process.
Image A: Welcome Screen for Students (Student View)
38
•
Students first select their School by typing in the name and performing a Search. Wildcard characters are permitted.
Image B: Students Select School (Student View)
39
•
Students then select their Professor and classes.
Image C: Students Select Professor and Classes (Student View)
40
•
Students are required to review and confirm their choices
•
Students are notified of successful sign-up or of failure as appropriate.
41
•
Students can now see (on their home page) a list of the classes that they signed-up for. They must wait for the
Professor to confirm their addition to the class.
Image D: Sign-Up Success Notification (Student View)
•
The Professor sees that Student has signed up for class and can accept or reject him or her from their class.
42
Image E: Manage Students Page (Professor View)
•
Professor accepts and confirms student to class (or rejects student as appropriate).
Image F: Manage Students Page (Professor View)
43
Image G: Professor Accepts Student to Class (Professor View)
44
•
In turn, students see that they have been added and confirmed by the Professor as belonging to the class.
45
Image H: Students See the Class Added to Their Manage Classes Page(Student View)
46