1
Streamline Measurement Ltd
Maximet User Manual 1-1
User Manual
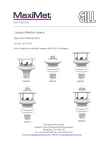
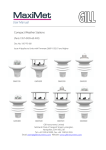
Compact Weather Stations
(Parts 1957-0X00-60-000)
Doc No: 1957-PS-001
Issue 1
GMX200
6WUHDPOLQH0HDVXUHPHQW/WG GMX600
6WUHDPOLQH0HDVXUHPHQW/WG
+DZWKRUQ%DQN
+DGILHOG
*ORVVRS6.(<
6WUHDPOLQH0HDVXUHPHQW/WGVDOHV#VWUHDPOLQHPHDVXUHPHQWFRXN ZZZVWUHDPOLQHPHDVXUHPHQWFRXN
Gill Instruments Ltd
_____________________________________________________________________________________________________________
Contents
1.
2.
FOREWORD ............................................................................................4
INTRODUCTION......................................................................................4
2.1.
MaxiMet Parameters and Part Numbers ........................................................... 5
2.1.1
MaxiMet Sensors. .................................................................................... 5
2.1.2
MaxiMet Derived Parameters. .................................................................. 5
2.1.3
MaxiMet Order Part Numbers. ................................................................. 5
Wind Speed and Direction Sensor (GMX200 and GMX600)................................... 6
Radiation Shield (GMX200 and GMX600).............................................................. 7
Temperature and Relative Humidity Sensor with Dewpoint Calculation (GMX600) . 7
Barometric Pressure (GMX600) ............................................................................. 7
Rain (GMX600) ..................................................................................................... 7
Compass (GMX200 and GMX600) ........................................................................ 7
Derived Parameters selectable using MetSet Software (see page 5 for applicability).
.................................................................................................................................... 8
3.
4.
TECHNICAL SPECIFICATION ..............................................................12
PRE-INSTALLATION ............................................................................15
4.1.
Equipment supplied ........................................................................................ 15
4.2.
4.3.
Connector and Cable Assembly...................................................................... 15
Cabling ........................................................................................................... 18
Optional Extras:................................................................................................... 15
4.3.1
4.3.2
Cable type ............................................................................................. 18
Cable length .......................................................................................... 18
4.4.
Connections.................................................................................................... 19
4.5.
Power supplies ............................................................................................... 19
4.6.
4.7.
4.8.
4.9.
4.10.
Connecting to a PC using RS232 (Default setting).......................................... 20
Connecting to a PC using RS422 (Not a Default Setting)................................ 20
Using RS485 (2 wire point to point only), not a default setting. ....................... 21
Using SDI-12 (2 wire network) not a default setting......................................... 21
Set up requirements ....................................................................................... 22
View of the MaxiMet connector ............................................................................ 19
MaxiMet units ...................................................................................................... 19
Host System:....................................................................................................... 22
Software: ............................................................................................................. 22
Bench system test ............................................................................................... 22
4.11.
Packaging ....................................................................................................... 22
5.
INSTALLATION .....................................................................................23
5.1.
General Installation Guidelines ....................................................................... 23
Interference ......................................................................................................... 23
Wind ................................................................................................................... 23
Compass............................................................................................................. 24
Alignment ............................................................................................................ 25
Dimensions (in mm) ............................................................................................ 26
6.
CONFIGURING WITH METSET ............................................................27
6.1.
MaxiMet Default Configurations ...................................................................... 27
GMX200 ASCII factory default configuration settings ........................................... 28
GMX600 Factory Default Data String ................................................................... 29
GMX600 factory default configuration settings ..................................................... 30
6.2.
Configuring MaxiMet with MetSet.................................................................... 31
6.3.
6.4.
Polled Mode.................................................................................................... 42
Configuring MaxiMet Compass ....................................................................... 43
MetSet Editing Pages. ......................................................................................... 35
________________________________________________________________________________________________
MaxiMet
Page 2
Issue 1
Doc. No. 1957-PS-000x
March 2015
Gill Instruments Ltd
_____________________________________________________________________________________________________________
Compass Declination .......................................................................................... 43
6.5.
Configuring MaxiMet for SDI-12 ...................................................................... 44
SDI-12 Units of Measure ..................................................................................... 44
SDI-12 Commands .............................................................................................. 45
SDI-12 Commands with CRC .............................................................................. 46
6.6.
Configuring MaxiMet for MODBUS ................................................................. 47
6.7.
Configuring MaxiMet for NMEA Output ........................................................... 50
MaxiMet Supported Modbus Specification ........................................................... 47
GMX200.............................................................................................................. 50
GMX600.............................................................................................................. 51
6.8.
Safe Mode ...................................................................................................... 53
Summary ............................................................................................................ 53
Safe Mode Method 1 ........................................................................................... 53
Connection .......................................................................................................... 53
Safe Mode Method 2 ........................................................................................... 56
Connection .......................................................................................................... 56
7.
VIEWING MAXIMET DATA STRING.....................................................58
7.1.
Use MetSet to View the MaxiMet Data String ................................................. 58
7.2.
Use a Terminal Program to View the MaxiMet Data String ............................. 59
Opening MetSet .................................................................................................. 58
Setting up a logging file ....................................................................................... 61
To stop logging.................................................................................................... 61
8.
MAINTENANCE & FAULT-FINDING ....................................................62
8.1.
8.2.
Cleaning and Handling.................................................................................... 62
Servicing ......................................................................................................... 62
Precipitation sensor. ............................................................................................ 62
Compass module. ............................................................................................... 62
Wind Sensor (WindSonic).................................................................................... 62
UV Shield (MetSpec) ........................................................................................... 63
Temperature, Humidity and Dewpoint .................................................................. 63
Barometer ........................................................................................................... 63
Calibration........................................................................................................... 63
Returning the MaxiMet ........................................................................................ 63
8.3.
Fault-finding .................................................................................................... 64
Common problems and their solution ......................................................................... 64
8.4.
Safe Mode ...................................................................................................... 65
8.5.
Bench Test ..................................................................................................... 65
See Para 4.2. ...................................................................................................... 65
8.6.
8.7.
Returning Units ............................................................................................... 65
Guarantee....................................................................................................... 65
9.
APPENDICES ........................................................................................66
9.1.
9.2.
Glossary & Abbreviations................................................................................ 66
Electrical Conformity ....................................................................................... 67
________________________________________________________________________________________________
MaxiMet
Page 3
Issue 1
Doc. No. 1957-PS-000x
March 2015
Gill Instruments Ltd
_____________________________________________________________________________________________________________
1. FOREWORD
Thank you for purchasing the MaxiMet manufactured by Gill Instruments Ltd.
To achieve optimum performance we recommend that you read the whole of this manual before
proceeding with use.
Gill products are in continuous development and therefore specifications may be subject to change
and design improvements without prior notice.
The information contained in this manual remains the property of Gill Instruments and should not
be copied or reproduced for commercial gain.
2. INTRODUCTION
The Gill MaxiMet sensor units are very robust with no moving parts. The sensor units, output rate
and formats are all user selectable.
The MaxiMet can be used in conjunction with a PC, data logger or other device.
The MaxiMet combines all the instrument data into a single data string. This may be configured for
digital ASCII RS232/RS422/RS485 (2 wire point to point), digital MODBUS RTU/ASCII, NMEA and
SDI-12 outputs.
________________________________________________________________________________________________
MaxiMet
Page 4
Issue 1
Doc. No. 1957-PS-000x
March 2015
Gill Instruments Ltd
_____________________________________________________________________________________________________________
2.1.
MaxiMet Parameters and Part Numbers
2.1.1 MaxiMet Sensors.
SENSOR PARAMETER
GMX200
GMX600
Wind Speed, Relative
Wind Direction, Relative
Compass
Temperature, Air
Humidity, Relative
Barometric Pressure
Rain (built in)
■ = Standard Fitted
■
■
■
NA
NA
NA
NA
NA = Not Available
■
■
■
■
■
■
■
DERIVED PARAMETER
GMX200
GMX600
Average Speed
Average Direction
■
■
■
■
Average Corrected Direction
Corrected Direction
■
■
■
■
Gust Direction
Gust Speed
■
■
■
■
Status
Wind Status
■
■
■
■
Dewpoint
Absolute Humidity
NA
NA
■
■
2.1.2 MaxiMet Derived Parameters.
Pressure at Station Level
Pressure at Station
Precipitation Intensity
Precipitation Total
Precipitation Status
■ = Standard
2.1.3
NA
NA
NA
NA
NA
NA = Not Available
■
■
■
■
■
MaxiMet Order Part Numbers.
1957-0X00-60-000
Where:
1957 = family number for MaxiMet.
0X00 = model number in family (so 0200 for GMX200, 0600 for GMX600.
60 = wind speed range
60 for 60 m/s wind range.
000 = Base model (further options as available):
________________________________________________________________________________________________
MaxiMet
Page 5
Issue 1
Doc. No. 1957-PS-000x
March 2015
Gill Instruments Ltd
_____________________________________________________________________________________________________________
Wind Speed and Direction Sensor (GMX200 and GMX600)
The MaxiMet uses the Gill WindSonic wind speed and direction sensor. The WindSonic measures
the times taken for an ultrasonic pulse of sound to travel from the North (N) transducer to the
South (S) transducer, and compares it with the time for a pulse to travel from S to N transducer.
Likewise times are compared between West (W) and East (E), and E and W transducer.
If, for example, a North wind is blowing, then the time taken for the pulse to travel from N to S will
be faster than from S to N, whereas the W to E, and E to W times will be the same. The wind
speed and direction can then be calculated from the differences in the times of flight on each axis.
This calculation is independent of factors such as temperature.
S
W
E
North
Alignment
Pointers
N
Compass points
The compass point and polarity of U and V if the wind components along the U and V axis are
blowing in the direction of the respective arrows.
MaxiMet can output the following wind readings depending on use of the Compass.
Relative wind – wind speed and/or direction, uncorrected, but relative to the north marker, which
may not be facing North).
Corrected wind – with the aid of the Compass Magnetic North corrected wind direction can be
output.
________________________________________________________________________________________________
MaxiMet
Page 6
Issue 1
Doc. No. 1957-PS-000x
March 2015
Gill Instruments Ltd
_____________________________________________________________________________________________________________
Radiation Shield (GMX200 and GMX600)
A MetSpec Multi-Plate Radiation Shield is used. The special shield plate geometry, with its double
louvre design, provides excellent response time performance of quick ambient temperature
changes while still working effectively as a baffle to stop larger contaminants such as salt or dirt
from reaching the temperature and humidity. The shield benefits from very robust material choice
and extremely high UV protection requiring no maintenance.
Temperature and Relative Humidity Sensor with Dewpoint Calculation (GMX600)
There is an internal solid state instrument contained within the Radiation shield that provides
digital output signals for Relative Humidity, Temperature and calculated Dewpoint.
Barometric Pressure (GMX600)
Barometric pressure output is provided by a solid-state device fitted on to a circuit board inside a
MaxiMet moulding.
Rain (GMX600)
A reading of Rain levels is provided by using an optical infra-red beam sensor. Infra-Red beams
that bounce off the inner optical surface between transmitters and receivers. Depending on rain
drop levels the intensity of the beams change and internal digital signal processing allows a
measurement of Rain levels to be made.
Compass (GMX200 and GMX600)
MaxiMet contains a 2-axis compass and magnetic field sensing module using Magneto-Inductive
(MI) sensors. The sensor changes inductance by 100% over its field measurement range. It
incorporates a temperature and noise stabilized oscillator/counter circuit. The compass has a high
degree of azimuth accuracy.
MaxiMet uses the internal; compass to electronically sense the difference in the earth's field from
the system's magnetic field, then an on-board microprocessor electronically subtracts out the
system's magnetic fields, reporting highly accurate compass readings. Wind direction data is
corrected for the orientation of the sensor. The output of the wind direction is relative to magnetic
North.
________________________________________________________________________________________________
MaxiMet
Page 7
Issue 1
Doc. No. 1957-PS-000x
March 2015
Gill Instruments Ltd
_____________________________________________________________________________________________________________
Derived Parameters selectable using MetSet Software (see page 5 for applicability).
AH
Absolute Humidity.
The humidity of the atmosphere, usually expressed as the number of grams of water
contained in 1 cubic metre of air.
(Note Relative Humidity also output, expressed as a percent, measures the current absolute
humidity relative to the maximum for that temperature).
Absolute humidity shall be computed as:- H = C · Pw/T.
Where:H = absolute humidity
C = Constant 2.16679 gK/J
Pw = Vapour pressure in Pa
T = Temperature in K
Result e.g. 08.14 g/m3.
AVGSPEED
Average Speed.
Outputs the World Meteorological Organisation (WMO) Average Wind Speed reading based on
AVG short and AVG long settings (see page 36).
Result e.g. 001.45 (Metres/second default).
AVGDIR
Average Direction.
Outputs WMO Average Direction Wind reading based on AVG short and AVG long settings (see
page 36).
Result e.g. 145 (degrees).
AVGCDIR
Average Corrected Direction
Outputs WMO average Compass Corrected Direction wind reading based on AVG short
and AVG long settings (see page 36).
Result e.g. 131 (degrees).
CDIR
Corrected Direction
Corrected Wind Direction shall be computed as the Apparent Wind Direction using the
compass heading reading.
Result e.g. 116 (degrees).
DEWPOINT
Dewpoint.
Output calculated Dewpoint from Temperature and Humidity readings.
Td = Tn / (Y-1)
where
Td = Dewpoint temperature
Y = m/log10(Pw/A)
Tn=Triple point temperature (in K)
Pw = Pws . RH / 100 (hPa)
Pws = water vapour saturation pressure (hPa)
Result e.g. 45.1 (%).
________________________________________________________________________________________________
MaxiMet
Page 8
Issue 1
Doc. No. 1957-PS-000x
March 2015
Gill Instruments Ltd
_____________________________________________________________________________________________________________
GDIR
Gust Direction.
Outputs WMO Gust Direction.
Result e.g. 123 (degrees).
GSPEED
Gust Speed.
Outputs WMO Gust Speed.
Result e.g. 015.15 (Metres/second default).
PASL
Pressure at Station Level.
Outputs Barometric Pressure at Sea Level if HASL figure set (see Page 38).
p0 = p1.exp( (g.h) / (R.T) )
where
p0 = air pressure at sea level (Pa)
p1 = air pressure at sensor (Pa)
h = sensor altitude above sea level (m)
R = specific gas constant
T = air temperature as measured
g = acceleration due to gravity
Result e.g. 1015.7 (hecto-pascals default).
________________________________________________________________________________________________
MaxiMet
Page 9
Issue 1
Doc. No. 1957-PS-000x
March 2015
Gill Instruments Ltd
_____________________________________________________________________________________________________________
PRECIPI
Precipitation Intensity.
Outputs Precipitation (Rain) Intensity. It is the sum of the last sixty lots of 1 minute
accumulated Rain data. A new sum measurement is generated every minute.
Result e.g. 000.2 (millimetres default).
PRECIPS
Precipitation Status.
Outputs Precipitation (Rain) Status as N or Y (No or Yes).
Changes N to Y when total precipitation is incremented.
Changes Y to N when total precipitation has not incremented in the last 60 seconds.
Result e.g. N (or Y).
PRECIPT
Precipitation Total
Outputs Precipitation (Rain) Total reading, this is an accumulated rain reading updated at
the output rate.
Is set to zero on MaxiMet power up.
Is set to zero when the clock reads 23:59:59 to 00 (midnight) and is the default setting.
For continuous measurement turn off Auto-reset of Total Precipitation using MetSet.
Result e.g. 00000.4 (millimetres default).
PSTN
Pressure at Station
Outputs Barometric Pressure at Station if HASL figure set (see page 38).
Pressure at station shall be computed as:
where:
Pb = static pressure (pascals)
Tb = standard temperature (K)
Lb = standard temperature lapse rate (K/m) in ISA
h = height above sea level (meters)
hb = height at bottom of layer b (meters; e.g., h1 = 11,000 meters)
R = universal gas constant for air: 8.31432 N·m /(mol·K)
g0 = gravitational acceleration (9.80665 m/s2)
M = molar mass of Earth's air (0.0289644 kg/mol)
Result e.g. 1001.2 (hecto pascals default).
STATUS
Status of MaxiMet Sensors
Outputs the MaxiMet Sensors Status Code
Result e.g. 0000 (see page 64).
WINDSTAT
Status of Wind Sensor in detail.
Outputs Status codes relating to Wind Sensor Data
Result e.g. 0000 (see page 65).
________________________________________________________________________________________________
MaxiMet
Page 10
Issue 1
Doc. No. 1957-PS-000x
March 2015
Gill Instruments Ltd
_____________________________________________________________________________________________________________
GMX Sensor Default Output Summary
Default Data String GMX200
Node,
Relative Wind Direction,
Relative Wind Speed,
Corrected Wind Direction,
Date and Time,
Supply Voltage,
Status,
Checksum.
Q,127,000.03,000,2000-01-01T00:40:50.2,+10.5,0000, 21
Default Data String GMX600
Node,
Relative Wind Direction,
Relative Wind Speed,
Corrected Wind Direction,
Pressure,
RH,
Temp,
Dewpoint,
Total Precipitation,
Precipitation Intensity,
Date and Time,
Supply Voltage,
Status,
Checksum.
Q,344,000.05,096,1018.5,037,+023.0,+007.8,00000.0,000.0,2014-05-24T06:21:01.0,+10.3,0002, 3C
________________________________________________________________________________________________
MaxiMet
Page 11
Issue 1
Doc. No. 1957-PS-000x
March 2015
Gill Instruments Ltd
_____________________________________________________________________________________________________________
3. TECHNICAL SPECIFICATION
Wind Measurement
Parameters
Polar Wind Speed & Direction
Units of Measurement
m/s, knots, mph, kph, ft/min
Wind Speed
Range
0.01 to 60m/s
Accuracy
3% 0.01m/s to 40m/s
5% above 40 and up to 60m/s
Resolution
0.01m/s
Threshold
0.01m/s
Wind Direction
Range
0-359 Degrees – No dead band
Accuracy
3 0.01m/s to 40m/s
5 above 40 and up to 60m/s
Resolution
1
Compass
Range
0-359 degrees
Resolution Compass Heading
1
Units of Measure
Degrees
Air Temperature
Range
-40C to +70C
Accuracy
0.3C @ 20C
Resolution
0.1C
Units of Measure
C or F or K
Relative Humidity
Range
0-100%
Accuracy
2% @ 20C (10% to 90% Relative humidity)
Resolution
1%
Units of Measure
% RH
________________________________________________________________________________________________
MaxiMet
Page 12
Issue 1
Doc. No. 1957-PS-000x
March 2015
Gill Instruments Ltd
_____________________________________________________________________________________________________________
Dew Point
Range
-40C to +70C
Resolution
0.1C
Accuracy
0.3C @ 25C
Units of Measure
C or F or K
Barometric Pressure
Range
300 to 1100hPa
Accuracy
0.5hPa @ 25C.
Resolution
0.1hPa
Units of Measure
hPa, mbar, mmHg, InHg
Rain
Precipitation Intensity
0 to 150mm per hour.
Resolution
0.2mm/tip
Accuracy
2%
Units of Measure
milli-metres, inches
Real Time Clock
Format Date and Time
YYYY-MM-DDThh:mm:ss.s,
e.g. : 2014-12-25-T22:34:56.1,
Updating
Manual Setting
Power Loss Accuracy
±10 seconds for at least 24 hours after power removed from
MaxiMet.
Clock back up Period
24 hours.
Outputs
Digital Outputs
RS232, RS422, *RS485 (*2 wire point to point) or SDI-12
(RS232 point to point and RS485 2 wire networkable –
MODBUS RTU/ASCII)
Baud Rates
1200 (SDI-12), 4800-57600 (ASCII RS232, RS422, *RS485)
9600-19200 (MODBUS RTU/ASCII)
Protocols
ASCII, SDI-12 V1.3, NMEA 0183 or MODBUS RTU/ASCII
Data Output
1 reading per second (1 Hz), 1 reading per minute, 1 reading
per hour or Polled Mode
MaxiMet Status
Status codes provided within the data message string
________________________________________________________________________________________________
MaxiMet
Page 13
Issue 1
Doc. No. 1957-PS-000x
March 2015
Gill Instruments Ltd
_____________________________________________________________________________________________________________
Power Supply
Input voltage (RS232, RS422,
RS485)
5v to 30v dc
Current
GMX200 – 25mA at 12v dc.
GMX600 - 80mA at 12v dc.
Environmental
Protection Class
IP66
EMC
BS EN 61326
FCC CFR47 Parts 15.109
Operating Temperature
-40C to +70C
Storage Temperature
-40C to +80C
Humidity
0-100%
RoHS Compliant
Yes
Mechanical
External Construction
Fittings
Overall Dimensions
GMX200 Series
GMA0600 Series
Weight
GMX200 Series
GMX600 series
Polycarbonate.
Bolt fittings supplied for securing the unit to a vertical pipe of
diameter 44.45mm.
169.5 mm x 142mm x 142mm
261mm x 142mm x 142mm
0.5Kg
0.8Kg
Software
MetSet Configuration
Free Software providing the means of configuration of the
MaxiMet
________________________________________________________________________________________________
MaxiMet
Page 14
Issue 1
Doc. No. 1957-PS-000x
March 2015
Gill Instruments Ltd
_____________________________________________________________________________________________________________
4. PRE-INSTALLATION
4.1.
and
and
and
Equipment supplied
MaxiMet
Installation kit comprising of a 9 way connector kit and 3 off M5 bolts and washers to bolt
the unit to a mounting pole.
MaxiMet User Manual and MetSet Software on a CD (this manual).
Product Test Report.
Optional Extras:
Part
Number
Item
Cable 3 Pair twisted and Shielded wires, 24awg, per metre.
Cable 4 Pair twisted and Shielded wires, 24awg, per metre.
Cable 15 metres (4 pair twisted and shielded 24 awg – connector pins
attached to one end and stripped wires the other).
9 way connector and 3 mounting bolts (1 supplied with the unit)
0.5 Metre x 50mm Aluminium Support Tube tapped for MaxiMet Mounting
bolts
50cm Lanyard
MaxiMet 1.8 Metre RS232 to USB power and communication configuration
cable (9 way MaxiMet connector fitted one end and USB connector at the
other end).
4.2.
026-02660
026-03156
1405-10-080
1405-PK069
1405-30-056
026-05335
1957-10-065
Connector and Cable Assembly.
The MaxiMet is supplied with a mating 9 way connector.
Open the pack of connector parts supplied (Gill Part 1405-PK-069).
Part Name
Connector 9 way
Backshell
Solder bucket contacts (9 required)
Souriau Clipper Part Number.
CLF1201
CL101021
CM10SS10MQ
Arrange Backshell Parts.
Trim back the screened cable outer and screen sleeves 40mm.
Trim back the screen drain wires flush with the outer sleeve.
Strip back the connection wires by 5mm and tin solder.
Solder the contact pins to the wires (please note that the connector supplies the correct strain
relief for cables with an outside diameter of 6-12mm).
Screen Twisted Pair Cable
5 mm
40 mm
Screen drain wires cut flush
________________________________________________________________________________________________
MaxiMet
Page 15
Issue 1
Doc. No. 1957-PS-000x
March 2015
Gill Instruments Ltd
_____________________________________________________________________________________________________________
Put the parts on the cable in the order as shown below.
Whilst squeezing the red retainer in the direction of ARROWS A, pull in the direction of ARROW B.
A
A
B
Your connector should now resemble the connector in the picture below.
Insert each contact pin until you feel a slight click. If you have inserted the contact into the
incorrect hole it can be removed at this point by simply pulling it out. Please note there will be
some resistance.
Rear View of Connector
________________________________________________________________________________________________
MaxiMet
Page 16
Issue 1
Doc. No. 1957-PS-000x
March 2015
Gill Instruments Ltd
_____________________________________________________________________________________________________________
Continue to insert all of the contacts you require. Once all of the contacts are inserted push the red
retainer into place. NB. The retainer can only be pushed back into place if the contacts are fully
engaged.
Fit the connector to the MaxiMet so that you can finish assembling the connector.
Screw the back shell onto the connector until it is fully in place. Please note that the final rotations
can be slightly stiff.
Now screw the next part of the connector into place.
Now screw the cable-clamping nut into place.
The connector can now be removed from the MaxiMet.
NOTE: To disassemble the connector, reverse this procedure.
________________________________________________________________________________________________
MaxiMet
Page 17
Issue 1
Doc. No. 1957-PS-000x
March 2015
Gill Instruments Ltd
_____________________________________________________________________________________________________________
4.3.
Cabling
MaxiMet has five communication connection options:
USB (using the 1.8m MaxiMet RS232 to USB cable, Part No. 1957-10-065).
RS232
RS422
RS485 (two wire point to point)
SDI-12
It is important that the cable is appropriate for the chosen communication network. The following
sections describe the recommended types and maximum lengths of cable in each case.
4.3.1 Cable type
Wire type:
24AWG
Wire size:
7x32 AWG.
Cable outer diameter:
6-12mm (to match the connector gland).
For RS422/485 operation the cable should have twisted pairs with drain wire, screened with
aluminised tape, with an overall PVC sheath. Typical wire size 7/0.2mm (24 AWG).
The following table shows an example manufacturers’ reference; other manufacturers’ equivalents
can be used.
Recommended Belden cable types
No. of
Pairs
24 AWG
Gill Ref.
24 AWG
Belden Ref.
24 awg Batt
Electronics Ref.
SDI-12
2
-
9729
-
Digital RS232 or RS485 2 wire
3
026-02660
9730
91030
Digital RS422/RS485 4 wire
4
026-03156
9728
91199
Application
4.3.2 Cable length
The maximum cable length is dependent on the chosen communication method.
The following table shows the maximum cable lengths for the supported communication protocols
at the given baud rates, using the recommended cable. If any problems of data corruption etc. are
experienced, then a slower baud rate should be used. Alternatively, a higher specification cable
can be tried.
Suggested maximum cable lengths for supported communication networks
Communication format
Baud rate
Max. cable length
RS232
19200
6.5M
RS422/RS485
19200
1000M
SDI-12
1200
90M
________________________________________________________________________________________________
MaxiMet
Page 18
Issue 1
Doc. No. 1957-PS-000x
March 2015
Gill Instruments Ltd
_____________________________________________________________________________________________________________
4.4.
Connections
Any cable wires not used should be isolated and grounded at the terminating equipment/user end.
Digital OV should be used in conjunction with RS422 TX/RX lines in order to improve noise
immunity.
View of the MaxiMet connector
9 way connector and cable connections
4.5.
9 Way Connector
Number
Signal Designation
1
2
3
4
5
6
7
8
Signal Ground
Supply +ve
Supply –ve
RS422/485 TXD+
RS232 TXD, RS422/RS485 TXDRS422/RS485 RXD+
RS232 RXD, RS422/RS485 RXDComms Select – Only.
Applicable if MaxiMet COMMS Interface Setting set for EXT
using MetSet. If MaxiMet is set for EXT Comms then:For RS232 connect Pin 8 to Pin 2 +ve.
For RS422 leave Pin 8 open circuit or connect to Pin 3 –ve.
9
SDI-12 Data
Power supplies
MaxiMet units
Supply Voltage:
9v to 30v DC.
Normal Mode Current:- 25mA Average @12v dc GMX200.
80mA Average, @ 12v dc GMX600.
The MaxiMet has reverse polarity protection.
________________________________________________________________________________________________
MaxiMet
Page 19
Issue 1
Doc. No. 1957-PS-000x
March 2015
Gill Instruments Ltd
_____________________________________________________________________________________________________________
4.6.
Connecting to a PC using RS232 (Default setting)
1.
2.
3.
4.
MaxiMet default factory comms setting is RS232.
The recommended cable length for reliable operation is limited to 6.5m (20ft).
For longer cable runs, we recommend use of RS422 output.
As an alternative method of using MaxiMet with RS232 comms change the COMMS setting
from RS232 to EXT and connect Pin 8 to the +ve supply connection (dotted line connection).
5. If EXT is selected and Pin 8 is left open circuit then note that RS422 comms will be set.
MaxiMet
PC, Typical 9 Way ‘D’
Connector
9 Way Connector
4.7.
Signal names
Pin
nos.
TXD-
Cable – 3
twisted pairs
Signal
names
Pin no's
5
RXD
2
RXD-
7
TXD
3
Signal Ground
1
Signal
Ground
5
Not connected this
end
N/A
Comms
8
V supply +
2
+
V supply -
3
-
Screen and
drain wires
Chassis
ground
N/A
DC Power supply
Connecting to a PC using RS422 (Not a Default Setting)
1. MaxiMet default factory comms setting is RS232.
2. To use the MaxiMet with RS422 comms use MetSet to change the COMMS Interface
setting to RS422.
3. Alternatively use MetSet to change the COMMS Interface setting to EXT and leave
connector Pin 8 open circuit.
4. If EXT is selected and Pin 8 connected to Pin 2 supply positive then COMMS will change
to RS232.
MaxiMet
PC with RS422
converter
9 Way Connector
Signal names
Pin
nos.
TXD+
4
RXD +
TXD –
5
RXD –
RXD+
6
TXD +
RXD –
7
TXD –
Signal Ground
1
Signal Ground
Not connected
this end
N/A
Comms
8
V supply +
2
+
V supply -
3
–
Cable – 4 twisted pairs
Signal names
Chassis ground
Screen and drain wires
DC Power
supply
________________________________________________________________________________________________
MaxiMet
Page 20
Issue 1
Doc. No. 1957-PS-000x
March 2015
Gill Instruments Ltd
_____________________________________________________________________________________________________________
4.8.
Using RS485 (2 wire point to point only), not a default setting.
1. MaxiMet default factory comms setting is RS232.
2. To use the MaxiMet with RS485 2 wire point to point communication use MetSet to change
the COMMS Interface setting to RS485P 2W.
3. Use MetSet to change the Message setting from CONT (Continuous) to POLL, the node
address letter may be changed if required.
4. Leave connector Pin 8 open circuit.
MaxiMet
9 Way Circular Connector
4.9.
PC with RS485 card
Signal names
Pin
Nos.
TXD+
RXD+
4
6
TXD –
RXD –
5
7
T/RXD –
Signal Ground
1
Signal Ground
Do NOT connect
at this end
N/A
COMMS
8
V supply +
2
+
V supply -
3
–
Cable – 3 twisted
pairs
Signal names
T/RXD +
Chassis ground
Screen and drain wires
DC Power
supply
Using SDI-12 (2 wire network) not a default setting.
1. MaxiMet default factory comms setting is RS232.
2. Use MetSet to change the COMMS Interface setting to SDI 12.
MaxiMet
9 Way circular Connector
Signal Names
Pin Nos.
SDI-12
Signal Ground
SDI-12 Device
Signal Names
2 Pair Cable
9
1
Chassis Ground
Terminal
Post
Supply +ve
Supply -ve
2
3
SDI-12
Signal Ground
Screen wires
Chassis ground
+
-
DC Power
Supply
________________________________________________________________________________________________
MaxiMet
Page 21
Issue 1
Doc. No. 1957-PS-000x
March 2015
Gill Instruments Ltd
_____________________________________________________________________________________________________________
4.10. Set up requirements
Host System:
Note: The default delivery output communication setting of MaxiMet output is RS232 with the
COMMS Interface setting set for RS232.
Use PC running Windows software including Windows 8 and with an internal or external interface
compatible with the output from the MaxiMet.
Use an RS232 to USB converter e.g. Gill part 1957-10-065, 1.8M configuration cable fitted with 9
way MaxiMet connector and with integral 5v USB connector power for MaxiMet.
Or
Use an RS232 to USB adaptor or equivalent for example EasySynch part ES-U-1001-A (if not
using Gill part 1957-10-065) or connect directly to an RS232 COM port.
Use a Power Supply, 5V to 30Vdc at 200mA if not using the Gill Instruments Configuration cable.
Use 3 pair cable e.g. Belden 9503 (if not using Gill Part 1723-10-051), length as required if not
using the Gill Instruments Configuration cable.
Software:
Gill MetSet Software used as a configuration Tool (supplied on MaxiMet CD), will run on PC’s with
up to and including Windows 8 and can be downloaded free from:http://www.gillinstruments.com/main/software.html
Bench system test
Prior to physically mounting the MaxiMet in its final location, we strongly recommend that a bench
system test be carried out to confirm the system is configured correctly, is fully functional and
electrically compatible with the selected host system and cabling (preferably utilising the final cable
length). The required data format, units, output rate, and other options should also all be
configured at this stage.
Connect the MaxiMet to a PC wired as per RS232 connections in Para 4.6.
A Gill configuration cable part 1957-10-065 with a 9 way connector fitted on one end and USB
converter at the other end is available if required to simplify set up between MaxiMet and a PC.
Open Gill MetSet software provided to read, check settings or change settings as per para 6.2.
Use MetSet to View the data string and confirm that the Status field reads 0000.
4.11. Packaging
Whilst the MaxiMet is being moved to its installation site, the unit should be kept in its packaging.
Retain the packaging for use if the unit has to be moved or returned to Gill Instruments.
________________________________________________________________________________________________
MaxiMet
Page 22
Issue 1
Doc. No. 1957-PS-000x
March 2015
Gill Instruments Ltd
_____________________________________________________________________________________________________________
5. INSTALLATION
5.1.
General Installation Guidelines
Interference
As with any sophisticated electronics, good engineering practice should be followed to ensure
correct operation.
Always check the installation to ensure the MaxiMet is not affected by other equipment operating
locally, which may not conform to current standards, e.g. radio/radar transmitters, boat engines,
generators etc.
Do NOT mount the MaxiMet in close proximity of high-powered radar or radio transmitters. A site
survey may be required if there is any doubt about the strength of external electrical noise.
Guidelines –
Avoid mounting in the plane of any radar scanner – a vertical separation of at least 2m should be
achieved.
Radio transmitting antennas, the following minimum separations (all round) are suggested
VHF IMM – 1m
MF/HF – 5m
Satcom – 5m (avoid likely lines of sight)
Ensure the product is correctly earthed in accordance with this manual
Use cables recommended by Gill, keeping the length below the maximum allowed. Where the
cables are cut and re-connected (junction boxes, plugs and sockets) the cable screen integrity
must be maintained, to prevent the EMC performance being compromised.
Earth loops should not be created – earth the system in accordance with the installation
guidelines.
Ensure the power supply operates to the MaxiMet specification at all times.
Wind
Avoid turbulence caused by surrounding structures that will affect the accuracy of the MaxiMet
such as trees, masts and buildings.
The World Meteorological Organisation makes the following recommendation:
The standard exposure of wind instruments over level open terrain is 10m above the ground.
Open terrain is defined as an area where the distance between the sensor and any
obstruction is at least 10 times the height of the obstruction.
If mounting on a building then theoretically the sensor should be mounted at a height of 1.5
times the height of the building.
If the sensor is to be mounted on a mast boom, part way up a tower or mast, then the boom
should be at least twice as long as the minimum diameter or diagonal of the tower. The boom
should be positioned on the prevailing wind side of the tower.
It is important to ensure that the MaxiMet is mounted in a position clear of any structure, which
may obstruct the airflow or induce turbulence.
Mount MaxiMet so as to have a clear view of prevailing winds.
________________________________________________________________________________________________
MaxiMet
Page 23
Issue 1
Doc. No. 1957-PS-000x
March 2015
Gill Instruments Ltd
_____________________________________________________________________________________________________________
Compass
Mounting Orientation
MaxiMet should be mounted horizontally and as level as possible.
It is not possible to calibrate for changing magnetic anomalies. Thus, for greatest accuracy, keep
the MaxiMet away from sources of local magnetic distortion that will change with time; such as
electrical equipment that will be turned on and off, or ferrous bodies that will move. Make sure that
MaxiMet is not mounted close to areas that may be see large sources of local magnetic fields.
Electric motors usually generate magnetic fields that are much stronger than the earth’s field. It is
recommended that MaxiMet be moved as far away from the motors as possible.
As a guide ensure that MaxiMet is mounted at least 1 metre away from Ferrous objects to prevent
them influencing the compass reading.
Lanyard Safety Line Attachment (Gill Part 026-05335).
A 50cm stainless steel Lanyard wire (Nylon Coated) is supplied connected to MaxiMet through a
slot in the lower moulding should this feature be required to prevent it falling from height when
installed.
The Lanyard should be removed if it is not to be used.
If it is required to fit a replacement lanyard:Push the larger loop through the Lanyard slot and then feed through the larger loop, pull to secure.
The smaller loop end of the lanyard should be secured to the installation pole/mount etc.
The picture shows where the lanyard safety wire/line attaches to recessed post in MaxiMet.
________________________________________________________________________________________________
MaxiMet
Page 24
Issue 1
Doc. No. 1957-PS-000x
March 2015
Gill Instruments Ltd
_____________________________________________________________________________________________________________
Mounting Tube/Pole
A tube 1.75 inches (44.45mm) Outside Diameter x 3mm wall thickness is recommended (see
figure on the next page). Note it is important that the correct diameter tube is used to prevent
damage to the MaxiMet lower moulding when tightening the screws.
The support tube requires three 3 equally spaced holes, tapped M5, 7.5mm from the top of the
tube. Pass the cable (fitted with the 9 way Clipper plug) through the tube.
Note: the customer must fit appropriate strain relief to the cable.
Connect the plug by twisting it whilst pushing it gently into the socket on the MaxiMet. When it
locates, twist the outer sleeve clockwise to connect and lock the plug.
Fix the MaxiMet to the tube using the 3 stainless steel screws provided. (Maximum mounting
screw torque 4 Nm.)
For hostile environments, you should select a material suitable for the intended environment. For
example, stainless steel 316 for marine use.
For non-hostile environments an Aluminium tube can be used.
NOTE: An optional 0.5 Metre Aluminium mounting tube is available from Gill Instruments (Part
1405-30-056). This tube is predrilled and tapped with 3 holes to match with those on the base of
the MaxiMet unit (3 mating screws and washers supplied with the MaxiMet mounting kit).
Alignment
The MaxiMet anemometer should be set to point North (or to another known reference direction),
using the North Pointers, which are identified on the instrument figure on the next page.
If the MaxiMet Compass output is enabled by using MetSet then a direct magnetic north compass
reading can be used to set MaxiMet north markers to north.
Otherwise MaxiMet need not be aligned precisely if the compass Corrected Direction (CDIR)
readings are to be used.
________________________________________________________________________________________________
MaxiMet
Page 25
Issue 1
Doc. No. 1957-PS-000x
March 2015
Gill Instruments Ltd
_____________________________________________________________________________________________________________
Dimensions (in mm)
GMX200
North Alignment
Pointers
North Alignment Notch
Use a hole in the support tube to
secure the cable with a Tyrap
Support tube 1.75 inch
(44.45mm) outer diameter,
3mm wall thickness.
With 3 equidistant M5 tapped
holes.
GMX600
North Alignment
Pointers
North Alignment Notch
Use a hole in the support tube to
secure the cable with a Tyrap
Support tube 1.75 inch
(44.45mm) outer diameter,
3mm wall thickness.
With 3 equidistant M5 tapped
holes.
________________________________________________________________________________________________
MaxiMet
Page 26
Issue 1
Doc. No. 1957-PS-000x
March 2015
Gill Instruments Ltd
_____________________________________________________________________________________________________________
6. CONFIGURING WITH METSET
MaxiMet can be configured using Gill Instruments MetSet Software which is loaded on the CD
supplied with MaxiMet.
MetSet software can run on PC’s running up to and including Windows 8 and can also be
downloaded from the Gill Website:http://www.gillinstruments.com/main/software.html.
6.1.
MaxiMet Default Configurations
GMX200 Factory Default Data String:
<STX>Q,127,000.03,089, 2000-01-01T00:40:50.2,+10.5,0000,<ETX>40 & (CR,LF)
STX
Node letter
Wind direction
Wind speed
Corrected Wind Direction
Date and Time
Supply voltage
Status code
ETX
Checksum
Carriage Return/Line Feed
NOTES:
<STX> is the Start of String character (ASCII value 2).
<ETX> is the End of String character (ASCII value 3).
Checksum, the 2 digit Hex Checksum sum figure is calculated from the Exclusive OR of the
bytes between (and not including) the STX and ETX characters.
Q,127,000.03,000,2000-01-01T00:40:50.2,+10.5,0000, 21
NOTE. Switch on Time.
Upon switching on the MaxiMet, allow 9.5 seconds to elapse before data is output.
________________________________________________________________________________________________
MaxiMet
Page 27
Issue 1
Doc. No. 1957-PS-000x
March 2015
Gill Instruments Ltd
_____________________________________________________________________________________________________________
GMX200 ASCII factory default configuration settings
Default configuration settings
Setting
Function
Comms Levels
Baud Rate
Data Connection
RS232
19200
Data Bits 8, Parity None, Stop Bits 1, Flow Control
None.
Q
1Hz
Continuous
Carriage return and line feed, Echo on
0
On
MS (Metres/Second)
Node, Polar (Relative Wind Direction and relative Wind
Speed), Corrected Wind Direction, Date and Time,
Supply Voltage, Status, Checksum.
On
On
Node ID
Output rate
Message Mode
ASCII Set Up
North Alignment
Sensor WindSpeed
Wind Speed Units
Report Format
Status Message Output
Report Message
Output
Units Message Output
Inputs Message Output
Output Sentence
On
On
Comma Separated Variable
________________________________________________________________________________________________
MaxiMet
Page 28
Issue 1
Doc. No. 1957-PS-000x
March 2015
Gill Instruments Ltd
_____________________________________________________________________________________________________________
GMX600 Factory Default Data String
<STX> Q,097,000.01,089,1009.59,051.9,+023.8,+013.3,00000.2,000.2,2000-01-01T00:05:25.0,+10.5,0000,<ETX>2F & (CR,LF)
STX
Node letter
Wind direction
Wind speed
Corrected Wind Direction
Pressure
Humidity
Temperature
Dewpoint
Total Precipitation
Precipitation Intensity
Date and Time
Supply voltage
Status code
ETX
Checksum
Carriage Return/Line Feed
NOTES:
<STX> is the Start of String character (ASCII value 2).
<ETX> is the End of String character (ASCII value 3).
Checksum, the 2 digit Hex Checksum sum figure is calculated from the Exclusive OR of the bytes
between (and not including) the STX and ETX characters.
Q,097,000.01,000,1009.59,051.9,+023.8,+013.3,00000.2,000.2,2000-01-01T00:05:25.0,+10.5,0000, 2F
NOTE. Switch on Time.
Upon switching on the MaxiMet, allow 9.5 seconds to elapse before data is output.
________________________________________________________________________________________________
MaxiMet
Page 29
Issue 1
Doc. No. 1957-PS-000x
March 2015
Gill Instruments Ltd
_____________________________________________________________________________________________________________
GMX600 factory default configuration settings
Default configuration settings
Setting
Function
Comms Levels
Baud Rate
Data Connection
RS232
19200
Data Bits 8, Parity None, Stop Bits 1, Flow Control
None.
Q
1Hz
Continuous
Carriage return and line feed, Echo on
0
On
MS (Metres/Second)
On
Hecto Pascals
On
%
On
C (Degrees Celsius)
On
C (Degrees Celsius)
On
mm
Node, Polar (Relative Wind Direction and Relative Wind
Speed), Corrected Wind Direction, Pressure, Humidity,
Temperature, Dewpoint, Total Precipitation, Precipitation
Intensity, Date and Time, Volts, Status, Checksum.
On
On
Node ID
Output rate
Message Mode
ASCII Set Up
North Alignment
Sensor WindSpeed
Wind Speed Units
Pressure Sensor
Pressure Units
Humidity Sensor
Humidity Units
Temperature Sensor
Temperature Units
Dewpoint Sensor
Dewpoint Units
Precipitation Sensor
Precipitation Units
Report Format
Status Message Output
Report Message
Output
Output Sentence
Comma Separated Variable
________________________________________________________________________________________________
MaxiMet
Page 30
Issue 1
Doc. No. 1957-PS-000x
March 2015
Gill Instruments Ltd
_____________________________________________________________________________________________________________
6.2.
Configuring MaxiMet with MetSet
Before you use MetSet check that MaxiMet is correctly connected to a Serial COM port or USB
COM port on your PC.
NOTE: MetSet is compatible with RS232 and RS422 connected units only.
Opening MetSet
Click on the MetSet button on your PC’s desktop or choose:
Start > All Programs > MetSet > MetSet
The MetSet Control Centre window is displayed. If you have more than one MaxiMet connected to
your PC, MetSet, by default, selects the first device detected.
For most applications it is recommended to click on the MetSet Connect and Read button.
Connect the MaxiMet
output to MetSet and
read its configuration
settings
Connect the MaxiMet
output to MetSet without
reading its configuration
settings
Not Used
Disconnect MaxiMet and
create MaxiMet device
settings using MetSet
Offline
Figure 1
MetSet supported products list
Opening MetSet Screen
MetSet interrogates the MaxiMet and returns a summary of the device settings.
Depending on the MaxiMet Sensor connected only settings and parameters appropriate to the
connected MaxiMet unit will be shown.
Note that MetSet also saves a copy of this screen to the connected PC as a Session Report File
that can be accessed from the following destination.
C:\Program Files(X86)\Gill Instruments\MetSet\SessionReports.
________________________________________________________________________________________________
MaxiMet
Page 31
Issue 1
Doc. No. 1957-PS-000x
March 2015
Gill Instruments Ltd
_____________________________________________________________________________________________________________
Example Summary of MaxiMet Device Settings (GMX600 shown):SETTINGS ARE AS FOLLOWS:
PROTOCOL : GILL
COMMS : RS232
(BAUD) : 19200
NODE : Q
OUTFREQ : 1HZ
MSGMODE : CONT
ASCTERM : CRLF
ECHO : ON
ALIGN : 0
SENSOR WIND : ON
UNITS WIND : MS
NODIR : 0.00
AVGSHORT : 60
AVGLONG : 10
SENSOR COMPASS : ON
SENSOR TEMP : ON
UNITS TEMP : C
SENSOR DEWPOINT : ON
UNITS DEWPOINT : C
SENSOR PRESS : ON
UNITS PRESS : HPA
HASL : +00000.00
HASTN : +00000.00
SENSOR RH : ON
UNITS RH : %
SENSOR PRECIP : ON
UNITS PRECIP : MM
ARPRECIP : ON
REPORT : NODE DIR SPEED CDIR PRESS RH TEMP DEWPOINT PRECIPT PRECIPI TIME VOLT STATUS
POWER : 0
TIME :2015-03-23T13:36:09
PUPMSG STATUS : ON
PUPMSG REPORT : ON
PUPMSG UNITS : ON
MODBUS : RTU
MODADDR : 1
DATABITS : 8
STOPBITS : 1
PARITY : NONE
MODTERM : 10
MODICT : 1000
Note changes to BAUD and COMMS settings will take place after next power-up.
Click on the Close button to continue to the MetSet set up screen.
________________________________________________________________________________________________
MaxiMet
Page 32
Issue 1
Doc. No. 1957-PS-000x
March 2015
Gill Instruments Ltd
_____________________________________________________________________________________________________________
MetSet Editing Screen
When connected correctly a MetSet editing screen is available to read configuration settings,
change configuration settings, save MaxiMet configuration settings to a PC file location, upload
MaxiMet configuration settings from a PC file and view the MaxiMet raw data string output.
MetSet Editing Screen
MaxiMet
Device Setting
Options
Move mouse over exclamation
or question marks to read
setting comment
View MaxiMet
Raw Data
Output String
Return to
opening MetSet
Screen
Source of MetSet
Data
Serial Number
Connection
Status
MetSet Connection Status Information.
Reading
Function
ONLINE
ONLINE in green indicates the MaxiMet has been
successfully connected to MetSet.
OFFLINE in Grey indicates that MetSet is being used
without a MaxiMet in communication with MetSet.
19200 COM10
19200 is a report on the MaxiMet Baud rate setting.
COM 10 is a report on the MaxiMet COM Port
connection number.
S/W ver 26690.00.20
2669 is the MaxiMet Firmware number.
0.00.20 is the firmware revision.
PV=1 is the Protocol Version (Gill Internal Reference).
Source:Device
MetSet reads ‘Device’ when the source of the data
that MetSet has retrieved has come from the MaxiMet
and the MaxiMet Model.
MetSet reads ‘File’ when the source of data has come
from a saved file.
MetSet reports on the connected MaxiMet device
(MAXIMET) and reads the unit Serial Number (S/N:
XXXXXXXX)
________________________________________________________________________________________________
MaxiMet
Page 33
Issue 1
Doc. No. 1957-PS-000x
March 2015
Gill Instruments Ltd
_____________________________________________________________________________________________________________
MetSet Online Settings.
Online Mode
Buttons
Get Device
Settings
Save Settings to
Device
Function
MetSet retrieves the MaxiMet Configuration settings.
MetSet configuration settings are saved to a
connected MaxiMet.
Load Configuration
File
When selected MetSet retrieves a MetSet edit PC file
and updates MetSet with these settings.
Save Configuration
File
When selected MetSet edit settings are saved to a PC
file location.
Back Up Device
Settings
When selected the MaxiMet configuration settings are
transferred to MetSet and then to a file location
selected on a PC.
Restore Device
Settings
When selected MetSet retrieves a MaxiMet
configuration setting from a PC file, loads it into the
MaxiMet and updates the MetSet edit settings.
Measurement
Mode
View Output
Click on View Output to view the raw ASCII MaxiMet
data string scrolling at the output rate. (View only
feature). E.g.
Main Menu
Click here to go back to the opening MetSet screen
Q,127,000.03,000,2000-01-01T00:40:50.2,+10.5,0000, 21
________________________________________________________________________________________________
MaxiMet
Page 34
Issue 1
Doc. No. 1957-PS-000x
March 2015
Gill Instruments Ltd
_____________________________________________________________________________________________________________
MetSet Editing Pages.
Feature and parameter available to view and select will depend on the MaxiMet model
connected. The following example pages refer to the GMX600 device. See page 5 for a
summary of available sensor outputs and parameters.
NOTE: Items shown in Bold are the default settings.
The Comms Page can be used to Select:-
Protocol:-
GILL, MODBUS or SDI-12 (for SDI-12 also set MetSet
Comms/Interface to SDI-12).
Interface:-
RS232, RS422, RS485P2W (point to point) ,SDI-12 and
EXT.
EXT setting means RS422 or RS232 selected by a wire link
on connector pin 8 (see Page 19 table).
Baud Rate:-
4800, 9600, 19200, 38400 or 57600
(1200 auto selected with SDI-12 setting).
Node ID:-
A to P, Q to Z.
Output Rate:-
0.25Hz to 1Hz.
Message Mode:-
CONT (Continuous output) or POLL (Polled Mode).
NOTE: When COMMS or Baud Rate settings are changed and Saved to Device a warning is
issued by MetSet. These setting changes will not become active until the MaxiMet power is
turned off and turned on again. The connecting device will then also need its Comms and
Baud rate settings changed to match the MaxiMet.
The ASCII Set up Page can be used to select:-
Termination:-
CRLF or CR
Echo:-
ON or OFF.
________________________________________________________________________________________________
MaxiMet
Page 35
Issue 1
Doc. No. 1957-PS-000x
March 2015
Gill Instruments Ltd
_____________________________________________________________________________________________________________
The Wind Page can be used to select:-
North Alignment from
0-359 degrees.
Sensor WindSpeed
ON or OFF.
Wind Speed Units
MS, KTS, MPH, KPH, FPM.
(Metres/Second, Knots (Nautical miles/hour), Miles/Hour, Kilometres/Hour, Feet/Minute).
No-Direction Wind Speed
0.00m/s to 5.00m/s speed above which direction readings
are output.
Short Term Average
60 (10 -60).
Configures WMO Short Term Average as the defined multiple of the Output rate .i.e. AVGSHORT
10 is a rolling average of the last ten outputs.
Long Term Average
10 (1-10).
Configures WMO Long Term Average as the defined multiple of the short Term Average.
.i.e. if AVGSHORT is 10 then short term average is a rolling average of the last ten outputs.
Then if AVGLONG is set to 10, long term average is a rolling average of the last 100 outputs.
Compass Sensor
ON or OFF
With Compass Sensor ON Wind Direction readings corrected to magnetic north are output in the
data string (CDIR). If set to OFF then the field with Compass corrected direction reading is left
blank.
WMO Average Wind Reading Notes:
The default output rate from MaxiMet is one new reading every second.
There in this case the WMO averaged Wind reading result will be based on:Long Term Average (1-10) x Short Term Average (10-60).
For instance if a 2 minute averaged data output was required set:RWA Long to 2
RWA Short to 60
For these settings then every minute you would get an averaged output reading based on the
previous 2 minutes of wind data.
________________________________________________________________________________________________
MaxiMet
Page 36
Issue 1
Doc. No. 1957-PS-000x
March 2015
Gill Instruments Ltd
_____________________________________________________________________________________________________________
For instance if a 10 minute averaged data output was required set:RWA Long to 10
RWA Short to 60
For these settings then every minute you would get an averaged output reading based on the
previous 10 minutes of wind data.
To enable WMO averaged Wind readings in the MaxiMet data string select the Reporting
Tab/USERDEF and add new reporting field from the drop down menu called:AVGSPEED
Outputs Average Speed readings.
AVGDIR
Outputs Average Direction Readings.
AVGCDIR
Outputs Average Corrected Direction Readings.
The maximum Gust Speed is the magnitude of the maximum gust measured over the short term
output period. Gust is generated from a rolling 3s average of the short term output period, and
reset at the end of short term output period.
GSPEED
Outputs Average Wind Gust Speed.
The Maximum Gust Direction is the direction of the maximum gust measured over the short term
output period. Gust is generated from a rolling 3s average of the short term output period, and
reset at the end of short term output period.
GDIR
Outputs Average Wind Gust Direction.
Whenever the unit is powered up then until the unit has reached its minimum long term averaging
interval the Wind Status code will read 0100 (Measurement Average Building).
If MaxiMet is in Polled mode then when polled (default 1Hz output) MaxiMet will output the last
valid 10 minute wind speed and direction average, updated every minute along with last valid 1
minute Gust magnitude.
In polled mode, the last set of computed WMO measurements shall be output on receipt of a poll
request.
In polled mode whilst a new WMO average is building, the last computed WMO average shall be
output.
The Temperature Page can be used to select:-
Temperature Sensor
ON or OFF
Temperature Units
C, K or F
Dew Point Sensor
ON or OFF
Dew Point Units
C, K or F
(Centigrade, Kelvin, Fahrenheit)
________________________________________________________________________________________________
MaxiMet
Page 37
Issue 1
Doc. No. 1957-PS-000x
March 2015
Gill Instruments Ltd
_____________________________________________________________________________________________________________
The Pressure Page can be used to select:-
Pressure Sensor
ON or OFF
Pressure Units
HPA, MB, MMHG, INHG
Height Above Sea Level
+00000.00 (0 to 10000 Metres)
Is the elevation (on the ground) of the unit, relative to the average sea level point.
Atmospheric pressure varies with height above sea level as well as with atmospheric conditions.
As the altitude at which the pressure sensor operates is usually constant (the station height), a
correction is made to make the reading of the pressure sensor seem as if it were made at sea
level. This means that the pressure reading has to be slightly increased from the value read by the
MaxiMet sensor situated above sea level (often known as the station pressure).
Height Above Station
+00000.00 (-100 to +100 Metres)
(Hecto Pascals, Milli-Bars, Millimetres Mercury, Inches Mercury).
The Humidity Page can be used to select:-
Humidity Sensor
ON or OFF
Humidity Units
%
The Precipitation (Rain) Page can be used to select:-
Rain Sensor
ON or OFF
Precipitation Units
MM or IN
Auto-reset Total Precipitation
ON or OFF
ON resets the total precipitation reading to zero when the clock time reads 23:55:59 to 00
(midnight)
OFF results in continuous total precipitation measurement.
________________________________________________________________________________________________
MaxiMet
Page 38
Issue 1
Doc. No. 1957-PS-000x
March 2015
Gill Instruments Ltd
_____________________________________________________________________________________________________________
The Reporting Page can be used to select:-
Report Format USERDEF, FULL or NMEA
Select Parameters to Report
Report FULL will set the MaxiMet to report default parameters (example show GMX600 report):NODE,DIR,SPEED,CDIR,PRESS,RH,TEMP,DEWPOINT,PRECIPT,PRECIPI,TIME,VOLT,STATUS.
Report parameters can be selected in any order or on or off in USERDEF setting.
NODE
Output Node letter.
DIR
Outputs wind direction readings.
SPEED
Outputs wind speed readings.
CDIR
Outputs Compass corrected wind direction readings.
PRESS
Outputs the Barometric Pressure reading.
RH
Outputs Relative Humidity reading.
TEMP
Outputs the Temperature reading.
DEWPOINT
Outputs the Dewpoint reading.
PRECIPT
Outputs Precipitation (Rain) Total reading, this is an accumulated rain reading
updated at the output rate.
Is set to zero on MaxiMet power up.
Is set to zero when the clock reads 23:59:59 to 00 (midnight) if Automatic
Reset of Total Precipitation is set to ON (default setting).
PRECIPI
Outputs Precipitation (Rain) Intensity. It is the sum of the last sixty lots of 1
minute accumulated Rain data. A new sum measurement is generated every
minute.
TIME
Outputs Date and Time.
VOLT
Outputs the MaxiMet Supply Voltage.
STATUS.
Outputs the MaxiMet Sensors Status Code (see page 64).
________________________________________________________________________________________________
MaxiMet
Page 39
Issue 1
Doc. No. 1957-PS-000x
March 2015
Gill Instruments Ltd
_____________________________________________________________________________________________________________
There are drop down menu selectable parameters available depending on the MaxiMet model
(see pages 5 and 8 to10).
These are:WINDSTAT
Outputs Status codes relating to Wind Sensor Data (see Page 65).
PRECIPS
Outputs Precipitation (Rain) Status as No (N) or Yes (Y).
Changes N to Y when total precipitation is incremented.
Changes Y to N when total precipitation has not incremented in the last 60
seconds.
CSPEED
Outputs Corrected Speed if a GPS unit is fitted.
PASL
Outputs Barometric Pressure at Sea Level if HASL figure set (see page 38).
p0 = p1.exp( (g.h) / (R.T) )
where
p0 = air pressure at sea level (Pa)
p1 = air pressure at sensor (Pa)
h = sensor altitude above sea level (m)
R = specific gas constant
T = air temperature as measured
g = acceleration due to gravity
PSTN
Outputs Barometric Pressure at Station if HAS figure set (see page 38).
Pressure at station shall be computed as:
where:
Pb = static pressure (pascals)
Tb = standard temperature (K)
Lb = standard temperature lapse rate (K/m) in ISA
h = height above sea level (meters)
hb = height at bottom of layer b (meters; e.g., h1 = 11,000 meters)
R = universal gas constant for air: 8.31432 N·m /(mol·K)
g0 = gravitational acceleration (9.80665 m/s2)
M = molar mass of Earth's air (0.0289644 kg/mol)
AH
Outputs Absolute Humidity.
Absolute humidity shall be computed as
H = C · Pw/T
where
H = absolute humidity
C = Constant 2.16679 gK/J
Pw = Vapour pressure in Pa
T = Temperature in K
________________________________________________________________________________________________
MaxiMet
Page 40
Issue 1
Doc. No. 1957-PS-000x
March 2015
Gill Instruments Ltd
_____________________________________________________________________________________________________________
AVGSPEED
Outputs WMO average speed reading based on AVG short and AVG long
settings.
AVGDIR
Outputs WMO average direction reading based on AVG short and AVG long
settings.
GSPEED
Outputs WMO Gust Speed.
GDIR
Outputs WMO Gust Direction.
AVGCDIR
Outputs WMO average corrected compass direction reading based on AVG
short and AVG long settings.
COMPASSH
Compass Heading reading.
The System Page can be used to select:-
Power Mode
0 or 1, 0 is the default normal operation mode.
(1 is a future operating condition).
Date Time
Set/Read system Date/time. (YYYY-MM-DDTHH:MM:SS).
The PowerUp Page can be used to select:-
Status Message Output
ON or OFF.
E.g.
MAXIMET - GMX 600 1B 2669 V0.00.17
STARTUP: OK
RCON: 0120
WDT enabled
Voltage reg. active during Sleep
CRC: 6BB8
Report Message Output
ON or OFF.
E.g.
NODE,DIR,SPEED,CDIR,PRESS,RH,TEMP,DEWPOINT,PRECIPT,PRECIPI,TIME,VOLT,STATUS,CHECK
Units Message Output
ON or OFF
E.g. -
DEG,MS,DEG,HPA,%,C,C,MM,MM/H,-,V,-,<END OF STARTUP MESSAGE>
________________________________________________________________________________________________
MaxiMet
Page 41
Issue 1
Doc. No. 1957-PS-000x
March 2015
Gill Instruments Ltd
_____________________________________________________________________________________________________________
The MODBUS Page can be used to select:-
Mode
RTU or ASCII.
Address
1 to 247.
Data Bits
8 for Modbus RTU, 7 for Modbus ASCII.
Stop Bits
2 for No Parity, 1 for Even/Odd Parity.
Parity
NONE, ODD, or EVEN.
Termination Char ASCII code
10, (0-255).
Inter Char Timeout (mS)
1000 (500 to 10000).
6.3.
Polled Mode
The measurement rate shall always be 1Hz (i.e.: regardless of the selected output rate).
The configured measurement string shall be output in response to a measurement request
("?<network node address>") from the user.
When the user issues a poll measurement request, the last computed set of 1 Hz measurement
shall be output.
________________________________________________________________________________________________
MaxiMet
Page 42
Issue 1
Doc. No. 1957-PS-000x
March 2015
Gill Instruments Ltd
_____________________________________________________________________________________________________________
6.4.
Configuring MaxiMet Compass
The MaxiMet compass is calibrated at Gill Instruments before the unit is delivered.
Prior to installing MaxiMet it is suggested that for best accuracy a declination figure
should be entered.
Compass Declination
Declination is the magnetic declination (the angle between Magnetic North and True North) in
degrees.
This is a correction factor that is added to the magnetic north heading from the compass.
Map and declination figures in decimal figures can be obtained from:http://www.geosats.com/magdecli.html
http://www.magnetic-declination.com/
http://www.ngdc.noaa.gov/geomag/declination.shtml
To find the MaxiMet current declination figure (default is 0.0) then using a terminal program.
Open a Terminal Program at MaxiMet baud rate e.g. 19200 bauds.
Type * to place the unit in SETUP MODE
Type COMPASSDECL and press the Enter key.
MaxiMet will report the current declination figure (range +- 180.0 degrees)
COMPASSDECL = 0.0
To enter a Compass declination figure of -1.0
Type COMPASSDECL -1.0 and press the Enter key.
MaxiMet reports back with New value saved (Advise to verify Compass Heading).
Type Q and press Enter key to return to measurement mode.
________________________________________________________________________________________________
MaxiMet
Page 43
Issue 1
Doc. No. 1957-PS-000x
March 2015
Gill Instruments Ltd
_____________________________________________________________________________________________________________
6.5.
Configuring MaxiMet for SDI-12
To configure a MaxiMet unit for SDI-12:
Connect a default set MaxiMet to a PC as described in Para 4.6.
Open MetSet as described on Para 6.2.
Click on the Edit Comms page and select:Set Protocol for SDI-12. and
Set Interface for SDI-12.
No other settings changes are required.
Click on Save Settings to Device on the Online Mode Menu.
Shut down the MaxiMet unit.
Change the hardware connections for SDI-12 (see Para 4.9).
Power up the MaxiMet unit.
SDI-12 Units of Measure
Relative Wind Speed:
Relative Wind Direction:
Corrected Wind Direction:
Temperature:
Relative Humidity:
Dewpoint:
Pressure:
Precipitation Intensity:
Total Precipitation:
Status
Metres/Second.
Degrees
Degrees
Degrees C
%
Degrees C
Hecto Pascals
Millimetres/hour
Millimetres
4 Digit Sensor Status code (e.g. 0000 for a no fault condition).
________________________________________________________________________________________________
MaxiMet
Page 44
Issue 1
Doc. No. 1957-PS-000x
March 2015
Gill Instruments Ltd
_____________________________________________________________________________________________________________
SDI-12 Commands
Note: Unavailable measurements shall be "padded", e.g.: +999.99.
?!
Returns Unit Address (default is 0).
a
Current unit address letter (factory default is 0, range is 0 to 9).
b
New address letter, range 0 to 9.
aAb!
Change unit address from a to b see above.
aM!
Address, Relative Wind Direction, Relative Wind Speed, Corrected Wind Direction,
Corrected Wind Speed (GPS option units only), Status.
aM1!
Address, Temperature, Relative Humidity, Dewpoint, Pressure and Status (GMX600).
aM2!
Address, Relative Wind Direction, Relative Wind Speed and Status.
aM3!
Address, Precipitation Intensity (Rain), Total precipitation (Rain), Status (GMX600).
aD0!
Request a line of the above data.
Command
Description
Response
Example
?!
Unit Address
a<CR><LF>
0<CR><LF>
aAb!
Change the unit address
b<CR><LF>
1<CR><LF>
a = 0, the default.
b = the new address.
aI!
Unit Identification
013GillInst
Serial Number<CR><LF>
aM!
Address, Relative Wind
Direction, Relative Wind
Speed, Corrected Wind
Direction, Corrected
Wind Speed (GPS
option unit only), Status.
atttn<CR><LF>
00055<CR><LF>
a is unit identifier.
0 is unit identifier.
ttt is time in seconds.
005 is 5 sec. measurement.
n is number of data values.
5 is the number of data readings
(Direction, Speed, Corrected
Direction and Corrected Speed).
Measurement command to retrieve a
reading of the maximum time the
MaxiMet will take to complete a
measurement, have data ready and the
number of data values.
013GillInst
00014490002<CR><LF>
Retrieve a line of the
above data.
<address><relative wind
direction><relative wind
speed><corrected wind
direction><corrected wind
speed><status>CR><LF>
0+220+000.01+218+999.99
aM1!
Address, Temperature,
Relative Humidity,
Dewpoint, Pressure and
Status
atttn<CR><LF>
00014<CR><LF>
0D0!
Retrieve a line of the
above data.
<address><temperature>
0+024.3+036+008.4
<relative humidity><dewpoint>
+1024.9+0000<CR><LF>
0D0!
+0000<CR><LF>
<pressure><status> CR><LF
aM2!
Address, Relative Wind
Direction, Relative Wind
Speed and Status.
atttn<CR><LF>
00053<CR><LF>
0D0!
Retrieve a line of the
above data.
a<dir><mag><status><CR><LF>
0+029+000.01+0000<CR><LF>
aM3!
Address, Precipitation
Intensity, Total
precipitation, Status
atttn<CR><LF>
00053<CR><LF>
0D0!
Retrieve a line of the
above data.
<address><precipitation
intensity><total precipitation><status>
CR><LF
0+0002.1+123.1+0000<CR><LF
>
________________________________________________________________________________________________
MaxiMet
Page 45
Issue 1
Doc. No. 1957-PS-000x
March 2015
Gill Instruments Ltd
_____________________________________________________________________________________________________________
SDI-12 Commands with CRC
Note: Unavailable measurements shall be "padded", e.g.: +999.99.
?!
Returns Unit Address (default is 0).
a
Current unit address letter (factory default is 0, range is 0 to 9).
b
New address letter, range 0 to 9.
aAb!
Change unit address from a to b see above.
aMC!
Address, Relative Wind Direction, Relative Wind Speed, Corrected Wind Direction,
Corrected Wind Speed (If GPS fitted), Status and CRC.
aMC1!
Address, Temperature, Relative Humidity, Dewpoint, Pressure, Status and CRC
(GMX600).
aM2C!
Address, Relative Wind Direction, Relative Wind Speed Status and CRC.
aM3C
Address, Precipitation Intensity, Total Precipitation, Status and CRC (GMX600).
aD0
Request a line of the above data.
Command
aMC!
Description
Address, Relative Wind
Direction, Relative Wind
Speed, Corrected Wind
Direction, Corrected Wind
Speed (GPS option unit
only), Status and CRC.
Response
Example
atttn<CR><LF>
00055<CR><LF>
a is unit identifier.
0 is unit identifier.
ttt is time in seconds.
005 is 5 sec. measurement.
n is number of data values.
5 is the number of data readings
(Direction, Speed, Corrected
Direction, Corrected Speed and
Status).
Measurement command to
retrieve a reading of the
maximum time the MaxiMet will
take to complete a
measurement, have data ready
and the number of data values.
0D0!
Retrieve a line of the
above data.
<address><relative wind
direction><relative wind
speed><corrected wind
direction><corrected wind
speed><status>
<CRC><CR><LF>
0+192+000.07+267+999.9+0000DQ^
<CR><LF>
aMC1!
Address, Temperature,
Relative Humidity,
Dewpoint, Pressure,
Status and CRC.
atttn<CR><LF>
00015<CRC><CR><LF>
0D0!
Retrieve a line of the
above data.
<address><temperature>
0+023.3+035+007.2+1015.1+0000AiL
<CR><LF>
<relative humidity><dewpoint>
<pressure><status><CRC><CR
><LF
aMC2!
Address, Relative Wind
Direction, Relative Wind
Speed, Status and CRC.
atttn<CR><LF>
00053<CR><LF>
0D0!
Retrieve a line of the
above data.
a<dir><mag><status><CRC><C
R><LF>
0+168+000.02+0000GbT><CR><LF>
aMC3!
Address, Precipitation
Intensity, Total
Precipitation, Status and
CRC.
atttn<CR><LF>
00053<CR><LF>
0D0!
Retrieve a line of the
above data.
<address><precipitation
intensity><total
precipitation><status><CRC>
<CR><LF
0+000.0+00000.0+0000HB@
<CR><LF>
________________________________________________________________________________________________
MaxiMet
Page 46
Issue 1
Doc. No. 1957-PS-000x
March 2015
Gill Instruments Ltd
_____________________________________________________________________________________________________________
6.6.
Configuring MaxiMet for MODBUS
MaxiMet Supported Modbus Specification
MODBUS
RTU or ASCII.
Baud Rate
9600 or 19200 Baud.
COMMS
RS232 point to point only, RS485 2 wire networkable.
Modbus Parameters ASCII or RTU.
Parameter
Character
Error Check
Frame Start
Frame End
Gaps in
Message
Start Bit
Data Bits
Parity
Stop Bits
Modbus ASCII
ASCII 0 to 9 and A to F (Hex)
Longitudinal Redundancy Check
(LRC)
Character ':' (3A Hex)
Characters CR/LF (0D/0A Hex)
Modbus RTU
Binary 0 to 255
Cyclic Redundancy Check
(CRC)
3.5 Characters Silence
3.5 Characters Silence
1 Second
1.5 Times Character Length
1
7
1
8
Even/Odd
1
None
2
Even/Odd
1
None
2
Requires:MaxiMet.
MetSet Software.
Connect a MaxiMet to a PC COM port (default communication is RS232).
Open Gill MetSet Software.
Click on Connect and Read to reach the Editing Pages as shown below.
Configuration
Click on the MODBUS Page
Mode:
Choose between RTU and ASCII, in this case RTU.
Address:
Choose a MaxiMet Address number between 1 to 247.
Data Bits:
Choose 7 for Modbus ASCII and 8 for Modbus RTU.
Stop Bits:
Choose 1 for Even/Odd Parity or 2 for No Parity (None).
Parity:
Choose Even/Odd or None.
Termination Char ASCII code:
Choose between 0-255.
Inter Char Timeout (ms):
Choose between 500ms to 10000ms.
________________________________________________________________________________________________
MaxiMet
Page 47
Issue 1
Doc. No. 1957-PS-000x
March 2015
Gill Instruments Ltd
_____________________________________________________________________________________________________________
Select the COMMS Page
Protocol:
Default is Gill.
Select MODBUS
Interface:
Default is RS232.
Select RS232 or RS4852W.
RS232 will only allow a single point to point non multi drop network connection. RS485 2 wire will
allow networking with up to 32 connected devices.
Baud Rate:
or 19200 supported).
Default is 19200.
Select required Baud rate (9600
Node ID:
Default is Q.
Not used for MODBUS.
Output Rate:
(0.25Hz to 1Hz).
Default is 1Hz.
Set update rate for MaxiMet Data
Message Mode:
Default is CONT.
Select POLL mode and MaxiMet
will only make and output a measurement (set by the output rate) on demand from the Modbus
Master. In CONTinuous mode the MaxiMet continuously makes measurements set by output rate
(0.25Hz to 1Hz) and only outputs a result when demanded from the Modbus Master.
When required settings have been selected click on Save Settings to Device
Click on Yes and OK.
Power down the MaxiMet and apply power back to the MaxiMet to complete setting changes.
Note: now that the unit is in MODBUS mode if any further changes need to be made use the
SAFE MODE connection and method to re-establish communication with MetSet.
________________________________________________________________________________________________
MaxiMet
Page 48
Issue 1
Doc. No. 1957-PS-000x
March 2015
Gill Instruments Ltd
_____________________________________________________________________________________________________________
MaxiMet MODBUS NOTES
1.
2.
3.
4.
5.
6.
7.
8.
All registers are 16bit.
The first byte is high order and the second is low.
Each measurement is comprised of two 16bit registers.
For all registers, the order of the two data bytes comprising the 16-bit register's value shall
be: High Byte/Low Byte.
For each 32-bit data type (whether floating point or integer), the order of the first pair of
bytes and last pair of bytes shall be: High Word/Low Word.
Registers start at address 40001.
Holding registers available in the order of the MaxiMet data string (which can be
established by the REPORT command in non-Modbus Gill ASCII Mode).
If measurements cannot be computed (i.e.: a blank field in Gill mode output string), their
Holding Register contents shall be set to the Maximum Positive value (0x7FFFFFFF for
32-bit format data (both floating point and integer), and as 0x7FFF for 16-bit format data).
MaxiMet MODBUS Default Data String Field Encoding (example shows GMX600):
Node
Direction:
Speed:
CDIR
Pressure:
Relative Humidity
Temperature:
Dewpoint:
Total Precipitation:
Precipitation Intensity:
Date:
Time:
Supply Voltage:
Status:
4-byte character string
32 Bit Floating point value
32 Bit Floating point value
32 Bit Floating point value
32 Bit Floating point value
32 Bit Floating point value
32 Bit Floating point value
32 Bit Floating point value
32 Bit Floating point value
32 Bit Floating point value
16 Byte Character String
16 Byte Character String
32 Bit Floating point value
32 bit Unsigned Integer (UINT)
Registers 40001-2.
Registers 40003-4.
Registers 40005-6.
Registers 40007-8.
Registers 40009-10.
Registers 400011-12.
Registers 400013-14.
Registers 400015-16.
Registers 400017-18.
Registers 400019-20.
Registers 400021-28.
Registers 400029-36.
Registers 400037-38.
Registers 400039-40.
See Simply Modbus program reading example MaxiMet MODBUS Data as follows:-
________________________________________________________________________________________________
MaxiMet
Page 49
Issue 1
Doc. No. 1957-PS-000x
March 2015
Gill Instruments Ltd
_____________________________________________________________________________________________________________
6.7.
Configuring MaxiMet for NMEA Output
Connect a default set MaxiMet to a PC as described in Para 4.6.
Open MetSet as described on Para 6.2 and click on the Reporting page.
Change the Report Format drop down menu from USERDEF to NMEA.
On the Comms Page select the required Interface, generally RS422.
On the Comms Page Select the required Baud rate, normally 4800 bauds (or sometimes 9600
baud).
Click on Save Settings to Device.
GMX200
GMX200 NMEA data strings comprise of: $WIMWV,049,R,000.03,N,A*03<CR><LF>. Where:$WIMWV
049
R
000.03
N
A
O3
Wind Instrument Mean Wind direction and Velocity.
Wind Direction.
Relative Wind measurement, wind speed and/or direction information,
reported with respect to the MaxiMet North marker.
Wind Speed.
Knots (NMEA output fixed to Knots measurement only).
Acceptable measurement (V is a void fail measurement).
Hex Check Sum.
Immediately followed by:$WIMWV,049,T,,N,A*18<CR><LF>.
$WIMWV
049
T
,,
N
A
OC
Wind Instrument Mean Wind direction and Velocity.
Wind Direction.
True Wind measurement, wind speed and/or direction information,
corrected by a compass and GPS (option) to give accurate data
regardless of where north marker is aligned.
Wind Speed only available if a GPS option is fitted.
Knots (NMEA output fixed to Knots measurement only).
Acceptable measurement (V is a void fail measurement).
Hex Check Sum.
Example GMX200 Data.
$WIMWV,069,R,004.06,N,A*00
$WIMWV,122,T,,N,A*14
________________________________________________________________________________________________
MaxiMet
Page 50
Issue 1
Doc. No. 1957-PS-000x
March 2015
Gill Instruments Ltd
_____________________________________________________________________________________________________________
GMX600
GMX600 NMEA data strings comprise of: $WIMWV,049,R,000.03,N,A*03<CR><LF>. Where:$WIMWV
049
R
000.03
N
A
O3
Wind Instrument Mean Wind direction and Velocity.
Wind Direction.
Relative Wind measurement, wind speed and/or direction information,
reported with respect to the MaxiMet North marker.
Wind Speed.
Knots (NMEA output fixed to Knots measurement only).
Acceptable measurement (V is a void fail measurement).
Hex Check Sum.
Immediately followed by:$WIMWV,049,T,,N,A*18<CR><LF>.
$WIMWV
049
T
,,
N
A
OC
Wind Instrument Mean Wind direction and Velocity.
Wind Direction.
True Wind measurement, wind speed and/or direction information,
corrected by a compass and GPS (option) to give accurate data
regardless of where north marker is aligned.
Wind Speed only available if a GPS option is fitted.
Knots (NMEA output fixed to Knots measurement only).
Acceptable measurement (V is a void fail measurement).
Hex Check Sum.
Immediately followed by:$WIXDR,C,+023.9,C,TEMP,P,1.0243,B,PRESS,H,039,P,RH,Y,000.0,M,PRECIP*01<CR><LF>.
Where: $WIXDR
C
+023.9
C
TEMP
P
1.0243
B
PRESS
H
039
P
RH
Y
000.0
M
PRECIP
*01
Wind Instrument Cross track error Dead Reckoning
Type of Sensor (Temperature)
Temperature Reading
Temperature Reading in Degrees Centigrade
Name of Temperature Sensor
Type of Sensor (Pressure)
Pressure Reading in Bars.
Pressure Units of Measure (Bars)
Name of Pressure Sensor
Type of Sensor (Humidity)
Humidity Reading in Percent
Humidity Units of Measure (Percent)
Name of Relative Humidity Sensor
Type of Sensor (Precipitation)
Millimetres per hour of Precipitation
Precipitation Units of Measure (Millimetres)
Name of Precipitation Sensor
Hex CheckSum
<CR> is a Carriage return character (ASCII hex value d)
<LF> is a Line Feed Character (ASCII hex value a)
Checksum, the 2 digit Hex Checksum sum figure is calculated from the Exclusive OR of
the bytes between (and not including) the $ and * characters.
________________________________________________________________________________________________
MaxiMet
Page 51
Issue 1
Doc. No. 1957-PS-000x
March 2015
Gill Instruments Ltd
_____________________________________________________________________________________________________________
Example GMX 600 Data.
$WIMWV,069,R,004.06,N,A*00
$WIMWV,122,T,,N,A*14
$WIXDR,C,+023.2,C,TEMP,P,1.0281,B,PRESS,H,037,P,RH,Y,000.0,M,PRECIP*0A
Followed 1 second later by
$WIMWV,238,R,000.46,N,A*06
$WIMWV,303,T,,N,A*15
$WIXDR,C,+023.2,C,TEMP,P,1.0281,B,PRESS,H,037,P,RH,Y,000.0,M,PRECIP*0A
Followed 1 second later by
$WIMWV,130,R,000.21,N,A*0C
$WIMWV,205,T,,N,A*12
$WIXDR,C,+023.2,C,TEMP,P,1.0281,B,PRESS,H,038,P,RH,Y,000.0,M,PRECIP*05
Etc.
________________________________________________________________________________________________
MaxiMet
Page 52
Issue 1
Doc. No. 1957-PS-000x
March 2015
Gill Instruments Ltd
_____________________________________________________________________________________________________________
6.8.
Safe Mode
Summary
The MaxiMet Safe Mode provides a means of recovering communication with the MaxiMet
whatever configuration setting may have been made. For instance if the unit has been set for SDI12 operation Safe Mode can be used to change the communication option back to RS232 or
RS422.
Safe Mode Method 1
Connection
Connect the MaxiMet for RS232 communication as detailed in Para 4.6.
Open Gill MetSet Software (see Para 6.2).
Click on Connect and Read. MetSet will scan COM port settings for a connected MaxiMet but as
the COMMS protocol is not matched will be unable initially to find the MaxiMet.
Now Click on the Safe Mode button.
Ensure the MaxiMet is wired for RS232 operation and power and Click on Next.
________________________________________________________________________________________________
MaxiMet
Page 53
Issue 1
Doc. No. 1957-PS-000x
March 2015
Gill Instruments Ltd
_____________________________________________________________________________________________________________
Enter the MaxiMet COM Port connection number.
Ensure power is now disconnected from the MaxiMet.
If using the Gill Instrument RS232 to USB configuration cable then unplug the 9 way connector
from the base of the MaxiMet.
Now click on Next.
________________________________________________________________________________________________
MaxiMet
Page 54
Issue 1
Doc. No. 1957-PS-000x
March 2015
Gill Instruments Ltd
_____________________________________________________________________________________________________________
Now re-connect power to the MaxiMet.
If using the Gill Instrument RS232 to USB configuration cable then plug in the 9 way connector to
the base of the MaxiMet.
MetSet now opens a Safe Mode 4800 baud connection from which all settings can now be
read and changed.
________________________________________________________________________________________________
MaxiMet
Page 55
Issue 1
Doc. No. 1957-PS-000x
March 2015
Gill Instruments Ltd
_____________________________________________________________________________________________________________
Safe Mode Method 2
Connection
Connect the MaxiMet for RS232 communication as detailed in Para 4.6.
Note at this stage the MaxiMet supply to be switched off.
Open a Terminal program e.g. Gill WIND Software (obtainable from
http://www.gillinstruments.com/main/software.html ) or equivalent terminal program e.g.
Tera-Term, Putty etc.
If using Gill Wind Software note that the Tools features are not applicable.
Open Gill Wind Software.
Serial Port:
Set the drop down menu to the required COM Port Connection.
Click on the OK button.
Baudrate:
Set the drop down menu to 4800 Bauds.
A blank Wind Terminal screen will be opened.
Left Click the mouse in the blank terminal screen.
Hold down the * key on the keypad.
With the * key still held down, apply power to the MaxiMet.
This will result in placing the unit into SAFE MODE.
Press Enter to start a new line (Ignore illegal command line).
To now change communication from say SDI-12 (or MODBUS) or RS422 or RS485 to Default
RS232.
Type COMMS RS232 and press Enter.
Type Q and press Enter to exit SAFE MODE.
Data will now scroll on screen.
________________________________________________________________________________________________
MaxiMet
Page 56
Issue 1
Doc. No. 1957-PS-000x
March 2015
Gill Instruments Ltd
_____________________________________________________________________________________________________________
Close the 4800 baud rate Wind or Terminal Program.
Power down the MaxiMet and re-apply power.
Open a new Wind or Terminal program at 19200 baud rate.
RS232 data will now scroll on screen at the MaxiMet default 19200-baud rate.
________________________________________________________________________________________________
MaxiMet
Page 57
Issue 1
Doc. No. 1957-PS-000x
March 2015
Gill Instruments Ltd
_____________________________________________________________________________________________________________
7. VIEWING MAXIMET DATA STRING
7.1.
Use MetSet to View the MaxiMet Data String
MetSet Software allows you to view the MaxiMet data string graphically.
Before you can use MetSet, check that MaxiMet is correctly connected to a Serial COM port or
USB COM port on your PC.
NOTES:
MetView is compatible with RS232 and RS422 connected units only.
MetView will not read SDI-12 or MODBUS data strings.
Opening MetSet
Click on the MetSet Connect and Read button:
MetSet will display the Editing Screen.
Now Click on View Output button.
The MaxiMet data string will be shown.
Note that this terminal program can only read MaxiMet data it cannot be used to send commands
to the MaxiMet.
________________________________________________________________________________________________
MaxiMet
Page 58
Issue 1
Doc. No. 1957-PS-000x
March 2015
Gill Instruments Ltd
_____________________________________________________________________________________________________________
7.2.
Use a Terminal Program to View the MaxiMet Data String
There are many terminal programs that might be used to view the MaxiMet data string examples
include: HyperTerminal, Putty, Tera Term etc.
If for example Tera Term is used.
Open Tera Term
Select Serial.
Select MaxiMet connected Com port.
Click on Ok.
Tera Term has opened at 9600 baud and MaxiMet uses 19200 as a default, so change Tera Term
Baud Rate setting to 19200.
________________________________________________________________________________________________
MaxiMet
Page 59
Issue 1
Doc. No. 1957-PS-000x
March 2015
Gill Instruments Ltd
_____________________________________________________________________________________________________________
Click on Serial
Change Baud rate to 19200
Click on OK.
Data will be output as follows.
________________________________________________________________________________________________
MaxiMet
Page 60
Issue 1
Doc. No. 1957-PS-000x
March 2015
Gill Instruments Ltd
_____________________________________________________________________________________________________________
Setting up a logging file
Select File/Log.
Look in
select a log file location.
Select Save in destination. E.g. Desktop.
File Name add the name for the file e.g. teraterm.
Tick options as required e.g. Timestamp.
Click on Save.
The following dialog box will open on the PC desk top.
To stop logging
Click on the Close button to Stop Logging
Understanding Logged Data
Logged data is stored to a file with a .log extension. This can be viewed in any text/HTML editor
or spreadsheet application.
________________________________________________________________________________________________
MaxiMet
Page 61
Issue 1
Doc. No. 1957-PS-000x
March 2015
Gill Instruments Ltd
_____________________________________________________________________________________________________________
8. MAINTENANCE & FAULT-FINDING
8.1.
Cleaning and Handling
Ideally when installing the unit handle with lint free gloves and degrease the unit to reduce the
build-up of deposits.
8.2.
Servicing
There are no moving parts or user-serviceable parts requiring routine maintenance.
Opening the unit or breaking the security seal will void the warranty and the calibration.
In the event of failure, prior to returning the unit to your authorised Gill distributor, it is
recommended that:
All cables and connectors are checked for continuity, bad contacts, corrosion etc.
A bench test is carried out.
Contact your supplier for advice if failure persists.
Precipitation sensor.
Users/Distributors should clean the plastic dome with a soft lint free cloth and where necessary
with a non aggressive cleaning solution ideally once a week. Where this is not possible, cleaning
should be done during regularly scheduled visits to the sensor and site. It is recommended the rain
gauge sensor should be cleaned every 3 months as a minimum.
Users can check operation of the rain gauge by performing a simple test of functionality by
spraying some water using a mist nozzle similar to that used in many households for watering
plants. The MaxiMet rain gauge should register incremental rain fall when sprayed with water.
Compass module.
The Compass device is maintenance free.
If required return the MaxiMet to Gill Instruments to check the Compass operation.
Wind Sensor (WindSonic)
If there is any build-up of deposits on the unit, it should be gently cleaned
with a cloth, moistened with soft detergent. Solvents should not be used,
and care should be taken to avoid scratching any surfaces. The unit
must be allowed to defrost naturally after being exposed to snow or icy
conditions, do NOT attempt to remove ice or snow with a tool.
There are no moving parts or user-serviceable parts requiring routine
maintenance.
Opening the unit or breaking the security seal will void the warranty and
the calibration.
________________________________________________________________________________________________
MaxiMet
Page 62
Issue 1
Doc. No. 1957-PS-000x
March 2015
Gill Instruments Ltd
_____________________________________________________________________________________________________________
UV Shield (MetSpec)
Ideally the user should try to keep MaxiMet radiation screens clean and
free of biological growth but a simple wipe with some non- aggressive
soft detergent cleaner will suffice. Solvents should not be used, and care
should be taken to avoid scratching any surfaces. The unit must be
allowed to defrost naturally after being exposed to snow or icy
conditions, do NOT attempt to remove ice or snow with a tool.
Temperature, Humidity and Dewpoint
The internal temperature and humidity sensor is not user maintainable or replaceable.
If used in areas of high pollution or marine environments then consideration should be considered
to return the unit for maintenance at Gill instruments every 12 to 24 months to ensure proper
performance.
Barometer
The Barometer device is located internally and is not maintainable or replaceable by a user.
If required return the MaxiMet to Gill Instruments to check the Barometer calibration.
Calibration
A calibration check can be done by any user/distributor by comparing the values measured by
MaxiMet with a reference value or in an environmental chamber. Users should understand that
these checks are not the same as the calibration checks or calibration done at Gill but they can
provide users with some degree of confidence to the validity of their measurements. If a
user/distributor notices a significant difference between the MaxiMet and their test
environment/reference they should contact Gill to discuss this and see if a calibration is required.
Returning the MaxiMet
If the unit has to be returned, it should be carefully packed in the original packaging and returned
to your authorised Gill distributor, with a full description of the fault condition. An RMA number
should be obtained from Gill Instruments first if returning directly to Gill Instruments.
________________________________________________________________________________________________
MaxiMet
Page 63
Issue 1
Doc. No. 1957-PS-000x
March 2015
Gill Instruments Ltd
_____________________________________________________________________________________________________________
8.3.
Fault-finding
Common problems and their solution
Symptom
No output
Corrupted output
One way communication
Unexpected Temperature
/Dewpoint readings
Unexpected Wind readings
Unexpected
Temperature/Dewpoint and
Humidity readings
Unexpected Barometer
Readings
Status code not 0000 or A
Solution
Check DC power to MaxiMet, cable and connections.
Check communications settings of the MaxiMet and
host system match, including correct Com port.
Check that the unit is in Continuous mode.
Check that in-line communication devices are wired
correctly.
NOTE: It is usual for Anemometer TX + to be
connected to converter device RX +.
If appropriate use Safe Mode to attempt to obtain
communication with the MaxiMet.
Check that the communication settings of the MaxiMet
and host system match.
Try a slower baud rate.
Check cable lengths and type of cable.
Check for sources of external signal interference.
Check that the wiring is in accordance with the manual.
Check that the Temperature and Dewpoint units of
measure (C, F, K) settings are correct on power up.
Check that the Wind Sensor units of measure (m/s,
knots, kph, ft/min, mph) settings are correct on power
up.
Temperature and Humidity Device faulty.
Check units of measure are set correctly and if offset
HASL or PSTN readings have been applied.
See Table below.
Sensor Status Codes
Code
Status
0000
OK
0001
Wind Measurement Fault
Temperature Measurement
Fault.
0010
0020
Dewpoint fault
0040
0080
Humidity fault
Pressure Sensor Warning
0100
Compass fault
Condition
No fault conditions detected in
measurement period.
Wind Sensor faulty
Temperature sensor faulty
If Temperature and Humidity are reporting
correctly then this code indicates a main
pcb fault.
Humidity Sensor faulty.
Pressure sensor reading not available/unit
faulty.
Compass fault
________________________________________________________________________________________________
MaxiMet
Page 64
Issue 1
Doc. No. 1957-PS-000x
March 2015
Gill Instruments Ltd
_____________________________________________________________________________________________________________
WindStat Codes
Code
Code
Status
Status
0000
OK
0001
0002
0004
000B
0100
Wind Sensor Axis failed
Wind Sensor Axis failed
Wind Sensor both Axis failed
Wind Sensor readings failed
Wind Average Building
Corrected Wind Measurement
not available.
0200
A
NMEA Acceptable Data
V
NMEA Void Data
8.4.
Condition
Condition
No fault conditions detected in
measurement period.
Wind U Axis blocked or faulty
Wind V Axis blocked or faulty
Wind U and V Axis blocked or faulty
Wind Sensor data output fault.
WMO wind average building.
Compass corrected wind measurement
failure.
No fault conditions detected in
measurement period.
Fault condition detected in measurement
period.
Safe Mode
If a unit is received that will not communicate or the configuration settings are not known then Safe
Mode can be used to establish communication with the MaxiMet and change configuration settings
(see Para 6.8).
8.5.
Bench Test
See Para 4.2.
8.6.
Returning Units
If the unit has to be returned, it should be carefully packed in the original packaging and returned
to your authorised Gill distributor, with a full description of the fault condition.
8.7.
Guarantee
For terms of guarantee contact your supplier.
Warranty is void if the unit is damaged or broken.
________________________________________________________________________________________________
MaxiMet
Page 65
Issue 1
Doc. No. 1957-PS-000x
March 2015
Gill Instruments Ltd
_____________________________________________________________________________________________________________
9. APPENDICES
9.1.
Glossary & Abbreviations
Item
Meaning
CAL
CR
CRLF
CSV
ENG
ESC
ETX
fpm
GND
HEX
I/P
IP66
KPH
LF
m/s
MAG
MAX
MIN
MPH
NMEA 0183 (V3)
No:
NVM
O/P
PC
PCB
ROM
RS232
RS422
RS485
RWA
RX
RXD
S/W
SDI-12
SEC
STX
TERM
TX
TXD
+VE
-VE
Calibration
Carriage Return
Carriage Return Line Feed
Comma Separated Variable
Engineering
ESCape key on keyboard.
End of string character
Feet per minute
GrouND
HEXadecimal
InPut
Protection Classification
Kilometres per Hour
Line Feed
Metres per second
MAGnitude - scalar reference to wind speed
MAXimum
MINimum
Miles per Hour
National Marine Electronics Association
Number
Non-Volatile Memory
Output
IBM compatible Personal Computer
Printed Circuit Board
Read Only Memory
Communications standard
Communications standard
Communications standard
Road Weather Averaging
Receive
Received Data
SoftWare
Serial Data Interface
SECond
Start of string character
TERMinal
Transmit
Transmitted Data
Positive
Negative
WRT
With Respect To
________________________________________________________________________________________________
MaxiMet
Page 66
Issue 1
Doc. No. 1957-PS-000x
March 2015
Gill Instruments Ltd
_____________________________________________________________________________________________________________
9.2.
Electrical Conformity
EC DECLARATION OF CONFORMITY ACCORDING
TO COUNCIL DIRECTIVE 2004/108/EC
We, Gill Instruments Ltd., declare under our sole responsibility that the products:
MaxiMet Weather Station (GMX200 Variants)
MaxiMet Weather Station (GMX600 Variants)
Manufactured by:
Gill Instruments Ltd
Saltmarsh Park
67 Gosport Street
Lymington, SO41 9EG
to which this declaration relates, are in conformity with the protection requirements of Council
Directive 2004/108/EC on the approximation of the laws relating to electromagnetic compatibility.
This Declaration of Conformity is based upon compliance of the product with the following
harmonized standards:
Emissions:
Immunity:
EN61326:2013
EN61326:2013
Signed by
A.C.R. Stickland – Director
Date of issue:
27/03/2015
Place of issue:
Gill Instruments Limited
Saltmarsh Park
67 Gosport Street
Lymington, SO41 9EG
________________________________________________________________________________________________
MaxiMet
Page 67
Issue 1
Doc. No. 1957-PS-000x
March 2015