1
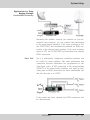
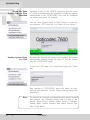
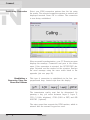
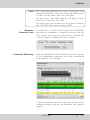
NETControl
Manual
NETControl
Manual
Software V1.13/2007
Table of Contents
Introduction
7
Program Configuration
Download of the NETControl Software
About NETControl
8
Info
Change Supervisor Password
Change Client Password
Program Setup
List Color
Display
Level Meter
Level Range, Headroom
Misc
Command Port
Default Input,
Allow ISDN >128 kbps
Confirm Disconnect
Always on Top
Translate IP
Edit IP List
Enter key code
10
12
Program Screen
Interrogate software Versions
14
Data Input
Creating a New Recipient
ISDN Connection
15
E
Samplingrate, Audio Mode,
Audio Input, Userdata
18
G.722 Con. with H.211 or SRT Sync
X.21 Connection
Codec Loop
19
Ethernet Connection
Audio Configuration OC 7600
Mode
Point-to-Point, SIP/RTP, RTP
20
Audio Configuration OC 7200/7400
Mode
Point-to-Point
Transmit
Receive
21
Broadcast
Multicast
Anwendungen
Unicast LAN, WAN,
Broadcast
Multicast
11
13
4
17
9
Software Update
Edit Recipient
Audio Configuration
Algorithm, ISDN Sync, Bitrate
16
22/23
Data Menu
Saving Units ISDN/IP Directory
to your PC Harddisk
Editing Units ISDN/IP Directory
Loading ISDN/IP Directory to
a Unit
Tip
24
System Setup
Configuration of the connected
OPTICODEC in System Setup
NETControl
25
Table of Contents
OPTICODEC 7200/7400
TCP/IP Basics
Local IP Address
Subnet Mask
Default Gateway
Dialing
Dialing Attempts
Dialing Delay
Redialing Attempts
TCP/IP Remote Control
Name
Port
Autodetect
TCP/IP Audio
Buffer Management
Audio Port (TCP)
Audio Data Encoder
Quality of Service
Type: TOS
Precedence Values
TOS Values
DiffServ
DiffServ Codepoints
Quick Configuration
OPTICODEC 7600
TCP/IP Basics
Init Mode
Local IP Address
Subnet Mask
Default Gateway
Name Server
Domain Name
TCP/IP Audio
Buffer Management
26
27
32
Quality of Service
Type: TOS
Precedence Values
33
TOS Values
DiffServ
DiffServ Codepoints
Audio Data Encoder
Audio Port (TCP)
Audio Port (RTP)
34
27
28
29
30
31
32
NETControl
Accept Configuration
Algorithm, ISDN Sync,
Bitrate, Samplingrate,
Audio Mode, Audio Input,
Userdata
35/36
Dialing
Dialing Attempts
Dialing Delay
Redialing Attempts
PBX Prefix
Min. lenght for PBX Prefix
37
ISDN Configuration
ISDN Protocol
Accept Telephone Calls
Accept MPEG/G.722 Calls
MSN Check
38
ISDN Interfaces
Number Prefix for
incoming calls
39
Local Numbers
SPID Numbers
40
E
5
Table of Contents
I/O Levels
Misc
Alarm Signals
Level Range, Headroom
External Sync Input, Backlight
Serial Interface
Automatic Connection Start
OPTICODEC 7600
More Misc
Buzzer Rington
Buzzer Volume
Direct Dial Buttons
X.21 Configuration
Backup Settings
X.21 Backup
Mode
42
Mode: Level, Mode: Pulse
46
Saving Units System Setup to
your PC Harddisk
Loading System Setup to
a Unit
E
Establishing Connection
Establishing a Con. w. DD Buttons
52
Automatic Connection Start
Connection Monitoring
53
Sync Icon
Adjust Audio Parameters
Adjust I/O Levels
Release
54
Allocate Unit
Establishing a Connection with X.21/V.35
Establishing a Con. w. 'Codec Loop'
Call Acceptance with ISDN Sync AUTO
Establishing a Con. with ISDN Sync AUTO
Terminating a Connection
55
44
45
Anwendungsbeispiele
SAT/ISDN Redundancy
Panic Dial
51
43
Backup Time (Ton)
Reconnect Time (Toff)
ACI Dialing
OPTICODEC 7200/7400
Backup Settings
X.21 Clock Monitoring
Mode: Level
6
41
Connect
Establishing a Connnection
Using the ISDN/IP Directory
Command line parameters
in the NetControl software
Selectip
Singleip
Autoallocate
Ownip
Topmost
56/57
47/48
Status Messages
Ethernet Error Messages
49
ISDN Error Messages
Delivery Scope
50
NETControl
58
59/60/61
62
Introduction
Description
The NETControl software is a 32bit version for Microsoft
WINDOWS 98/ME/2k/XP intended for the remote control of
nearly any number of OPTICODEC units types 7200, 7400
and 7600 using as many PC work places as desired. The
parameter settings are the same as for the OPTICODEC.
ISDN and
Ethernet Cabelling
Correct operation of the OPTICODEC is only ensured when
RJ45 cables type CAT5 are used.
ISDN Connection
Correct operation of the OPTICODEC is only ensured
when the OPTICODEC is connected to an approved Telecom access. When operating the unit on other telephone networks (private exchange), several adjustments are
necessary. Please see chapter “System Setup”. Adaptation
to certain networks other than herewith specified can not
be guaranteed.
Please note
WHEN INSTALLING THE SOFTWARE PROGRAM
NETCONTROL, PLEASE DECLARE ACKNOWLEDGEMENT
OF THE TERMS OF THE LICENSE AGREEMENT.
This software program is for the use of the owners and
their staff only and may only be installed on a computer.
The licensee may not copy the software or the included
original documentation or own any such copies. All included information, text and diagrams are confidential, the
content of which remains the unpublicised property of
ORBAN Europe GmbH. Furthermore, the licensee may not
change, adapt, translate, duplicate, loan, lease or in any
other form supply the availability of the software or service
instructions as a whole or any part thereof. It is strictly
forbidden to reengineer or disassemble the software, or
in any other way and means attempt to trace the source
code. Hereby the right to register utility models or patent
applications is reserved explicitly. In the case of violation
or non-compliance resulting in consequential losses, ORBAN
Europe GmbH may be entitled to claim damages according
to the German BGB, HGB as well as the Competition Law
and Patents Act.
Due to the further development for product improvement of
the present series units and alterations of certain industrial
parts, it cannot be avoided that some parts might not be
fully compatible. Different component modifications can
lead to different configuration options. Deviating program
sections in the software are therefore quite possible.
All technical information may be subject to change without
notice
NETControl
E
7
Program Configuration
Download of the
NETControl Software
Start the setup program of the current application from
the Internet or from the delivered storage medium with
a double click on the setup icon. Follow the installation
instructions on the PC screen.
Connection to PC
The connection between the PC and your OPTICODEC
occurs via a RJ45 type CAT5 network cabel.
With a double click on the NETControl icon you start the
application. After a short initializing sequence the basic
configuration menu of the program appears.
About NETControl
A double click on the ‘Program’ menu opens a pulldown
menu.
A window is displayed over the ‘About’ menu item where
you will find information on the version number, creation
date and manufacturer of the NETControl software.
8
E
NETControl
Program Configuration
Info
This function is found on the 'Unit/Info' pulldown menu
and serves to display the latest software versions of the
connected OPTICODEC unit.
All software parts with their
corresponding versions are displayed. You can also interrogate
the serial number of your OPTICODEC.
Change
Supervisor Password
Change
Client Password
As a standard the program is equipped with two passwords, however after installation the pre-setting is that no
password is required. If desired an administrator password
can be entered and thereafter the possibility to enter a
client password is also available.
These passwords can be changed by activating the function
“Change client password” or “Change supervisor password”.
Please ensure that both passwords are entered correctly,
access to certain menus will otherwise be denied.
Confirm the new settings with the 'OK' key.
Should you not wish to enter a client password, simply
leave these fields empty and click on the 'Cancel' key.
NETControl
E
9
Program Configuration
Program Setup
Using this menu item, changes can be made to the level
display, the scale reading and port addresses. Activation
of the 4SB ADPCM algorithm and changes to the data rate
are also made here. The display color setting can also be
adapted to your personal taste.
List Color
For an easier location and monitoring of the ISDN and IP
connections, adjustments can be made to the writing (fG)
and background (BG) color setings.
A mouse click on the 'Default' key resets all changes and
returns to the settings ex-factory.
Display
Level Meter
Level Range
Headroom
Warning
10
E
Setting of the desired colors of the status display.
Adjustment of the level range:
50 or 80 dB.
Setting of the desired headroom. The scale display in the
online menu is moved. You can select between 0 and 20
dB in 1 dB steps. Ex-factory the setting is 0 dB.
Clipping limit at 0 dB + selected headroom!
NETControl
Program Configuration
Misc
Command Port
With this port number, it is indicated which service is
required.For the OPTICODEC, the port number 6137 is to
be entered.
You can enter an Administrator password to block access
for changing the port number. Make sure you have selected the port number.
Default Input
The 'Default Input‘ option allows you to set the audio input using the direct dial keys. You can choose between:
Analog, AES/EBU and S/PDIF* (* for OPTICODEC 7200
and 7400 only).
Allow
ISDN>128 kbps
The control box should only be activated if at least one
of the units to be controlled is in possession of more than
one ISDN module. This function allows the setting (in the
ISDN/IP directory) of a data rate larger than 128 kbps.
4SB ADPCM Stereo
This function has been reserved for further features. Please
do therefore not activate the control box.
Confirm Disconnect
A safety query to appear before a connection is
disconnected can be set up by activating the ‘Confirm
Disconnect’ check box.
Always on top
This function allows you to choose whether the 'NETControl‘
window should always be in the foreground.
Translate IP
This function translates the IP addresses into plain text
names for all devices known from the name server. These
devices are displayed in the IP column of the device list
in the main window.
Confirm your intention with the 'OK' key or press 'Cancel'
if the changes made should be rejected.
NETControl
E
11
Program Configuration
In this menu item the IP
addresses of the units to
be controlled using the
NETControl software are
entered. This is necessary for units which are not
in the same network or
for those where the “Auto
Detect” function has been
switched off.
Edit IP list
Wit h “A d d I P ” n e w
addresses are added,
“Remove IP” deletes selected addresses from
the list.
The 'Edit IP‘ function allows entered IP addresses to be
changed.
Pressing the 'Scan‘ key deletes the current IP list and starts
a search for all devices located in the local network.
After the safety query, confirm with the ‘Reset’ key if the
reset procedure should be performed, or with ‘Cancel’ if
you want to abort the reset.
Warning
Enter Key Code
12
E
Resetting the configuration cannot be undone!
The menu item 'Enter key codes' is used for release of
additional features (e.g. the 4SB ADPCM algorithm). The
release is dependent on the unit model and its serial
number. Each unit receives a unique key code.
NETControl
Software Update
Software Update
This function is found on the 'Unit/Software Update' pulldown menu.
Any new software updates can be downloaded free of
charge at any time from the ORBAN Europe Internet server
(www.orban-europe.eu) or from the supplied data media.
If necessary, please store the device-specific *.BIN file on
your local hard drive under Program Files/Orban/OpticodecRemote/Updates. The program automatically recognizes
the connected OPTICODEC and which software parts are
to be updated.
Note
The 'NETControl‘ program is able to update only OPTICODEC
7600 software. Please update any other OPTICODECs using
the 'OPTICODEC PC Remote‘ software.
A dialogbox accompanies you throughout the update and
informs you about the current process.
Warning
Do not switch off your PC or OPTICODEC during the
update process.
After a successful update, the OPTICODEC restarts
automatically.
After a failed update, you may repeat the update
process.
Turn the unit off and then back on again.
If a software update is cancelled during the programming
operation, the unit may not start and/or may display only
the company logo.
If this happens, the unit can be ‘revived’ only by its manufacturer, ORBAN Europe GmbH in Ludwigsburg.
NETControl
E
13
Program Configuration
Program Screen
System Menu
OPTICODEC Display/
Status Display
Control Border
Pulldown Menus
Units List
Direct dial buttons
Units
configuration
Allocate Unit/
ISDN/IP Directory/
Release Unit
Configuration of the
connection partner
Connect/Disconnect
Call acceptance
Sort: IP addresse, codec name, connection target
Interrogate
Software Version
By simultaneously pressing the buttons STRG+ALT+V it
is possible to interrogate the software versions and serial
numbers of the connected units in the units list.
The field size is variable and can be changed using the
mouse.
14
E
NETControl
Data Input
Data Input
In standby mode select ‘Data Input’ from the main screen
or alternatively the 'Data/Edit local directory' pulldown
menu..
The telephone directory appears (ISDN/IP Directory).
The window and columns widths are variable and can be
modified with the mouse.
Creating a
New Recipient
Open the input mask by clicking onto the function ‘New’.
Here you have the choice between ISDN or Ethernet
configuration.
ISDN Connection
Depending on the number of installed ISDN modules, the
writeable input fields are represented white. Two B-channels are available for each ISDN module.
NETControl
E
15
Data Input
Note
If any of the devices to be controlled feature more than
one ISDN module and the number of writable fields is
inconsistent with the number of corresponding B channels,
check the control box for 'Allow ISDN > 128 kbps‘ using
the 'Program/Program Setup‘ menu.
The positioning marker of the cursor blinks when the
number can be entered. Move between ISDN input fields
using the tab key.
Once the ISDN numbers have been entered, you can assign
a name to the recipient (max. 49 characters).
Edit Recipient
The ISDN/IP address directories of the connected ORBAN
OPTICODEC 7600, OC 7400, CTAXI or PAN-PRO can easily
be imported and exported via the 'Data' menu to your PC
for more efficient management.
Select the entry you want to process from the ISDN/IP
directory using the 'Edit' key or with a mouse doubleclick.
To delete a recipient click with the left mouse button onto
the entry in the ISDN/IP directory you would like to delete and press the 'Delete' key.. Deletion takes place after
confirming with the ‘OK’ key.
Audio Configuration
Alterations of the default audio configuration can be made
by clicking onto the ‘Change’ key.
The configuration menu of the audio parameters which are
assigned to the current entry appears. By activating the
arrows (left-right) you can change the pre-settings.
16
E
NETControl
Data Input
Algorithm
The 'Algorithm' menu item is used for presetting the desired
data reduction procedure on outgoing calls.
By pressing the arrow keys, you can select between Layer 2,
Layer 3, G.722, G.711 and 4SB ADPCM (optional).
ISDN Sync
The 'ISDN Sync' menu item is used to set the desired
synchronisation procedure of the partner codec.
The available sync modes for Layer 3 are:
AUTO – automatic codec detection
MusicTAXI (MusicTAXI sync for 1 to 6 B-channels)
NO SYNC for the use of 1 x B-channel
NO SYNC (INV) for the use of 1 x B-channel
ZEPHYR (Telos sync for 2 B-channels)
For Layer 2:
AUTO – automatic codec detection.
MusicTAXI (MusicTAXI sync for 1 to 6 B-channels)
NO SYNC for the use of 1 x B-channel
NO SYNC (INV) for the use of 1 x B-channel
PRIMA (CCS sync for 2 B-channels)
AETA (for 4SB ADPCM; optional)
The activation for AETA sync and 4SB ADPCM algorithm
(not included in the standard delivery) is performed as
described on the page 12.
Bitrate
According to the setting of the algorithm and the number
of outgoing B-channels, the transfer rate is set here: 64,
128, 192, 256, 320 or 384 kbps for layer 2 and 64, 128, 192,
256 and 320 kbps for Layer 3.
NETControl
E
17
Data Input
Samplingrate
The 'Samplingrate' menu item is used for setting the desired
sampling frequency on outgoing calls.
You can choose between: 16, 22.05, 24, 32, 44.1, 48 kHz,
AUTO (the sampling frequency of the addressing device
is used)
Audio Mode
The 'Audio Mode' menu item is used for setting the desired
audio behaviour on outgoing calls.
Mono
mono signal. The left input is used..
Dual Mono
two different signals which do not jam each
other, e.g. left channel: original soundtrack;
right channel: translation
Stereo
as for Dual Mono, each channel is encoded
separately, but with the difference that a
channel is allocated excess bits if less or
no audio is transmitted on the other channel
(i.e. bit distribution as needed).
Joint Stereo
comparable with MS stereophony (middle/
side signal). Encodes the sum between left
and right and the difference between left
and right; these are encoded and transmitted
separately (subjectively better quality at low
data rates).
Audio Input
The 'Audio Input' menu item is used for setting the desired
audio input on outgoing calls. You can choose between:
Analog and AES/EBU and S/PDIF* (OC 7200/7400 only).
Userdata
The menu item 'Userdata' is used for setting the desired
ancillary data on outgoing calls.
You can choose between:
OFF (no ancillary data is transferred)
1200, 2400, 4800 baud with Layer 2 and 3.
Note
If the ancillary data is switched off (OFF), no remote effect
signals are transmitted either.
Between OPTICODECs, the smallest preset baud rate of
the ancillary data is used in the context of the device
handshake.
18
E
NETControl
Data Input
G.722 Connection
with H.221
or SRT Sync
If you enter a G.722 partner in the ‘Data Input’ menu, please
observe the following order:
1.
2.
3.
Enter the ISDN number.
Enter G.722 in ‘Algorithm’
Determine the Sync modes in ‘ISDN Sync’.
Now H=H.221 or S=SRT is displayed in the directory for
the selected SYNChronisation procedure.
X.21 Connection
To activate the X.21 interface, enter an 'X' in the ISDN field
(e. g. position #11 in directory).
Codec Loop
If the input fields are empty, the OPTICODEC starts the
‘codec loop’ mode. This serves as a test for the coded
audio signal (without ISDN). (E. g. position #12.)
NETControl
E
19
OPTICODEC 7600
Data Input
Ethernet Connection
Should an Ethernet connection be desired, please activate
the radio button for Ethernet. Enter the target address
and, for easier identification, also enter the name of your
connection partner.
You may enter both IP address and plain-text names*.
(* Only if a name server also exists.)
Audio Configuration
OPTICODEC 7600
In the same way as the description of ISDN connections,
you can set the audio parameters for the planned connection here. The menu guides you through algorithm (Layer
2 and Layer 3), mode, bitrate, and finally userdata.
Mode
To transfer audio signals in real time over IP networks
(VoIP = Voice over IP) with OPTICODEC 7600, three protocols are used:
Point-to-Point
A bi-directional connection between two units. TCP is
utilised as the protocol, possible transmission errors are
corrected to a certain degree by this protocol. These
entries are marked with an 'x' in the Sync column of the
directory (e. g. pos. #11, on page 21).
SIP/RTP
SIP (Session Initiation Protocol) Signalling protocol responsible for the establishment, termination and control of
connections and RTP (Real-time Transport Protocol). The
actual voice connection is created using data units (streams)
by means of RTP.
These entries are marked with an 'n' in the Sync column
of the directory (e. g. pos. #12, page 21).
RTP
20
E
RTP is a special protocol for the transmission of realtime
data (here for audio signals) and uses UDP (User Data
Protocol) as transport protocol. These entries are marked
with an 'r' in the Sync column of the directory (e. g. pos.
#12, page 21).
NETControl
OPTICODEC 7200/7400
Data Input
Audio Configuration
OPTICODEC 7200/7400
Mode
Point-to-Point
Using OC 7200 and 7400 the IP address to be entered is
dependent on the desired transmission mode. The entries
can be changed by activating the arrows (left/right). The
following IP connection types are possible: Point-to-Point,
Transmit and Receive.
A bi-directional connection between two units. TCP is
utilised as the protocol, possible transmission errors are
corrected to a certain degree by this protocol.
These entries are marked with an “X” in the Sync column
of the directory (e g. pos #1).
Should ‘Point-to-Point’ be set for the mode, then the IP
address of the partner unit is to be entered.
Transmit
The unit functions as a transmitter for broadcast or multicast transmission. UDP is utilised as the protocol, possible
transmission errors can not be corrected. In this mode,
the unit transmits to one or more receivers. Bidirectional
UDP connections are possible when both units are set to
TRANSMIT.
Marked with “T” in the directory (e g. pos #4).
Receive
The unit functions as a receiver for a broadcast or a
multicast transmission. This setting is the opposite of
TRANSMIT.
Marked with “R” in the directory (e g. pos #5).
NETControl
E
21
OPTICODEC 7200/7400
Data Input/Applications
22
E
Broadcast
A broadcast address must be entered for the unit set
to TRANSMIT (for e.g. position #2 in the directory:
255.255.255.255). The unit set to RECEIVE dials the address
of the partner unit. This is the address of the unit set to
TRANSMIT.
Multicast
Here the same address has to be dialed from both the
TRANSMIT and RECEIVE units. This has to be a multicast address found in the number range from 224.0.0.0
to 239.255.255.255 (for e.g. position #4 in the directory:
234.0.0.0).
Unicast
Describes the POINT-TO-POINT bi-directional data transmission from one unit to another within the same network
(LAN) or another network (WAN).
LAN
Local Area Network (Ethernet, Intranet). According to ISO,
LAN is a locally strongly limited network which is mostly
installed within company headquarters.
WAN
Wide Area Network. Long-distance data traffic networks,
as for example the Internet or connections using ISDN
units.
NETControl
OPTICODEC 7200/7400
Data Input/Applications
Broadcast
Describes the data transmission from one unit to all of the
other units within the same network.
Multicast
Describes the data transmission from one unit to all of the
others within the same network or another network.
The multicast mode should preferably be used instead of
the broadcast mode. Important is therefore the agreement
between connection partners of suitable application and
protocol types.
The following is a brief comparison:
Broadcast
Multicast
All units within the network
receive the same packet
which they then have to analyse even when the packet
has not been directed to all
units. This results in an unnecessarily high processing power load. Several broadcast
transmissions could possibly
even cause disturbances in
these units.
Only the units of a multicast group receive the
data, all other units remain
unloaded.
Routers which are able to
direct broadcast transmissions to other networks are
not customary.
A large selection of routers
which support multicast are
available.
NETControl
E
23
Data Menu
Saving the Unit
ISDN/IP Directory to
your PC Harddisk
Use the feature ‘Save directory to disk’ to store the ISDN/IP
directory of your unit on PC.
Do this by selecting the file format you require, either Directory File (*.DIR), Text separated Files (*.TXT) or Comma
separated Files (*.CSV) and importing the address book
into MS Word or Excel, for example. These file formats
can also be exported to the unit.
However, the program’s own editor can run only *.DIR
file formats.
Edit saved Directory
The entries can be edited, newly entered, deleted and
sorted by means of the ‘Edit saved directory’ function.
Double-click a vacant field of entry in the directory to
enter a new codec partner
Loading
ISDN/IP Directory
to a Unit
Click onto ‘Load directory to unit’, locate the desired *.DIR
file and finally activate the ‘Open’ key.
All 96 entries (connection partners) with their names, ISDN
numbers/IP addresses and set audio parameters are now
loaded to the unit.
It is irrelevant whether all or only some of the entries have
been occupied or whether they are all or partly vacant;
or whether the connected unit is an OPTICODEC 7600,
OC 7400, CTAXI or PAN-PRO.
If entries contain configurations that do not support the
device, these will be automatically corrected and a corresponding warning message will be generated.
Exporting the directory can easily be repeated should it
fail because of for e.g. a power down or power failure.
Tip
24
E
The local ISDN/IP directory is saved in the 'OpticodecRemote‘ program directory as a 'num.dat‘ file. This directory
can be easily exported to any number of PCs, hence
saving time by copying the same address book directory
to all of them.
NETControl
System Setup
Configuration of the
connected OPTICODEC
in System Setup
You can sort the list of units according to IP address,
codec name or connection destination, in ascending or
descending order. Select the unit to be configured from
the list and open the ‘System Setup’ menu with a mouse
click. Your password is requested. Should simply the user
password be entered, then only one page of the basic
configuration menu will be accessible and only changes
in ‘Accept Configuration’ are permitted. By entering the
administrator password, the basic menu appears.
The ‘System Setup’ function is only selectable when:
a unit from the list is selected
the unit isn’t connected to another network partner
no other network partner undertakes changes in the
unit configuration.
Open 'System Setup‘ via the button below or by left-clicking
the 'Unit/System Setup’ menu option.
The basic configuration menu of the connected OPTICODEC
differs in appearance depending on the machine type and
its equipment. If you have an OPTICODEC 7600, please
read from page 31 onwards.
NETControl
E
25
OPTICODEC 7200/7400
System Setup
TCP/IP Basics
In this menu item the basic settings of the unit within the
network are entered.
Local IP Address
IP (Internet Protocol) is a connectionless protocol and provides a datagram transport service between units. It is used
by both TCP and UDP (User Datagram Protocol) and is
responsible for addressing the packet, packet routing, the
splitting and joining of data and for the exchange between
transport and network layers.
Enter the IP address of your OPTICODEC into the input
mask. Please note that each connection in the network
requires a separate and unique IP address.
Subnet Mask
The 'Subnet mask' is utilised to divide the network into
sub-networks and herewith splits the amount of data exchange into several channels.
The subnet mask is, just as the IP addresses, a binary
32-bit value and is provided by your network administrator.
The number 255.255.255.0 is normally entered for Class
C networks.
26
Default Gateway
The data exchange between the different cross points of
the network is transparent for the user. The IP-stack recognizes whether a data packet is scheduled for another
network and will then address the default gateway. This
corresponds for e.g. with a router or other gateway units.
0.0.0.0 must be entered if the default gateway should not
be used.
Note
You will be informed of the IP Address, Subnet Mask and
Default Gateway by your network administrator.
E
NETControl
OPTICODEC 7200/7400
System Setup
Warning
OPTICODEC and PC units with the NETControl program
differentiate only in the host ID. The host ID is made up
of the Subnet Mask and Local IP Address.
Dialing
Dialing Attempts
This menu item serves for setting the desired dialing
attempts. You can select between 1 ... 5 and INFINITE.
Dialing Delay
This menu items serves for setting the desired time between
dialing attempts (between 10 and 360 seconds).
Redialing Attempts
This menu item serves for setting the desired redialing
attempts, if a connection had not been disconnected by
the calling OPTICODEC. You can select between 0 ... 9
and INFINITE.
TCP/IP Remote Control
The settings for the remote control of the unit over the network are found in the menu item TCP/IP Remote Control.
Name
This is for the easier identification of units within the network. Enter the name of your OPTICODEC in any length
of characters here. This name is conveyed to the remote
control program and displayed in the list of units.
When the name of a unit has been changed and confirmed
with OK, the unit will disappear from the unit list in the
remote control program for several seconds. The unit
reappears under the new name.
Port
Here you enter the port number for remote control over
the network. For the OPTICODEC, the value 6137 should
always be entered.
NETControl
E
27
OPTICODEC 7200/7400
System Setup
Warning
Should the 'Port' setting be altered, then the unit in the
unit directory list of the NETControl program will only
be visible again once the same port number has been
entered under 'Program Setup' (pls. see pg. 11) in the field
'Command Port'.
Autodetect
This feature is used for the automatic recognition of units
via the control software (e.g. NETControl). This feature
can only be utilised within a local network and should
be deactivated when controlling units outside of the local
network area.
TCP/IP Audio
The settings for audio transmission over the network are
found in this menu.
Buffer Management
This buffer serves as a bridge for short-term interruptions
during transmission. The size of the buffer (which stores
the audio data) can be influenced.
For the most reliable transmission, the maximum value
(bar to the top) should be set. This results, however, in a
greater delay. Should a lower value be desired, the bar
can be adjusted downwards. This will, however, negatively
influence the transmission reliability. To achieve the highest possible transmission reliability with a low delay, it
should be ensured that no further units are simultaneous
transmitting data within the network.
Audio Port (TCP)
28
E
Here the port number for audio transmission over the
network with TCP and UDP protocols is entered. Always
enter the value 6136 for the OPTICODEC.
NETControl
OPTICODEC 7200/7400
System Setup
Audio Data Encoder
This encoder configuration is taken over when the OPTICODEC is called by another OPTICODEC in the mode
Point-to-Point. It may be possible to use: For Tx Layer 2,
384 kbps, 48 kHz, dual mono; for Rx Layer 3, 32 kbps, 16
kHz, mono.
As opposed to the corresponding menu to call via ISDN,
here no automation is possible. Further information on audio
settings are found starting page 35.
Quality of Service
Not all data transmission applications have the same priority and not all of these require the same high standards
for the transfer of data. In order to minimize or avoid the
risk of data network congestion, a so-called “Quality of
Service“ or QoS option has been implemented in the IP
header together with acknowledgement fields such as Time
to Live, Protocol and Header Checksum. QoS (when the
router has been configured accordingly) actively regulates
traffic in the net and utilises the available bandwidth both
intelligently and effectively on the basis of data priority
and bandwidth reservation.
Type
TOS (Type of Service) and DiffServ (Differentiated Service
Architecture) are the key mechanisms of QoS and are
responsible for the assessment of packet priority.
TOS
The TOS bits contain information on the ways and means
of how a datagramm should be handled by a router. An
overloaded router can, for example, on the basis of the
TOS field determine which packets are less important
(and can therefore be cancelled) and which packets must
essentially be forwarded.
Precedence Values
TOS Values
Precedence
000
010
010
TOS
0000
1000
0100
Significance
Normal
Priority
Immediate
Significance
Normal
min. Delay
max. Throughtput
NETControl
Precedence
011
100
101
Significance
Flash
Flash Override
Critical
TOS Significance
0010 max. Reliability
0001 min. Monetary Cost
E
29
OPTICODEC 7200/7400
System Setup
DiffServ
DiffServ utilises a new definition of the IPv4 TOS header
field and the IPv6 traffic class header field. The objective
of DiffServ is the subdivision of data traffic into service
classes of different priorities without using costly signaling
on each router. Each packet can be labelled and then
handled and transmitted according to its labelling.
DiffServ Codepoints
(DSCP)
Each Per-Hop-Behavior (PHB) stream is determined by a
DSCP. You can select between: Default („Best Effort“), Class
Selector (1 - 7), Assured Forwarding (11-13, 21-23, 31-33,
41-43) and Expedited Forwarding.
Note
Further details and specifications can be found under
the „Request for Comments“ lists (RFC1349 TOS; RFC2474
DiffServ) available online in Internet (www.rfe-editor.org)
and accessible for all users.
Quick Configuration
Pre-requisite: only OPTICODEC units within the network
LOCAL IP ADDRESS 192.168.200.100
192.168.200.101
192.168.200.102
...
192.168.200.105
SUBNET MASK
DEFAUL GATEWAY
REMOTE CONTROL
NAME (e.g.)
for OPTICODEC #1
for OPTICODEC #2
for OPTICODEC #3
for OPTICODEC #6
255.255.255.0
0.0.0.0
OC7200 #1 for OPTICODEC #1
OC7400 #2 for OPTICODEC #2
...
PORT
6137
AUDIO TRANSMISSION
BUFFER MANAGEMENTBar all the way to the right
PORT
6136
ACCEPT CONFIG.
Layer 3, 128 kbps,
44.1 kHz, J. Stereo
Should additional PCs also be connected to the network to
remote control the OPTICODEC units, these are configured
as follows:
Own IP Address:
192.168.200.1 for the first PC
192.168.200.2 for the second PC
192.168.200.3 for the third PC
Subnet Mask:
255.255.255.0
30
E
NETControl
OPTICODEC 7600
System Setup
TCP/IP Basics
Init Mode
With this menu item, you set the initialization mode of the
OPTICODEC 7600. You can choose between:
Manual
Manual setup of your IP address
DHCP
Dynamic Host Configuration Protocol (DHCP)
permits, with the aid of a corresponding server, the dynamic allocation of an IP address
and additional configuration parameters in a
TCP/IP network (e.g. Internet or LAN)
Disabled
Network interface deactivated.
Warning
If the functions 'DHCP‘ or 'Disabled‘ are activated, all
additional submenus are disabled.
Local IP Address
In the data entry mask, enter the IP address of your
OPTICODEC. Be aware that every connection to the network
must possess its own unique IP address.
Note
Switching from 'Manual‘ to 'DHCP‘ mode may result in the
device being inaccessible until the IP address has been
re-entered into the 'IP list‘ (see page 12).
Subnet Mask
The 'Subnet mask' is used to subdivide a network into
smaller subnets, in order to reduce the data traffic to the
subnets and/or permit better administration of the data
traffic.
NETControl
E
31
OPTICODEC 7600
System Setup
Default Gateway
The data exchange occurs between the various nodes
in the network with complete transparency to the user.
However, the IP software detects when a data packet is
intended for a different subnet and sends it to the corresponding gateway.
If necessary, you can enter the IP address of a router here.
Otherwise, 0.0.0.0 must be entered.
32
Name Server
Domain Name Servers (DNS), also called name servers for
short, are responsible for the conversion of Internet hostnames into Internet addresses, since the actual communication
in TCP/IP networks is based on IP addresses. Enter the
IP address of your DNS here. If DHCP is activated, this
menu item is disabled or the settings are taken from the
DHCP server.
Domain Name
Enter the name of your domain here.
If DHCP is activated, this menu item is disabled or the
settings are taken from the DHCP server and the OPTICODEC can be addressed via 'Unitname.Domainname‘.
TCP/IP Audio
The settings for audio transmission over the network are
found in this menu.
Buffer Management
This buffer serves as a bridge for short-term interruptions
during transmission. The size of the buffer (which stores
the audio data) can be influenced.
E
NETControl
OPTICODEC 7600
System Setup
For the most reliable transmission, the maximum value
(bar to the top) should be set. This results, however, in
a greater delay.
Should a lower value be desired, the bar can be adjusted
downwards. This will, however, negatively influence the
transmission reliability. To achieve the highest possible
transmission reliability with a low delay, it should be
ensured that no further units are simultaneous transmitting
data within the network.
Quality of Service
Not all data transmission applications have the same priority and not all of these require the same high standards
for the transfer of data. In order to minimize or avoid the
risk of data network congestion, a so-called “Quality of
Service“ or QoS option has been implemented in the IP
header together with acknowledgement fields such as Time
to Live, Protocol and Header Checksum.
QoS (when the router has been configured accordingly)
actively regulates traffic in the net and utilises the available
bandwidth both intelligently and effectively on the basis
of data priority and bandwidth reservation.
Type
TOS (Type of Service) or DiffServ (Differentiated Service
Architecture) are key mechanisms of QoS and are responsible for determining the packet priority.
TOS
The TOS bits contain information about how a data packet
should be handled by a router. For example, an overloaded
router can determine, by means of the TOS field, which
packets are less important (and can therefore be dropped)
and which packets must absolutely be transmitted.
Precedence Values
Precedence
Significance
Precedence Significance
000
Normal
011
Flash
010
Priority
100
Flash Override
010
Immediate
101
Critical
NETControl
E
33
OPTICODEC 7600
System Setup
TOS Values
TOS
0000
1000
0100
Significance
Normal
min. Delay
max. Throughtput
TOS Significance
0010 max. Reliability
0001 min. Monetary Cost
DiffServ
DiffServ uses a new definition of the IPv4 TOS header field
and IPv6 traffic class header field. The goal of DiffServ
is to subdivide the data traffic into service classes with
different priorities, without using the intensive signalling on
each router. Each packet can be marked and is handled
and transmitted accorded to this marking.
DiffServ Codepoints
(DSCP)
Each per-hop-behaviour (PHB) flow is determined by a
DSCP. You can choose between: Standard (Default, 'Best
Effort'), Class Selector 1-7, Assured Forwarding 11-13, 21-23,
31-33, 41-43, and Expedited Forwarding.
Audio Data Encoder
This encoder configuration is taken over when the OPTICODEC is called by another OPTICODEC over IP. The presettings are AUTO. Descriptions of the individual functions
can be found starting page 35.
Audio Port (TCP)
This menu contains the setting for audio transfer over
the network with TCP protocol. The setting is for pointto-point.
For the OPTICODEC, the value 6136 should always be
entered.
Audio Port (RTP)
Here you enter the port number for the audio transfer over
RTP. The settings are for SIP/RTP and RTP.
For the OPTICODEC, the value 5004 should always be
entered. In the basic settings, this value is used by default. For the audio transfer, two port numbers are used
- the one entered here and the port number immediately
above it.
Note
34
E
When using other port numbers, please be aware that the
lower of the two numbers must be entered and must be
an even number.
NETControl
System Setup
Algorithm
The 'Algorithm' menu item serves for setting the desired
data reduction procedure on incoming ISDN calls.
You can select between: Layer 2 Layer 3, 4SB ADPCM
(optional), AUTO (G.711/G.722 calls are also accepted).
Please see also ‘Brief Lexicon’, page #47.
ISDN Sync
The 'ISDN Sync' menu serves for setting the desired synchronization procedure. You can select between:
MusicTAXI (MusicTAXI Sync for 1 to 6 B-channels)
PRIMA (CCS Sync for 2 B-channels)
ZEPHYR (Telos Sync for 2 B-channels)
AETA (for the 4SB ADPCM algorithm; optional)
NO SYNC when using 1 B-channel
NO SYNC (INV) when using 1 B-channel
AUTO - Automatic Audio Codec Detection
Note
If a sync other than ‘MusicTAXI’ or ‘AUTO’ is preset, G.722
calls can not be received.
Bitrate
The menu item 'Bitrate' cannot be adjusted. The transmission rate is determined and set according to the number
of incoming B-channels (always 'AUTO').
Samplingrate
The 'Samplingrate' menu item serves for setting the desired
sampling frequency when calls are coming in.
You can select between:
16, 22.05, 24, 32, 44.1, 48 kHz
AUTO (the sampling frequency of the calling unit is taken
over).
NETControl
E
35
System Setup
Audio Mode
The 'Audio Mode' menu item is used for setting the desired
audio behaviour on outgoing calls.
Mono
mono signal. The left input is used..
Dual Mono
two different signals which do not jam each
other, e.g. left channel: original soundtrack;
right channel: translation
Stereo
as for Dual Mono, each channel is encoded
separately, but with the difference that a
channel is allocated excess bits if less or
no audio is transmitted on the other channel
(i.e. bit distribution as needed).
Joint Stereo
comparable with MS stereophony (middle/
side signal). Encodes the sum between left
and right and the difference between left
and right; these are encoded and transmitted
separately (subjectively better quality at low
data rates).
and AUTO
the audio mode of the calling unit is taken
over.
Audio Input
The menu item 'Audio Input' serves for setting the desired
audio input, when calls are coming in. You can select
between: Analog, AES/EBU and S/PDIF.
Userdata
The menu item 'Userdata' serves for setting the desired
ancillary data, when calls are coming in.
You can select between:
OFF (no ancillary data is transmitted)
1200, 2400, 4800 baud in Layer 2
1200, 2400, 4800, 9600 baud in Layer 3.
Note
If the ancillary data is switched off (OFF), the alarm control
signals are also not transmitted.
From OPTICODEC to OPTICODEC, the lowest preset
baud rate of the ancillary data is agreed within the unit
handshake.
Press ‘OK’ (left mouse click) to take over the presetting
of the call acceptance. Press ‘Cancel’ and the presetting
is not taken over
.
36
E
NETControl
OPTICODEC 7200/7400
System Setup
Dialing
Dialing Attempts
This menu item serves for setting the desired dialing
attempts. You can select between 1 and 5.
Dialing Delay
This menu item serves for setting the desired time between
dialing attempts (between 10 and 60 seconds).
Redialing Attempts
This menu item serves for setting the desired redialing
attempts, if a connection had not been disconnected by the
calling OPTICODEC. You can select between 0 and 5.
PBX Prefix
Under certain conditions (e.g. private branch exchange
PBX), a number that prefixes the ISDN number for dial-up
via ISDN can be entered here. To make an outside call
from a telephone system, for instance, enter 0.
A preselection number can also be entered here. The
number max not exceed five digits.
Min. length for
PBX Prefix
Using the 'Min. length for PBX Prefix‘ menu option, define
the minimum number of digits an ISDN number must have
to allow this prefix to be set before the number.
If, for example, internal extension numbers have three
digits, a 4 should be entered here.
To continue to enable internal calls, PBX dialling codes for
ISDN numbers with less than four digits are ignored.
NETControl
E
37
System Setup
ISDN
Configuration
ISDN Protocol
The OPTICODEC 7600 is equipped by default with a ‘Stollmann’ type ISDN module and the following ISDN D-channel
protocols: EURO (DSS1), NATIONAL 1/2 (North America),
JATE (Japan), AT&T (USA), VNx (France) and AUSTEL
(Australia).
For use in the USA, the OPTICODEC 7600 can be equipped
with 'IMD4‘ type ISDN modules. This is necessary if
additional U-interfaces are required for North America.
When 'IMD4‘ modules are used, the device possesses two
ISDN D-channel protocols: EURO (DSS1) and NATIONAL 1
(North America).
38
Warning
Decisive is the ISDN protocol of your connection, not the
one of the partner unit! You can alter the settings by
pressing the arrow keys.
Accept
Telephone Calls
This menu item serves to define the OPTICODEC behavior
when operated at a S0 connection together with other units.
You can select between:
ALWAYS every telephone call is accepted
NEVER every telephone call is rejected.
Accept
MPEG/G.722 Calls
In this menu item the call acceptance for MPEG and
G.722 calls is defined. The settings are the same as the
previous menu item.
MSN Check
In case of a passive call, the interrogation of the MSN
number can be activated or switched off. If 'YES' is entered
for MSN check, the called number is compared to the
one which has been entered in Local Numbers. The call
is only accepted, if both numbers are identical.
E
NETControl
System Setup
In case of EURO ISDN, the MSN is usually the ISDN number of your connection without the area code, in case of
private exchanges only the number of your extension.
The ‘YES’ option should only be activated if, in addition
to the OPTICODEC, other devices (e.g. a telephone, fax
machine, PC card) must also be operated on the same
ISDN connection.
Warning
ISDN Interface
The incorrect configuration of only one unit might result
in the rejection of all calls
Via this menu item, the S0 and U interfaces used for the
transfer are selected:
S0 PMP
(Point-to-Multipoint)
S0 PP
(Point-to-Point)
U PMP
(Point-to-Multipoint)
Number Prefix for
incoming calls
for multiple device connection.
(This is the usual connection
type.)
for equipment connection
for North America only
(using a ISDN module
type 'IMD4').
These settings concern incoming calls for OPTICODEC 7200
and 7400. If the 'Add PBX Prefix‘ option is set to 'YES‘, the
number from the PBX Prefix (see 'Dialing‘, page 40) is inserted before the number for incoming calls. The minimum
number length applies here too. This setting is required
only for those ISDN systems that do not automatically add
the ISDN number.
For direct S0 connections with EURO ISDN, the leading
zeros in the ISDN numbers are not transferred for incoming
calls, e.g. 7141226622. This can be corrected by means of
the following entries.
If a 0 is entered for 'National Calls‘, this is added here.
The same applies for 'International Calls‘, where 00 is to
be entered in Germany.
When these digits are entered, the ISDN number required
to make the call will actually be displayed.
NETControl
E
39
System Setup
Local Numbers
The ISDN numbers entered here are sent when the connection has been established. Under certain conditions
(e.g. private branch exchange (PBX)* type), the individual
ISDN number must be entered.
S0 without PBX*
1 x unit only
n x units
can remain vacant
or
ISDN number
without area code
ISDN number
without area code
and
MSN Check
activated
S0 on PBX*
can remain vacant
or
only the No. of
your extension
only the No. of
your extension
and
MSN Check
activated
(Test Called Number)
Note
If a local number is required, then all of the entry windows
must always be confirmed.
SPID Numbers
The identification numbers entered here are sent when the
connection has been established. They are only necessary when operating the OPTICODEC on US and Canadian
networks.
The identification numbers are entered and allocated as
described in ‘Local Numbers’.
You will be informed of the SPID number by your ISDN
provider. These input fields otherwise remain empty.
40
E
NETControl
System Setup
I/O Levels
This menu item serves for setting the analog Input and
Output levels for the left and right channels.
Ex-factory the setting is +12 dBu, the headroom is 0 dB.
This means: input level = output level = 12 dBu. With a
mouse click on the ‘up’ and ‘down’ arrow keys the level
value can be altered.
Misc
Alarm Signals
If these signals are switched OFF, the relevant switching
information of the OPTICODEC inputs is transferred to the
partner unit. Otherwise you can select between:
CON
DIS
CON+DIS
The signal is set to pin 19 once the decoder
has been synchronized i.e. when the connection
is ‘OK’.
The signal is set to pin 18 if the line has been
disconnected from the partner unit or because
of an ISDN error.
Both signals are set.
NETControl
E
41
System Setup
Level Range
This menu item shows the adjustment at the level range:
50 or 80 dB (under 'Program/Program Setup').
Headroom
This menu item shows the setting of the desired headroom.
You can select between 0 and 20 dB in 1 dB steps. Exfactory the setting is 0 dB. The scale display in the online
menu is moved (under 'Program/Program Setup').
Warning
Clipping limit at 0 dB + selected headroom!
External Sync Input
The OPTICODEC has a sample rate converter at the audio
input and output. For the external synchronization of the
digital output you can select between:
DISABLED Word clock is generated from the ISDN
transmission clock
DIGITAL IN Word clock is generated from the AES or S/PDIF
input signal
SYNC IN
Word clock is taken over from SYNC IN.
Backlight
This function serves to set the display background lighting
of the connected unit:
ALWAYS ON
background lighting is always on
ON CONNECT the background lighting switches on
once a connection has been established
or when the ‘System Setup’ or ‘Data
Input’ menus have been called up.
The lighting switches off shortly after
returning to the main menu.
Serial Interface
This menu item is used to convert the RS232 signals in the
'Remote Control‘ or 'Ancillary Data‘ mode (only OC 7600
with ACI module).
If the 'Ancillary Data‘ setting is selected, the OPTICODEC
can no longer be remotely controlled via OC Remote.
The 'Remote Control‘ mode can only be reselected via
the unit under 'System Setup‘ >> 'Miscellaneous‘ >> 'Serial
Interface‘.
Automatic
Connection Start
When ‘Auto connect after power up’ check box is activated,
the unit automatically begins establishing a connection once
it has been switched on. The configuration used here is
set up using the ‘Config’ key.
42
E
NETControl
OPTICODEC 7600
System Setup
More Misc
Buzzer Rington
Buzzer Volume
If the OPTICODEC 7600 is called, then an audible signal
can be heard. In these menu items, select between 4 ringtones and a 4-level volume or OFF (Buzzer switched off).
Direct Dial Buttons
Here you can allocate the 4 direct-dial buttons to the selected dialing procedure.
You can choose between: Layer 2, Layer 2, G.722, G.711,
AAC* and 4 SB ADPCM* (* optional).
X.21 Configuration
This menu item is used to configure the data transfer via
the X.21 interface or the inversion of the data and/or clock
circuits in the event that, in the corresponding circuits, the
A- or B-wires are confused with each other (OPTICODEC
7600 optional).
In the data cables, Rx and Tx are always jointly
inverted.
NETControl
E
43
OPTICODEC 7600
System Setup
Backup Settings
In the Backup Settings mode you can allocate an entry of
the ISDN directory of the OC 7600 to each input port of
the alarm/control interface.
X.21 Backup
If your OPTICODEC is equipped with an X.21 interface,
the menu item 'X.21 Backup‘ appears on the display.
To do this, you must activate the check box. Press the ‘Cfg’
key to allocate an ISDN number to this input port.
Press the 'Change' key if you wish to operate changes of
the audio parameters. This ISDN number complies in all
parameters to the respective entry in the ISDN/IP directory
of the OPTICODEC 7600.
Mode
44
E
The X.21 connection is a bidirectional connection between
two devices. You can choose between:
SLAVE
Sender*,
MASTER
Receiver*
and OFF (function switched off).
* monitored is the direction from SLAVE to MASTER.
NETControl
OPTICODEC 7600
System Setup
The master device receives the signals from the slave
device and constantly checks the connection. If the X.21
connection is turned off, the master device establishes an
ISDN connection.
Backup Time
(Ton)
Here you set the time interval for which the sync must be
absent before an ISDN connection is established. Select a
time period between 10 and 60 seconds.
Reconnect Time
(Toff)
During a backup connection, the X.21 line is constantly
checked. If no transfer errors occur during the time
period set with Toff, then it switches back to an X.21
connection.
To establish the connection, select a time period between
10 and 60 seconds or OFF (no backup/X.21 switching).
ACI Dialing
In the following example, the entries IN1 to IN4 are
allocated to entries 87 to 90 in the OC 7600 ISDN/IP
Directory.
Press the 'Change' key if you wish to operate changes of
the audio parameters. This ISDN number complies in all parameters to the respective entry in the ISDN directory.
The entries IN5 to IN8 are not allocated to any entries and
are transmitted transparently to the remote end.
NETControl
E
45
OPTICODEC 7600
System Setup
An acknowledgment of whether the connection was established is sent via the corresponding outputs of the
Alarm/Control interface. For example, if a connection is
established with IN2, then the output OUT2 (PIN 23) is
activated as soon as the connection was established and
the decoder was synchronised.
Mode: Level
As soon as a switching signal is applied to the corresponding input INx, the connection is established and continues
until the switching signal is disconnected.
On
INx
Mode: Pulse
Connecting
Disconnecting
Off
In this mode, the connection is established and disconnected
via two separate switching signals.
INx
Connecting
IN 8
Disconnecting
As soon as a switching signal is applied to INx, the
establishment of the connection begins. The level on INx
is then no longer significant for the connection.
If a switching signal is applied to IN8, then the connection
is disconnected. If a signal is already being applied during
the establishment of the connection, then this signal is
ignored and must first be disconnected again.
Only the rising edge of a switching signal is reacted to
here.
46
E
NETControl
OPTICODEC 7200/7400
System Setup
Backup Settings
In the 'Backup Settings' mode you can allocate an entry of
the ISDN directory to each input port of the Alarm/Control
Interface.
To do this, you must select the requested input port. Press
the ‘Cfg’ (Configuration) key to allocate an ISDN number
to this input port.
This ISDN number complies in all parameters to the respective entry in the ISDN directory.
In the following example, the entries IN1 to IN 4 for backup are utilised.
The entries IN5 to IN8 have not been allocated and are
transmitted transparently to the opposite side. A feedback
to confirm whether connection has been established takes
place over the respective outputs of the Alarm/Control
Interface. When, for example, a connection has been
established with IN2, the output OUT2 is activated once
the connection has been established and the decoder has
been synchronised.
Further information on applications of Backup Settings can
be found on page 49.
X.21 Clock Monitoring
To do this the ‘No X.21 clock’ must be activated. Enter
with the corresponding Cfg button, the ISDN number of
the partner unit which should be dialed in case of error.
The desired configuration is also entered.
NETControl
E
47
OPTICODEC 7200/7400
System Setup
When the unit is in the X.21 mode and the X.21 clock fails,
the unit returns to the main menu and the ISDN connection
is then established.
As soon as the X.21 clock is active again, the ISDN connection
is disconnected and the unit returns to the X.21 mode.
X.21 clock OK
No X.21 clock
X.21 mode
No connection
ISDN connection
T1: Time, how long the X.21 mode must fail before the
ISDN connection is established.
T2: Length of time for an ISDN connection to be established.
T3: Time, how long the X.21 clock must again be active
before the ISDN connection is again disconnected.
T4: Length of time for ISDN connection and change into
X.21 mode.
Times:
(sec.)
Mode: Level
T1
2
T2
5-30
T3
5
T4
1-2
As soon as a switching signal is applied to the corresponding
input INx, the connection is established and continues until
the switching signal is disconnected.
On
INx
48
E
Connecting
NETControl
Disconnecting
Off
System Setup
Applications by Using
Backup Settings:
Satellite/ISDN Redundcy
Assuming the satellite receiver can indicate an opto-decoupled error message, you can connect this information
to the alarm/control interface. If the error message is ON,
the OPTICODEC will automatically establish an ISDN connection to the relevant entry number. If the error message
signal is OFF, the OPTICODEC will disconnect an existing
ISDN connection.
‘Panic Dial’
Up to 8 individually configured connection partners can
be called by using switches. The audio parameters and
connection relevant information are programmed in the
‘Data Input’ menu. A LED connected to the corresponding
OUTPUT of the alarm/control interface will light up indicating that an ISDN connection has been established and
that the decoder is in SYNC.
If the switch has been opened, the ISDN connection will
be disconnected.
NETControl
E
49
System Setup
Saving the Units
System Setup to Your
Harddisk
Similarly to that of the ISDN/IP directory (pls see page
30), there is alternatively the possibility to save the system
configuration of the OPTICODEC onto your PC harddisk
for archive purposes, for example.
Use the ‘Save System Setup to Disk’ feature to store the
unit specific *.CFG data file in a folder of your choice.
Loading System Setup
to a Unit
By using the ‘Load System Setup to Unit’ feature, the system
configuration already stored on your PC can be loaded
onto the OPTICODEC units.
Locate the *.CFG data to be loaded and press the 'Open'
key.
Any number of OPTICODEC units can easily be configured with identical ‘System Setup’ settings using this
procedure.
Note
50
E
To prevent the network configuration being altered during
this process, the following settings are not sent to the
device: Name Server, Domain Name, Local IP Address,
Subnet Mask, Default Gateway, Unit Name, Remote Port
and IP Init Mode.
NETControl
Connect
Connect
The respective connection can be established quickly and
easily. A pre-requisite for the connection establishment is
the correct initializing of the NETControl software with
the connected OPTICODEC. This is confirmed with the
‘Standby’ status message in the program screen.
Establishing a
Connection Using the
ISDN/IP Directory
Select the ‘Connect’ key from the main menu or choose
alternative the 'Unit/Connect'. pulldown menu.
The present ISDN/IP directory appears.
Assigned to each entry you will find the name of your
connection partner, the ISDN number, IP address or target
address, the selected audio parameters as well as the sync
mode of your partner unit.
NETControl
E
51
Connect
Establishing Connection
Select your ISDN connection partner from the list using
the mouse. The selected connection partner is marked and
displayed inverted. Press ‘OK’ to confirm. The connection
is now being established.
After successful synchronization, your OC Remote program
displays the message ‘Connected’ and goes to the online
menu. If the connection is rejected, the OPTICODEC displays ‘Rejected’ and the reason for the rejection. Analyse
the error message using the error codes listed in the
appendix (pls. see page 58).
Establishing a
Connection Using the
Direct-Dial Buttons
This type of connection is established via the four
programmed keys, located right from the display.
pre-
The transmission quality must first be determined. By
pressing a key, you select between Layer 2, Layer 3,
G.711 (3.1 kHz, telephone), G.722 (H.221 or SRT) and 4SB
ADPCM* (*optional).
The entry menu then requests the ISDN number, which is
entered with the numeric keypad as usual.
52
E
NETControl
Connect
Note
The connection parameters for Layer 2 and Layer 3 are
determined as follows: Only entry of the first ISDN number.
64 kbps, 48 kHz, Mono, User Data 1200 baud.
For the entry of two ISDN numbers: 128 kbps, 48 kHz,
Joint Stereo, User Data 1200 baud.
The audio input used is taken from the Accept Configuration. The ISDN Sync used is always AUTO.
Automatic
Connection Start
On switch-on or e.g. after a power outage, the OPTICODEC
automatically establishes a connection provided that the
‘Auto connect after power up’ check box is activated and
a target number or address has been allocated.
Connection Monitoring
After the establishment of the connection and the exchange
of the transmission parameters, the online transmission
menu appears on the display.
It shows information about the send and receive levels,
connection duration and the set headroom and synchronisation.
NETControl
E
53
Connect
In addition, together with the send (Tx) and receive configuration (Rx), the IP address / ISDN number (according
to the connection type) of your codec partner are shown
on the display.
Sync Icon
If the decoder of the connection partner receives the correct data, then this is confirmed by the Sync icon in the
Rx path. The Sync icon is only available between OPTICODECs during POINT-to-POINT or ISDN connections in
Layer 2 and Layer 3. During connections to other units or
with other algorithms as well as during Broadcast/Multicast
connections, this icon is missing.
Adjust
Audio Parameters
During a live connection, you can place a query without
interrupting the line and change the audio parameter
settings.
This function is available from the 'Unit/Audio Data Encoder‘
pulldown menu.
If a connection is made in 'Layer 2‘ or 'Layer 3‘ mode, you
can toggle between these algorithms. The parameters between G.711, G.722 and 4SB ADPCM cannot be changed.
Adjust Audio Levels
This menu item serves for setting the analog Input and
Output levels for the left and right channels without interrupting the line.
Ex-factory the setting is
+12 dBu, the headroom
is 0 dB. This means:
input level = output
level = 12 dBu.
With a mouse click on the arrow keys the level value can
be altered.
Release
54
E
An existing connection can be put on hold for another
network partner by pressing the ‘Release’ button. This is
displayed in the list of units using a color code. An existing
connection remains also in this case unaffected.
NETControl
Connect
Allocate Unit
The safety query ‘Allocate unit?’ now refers to the unit
reservation by another PC. This message appears on all
computers.
By pressing the ‘Allocate’ button, an OPTICODEC is reserved for your computer only. Access to this unit from
another PC is then not possible.
Establishing a
Connection with
X.21/V.35
From the Directory, select an entry with ‘X.21/V.35’ as the
digit of the ISDN number.
Establishing a
Connection with
Codec Loop
From the Directory, select an entry without an ISDN number. The connection is established via the Directory, 'Quick
Dial' or 'Direct Dial Buttons'.
Call Acceptance
with ISDN Sync AUTO
The function ‘AUTO’ (Automatic Detection of the calling Unit)
is entered in the ‘System Setup / Accept Configuration’.
The function ‘ISDN Sync AUTO’ has priority over all other
entries. This means if ‘AUTO’ is set and the OPTICODEC
is called by any competitor codec, the OPTICODEC sets
itself to the audio parameters incl. sync modes of the calling
unit automatically. This might last up to 30 seconds.
The set parameters of the ‘System Setup / Accept Configuration’ are taken over if the OPTICODEC is called by
an OPTICODEC.
Establishing a
Connection with
ISDN Sync AUTO
When a connection partner is entered into the telephone
directory, ISDN Sync and audio parameters can be preset in the configuration. However, an entered ‘ISDN Sync
AUTO’ has priority over all other settings. This means
that if a connection has been established to a competitor
unit, the OPTICODEC automatically adapts itself to the
audio parameters incl. sync modes of the remote unit. This
might last up to 30 sec.
Terminating the
Connection
An existing ISDN or Point-to-Point connection is terminated by pressing the 'Hang Up‘ key twice. Your connection
partner sees the message ‘REMOTE DISCONNECT’.
After the connection has been terminated, the device
goes into standby mode and waits for further connection
requests or calls.
NETControl
E
55
Command line parameters in the NetControl software
Command line
parameters in the
NetControl software
Various software functions can be controlled when the
software is started via command line parameters:
Right-clicking on the
program link opens the
'Properties‘ window.
If the IP list contains
a device that has the
IP address transferred
here, this device will
be selected from the list
as soon as the program
is started. Enter the
following command line
under 'Destination‘:
SELECTIP
”..\netcontrol.exe” SELECTIP:aaa.bbb.ccc.ddd[:pppp]
'aaa.bbb.ccc.dd‘ being the IP address and 'pppp‘ the port
number on the device.
A port number only needs to be defined if the SINGLEIP
parameter is also stated.
If the program is opened with this parameter but without
SINGLEIP, the device whose IP address has been transferred will be selected in the current program.
SINGLEIP
In this mode, the software controls only one device. The
IP address of the device to be controlled is communicated via SELECTIP.
If SELECTIP transfers a further port number separated by
a colon, this will be used to control the device.
This enables the software to be started repeatedly so that
each device to be controlled can be provided with its
own program window. The used port number is displayed
in the software‘s title bar.
56
E
NETControl
Command line parameters in the NetControl software
Example:
1st call:
netcontrol.exe SELECTIP=192.168.206.200:6137 SINGLEIP
2nd call:
netcontrol.exe SELECTIP=192.168.206.201:6138 SINGLEIP
3rd call:
netcontrol.exe SELECTIP=192.168.206.202:6139 SINGLEIP
The Remote Control Port must be configured correctly
for the individual devices. In this mode, the 'Program/Edit
IP List‘ menu option is disabled and any IP addresses
previously entered will be ignored.
AUTOALLOCATE
If this parameter is also transferred, the device will
automatically be reserved by the software as soon as a
call is made. Corresponds to clicking 'Allocate‘.
This function can be used only in conjunction with
SINGLEIP.
OWNIP=aaa.bbb.ccc.ddd
If the PC has several network interfaces available, this
parameter can be used to select which of the interfaces are
to be used for controlling the devices. This corresponds to
selecting the network interface in Program Configuration
under Available Adapters. This selection is overwritten
by the command line parameter. This parameter enables
the software to be started repeatedly even if a different
IP address is transferred at each start. The particular
IP address used is also displayed in the software‘s title
bar.
TOPMOST
The program window is always the uppermost window.
Corresponds to the 'Always on top‘ option in 'Program
Configuration‘.
NETControl
E
57
Status Messages
Ethernet Error Messages
Status Messages
In the online menus of the NETControl and OPTICODEC
units, the following messages can be output:
Status Messages
Possible causes
NO X.21 CLOCK
No X.21 clock pulse was detected.
ILLEGAL X.21 CLK
The measured X.21 clock pulse does not correspond to
an ISO data rate.
The AES input has been set and there is no signal
on the selected input.
On accessing the DSPs, no acknowledgment is
received.
The measured X.21 clock pulse does not match the
encoder settings.
NO INPUT SIGNAL
DSP TIMEOUT
WRONG X.21 CLOCK
Ethernet Error
Messages
The following messages may appear on the display when
connections over a network have failed:
Error message
Possible causes
•
NETWORK IS DOWN
Device not connected to the network.
•
NETWORK IS UNREACHABLE
Local IP address has duplicate allocation.
•
HOST IS UNREACHABLE
The desired IP address cannot be reached.
•
NETWORK RESET
Error on the network.
•
CONNECTION RESET BY PEER
The remote device has terminated the
connection.
•
CONNECTION TIMED OUT
The remote device is not reachable.
•
CONNECTION REFUSED
The connection was refused.
•
HOST IS DOWN
The desired IP address cannot be reached
at the current time.
58
E
NETControl
ISDN Error Messages
Error message
• ISDN NOT RESPONDING
Possible causes
Checkpoint/
workaround
The OPTICODEC could not
• Check the ISDN
connection and
establish a communication to
the cable, and try
the ISDN connection:
again.
• ISDN cable not connected.
• Faulty ISDN cable.
• ISDN connection not in
operation.
• Both B-channels are
already being used by
other devices on this
connection.
• CHANNEL
UNACCEPTABLE
• CALL IN AN
ESTABLISHED CHANNEL
• USER BUSY
• NON-SELECTED USER
CLEARING
• RESPONSE TO STATUS
INQUIRY
The OPTICODEC could not
• Check the entered
establish a connection to the
ISDN number and/
entered number:
or retry later.
• The remote device already
has a connection („busy“).
• The ISDN number is
incorrect.
• UNALLOCATED NUMBER
• NO ROUTE TO SPECIFIED
NETWORK
• NO ROUTE TO
DESTINATION
• NUMBER CHANGED
• DESTINATION OUT OF
ORDER
• INVALID NUMBER
FORMAT
• FACILITY REJECTED
The OPTICODEC could not
• Check the entered
establish a connection to the
ISDN number and
entered ISDN number:
try again.
• The ISDN number is
incorrect or does not exist.
• NORMAL CALL
CLEARING
• NO USER RESPONDING
• NO ANSWER FROM USER
• CALL REJECTED
• NORMAL, UNSPECIFIED
The OPTICODEC could not
• Check the ISDN
establish a connection to the
number and try
entered ISDN number:
again.
• The ISDN number is
• Check the status of
incorrect or does not exist. the remote device
• The addressed remote
and correct if
device is not switched on
necessary.
or is not connected.
NETControl
E
59
ISDN Error Messages
Error message
Possible causes
• NO CHANNEL
AVAILABLE
• NETWORK OUT OF
ORDER
• TEMPORARY FAILURE
• SWITCHING EQUIPMENT
CONGESTION
• ACCESS INFORMATION
DISCARDED
• CHANNEL NOT
AVAILABLE
• RESOURCES
UNAVAILABLE
The cause is attributable
to the ISDN, i.e. it is not
possible for the ISDN
network to establish the
desired connection at the
present time.
• No B-channels are currently
free, since they are being
used at the moment by
other devices on this
connection.
• The ISDN network is
overloaded.
• INTER. NETWORKING,
UNSPECIFIED
This error message appears
when switching between
ISDN networks of different
providers, e.g. from a
private provider to Deutsche
Telekom or on foreign
connections.
• Try again later.
• INTERNAL TIMEOUT
A timeout occurred in the
device while establishing
the connection.
• Check the ISDN
connection, cable,
numbers and
protocol.
• QUALITY OF SERVICE
UNAVAILABLE
• REQUESTED FACILITY
NOT SUBSCRIBED
• BEARER CAPABILITY
NOT AUTHORIZED
• BEARER CAPABILITY
NOT AVAILABLE
• SERVICE OR OPTION
NOT AVAILABLE
• BEARER CAPABILITY
NOT IMPLEMENTED
• CHANNEL TYPE NOT
IMPLEMENTED
• REQUESTED FACILITY
NOT IMPLEMENTED
• ONLY RESTICTED DIG.
INFO AVAILABLE
• SERVICE OR OPTION
NOT IMPLEMENTED
These error messages mean • Check the ISDN
protocol. If it is set
that a function required
correctly, then you
by the OPTICODEC is not
should establish a
supported by the ISDN
test connection in
network. Additional redial
telephone mode to
attempts will result in the
check the activasame error.
ted services. If a
• The set ISDN protocol is
connection can now
incorrect.
be established,
then the service
„Data Transfer“ is
not activated on
the ISDN connection of the dialing
OPTICODEC. The
service must be
activated by your
provider.
60
E
NETControl
Checkpoint/
workaround
• Try again later.
ISDN Error Messages
Error message
Possible causes
• INVALID CALL
REFERENCE VALUE
• IDENTIFIED CHANNEL
DOES NOT EXIST
• CALL IDENTITY IN USE
• INCOMPATIBLE
DESTINATION
• DEST. ADDRESS MISSING
INCOMPLETE
• INVALID TRANSIT
NETWORK SELECTION
• INVALID MESSAGE,
UNSPECIFIED
• MANDATORY ELEMENT
MISSING
• MESSAGE TYPE NOT
IMPLEMENTED
• ILLEGAL MESSAGE
• INFORM. ELEMENT NOT
IMPLEMENTED
• INVALID INFORMATION
ELEMENT
• MESSAGE INCOMPATIBLE
TO CALL STATE
• RECOVERY ON TIMER
EXPIRY
• PROTOCOL ERROR,
UNSPECIFIED
• “ --- “
These error messages are
generally caused by an incorrectly set ISDN protocol.
ONLY FOR US PROTOCOLS
• SPID REQUEST PENDING
• SPID FAILED
• ILLEGAL SPID
• SPID MISSING
The ISDN network did not
report any error. The OC
may possibly have terminated the corresponding
B-channel itself or it was
terminated by the remote
device.
The querying of the SPID
numbers for ISDN has not
yet been answered.
The SPID was rejected by
the ISDN.
The SPID number entered is
too short.
A US protocol was set,
but no SPID number was
entered.
NETControl
Checkpoint/
workaround
• Check the set ISDN
protocol and try
again.
• Check the set ISDN
protocol and try
again.
• Check the SPID
number and
connection.
• Check the SPID
number and connection.
• Enter the SPID and
try again.
E
61
Delivery
Scope
Remote control software NETControl Version 1.13
and e-Book (on data medium)
Guarantee
Unless otherwise stipulated, standard guarantee
regulations are valid and applicable.
Damages resulting from changes or improper
repairs by the orderer or a third party are not
covered by the guarantee.
Call the ORBAN Europe GmbH ISDN test number:
+49 7141 22 66 22.
ORBAN Europe GmbH --- NETControl V1.13_en. 18/09/007R014_DF/RS/Lo
OPTICODEC
Test Number