1
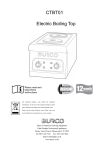
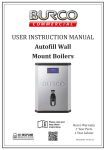
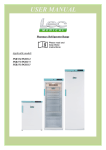
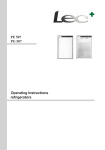
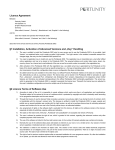
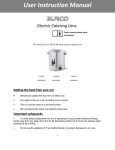
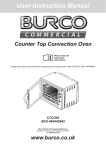
USER MANUAL Laboratory Refrigerator Range Applicable models: LSR151 LSR288 1 Contents Before first use 3 Positioning of refrigerator 3 Transportation and moving of refrigerator 3 Energy saving tips 4 Important information 4 ATEX Conditions of Safe Use 4 Product information 4 Product details 5 Controller overview 6 Viewing and resetting minimum and maximum temperatures Changing the factory set point Changing the temperature scale Changing the remote alarm contacts 7 8 8 9 Alarms 10 Remote alarm contacts 10 Maintenance and Servicing 12 Defrosting Cleaning 12 12 Reversing the door (LSR151) 13 Reversing the door (LSR288) 14 Storage 16 Electrical Connection 17 Disposal 18 Troubleshooting 18 Contact Information 19 2 Thank you for purchasing this Lec Medical product. Before you first use this laboratory refrigerator please carry out the following actions: Check that the refrigerator has not been damaged in any way during transportation. If any damage is found it must be reported to our customer services department immediately on 0844-815-3755 Ensure all packaging has been removed, including cardboard, polystyrene and any tape used to hold shelves in place for transportation. The refrigerator has been cleaned prior to despatch; however, we advise that it should be cleaned using lukewarm water containing a mild detergent and a soft cloth. We recommend that the refrigerator should be left in an upright position for 24 hours prior to switching on. This appliance is intended for professional use in applications such as pharmacies, laboratories, medical facilities etc. This appliance is not intended for use by persons (including children) with reduced physical, sensory or mental capabilities, or lack of experience and knowledge, unless they have been given supervision or instruction concerning use of the appliance by a person responsible for their safety. Children should be supervised to ensure that they do not play with the appliance. Positioning and safely using your Lec Medical refrigerator Make sure the appliance is placed in a dry, well ventilated site, away from heat sources. The appliance must be placed on a level surface. If necessary, adjust the feet on the product so the appliance remains level during operation. The appliance should have sufficient clearance around it to provide adequate ventilation – 10cm at each side, 6cm at the rear and 2.5cm at the top. Before ANY maintenance activity, pull the plug out of the socket by gripping the plug, DO NOT pull on the plug cord. DO NOT use double-wire extension cords. If an extension cord is necessary make sure it is a cord, which possess a protection safety certificate. If the main power supply cord is damaged, it should be replaced by a qualified service engineer. DO NOT attempt any repairs to the appliance yourself (apart from those highlighted in the Maintenance and Service Section). Repairs carried out by someone without the relevant training are putting their personal safety at risk and will invalidate your warranty. Do not store explosive substances such as aerosol cans with a flammable propellant in this appliance. WARNING: this appliance is only to be operated by authorised personnel or personnel who have correct knowledge on how the appliance operates. Transporting and moving your Lec Medical refrigerator The refrigerator must always be moved in the vertical position. The cabinet must not be tilted anymore than 40°. In the event that the cabinet is tilted more than 40°, the power supply must not be connected until the appliance has stood upright for at least 24 hours. 3 Energy saving tips This appliance is cooled by energy-efficient R600a refrigerant. To keep running costs as low as possible always: Position the appliance away from heat sources. Make sure the air can circulate freely around the appliance, don‟t block ventilation grid. Ensure that products being stored in the appliance are below room temperature upon entry. Make sure the door is opened as little as possible whilst in use and closed as quickly as possible to prevent unnecessary temperature fluctuations. Important Information The refrigerator contains environment-friendly, non ozone depleting refrigerant R600a. As R600a is a flammable gas, it is important to avoid damage to the refrigeration circuit during transport and installation. If the refrigeration circuit is damaged, avoid using a naked flame in the vicinity of the refrigerator and connecting power to the refrigerator. Also make sure there is good ventilation in the room. If you are in doubt please contact your supplier. WARNING: Keep ventilation openings, in the appliance enclosure or in the built-in structure, clear of obstruction. WARNING: Do not use mechanical devices or other means to accelerate the defrosting process, other than those recommended by the manufacturer. WARNING: Do not damage the refrigerant circuit WARNING: Do not use electrical appliances inside the food storage compartments of the appliance, unless they are of the type recommended by the manufacturer. ATEX Conditions of Safe Use Equipment shall not be used if frequent electrostatic brush discharges are expected to occur in normal operation. The internal refrigeration chamber is classed as Zone 2, category 3 when the door is closed. The external parts of the refrigerator is classed as safe area and as such do not need to comply with the requirements of the Directive. Product Information This refrigerator has been designed and built with the intention of the product being used within a Laboratory and is designed to store contents between +2°C to +10°C. Please see below for specific product information: Model Height (mm) Width (mm) Depth (mm) Weight (Kg) LSR151 845 595 635 36 LSR288 1565 595 670 58 Refrigerant type R600a Ambient/Room working temperature No. of shelves Door Type +10°C to +32°C 3 Solid 3 Solid 4 Product details 1 2 3 4 5 6 7 1. 2. 3. 4. 5. 6. 7. Lock Electronic Controller Antimicrobial handle Wire Shelf Wire Basket Adjustable foot (2 at front of appliance) Door furniture There are also 2 roller castors at the rear of the appliance to ease product movement. Additional or replacement parts are available from our spare parts department. See back of booklet for contact details. 5 Controller overview and operation 1 2 3 4 1. 2. 3. 4. 5. 6. 7. 5 6 7 Menu Lock keypad Maximum temperature / Up Power Mute Minimum temperature / Down Set / Enter 6 Viewing & resetting minimum and maximum temperatures 7 Changing the factory set point (the set point is the point at which the refrigerator normally holds the temperature at; in some circumstances such as high/low room temperatures it may be necessary to adjust this slightly) Changing the temperature scale between Celsius (°C) and Fahrenheit (°F) 8 Changing the remote alarm contacts 9 Warning Alarms This refrigerator has been designed to provide both an audible and visual alarm should any of the following situations occur: Door is left open for a set period Internal air temperature goes outside the set parameters, either too high or too low Internal „load‟ temperature goes outside the set parameters, either too high or too low Should one of these alarms occur this can be muted by pressing on the controller. The „load‟ temperature is a simulated temperature which is intended to provide an indication of the temperature of the refrigerator‟s contents (e.g. a 5ml vaccine). The temperature of a refrigerator‟s contents will change more slowly (up or down) than the air temperature within that refrigerator should there be a fault or the door is left open. Remote alarm contacts All Lec Medical laboratory refrigerators include remote alarm contacts and these terminal contacts enable the user to connect to a remote control station; these contacts can be found on the rear of the cabinet. WARNING: These contacts must only be accessed by a competent electrician. In order to use these contacts the following must be carried out: 1. The refrigerator MUST be disconnected from the power supply before removing the terminal cover. 2. Unscrew the cover (figure 1) on the right hand side of the rear of the cabinet to expose the connectors (figure 2). Figure 1 Figure 2 3. Use the right hand outer positions that correspond to the left hand cable positions for your connections using 0.75mm cable stripped to 0.6mm. 4. Depress the larger slot above the cable entrance on the right hand side with a small electrical screwdriver. This allows the cable to be inserted into the slot directly below. In the event of a door open alarm, high or low temperature alarm or power failure a remote relay will switch within the controller to make an electrical circuit. Please note that the contacts supplied are voltage free. A voltage of between 12V DC and 230V AC can be connected at the contacts. The maximum load must not exceed 2A. The minimum power rating is 500mA / 12V AC. 10 In a normal condition (i.e. no alarm) the relay OPENS the contact for the remote alarm facility. In an alarm condition the relay CLOSES the contact for the remote alarm facility. 11 Maintenance and Service of your Lec Medical Refrigerator Defrosting All laboratory refrigerators feature automatic defrosting and, in normal conditions, means that no manual defrosting is required. However, in certain conditions (e.g. when the refrigerator is very full or when any new items of are stored in the refrigerator) frost may form on the rear wall of the appliance as the compressor must run for long periods of time. As automatic defrosting takes place while the compressor is not running the refrigerator may not defrost completely before the compressor restarts. In these instances some manual defrosting may be required. Before manually defrosting the cabinet, make sure the power lead is disconnected from the mains. Any loose frost found on the evaporator can be removed carefully using a wooden or plastic scrapper. WARNING: Do not use any knives or sharp metallic objects to remove frost. Alternatively a non-scheduled defrost can sometimes be carried out as follows: Cleaning Your freezer should be cleaned regularly. Before cleaning you MUST switch off and disconnect your freezer from the power supply. The whole freezer except the door gasket can be cleaned with mild cleaning detergent. Clean only with a damp cloth The door gasket should be cleaned with water only and wiped dry. The antimicrobial handle should be cleaned regularly with soap and water. Remove shelves/basket/door furniture and wipe with a damp cloth. DO NOT put then in a dishwasher. Detergents containing abrasives or acids are not suitable for the cleaning. When all cleaning has been completed and accessories replaced, reconnect the plug with dry hands. 12 Reversing the door – LSR151 In order to reverse the door please follow the below instructions. This should be carried out by 2 people for safety purposes. 1. Tilt the refrigerator backwards by 45° and lean on a vertical, hard surface such as a wall. 2. Remove the feet from the bottom, right hand hinge (figures 1 and 2). 3. Remove the screws from the hinge (figure 3) and remove hinge. Figure 1 Figure 2 Figure 3 4. Pull the door from the bottom to remove from the refrigerator. 5. Remove the top, right hand hinge (figure 4). 6. Install the hinge on the top, left hand side (figure 5). Figure 4 Figure 5 7. Remove the bottom left hand feet and base plate (figures 6 and 7). Figure 6 Figure 7 13 8. Insert the door into the top, left hand hinge (figure 8). 9. Install the bottom, left hand hinge (figure 9) and screw in the feet. Figure 8 Figure 9 10. Add the feet and base plate to the bottom, right hand side. 11. Remove the caps from the screws holding the handle in position. 12. Remove the handle screws. 13. Remove the caps on the opposite side of the door. 14. Screw the handle into position and add the caps to cover the screws. Reversing the door – LSR288 In order to reverse the door, please follow the instructions below. This should be carried out by 2 people for safety purposes 1.Tilt the refrigerator backwards by 45° and lean on a vertical, hard surface such as a wall 2. Unclip the plastic trim from the bottom of the unit (figure 1) 3.With somebody holding the door, Unscrew the bottom hinge plate and slide the door off the unit (figure 2) Figure 1 Figure 2 4.Using a flat blade screwdriver, Unscrew the top hinge pin (figure 3) and swap over to the corresponding hole on the other side (figure 4) Figure 3 Figure 4 14 5.Using a flat blade screwdriver, unscrew the hinge pin from the bottom hinge plate (figure 5) and swap the pin to the other side as shown (figure 6) Figure 5 Figure 6 6. Move the hinge pin blanking plug from the top left hand side of the door to the corresponding position on the right hand side (figure 7) Figure 7 7. Remove the piece of white tape from the bottom left hand corner (figures 8a & 8b) Figure 8a Figure 8b 8.Carefully slide the door onto the top hinge pin (figure 9) and get somebody to hold it in place Figure 9 15 9.Engage the bottom hinge pin into the bottom of the door and fix the bottom hinge into position with the 2 screws (figure 10) Figure 10 10. Remove the caps from the screws holding the handle in position 11. Remove the handle screws (figure 11). Figure 11 Figure 12 12.Remove the caps on the opposite side of the door (figure 12) 13.Screw the handle into position and add the caps to cover the screws. Storage If the refrigerator is to remain unused for a period of time (e.g. during refurbishment work) switch the appliance off by pressing the power button and disconnect the power supply to the cabinet at the wall socket. It is also advised that the appliance is unplugged from the power supply. Empty, defrost and clean the refrigerator. Make sure the door is left slightly ajar to prevent any bad odours forming within the cabinet. 16 Electrical Connection The appliance is intended for connection to alternating current. The connection values for voltage (V) and frequency (Hz) are declared on the name plate in the cabinet. Power must be connected via a wall socket with a switch. It is strongly recommended that the wall socket is easily accessible. All earthing requirements stipulated by the local electricity authority. The cabinet plug and wall socket should give correct earthing. If in doubt, contact your local supplier or an authorised electrician. If the supply cord is damaged, it must be replaced by the manufacturer, its service agent or similarly qualified persons in order to avoid a hazard. WARNING: THIS APPLIANCE MUST BE EARTHED The flexible cord (mains lead) fitted to this appliance has three cores for use with a 3-pin 13 amp plug. If a BS 1363 (13-amp) fused plug is used it should be fitted with a 13-amp fuse. The cores in the mains lead are coloured in accordance with the following code: GREEN AND YELLOW: EARTH BLUE: NEUTRAL BROWN: LIVE These colours might not correspond with the colour markings identifying the terminals in your plug. Note: First Connection to the mains The high temperature alarm will sound and “Hi” will be displayed until the appliance has reached the correct temperature. To silence the alarm, press any button. The alarm is repeated every 15 minutes until the required temperature has been reached. 17 Disposal of your refrigerator When disposing your refrigerator do not take it to regular municipal waste containers. Instead, take it to an electrical/electronic waste recycling and re-use centre. This refrigerator contains insulation gases and refrigerant and must be disposed of in the appropriate manner. Please contact the manufacturer or local authority for advice on how best to dispose of this product. A relevant label has been placed on the refrigerator‟s packaging (see below). The product has been manufactured of recyclable materials. Ask your local environmental care authority for information concerning location of such facilities. Troubleshooting PROBLEM The appliance does not work REASON A gap in the electric system circuit The compressor hardly ever activates The door doesn't shut tight or is opened too often The temperature inside the appliance is not low enough (the compressor operates continuously) Water collects at the bottom part of the refrigerator The appliance makes too much noise The ambient temperature is above that which has been outlined in the product specification (page 6) Air circulation at the back of the appliance is hampered The appliance is placed such that it is subject to constant sunlight, or another heat source e.g. Radiator The contents touch the back wall of the cabinet The drain opening is clogged The appliance is not level The appliance is touching another object SOLUTION 1. Make sure the plug is properly inserted into the socket 2. Make sure the socket is not faulty 3. Make sure the power supply cord is not damaged 1. Check to see if the ambient temperature is below +10C 1. Rearrange the products so they don't hamper the door 2. Shorten the time the door is open for 1. Check that the appliance is operating at an ambient temperature that meets the product specification on page 4 1. Move appliance further away from the wall 1. Move the appliance to a different place away from heat sources or direct sunlight 1. Move the products so they aren't in contact with the back wall 1. Take the cleaning plug and unclog the condensate opening 1. Place the appliance on an even surface or use adjustable feet 1. Reposition the appliance so it is detached from any other objects 18 Sales Enquiries: email: tel: fax: [email protected] 0844 815 3742 0844 815 3748 Marketing Enquiries: email: tel: [email protected] 0844 248 4661 Spares and After Sales Service: email: tel: fax: [email protected] 0844 815 3755 0844 248 4123 Address: Lec Medical Stoney Lane, Prescot, Merseyside, L35 2XW. For any other information please visit: www.lec-medical.co.uk I3001 – Iss. B – March 2013 19