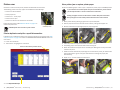
1
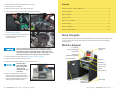
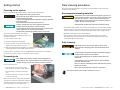
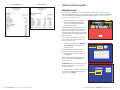
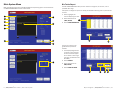
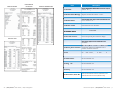
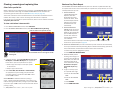
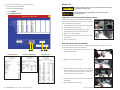
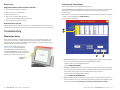
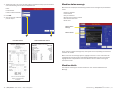
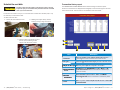
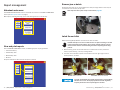
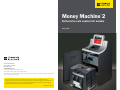
Money Machine 2
®
Self-service coin counter bin models
User guide
852 Feehanville Drive
Mt. Prospect, IL 60056
800 786 5528
cumminsallison.com
© 2014 Cummins-Allison Corp. All rights reserved.
All trademarks remain the property of their respective owners.
Cummins-Allison Corp. has endeavored to make the content of this document accurate and complete, but this information is subject to
correction or change without prior notice.
This manual contains proprietary information of Cummins-Allison Corp. It is intended solely for the
information and use of parties authorized by Cummins Allison to maintain the equipment described herein.
Such proprietary information may not be used, reproduced, or disclosed to any other parties for any other
purpose without express written permission of Cummins Allison.
022-7827-00 Rev. C
Safety information, power specifications
High voltage inside. Risk of electric shock.
Do not attempt repairs. Repairs must be made by authorized
Cummins Allison personnel.
Plug three-prong grounded plug (supplied) into properly grounded
three-prong outlet.
Read and understand all instructions before use.
CAUTION
Sort disk rotates when motor is running. Risk of injury.
Do not defeat safety interlock switches.
Improper voltage levels can cause equipment malfunction,
damage electrical components, and void warranty.
Provide separate circuit serving only this device and follow listed
power requirements to ensure proper operation.
Provide power conditioning/stabilizing devices if necessary.
• Voltage operating range: 105–253 VAC, automatic switching
• Frequency: 50/60 Hz
• Full load amps (FLA): 4.5/9A
• Electrical supply circuit: The customer must provide a single-phase, dedicated power line that meets the
machine’s power requirements. Use a properly grounded circuit breaker in compliance with applicable local
electrical code.
Environmental operating conditions
• Temperature: 60°F - 85°F (15°C - 29°C)
• Humidity: 30% to 70% (non-condensing)
Compliance acknowledgments
• Laser: This equipment may contain Class 2 laser products and complies with FDA Radiation Performance
Standards, 21 CFR Subchapter 1 and the international laser safety standard IEC-60825.1-2001-08.
• FCC: This device complies with part 15 of the FCC rules. Operation is subject to the following two conditions: (1)
this device may not cause harmful interference, and (2) this device must accept any interference received,
including interference that may cause undesired operation.
• Regulatory: UL/CUL, FCC/CE
2 | Money Machine® 2 bin models | Safety information, power specifications
| Money Machine® 2 bin models | 27
1. Raise the hood to access the inside of the machine.
Contents
2. Empty debris cup as needed.
3. Remove any stray coins or other objects by hand.
4. Vacuum interior areas to remove accumulated dust or debris.
Safety information, power specifications...........................................................................2
About this guide ..................................................................................................................3
Machine diagram ................................................................................................................3
Getting started ....................................................................................................................4
How to use the system........................................................................................................5
Troubleshooting ................................................................................................................ 10
Report management ........................................................................................................ 16
5. Raise and inspect sort disk (see Unlatch
the sort disk on page 12).
6. Remove any debris by hand. Clean disk if
needed using dry microfiber towel or
clean cotton cloth.
Daily cleaning procedures ............................................................................................... 25
About this guide
This guide covers basic features of the Money Machine® 2 coin counter with single or dual
bin. For coin counters having other collection types, please refer to the corresponding
operating guide.
Machine diagram
Clean sort disk only as instructed. Do not attempt to remove
oil coating on disk. Removing oil from disk negatively impacts
performance and may negate disk warranty. If disk cannot be
cleaned with a clean, dry microfiber towel or cotton cloth, contact
your Cummins Allison service representative for assistance.
7. Lower sort disk and secure latch. See Latch the sort disk on page 13.
8. Close hood and front door, secure machine.
15” color LCD
touch-screen display
Indicator light
(optional)
Printer bezel
Storage for
optional telescopic dolly
Front access door
Speakers
9. Clean the touch-panel display with a dry microfiber towel..
Gravity-flow
coin tray cover
Avoid damaging
touch-panel display.
Clean touch-panel
display with dry
microfiber towel only
as directed.
10. Clean remaining exterior surfaces as
necessary with a Simple Green safety
towel. If using Simple Green concentrate,
dilute 1 part Simple Green with 8 parts
water. Apply with microfiber towel.
26 | Money Machine® 2 bin models | Daily cleaning procedures
Access cover
(hood)
Coin reject cup
Barrel lock
Bin cavity
(single bin
machine shown)
Leveling legs
®
About
this
| Money
Machine
bin models
Table
of guide
Contents
| Money
Machine2Model
7699 || 3
3
Getting started
Daily cleaning procedures
Powering on the system
Daily cleaning of Money Machine 2 machines is recommended to ensure maximum
productivity and reliability.
Power on your Money Machine 2 system and get started processing coin.
High voltage inside. Risk of electric shock.
Do not attempt repairs. Repairs must be made by authorized
Cummins Allison personnel.
Plug three-prong grounded plug (supplied) into properly grounded
three-prong outlet.
Read and understand all instructions before use.
Improper voltage levels can cause equipment malfunction,
damage electrical components, and void warranty.
Provide separate circuit serving only this device and follow listed
power requirements to ensure proper operation.
Provide power conditioning/stabilizing devices if necessary.
The master power switch that turns Money
Machine 2 ON and OFF is located inside the unit.
To access the switch:
1. Open the front access door.
2. Raise the access cover completely.
3. Locate the switch on the inside back panel,
slightly to the right of center, as shown.
4. With the power cord firmly plugged into a grounded outlet, POWER ON the system by
pressing the master power switch rocker panel to –.
System performs a confidence test and the WELCOME screen appears on the display.
In the event of a power outage, all transaction data is retained.
Processing coin
Coin should be dry and free of debris before pouring into the
gravity-flow coin tray. Liquid, mutilated coin or debris may cause
machine damage or a jam that requires assistance to remove.
Prior to processing coin:
• Remove non-coin items such as paper
clips, hardware, wrappers, candy, gum, etc.
• Remove foreign, mutilated or damaged
coin.
Recommended cleaning materials
CAUTION
Simple Green, the recommended cleaning agent, can be an eye
irritant. Avoid eye contact. If eye contact occurs, flush eye(s) with
cool water for 5 minutes – remove contact lenses if present –
continue flushing eye (s) with cool water for 15 more minutes. If
irritation persists, consult physician.
Individuals with sensitive skin should rinse hands after using.
• Simple Green safety towels. (Part number: 022-2118-00.) A pre-moistened microfiber
towel also may be used. If using Simple Green concentrate, dilute to: 30 ml of Simple
Green per 240 ml of water. For material-safety-data sheets, see simplegreen.com.
• Microfiber towels. (Part number: 022-2223-00.)
• Vacuum cleaner. (In the United States: Order standard vacuum part number
022-1959-00 or heavy-duty vacuum part number 022-1308-00. Outside of the
United States: Buy vacuum locally.)
Daily cleaning
High-voltage levels may be present. Risk of electric shock.
Turn power OFF and unplug power cord from machine before
cleaning.
To avoid machine/component damage and potential voiding of
existing warranty, follow these procedures:
Only use the specified tools for cleaning machine. Never use
metal tools.
If using Simple Green concentrate, dilute to: 30 ml of Simple
Green per 240 ml of water.
Never use cleaners containing ammonia. Ammonia may remove
labels from machine.
Never spray cleaners directly on machine components.
Never wipe sort disk or pad, except as instructed on page 26.
• Verify that no liquid or moisture is present
in the coin container.
Most non-coin objects inadvertently processed
with coin are culled into a receptacle inside the
cabinet. Foreign coin is returned to consumer
via the coin-reject cup in the door panel.
4 | Money Machine® 2 bin models | Getting started
Daily cleaning procedures | Money Machine® 2 bin models | 25
PRINT BIN REPORT
PRINT ALL BINS
How to use the system
Attendant Login
If a transaction is interrupted, or “Momentary Delay, please call an attendant” appears
on the CONSUMER screen, the attendant should login to access the MAIN SYSTEM MENU
and review Machine Status Message and Machine Details. Refer to Troubleshooting on
page 10 for more information.
1. Place your finger on the top right-hand
corner of the WELCOME screen and
hold for 3 seconds. The ATTENDANT
LOGIN screen appears.
If the ATTENDANT LOGIN screen does not
appear after 10 seconds, lift your finger off
the screen. Place finger back on the top
right-hand corner of the screen and hold for
3 seconds. Repeat until ATTENDANT LOGIN
screen appears.
If no response, power-cycle the machine
(turn machine off, wait 10 seconds, turn
back on); repeat step 1.
2. Select the entry field beside Attendant
ID or Password to activate the touchscreen keyboard.
Navigate the keyboard using either the
directional keys or by selecting a field.
3. Enter your Login information and press
the Login key.
When a valid attendant ID and password
are entered, the MAIN SYSTEM MENU
screen appears.
Invalid Login appears in red below the entry
fields when login information is incorrect.
Proceed as follows:
1. Verify your login information and re-enter.
To return to the WELCOME screen without
logging in, select Cancel.
24 | Money Machine® 2 bin models | Report management
How to use the system | Money Machine® 2 bin models | 5
Main System Menu
Bin Totals Report
Most management functions of the Money Machine 2 operating system are accessed via
the MAIN SYSTEM MENU screens shown below.
The BIN TOTALS REPORT screen prints bin totals for a single bin, for all bins, or for a
specified date range.
Two copies of a single bin report are usually printed before clearing a full or partial bin for
removal.
2
3
1
1. Select (highlight) the
column displaying the data.
2. Select desired format
(UNIT/VALUE)
12
4
1
3. Select PRINT BIN REPORT.
11
10
8
9
7
2
5
3
6
A report of all bins can be
generated and printed as
needed:
1. Use Display Range feature
to choose a date range for
bin data, if desired. (If you
do not select a date range,
the report printed will be for
ALL BINS.)
13
2. Select UPDATE.
3. Select desired format:
UNIT/VALUE)
4. Select PRINT ALL BINS.
3
6 | Money Machine® 2 bin models | How to use the system
1
2
4
Report management | Money Machine® 2 bin models | 23
PRINT DAY REPORT
PRINT DETAILED
DAY REPORT
Item
PRINT DAY TRANSACTIONS
Description
1.. At
1
Atte
Attendant
tend
ndan
antt
Access
ATTENDANT
reports
Acce
Ac
cess
ss AT
ATTE
TEND
NDAN
ANTT MAIN
MAIN MENU
MEN
ENU
U screen
scre
sc
reen
en fo
forr re
repo
port
rtss
and
d bi
bin clea
l ring.
i
clearing.
2.. Ma
Machine
Status
Message
2
Mach
chin
ine
e St
Stat
atus
us M
essa
es
sage
ge
Reports
condition
machine
errors.
Re
Repo
port
rtss co
cond
ndit
itio
ion
n of m
achi
ac
hine
ne – e
rror
rr
ors.
s.
3.. Ma
Machine
Status
3
Mach
chin
ine
e St
Stat
atus
us
Calendar
Day
Reject
Count,
Balance
Ca
Cale
lend
ndar
ar D
ay TTotal,
otal
ot
al, Re
Reje
ject
ct C
ount
ou
nt, Bi
Bin
n Ba
Bala
lanc
nce
e an
and
d
D
Denomination
enominati
i tion TTotals.
ottals.
l
4.. Ma
Machine
Details
4
Mach
chin
ine
e De
Deta
tail
ilss
Instructions
error
In
Inst
stru
ruct
ctio
ions
ns ffor
or e
rror
rr
or rresolution.
esol
es
olut
utio
ion.
n.
5.. Co
Consumer
5
Cons
nsum
umer
er Screen
Scr
cree
een
n
Return
CONSUMER
screen.
Re
Retu
turn
rn tto
o th
the
e CO
CONS
NSUM
UMER
ER sc
scre
reen
en..
6.
Service
6. Place
Plac
Pl
ace
e Ou
Outt of S
ervi
er
vice
ce
Initiate
‘Temporarily
Service’
display.
Init
In
itia
iate
te ‘Te
Temp
mpor
orar
arililyy Ou
Outt of S
ervi
er
vice
ce’ di
disp
spla
lay.
y.
7.
7. Clear
Clea
Cl
earr
(Not
Appears
needed
error
(Not sshown)
hown
ho
wn)) Ap
Appe
pear
arss wh
when
en n
eede
ee
ded
d fo
forr er
erro
rorr
resolution.
resollution.
i
8.
End
8. Manually
Manu
Ma
nual
ally
ly E
nd TTransaction
rans
ra
nsac
acti
tion
on
(Not
shown)
Allows
attendant
active
( ot sh
(N
hown)) Al
All
lows attend
dant to end
d the
h ac
tive
i
tran
tr
ansa
sact
ctio
ion.
n. A
ppea
pp
ears
rs a
need
eded
ed ffor
or e
rror
rr
or o
transaction.
Appears
ass ne
needed
error
orr
machine condition resolution.
9. Footer
Foot
Fo
oter
er
9.
Show
Sh
owss da
date
te a
nd ttime,
ime,
im
e, ccurrent
urre
ur
rent
nt ssoftware
oftw
of
twar
are
e ve
vers
rsio
ion.
n.
Shows
and
version.
10 Administrator
Admi
Ad
mini
nist
stra
rato
torr
10.
Not fo
forr at
atte
tend
ndan
antt us
use
e
Not
attendant
11 Diagnostics
Diag
Di
agno
nost
stic
icss
11.
Not fo
forr at
atte
tend
ndan
antt us
use
e
Not
attendant
12 Setup
Setu
Se
tup
p
12.
Not fo
forr at
atte
tend
ndan
antt us
use
e
Not
attendant
13. Bin Fullness, Active Bin
Show percent-full for each bin (if dual bin) and
indicate which bin is active (dual bin only).
PRINT ALL DAYS
22 | Money Machine® 2 bin models | Report management
How to use the system | Money Machine® 2 bin models | 7
Clearing, removing and replacing bins
Business Day Totals Report
Clear full or partial bin
The BUSINESS DAY TOTALS REPORT screen prints coin data for a specific business day/
time period. Can be set to occur automatically at a specific time, every 24 hours, or can be
manually cleared at any time.
When a hard bin limit is reached during a transaction, the MOMENTARY DELAY screen
appears. Attendant should login to the MAIN SYSTEM MENU screen and follow the
instructions given to resolve the error. (See Momentary delay on page 10).
The current transaction must be ended. Consumer can leave with uncounted coins and
redeem their receipt or wait to count remaining coins after full bin is replaced.
If an empty bin is not available to replace the full bin, leave bin in the machine and select
Temporarily Out of Service.
To clear a bin before it becomes full:
1. From MAIN SYSTEM MENU screen, select Attendant.
2. From ATTENDANT MAIN MENU screen, select Bin and Business Day Clearing.
Press to return to the previous screen.
1. PRINT DAY REPORT
includes Business Date
Reported, Total Amt.
Processed, Total Units,
Transaction Count, Value
of Coin Accepted, Service
Charges, and value by
denomination for the
selected day.
2. PRINT DETAILED DAY
REPORT prints the start of
day (SOD) and end of day
(EOD) for the selected day,
plus the EOD sequence
number. Coin totals are
listed by denomination,
Unit and Value.
1
3
2
The Statistics Section of the report includes bag details and other information, as
shown in the report example on page 22.
3. PRINT DAY TRANSACTIONS prints all transactions by audit number for the selected day
and may be used for end-of-day balancing. Report includes the date being reported on,
Time, Audit Number, Value and Service Fee totals for each transaction.
a. Select a day (column highlighted in yellow).
For dual bin machines, the current bin is identified in box to the right of the Bin
Clearing box.
3. Under Bin Clearing, select Print Bin Report, Print Front
Bin Report or Print Rear Bin Report, as appropriate.
Press twice to print two copies of the bin report.
a. Place a copy of the report in the report pocket
on the coin bin.
b. Keep a copy at the location.
4. Select Clear Bin, Clear Front Bin or Clear Rear Bin,
as appropriate. A system dialog prompts Attendant
to confirm clearing a non-full bin. Select Yes to clear
the bin or No to cancel.
When Clear Bin is selected without first printing a
report, a system dialog asks Attendant to print report or to
confirm clearing the bin without printing a report. Select Yes
to print bin report or No to clear the bin and continue without
printing a report.
8 | Money Machine® 2 bin models | How to use the system
b. Select PRINT DAY TRANSACTIONS.
4. PRINT ALL DAYS (without
entering a date range) is a
summary that includes the
Date, Value, Unit Total and
Service Fee Total for all
coins collected for all days.
Be advised - the report
generated may be very
long.
5. To get a summary report
for a specific date range:
a. Enter the desired START
DATE.
b. Enter the desired END
DATE.
c. Select UPDATE.
5a 5b
5c
4 5d
d. Select PRINT ALL DAYS.
Report management | Money Machine® 2 bin models | 21
Remove bin
4. To get a summary report for a specific date range:
a. Enter the desired START DATE.
CAUTION
b. Enter the desired END DATE.
c. Select UPDATE.
A full bin can weigh 500 lb. or more. Please follow recommended
procedures to prevent injury.
Handle flyaway hazard. Completely lower bin to floor before
releasing handle.
d. Select PRINT ALL DAYS.
Single bin or front bin (dual bin machine) removal:
Use exterior bin dolly or telescoping dolly stored inside
machine cabinet (if available) to move bins to a secure
indoor location for later transport.
1. Extend and secure handle if using telescoping dolly.
2. Insert dolly ball into bin socket.
3. Push dolly handle down only enough to lift bin
slightly off floor, and pull bin forward slowly.
4. Move bin to a secure location.
5. Carefully raise dolly handle to lower bin onto a level
floor surface.
6. Remove dolly from bin.
Rear bin removal (dual bin machine):
Use bin dolly with both ball and hook or modified telescoping dolly with hook for rear bin
removal/replacement (hook sold separately).
4a 4b
PRINT DAY REPORT
PRINT DAY TRANSACTIONS
4c
3 4d
1. If dolly has ball exposed, push lever up with foot as
shown to expose hook.
PRINT ALL DAYS
2. Maneuver hook beneath socket.
3. Push dolly handle down enough to lift bin slightly off
floor and slowly pull bin forward to about the position
shown (or until the ball can be used to pull bin the
rest of the way out of the machine).
4. Push down with foot as shown to flip hook over and
expose ball.
5. Follow steps 2 through 6 above.
20 | Money Machine® 2 bin models | Report management
How to use the system | Money Machine® 2 bin models | 9
Replace bin
Calendar Day Totals Report
Single bin model or dual bin model, front bin:
1. Insert dolly ball in socket of empty bin.
2. Maneuver bin into machine cavity.
3. Remove dolly from bin.
4. Pull the tab to collapse dolly and store
inside machine cabinet (telescoping dolly only).
Prints counted coin data for specified calendar day(s).
The CALENDAR DAY TOTALS REPORT screen database contains only days in which valid or
foreign coin is counted. If a date does not appear, no coin was counted during that
24-hour period.
The on-screen report provides the detail for each day of processing. Amounts can be given
in units or values by toggling the UNIT/VALUE key.
Four reports may be printed:
5. Close and lock the machine cabinet.
Dual bin model, rear bin:
If replacing rear bin on a dual-bin machine, use ball end of dolly to move bin part way in,
then flip from ball to hook (see photo) and use hook to slowly push bin to back of cabinet.
1a
Troubleshooting
2a
Momentary delay
When selected in setup, the optional indicator light on top of the display signals that
the machine has an error or needs attention. The screen displays a message stating
“Momentary Delay – Please call an attendant for assistance.” The current value of coin
processed is also displayed, if applicable.
Attendant should login (see Attendant
Login on page 5) to read the Machine
Status Message and Machine Details on
the MAIN SYSTEM MENU screen. Follow the
recommended steps to resolve the issue and
restore the machine to active service.
Indicator light
(optional)
2b
1b
1. PRINT DAY REPORT prints a summary for the highlighted date. Report shows the Date,
Value, Unit and Service Fee totals for the selected 24-hour period.
a. Select a day (column highlighted in yellow).
b. Select PRINT DAY REPORT.
2. PRINT DAY TRANSACTIONS prints all transactions by audit number for the selected day
and may be used for end-of-day balancing. Report includes the date being reported on,
Time, Audit Number, Value and Service Fee totals for each transaction.
a. Select a day (column highlighted in yellow).
b. Select PRINT DAY TRANSACTIONS.
3. PRINT ALL DAYS (without entering a date range) prints a summary for all days. Report
includes the Date, Value, Unit and Service Fee totals for each day, and aggregate totals
for the period requested. Be advised - the report generated may be very long.
10 | Money Machine® 2 bin models | Troubleshooting
Report management | Money Machine® 2 bin models | 19
1. To filter the report, set a start and end range for transaction history report and choose
one of the following criterion from the drop-down list:
Machine status message
Machine status is displayed. The following machine status messages require attendant
action:
• Date
• Audit Number
•
•
•
•
•
•
• Total $ of Amt Processed
2. Press OK.
3. View results and, if desired,
print the report.
Table jam detected
Laser blocked
Coin jam detected
Hard bin limit has been reached
Coin discrimination limit
Printer error
Machine Status
Message
Machine Details
1
DUPLICATE RECEIPT
2
PRINT TRANSACTION DETAILS
Other machine condition messages may also appear with corresponding instructions for
resolution as needed.
When more than one message appears, highlight one issue at a time. Instructions for
the highlighted message appear under Machine Details. When that issue is corrected,
highlight another and proceed as instructed. Resolve all errors before restoring the
machine to service.
Machine details
View steps for resolving the machine condition or error named in Machine Status
Message.
18 | Money Machine® 2 bin models | Report management
Troubleshooting | Money Machine® 2 bin models | 11
Unlatch the sort disk
CAUTION
Transaction history report
Sort disk rotates and laser light is present when motor is running.
To prevent injury, do not defeat safety interlock switches and avoid
direct eye contact with laser.
The TRANSACTION HISTORY REPORT screen allows viewing of onscreen reports.
Consumer transactions are displayed chronologically in columns starting from the most
recent at the far left. Use the scroll bar as needed to view transactions.
In the event of a table or coin jam, or to remove coins or debris from the disk pad, it may
be necessary to raise the sort disk.
To unlatch the sort disk:
1. Locate the latch behind the coin
hopper.
2. Holding coin hopper firmly, release
latch by turning to align with cutout.
3. Allow sort disk to gradually rise from
the sort pad, continuing to hold
hopper until disk is fully raised.
1
2
3
Item
12 | Money Machine® 2 bin models | Troubleshooting
4
5
6
Description
1. Statistics
View
statistics
orr bi
statistics
denomination
View ccoin
oin
oi
in st
tat
ati
tisti
isti
tics
cs o
bin
n st
tat
ati
tisti
isti
tics
cs sshowing
howi
ho
wing
ing d
enom
en
omiin
inat
ati
tion
ion
percentages
orr fo
bin.
perc
pe
rcen
enta
tage
gess fo
forr ea
each
ch ttransaction
rans
ra
nsac
acti
tion
on o
forr ea
each
ch ccoin
oin
oi
n bi
bin
n.
Unit/Value
2. U
2.
nit/
ni
it/
t/V
Value
Val
lue
Select
Sele
Se
lect
ct tto
o to
togg
toggle
ggle
gg
le d
denomination
enom
en
omin
inat
atio
ion
n di
disp
display
sp
pla
layy be
bet
between
twee
een
n unit
units
nitss an
and
d val
values.
alues
es.
3. Duplicate
3.
Dup
upli
lica
li
catte
te Rece
R
Receipt
eceiipt
ipt
Select
print
duplicate
receipt
Sellectt tto
o pr
p
intt a d
upl
plicate
t recei
ipt ffor
or a ttransaction.
ransacti
tion.
4.. Print
4
Pri
rint
nt Transaction
Tra
rans
nsac
acti
tion
on
Details
Deta
De
tail
ilss
Print
highlighted
Button
reads
Priintt detail
dettailil reportt off h
ighl
ighl
hliight
ighted
d ttransaction.
ransacti
tion. B
ti
utt
tton read
tt
ds
Print All Transactions when no transaction is selected (no
yellow on screen).
5
Prin
Pr
intt Al
Alll
5.. Print
Tran
Tr
ansa
sact
ctio
ions
ns
Transactions
Priintt enti
tire h
isttory off ttransactions.
ransacti
tions. B
utt
tton read
ds Print
Priintt
Print
entire
history
Button
reads
Transaction Details when a transaction is selected in yellow
on screen.
6. Filter
Alllows
Al
lows rreports
epor
ep
ortts
ts tto
o be
be fifilltered
ltere
tered
d by
by D
ate,
at
te, A
udit
ud
dit N
umb
um
ber an
ber
and
d Tot
TTotal
otal
tal $
Allows
Date,
Audit
Number
mt P
roce
ro
cess
ssed
ed.
of A
Amt
Processed.
Report management | Money Machine® 2 bin models | 17
Report management
Attendant main menu
Remove jam or debris
Proceed to clear table jam or remove debris from disk pad. Large debris or coins may be
removed from the sort disk pad by hand.
Never wipe sort disk or pad, except as instructed on page 26.
The ATTENDANT MAIN MENU screen is accessed via a button on the MAIN SYSTEM MENU
screen (see Main System Menu on page 6).
Menu options include generating reports and clearing the bin or business day.
Latch the sort disk
Before operating Money Machine 2, latch the sort disk as shown.
View and print reports
From the REPORT MAIN MENU screen, the following reports may be generated:
• Transaction History
• Calendar Day Total
• Business Day Total
DO NOT attempt to force the sort disk onto the sort pad for latching. If the disk
resists being lowered into position, raise it again. Carefully remove coin and
debris from all surfaces and surrounding area before repeating the latching
process.
1. Without forcing, press the sort disk down until it is flush with the sort pad. If disk
resists, repeat cleaning – see stop message above.
2. Turn latch to lock the disk in place. Latch should be at a full right angle to the unlatched position, as shown.
• Bin Total
All reports include the date and time the report is printed.
Correct: disk is secured
Incorrect: disk is not secured
Sort disk should always be latched properly before restoring Money
Machine 2 to service. An improperly latched sort disk negatively
impacts performance and may damage the machine.
16 | Money Machine® 2 bin models | Report management
Troubleshooting | Money Machine® 2 bin models | 13
Printer error
Clear printer jam or replace printer paper
Solutions to some common printer problems are described in this section.
Perform the following steps to clear a jam or replace the printer paper in CUSTOM printers.
If your machine has a Citizen printer and you need assistance, please contact
your CA representative or service technician for instructions.
The following printer errors may appear in the Machine Status Message:
• Printer error. Printer offline.
• Printer paper low.
Always pull paper out from the back of the machine with print head raised.
Never pull paper out from inside printer toward the front of the machine.
• Printer error – out of paper.
• Printer cover is open.
• Printer error. Printer not connected or turned off.
1. Raise printer head by pushing up green tab on printer faceplate.
Follow the instructions under Machine details on page 11 to
resolve the printer error.
CUSTOM printer does not have a power switch.
2. Pull the paper end out from the back of the machine, pulling toward paper roll.
CUSTOM printer
3. Remove and discard any damaged paper or paper fragments.
3
1
Print a duplicate receipt for a specific transaction
If needed, print a duplicate receipt for the consumer. Follow the instructions under View
and print reports on page 16 to access the TRANSACTION HISTORY REPORT screen. On
that screen:
2
1. Locate the transaction.
2. Touch column to highlight the transaction.
Press to return to the previous screen.
4. Lower the printer head (you should hear an audible “click”).
5. If replacing paper, raise spool rod and remove existing roll.
6. Place new roll of thermal paper on the rod with paper flowing over the top, then lower
rod back into place.
7. Follow the arrow and feed the paper edge into the back of the printer just beneath the
green guide. (Printer “grabs” the paper and advances it through the paper path
automatically.)
8. Paper is cut – remove visible end and discard.
5
6
7
8
3. Press Duplicate Receipt.
14 | Money Machine® 2 bin models | Troubleshooting
Troubleshooting | Money Machine® 2 bin models | 15