1
Production: RAK Design AB
2-D Electrophoresis – Principles and Methods
2-D Electrophoresis
using immobilized pH gradients
Principles and Methods
www.amershambiosciences.com
80-6429-60
Edition AB
Handbooks
from Amersham Biosciences
Antibody Purification
Handbook
18-1037-46
The Recombinant Protein Handbook
Protein Amplification and Simple Purification
18-1142-75
Protein Purification
Reversed Phase Chromatography
Handbook
18-1132-29
Principles and Methods
18-1134-16
Ion Exchange Chromatography
Expanded Bed Adsorption
Principles and Methods
18-1114-21
Principles and Methods
18-1124-26
Affinity Chromatography
Chromatofocusing
Principles and Methods
18-1022-29
with Polybuffer and PBE
50-01-022PB
Hydrophobic Interaction Chromatography
Microcarrier cell culture
Principles and Methods
18-1020-90
Principles and Methods
18-1140-62
Gel Filtration
Percoll
using immobilized pH gradients
Principles and Methods
18-1022-18
Methodology and Applications
18-1115-69
Principles and Methods
80-6429-60
Ficoll-Paque Plus
For in vitro isolation of lymphocytes
18-1152-69
GST Gene Fusion System
Handbook
18-1157-58
2-D Electrophoresis
CleanGel, Ettan, Eazy Breeze, ExcelGel, Hoefer, ImageMaster, ImageScanner, Immobiline,
IPGphor Multiphor, MultiTemp, Pharmalyte, PlusOne and Typhoon are trademarks of the
Amersham Biosciences group.
Amersham and Amersham Biosciences are trademarks of Amersham plc.
Coomassie is a trademark of ICI plc.
SYPRO is a trademark of Molecular Probes Inc.
Tris and Triton X-100 are trademarks of Rohm & Haas.
Tween is a trademark of ICI Americas Inc.
All goods and services are sold subject to the terms and conditions of sale of the company
within the Amersham Biosciences group that supplies them. A copy of these terms and
conditions is available on request. © Amersham Biosciences AB 2001 - All rights reserved.
Amersham Biosciences AB
AB Björkgatan 30, SE-751 84 Uppsala, Sweden
Amersham Biosciences
Amersham Place, Little Chalfont, Buckinghamshire HP7 9NA, England
Amersham Biosciences Corp
800 Centennial Avenue, PO Box 1327, Piscataway, NJ 08855 USA
Amersham Biosciences Europe GmbH
Munzinger Strasse 9, D-79111 Freiburg, Germany
Amersham Biosciences
Sanken Building, 3-25-1, Shinjuku-ku, Tokyo 169-0073, Japan
2-D Electrophoresis
Principles and Methods
Tom Berkelman and Tirra Stenstedt
with contributions from
Bengt Bjellqvist
Nancy Laird
Michael McDowell
Ingmar Olsson
Reiner Westermeier
1
Preface
○
○
○
○
○
○
○
○
○
○
○
○
○
○
○
○
○
○
○
○
○
○
○
○
○
○
○
○
○
○
○
○
○
○
○
○
○
○
“Proteomics” is the large-scale screening of the proteins of a cell, organism
or biological fluid, a process which requires stringently controlled steps of
sample preparation, 2-D electrophoresis, image detection and analysis, spot
identification, and database searches. The core technology of proteomics is
2-D electrophoresis. At present, there is no other technique that is capable of
simultaneously resolving thousands of proteins in one separation procedure.
The replacement of classical first-dimension carrier ampholyte pH gradients
with well-defined immobilized pH gradients has resulted in higher resolution,
improved interlaboratory reproducibility, higher protein loading capacity,
and an extended basic pH limit for 2-D electrophoresis. With the increased
protein capacity, micropreparative 2-D electrophoresis has accelerated spot
identification by mass spectrometry and Edman sequencing. With immobilized
gradients stable as high as pH 12, basic proteins can be separated routinely
where previously they were lost due to cathodic drift of carrier ampholyte
gradients, or suffered from the limited reproducibility of NEPHGE.
The remarkable improvements in 2-D electrophoresis resulting from
immobilized pH gradient gels, together with convenient new instruments
for IPG-IEF, will make critical contributions to advances in proteome analysis.
It is my pleasure to introduce this manual on 2-D electrophoresis. It clearly
describes the actual and technical basis of the current state-of-the-art 2-D
separations using immobilized pH gradients for the first dimension, it
provides detailed protocols for new and experienced users, and it includes
an extensive bibliography. Finally, there is the pictorial troubleshooting
guide—a bit like photos from the album of Murphy’s law that you
wouldn’t dare include in an official publication—but here they are for
all to learn from.
Angelika Görg
Technical University of Munich, August 1998
2
Contents
Introduction ............................................................................................................. 7
Introduction to the manual ........................................................................................... 7
Introduction to two-dimensional (2-D) electrophoresis ..................................................... 7
Symbols and abbreviations used in this handbook .............................................................................. 8
Choices for first-dimension IEF ........................................................................................................ 9
Choices for second-dimension SDS-PAGE ....................................................................................... 10
Choices for second-dimension SDS-PAGE ....................................................................................... 11
Equipment choices .................................................................................................... 12
Selecting an IEF system ................................................................................................................ 12
Selecting a second-dimension system ............................................................................................. 13
Multiphor II flatbed system ............................................................................................................ 14
Vertical systems ........................................................................................................................... 14
Laboratory technique ................................................................................................. 15
Chapter 1
Sample Preparation ................................................................................................ 17
1.0 Sample preparation—general strategy .................................................................... 17
1.1 Methods of cell disruption .................................................................................... 18
1.1.1 Gentle lysis methods ............................................................................................................ 19
1.1.2 More vigorous lysis methods ................................................................................................. 20
1.2 Protection against proteolysis ................................................................................ 21
1.3 Precipitation procedures ...................................................................................... 22
1.4 Removal of contaminants that affect 2-D results ..................................................... 23
1.5 Composition of sample solution ............................................................................. 25
Chapter 2
First-dimension Isoelectric Focusing (IEF) ............................................................... 27
2.0 First-dimension isoelectric focusing—overview ....................................................... 27
2.1 Background to isoelectric focusing (IEF) ................................................................ 27
2.2 Immobilized pH gradient selection ........................................................................ 31
2.3 Sample application method selection .................................................................... 31
2.4 IPG strip rehydration solution ............................................................................... 33
2.4.1 Components of the rehydration solution ................................................................................. 33
2.4.2 Rehydration solution preparation ........................................................................................... 35
2.5 Multiphor II and Immobiline DryStrip Kit ............................................................... 35
2.5.1 IPG strip rehydration—Immobiline DryStrip Reswelling Tray ..................................................... 35
2.5.2 Preparing for IEF ................................................................................................................. 37
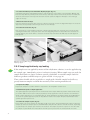
2.5.3 Sample application by cup loading ........................................................................................ 38
2.5.4 Paper-bridge loading ............................................................................................................ 39
2.5.5 Isoelectric focusing guidelines .............................................................................................. 40
2.5.6 Protocol examples—Multiphor II ........................................................................................... 41
2.5.7 Running a protocol .............................................................................................................. 41
2.5.8 Preservation of focused IPG strips ......................................................................................... 43
2.5.9 Troubleshooting ................................................................................................................... 43
3
2.6 Ettan IPGphor Isoelectric Focusing System ............................................................ 44
2.6.1 IPG strip rehydration—Ettan IPGphor Strip Holder .................................................................. 44
2.6.2 IPG strip rehydration—Ettan IPGphor Cup Loading Strip Holder ............................................... 47
2.6.3 Isoelectric focusing guidelines .............................................................................................. 51
2.6.4 Protocol examples—Ettan IPGphor ........................................................................................ 52
2.6.5 Running a protocol .............................................................................................................. 52
2.6.6 Troubleshooting ................................................................................................................... 55
Chapter 3
Second-dimension SDS-PAGE ................................................................................. 57
3.0 Second-dimension SDS-PAGE—overview ............................................................... 57
3.1 Background to SDS-PAGE .................................................................................... 57
3.2 IPG strip equilibration .......................................................................................... 58
3.2.1 Equilibration solution components ........................................................................................ 58
3.2.2 Equilibration steps .............................................................................................................. 59
3.3 The Ettan DALTtwelve system ............................................................................... 59
3.3.1 Preparation of Ettan DALTtwelve Separation Unit for electrophoresis ......................................... 60
3.3.2 Ettan DALT precast gels ....................................................................................................... 60
3.3.3 Equilibrate the IPG strip ...................................................................................................... 61
3.3.4 Applying the equilibrated IPG strip ........................................................................................ 61
3.3.5 Insert the precast gel cassettes into the Ettan DALTtwelve Separation Unit ................................ 63
3.3.6 Electrophoresis conditions .................................................................................................... 63
3.3.7 Preparing SDS slab gels—vertical systems ............................................................................. 64
3.3.8 Troubleshooting ................................................................................................................... 66
3.4 Multiphor II flatbed system ................................................................................... 68
3.4.1 ExcelGel preparation ............................................................................................................ 68
3.4.2 Applying the equilibrated IPG strip ........................................................................................ 69
3.4.3 Electrophoresis conditions .................................................................................................... 70
3.4.4 Troubleshooting ................................................................................................................... 71
Chapter 4
Visualization and evaluation of results .................................................................... 73
4.0 Visualization of results ......................................................................................... 73
4.1 Blotting .............................................................................................................. 74
4.2 Evaluation .......................................................................................................... 74
4.3 Standardization of results ..................................................................................... 75
4.4 Further analysis of protein spots ............................................................................ 76
4.4.1 Picking the spots ................................................................................................................. 76
4.4.2 Digestion of the proteins ...................................................................................................... 76
4.4.3 MALDI-ToF mass spectrometry .............................................................................................. 76
Chapter 5
Troubleshooting ..................................................................................................... 77
5.0 Troubleshooting 2-D results .................................................................................. 77
4
Appendix I ............................................................................................................. 83
Solutions .................................................................................................................. 83
A. Lysis solution ........................................................................................................................... 83
B. Rehydration stock solution without IPG Buffer ............................................................................. 83
C. Rehydration stock solution with IPG Buffer ................................................................................. 84
D. SDS equilibration buffer ........................................................................................................... 84
E. 30% T, 2.6% C monomer stock solution ..................................................................................... 84
F. 4× resolving gel buffer ............................................................................................................... 85
G. 10% SDS ................................................................................................................................ 85
H. 10% ammonium persulfate ....................................................................................................... 85
I. Gel storage solution ................................................................................................................... 85
J. SDS electrophoresis buffer ......................................................................................................... 85
K. Agarose sealing solution ............................................................................................................ 86
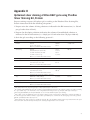
Appendix II ............................................................................................................ 87
Optimized silver staining of Ettan DALT gels using
PlusOne Silver Staining Kit, Protein ............................................................................ 87
References ............................................................................................................ 89
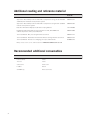
Additional reading and reference material ............................................................... 94
Recommended additional consumables ................................................................... 94
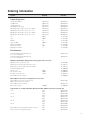
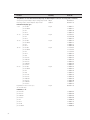
Ordering information .............................................................................................. 95
5
6
Introduction
Introduction to the manual
This handbook is intended as a guideline for performing high-resolution 2-D electrophoresis.
Depending on the sample type and the nature of the investigation, the procedures may need
to be adjusted or optimized.
The manual is divided into four chapters: Chapter 1 provides guidelines for sample preparation.
Chapter 2 details procedures for performing the first-dimension of 2-D electrophoresis.
Chapter 3 contains general directions for subsequent second-dimension electrophoresis of
immobilized pH gradient (IPG) strips. Chapter 4 discusses visualization and analysis of the
2-D electrophoresis results. The 2-D protocols described herein are performed using Amersham
Biosciences products. Equipment choices are discussed on page 12 and illustrated in Table 1.
Introduction to two-dimensional (2-D) electrophoresis
Two-dimensional electrophoresis (2-D electrophoresis) is a powerful and widely used
method for the analysis of complex protein mixtures extracted from cells, tissues, or other
biological samples. This technique sorts proteins according to two independent properties
in two discrete steps: the first-dimension step, isoelectric focusing (IEF), separates proteins
according to their isoelectric points (pI); the second-dimension step, SDS-polyacrylamide
gel electrophoresis (SDS-PAGE), separates proteins according to their molecular weights
(Mr, relative molecular weight). Each spot on the resulting two-dimensional array corresponds
to a single protein species in the sample. Thousands of different proteins can thus be separated,
and information such as the protein pI, the apparent molecular weight, and the amount of
each protein is obtained.
Two-dimensional electrophoresis was first introduced by P. H. O'Farrell (1) and J. Klose (2)
in 1975. In the original technique, the first-dimension separation was performed in carrier
ampholyte-containing polyacrylamide gels cast in narrow tubes. See section 2.1, 'Background to IEF', page 27 for more detail.
The power of 2-D electrophoresis as a biochemical separation technique has been recognized
virtually since its introduction. Its application, however, has become significant only in the
last few years as a result of a number of developments.
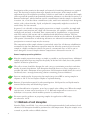
• The introduction of immobilized pH gradients and Immobiline™ reagents (3) brought
superior resolution and reproducibility to first-dimension IEF. Based on this concept,
A. Görg and colleagues (4,5) developed the currently employed 2-D technique, where
carrier ampholyte-generated pH gradients have been replaced with immobilized pH
gradients and tube gels replaced with gels supported by a plastic backing. A more
detailed discussion of the merits of this technique is presented in section 2.1,
'Background to IEF', page 27.
• New mass spectrometry techniques have been developed that allow rapid identification
and characterization of very small quantities of peptides and proteins extracted from
single 2-D spots.
7
• More powerful, less expensive computers and software are now available, rendering
thorough computerized evaluations of the highly complex 2-D patterns economically
feasible.
• Data about entire genomes (or substantial fractions thereof) for a number of organisms
are now available, allowing rapid identification of the gene encoding a protein separated
by 2-D electrophoresis.
• The World Wide Web provides simple, direct access to spot pattern databases for the
comparison of electrophoresis results and genome sequence databases for assignment of
sequence information.
A large and growing application of 2-D electrophoresis is "proteome analysis." Proteome
analysis is "the analysis of the entire PROTEin complement expressed by a genOME" (6,7).
The analysis involves the systematic separation, identification, and quantification of many
proteins simultaneously from a single sample. Two-dimensional electrophoresis is used in this
technique due to its unparalleled ability to separate thousands of proteins simultaneously.
Two-dimensional electrophoresis is also unique in its ability to detect post- and co-translational
modifications, which cannot be predicted from the genome sequence. Applications of 2-D
electrophoresis include proteome analysis, cell differentiation, detection of disease markers,
monitoring therapies, drug discovery, cancer research, purity checks, and microscale protein
purification. This manual describes methods for 2-D electrophoresis using precast IPG strips
(Immobiline DryStrip gels) available from Amersham Biosciences.
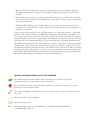
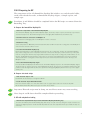
Symbols and abbreviations used in this handbook
this symbol indicates general advice which can improve procedures or provide
recommendations for action under specific situations.
this symbol denotes advice that should be regarded as mandatory and gives a warning
when special care should be taken.
this symbol highlights troubleshooting advice to help analyse and resolve difficulties that
may occur.
chemicals, buffers, and equipment.
experimental protocol.
PBS
8
phosphate buffered saline (140 mM NaCl, 2.7 mM KCl, 10 mM Na2HPO4,
1.8 mM KH2PO4, pH 7.4).
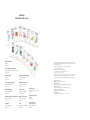
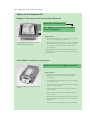
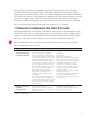
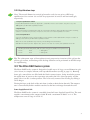
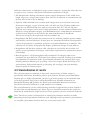
Table 1. Equipment choices for 2-D electrophoresis
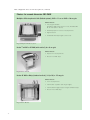
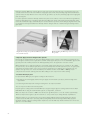
Choices for first-dimension IEF
Multiphor™ II Electrophoresis Unit with Immobiline DryStrip Kit
Rehydration in Reswelling Tray
IEF in Multiphor II Electrophoresis Unit with
Immobiline DryStrip Kit
Choice Factors:
• Multiphor II Electrophoresis Unit can be used for both
first- and second-dimension separations.
Fig 1. Multiphor II Electrophoresis Unit
with Immobiline DryStrip Kit.
• Multiphor II is a versatile system. Its use is not limited to
IEF with IPG strips from 7 to 24 cm. Several different
electrophoresis techniques can be performed with
the instrument.
Note: EPS 3501 XL Power Supply and MultiTemp™ III
Thermostatic Circulator are required to supply power and
cool the system.
Ettan™ IPGphor™ Isoelectric Focusing System
Rehydration and IEF in Ettan IPGphor Strip Holder
Choice Factors:
• Rehydration, in Ettan IPGphor Strip Holder: Sample
application and IEF can be performed overnight,
unattended.
• Fewer IPG strip manipulations are required, reducing
the chance of error.
Fig 2. Ettan IPGphor Isoelectric Focusing
System.
• Separations are faster and proteins focus more sharply
because of higher voltage.
• Power supply and temperature control are built into
the instrument.
• Ettan IPGphor Strip Holders in five different lengths
from 7 to 24 cm.
• Ettan IPGphor Cup Loading Strip Holder for all different
IPG strip lengths from 7 to 24 cm and for extreme pH
gradients.
• Strip holders are serialized for easy sample tracking.
9
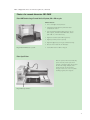
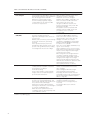
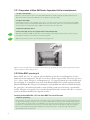
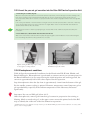
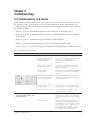
Table 1. Equipment choices for 2-D electrophoresis (continued)
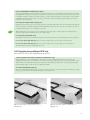
Choices for second-dimension SDS-PAGE
Multiphor II Electrophoresis Unit (flatbed system), 24.5 × 11 cm or 24.5 × 18 cm gels
Choice Factors:
• Precast gels available:
ExcelGel™ SDS 12.5% (24.5 × 11 cm), ExcelGel SDS
XL 12–14% (24.5 × 18 cm).
• Relatively rapid: 4 h or less for electrophoresis.
• High resolution.
• All available IPG strip lengths can be used.
Fig 3. Multiphor II flatbed system.
Hoefer™ miniVE or SE 260 (mini vertical), 8 × 9 cm gels
Choice Factors:
• Rapid: 1–2 h electrophoresis.
• Best for 7 cm IPG strips.
Fig 4. Hoefer miniVE.
Hoefer SE 600 or Ruby (standard vertical), 14 (or 16) × 15 cm gels
Choice Factors:
• 2–5 h electrophoresis.
• Intermediate separation (16 cm gel length).
• Intermediate throughput (up to four gels simultaneously).
• Best for 13 cm IPG strips.
Fig 5. Hoefer SE 600.
10
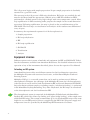
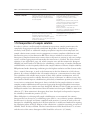
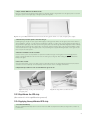
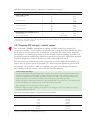
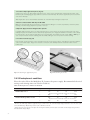
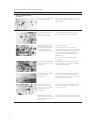
Table 1. Equipment choices for 2-D electrophoresis (continued)
Choices for second-dimension SDS-PAGE
Ettan DALTtwelve Large Format Vertical System, 26 × 20 cm gels
Choice Factors:
• 4 h to overnight electrophoresis.
• Integrated system with very efficient Peltier
temperature control.
• Precast gels with stable buffer system, cast on
film support, available: Ettan DALT Gel, 12.5%
(26 × 20 cm, 1 mm thickness),
• Highest resolution (26 × 20 cm gel size).
• Highest possible protein capacity.
• High throughput (up to 12 gels simultaneously).
• Best for 18 cm and 24 cm IPG strips.
Fig 6. Ettan DALTtwelve system.
• Low buffer volume: 10 l for 12 gels.
Ettan Spot Picker
Robotic system, which automatically
picks selected protein spots from
stained or destained gels using a pick
list from the image analysis, and
transfers them into microplates.
The gels need to be cast on a plastic
backing or glass plate support.
Fig 7. Ettan Spot Picker.
11
The 2-D process begins with sample preparation. Proper sample preparation is absolutely
essential for a good 2-D result.
The next step in the 2-D process is IPG strip rehydration. IPG strips are provided dry and
must be rehydrated with the appropriate additives prior to IEF. First-dimension IEF is
performed on a flatbed system at very high voltages with active temperature control. Next,
strip equilibration in SDS-containing buffer prepares the sample for the second-dimension
separation. Following equilibration, the strip is placed on the second-dimension gel for
SDS-PAGE. The final steps are visualization and analysis of the resultant two-dimensional
array of spots.
In summary, the experimental sequence for 2-D electrophoresis is:
1. Sample preparation
2. IPG strip rehydration
3. IEF
4. IPG strip equilibration
5. SDS-PAGE
6. Visualization
7. Analysis
Equipment choices
Different options exist in terms of methods and equipment for IEF and SDS-PAGE. Table 1
lists the instruments available from Amersham Biosciences. For detailed information on the
operation of any of the instruments described, please also see the respective User Manual.
Selecting an IEF system
Amersham Biosciences offers two different systems for the first-dimension separation;
the Multiphor II system with associated accessories, and the Ettan IPGphor Isoelectric
Focusing System.
Multiphor II (Fig 1) is a versatile system that can be used to perform several different
electrophoresis techniques. An advantage of the Multiphor II system for 2-D electrophoresis
is the fact that it can be used for both first-dimension IEF and second-dimension SDS-PAGE.
Strip rehydration without sample or including sample ("rehydration loading") is performed
in the Immobiline DryStrip Reswelling Tray. After rehydration, the IPG strips are transferred
to the electrophoresis unit for first-dimension IEF.
The electrophoresis system is comprised of the Multiphor II flatbed unit with Immobiline
DryStrip Kit, which also allows cup loading and "paper-bridge loading" of the sample onto
rehydrated IPG strips. This system accommodates up to 12 rehydrated IPG strips of the same
length for any one IEF protocol. Power is supplied by the EPS 3501 XL power supply and
temperature control is provided by the MultiTemp III Thermostatic Circulator.
12
The Ettan IPGphor Isoelectric Focusing System (Fig 2) further simplifies the first-dimension
separation with a system dedicated to IEF separation on IPG strips. The system is comprised
of Ettan IPGphor Strip Holders that serve both as rehydration and IEF chambers, and the
IPGphor unit, which includes an 8 000 V power supply and built-in temperature control.
Programmable parameters include rehydration temperature and duration, IEF temperature
and maximum current, and the duration and voltage pattern of multiple steps for one
separation. Up to 12 strip holders of the same length can be placed on the Ettan IPGphor
platform for any one protocol. Because rehydration loading and IEF are performed consecutively without user intervention, they can be performed unattended overnight.
For gradients at the high and low end of the pH scale, as well as for very high protein loads
on narrow pH-range gradient strips, Ettan IPGphor Cup Loading Strip Holder is employed
for running the IPG strips gel-side up. Cup Loading Strip Holder allows additional ways of
loading the sample; cup loading and paper-bridge loading.
Fewer IPG strip manipulations result in less error, strip mix-up, contamination, air contact,
and urea crystallization. Separations are faster because of the substantially higher voltage
that can be applied and the better temperature dissipation of the ceramic material of both
types of strip holders.
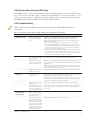
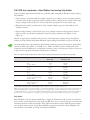
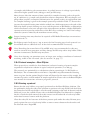
Table 2 shows the key operating differences between the Multiphor II system and the Ettan
IPGphor Isoelectric Focusing System for first-dimension IEF.
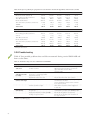
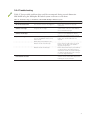
Table 2. IEF system selection
Maximum voltage
Additional equipment required
Time required for IEF*
Multiphor II
3 500 V†
Immobiline DryStrip Reswelling Tray,
Immobiline DryStrip Kit,
EPS 3501 XL power supply,
MultiTemp III Thermostatic Circulator
2–72 h
IPGphor
8 000 V
Ettan IPGphor Strip Holders of desired length,
Cup Loading Strip Holder for 7–24 cm strips,
Reswelling Tray for 7–24 cm strips
2–36 h
* Optimal focusing time varies widely depending on the IPG strip length and pH range, and the nature of the sample.
Similar separations can generally be performed at least two-fold faster with the IPGphor system than with the
Multiphor II system.
† Higher voltages are not recommended for safety reasons.
A graphic guide for the selection of sample application methods and strip holders for
Multiphor II as well as for Ettan IPGphor can be found on page 32.
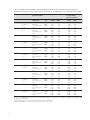
Selecting a second-dimension system
The second-dimension separation may be performed in a flatbed or vertical system. Table 3
matches the appropriate second-dimension system and gel size with IPG strip length. Further
considerations are discussed below. For a more complete discussion of the relative merits of
flatbed vs. vertical second-dimensions, consult reference 8.
13
Table 3. Selection of a second-dimension electrophoresis system
Approx. gel size
(w × l, cm)
Number of gels
Gel thickness
(mm)
IPG strip length
(cm)
Total separation time
(h:m)
24.5 × 11
24.5 × 18
1
0.5
all
1:45
3:20
8×9
2
1, 1.5
7
1:30
2–5
2–5
1–3
5
Flatbed
Multiphor II,
ExcelGel*
Vertical
Hoefer miniVE
or SE 260
Hoefer SE 600
Ettan DALT Gel, 12.5*
14 × 15,
16 × 15†
16 × 7¶
2 or 4‡
1, 1.5
11,
13,
2×7
26 × 20
12
1
18, 24
* Multiple shorter IPG strips (two 11 cm strips or three 7 cm strips) fit on one gel.
† If 1 cm-wide spacers are used.
‡ An accessory divider plate increases the capacity to four gels.
¶ Up to 8 mini-format separations can be simultaneously achieved using the shorter (8 cm) glass plates.
Multiphor II flatbed system
This system provides excellent resolution and relatively rapid separations in a large-format
gel. Precast ExcelGel products offer the convenience of ready-to-use gels and buffer strips.
The Multiphor II flatbed system (Fig 3, page 10) offers convenience and versatility as it can
be used for both first-dimension IEF, as well as second-dimension SDS-PAGE.
The protein loading capacity of an IPG strip can exceed the capacity of the thin, horizontal
second-dimension gel, so thicker vertical second-dimension gels are preferred for micropreparative separations.
The Multiphor II system is not recommended for the second-dimension if pH 6–11 IPG
strips have been used for the first-dimension separation.
Vertical systems
Vertical systems offer relative ease of use and the possibility of performing multiple separations
simultaneously. Vertical 2-D gels can be either 1 or 1.5 mm thick.
For rapid results, the mini-gel units–Hoefer miniVE (Fig 4, page 10) or SE 260–are recommended. The second-dimension separation is typically complete in 1 to 2 h. The use of
mini-gels for the second-dimension of 2-D is ideal when quick profiling is required, or
when there are relatively few different proteins in the sample.
For increased throughput and resolution, the standard-sized SE 600 vertical gel system
(Fig 5, page 10) is recommended. The SE 600 accommodates up to four 16 cm-long gels,
and the built-in heat exchanger offers cooling capability for increased reproducibility. The
standard spacer width is 2 cm, giving a 14 cm-wide gel. If additional space for molecular
weight markers is desired at both ends of a 13 cm IPG strip, 1 cm-wide spacers are available
for the preparation of 16 cm-wide gels.
For maximal resolution, reproducibility, and capacity, the large-gel format of the Ettan
DALTtwelve system (Fig 6, page 11) is recommended. Precast large-format Ettan DALT
gels on film support offer the convenience of ready-to-use gels. The system can accommodate
the entire length of an 18 and 24 cm IPG strip (plus molecular weight markers) and up to
14
twelve gels can be run simultaneously. Integrated Peltier temperature control and a buffer
circulation pump provide a precise and uniform thermal environment. Up to fourteen
1 mm-thick gels can be cast simultaneously in the Ettan DALTtwelve Gel Caster.
Laboratory technique
Always wear gloves when handling IPG strips, SDS polyacrylamide gels, ExcelGel Buffer
Strips, and any equipment that these items will contact. The use of gloves will reduce
protein contamination that can produce spurious spots or bands in 2-D patterns.
Clean all assemblies that will contact the gels or sample with a detergent designed for
glassware and rinse well with distilled water. This is particularly important when highly
sensitive mass spectrometry techniques are employed for spot identification and
characterization.
Always use the highest quality reagents and the purest water available.
Some of the chemicals used in the procedures—acrylamide, N,N'-methylenebisacrylamide,
TEMED, ammonium persulfate, and SDS—are extremely hazardous. Acrylamide monomer,
for example, is a neurotoxin and suspected carcinogen. You should have a manufacturer's
safety data sheet (MSDS) detailing the properties and precautions for all chemicals in your
lab. The safety sheets should be reviewed prior to starting the procedures in the manual.
General handling procedures for hazardous chemicals include using double latex gloves for
all protocols. Hazardous materials should be weighed in a fume hood while wearing a
disposable dust mask.
15
16
Chapter 1
Sample Preparation
1.0 Sample preparation—general strategy
Appropriate sample preparation is absolutely essential for good 2-D results. Due to the great
diversity of protein sample types and origins, only general guidelines for sample preparation
are provided in this guide. The optimal procedure must be determined empirically for each
sample type. Ideally, the process will result in the complete solubilization, disaggregation,
denaturation, and reduction of the proteins in the sample.
When developing a sample preparation strategy, it is important to have a clear idea of what
is desired in the final 2-D result. Is the goal to view as many proteins as possible, or is only a
subset of the proteins in the sample of potential interest? Which is more important—complete
sample representation, or a clear, reproducible pattern? Additional sample preparation steps
can improve the quality of the final result, but each additional step can result in the selective
loss of protein species. The trade-off between improved sample quality and complete protein
representation must therefore be carefully considered.
In order to characterize specific proteins in a complex protein mixture, the proteins of
interest must be completely soluble under electrophoresis conditions. Different treatments
and conditions are required to solubilize different types of protein samples; some proteins
are naturally found in complexes with membranes, nucleic acids, or other proteins, some
proteins form various non-specific aggregates, and some proteins precipitate when removed
from their normal environment. The effectiveness of solubilization depends on the choice of
cell disruption method, protein concentration and dissolution method, choice of detergents,
and composition of the sample solution. If any of these steps are not optimized for a particular
sample, separations may be incomplete or distorted and information may be lost.
To fully analyze all intracellular proteins, the cells must be effectively disrupted. Choice of
disruption method depends on whether the sample is from cells, solid tissue, or other biological
material and whether the analysis is targeting all proteins or just a particular subcellular
fraction. Both gentle and vigorous lysis methods are discussed in section 1.1.
Proteases may be liberated upon cell disruption. Proteolysis greatly complicates analysis of
the 2-D result, thus the protein sample should be protected from proteolysis during cell
disruption and subsequent preparation. Protease inhibition is discussed in section 1.2.
If only a subset of the proteins in a tissue or cell type is of interest, prefractionation can be
employed during sample preparation. If proteins from one particular subcellular compartment
(e.g. nuclei, mitochondria, plasma membrane) are desired, the organelle of interest can be
purified by differential centrifugation or other means prior to solubilization of proteins for
2-D electrophoresis. The sample can also be prefractionated by solubility under different
extraction conditions prior to 2-D electrophoresis. References 9, 10, 11, and 12 describe
examples of this approach. See reference 13 for an overview of protein fractionation
techniques.
17
Precipitation of the proteins in the sample and removal of interfering substances are optional
steps. The decision to employ these steps depends on the nature of the sample and the
experimental goal. Precipitation procedures, which are used both to concentrate the sample
and to separate the proteins from potentially interfering substances, are described in section 1.3.
Removal techniques, which eliminate specific contaminants from the sample, are described
in section 1.4, as are the effects contaminants (salts, small ionic molecules, ionic detergents,
nucleic acids, polysaccharides, lipids, and phenolic compounds) might have on the 2-D
result if they are not removed.
In general, it is advisable to keep sample preparation as simple as possible. A sample with
low protein concentrations and a high salt concentration, for example, could be diluted
normally and analyzed, or desalted, then concentrated by lyophilization, or precipitated
with TCA and ice-cold acetone and re-solubilized with rehydration solution. The first
option of simply diluting the sample with rehydration solution may be sufficient. If problems
with protein concentration or interfering substances are otherwise insurmountable, then
precipitation or removal steps may be necessary.
The composition of the sample solution is particularly critical for 2-D because solubilization
treatments for the first-dimension separation must not affect the protein pI, nor leave the
sample in a highly conductive solution. In general, concentrated urea as well as one or
more detergents are used. Sample solution composition is discussed in section 1.5.
General sample preparation guidelines:
Keep the sample preparation strategy as simple as possible to avoid protein losses. Additional
sample preparation steps may improve the quality of the final 2-D result, but at the possible
expense of selective protein loss.
The cells or tissue should be disrupted in such a way as to minimize proteolysis and other
modes of protein degradation. Cell disruption should be done at as low a temperature as
possible and with a minimum of heat generation. Cell disruption should ideally be carried
out directly into a strongly denaturing solution containing protease inhibitors.
Preserve sample quality by preparing the sample just prior to IEF or storing samples in
aliquots at -80 °C. Do not expose samples to repeated thawing.
Remove all particulate material by ultracentrifugation. Solid particles and lipids must be
removed because they will block the gel pores.
To avoid modification of proteins, never heat a sample after adding urea. When the sample
contains urea, it must not be heated over 37 °C. Elevated temperatures cause urea to
hydrolyze to isocyanate, which modifies proteins by carbamylation.
For more specific guidance on preparing samples for application to IPG strips,
see references 14–16.
1.1 Methods of cell disruption
Listed in Table 4 and Table 5 are a few standard disruption methods, both mechanical and
chemical. Cell disruption should be performed at cold temperatures. Keep the sample on ice
as much as possible and use chilled solutions.
18
Proteases may be liberated upon cell disruption, thus the protein sample should be protected
from proteolysis if one of these methods is to be used (see section 1.2). It is generally
preferable to disrupt the sample material directly into a strongly denaturing lysis solution,
in order to rapidly inactivate proteases and other enzymatic activities that may modify
proteins. Cell disruption is often carried out in an appropriate solubilization solution for
the proteins of interest. References 17 and 18 contain general information on tissue
disruption and cell lysis.
1.1.1 Gentle lysis methods
These methods are generally employed when the sample of interest consists of easily lysed
cells (such as tissue culture cells, blood cells, some microorganisms). Gentle lysis methods
can also be employed when only one particular subcellular fraction is to be analyzed. For
example, conditions can be chosen in which only cytoplasmic proteins are released, or
intact mitochondria or other organelles are recovered by differential centrifugation. Sometimes these techniques are combined (e.g. osmotic lysis following enzymatic treatment,
freeze-thaw in the presence of detergent).
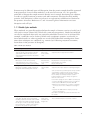
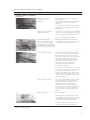
Table 4. Gentle lysis methods
Cell disruption method
Application
General procedure
Osmotic lysis (19)
This very gentle method is well-suited for
applications in which the lysate is to be
subsequently fractionated into subcellular
components.
Blood cells,
tissue culture
cells
Suspend cells in a hypoosmotic solution.
Bacterial cells,
tissue culture
cells
Rapidly freeze cell suspension using
liquid nitrogen, then thaw.
Repeat if necessary.
Tissue culture
cells
Suspend cells in lysis solution containing detergent.
Freeze-thaw lysis (9,17,20)
Many types of cells can be lysed by
subjecting them to one or more cycles
of quick freezing and subsequent thawing.
Detergent lysis
Detergents solubilize cellular membranes,
lysing cells and liberating their contents.
Cells can often be lysed directly into sample solution
or rehydration solution because these solutions
always contain detergent. See Appendix I, solution A
for an example of a widely used lysis solution.
Further examples of this technique are given in
references 21 and 22.
If an anionic detergent such as SDS is used for lysis,
one of the following preparation steps is required to
ensure that the SDS will not interfere with IEF:
• Dilute the lysed sample into a solution containing
an excess of non-ionic or zwitterionic detergent
OR,
• Separate the SDS from the sample protein by
acetone precipitation.
(See Table 7 and Table 8, section 1.3 and section 1.5
for details)
Enzymatic lysis (23,24)
Cells with cell walls can be lysed gently
following enzymatic removal of the cell wall.
This must be done with an enzyme specific
for the type of cell to be lysed (e.g. lysozyme
for bacterial cells, cellulase and pectinase
for plant cells, lyticase for yeast cells).
Plant tissue,
bacterial cells,
fungal cells
Treat cells with enzyme in isoosmotic solution.
19
1.1.2 More vigorous lysis methods
These methods are employed when cells are less easily disrupted, i.e. cells in solid tissues or
cells with tough cell walls. More vigorous lysis methods will result in complete disruption
of the cells, but care must be taken to avoid heating or foaming during these procedures.
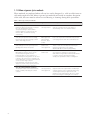
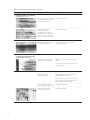
Table 5. More vigorous lysis methods
Cell disruption method
Sonication (5,25,26)
Ultrasonic waves generated by a sonicator
lyse cells through shear forces.
Complete shearing is obtained when
maximal agitation is achieved, but care
must be taken to minimize heating
and foaming.
French pressure cell (23,24,27)
Cells are lysed by shear forces resulting
from forcing suspension through a small
orifice under high pressure.
Grinding (5,8,28,29)
Some cell types can be opened by hand
grinding with a mortar and pestle.
Mechanical homogenization (9,19,30–32)
Many different devices can be used to
mechanically homogenize tissues.
Hand-held devices such as Dounce or
Potter-Elvehjem homogenizers can be used
to disrupt cell suspensions or relatively soft
tissues. Blenders, or other motorized devices
can be used for larger samples.
Homogenization is rapid and poses little
danger to proteins except by the proteases
that may be liberated upon disruption.
Glass bead homogenization (23,24,33)
The abrasive action of the vortexed beads
breaks cell walls, liberating the cellular
contents.
20
Application
General procedure
Cell suspensions
Sonicate cell suspension in short bursts to
avoid heating. Cool on ice between bursts.
Microorganisms
with cell walls
(bacteria, algae,
yeasts)
Place cell suspension in chilled French pressure
cell. Apply pressure and collect extruded lysate.
Solid tissues,
microorganisms
Tissue or cells are normally frozen with liquid
nitrogen and ground to a fine powder.
Alumina (Al2O3) or sand may aid grinding.
Solid tissues
Chop tissue into small pieces if necessary.
Add chilled homogenization buffer (5–20 volumes
to volume of tissue). Homogenize briefly.
Clarify lysate by filtration and/or centrifugation.
Cell suspensions,
microorganisms
Suspend cells in an equal volume of chilled lysis
solution and place into a sturdy tube. Add 1–3 g
of chilled glass beads per gram of wet cells.
Vortex for 1 min and incubate cells on ice 1 min.
Repeat vortexing and chilling two to four times.
1.2 Protection against proteolysis
When cells are lysed, proteases are often liberated or activated. Degradation of proteins
through protease action greatly complicates the analysis of 2-D electrophoresis results, so
measures should be taken to avoid this problem. If possible, inhibit proteases by disrupting
the sample directly into strong denaturants such as 8 M urea, 10% TCA, or 2% SDS (34–38).
Proteases are less active at lower temperatures, so sample preparation at as low a temperature
as possible is recommended. In addition, proteolysis can often be inhibited by preparing the
sample in the presence of tris base, sodium carbonate, or basic carrier ampholyte mixtures.
These approaches alone are often sufficient protection against proteolysis. However, some
proteases may retain some activity even under these conditions. In these cases, protease
inhibitors may be used. Individual protease inhibitors are only active against specific classes
of proteases, so it is usually advisable to use a combination of protease inhibitors. Broadrange protease inhibitor "cocktails" are available from a number of commercial sources.
Table 6 lists common protease inhibitors and the proteases they inhibit. For more comprehensive discussions of protease inhibition see references 15, 31, and 39–43.
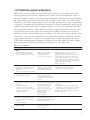
Table 6. Protease inhibitors
Protease inhibitor
PMSF
(Phenylmethylsulfonyl fluoride)
Most commonly used inhibitor.
Use at concentrations up to 1 mM.
AEBSF
(Aminoethyl benzylsulfonyl fluoride
or Pefabloc SC Serine Protease
Inhibitor)
Use at concentrations up to 4 mM.
1 mM EDTA or 1 mM EGTA
Generally used at 1 mM.
Peptide protease inhibitors
(e.g. leupeptin, pepstatin, aprotinin,
bestatin)
• reversible inhibitors
• active in the presence of DTT
• active at low concentrations under
a variety of conditions
Use at 2–20 µg/ml.
TLCK, TPCK
(Tosyl lysine chloromethyl ketone,
tosyl phenylalanine chloromethyl
ketone)
Use at 0.1–0.5 mM.
Benzamidine
Use at 1–3 mM.
Effective against:
Limitations
PMSF is an irreversible
inhibitor that inactivates:
• serine proteases
• some cysteine proteases
PMSF rapidly becomes inactive in aqueous
solutions: Prepare just prior to use.
PMSF may be less effective in the presence of
thiol reagents such as DTT or 2-mercaptoethanol. This limitation can be overcome by
disrupting the sample into PMSF-containing
solution lacking thiol reagents. Thiol reagents
can be added at a later stage.
PMSF is very toxic.
AEBSF is similar to PMSF in
its inhibitory activity, but is
more soluble and less toxic.
AEBSF-induced modifications can
potentially alter the pI of a protein.
These compounds inhibit
metalloproteases by chelating
free metal ions required for
activity.
Leupeptin inhibits many serine
and cysteine proteases.
Pepstatin inhibits aspartyl
proteases (e.g. acidic
proteases such as pepsin)
Aprotinin inhibits many
serine proteases.
Bestatin inhibits
aminopeptidases.
Peptide protease inhibitors are:
• expensive.
• small peptides and thus may appear on
the 2-D map, depending on the size range
separated by the second-dimension gel.
Pepstatin does not inhibit any proteases that
are active at pH 9.
These similar compounds
irreversibly inhibit many serine
and cysteine proteases.
Benzamidine inhibits
serine proteases.
21
1.3 Precipitation procedures
Protein precipitation is an optional step in sample preparation for 2-D electrophoresis.
Precipitation, followed by resuspension in sample solution, is generally employed to
selectively separate proteins in the sample from contaminating species such as salts,
detergents, nucleic acids, lipids, etc., that would otherwise interfere with the 2-D result.
Precipitation followed by resuspension can also be employed to prepare a concentrated
protein sample from a dilute source (e.g. plant tissues, urine).
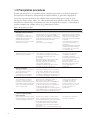
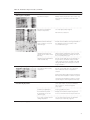
Table 7. Precipitation procedures
Precipitation method
General procedure
Limitations
Ammonium sulfate precipitation
("Salting out")
In the presence of high salt
concentrations, proteins tend to
aggregate and precipitate out of
solution. Many potential
contaminants (e.g. nucleic acids)
will remain in solution.
Prepare protein so final concentration of the
protein solution is >1 mg/ml in a buffer
solution that is >50 mM and contains EDTA.
Slowly add ammonium sulfate to the desired
percent saturation (44) and stir for
10–30 min.
Pellet proteins by centrifugation.
Many proteins remain soluble at
high salt concentrations, so this
method is not recommended
when total protein representation
is desired.
This method can, however, be
used for prefractionation or
enrichment.
Residual ammonium sulfate will
interfere with IEF and must be
removed (45). See section 1.4
on removal of salts.
TCA is added to the extract to a final
concentration of 10–20% and the proteins
are allowed to precipitate on ice for
30 min (46).
Alternatively, tissue may be homogenized
directly into 10–20% TCA (35,47).
This approach limits proteolysis and
other protein modifications.
Centrifuge and wash pellet with acetone
or ethanol to remove residual TCA.
Proteins may be difficult to
resolubilize and may not
resolubilize completely.
Residual TCA must be removed
by extensive washing with
acetone or ethanol.
Extended exposure to this low
pH solution may cause some
protein degradation or
modification.
TCA precipitation
TCA (trichloroacetic acid) is a very
effective protein precipitant.
Acetone precipitation
This organic solvent is commonly
used to precipitate proteins.
Many organic-soluble
contaminants (e.g. detergents,
lipids) will remain in solution.
Precipitation with TCA in acetone
The combination of TCA and
acetone is commonly used to
precipitate proteins during sample
preparation for 2-D electrophoresis,
and is more effective than either
TCA or acetone alone.
Precipitation with ammonium
acetate in methanol following
phenol extraction
This technique has proven useful
with plant samples containing high
levels of interfering substances.
22
Add at least 3 volumes of ice-cold acetone
to the extract. Allow proteins to precipitate
at -20 ºC for at least 2 h. Pellet proteins by
centrifugation (46,48–50). Residual acetone
is removed by air drying or lyophilization.
Suspend lysed or disrupted sample in
10% TCA in acetone with either
0.07% 2-mercaptoethanol or 20 mM DTT.
Precipitate proteins for at least 45 min
at -20 ºC. Pellet proteins by centrifugation
and wash pellet with cold acetone
containing either 0.07% 2-mercaptoethanol
or 20 mM DTT. Remove residual acetone by air
drying or lyophilization (5,28,34,43,51,52).
Proteins may be difficult to
resolubilize and may not
resolubilize completely.
Extended exposure to this low
pH solution may cause some
protein degradation or
modification.
Proteins in the sample are extracted into
The method is complicated
water- or buffer-saturated phenol. Proteins
and time consuming.
are precipitated from the phenol phase with
0.1 M ammonium acetate in methanol.
The pellet is washed several times with
ammonium acetate in methanol and then
with acetone.
Residual acetone is evaporated (42,43,47,53).
No precipitation technique is completely efficient and some proteins may not readily
resuspend following precipitation. Thus, employing a precipitation step during sample
preparation can alter the protein profile of a sample. Precipitation and resuspension should
be avoided if the aim of a 2-D experiment is complete and accurate representation of all the
proteins in a sample. Table 7 lists some of the precipitation techniques used. If sample
preparation requires precipitation, typically only one precipitation technique is employed.
For an overview of precipitation techniques see references 17, 18, and 44.
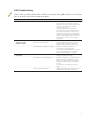
1.4 Removal of contaminants that affect 2-D results
Non-protein impurities in the sample can interfere with separation and subsequent visualization of the 2-D result, so sample preparation can include steps to rid the sample of these
substances. Table 8 lists contaminants that affect 2-D results and techniques for their removal.
Reference 15 provides further discussion on the removal of interfering substances.
Salt contamination is the most frequent cause of insufficient focusing of protein spots!
Table 8. Contaminants that affect 2-D results
Contaminant
Reason for removal
Removal techniques
Salts, residual buffers,
and other charged small
molecules that carry over
from sample preparation.
Salts disturb the electrophoresis process
and must be removed or maintained at
as low a concentration as possible.
Salts in the IPG strip result in high strip
conductivity. Focusing of the proteins will
not occur until the ions have moved to the
ends of the strips, prolonging the time
required for IEF. Water movement can also
result, causing one end of the strip to dry
out and the other to swell. Salt in the IPG
strip can result in large regions at either
end of the IPG strip where proteins do not
focus (seen as horizontal streaking or
empty regions in the final result).
If the sample is rehydrated into the IPG
strip, the salt concentration in the
rehydration solution should be lower
than 10 mM.
If the sample is applied in sample cups,
salt concentrations of up 50 mM in the
sample may be tolerated, however proteins
may precipitate at the sample application
point as they abruptly move into a lower
salt environment.
Desalting can be performed by
• dialysis
• spin dialysis
• gel filtration
• precipitation/resuspension
Dialysis is a very effective method for salt
removal resulting in minimal sample loss,
however, the process is time consuming
and requires large volumes of solution.
Spin dialysis is quicker, but protein
adsorption onto the dialysis membrane
may be a problem. Spin dialysis should
be applied to samples prior to addition of
urea and detergent.
Gel filtration can be acceptable but often
results in protein losses.
Precipitation/resuspension is an effective
means for removing salts and other
contaminants, but can also result in losses
(see section 1.3).
Endogenous small ionic
molecules, (nucleotides,
metabolites,
phospholipids, etc).
Endogenous small ionic molecules are
present in any cell lysate.
These substances are often negatively
charged and can result in poor focusing
towards the anode.
TCA/acetone precipitation is particularly
effective at removing this sort of
contaminant. Other desalting techniques
may be applied (see above).
continues on following page
23
Table 8. Contaminants that affect 2-D results (continued)
Contaminant
Reason for removal
Removal techniques
Ionic detergent
Ionic detergent (usually SDS) is often used
during protein extraction and solubilization,
but can strongly interfere with IEF.
SDS forms complexes with proteins,
and the resulting negatively charged
complex will not focus unless the SDS
is removed or sequestered.
Dilute the SDS-containing sample into a
rehydration solution containing a
zwitterionic or non-ionic detergent
(CHAPS, Triton X-100™, or NP-40) so the
final concentration of SDS is 0.25% or
lower and the ratio of the other
detergent to SDS is at least 8:1 (27).
Acetone precipitation of the protein will
partially remove SDS.
Precipitation at room temperature will
maximize removal of SDS, but protein
precipitation is more complete
at -20 °C (45).
Nucleic acids
(DNA, RNA)
Nucleic acids increase sample viscosity
and cause background smears.
High-molecular weight nucleic acids can
clog gel pores.
Nucleic acids can bind to proteins through
electrostatic interactions, preventing
focusing.
If the separated sample proteins are
visualized by silver staining, nucleic acids
present in the gel will also stain, resulting
in a background smear on the 2-D gel.
Treat samples rich in nucleic acids with a
protease-free DNase/RNase mixture to
reduce the nucleic acids to mono- and
oligonucleotides. This is often done by
adding 0.1 × volume of a solution
containing 1 mg/ml DNase I, 0.25 mg/ml
RNase A, and 50 mM MgCl2 followed by
incubation on ice (33,50).
Note: The proteins DNase and RNase may
appear on the 2-D map.
Ultracentrifugation can be used to remove
large nucleic acids, however, this technique
may also remove high-molecular weight
proteins from the sample.
When using low-ionic strength extraction
conditions, negatively charged nucleic
acids may form complexes with positively
charged proteins. High-ionic strength
extraction and/or high-pH extraction may
minimize these interactions. (Note that salts
added during extraction must be
subsequently removed, see above).
Polysaccharides
Polysaccharides can clog gel pores
causing either precipitation or extended
focusing times, resulting in
horizontal streaking.
Some polysaccharides contain negative
charges and can complex with proteins
by electrostatic interactions.
Precipitate the sample in TCA, ammonium
sulfate, or phenol/ammonium acetate,
then centrifuge.
Ultracentrifugation will remove highmolecular weight polysaccharides.
Employing the same methods used for
preventing protein-nucleic acid interactions
may also be helpful (solubilize sample in
SDS or at high pH).
Lipids
Many proteins, particularly membrane
proteins, are complexed with lipids. This
reduces their solubility and can affect both
the pI and the molecular weight.
Lipids form complexes with detergents,
reducing the effectiveness of the detergent
as a protein-solubilizing agent.
When extracts of lipid-rich tissues are
centrifuged, there is often a lipid layer that
can be difficult to remove.
Strongly denaturing conditions and
detergents minimize protein-lipid
interactions. Excess detergent may be
necessary.
Precipitation with acetone removes
some lipid.
continues on following page
24
Table 8. Contaminants that affect 2-D results (continued)
Contaminant
Reason for removal
Removal techniques
Phenolic compounds
Phenolic compounds are present in many
plant tissues and can modify proteins
through an enzyme-catalyzed oxidative
reaction (43,49).
Prevent phenolic oxidation by employing
reductants during tissue extraction
(e.g. DTT, 2-mercaptoethanol, sulfite,
ascorbate).
Rapidly separate proteins from phenolic
compounds by precipitation techniques.
Inactivate polyphenol oxidase with
inhibitors such as diethyldithiocarbamic
acid or thiourea.
Remove phenolic compounds by
adsorption to polyvinylpyrrolidone (PVP) or
polyvinylpolypyrrolidone (PVPP).
Insoluble material
Insoluble material in the sample can clog
gel pores and result in poor focusing.
Insoluble material is particularly
problematic when the sample is applied
using sample cups; it can prevent protein
entry into the IPG strip.
Samples should always be clarified by
centrifugation prior to application to
first-dimension IEF.
1.5 Composition of sample solution
In order to achieve a well-focused first-dimension separation, sample proteins must be
completely disaggregated and fully solubilized. Regardless of whether the sample is a
relatively crude lysate or additional sample precipitation steps have been employed, the
sample solution must contain certain components to ensure complete solubilization and
denaturation prior to first-dimension IEF. These always include urea and one or more
detergents. Complete denaturation ensures that each protein is present in only one configuration, and that aggregation and intermolecular interaction is avoided. The lysis solution,
solution A (see Appendix I, page 83), which contains urea and the zwitterionic detergent
CHAPS, has been found to be effective for solubilizing a wide range of samples. Reductant
and IPG Buffer are also frequently added to the sample solution to enhance sample solubility.
IEF performed under denaturing conditions gives the highest resolution and the cleanest results.
Urea, a neutral chaotrope, is used as the denaturant in the first-dimension of 2-D electrophoresis. It is always included in the 2-D sample solution at a concentration of at least 8 M.
Urea solubilizes and unfolds most proteins to their fully random conformation, with all
ionizable groups exposed to solution. Recently, the use of thiourea in addition to urea has
been found to further improve solubilization, particularly of membrane proteins (10,16,54–56).
A non-ionic or zwitterionic detergent is always included in the sample solution to ensure
complete sample solubilization and to prevent aggregation through hydrophobic interactions.
Originally, either of two similar non-ionic detergents, NP-40 or Triton X-100, was used (1,2).
Subsequent studies have demonstrated that the zwitterionic detergent CHAPS is often more
effective (57). New zwitterionic detergents have been developed and reported to improve
the solubility of membrane proteins (58,59).
When difficulties in achieving full sample solubilization are encountered, the anionic
detergent SDS can be used as a solubilizing agent. SDS is a very effective protein solubilizer,
but because it is charged and forms complexes with proteins, it cannot be used as the sole
detergent for solubilizing samples for 2-D electrophoresis. A widely used method for negating
the interfering effect of SDS is dilution of the sample into a solution containing an excess of
CHAPS, Triton X-100, or NP-40. The final concentration of SDS should be 0.25% or lower
and the ratio of the excess detergent to SDS should be at least 8:1 (27,34,60).
25
Reducing agents are frequently included in the sample solution to break any disulfide
bonds present and to maintain all proteins in their fully reduced state. The most commonly
used reductant is dithiothreitol (DTT) at concentrations ranging from 20 to 100 mM.
Dithioerythreitol (DTE) is similar to DTT and can also be used as a reducing agent.
Originally, 2-mercaptoethanol was used as a reductant, but higher concentrations of the
reductant are required and inherent impurities may result in artifacts (61). More recently,
the non-thiol reductant tributyl phosphine (TBP), at a concentration of 2 mM, has been used
as a reductant for 2-D samples (62). However, due to the limited solubility and instability
of TBP in solution, a thiol reductant such as DTT should be used to maintain proteins in
their reduced state through rehydration and first-dimension IEF, if TBP is employed as a
reductant during sample preparation.
Carrier ampholytes or IPG Buffer (up to 2% (v/v)) can be included in the sample solution.
They enhance protein solubility by minimizing protein aggregation due to charge-charge
interactions. In some cases, buffers or bases (e.g. 40 mM Tris base) are added to the sample
solution. This is done when basic conditions are required for full solubilization or to minimize
proteolysis. However, introduction of such ionic compounds can result in first-dimension
disturbances. Bases or buffers should be diluted to 5 mM or lower prior to loading the
sample onto first-dimension IEF.
A sample should remain in sample solution at room temperature for at least 30 min for full
denaturation and solubilization prior to centrifugation and subsequent sample application.
Heating of the sample in the presence of detergent can aid in solubilization, but should only
be done prior to the addition of urea. Sonication helps speed up solubilization, particularly
from material that is otherwise difficult to resuspend.
A widely used sample solution is given in Appendix I, solution A. For a general review of
protein solubilization for electrophoretic analysis, see reference 15.
For the first experiments with an unknown sample the following, most frequently employed,
default sample solutions are proposed:
Dissolve proteins in:
• 8 M urea, 4% CHAPS, 60 mM DTT, 2% Pharmalyte™ 3–10, 0.002% bromophenol blue.
To solubilize large and more hydrophobic proteins the following procedure is recommended:
• 7 M urea, 2 M thiourea, 4% CHAPS, 60 mM DTT, 2% Pharmalyte pH 3–10, 0.002% bromophenol blue.
To prepare proteins from tissues that are dilute sources of protein and contain high levels of
interfering substances (e.g. plant tissues) the following procedure is recommended. This
method produces protein solutions substantially free of salts, nucleic acids, and other
contaminants:
• Grind tissue in mortar and pestle with liquid nitrogen. Suspend powder in 10% TCA, 0.3% DTT in acetone.
Keep at -18 ºC overnight and centrifuge. Wash pellet with acetone. Dry and resuspend in 9 M urea,
2% CHAPS, 1% DTT, 2% Pharmalyte 3–10 (52,63).
New kits for mild protein precipitation, quick dialysis without protein loss, and noninterfering protein assays, have been introduced by Amersham Biosciences.
For appropriate sample loads see Table 12 on page 36.
26
Chapter 2
First-dimension Isoelectric Focusing (IEF)
2.0 First-dimension isoelectric focusing—overview
Amersham Biosciences offers two different systems for the first-dimension separation; the
Multiphor II system with associated accessories and the Ettan IPGphor Isoelectric Focusing
System. For a comparison of these two systems, see page 12.
A useful first-dimension separation requires selecting a first-dimension pH range appropriate
for the sample, as well as a suitable sample application method. Choice of immobilized pH
gradient is discussed in section 2.2. Sample application methods and their selection are
discussed in section 2.3.
The first-dimension separation procedure involves IPG strip rehydration, sample application,
and isoelectric focusing. Preparation of the IPG strip rehydration solution is described in
section 2.4. The protocols for IPG strip rehydration, sample application, and IEF are specific
to the first-dimension system used and are described in section 2.5 for the Multiphor II
system, and section 2.6 for the IPGphor Isoelectric Focusing System.
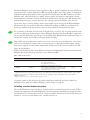
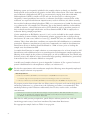
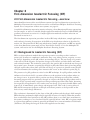
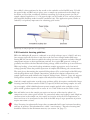
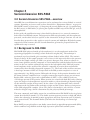
2.1 Background to isoelectric focusing (IEF)
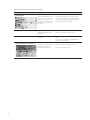
IEF is an electrophoretic method that separates proteins according to their isoelectric
points (pI). Proteins are amphoteric molecules; they carry either positive, negative, or zero
net charge, depending on the pH of their surroundings (Fig 8). The net charge of a protein
is the sum of all the negative and positive charges of its amino acid side chains and aminoand carboxyl-termini. The isoelectric point (pI) is the specific pH at which the net charge of
the protein is zero. Proteins are positively charged at pH values below their pI and negatively
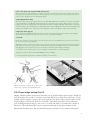
charged at pH values above their pI. If the net charge of a protein is plotted versus the pH
of its environment, the resulting curve intersects the x-axis at the isoelectric point (Fig 8).
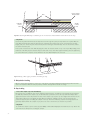
The presence of a pH gradient is critical to the IEF technique. In a pH gradient, under the
influence of an electric field, a protein will move to the position in the gradient where its
net charge is zero. A protein with a positive net charge will migrate toward the cathode,
becoming progressively less positively charged as it moves through the pH gradient until it
reaches its pI. A protein with a negative net charge will migrate toward the anode, becoming
less negatively charged until it also reaches zero net charge. If a protein should diffuse away
from its pI, it immediately gains charge and migrates back. This is the focusing effect of
IEF, which concentrates proteins at their pIs and allows proteins to be separated on the
basis of very small charge differences.
The resolution is determined by the slope of the pH gradient and the electric field strength.
IEF is therefore performed at high voltages (typically in excess of 1 000 V). When the proteins
have reached their final positions in the pH gradient, there is very little ionic movement in
the system, resulting in a very low final current (typically below 1 mA). IEF of a given sample
in a given electrophoresis system is generally performed for a constant number of Volt-hours
(Volt-hour (Vh) being the integral of the volts applied over the time).
27
IEF performed under denaturing conditions gives the highest resolution and the cleanest
results. Complete denaturation and solubilization is achieved with a mixture of urea and
detergent, ensuring that each protein is present in only one configuration and aggregation
and intermolecular interaction is minimized.
COO
COOH
COO
NH 3
NH 3
NH 2
COOH
COO
COO
NH 3
NH 3
pH<pI
NH 2
pH<pI
pH<pI
Net Charge
+3
+2
Isoelectric point (pl)
+1
0
3
4
5
6
7
8
9
10
11 pH
-1
-2
-3
Fig 8. Plot of the net charge of a protein versus the pH of its environment. The point of intersection of the curve at the
x-axis represents the isoelectric point of the protein.
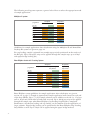
The original method for first-dimension IEF depended on carrier ampholyte-generated pH
gradients in polyacrylamide gel rods in tubes (1,2). Carrier ampholytes are small, soluble,
amphoteric molecules with a high buffering capacity near their pI. Commercial carrier
ampholyte mixtures are comprised of hundreds of individual polymeric species with pIs
spanning a specific pH range. When a voltage is applied across a carrier ampholyte mixture,
the carrier ampholytes with the highest pI (and the most negative charge) move toward the
anode and the carrier ampholytes with the lowest pI (and the most positive charge) move
toward the cathode. The other carrier ampholytes align themselves between the extremes,
according to their pIs, and buffer their environment to the corresponding pHs. The result is
a continuous pH gradient.
Although this basic method has been used in hundreds of 2-D electrophoresis studies, it has
several limitations that have prevented its more widespread application:
• Carrier ampholytes are mixed polymers that are not well characterized and suffer from
batch-to-batch manufacturing variations. These variations reduce the reproducibility of
the first-dimension separation.
• Carrier ampholyte pH gradients are unstable and have a tendency to drift, usually toward
the cathode, over time. Gradient drift adversely affects reproducibility by introducing a
time variable. Gradient drift also causes a flattening of the pH gradient at each end,
particularly above pH 9, rendering the 2-D technique less useful at pH extremes.
28
• The soft polyacrylamide tube gels have low mechanical stability. The gel rods may stretch
or break, affecting reproducibility. Results are often dependent on the skill of the operator.
As a result of the limitations and problems with carrier ampholyte pH gradients, immobilized pH gradients were developed and Amersham Biosciences's Immobiline chemicals were
introduced for the generation of this type of pH gradient (3). Görg et al. (4,5) pioneered the
development and use of IPG IEF for the first-dimension of 2-D electrophoresis. The techniques
used today are largely based on the work of A. Görg and her colleagues.
An immobilized pH gradient (IPG) is created by covalently incorporating a gradient of
acidic and basic buffering groups into a polyacrylamide gel at the time it is cast. The buffers,
Amersham Biosciences Immobiline reagents, are a set of well-characterized molecules, each
with a single acidic or basic buffering group linked to an acrylamide monomer.
The general structure of Immobiline reagents is:
CH 2 = CH–C–NH–R
O
R = weakly acidic or basic buffering group.
Immobilized pH gradients are formed using two solutions, one containing a relatively
acidic mixture of acrylamido buffers and the other containing a relatively basic mixture.
The concentrations of the various buffers in the two solutions define the range and shape
of the pH gradient produced. Both solutions contain acrylamide monomers and catalysts.
During polymerization, the acrylamide portion of the buffers copolymerize with the
acrylamide and bisacrylamide monomers to form a polyacrylamide gel. Figure 9 is a
graphic representation of the polyacrylamide matrix with attached buffering groups.
+
R
N
H
R
N H+
R
C
O
O
O
R
C
–
O
–
+
NH
R
R
Fig 9. Immobilized pH gradient polyacrylamide gel matrix showing attached buffering groups.
29
For improved performance and simplified handling, the IPG gel is cast onto a plastic
backing. The gel is then washed to remove catalysts and unpolymerized monomers, which
could otherwise modify proteins and interfere with separation. Finally the gel is dried and
cut into 3 mm-wide strips. The resulting IPG strips can be rehydrated with a rehydration
solution containing the necessary components for first-dimension IEF.
IEF is performed with the IPG strips placed horizontally on a flatbed electrophoresis unit.
Advantages of using the flatbed format include the following:
• Isoelectric focusing requires efficient cooling for close temperature control, which can be
effectively achieved on a horizontal ceramic cooling plate connected to a thermostatic
circulator or a Peltier cooling plate.
• IEF requires high field strengths to obtain sharply focused bands, thus high voltages must
be applied. A flatbed design is the most economical way to meet the necessary safety
standards required to operate at such high voltages.
The IPG strips are rehydrated in a solution containing the necessary additives and,
optionally, the sample proteins. (Rehydration solution is described in detail in section 2.4,
page 33). IEF is performed by gradually increasing the voltage across the IPG strips to at least
3 500 V and maintaining this voltage for at least several thousand Volt-hours. After IEF, the
IPG strips are equilibrated in equilibration solution and applied onto flatbed or vertical
SDS-polyacrylamide gels.
When IPG strips are used for the first-dimension separation, the resultant 2-D maps are
superior in terms of resolution and reproducibility. IPG strips are a marked improvement
over tube gels with carrier ampholyte-generated pH gradients:
• The first-dimension separation is more reproducible because the covalently fixed gradient
cannot drift.
• Plastic-backed IPG strips are easy to handle. They can be picked up at either end with
forceps or gloved fingers.
• The plastic support film prevents the gels from stretching or breaking.
• IPG technology increases the useful pH range on any single IPG strip; more very acidic
and basic proteins can be separated.
• IPG strips have a higher loading capacity for protein (64).
• The sample can be introduced into the IPG strip during rehydration (65,66).
• Precast Immobiline DryStrip gels are available from Amersham Biosciences. These
ready-made dry IPG strips eliminate the need to handle toxic acrylamide monomers,
preparation time and effort are significantly reduced, and reproducibility of the pH
gradient is assured.
30
2.2 Immobilized pH gradient selection
Ready-made IPG strips, Immobiline DryStrip gels, are available from Amersham Biosciences
with strip lengths of 7, 11, 13, 18, and 24 cm. Choose shorter strips for fast screening or
when the most abundant proteins are of interest. Use longer strips for maximal resolution
and loading capacity.
Choosing the pH Gradient
Use a pH interval of 3–10 for an overview of total protein distribution. With a linear
gradient pH 3–10 the estimation of protein's isoelectric point pI is relatively easy.
For increased resolution between pH 5 and 7, use 3–10 NL (Non Linear) to distribute the
proteins more evenly over the gel. This is especially helpful when analyzing complex samples
like serum, cerebrospinal fluid, extracts from E.coli, and yeast.
Combine pH 3–7 and 6–11 (or pH 4–7 and 6–9) to obtain a more detailed overview of the
protein distribution.
For studying the protein pattern in more detail with the highest resolution and sample load,
narrow pH gradients in 18 and 24 cm strips offered for extremely high resolution are
available: pH 3.5–4.5, 4–5, 4.5–5.5, 5–6, and 5.5–6.7.
Note: The gradients overlap to enable the assembly of virtual high-resolution 2-D maps
from different narrow-range separations.
If a specialized pH gradient is required, recipes for preparing custom narrow and wide
immobilized pH gradients are given in (67).
2.3 Sample application method selection
Sample can be applied either by including it in the rehydration solution (rehydration loading)
or by applying it directly to the rehydrated IPG strip via sample cups, sample wells, or paper
bridge. Usually rehydration loading is preferable (see section 2.4). Advantages to this mode
of application include the following:
• Rehydration loading allows larger quantities of protein to be loaded and separated (65,66).
• Rehydration loading allows more dilute samples to be loaded.
• Because there is no discrete application point, this method eliminates the formation of
precipitates at the application point that often occur when loading with sample cups.
• The rehydration loading method is technically simpler, avoiding problems of leakage that
can occur when using sample cups.
• There are, however, cases when one might prefer to load the sample following rehydration,
immediately prior to IEF, e.g. if proteolysis or other protein modifications are a concern,
overnight rehydration with sample may not be desired.
Better results are obtained on pH 6–11 or 6–9 IPG strips when the sample is loaded
anodically in a sample cup!
31
The following two diagrams represent a general rule of how to select the appropriate mode
of sample application:
Multiphor II system
Analytical
pH gradient
3.5–4.5
4.0–5.0
4.5–5.5
5.0–6.0
5.5–6.7
4–7, 3–7
3–10
3–10 NL
6–9
6–11
rehydration
loading
Preparative
cup
loading
rehydration
loading
paper
bridge
Guidelines for sample application after rehydration using the Multiphor II and Immobiline
DryStrip Kit system are given on page 34.
For cup loading, sample is pipetted into sample cups precisely positioned on the surface of
the IPG gels. Up to 100 µl per strip can be applied through the sample cups, up to 850 µl
with paper-bridge loading (68).
Ettan IPGphor Isoelectric Focusing System
Analytical
pH gradient
3.5–4.5
4.0–5.0
4.5–5.5
5.0–6.0
5.5–6.7
4–7, 3–7
3–10
3–10 NL
6–9
6–11
Strip Holder
rehydration
loading
Preparative
Cup Loading
Strip Holder
rehydration
loading
cup
loading
Cup Loading
Strip Holder
rehydration
loading
paper
bridge
Ettan IPGphor system guidelines for sample application after rehydration are given in
section 2.6.3, page 51. Sample is pipetted into sample application wells located at each end
of the Strip Holder. Up to 7.5 µl of sample solution can be added to each side (i.e. 15 µl per
well or 30 µl total if both sides of both wells are used). Up to 100 µl per strip can be applied
through the sample cups when Ettan IPGphor Cup Loading Strip Holder is employed.
Furthermore, rehydration loading and cup loading can be combined for the application of
larger volumes. Paper-bridge loading can be performed in the Ettan IPGphor Cup Loading
Strip Holder as well. Up to 500 µl can be applied using the paper bridge method.
32
2.4 IPG strip rehydration solution
IPG strips must be rehydrated prior to IEF. The IPG strips are rehydrated in the Immobiline
DryStrip Reswelling Tray if either Multiphor II system or the Ettan IPGphor Cup Loading
Strip Holder are used for IEF. Using the Ettan IPGphor and the Strip Holder, the strips are
rehydrated in these strip holders.
Rehydration solution, which may or may not include the sample, is applied to the reservoir
slots of the Reswelling Tray or Ettan IPGphor Strip Holder, then the IPG strips are soaked
individually. Rehydrated strips are 3 mm wide and approximately 0.5 mm thick.
Note: Cup Loading Strip Holder cannot be used for rehydration.
2.4.1 Components of the rehydration solution
The choice of the most appropriate rehydration solution for the sample will depend on
its specific protein solubility requirements, but a typical solution generally contains urea,
non-ionic or zwitterionic detergent, dithiothreitol (DTT), Pharmalytes, or IPG Buffer
(Amersham Biosciences) appropriate to the pH range of the IPG strip and dye. The sample
may also be included. The role of each component is described below, as well as the
recommended concentration range.
Urea solubilizes and denatures proteins, unfolding them to expose internal ionizable amino
acids. Commonly 8 M urea is used, but the concentration can be increased to 9 or 9.8 M if
necessary for complete sample solubilization. Thiourea, in addition to urea, can be used to
further improve protein solubilization (10,16,54–56).
Detergent solubilizes hydrophobic proteins and minimizes protein aggregation. The detergent
must have zero net charge—use only non-ionic and zwitterionic detergents. CHAPS,
Triton X-100, or NP-40 in the range of 0.5 to 4% are most commonly used.
Reductant cleaves disulfide bonds to allow proteins to unfold completely. DTT or DTE
(20 to 100 mM) are commonly used. 2-Mercaptoethanol is not recommended, because
higher concentrations are required, and impurities may result in artifacts (61). Tributyl
phosphine (TBP) is not recommended as reductant for IEF due to its low solubility and
poor stability in rehydration solution. Reductants should be added directly before use.
IPG Buffer or Pharmalyte (carrier ampholyte mixtures) improve separations, particularly
with high sample loads. Carrier ampholyte mixtures enhance protein solubility and produce
more uniform conductivity across the pH gradient without disturbing IEF or affecting the
shape of the gradient.
IPG Buffers are carrier ampholyte mixtures specially formulated not to interfere with silver
staining following 2-D electrophoresis. Select an IPG buffer with the sample pH interval as
the Immobiline DryStrip to be rehydrated. Use IPG Buffer 3.5–5.0 for Immobiline DryStrip
3.5–4.5 and 4.0–5.0. Use IPG Buffer 6–11 for Immobiline DryStrip 6–9 and 6–11.
Pharmalyte 3–10 may be used for separations on Immobiline DryStrip pH 3–10 and 3–10
NL. Pharmalyte 5–8 may be used for separations on Immobiline DryStrip pH 4–7.
33
Table 9 lists the recommended final concentration of IPG Buffer / Pharmalyte for the
rehydration solution. The recommended IPG Buffer / Pharmalyte concentration for the
IPGphor system is 0.5%, but up to 2% can be added if sample solubilization remains
a problem.
Table 9. Addition of IPG Buffer or Pharmalyte to rehydration solution
IEF system
Sample application
mode(s)
Second-dimension
system
Recommended concentration
Multiphor II
Cup-, rehydration-, and
paper-bridge loading
Vertical gels, flatbed
2% IPG Buffer (50 µl per 2.5 ml)
0.5% IPG Buffer (12.5 µl per 2.5 ml)
Rehydration and samplewell loading
Vertical gels, flatbed
0.5% IPG Buffer (12.5 µl per 2.5 ml)
0.5% IPG Buffer (12.5 µl per 2.5 ml)
Cup- and paper-bridge
loading
Vertical gels, flatbed
2% IPG Buffer (50 µl per 2.5 ml)
0.5% IPG Buffer (12.5 µl per 2.5 ml)
Ettan IPGphor
Strip Holder
Cup Loading Strip
Holder
The advantages of increased concentration of IPG Buffer / Pharmalyte are:
• Improved sample solubilization
• Increased tolerance to salt in sample
• A more even conductivity in the gel
The drawbacks of increased concentration of IPG Buffer / Pharmalye are:
• Higher concentrations will limit the voltage use during IEF and increase the time required
for the focusing step.
• Silver staining may require a prolonged fixing step to wash out carrier ampholyte that
may cause staining background.
IPG Buffer or Pharmalyte can be included in the stock rehydration solution or added just
prior to use. (The carrier ampholytes are included in the stock solution when multiple IPG
strips of the same pH range are to be used. Carrier ampholytes are added to single aliquots
of the stock solution when the same stock solution will be used with different pH range
IPG strips). See section 2.4.2.
Tracking dye (bromophenol blue) allows IEF progress to be monitored at the beginning of
the protocol. If the tracking dye does not migrate toward the anode, no current is flowing.
Note: the dye leaves the strip well before the sample is focused!
Sample can be applied by including it in the rehydration solution. Up to 1 mg of sample per
strip can be diluted or dissolved in rehydration solution prior to IEF. The amount of sample
required is dictated in part by the detection or visualization method used. Radiolabelling
requires a very small amount of sample, silver staining requires typically 1 to 100 µg of
sample, and Coomassie™ blue staining and preparative applications require larger sample
amounts.
34
2.4.2 Rehydration solution preparation
Typical composition of rehydration solution without sample, or for dilution with sample
solution:
8 M urea, 0.5% (w/v) CHAPS, 0.2% (w/v) DTT, 0.5% (v/v) IPG Buffer or Pharmalyte, 0.002% bromophenol blue.
1. Prepare the rehydration stock solution. Recommended formulations are listed in Appendix I, solutions B, C,
and D (select the formulation appropriate to the experiment).
Note: Stock solution can be stored in 2.5 ml aliquots at -20 °C.
2. Just prior to use, slowly thaw a 2.5 ml aliquot of stock solution. Add the appropriate amount of IPG Buffer or
Pharmalyte, if it is not already included in the rehydration stock solution (refer to Table 9).
3. Add 7 mg DTT and sample (if rehydration loading is desired, refer to Table 11).
Note: DTT and the sample must be added fresh, just prior to use.
2.5 Multiphor II and Immobiline DryStrip Kit
2.5.1 IPG strip rehydration—Immobiline DryStrip Reswelling Tray
The Immobiline DryStrip Reswelling Tray has twelve independent reservoir slots that can
each hold a single IPG strip up to 24 cm long. Separate slots allow the rehydration of
individual IPG strips in a minimal volume of solution.
1. Prepare the Reswelling Tray (Fig 10)
Slide the protective lid completely off the tray and level the tray by turning the leveling feet until the bubble in the
spirit level is centered. Ensure the tray is clean and dry.
2. Apply the rehydration solution
Prepare the rehydration solution, including sample for rehydration loading or without sample for cup application.
Pipette the appropriate volume of rehydration solution into each slot as indicated in Table 10. Deliver the solution
slowly at a central point in the slot. Remove any larger bubbles.
Important: To ensure complete fluid (and sample) uptake, do not apply excess rehydration solution.
3. Position the IPG strip (Fig 11)
Remove the protective cover from the IPG strip starting at the acidic (pointed) end. Removal from the acidic
(pointed) end prevents damage to the basic (square) end of the IPG strip, which is generally softer. Position the
IPG strip as shown in Figure 11, with the gel side down and the pointed end of the strip against the sloped end of
the slot. Lower the IPG strip onto the solution. To help coat the entire IPG strip, gently lift and lower the strip and
slide it back and forth along the surface of the solution. Be careful not to trap bubbles under the IPG strip.
Table 10. Rehydration solution volume per IPG Strip
IPG strip length (cm)
Total volume per strip* (µl)
7 cm
125 µl
11 cm
200 µl
13 cm
250 µl
18 cm
340 µl
24 cm
450 µl
*Including sample, if applied.
Fig 10. Sliding the
protective cover off
Immobiline DryStrip
Reswelling Tray.
Fig 11. Positioning of an IPG strip on
Immobiline DryStrip Reswelling Tray.
35
4. Overlay the IPG strip with DryStrip Cover Fluid
Overlay each IPG strip with 3 ml of DryStrip Cover Fluid to minimize evaporation and urea crystallization.
5. Allow the IPG strip to rehydrate
Slide the lid onto the Reswelling Tray and allow the IPG strips to rehydrate at room temperature. A minimum of
10 h is required for rehydration; overnight is recommended. If the IPG strips swell unevenly, refer to Table 12.
6. Prepare the Immobiline DryStrip Kit
Before removing the IPG strips from the Reswelling Tray, prepare the Immobiline DryStrip Kit and the electrode
strips as described in section 2.5.2.A and 2.5.2.B.
Table 11. Suitable sample loads* for silver and Coomassie staining using cup loading and rehydration loading
Immobiline DryStrip (pH)
7 cm
Suitable sample load (µg of protein)
Silver stain
Coomassie stain
4–7
6–11
3–10, 3–10 NL
4–8
8–16
2–4
20–120
40–240
10–60
11 cm
4–7
6–11
3–10 L
10–20
20–40
4–8
50–300
100–600
20–120
13 cm
4–7
6–11
3–10, 3–10 NL
15–30
30–60
8–15
75–450
150–900
40–240
18 cm
4–7
6–11, 6–9, narrow interval†
3–10, 3–10 NL
30–60
60–120
15–30
150–900
300–1 500
75–450
24 cm
4–7, 3–7
6–9, narrow interval†
3–10, 3–10 NL
45–90
80–170
20–40
200–1 300
400–2 000
100–600
* When using cup loading an increased sample concentration will lead to an increased risk of protein precipitation in the
sample cup. Maximum concentration of 100 µg protein / 100 µl sample solution (100 µl is the volume of the cup) is
recommend. This is a general recommendation, which will function for most samples, but the maximum concentration
that is possible to use varies greatly between sample types. For larger sample loads, rehydration loading is recommended.
†
Immobiline DryStrip narrow intervals pH: 3.5–4.5, 4.0–5.0, 4.5–5.5, 5.0–6.0, and 5.5–6.7.
Table 12. Troubleshooting IPG strip rehydration in Reswelling Tray
36
Symptom
Possible cause
Uneven or incomplete
swelling of strips
Depending on the Immobline DryStrip pH
interval and the pH of the reswelling solution
either the basic end or the acidic end will
swell faster than the other. The strip may
not necessarly be of an even thickness
following rehydration.
Remedy
The unopened IPG strips package was stored
at or above room temperature for too long.
Store IPG strips sealed at temperatures
below -20 °C.
IPG strips were stored at or above room
temperature for too long.
Do not allow dry IPG strips to sit at room
temperature for longer than 10 min.
Strips will pick up moisture from the air.
Incorrect volume of rehydration solution used.
Make sure the correct amount of solution
according to Table 10 is added to the slot
in the Reswelling Tray.
The rehydration time is too short.
Rehydrate the IPG strips for at least 10 h.
2.5.2 Preparing for IEF
The components of the 2-D Immobiline DryStrip Kit include a tray and electrode holder,
anode and cathode electrodes, an Immobiline DryStrip aligner, a sample cup bar, and
sample cups.
Procedures A and B below should be completed before the IPG strips are removed from the
Reswelling Tray.
A. Prepare the Immobiline DryStrip Kit
1. Clean all components of the Immobiline DryStrip Kit
The Immobiline DryStrip tray, Immobiline DryStrip aligner, electrodes, sample cup bar, and sample cups must be
clean and ready for use. Clean with detergent, rinse thoroughly with distilled water, and allow to dry.
2. Confirm electrical connections on Multiphor II
Check that the red bridging cable in the Multiphor II unit is connected.
3. Establish cooling
Set the temperature on MultiTemp III Thermostatic Circulator to 20 °C. Position the cooling plate on the Multiphor II
unit and ensure that the surface is level.
6. Position the Immobiline DryStrip tray
Pipette approximately 3 to 4 ml of DryStrip Cover Fluid onto the cooling plate. Position the Immobiline DryStrip
tray on the cooling plate so the red (anodic) electrode connection of the tray is positioned at the top of the plate
near the cooling tubes. Remove any large bubbles between the tray and the cooling plate; small bubbles can be
ignored. The DryStrip Cover Fluid at this point serves as an electrical insulating fluid to ensure good thermal
contact between the cooling plate and the tray. Connect the red and black electrode leads on the tray to the
Multiphor II unit.
7. Place the Immobiline DryStrip aligner
Pour about 10 ml of DryStrip Cover Fluid into the Immobiline DryStrip tray. Place the Immobiline DryStrip aligner,
12-groove-side-up, into the tray on top of the DryStrip Cover Fluid. The presence of air bubbles between the strip
positions under the aligner will not affect the experiment. Avoid getting DryStrip Cover Fluid on top of the aligner
at this point.
B. Prepare electrode strips
1. Cut electrode strips to size
Cut two IEF electrode strips to a length of 110 mm.
2. Soak electrode strips with distilled water
Place the electrode strips on a clean, flat surface such as a glass plate. Soak each electrode strip with
0.5 ml distilled water. Blot with tissue paper to remove excess water.
Important: Electrode strips must be damp, not wet. Excess water may cause streaking.
Note: Steps A and B above should be completed before proceeding.
C. IEF with rehydration loading
1. Remove the rehydrated IPG strip from the Immobiline DryStrip Reswelling Tray
To remove an IPG strip from the Reswelling Tray, slide the tip of a pair of forceps along the sloped end of the slot
and into the slight depression under the IPG strip. Grab the end of the strip with the forceps and lift the strip out
of the tray.
37
2. Position the IPG strip in the Immobiline DryStrip aligner (Fig 12)
Immediately transfer the rehydrated IPG strips to adjacent grooves of the aligner in the Immobiline DryStrip tray.
Place the strips with the pointed (acidic) end at the top of the tray near the red electrode (anode). The blunt end
should be at the bottom of the tray near the black electrode (cathode). Align the IPG strips so the anodic gel
edges are lined up.
3. Attach the electrode strips
Place the moistened electrode strips across the cathodic and anodic ends of the aligned IPG strips. The electrode
strips must at least partially contact the gel surface of each IPG strip.
4. Position the electrodes (Fig 13)
Each electrode has a side marked red (anode) or black (cathode). Align each electrode over an electrode strip,
ensuring the marked side corresponds to the side of the tray giving electrical contact. When the electrodes are
properly aligned, press them down to contact the electrode strips. Check that the IPG strips are still aligned in
their grooves.
Fig 12. Positioning IPG strip gels in the Immobiline
DryStrip aligner.
Fig 13. Alignment of electrodes over IPG strips.
2.5.3 Sample application by cup loading
If the sample was not applied by means of the rehydration solution, it can be applied using
the sample cups, immediately prior to isoelectric focusing. When sample cups are used, the
sample load limits are lower and more specific. Guidelines on suitable sample loads for
different gradients and IPG strips are given in Table 11 on page 36.
These values should only be regarded as a rough guide. Suitable sample load will vary
greatly between samples and with the sensitivity of the staining method used.
1. Prepare the sample
Prepare the sample in a solution similar in composition to the rehydration solution used.
2. Determine the point of sample application
The optimal application point depends on the characteristics of the sample. When the proteins of interest have acidic
pIs or when SDS has been used in sample preparation, sample application near the cathode is recommended.
Anodic sample application is necessary with pH 6–11 and 6–9 gradients and preferred when pH 3–10 gradients
are used. The optimal application point can vary with the nature of the sample. Empirical determination of the
optimal application point is best.
3. Position the sample cup bar (Fig 14)
Place sample cups on the sample cup bar, high enough on the bar to avoid touching the gel surface. Position the
sample cup bar so the sample cups are a few millimeters away from the cathodic or anodic electrode, depending
on your sample. The sample cups must face the electrode. The sample cup bar has a spacer on one side. Slide
the sample cup bar towards the anode/cathode until the spacer just touches the anodic/cathodic electrode.
38
4. Press the sample cups against the IPG strips (Fig 14)
Move the sample cups into position, one sample cup above each IPG strip, and press the sample cups down to
ensure good contact with each IPG strip. This is perhaps the most critical part of the setup. Check that strips are
in their correct, straight position in the DryStrip aligner.
5. Apply DryStrip Cover Fluid
Once the sample cups are properly positioned, pour 70 to 80 ml DryStrip Cover Fluid into the tray to completely
cover the IPG strips. If the DryStrip Cover Fluid leaks into the sample cups remove it with a pipette, correct the
leakage and check for leakage again. Add approximately 150 ml of additional DryStrip Cover Fluid to completely
cover the sample cups. The IPG strips are submerged under a layer of DryStrip Cover Fluid to prevent drying of the
IPG strip, precipitation of the components of the rehydration solution and diffusion of gas into the IPG strip.
6. Apply the sample (Fig 15)
Apply sample (up to 100 µl per IPG strip) into the sample cups by pipetting under the surface of the DryStrip
Cover Fluid. The sample should sink to the bottom of the cup. Check for leakage.
7. Start IEF
Ensure the electrodes on the tray are connected and place the lid on the Multiphor II unit. Connect the leads on
the lid to the power supply. Begin IEF.
Note: When sample is applied via sample cups, precipitates can form at the application point and the amount of
protein that can be loaded is less than if the sample was included in the rehydration solution. Protein precipitation
and aggregation at the application point can sometimes be avoided by observing the following:
• The sample should contain urea, non-ionic detergents, and IPG buffer or carrier ampholytes.
• Apply the sample in dilute solutions (60–100 µg protein per 100 µl).
For micropreparative applications, rehydration loading is recommended.
Fig 14. Attachment of sample cups to the cup bar
and pressing of sample cups against IPG strips.
Fig 15. Applying sample into sample cups.
2.5.4 Paper-bridge loading (Fig 16)
Higher sample volumes and protein amounts can be applied with paper bridges, which are
placed between the anodic or cathodic end of the IPG strip and the electrode strip. A large
sample volume requires a large paper pad applied at the other side to absorb excess water.
Paper bridges and electrode pads are cut from 1 mm-thick CleanGel™ electrode strips
(see Ordering Information) to a size of 15 × 25 mm and with an arrowhead as shown in
Figure 16. The rehydrated IPG strip is positioned directly on the glass bottom of the
Immobiline DryStrip tray. The arrowheaded paper, to which 375 µl sample solution has
39
been added, is then positioned at the anodic or the cathodic end of the IPG strip. To hold
the paper bridge and IPG strip in place, press a sample cup positioned on the sample cup
bar down on top of the arrowhead. Solution containing up to 10 mg protein (in 850 µl
sample solution applied to a 15 × 50 paper bridge) can be loaded on a 18 cm long narrow
pH range IPG DryStrip under favorable conditions (68). The application point (anodic or
cathodic) is of primary importance for obtaining good results.
Fig 16. Setup for sample application via a paper bridge.
2.5.5 Isoelectric focusing guidelines
IEF in the Multiphor II system is conducted at very high voltages (up to 3 500 V) and very
low currents (typically less than 1 mA) due to the low ionic strength within IPG strips.
During IEF, the current decreases while the voltage increases as proteins and other charged
components migrate to their equilibrium positions. In a typical IEF protocol, voltage is
gradually increased to the final desired focusing voltage, which is held for up to several hours.
With cup loading, a low initial voltage minimizes sample aggregation and a low initial
voltage generally allows the parallel separation of samples with differing salt concentrations.
The main factors determining the required Voltage-hours (Vh) are the length of the IPG strips
and the pH gradient used. Sample composition, rehydration solution composition, and
sample application mode influence the required Voltage-hours. Table 13, (page 42) suggests
Voltage-hours suitable for most samples with rehydration loading or anodic cup loading.
Cathodic sample application on wide-range gradients pH 3–10 requires considerably longer
focusing times than those stated in Table 13, especially if SDS-containing samples are used.
As an example, a SDS solubilized serum protein sample applied at the cathodic end of a
pH 3–10 NL gradient requires Vh in excess of 2–2.5 fold of that stated in Table 13 (69).
Salt and buffer ions in the sample can require an increase of the time for phase 2 in
comparison to the values given in Table 13, particularly when cup loading is used. High ion
concentrations in the sample can also require an increase of the total Vh-requirement, as
these ions have to be transported to the ends of the IPG strips. Larger quantities of protein
require more time to focus.
Note: Focusing for substantially longer than recommended will cause horizontal streaking
and loss of proteins. This phenomenon is called "over-focusing". Therefore focusing time
should be reduced to the minimum necessary (see section 5.0, page 77).
40
2.5.6 Protocol examples—Multiphor II
The protocols in Table 13 are suitable for first-dimension isoelectric focusing of protein
samples in typical analytical quantities (see Tables 10 and 11, pages 35 and 36) with IPG
Buffer concentrations of 0.5 to 2% in the rehydration solution. Optimal focusing time will
vary with the nature of the sample, the amount of protein, and how the sample is applied.
For higher protein loads (up to 1 mg or more) the final focusing step of each protocol can
be extended with an additional 20% of the total recommended Vh if necessary.
Note: Sample application onto pH 6–11 and 6–9 IPG strips by rehydration loading is less
likely to result in high quality 2-D results and should be avoided. Samples should be
applied using cup loading at the acidic end of the IPG strip.
2.5.7 Running a protocol
Ensure that the electrodes in the Immobiline Dry Strip tray are connected and place the lid
on the Multiphor II unit. Connect the leads on the lid to the power supply. Ensure that the
current check on the EPS 3501 XL power supply is switched off. Begin IEF.
As isoelectric focusing proceeds, the bromophenol blue tracking dye migrates toward the
anode. Note that the dye front leaves the IPG strip well before focusing is complete, so
clearing of the dye is no indication that the sample is focused. If the dye does not migrate,
no current is flowing. If this occurs, check the contact between the electrodes and the
electrode strips.
41
Table 13. Immobiline DryStrip IEF guidelines for Multiphor II
*Immobiline
DryStrip
Cup loading or Rehydration loading
†
EPS 3501 XL power supply in gradient mode
*Immobiline
DryStrip
Cup loading
†
EPS 3501 XL power supply in gradient mode
Length pH
range(s)
Phase
Voltage
(V)
Duration
(h:min)
kVh
Length pH
range(s)
Phase
Voltage
(V)
7 cm
4–7
1
2
3
Total
200
3 500‡
3 500
0:01
1:30
0:55–1:30
2:25–3:00
0.001
2.8
3.2–5.2
6–8
7 cm
6–11
1
2
3
Total
3–10,
3–10 NL
1
2
3
200
3 500‡
3 500
0:01
1:30
0:35–1:05
2:05–2:35
0.001
2.8
2.2–3.7
5–6.5
4–7
1
2
3
Total
300
3 500‡
3 500
0:01
1:30
2:20–3:30
3:50–5:00
0.001
2.9
8.1–12.1
11–15
11 cm
6–11
3–10
1
2
3
Total
300
3 500‡
3 500
0:01
1:30
2:05–2:35
3:35–4:05
0.001
2.9
7.1–9.1
10–12
4–7
1
2
3
Total
300
3 500‡
3 500
0:01
1:30
3:45–4:20
5:15–5:50
0.001
2.9
13.1–18.1
16–21
13 cm
3–10,
3–10 NL
1
2
3
Total
300
3 500‡
3 500
0:01
1:30
3:10–4:00
4:40–5:30
0.001
2.9
11.1–14.1
14–17
4–7
1
2
3
Total
500
3 500‡
3 500
0:01
1:30
5:40–7:40
7:10–9:10
0.001
3.0
20–27
23–30
18 cm
3–10,
3–10 NL
1
2
3
Total
500
3 500‡
3 500
0:01
1:30
4:50–6:20
6:20–7:50
0.001
3.0
17–22
20–25
Narrow
intervals¶
1
2
3
Total
500
3 500‡
3 500
0:01
1:30
13:20–16:20
14:50–17:50
0.001
3.0
47–57
50–60
3–10
1
2
3
Total
500
3 500‡
3 500
0:01
1:30
7:40–10:40
9:10–12:10
0.001
3.0
27–37
30–40
4–7,
3–7 NL
3–10 NL
1
2
3
Total
500
3 500‡
3 500
0:01
1:30
12:00–16:20
13:30–17:50
0.001
3.0
42–47
45–60
Narrow
Intervals¶
1
2
3
Total
500
3 500‡
3 500
0:01
1:30
22:00–27:40
23.30–29:10
0.001
3.0
77–97
80–100
Total
11 cm
13 cm
18 cm
24 cm
24 cm
Duration
(h:min)
kVh
200
3 500‡
3 500
0:01
1:30
0:40
2:10
0.01
2.8
2.3
5
1
2
3
Total
300
3 500‡
3 500
0:01
1:30
2:05
3:35
0.01
2.9
7.1
10
6–11
1
2
3
Total
300
3 500‡
3 500
0:01
1:30
3:10
4:40
0.01
2.9
11.1
14
6–11
1
2
3
Total
500
3 500‡
3 500
0:01
1:30
5:40
7:10
0.01
3.0
20.0
23
6–9
1
2
3
Total
500
3 500‡
3 500
0:01
1:30
12:00
13:30
0.01
3.0
42
45
6–9
1
2
3
Total
500
3 500‡
3 500
0:01
1:30
16:20
17:50
0.01
3.0
57
60
* For all Immobiline DryStrip gels: Temperature: 20 °C, Current: 0.5 mA/strip, Power: 5 W total. Kilovolt-hour (kVh)
values are recommended.
† Program EPS 3501 XL power supply with current check option turned off. IPG strip is rehydrated with a solution
containing IPG Buffer of the corresponding pH gradient.
‡ During phase 2, the voltage will rise from the voltage set for phase 1 to 3 500 V. The voltage will remain at 3 500 V
throughout phase 3.
¶ Immobiline DryStrip narrow intervals pH: 3.5–4.5, 4.0–5.0, 4.5–5.5, 5.0–6.0, and 5.5–6.7.
42
2.5.8 Preservation of focused IPG strips
After IEF proceed to the second-dimension separation immediately or store the IPG strips
at -70 °C in screw-cap tubes. The 7 cm strips fit in disposable, 15 ml conical tubes; 11, 13,
and 18 cm strips fit in 25 × 200 mm screw cap culture tubes; 18 and 24 cm strips fit into
the Equilibration Tubes available from Amersham Biosciences.
2.5.9 Troubleshooting
Table 14 lists possible problems that could be encountered during IEF and how to
solve them.
Table 14. Troubleshooting first-dimension IEF: Multiphor II and Immobiline DryStrip Kit
○
Symptom
Possible cause
Remedy
Sample cups leak
Incorrect handling and
placement of sample
cups.
Sample cups are fragile and should not be used too many times.
Make sure the sample cups are aligned with the IPG strips.
Make sure the bottom of the sample cups are flat against the gel
surface of the IPG strips.
Note: Leaks can often be detected prior to sample application:
• Observe the IPG DryStrip Cover Fluid when it is poured into the
Immobiline DryStrip Kit tray. If it leaks in through the bottom of the
sample cups, reposition the cups, remove the cover fluid with a
pipette, and check for leakage again.
• An optional check for leakage is to add 0.01% bromophenol blue
dye solution to the cups. If the dye leaks out of a cup, it must be
corrected. (Important: the leaked detection dye must be removed
from the sample cup before loading the sample).
Low current
This is normal for IPG
gels. The gels have very
low conductivity.
Usually an IPG run starts close to 1 mA and drops into the µA range.
This depends on the number of IPG strips in the instrument.
○
○
○
○
○
○
○
○
○
○
○
○
○
○
○
○
○
○
○
Power supply cannot
detect the low µA range
current and shuts off.
○
○
○
○
○
○
○
○
○
○
No current at
start of run
○
○
○
○
○
○
○
○
○
○
○
○
○
○
○
○
○
○
○
○
○
○
○
○
○
○
○
○
○
○
○
○
○
○
○
○
○
○
○
○
○
○
○
○
○
○
○
○
○
○
○
○
○
○
○
○
○
○
○
○
○
○
○
○
○
○
○
○
○
○
○
○
○
○
○
○
○
○
○
○
IPG Buffer omitted from
rehydration solution.
Always include IPG buffer or Pharmalyte in the rehydration solution.
No electrode contact
or lack of electrical
continuity.
Check to make sure all Multiphor II contacts are in place.
Make sure the metal band within the electrode contacts the metal
band along the side of the Immobiline DryStrip tray.
Note that the metal band within the electrode is only on the end
marked with the red or black circle. Ensure that the bridging cable
under the cooling plate is properly installed.
○
○
○
○
○
○
○
○
○
○
IPG strip is improperly
rehydrated.
○
○
Because the EPS 3501 XL can operate under very low currents, it is
recommended for use with Immobiline DryStrip Kit and Immobiline
DryStrip gels.
Make sure the low-current shut-off has been bypassed (see power
supply instructions). IPG runs may start in a current range that is
not detectable by the power supply.
○
○
○
○
○
○
○
○
○
○
○
○
○
○
○
○
○
○
○
○
○
○
○
○
○
○
○
○
○
○
○
○
○
○
○
○
○
Ensure that the IPG strip is rehydrated along its entire length.
○
○
○
○
○
○
○
○
○
○
○
○
○
○
○
○
○
○
○
○
○
○
○
○
○
The high voltage lead
Ensure that the plugs on the high-voltage leads fit securely into the
from the electrophoresis
output jacks on the power supply. Use the appropriate adapter if
unit is not plugged into
necessary.
the power supply correctly.
Sample dye does
not move out of
the sample cup
○
○
○
○
○
○
○
It is normal for several
hours to elapse before
the sample dye leaves
the sample cups.
○
○
○
○
○
○
○
○
○
○
○
○
The sample cups were
pressed down so hard
against the gel that they
pushed through the gel
to rest against the plastic
backing. This blocks the
current and physically
prevents the protein from
entering the IPG strip.
○
○
○
○
○
○
○
○
○
○
○
○
○
○
○
○
○
○
○
○
○
○
○
○
○
○
○
Replace IPG strip and re-apply sample cup.
continues on following page
43
Table 14. Troubleshooting first-dimension IEF: Multiphor II and Immobiline DryStrip Kit (continued)
Symptom
Possible cause
Remedy
Sample dye does
not move out of
the sample cup
The ionic strength of the
sample is higher than the
gel. As a result, the field
strength in the sample zone
is inadequate to move the
protein out of the sample
zone at an appreciable rate.
Dilute the sample as much as possible or, just prior
to loading, dialyze the sample to remove salts.
Sparking or burning
of IPG strips
Conductivity of the
sample/IPG strips is
too high.
Ensure the sample is adequately desalted.
Alternatively, before raising the voltage to maximum,
include a prolonged low-voltage phase in the IEF protocol
to allow the ions to move to the ends of the IPG strip.
2.6 Ettan IPGphor Isoelectric Focusing System
With the IPGphor Isoelectric Focusing system, both rehydration of the IPG strip and IEF
occur in individual strip holders. Different strip holder lengths are available for different IPG
strip lengths. The Ettan IPGphor Strip Holder is made of thermally conductive ceramics
with built-in platinum electrodes and a transparent lid.
IPG strip holders have a special surface treatment to minimize protein adsorption. Because
some cleaning agents can damage the surface, clean the strip holders only with the Ettan
IPGphor Strip Holder Cleaning Solution as directed. The sample can be loaded by simply
including it in the rehydration solution, or loaded separately just prior to IEF into small
lateral sample wells or alternatively, into the loading cups of Cup Loading Strip Holder.
Ettan IPGphor Cup Loading Strip Holder can accommodate Immobiline DryStrip gels up
to 24 cm length and is equipped with movable platinum electrode contacts.
Once sample is applied to the IPG strip and a Strip Holder is in place on the Ettan IPGphor
unit platform, the remaining steps are carried out automatically according to the chosen
protocol. Up to 12 strip holders can be supported.
2.6.1 IPG strip rehydration—Ettan IPGphor Strip Holder
1. Prepare the strip holder(s)
Select the strip holder(s) corresponding to the IPG strip length chosen for the experiment.
Important: Handle the ceramic strip holders with care, as they are fragile.
Very Important: Wash each strip holder with detergent to remove residual protein. Use a neutral pH detergent,
such as the Ettan IPGphor Strip Holder Cleaning Solution, to remove residual protein from these strip holders.
Ettan IPGphor Strip Holder Cleaning Solution has been specifically formulated for removing protein deposits and
will not damage the strip holder. Ettan IPGphor Strip Holder Cleaning Solution can be ordered in 950 ml bottles
from Amersham Biosciences. See Ordering information.
Clean strip holders after each first-dimension IEF run. Do not let solutions dry in the strip holder. Cleaning may be
more effective if the strip holders are first soaked a few hours overnight in a solution of 2–5% Ettan IPGphor Strip
Holder Cleaning Solution in water.
1. First rinse off the strip holder. A mild liquid soap may be used to remove any residual DryStrip cover fluid.
2. Squeeze a few drops of Ettan IPGphor Strip Holder Cleaning Solution into the strip holder slot. Use a
toothbrush and vigorous agitation to clean the strip holder.
3. Rinse well with distilled or deionized water. Thoroughly air dry the strip holders or dry well with a lint-free
tissue prior to use.
44
Recalcitrant or dried-on protein deposits may be removed with hot (up to 95 ºC) 1% (w/v) SDS. Add 1% (w/w)
DTT for complete removal of sticky proteins. Rinse completely with distilled or deionized water after cleaning.
Handle clean strip holders with gloves to avoid contamination.
Important: Strip holders may be baked, boiled or, autoclaved. DO NOT EXPOSE THEM TO STRONG ACIDS OR
BASES, INCLUDING ALKALINE DETERGENTS.
Note: The strip holder must be completely dry before use.
2. Apply the rehydration solution (Fig 17)
Pipette the appropriate volume of rehydration solution into each strip holder as indicated in Table 15. Deliver the
solution slowly at a central point in the strip holder channel away from the sample application wells. Remove any
larger bubbles.
Typical composition of rehydration solution: 8 M urea, 0.5% (w/v) CHAPS, 0.2% (w/v) DTT, 0.5% (v/v) IPG Buffer
or Pharmalyte, 0.002% bromophenol blue.
Important: To ensure complete sample uptake, do not exceed the recommended volume of rehydration solution,
see Table 15.
3. Position the IPG strip (Fig 18)
Remove the protective cover foil from the IPG strip starting at the acidic (pointed) end. Removal from the acidic
(pointed) end prevents damage to the basic (square) end of the IPG strip, which is generally softer. Position the
IPG strip with the gel side down and the pointed (anodic) end of the strip directed toward the pointed end of the
strip holder. Pointed end first, lower the IPG strip onto the solution. To help coat the entire strip, gently lift and
lower the strip and slide it back and forth along the surface of the solution, tilting the strip holder slightly as
needed to assure complete and even wetting.
Finally, lower the cathodic (square) end of the IPG strip into the channel, making sure that the gel contacts the
strip holder electrodes at each end. (The gel can be visually identified once the rehydration solution begins to dye
the gel). Be careful not to trap air bubbles under the IPG strip.
4. Apply DryStrip Cover Fluid
Apply IPG Cover Fluid to minimize evaporation and urea crystallization. Pipette the fluid dropwise into one end of
the strip holder until one half of the IPG strip is covered. Then pipette the fluid dropwise into the other end of the
strip holder, adding fluid until the entire IPG strip is covered.
5. Place the cover on the strip holder
Pressure blocks on the underside of the cover assure that the IPG strip maintains good contact with the
electrodes as the gel swells.
6. Allow the IPG strip to rehydrate
Rehydration can proceed on the bench top or on the Ettan IPGphor unit platform. Ensure that the strip holder is
on a level surface. A minimum of 10 h is required for rehydration; overnight is recommended. The rehydration
period can be programmed as the first step of an Ettan IPGphor protocol. This is especially convenient if
temperature control during rehydration is a concern.
a
Fig 17. Applying rehydration
solution into the strip holder.
b
Fig 18a, b. Positioning the IPG strip.
45
A. Rehydration loading
There are two possible rehydration conditions:
1. Passive rehydration
No electric field is applied during rehydration.
2. Rehydration under voltage
In some cases, rehydration under a low voltage (30–120 V) facilitates the entry of high-molecular weight proteins (70).
B. Optional: Apply electrode pads
During isoelectric focusing the transport of ions, proteins, and IPG buffer to the electrodes
is accompanied by transport of water.
For large sample loads and narrow Immobiline DryStrip gels, better results are obtained by
applying damp paper pads between the IPG strip and each strip holder electrode just before
IEF to adsorb excess water.
1. Prepare electrode pads
To apply, cut two 3 mm-wide electrode pads from a paper IEF electrode strip. Place on a clean, flat surface such
as a glass plate and soak with deionized water. Remove excess water by blotting with tissue paper.
Important: Electrode pads must be damp, not wet.
2. Position electrode pads
Using forceps or tweezers, lift one end of the rehydrated IPG strip. Position an electrode pad over the electrode,
then lower the IPG strip back into place. Repeat at the other end.
C. Apply sample after gel rehydration
If the sample was not applied as a part of the rehydration solution, it can be applied
immediately prior to IEF.
1. Prepare sample
Prepare the sample in a solution similar in composition to the rehydration solution used.
2. Apply sample (Fig 19)
Pipette the sample into either or both of the lateral wells at either end of the strip holder. Introduce the sample
below the DryStrip Cover Fluid.
Up to 7.5 µl of sample solution can be added to each side (i.e. 15 µl per well or 30 µl total if both sides of both
wells are used).
Note: The IPG strip backing is impermeable; do not apply the sample to the back of the strip.
Replace cover on strip holder.
Table 15. Rehydration solution volume per Immobiline DryStrip
IPG strip length (cm)
Total volume per strip* (µl)
7 cm
125 µl
11 cm
200 µl
13 cm
250 µl
18 cm
340 µl
24 cm
450 µl
*Including sample, if applied.
Fig 19. Applying sample after
gel rehydration.
46
2.6.2 IPG strip rehydration—Ettan IPGphor Cup Loading Strip Holder
Several sample application methods are available when using Ettan IPGphor Cup Loading
Strip Holder:
• Cup loading is recommended for sample volumes up to 100 µl, and a maximum protein
concentration of 100 µg protein/100 µl sample solution (100 µl is the volume of the cup).
Larger sample loads can lead to increased protein precipitation in the sample cup.
• Rehydration loading is preferred for large sample volumes (greater than 100 µl) and
sample amounts.
• Paper-bridge loading is selected for very large sample volumes and preparative electrophoresis and is particularly applicable when using basic pH intervals (pH 6–9 and
pH 6–11).
Details of appropriate sample loads for silver and Coomassie staining using rehydration
loading and cup loading using Ettan IPGphor Cup Loading Strip Holder are given in Table 16.
As mentioned earlier, cup loading has been found to improve protein 2-D patterns, particularly
with basic IPG strips (pH 6–9 and pH 6–11). Under conditions where substantial water
transport (electroendosmosis) accompanies focusing, such as with protein loads in excess of
1 mg, the face-up mode frequently yields better resolution.
Table 16. Suitable sample loads for silver and Coomassie staining using rehydration loading and cup loading
Immobiline DryStrip (pH)
7 cm
4–7
6–11
3–10, 3–10 NL
Suitable sample load (µg of protein)
Silver stain
Coomassie stain
4–8
8–16
2–4
20–120
40–240
10–60
11 cm
4–7
6–11
3–10 L
10–20
20–40
4–8
50–300
100–600
20–120
13 cm
4–7
6–11
3–10, 3–10 NL
15–30
30–60
8–15
75–450
150–900
40–240
18 cm
4–7
6–11, 6–9, narrow interval*
3–10, 3–10 NL
30–60
60–120
15–30
150–900
300–1 500
75–450
24 cm
4–7, 3–7
6–9, narrow interval*
3–10, 3–10 NL
45–90
80–170
20–40
200–1 300
400–2 000
100–600
* Immobiline DryStrip narrow intervals pH: 3.5–4.5, 4.0–5.0, 4.5–5.5, 5.0–6.0, and 5.5–6.7.
When using cup loading, an increased sample concentration will lead to an increased risk of protein precipitation in the
sample cup. Maximum concentration of 100 µg protein / 100 µl sample solution (100 µl is the volume of the cup) is
recommended. This is a general recommendation, which will function for most samples, but the maximum concentration
possible to use varies greatly between sample types. For larger sample loads, rehydration loading is recommended.
Strip holder
Ettan IPGphor Cup Loading Strip Holder is made of aluminum oxide ceramic for efficient
heat transfer and temperature control during IEF. Two areas of metal plating on the bottom
extend up the sides of the strip holder. These plated areas make contact with the power supply
contact pads when placed on the Ettan IPGphor separation platform. Ettan IPGphor can
accomodate a maximum of 9 Cup Loading Strip Holders.
47
Protrusions along the channel inside the strip holder align the rehydrated IPG strip, keeping
it straight and centered when placed inside the strip holder. The anodic end of the strip holder
is somewhat pointed to indicate the direction of placement of the pointed IPG strip.
The strip holders have a special surface treatment to minimize protein adsorption. Because
some cleaning agents can damage the surface, clean the strip holders only with the Ettan
IPG Strip Holder Cleaning Solution as directed. The strip holders are very fragile and should
be handled with care.
Electrodes
The moveable electrode clips can be placed anywhere along the chamber where the electrode
bosses make electrical contact with the conducting rails on the sides of the strip holder.
Strips from 7 cm to 24 cm long can be used.
Sample cups
Sample cups can be placed almost anywhere along the length of the Ettan IPGphor Cup
Loading Strip Holder that is not blocked by a protrusion. For proper sealing of the cup to
the gel, the feet of the sample cup must all rest on the bottom of the channel.
Cover
The cover is used to ensure that the electrodes stay in place and that they are in good
contact with the IPG strip. The cover also applies gentle pressure to assure that the strip
holder makes good contact with the IPGphor separation platform and power supply
contact pads.
Immobiline DryStrip Cover Fluid
The Immobiline DryStrip Cover Fluid is required to ensure that the rehydrated Immobiline
DryStrip gels do not dry out during electrophoresis. Without cover fluid, the strips will dry
out, urea crystallize, and the sample will not focus properly.
Electrode pads
Although electrode pads are not required to make electrical contact between the IPG strip
and the electrode, they can improve the quality of results, particularly on narrow-range
Immobiline DryStrip gels. The pads absorb excess water, as well as proteins with pIs that
are outside the pH range of the IPG strip.
A. Immobiline DryStrip Reswelling Tray
IPG strips must be rehydrated prior to IEF. The IPG strips are rehydrated in the Immobiline
DryStrip Reswelling Tray if Ettan IPGphor Cup Loading Strip Holders are used for IEF.
Immobiline DryStrip Reswelling Tray has 12 independent reservoir slots that can each hold
a single IPG strip up to 24 cm long. Separate slots allow the rehydration of individual IPG
strips in a minimal volume of solution.
1. Prepare the Reswelling Tray (Fig 10, page 35)
Slide the protective lid completely off the tray and level the tray by turning the leveling feet until the bubble in the
spirit level is centered. Ensure the tray is clean and dry.
48
2. Apply the rehydration solution
Pipette the appropriate volume into each slot as indicated in Table 15, page 46.
Typical composition of rehydration solution:
8 M urea, 0.5% (w/v) CHAPS, 0.2% (w/v) DTT, 0.5% (v/v) IPG Buffer or Pharmalytes, 0.002% bromophenol blue.
The solution is either mixed with the sample solution for rehydration loading, or is applied as such for later cup
loading or paper-bridge loading. Deliver the solution slowly at a central point in the slot. Remove any larger
bubbles.
Important: To ensure complete fluid (and sample) uptake, do not apply excess rehydration solution.
3. Position the IPG strip (Fig 11, page 35)
Remove the protective cover from the IPG strip starting at the acidic (pointed) end, because of its superior
mechanical stability. Position the IPG strip as shown in Figure 11, with the gel side down and the pointed end of
the strip against the sloped end of the slot. Lower the IPG strip onto the solution. To help coat the entire IPG strip,
gently lift and lower the strip and slide it back and forth along the surface of the solution. Be careful not to trap
bubbles under the IPG strip.
4. Overlay the IPG strip with DryStrip Cover Fluid
Overlay each IPG strip with 3 ml of DryStrip Cover Fluid to minimize evaporation and prevent urea crystallization.
5. Allow the IPG strip to rehydrate
Slide the lid onto the Reswelling Tray and allow the IPG strips to rehydrate at room temperature. A minimum of
10 h is required for rehydration; overnight is recommended. If the IPG strips swell unevenly, refer to Table 12 on
page 36.
Note: Rehydrate the IPG strips using the Immobiline DryStrip Reswelling Tray. If the Immobiline DryStrip
Reswelling Tray is not available, strips can be rehydrated in the Ettan IPGphor Strip Holder.
Note: Rehydration in the Ettan IPGphor Cup Loading Strip Holder is not recommended: the channel is too wide
for the rehydration volume.
For rehydration in Ettan IPGphor Strip Holder see page 44.
B. Prepare the Ettan IPGphor Cup Loading Strip Holder
1. Position the strip holder on the Ettan IPGphor platform
Due to the high voltage applied to the Ettan IPGphor Cup Loading Strip Holder it is important that it be clean and
dry. The pointed end of the strip holder should contact the anodic electrode area (+) and the blunt end should
contact the cathodic electrode area (–) of the Ettan IPGphor separation platform.
2. Transfer the strips to the Ettan IPGphor Cup Loading Strip Holder
The strips should be placed face up in the tray with the anodic (+, pointed) end of the IPG strip toward the
pointed end of the strip holder. The strip must be positioned so that the gel overlaps the ends of both plated
regions of the strip holder. The cathodic end of the IPG strip must be approximately 1.5 cm from the end of the
channel and in electrical contact with the cathodic rails via the electrode clips (Fig 20). Center the strip down the
length of the strip holder channel. Protrusions along the sides guide the strip approximately straight although
some manual adjustment of the strip may be necessary.
3. Overlay Immobiline DryStrip Cover fluid across the surface of the IPG strip
It is important to distribute the oil evenly across the IPG strip and down the entire length of the Ettan IPGphor
Cup Loading Strip Holder. Use only enough oil to cover the strip without overfilling (3–5 ml).
49
Rail
Cathodic
contact
area
Cup Loading
Strip holder
Anodic
contact
area
Fig 20. Positioning the IPG strips so that the gels are in electrical contact with the rails via the electrode clips.
4. Optional:
Cut electrode pads from IEF electrode strips about 5 mm long. Two pads per strip holder are required. Wet the
pads with deionized water and blot them almost completely dry. Longer pads can be used if desired. If using
longer pads, one end of the pad should overlap the end of the gel on the IPG strip. The electrode must contact
the other end of the pad.
Place pads on both ends of the IPG strip (Fig 21). Slide an electrode down on top of each pad. Depending on the
thickness of the IEF pad, the electrode may not feel solid on top of the filter paper. However, pressure applied by
the cover will ensure complete contact when the lid of the Ettan IPGphor unit is closed.
Fig 21. Placing a filter paper pad at the end of the gel strip.
C. Rehydration loading
Mix the sample with rehydration solution (see page 48, A. Immobiline DryStrip Reswelling Tray). When the IPG
strips are rehydrated with the sample proteins, continue directly with isoelectric focusing.
D. Cup loading
1. Place the sample cup over the IPG strip
Do not place the cup with the feet over an alignment protrusion; the cup will not seat squarely and seal against
the IPG strip. However, the sample cup can straddle these protrusions. Press the cup down until fully seated
against the bottom of the strip holder. The feet on the sample cup stop the cup at a height above the floor of the
strip holder sufficient to seal against the strip without cutting into it. Make sure the cup and electrodes are
positioned properly prior to loading the sample in the cup. For basic IPG strips, superior focusing patterns are
generally obtained when the sample cup is placed as close to the anodic (+) electrode as possible.
2. Optional:
To confirm the sample cup has sealed, pipette 100 µl of Immobiline DryStrip Cover Fluid into the cup. Check the
seal. Remove the fluid prior to loading the sample.
50
3. Three common causes of leakage include:
• A foot of the cup is resting on top of one of the protrusions. Reposition the cup and recheck for leakage.
• The gel strip is not centered in the channel. Remove the cup and the electrodes, center the strip, reposition
the cup, and check again.
• The strip may not have rehydrated properly. Examine the strip closely for a thin region in which the cup may
not be able to seal properly. Be sure to use the proper volume of rehydration solution for a sufficient time to
allow complete rehydration.
4. Pipette up to 100 µl of sample into the sample cup
5. Place the cover over the strip holder
E. Paper-bridge loading
Very large sample volumes and protein amounts can be applied with paper bridges, which are placed between
the anodic or cathodic end of the IPG strip and the electrode pad. Paper bridges or electrode pads are cut from a
1 mm-thick CleanGel™ electrode strip, see Ordering information. Solution containing up to 5 mg protein can be
loaded on an 18 cm-long narrow pH range Immobiline DryStrip gel (68).
A large sample volume requires that a large paper pad or arrowhead paper bridges be applied at the other end of
the IPG strip to absorb excess water. Figure 22 below shows the arrangement used when sample is applied to a
paper bridge positioned between the anode and an 18 cm long-IPG strip. Paper bridges are cut from the 1 mm-thick
CleanGel electrode strips to a size of 8 × 45 mm and 8 × 35 mm to fit at the anodic and cathodic end of the Cup
Loading Strip Holder. The paper bridge is soaked with distilled water and blotted with a tissue paper to become
damp, not wet. Sample solution is applied to the paper bridge (450 µl for anodic sample application and 350 µl
for cathodic sample application). The rehydrated IPG strip is first positioned in the bottom of the stripholder. Then
the paper bridge positioned as indicated in Figure 22. With anodic application the anode is positioned as far out
as possible in the electrode holder, while the cathode is positioned close to the end of the IPG strip to ensure good
contact between electrode pad and IPG strip. A 6 mm soft plastic tubing is positioned as indicated in Figure 22.
When the cover is placed over the strip holder it will press down the tubing and ensure good contact between the
paper bridge and IPG strip. Solutions containing up to 5 mg protein can be loaded on an 18 cm long narrow pH
range IPG strip.
Note: The application point (anodic or cathodic) is an important factor for obtaining good results.
Fig 22. Equipment used for paper-bridge loading of large sample volumes.
2.6.3 Isoelectric focusing guidelines
IEF in the Ettan IPGphor system is conducted at very high voltages (up to 8 000 V) and
very low currents (typically less than 50 µA per IPG strip) due to the low ionic strength
within IPG strips. During IEF, the current decreases while the voltage increases as proteins
and other charged components migrate to their equilibrium positions. A typical IEF protocol
generally proceeds through a series of voltage steps that begins at a relatively low value.
Voltage is gradually increased to the final desired focusing voltage, which is held for several
hours. A low initial voltage minimizes sample aggregation and allows the parallel separation
51
of samples with differing salt concentrations. A gradual increase in voltage is particularly
advised for higher protein loads (100 µg or more per IPG strip).
Many factors affect the amount of time required for complete focusing, and each specific
set of conditions (e.g. sample and rehydration solution composition, IPG strip length, and
pH gradient) requires an empirical determination for optimal results. An approximate time
for complete focusing is given in the example protocols provided in Table 17. Factors that
increase the required focusing time include residual ions, which must move to the ends of the
IPG strips before protein focusing can occur and the presence of IPG Buffers or Pharmalyte,
which contributes to the ionic strength of the electrophoresis medium. A higher IPG Buffer
concentration increases the conductivity of the IPG strip, resulting in a lower final voltage
when the system is limited by the maximum current setting.
Longer focusing times may therefore be required at IPG Buffer/Pharmalyte concentrations
higher than 0.5%.
For higher protein loads (up to 1 mg or more) the final focusing step of each protocol can
be extended with an additional 20% of the total recommended Vh if necessary.
Note: Exceeding the current limit of 50 µA/IPG strip is not recommended, as this may
result in excessive heat generation and may damage the IPG strip and/or strip holder. Under
extreme circumstances, the IPG strip may burn.
Note: Over-focusing can sometimes occur on longer runs and may contribute to horizontal
streaking, visible in the 2-D result. (See also section 5.0, page 77).
2.6.4 Protocol examples—Ettan IPGphor
These protocols are suitable for first-dimension isoelectric focusing of protein samples
suspended in rehydration solution in typical analytical quantities (1 to 100 µg).
The protocols are optimized for a rehydration solution containing 0.5% IPG buffer or
Pharmalyte. The recommended current limit is 50 µA/IPG strip. Recommended focusing
times are given, but the optimal length of time will depend on the nature of the sample, the
amount of protein, and the method of sample application. Please refer to the Ettan IPGphor
user manual for instructions on how to program a protocol.
2.6.5 Running a protocol
Ensure that the strip holders are properly positioned on the Ettan IPGphor platform. (Use
the guidemarks along the sides of the platform to position each strip holder and check that
the pointed end of the strip holder is over the anode (pointing to the back of the unit) and the
blunt end is over the cathode. Please refer to the Ettan IPGphor User Manual for complete
details). Check that both external electrode contacts on the underside of each strip holder
make metal-to-metal contact with the platform.
Close the safety lid. At least two of the three pressure pads under the safety lid must press
gently against the cover of each strip holder to ensure contact between the electrodes and
the electrode areas. Begin IEF.
52
As isoelectric focusing proceeds, the bromophenol blue tracking dye migrates toward the
anode. Note that the dye front leaves the IPG strip well before focusing is complete, so
clearing of the dye is no indication that the sample is focused. If the dye does not migrate,
no current is flowing. If this occurs, check the contact between the external face of the strip
holder electrodes and the electrode areas on the instrument and between the rehydrated gel
and the internal face of the electrodes.
Note: it is possible that the programmed maximum voltage will not be reached with the
shorter IPG strips or with samples with high conductivity.
Table 17. Guidelines for Ettan IPGphor with rehydration loading/IEF for Immobiline Dry Strip, pH 4–7, 3–10,
3–10 NL, and narrow pH intervals. Voltage step and hold mode, 50 µA/IPG strip, 0.5% IPG buffer, 20 °C for both
rehydration and IEF. Rehydration time 12 h. (The total rehydration time can be adjusted somewhat for convenience,
but must be greater than 10 h)
Immobiline DryStrip
Length
Rehydration loading
Step duration†
(h:min)
Volt-hours
(kVh)
500
1 000
5 000*
0:30
0:30
1:40
2:40
0.25
0.5
7.5
8.0
1 Step and Hold
2 Step and Hold
3 Step and Hold
Total
500
1 000
8 000*
1:00
1:00
1:50
3:50
0.5
1.0
12.5
14.0
3–10
3–10 NL
4–7
1 Step and Hold
2 Step and Hold
3 Step and Hold
Total
500
1 000
8 000*
1:00
1:00
2:00
4:00
0.5
1.0
14.5
16.0
3–10
3–10 NL
4–7
1 Step and Hold
2 Step and Hold
3 Step and Hold
Total
500
1 000
8 000*
1:00
1:00
4:00
6:00
0.5
1.0
30.5
32.0
Narrow intervals‡
1 Step and Hold
2 Step and Hold
3 Step and Hold
Total
500
1 000
8 000*
1:00
1:00
7:30
9:30
0.5
1.0
58.5
60.0
3–10
3–10 NL
4–7
3–7
1 Step and Hold
2 Step and Hold
3 Step and Hold
Total
500
1 000
8 000*
1:00
1:00
8:20
10:20
0.5
1.0
62.5
64.0
Narrow intervals‡
1 Step and Hold
2 Step and Hold
3 Step and Hold
Total
500
1 000
8 000*
1:00
1:00
10:30
12:30
0.5
1.0
94.5
96.0
pH range(s)
Step and
voltage mode
3–10
3–10 NL
4–7
1 Step and Hold
2 Step and Hold
3 Step and Hold
Total
11 cm
3–10
4–7
13 cm
18 cm
7 cm
24 cm
Voltage
(V)
* This voltage may not be reached within the suggested step duration.
† The sample entry phase step 1 and 2 should be extended for high protein loads, or for convenience, if the strips are to
be run overnight.
‡ Narrow intervals, 3.5–4.5, 4.0–5.0, 4.5–5.5, 5.0–6.0, and 5.5–6.7.
After IEF, proceed to the second-dimension separation immediately or store the IPG strips
at -70 °C in screw-cap tubes. The 7 cm strips fit in disposable, 15 ml conical tubes; 11, 13,
and 18 cm strips fit in 25 × 200 mm screw cap culture tubes; 18 and 24 cm strips in the
Equilibration Tubes available from Amersham Biosciences.
53
Table 18. Guidelines for Ettan IPGphor with Cup Loading Strip Holder for broad, medium, and narrow pH range
Immobiline DryStrip gels. Voltage gradient and step and hold mode, 50 µA/IPG strip, 0.5%* IPG buffer, 20 °C for IEF
Immobiline DryStrip
Running conditions for cup-loading
application method
Running conditions
for paper-bridge
application method
Length
pH range(s)
Step and
voltage mode
Voltage
(V)
Duration Volt-hours
(h:min)
(kVh)
3–10
3–10 NL
4–7
6–11
1 Gradient
2 Gradient
3 Step and Hold
Total
500
4 000†
5 000†
0:01
1:30
0:45
2:15
0.01
3.4
3.7
7.1
0:01
2:30
0:30
3:00
0.01
5.6
2.5
8.0
3–10
4–7
1 Gradient
2 Gradient
3 Step and Hold
Total
500
4 000†
8 000†
0:01
1:30
1:30
3:00
0.01
3.4
10.6
14.0
0:01
2:30
1:40
4:10
0.01
5.6
12.0
17.6
6–11
1 Gradient
2 Gradient
3 Step and Hold
Total
500
4 000†
8 000†
0:01
1:30
1:15
2:45
0.01
3.4
8.5
12
0:01
2:30
1:30
4:00
0.01
5.6
10.0
15.6
3–10
3–10 NL
4–7
1 Gradient
2 Gradient
3 Step and Hold
Total
500
4 000†
8 000†
0:01
1:30
1:50
3:50
0.01
3.4
13.5
17
0:01
2:30
2:10
4:40
0.01
5.6
15.2
20.8
6–11
1 Gradient
2 Gradient
3 Step and Hold
Total
500
4 000†
8 000†
0:01
1:30
1:40
3:10
0.01
3.4
11.6
15
0:01
2:30
1:50
4:20
0.01
5.6
13.4
19.0
3–10
3–10 NL
4–7
1 Gradient
2 Gradient
3 Step and Hold
Total
500
4 000†
8 000†
0:01
1:30
3:10
4:40
0.01
3.4
24.6
28
0:01
2:30
3:30
6:00
0.01
5.6
27.3
33
6–9
1 Gradient
2 Gradient
3 Step and Hold
Total
500
4 000†
8 000†
0:01
1:30
5:20
6:50
0.01
3.4
41.6
45
0:01
2:30
5:40
8:10
0.01
5.6
44.3
50
Narrow
intervals‡
1 Gradient
2 Gradient
3 Step and Hold
Total
500
4 000†
8 000†
0:01
1:30
7:10
8:40
0.01
3.4
56.6
60
0:01
2:30
7:40
10:10
0.01
5.6
60.3
66
6–11
1 Gradient
2 Gradient
3 Step and Hold
Total
500
4 000†
8 000†
0:01
1:30
2:40
4:10
0.01
3.4
20.6
24
0:01
2:30
2:50
5:20
0.01
5.6
22.3
28
3–10
3–10 NL
4–7
3–7
1 Gradient
2 Gradient
3 Step and Hold
Total
500
4 000†
8 000†
0:01
1:30
6:30
8:00
0.01
3.4
51.6
55
0:01
2:30
7:40
10:10
0.01
5.6
60.0
65
6–9
1 Gradient
2 Gradient
3 Step and Hold
Total
500
4 000†
8 000†
0:01
1:30
7:10
8:40
0.01
3.4
56.6
60
0:01
2:30
11:00
15:30
0.01
5.6
88.0
106
Narrow
intervals‡
1 Gradient
2 Gradient
3 Step and Hold
Total
500
4 000†
8 000†
0:01
1:30
12:00
13:30
0.01
3.4
95.6
99
0:01
2:30
14:20
16:50
0.01
5.6
114.4
120
7 cm
11 cm
13 cm
18 cm
24 cm
Duration Volt-hours
(h:min)
(kVh)
* If 1 or 2% IPGbuffer is used, decrease the maximum voltage to 3 500 V for 7 cm strips, 5 500V for 11 cm strips, and
6 500V for 13 cm strips.
† This voltage may not be reached within the suggested step duration.
‡ Narrow intervals, 3.5–4.5, 4.0–5.0, 4.5–5.5, 5.0–6.0, and 5.5–6.7.
54
2.6.6 Troubleshooting
Table 19 lists possible problems that could be encountered during IEF and how to solve them.
Table 19. Troubleshooting first-dimension IEF: Ettan IPGphor
○
Symptom
Possible cause
Remedy
Current is too low or zero
Electrical continuity is impeded.
Check the external electrode contacts:
The electrodes at the bottom of the strip
holder (one at each end) must make metalto-metal contact with the appropriate
electrode contact area.
Check the internal electrode contacts:
The gel (which becomes visible because of
the dye in the rehydration solution) must
contact both electrodes in the strip holder.
Check that the IPG strip is fully rehydrated
along its entire length. Electrical contact at
the electrodes is reduced by incomplete
rehydration.
Voltage too low or
does not reach the
maximum set value
The Ettan IPGphor protocol settings are
incorrect for the experiment
Check that the current limit is properly set.
Check that the actual number of strips on
the Ettan IPGphor platform equals the
number of strips entered in the protocol.
○
○
○
○
○
○
○
○
○
○
○
○
○
○
○
○
○
○
○
○
○
○
○
○
○
○
○
Conductivity/ionic strength is too high.
Sparking or burning
in the strips
○
○
○
○
○
○
○
○
Current limit setting is too high.
○
○
○
○
○
○
○
○
○
○
○
○
○
○
○
○
○
○
○
○
○
○
○
○
○
○
○
○
○
○
○
○
○
○
○
○
○
○
The IPG strip dried during IEF.
○
○
○
○
○
○
○
○
○
○
○
○
○
○
○
○
○
○
Do not exceed the maximum recommended
setting of 50 µA per IPG strip.
○
○
○
○
The IPG strip is not fully rehydrated.
○
○
Prepare the sample to yield a salt
concentration less than 10 mM.
The recommended IPG Buffer concentration
is 0.5%. A maximum of 2% is advisable
only if sample solubility is a problem.
○
○
○
○
○
○
○
○
○
○
○
○
○
○
○
○
○
○
○
○
○
○
Ensure the IPG strips are rehydrated with a
sufficient volume of rehydration solution.
Remove any large bubbles trapped under
the IPG strip after placing on rehydration
solution.
Check that the entire IPG strip surface is
wetted.
○
○
○
○
○
○
○
○
○
○
○
○
○
○
○
○
○
○
Always apply DryStrip Cover Fluid to prevent
dehydration of a rehydrated IPG strip.
55
56
Chapter 3
Second-dimension SDS-PAGE
3.0 Second-dimension SDS-PAGE—overview
After IEF, the second-dimension separation can be performed on various flatbed or vertical
systems, depending on factors such as those discussed in “Equipment Choices” on page 12.
SDS-PAGE consists of four steps: (1) Preparing the second-dimension gel, (2) equilibrating
the IPG strip(s) in SDS buffer, (3) placing the equilibrated IPG strip on the SDS gel, and (4)
electrophoresis.
In this guide, the equilibration step is described first because it is a protocol common to
both vertical and flatbed systems. Gel preparation, IPG strip placement, and electrophoresis
protocols, on the other hand, are specific to the orientation of the gel. Sections 3.3 and 3.4
describe these protocols as they apply to vertical systems and Multiphor II flatbed systems,
respectively. Note however, that the second-dimension gel must be prepared before the
equilibration step is started.
3.1 Background to SDS-PAGE
SDS-PAGE (SDS-polyacrylamide gel electrophoresis) is an electrophoretic method for
separating polypeptides according to their molecular weights (Mr). The technique is
performed in polyacrylamide gels containing sodium dodecyl sulfate (SDS). The intrinsic
electrical charge of the sample proteins is not a factor in the separation due to the presence
of SDS in the sample and the gel. SDS is an anionic detergent, that, when in solution in
water, forms globular micelles composed of 70–80 molecules with the dodecyl hydrocarbon
moiety in the core and the sulfate head groups in the hydrophilic shell. SDS and proteins
form complexes with a necklace-like structure composed of protein-decorated micelles
connected by short flexible polypeptide segments (71). The result of the necklace structure
is that large amounts of SDS are incorporated in the SDS-protein complex in a ratio of
approximately 1.4 g SDS/g protein. SDS masks the charge of the proteins themselves and
the formed anionic complexes have a roughly constant net negative charge per unit mass.
Besides SDS a reducing agent such as dithiothreitol (DTT) is also added to break any
-S-S-linkages present in the proteins. When proteins are treated with both SDS and a reducing
agent, the degree of electrophoretic separation within a polyacrylamide gel depends largely
on the molecular weight of the protein. In fact, there is an approximately linear relationship between the logarithm of the molecular weight and the relative distance of migration
of the SDS-polypeptide complex. (Note: This linear relationship is only valid for a certain
molecular weight range, which is determined by the polyacrylamide percentage).
The most commonly used buffer system for second-dimension SDS-PAGE is the tris-glycine
system described by Laemmli (72). This buffer system separates proteins at high pH, which
confers the advantage of minimal protein aggregation and clean separation even at relatively
heavy protein loads. The Laemmli buffer system has the disadvantage of a limited gel
shelflife.
Ettan DALT precast gels utilize a new buffer system based on piperidinopropionamide (PPA),
which combines long shelflife with the high separation pH of the Laemmli system.
57
Other buffer systems can also be used, particularly the Tris-tricine system of Schägger and
von Jagow (73) for resolution of polypeptides in the Mr below 10 000. ExcelGel precast
gels for second-dimension SDS-PAGE on the Multiphor II flatbed system utilize a different
Tris-tricine buffer system.
3.2 IPG strip equilibration
The equilibration step saturates the IPG strip with the SDS buffer system required for the
second-dimension separation. The equilibration solution contains buffer, urea, glycerol,
reductant, SDS, and dye. An additional equilibration step replaces the reductant with
iodoacetamide.
Note: Equilibration is always performed immediately prior to the second-dimension run,
never prior to storage of the IPG strips at -40 °C or lower.
3.2.1 Equilibration solution components
Equilibration introduces reagents essential for the second-dimension separation.
Equilibration buffer (50 mM Tris-HCl, pH 8.8) maintains IPG strip pH in a range
appropriate for electrophoresis.
Urea (6 M) together with glycerol reduces the effects of electroendosmosis by increasing the
viscosity of the buffer (4). Electroendosmosis is due to the presence of fixed charges on the
IPG strip in the electric field and can interfere with protein transfer from the IPG strip to
the second-dimension gel.
Glycerol (30%) together with urea reduces electroendosmosis and improves transfer of
protein from the first to the second-dimension (4).
DTT preserves the fully reduced state of denatured, unalkylated proteins.
Sodium dodecyl sulfate (SDS) denatures proteins and forms negatively charged protein-SDS
complexes. The amount of SDS bound to a protein, and therefore the additional negative
charge, is directly proportional to the mass of the protein. Thus, electrophoresis of proteins
through a sieving gel in the presence of SDS separates proteins on the basis of molecular mass.
Iodoacetamide alkylates thiol groups on proteins, preventing their reoxidation during
electrophoresis. Protein reoxidation during electrophoresis can result in streaking and other
artifacts. Iodoacetamide also alkylates residual DTT to prevent point streaking and other
silver-staining artifacts (74). Iodoacetamide is introduced in a second equilibration step.
This step is optional when SDS-PAGE is performed in a vertical second-dimension system,
but required when SDS-PAGE is performed on a flatbed second-dimension system especially
when the flatbed separation is to be visualized by silver staining. The second equilibration
with iodoacetamide is also used to minimize unwanted reactions of cysteine residues (i.e.
when mass spectrometry is to be performed on the separated proteins).
Tracking dye (bromophenol blue) allows monitoring of electrophoresis.
58
3.2.2 Equilibration steps
Note: The second-dimension vertical gel must be ready for use prior to IPG strip
equilibration. See sections 3.3 and 3.4 for preparation of vertical and horizontal gels,
respectively.
1. Prepare equilibration solution
Prepare SDS Equilibration buffer (see Appendix I, solution D). This is a stock solution. Just prior to use, add
100 mg DTT per 10 ml SDS equilibration buffer.
2. Equilibration
Place the IPG strips in individual tubes with the support film toward the wall. Add 10 ml of the DTT-containing
solution to each tube. Cap the tube, and place it on its side on a rocker. Equilibrate for 15 min.
3. Second equilibration
A second equilibration may be performed with an iodoacetamide solution (without DTT). Prepare a solution of
250 mg iodoacetamide per 10 ml SDS equilibration buffer.
Note: This second equilibration step reduces point streaking and other artifacts.
Add 10 ml of solution per tube. Cap the tube, place it on its side on a rocker, and equilibrate for 15 min.
Equilibration of IPGstrips prior to SDS PAGE:
2% SDS, 50 mM Tris-HCl pH 8.8, 6 M urea, 30% (v/v) glycerol, 0.002% bromophenol blue
15 min
10 ml
+ 100 mg DTT
15 min
10 ml
+ 250 mg IAA
Tip: The subsequent steps of electrophoresis unit preparation, insertion of the gel into the
precast gel cassette, and melting of the Sealing Solution can be performed as the IPG strips
are equilibrating.
3.3 The Ettan DALTtwelve system
The Ettan DALTtwelve system is designed to handle up to 12 large, second-dimension gels
(26 × 20 cm) in a simple, efficient, and reproducible manner (see Fig 6, page 11). Running
fewer gels, unused slots are filled with the blank cassette inserts. Safety interlocks prevent
the application of power to the separation unit unless the lid is closed properly and the
pump valve is in the circulate position. The lid is easily removed for cleaning by sliding it
off its hinges.
Turning the lever at the back of the unit from circulate to drain drains the tank. The temperature is controlled by Peltier modules attached to the heat exchanger beneath the tank.
Power Supply/Control Unit
The Ettan DALTtwelve system is controlled from the Power Supply/Control Unit. The unit
supplies a maximum power output of 200 W with a maximum of 600 V or 1 A. The
temperature control range is 10–50 °C.
59
3.3.1 Preparation of Ettan DALTtwelve Separation Unit for electrophoresis
1. Prepare cathode buffer
Dilute the cathode buffer included in the Ettan DALT Buffer Kit to working strength by adding both bottles of
10× cathode buffer (total volume 250 ml) to 2.25 l distilled or deionized water.
2. Prepare anode buffer
Ensuring that the valve on the separation unit is set to "circulate", add the entire contents (75 ml) of the 100×
anode buffer included in the Ettan DALT Buffer Kit into the tank. Fill the tank to the 7.5 l fill line with distilled or
deionized water, in this way washing the 100× anode solution from the buffer seal.
3. Switch the separation unit on
4. Turn on the pump to mix, set separation unit to desired temperature
Note: Avoid pouring the 100× anode buffer onto the tubing by spreading the tubing elements apart using one
hand while pouring the solution with the other hand (Fig 23).
Note: A temperature of 25 °C is recommended for electrophoresis.
Fig 23. Avoid pouring the 100× anode buffer onto the tubing by spreading the tubing elements apart with one hand
while pouring the solution with the other.
3.3.2 Ettan DALT precast gels
Ettan DALT Gel, 12.5 is a precast polyacrylamide gel for the second-dimension of twodimensional electrophoresis. The gel is cast onto a plastic support film. The exact gel size is
255 × 196 × 1 mm. The gel is a homogeneous 12.5% polyacrylamide gel cross-linked with
bisacrylamide. It is intended to be used in the Ettan DALTtwelve system together with the
Ettan DALT Buffer Kit. The gel is formulated for long shelflife and, when used with the buffer
kit, generates a discontinuous buffer system yielding rapid runs with sharp, reproducible
results. The gels are inserted into a specially designed reusable cassette and run in a vertical
mode in the Ettan DALTtwelve Separation Unit.
Inserting the Ettan DALT Gel, 12.5 into Ettan DALT Precast Gel Cassette
1. Open the gel package
Cut around the gel on two sides at about 1 cm from the edge to avoid cutting the gel or the support film. Remove
the gel from the package. The gel is cast onto a plastic support film and does not cover the film entirely. The gel
is covered with a protective plastic sheet. Markings on the protective sheet indicate the orientation of the gel and
the direction of electrophoresis. The bottom (+ or anodic) edge of the gel is flush with the edge of the support
film. The support film protrudes approximately 15 mm beyond the top (– or cathodic) edge of the gel and
approximately 5 mm at either side.
60
2. Open an Ettan DALT Precast Gel Cassette
Place it on the bench top with the hinge down (see Fig 24). Apply 1 ml gel buffer onto the glass plate as a streak
along the spacer on the right edge of the glass plate (see Fig 24).
Fig 24. An opened Ettan DALT Precast Gel Cassette showing plastic frame cover (left) and glass plate (right).
3. Remove the protective plastic sheet from the gel
Handling the gel only by the side support film margins, hold it (gel-side down) over the glass plate. Ensure that it is
oriented with the cathodic (–) edge of the gel toward the cathodic (–) edge of the cassette. Align the right edge of
the gel with the right edge of the side spacer of the glass plate side, flex the gel downward slightly and lower it slowly
toward the glass plate from left to right. Take care that the bottom (anodic) edge of the gel is flush (within 1 mm)
of the bottom (anodic) edge of the glass plate. The protruding side support film margins (but not the gel) should
rest on top of the side spacers.
4. Removal of bubbles and excess buffer
Use the roller to press out any bubbles or liquid from between the gel and the glass. Press firmly against the
plastic support film with the roller and roll over the entire gel (see Fig 25). After rolling, the gel should adhere
firmly to the glass.
5. Close the cassette
Snap the plastic frame cover to the glass plate (see Fig 26) and press the edges tightly together. Ensure that the
cassette is closed completely: an incompletely closed cassette causes a strongly curved front.
6. Repeat the procedure for each second-dimension gel to be run
Fig 25. Pressing out air pockets between gel
and glass plate.
Fig 26. Closing the Precast Gel Cassette.
3.3.3 Equilibrate the IPG strip
(See section 3.2.2 for equilibration protocol)
3.3.4 Applying the equilibrated IPG strip
1. Position the IPG strip
Dip the equilibrated IPG strip (from section 3.2.2) in the SDS electrophoresis buffer (see Appendix I, solution J)
to lubricate it.
61
Both types of Ettan DALT gel cassettes (those for lab-cast and for precast gels) have a "longer" glass plate. The
cassette should be laid on the bench with the longer glass plate down, the protruding edge oriented towards the
operator. Place the strip with the acidic end to the left, gel surface up onto the protruding edge of the longer glass
plate (see Fig 27).
For other systems: Position the IPG strip between the plates on the surface of the second-dimension gel with the
plastic backing against one of the glass plates (Fig 27). With a thin plastic ruler, gently push the IPG strip down
so that the entire lower edge of the IPG strip is in contact with the top surface of the slab gel (Fig 28). Ensure that
no air bubbles are trapped between the IPG strip and the slab gel surfaces or between the gel backing and the
glass plate.
Fig 27. Positioning an equilibrated IPG strip on the
Precast Gel Cassette.
Fig 28. Pushing the IPG strip down to contact
the gel slab.
2. Optional: Apply molecular weight marker proteins
Best results are obtained when the molecular weight marker protein solution is mixed with an equal volume of a
hot 1% agarose solution prior to application to the IEF sample application piece. The resultant 0.5% agarose will
gel and prevent the marker proteins from diffusing laterally prior to the application of electric current.
Other alternatives are to apply the markers to a paper IEF sample application piece in a volume of 15 to 20 µl.
For less volume, cut the sample application piece proportionally. Place the IEF application piece on a glass plate
and pipette the marker solution onto it, then pick up the application piece with forceps and apply to the top
surface of the gel next to one end of the IPG strip. The markers should contain 200 to 1 000 ng of each
component for Coomassie staining and about 10 to 50 ng of each component for silver staining.
3. Seal the IPG strip in place
For precast Ettan DALT gels, the agarose sealing has two functions:
1. Blockage of the narrow gap(s) between the gel edge(s) and the lateral spacer(s) to prevent leakage of the
upper buffer.
2. Preventing the IPG strip from moving or floating in the elecrophoresis buffer.
The second point is valid for all vertical systems.
Prepare agarose sealing solution for Ettan DALT precast gels using the agarose sealing solution from the Ettan
DALT Buffer Kit. If using the Laemmli buffer system, see Appendix I, solution K.
Melt each aliquot as needed in a 100 °C heat block (each gel will require 1 to 1.5 ml). It takes approximately
10 min to fully melt the agarose. (Tip: An ideal time to carry out this step is during IPG strip equilibration).
Allow the agarose to cool until the tube can be held by fingers (60 °C) and then slowly pipette the amount
required to seal the IPG strip in place (Fig 29). Pipetting slowly avoids introducing bubbles. Only apply the
minimum quantity of agarose sealing solution required to cover the IPG strip. Allow a minimum of 1 min for the
agarose to cool and solidify.
62
3.3.5 Insert the precast gel cassettes into the Ettan DALTtwelve Separation Unit
1. Insert the gel cassettes (Fig 30)
When the electrophoresis buffer has reached the desired temperature, insert loaded gel cassettes (starting at the
back of the separation unit) ensuring that the IPG strips are in place. Push blank cassette inserts into any
unoccupied slots. When all 12 slots are occupied, the buffer level should be slightly below the level of the gaskets
(0.5 cm).
If necessary, add distilled or deionized water to bring the level of the lower (anode) buffer to this level or drain any
excess anode buffer that is in the upper chamber. The slight dilution of the anode buffer with extra distilled or
deionized water will not affect the results.
Note: Cassette insertion is aided by spraying the gel cassettes with a mist of SDS electrophoresis buffer prior
to insertion.
2. Pour diluted (1×) cathode buffer into the tank to the fill line
Note: Some of the diluted cathode buffer may drip through the gasket and mix with the anode buffer during the
run. This mixing effect will not affect performance or results.
Fig 29. Sealing the IPG strip in place using
treated agarose sealing solution.
Fig 30. Inserting Precast Gel Cassettes into the Ettan
DALTtwelve Separation Unit.
3.3.6 Electrophoresis conditions
Table 20 lists the recommended conditions for the Hoefer miniVE, SE 260, SE 600, and
Ettan DALTtwelve. Electrophoresis is performed at constant current (or constant power for
the Ettan DALTtwelve) in two steps. During the initial migration and stacking period, the
current is approximately half of the value required for the separation.
Stop electrophoresis when the dye front is approximately 1 mm from the bottom of the gel.
For the smaller systems cooling is optional. However, temperature control improves gel-togel reproducibility, especially if the ambient temperature of the laboratory fluctuates
significantly.
Important: Do not cool SDS gels below 10 °C.
After electrophoresis, remove gels from their gel cassettes in preparation for staining or
blotting. Notch or mark each gel* at the upper corner nearest the pointed end of the IPG
strip to identify the acidic end of the first-dimension separation.
* If IPG strips have been applied correctly onto the precast Ettan DALT gels, this measure will not be necessary as the
gels are cast on a support film.
63
Table 20. Recommended electrophoresis conditions for second-dimension vertical gels
Hoefer miniVE or SE 260
1.5 mm-thick gels
1.0 mm-thick gels
Hoefer SE 600
1.5 mm-thick gels
1.0 mm-thick gels
Ettan DALTtwelve (set temperature to 25 °C)
1 mm-thick gels
(lab-cast and precast)
Step
Current (mA/gel)
1
2
15
30
0:15
1:30*
1
2
10
20
0:15
1:30*
1
2
15
30 †
0:15
5:00*
1
2
10
20 †
0:15
5:00*
1
2
Power (W/gel)
2.5
17 (max 180)
Duration (h:min)
0:30
4:30
* The time shown is approximate. Stop electrophoresis when the dye front is 1 mm from the bottom of the gel.
† Currents up to 50% higher may be used if only two gels per unit are being run (no divider plates) and the unit is being
cooled with a thermostatic circulator.
3.3.7 Preparing SDS slab gels—vertical systems
The acrylamide, TEMED, ammonium persulfate, and SDS used in this protocol are
extremely hazardous. You should have a manufacturer's safety data sheet (MSDS) detailing
the properties and precautions for all chemicals in your lab. The safety sheets should be
reviewed prior to starting the procedures in this manual. General handling procedures for
hazardous chemicals include using double latex gloves for all protocols. Hazardous materials
should be weighed in a fume hood while wearing a disposable dust mask.
The instructions provided below for the preparation of vertical SDS-polyacrylamide gels
employ the tris-glycine system of Laemmli (72). Vertical second-dimension gels are most
conveniently cast several at a time, in a multiple gel caster (see Ordering information).
For assembly of the gel cassette, refer to the relevant User Manual.
1. Select the gel percentage
a. Single percentage gel versus gradient gel. When a gradient gel is used, the overall separation interval is wider
and the linear separation interval is larger. In addition, sharper bands result because the decreasing pore size
functions to minimize diffusion. However, a gradient gel requires more skill to cast. For detailed instructions on
gradient preparation see the instruction manual for the relevant gel unit and multiple gel caster.
Single percentage gels offer better resolution for a particular Mr window. A commonly used second-dimension gel
for 2-D electrophoresis is a homogeneous gel containing 12.5% total acrylamide.
Note: Stacking gels are not necessary for vertical 2-D gels.
b. Whether single percentage or gradient, the appropriate percentage gel is selected according to the range of
separation desired (see Table 21).
Table 21. Recommended acrylamide concentrations for protein separation
Separation size range (Mr × 10-3)
% Acrylamide in resolving gel
Single percentage:
Gradient:
5%
7.5%
10%
12.5%
15%
5–15%
5–20%
10–20%
* Larger proteins fail to move significantly into the gel.
64
36–200
24–200
14–200
14–100*
14–60*
14–200
10–200
10–150
2. Prepare the gel solution
The total volume of solution needed depends on the gel size, the gel thickness, and the number of gels cast.
Table 22 gives volumes of gel solution required per gel for the various possible vertical gel formats.
3. Select gel thickness for Hoefer SE 600, MiniVE, or SE 260 electrophoresis systems
Either 1.0 or 1.5 mm-thick spacers can be used for all the smaller vertical formats. Thinner gels stain and destain
more quickly and generally give less background staining. Thicker gels have a higher protein capacity. Thicker
gels are also less fragile and easier to handle.
Table 22. Volumes required per vertical gel
Casting system
Volume (ml)
Hoefer miniVE or SE 260 (10 × 10.5 cm plates)
1 mm-thick spacers
1.5 mm-thick spacers
10
15
Hoefer SE 600 (18 × 16 cm plates)
2 cm-wide × 1 mm-thick spacers
2 cm-wide × 1.5 mm-thick spacers
1 cm-wide × 1 mm-thick spacers
1 cm-wide × 1.5 mm-thick spacers
30
40
30
45
4. Calculate the formulation of the gel solution
The recipes given in Table 23 produce 100 ml of solution for a single percentage gel. The recipes in Table 24
produce 50 ml each of light and heavy solution for a gradient gel. These recipes are to be scaled up or down,
depending on the volume required.
5. Prepare the gel solution
Gel solution is prepared in a vacuum flask, omitting the TEMED and ammonium persulfate. Add a small magnetic
stir bar. Stopper the flask and apply a vacuum for several min while stirring on a magnetic stirrer.
Add the TEMED and ammonium persulfate and gently swirl the flask to mix, being careful not to generate
bubbles. Immediately pour the gel.
6. Pour and prepare the gel
Fill the gel cassette to 3 to 10 mm below the top (no stacking gel layer is required).
Overlay each gel with a layer of water-saturated n-, i-, or t-butanol (3 ml) immediately after pouring to minimize
gel exposure to oxygen and to create a flat gel surface.
After allowing a minimum of 1 h for polymerization, remove the overlay and rinse the gel surface with gel storage
solution (see Appendix I, solution I).
7. Storage of unused gels
Gels not used immediately can be stored for future use at 4 °C for up to two weeks. Gel storage solution (see
Appendix I, solution I) is pipetted over the top gel surface and the gel cassette is sealed with flexible paraffin film.
Alternatively, the gel cassettes can be stored fully immersed in gel storage solution.
Note: For further information on the preparation of second-dimension vertical SDS slab gels, refer to the user
manuals for the respective vertical gel unit and multiple gel caster.
Table 23. Single-percentage gel recipes (preparation of stock solutions is described in Appendix I, solutions E, F, G, and H)
Final Gel Concentration
5%
7.5%
10%
12.5%
15%
16.7 ml
25 ml
33.3 ml
41.7 ml
50 ml
25 ml
25 ml
25 ml
25 ml
25 ml
10% SDS (Solution G)
1 ml
1 ml
1 ml
1 ml
1 ml
Double distilled water
56.8 ml
48.5 ml
40.2 ml
31.8 ml
23.5 ml
500 µl
500 µl
500 µl
500 µl
500 µl
33 µl
33 µl
33 µl
33 µl
33 µ l
100 ml
100 ml
100 ml
100 ml
100 ml
Monomer solution (solution E)
4× resolving gel buffer (Solution F)
10% ammonium persulfate* (Solution H)
TEMED*
Total volume
* Add after deaeration.
65
Table 24. Recipes for gradient gels (preparation of stock solutions is described in Appendix I, solutions E, F, G, and H)
Light solution - Final Concentration
Monomer solution (solution E)
4× resolving gel buffer (Solution F)
5%
7.5%
10%
12.5%
15%
8.4 ml
12.5 ml
16.5 ml
21.0 ml
25 ml
12.5 ml
12.5 ml
12.5 ml
12.5 ml
12.5 ml
10% SDS (Solution G)
500 µl
500 µl
500 µl
500 µl
500 µl
Double distilled water
28.5 ml
24.5 ml
20.0 ml
16.0 ml
12.0 ml
170 µl
170 µl
170 µl
170 µl
170 µl
17 µl
17 µl
17 µl
17 µl
17 µl
50 ml
50 ml
50 ml
50 ml
50 ml
10%
12.5%
15%
17.5%
20%
Monomer solution (solution E)
16.7 ml
21.0 ml
25.0 ml
29.2 ml
33.3 ml
4× resolving gel buffer (Solution F)
12.5 ml
12.5 ml
12.5 ml
12.5 ml
12.5 ml
7.5 g
7.5 g
7.5 g
7.5 g
7.5 g
10% SDS (Solution G)
500 µl
500 µl
500 µl
500 µl
500 µl
Double distilled water
16.2 ml
11.7 ml
7.7 ml
3.5 ml
0 ml
165 µl
165 µl
165 µl
165 µl
165 µl
16.5 µl
16.5 µl
16.5 µl
16.5 µl
16.5 µl
50 ml
50 ml
50 ml
50 ml
50 ml
10% ammonium persulfate* (Solution H)
TEMED*
Total volume
Heavy solution - Final Concentration
Sucrose
10% ammonium persulfate* (Solution H)
TEMED*
Total volume
* Add after deaeration.
3.3.8 Troubleshooting
Table 25 lists possible problems that could be encountered during vertical SDS-PAGE and
how to solve them.
Table 25. Troubleshooting vertical second-dimension SDS-PAGE
○
Symptom
Possible cause
Remedy
No current at
start of run
Insufficient volume of buffer in upper
or lower reservoir.
Ensure that both reservoirs contain enough
SDS electrophoresis buffer to contact both
upper and lower electrode wires.
Check for leaks.
Second-dimension
separation proceeds
too slowly
SDS electrophoresis buffer prepared
incorrectly, or, resolving gel buffer
prepared incorrectly.
Make fresh solutions.
○
○
○
○
○
○
○
○
○
Dye front curves up
(smiles) at the edges
○
○
○
○
○
○
○
○
○
○
○
○
○
○
○
○
○
○
○
○
○
○
○
○
○
○
○
Dye front curves
down (frowns)
○
○
○
○
○
○
○
○
○
○
○
○
○
○
○
○
○
○
○
○
○
○
○
○
○
○
○
○
○
○
○
○
During electrophoresis, actively cool gel using
a thermostatic circulator.
Use the maximum possible volume of buffer
in the lower reservoir.
○
○
○
○
○
○
○
○
○
○
○
○
○
○
○
○
○
○
○
○
○
○
○
○
○
○
○
○
○
○
○
○
○
○
○
○
○
Leakage of upper reservoir
continues on following page
○
○
○
○
○
○
○
○
○
○
○
○
○
○
○
○
○
○
○
○
○
Limit current or power to values suggested
in Table 20.
○
Degas the gel solution, or increase the amount
of ammonium persulfate and TEMED by 50%.
○
○
○
○
○
○
○
○
Improper instrument assembly (SE 600).
66
○
Gel is not properly cooled.
Gel is poorly polymerized near
the spacers.
○
○
Prepare fresh monomer stock solution.
Current or power too high.
○
○
Acrylamide solution is too old.
○
○
○
○
○
○
○
○
○
○
○
○
○
○
○
○
○
○
○
○
○
○
○
○
○
○
○
○
○
Ensure that the gasket is not pinched.
○
○
○
○
○
○
○
○
○
○
○
○
○
○
Ensure that an adequate level of buffer is in
the upper reservoir.
Table 25. Troubleshooting vertical second-dimension SDS-PAGE (continued)
○
Symptom
Possible cause
Remedy
Second-dimension
separation proceeds
slowly with high
current
All of the slots in the sealing assembly are
not occupied by either gel cassettes or
blank cassettes.
Ensure that all 12 slots in the sealing
assembly are occupied.
○
○
○
○
○
○
○
○
○
○
○
○
○
○
○
○
○
○
○
○
○
○
○
○
○
○
Anodic buffer has mixed with cathodic
buffer from overfilling of either the
cathodic reservoir or the anodic reservoir.
Dye front is irregular
○
○
○
○
○
○
○
○
○
Poor, uneven polymerization of gel.
○
○
○
○
○
○
○
○
○
○
○
○
○
○
○
○
○
○
○
○
○
○
○
○
○
○
○
○
○
○
○
○
○
○
○
○
○
○
○
○
○
○
○
○
○
○
○
○
○
○
○
○
○
○
○
○
○
○
○
○
○
○
○
○
○
○
○
○
○
○
○
○
○
○
○
○
○
○
○
○
○
○
○
○
○
○
○
○
○
○
○
○
○
○
○
○
○
○
○
Pronounced
downward curving
of the dye front on
one side of the gel
○
○
○
○
○
○
○
○
○
○
Distortion in the
2-D pattern
○
○
○
○
○
○
○
○
○
○
○
○
○
○
○
○
○
○
○
○
○
○
○
○
○
○
○
○
○
○
○
○
○
○
○
○
○
○
○
○
○
○
○
○
○
○
○
○
○
○
○
○
○
○
○
○
○
○
○
○
○
○
○
○
○
○
○
○
○
○
○
○
○
○
○
○
○
○
○
○
○
○
○
○
○
○
○
○
○
○
○
○
○
○
○
○
○
○
○
○
○
○
○
○
○
○
○
○
○
○
○
○
○
○
○
○
○
○
○
○
Ensure that no visible bubbles remain and that
the gel adheres firmly to the glass and resists
movement.
○
○
○
○
○
○
○
○
○
○
○
○
○
○
○
○
○
○
○
○
○
○
○
Contaminants in the sample can cause
distortions or swollen regions in the IPG strip
following IEF. These distortions can result in
turn in disturbances in the second-dimension.
Modify sample preparation to limit these
contaminants.
There is an unfilled gap between the
gel and one of the spacers.
When sealing the IPG strip into place on top
of the gel, ensure that some of the sealing
solution flows down any gap that may exist
between the gel and spacer.
○
○
○
○
○
○
○
○
○
○
○
○
○
○
○
○
○
○
○
○
○
○
○
○
○
○
○
○
○
○
○
○
○
Precast gel cassette(s) not
properly closed.
Ensure cassette(s) are properly closed and
repeat the run.
Bubbles between the gel and the
glass plate.
Liquid between the gel and the
glass plate.
Use the roller to remove any bubbles or
excess liquid between the gel and the glass
plate. Ensure that no visible bubbles remain
and that the gel adheres firmly to the glass and
resists movement.
○
○
○
○
○
○
○
○
○
○
○
○
○
Interfering substances in the
first-dimension.
○
○
Use the roller to remove any bubbles or excess
liquid between the gel and the glass plate.
Liquid between the gel and the
glass plate.
○
○
Take care during application of the IPG strip
that the gel is not damaged.
Bubbles between the gel and the
glass plate.
○
○
Immediately after pouring the gel, overlay the
surface with water-saturated butanol.
The top surface of the gel has been
damaged during application of
the IPG strip.
○
○
Degas the gel solution, or increase the amount
of ammonium persulfate and TEMED by 50%.
○
The top surface of the second-dimension
gel is not flat.
○
○
Do not pour more than the suggested
volume (7.5 l) into the lower reservoir.
Ensure that the level of the anode buffer does
not come above the sealing assembly when the
electrophoresis unit is fully loaded. If excess
anode buffer is in the upper reservoir, it should
be removed with a pipette.
Ensure that the level of cathode buffer does not
come above the air vents in the corners of the
upper reservoir.
Lack of mixing between upper and lower
reservoirs can be verified by adding
bromophenol blue dye to the lower reservoir
prior to loading the unit with gels. Several drops
of 1% (w/v) bromophenol blue will impart
sufficient color to the anode buffer.
○
○
○
○
○
○
○
○
○
○
○
○
○
○
○
○
○
○
○
○
○
○
○
Interfering substances in the first-dimension. Contaminants in the sample can cause
distortions or swollen regions in the IPG strip
following IEF. These distortions can result in
turn in disturbances in the second-dimension.
Modify sample preparation to limit these
contaminants.
Vertical gap in
the 2-D pattern
Bubble between IPG strip and top surface
of second-dimension gel.
Ensure that no bubbles are trapped between
the IPG strip and the top surface of seconddimension gel.
continues on following page
67
Table 25. Troubleshooting vertical second-dimension SDS-PAGE (continued)
○
Symptom
Possible cause
Vertical streaking
Incorrectly prepared equilibration solution.
○
○
○
○
○
○
○
○
○
○
○
○
○
○
○
Remedy
○
○
○
○
○
○
○
○
○
○
Prepare equilibration solution according
to instructions.
○
Poor transfer of protein from IPG strip to
second-dimension gel.
○
○
○
○
○
○
○
○
○
○
○
○
○
○
○
○
○
○
○
○
○
○
○
○
○
○
○
○
○
○
○
○
○
○
○
○
○
○
○
○
○
○
○
○
○
○
○
○
○
○
○
○
○
○
○
○
○
○
○
○
○
○
Insufficient equilibration.
Prolong equilibration time.
Spots are vertically
doubled, or
"twinned".
IPG strip is not placed properly.
Ensure that the plastic backing of the IPG strip
is against the glass plate of the seconddimension cassette.
Poor representation
of higher molecular
weight proteins
Incorrectly prepared equilibration solution.
Prepare equilibration solution according to
instructions.
○
○
○
○
○
○
○
○
○
○
○
○
○
○
○
○
○
○
○
○
○
○
○
○
Poor transfer of protein from IPG strip to
second-dimension gel.
○
○
○
○
○
○
Employ a low power or current sample entry
phase in the second-dimension electrophoresis
run. Prolong entry phase if necessary.
○
○
○
○
○
○
○
○
○
○
○
○
○
○
○
○
○
○
○
Employ a low power or current sample entry
phase in the second-dimension electrophoresis
run. Prolong entry phase if necessary.
3.4 Multiphor II flatbed system
3.4.1 ExcelGel preparation
Two sizes of precast ExcelGel gradient SDS gels are recommended for 2-D electrophoresis:
the 110 × 250 mm gel homogeneous 12.5% and the 180 × 250 mm gel, which contains a
12–14% acrylamide gradient. Either gel accepts a single 24, 18, or 13 cm IPG strip, two
11 cm, or three 7 cm IPG strips. Placing shorter IPG strips end-to-end is ideal for comparative studies. For maximum resolution, the larger gel coupled with the 24 cm or 18 cm IPG
strip is the best choice. Using the buffer strip positioner helps to get optimal results: good
reproducibility is achieved because of standardized placement of IPG strips and buffer strips,
and a straight run because the gel surface is covered.
Important: A flatbed second-dimension system is not recommended if the first dimension
has been run on a pH 6–11 IPG strip.
1. Equilibrate the IPG strips
During the preparation of the ExcelGel SDS gel, equilibrate the IPG strips as described in section 3.2.2.
2. Prepare the Multiphor II Electrophoresis Unit
Set the temperature on the MultiTemp III Thermostatic Circulator to 15 °C. Pipette 2.5 to 3.0 ml of kerosene onto
the Multiphor II cooling plate.
3. Position the ExcelGel SDS gel
Remove the gel from the foil package by cutting away the edges of the package. A notch at the lower lefthand
corner of the film identifies the 12.5% or 14% (i.e., anodic) end.
Note: The gel is cast on a plastic support film and does not cover the film entirely. Both gel types contain a
stacking gel zone with 5% acrylamide. Markings on the plastic cover indicate the direction of electrophoresis.
Orient the gel according to these markings, remove the cover, and place the gel on the cooling plate. The
cathodic edge of the ExcelGel SDS must align and make uniform contact with the cathodic edge of the grid on
the cooling plate.
Note: Avoid trapping bubbles between the gel and the cooling plate. Avoid getting DryStrip Cover Fluid or
kerosene on the gel surface as this may cause the buffer strips to slide during electrophoresis.
Separation quality is improved if the gel surface is allowed to dry, uncovered, for about min 5 min before proceeding.
68
4. Place the Multiphor II Buffer Strip Positioner
The pegs protruding from the bottom of the positioner should be in contact with the shorter sides of the cooling
plate. Match the cathode (–) and anode (+) symbols on the positioner to the cathode and anode symbols on the
cooling plate. Slide the positioner so that the cathodic (–) edge of the gel bisects the slot at position 1 (see instruction
for Multiphor II Buffer Strip Positioner). Lock the positioner in place by turning the grey locking cam until the
positioner cannot be moved.
5. Position the cathodic buffer strip (Fig 31)
Carefully peel back the foil on the colorless cathodic (–) ExcelGel SDS buffer strip. Place the buffer strip with the
smooth, narrow face downward. Align the buffer strip with the edge of the slot at position 1 and place it in the slot.
If the buffer strip breaks, piece it together on the gel.
Note: Vinyl gloves tend to stick less to the buffer strips than other types of plastic gloves. If sticking persists,
dampen the gloves with distilled water or a 5% SDS solution.
6. Position the anodic buffer strip
Carefully peel back the foil on the yellow-colored (+) anodic strip and place it in the appropriate slot of the positioner:
For 11 × 25 cm ExcelGel SDS gels, place the anodic strip in slot 3, in the center of the positioner.
For 18 × 25 cm ExcelGel SDS gels, place the anodic strip in slot 4, anodic edge (+) of the positioner.
The buffer strips should sit snugly within the slots.
3.4.2 Applying the equilibrated IPG strip
(See section 3.2.2 for the equilibration protocol).
1. Drain moisture from IPG strips (flatbed second-dimension only)
After equilibration, place the IPG strips on filter paper moistened with deionized water. To help drain the
equilibration solution, place the IPG strips so they rest on an edge. IPG strips can be left in this position for up to
10 min without noticeably affecting the spot sharpness. Alternatively, the IPG strips can be gently blotted with
moistened filter paper to remove excess equilibration buffer.
2. Position the IPG strip(s) (Fig 32)
Once the equilibrated IPG strips (from section 3.2.2) have drained for at least 3 min, place the IPG strips, using
forceps, gel-side down on the ExcelGel through the slot at position 2.
Fig 31. Positioning the cathodic buffer strip on
Multiphor II.
Fig 32. Positioning equilibrated IPG strips on
Multiphor II.
69
3. Position sample application pieces (Fig 33)
Using forceps place one IEF sample application piece at the end of each IPG strip underneath the plastic "tab"
formed by the overhanging gel support film at each end of the IPG strip. Be sure the application pieces touch the
ends of the IPG strip.
Note: Application pieces absorb water that flows out of the IPG strips during electrophoresis.
4. Ensure contact between IPG strip and ExcelGel
Make sure that the IPG strip is in full, direct contact with the SDS gel. To remove any bubbles, stroke the plastic
backing of the IPG strip gently with a spatula or forceps.
5. Optional: Apply molecular weight marker proteins
If loading marker proteins, place an extra application piece on the surface of the gel just beyond the end of the
IPG strip. Pipette the markers onto the extra sample application piece. Apply the markers in a volume of 15 to 20 µl.
For less volume, cut the sample application piece proportionally. The markers should contain 200 to 1 000 ng of
each component for Coomassie staining and about 10 to 50 ng of each component for silver staining.
6. Position electrodes (Fig 34)
Place the IEF electrode holder on the electrophoresis unit, in the upper position, and align the electrodes with the
center of the buffer strips. Plug in the electrode connectors and carefully lower the electrode holder onto the
buffer strips.
Fig 33. Positioning of application pieces.
Fig 34. Positioning electrodes.
3.4.3 Electrophoresis conditions
Place the safety lid on the Multiphor II. Connect the power supply. Recommended electrical
settings and running times are listed in Table 26.
Table 26. Electrophoresis conditions for ExcelGel
Step
ExcelGel SDS, 12.5 %
ExcelGel XL SDS, gradient, 12–14%
Voltage(V)
Current (mA)
Power (W)
Duration (h:min)
1
120
20
30
0:40
Open the lid and carefully remove the electrodes*
2
600
50
30
1:10†
1
200
20
20
0:40
Open the lid and carefully remove the electrodes*
2
800
40
40
2:40†
* Remove the IPG strip and the application pieces. Then move the cathodic buffer strip forward to cover the area of the
removed IPG strip. Adjust the position of the cathodic electrode.
Electrophoresis is stopped 5 min after the bromophenol blue front has just reached the anodic buffer strip. Remove
and discard the buffer strips.
†
70
3.4.4 Troubleshooting
Table 27 lists possible problems that could be encountered during second-dimension
SDS-PAGE using the Multiphor II flatbed system and how to solve them.
Table 27. Troubleshooting second-dimension SDS-PAGE: Multiphor II flatbed system
○
Symptom
Possible cause
Remedy
No current at start of run
The electrode cable is not plugged in.
Ensure that all cables are properly
connected.
Dye front curves up
(smiles) at one edge
Cathodic buffer strip does not contact
the gel at the one edge.
Ensure that the cathodic buffer strip is
centered and covers the entire width of
the second-dimension gel.
Dye front curves up
(smiles) at both edges
Inadequate cooling.
Ensure that the thermostatic circulator is
connected to the Multiphor II Electrophoresis Unit and functioning correctly.
Dye front is irregular
Some dye front irregularity results from
the use of IPG Buffer and does not
affect results.
Buffer strips or ExcelGel are old.
Ensure that the expiration dates on the
buffer strips and ExcelGel have not
elapsed.
○
○
○
○
○
○
○
○
○
○
○
○
○
○
○
○
○
○
○
○
○
○
○
○
○
○
○
○
Bubbles under the buffer strip.
○
○
○
○
○
○
○
○
○
○
Buffer strip slides out
from under the electrode
○
○
○
○
○
○
○
○
○
○
○
○
○
○
○
○
○
○
○
○
○
○
○
○
○
○
○
○
○
○
○
○
○
○
Ensure that the buffer strips are placed
firmly on the gel with no air bubbles
trapped beneath them.
○
○
○
○
○
○
○
○
○
○
○
○
○
○
○
○
○
○
○
Bubbles under the IPG strip.
Ensure that the IPG strip is placed firmly
on the gel with no air bubbles trapped
underneath. Stroke the plastic backing of
the IPG strip gently with a pair of forceps
to remove trapped bubbles.
Incorrect electrode placement.
Ensure that the electrodes are aligned
over the center of the buffer strips before
lowering the electrode holder.
71
72
Chapter 4
Visualization and evaluation of results
4.0 Visualization of results
Most detection methods used for SDS gels can be applied to second-dimension gels.
The following features are desired:
• High sensitivy
• Wide linear range for quantification
• Compatibility with mass spectrometry
• Low toxicity and environmentally safe
• Environmentally friendly
However, because none of the existing techniques can meet all these requirements, a 2-D
electrophoresis laboratory may need to have more than one of the following methods in its
repertoire:
Autoradiography and fluorography are the most sensitive detection methods (down to
200 fg protein). To employ these techniques, the sample must consist of protein radiolabelled
in vivo using either 35S, 14C, 3H or, in the case of phosphoproteins, 32P. For autoradiographic
detection, the gel is simply dried and exposed to X-ray film or—for quicker results and
superior dynamic range of quantification—to a storage phosphor screen. Fluorography is a
technique that provides extra sensitivity by impregnating the gel in a scintillant such as PPO
(2,4-diphenyloxazole) prior to drying.
Silver staining is the most sensitive non-radioactive method (below 1 ng). Silver staining is a
complex, multi-step process utilizing numerous reagents for which quality is critical. It is
therefore often advantageous to purchase these reagents in the form of a dedicated kit, in
which the reagents are quality assured specifically for the silver-staining application. The
PlusOne™ Silver Staining Kit, Protein combines superior sensitivity with ease of use.
By omitting glutardialdehyde from the sensitizer and formaldehyde from the silver nitrate
solution the method becomes compatible with mass spectrometry analysis (75), however at
the expense of sensitivity.
When staining Ettan Dalt precast gels with PlusOne™ Silver Staining Kit, Protein, a modified
staining protocol should be used. For details of the modified protocol, see Appendix II—
Optimized silver staining of precast DALT gels using PlusOne Silver Staining Kit, Protein.
Coomassie staining, although 50- to 100-fold less sensitive than silver staining, is a relatively
simple method and more quantitative than silver staining. Coomassie blue is preferable
when relative amounts of protein are to be determined by densitometry. Colloidal
staining methods are recommended, because they show the highest sensitivity, down
to 100 ng/protein spot (76).
73
Hoefer Processor Plus automates multistep staining processes for increased convenience and
reproducibility. Automated protocols were developed to use the PlusOne Silver Staining Kit,
Protein to silver stain proteins in SDS gels. This convenient adaptation gives reproducible
results and sensitivity below 1 ng per spot for most proteins. With a modification for
subsequent mass spectrometry, detection down to approx. 5 ng per spot can be achieved
(77). For complete details, please refer to the Hoefer Processor Plus Protocol Guide.
The Staining Tray Set provides a convenient means of staining up to 4 large-format gels at
a time—film-backed, as well as unbacked. The set includes two stainless steel trays and a
perforated stainless steel tray, which seats within the staining trays, and a transparent
plastic cover. The perforated insert supports and restrains gels for transfer between staining
trays while allowing staining soultion to drain rapidly.
Negative Zinc--Imidazole staining has a detection limit of approx. 15 ng protein/spot (78)
and is well compatible with mass spectrometry, but it is a poor quantification technique.
Fluorescent labelling (79) and fluorescent staining with SYPRO™ dyes (80–83) have a
sensitivity in-between colloidal Coomassie and modified PlusOne Silver Staining Kit, Protein
staining (77). These techniques require fluorescence scanners, but they are compatible with
mass spectrometry and show a wide dynamic range for quantification.
Preserving the gels: The film-supported Ettan DALT and ExcelGel gels are optimally stored in
sheet protectors after soaking them in 10% v/v glycerol for 30 min. Unbacked gels are shrunk
back to their original sizes by soaking them in 30% (v/v) methanol or ethanol/4% glycerol
until they match their original sizes. For autoradiography the gels are dried onto strong
filter paper with a vacuum drier or in-between two sheets of wet cellophane locked in
Easy Breeze™ drying frames.
4.1 Blotting
Second-dimension gels can be blotted onto a nitrocellulose or PVDF membrane for
immunochemical detection of specific proteins or chemical microsequencing.
Note: The plastic backing on Ettan DALT and ExcelGel precast gels is removed with the
Film Remover prior to electrotransfer (see Ordering Information).
4.2 Evaluation
In theory, the analysis of up to 15 000 proteins should be possible in one gel; in practice,
however, 5 000 detected protein spots means a very good separation. Evaluating highresolution 2-D gels by a manual comparison of two gels is not always possible. In large
studies with patterns containing several thousand spots, it may be almost impossible to detect
the appearance of a few new spots or the disappearance of single spots. Image collection
hardware and image evaluation software are necessary to detect these differences as well as
to obtain maximum information from the gel patterns.
Amersham Biosciences ImageMaster™ 2D Elite Software and 2D Database Software, as
well as Ettan Progenesis software together with ImageScanner™ and/or Typhoon™
74
multicolor fluorescence and phosphor image scanner comprise a system that allows the user
to capture, store, evaluate, and present information contained in 2-D gels:
• The ImageScanner desktop instrument captures optical information in the visible wavelength range over a range from 0 to more than 3.4 O.D. in reflection or transmission mode.
It scans 20 × 20 cm in 40 s at 300 dpi.
• Typhoon 8600 and 9200 series variable mode imagers have two excitation sources for
fluorescence imaging; a green (532 nm) and a red (633 nm) laser. Typhoon 9400 series
imager has an additional blue laser with two excitation lines (457 nm and 488 nm).
Typhoon series imagers can be used for high-performance 4-color automated fluorescence
detection, storage phosphor imaging, and chemiluminescence. Comprehensive information
on fluorescence imaging can be found in the Amersham Biosciences handbook:
Fluorescence Imaging, principles and methods (63-0035-28).
• ImageMaster 2D Elite provides the essential tools for analyzing complex protein samples
separated by 2-D electrophoresis. Protein spots are automatically detected, background is
corrected, spot density is quantified, and spots are matched between up to 100 gels. The
software can also detect and graphically display quantitative changes in spot patterns.
• ImageMaster 2D Database software adds a database search facility that searches and
queries across experiments and images, and analyzes experiments for quantitative pattern
relationships.
• Ettan Progenesis is a high-throughput, fully automated 2-D imaging software for
parameter-free spot detection. No manual spot editing is required, resulting in maximum
reproducibility of evaluation results. Its automated parameter-free warping drives spot
matching between different gels, providing a 3-D view of spots. Batch processing of all
spot detection, background removal, gel warping, gel averaging, and spot matching
improves speed of routine analysis.
4.3 Standardization of results
The 2-D electrophoresis technique is often used comparatively, and thus requires a
reproducible method for determining relative spot positions. Because precast Immobiline
DryStrip gels are highly reproducible, the pI of a particular protein can be estimated from
its focusing position along a linear pH gradient IPG strip. Detailed information on
Immobiline DryStrip pH gradients are found in the Amersham Biosciences brochure:
Immobiline DryStrip visualization of pH gradients (18-1140-60).
The second-dimension can be calibrated using molecular weight marker proteins loaded to
the side of the second-dimension gel. Often, there are abundant proteins in the sample for
which the pI and molecular weight are known. These proteins can serve as internal standards.
Note: The pI of a protein can depend on its chemical environment and thus can differ
depending on the experimental conditions used. Although marker proteins for pI estimation
are available, pI estimates based on their use are not necessarily valid.
75
4.4 Further analysis of protein spots
4.4.1 Picking the spots
The Ettan Spot picker is a robotic system that automatically picks selected protein spots
from stained or destained gels using a pick list from the image analysis, and transfers them
into microplates.
Ettan DALT or ExcelGel precast gels on film supports or lab-cast gels on glass or plastic
films are stained with Coomassie, silver, or fluorescent dyes and two visible reference
markers are pasted on each gel. The gels are scanned using ImageScanner or Typhoon and
analyzed using ImageMaster 2D Elite or Ettan Progenesis software. The positions of
selected protein spots are exported as a pick list to the Ettan Spot Picker. The gels are
placed into the instrument under liquid, the camera detects the reference markers. Control
software converts spot pixel co-ordinates into picking co-ordinates, and the Ettan Spot
Picker selects and tranfers gel plugs into 96-well microplates.
4.4.2 Digestion of the proteins
The gel plugs are automatically digested in the Ettan Digester, the supernatant peptides are
mixed with MALDI matrix material and spotted onto MALDI slides using Ettan Spotter.
This spot handling procedure can either be performed fully automatically in the integrated
Ettan Spot Handling Workstation or semi-automatically by manual transfer of gels and
microplates between these instruments as stand-alone units.
4.4.3 MALDI-ToF mass spectrometry
In the Ettan MALDI-ToF mass spectrometer, a laser beam is fired into the dried peptide-matrix
spots for ionization of the peptides. After accurate determination of the peptide masses,
databases are searched for identification of the original proteins. Ettan MALDI-ToF utilizes
an advanced quadratic field reflectron (Z2 reflectron) for automatic protein identification
by peptide mass fingerprinting. The Z2 reflectron also allows de novo sequencing of
peptides by post-source decay.
76
Chapter 5
Troubleshooting
5.0 Troubleshooting 2-D results
Table 28 lists problems that may be encountered in 2-D electrophoresis results, describes
the possible causes, and suggests ways to prevent problems in future experiments. For
troubleshooting problems encountered during the various steps of the 2-D process, refer to
the following Tables:
• Table 12, page 36. Troubleshooting IPG strip rehydration in Reswelling Tray.
• Table 14, page 43. Troubleshooting first-dimension IEF: Multiphor II and Immobiline
DryStrip Kit.
• Table 19, page 55. Troubleshooting first-dimension IEF: IPGphor.
• Table 25, page 66. Troubleshooting vertical second-dimension SDS-PAGE.
• Table 27, page 71. Troubleshooting second-dimension SDS: Multiphor II flatbed system.
Table 28. Troubleshooting 2-D results
Symptom
Possible cause
No distinct spots are visible
Remedy
Sample is insufficient.
○
○
○
○
○
○
○
○
Increase the amount of sample applied.
○
○
○
○
Insufficient sample entered
the IPG strip due to poor
sample solubilization.
○
○
○
○
○
○
○
○
○
○
○
○
Sample contains impurities
that prevent focusing.
○
○
○
○
○
○
○
○
○
○
○
○
○
○
○
○
○
○
○
○
○
○
○
○
○
○
○
○
○
Individual proteins appear as multiple
spots or are missing, unclear, or in
the wrong position
○
○
○
○
○
○
○
○
○
○
○
○
○
○
○
○
○
○
○
○
○
○
○
○
○
○
○
○
○
○
○
○
○
○
○
○
○
○
○
○
○
○
○
○
○
○
○
○
○
○
○
○
○
○
○
○
○
○
○
○
○
○
○
○
○
○
○
○
○
○
○
○
○
○
○
○
○
○
○
○
○
○
○
○
○
○
○
○
○
○
○
○
○
○
○
○
○
○
○
○
○
○
○
○
○
○
○
○
○
○
Check expiry dates on staining solutions.
Prepare fresh staining solutions.
Protein carbamylation.
Do not heat any solutions containing urea
above 30 ºC, as cyanate, a urea degradation
product, will carbamylate proteins, changing
their pI.
○
○
○
○
○
○
○
○
○
○
○
○
○
○
○
○
○
○
○
○
○
○
Use another detection method (e.g., silver
staining instead of Coomassie blue staining).
Failure of detection reagents.
Protein oxidation.
○
Ensure that the IPG strip is placed gel-side
down (plastic backing upward) on the SDS
second-dimension gel.
Detection method was not
sensitive enough.
○
○
The pointed end of the Immobiline DryStrip is
the acidic end and should point toward the
anode (+).
(Flatbed gel format) IPG strip
is placed wrong side down
on second-dimension gel.
○
○
Increase the focusing time or modify the
sample preparation method. (See ‘Chapter I,
Sample Preparation.’)
The pH gradient is
wrongly oriented.
○
○
Increase the concentration of the solubilizing
components in the sample solution.
(See section 1.5, ‘Composition of sample
solution.’)
○
○
○
○
○
○
○
○
○
○
○
○
○
○
○
○
○
○
DTT in the rehydration and equilibration
solutions keeps the disulfide bonds reduced.
For additional protection include an iodoacetamide treatment during equilibration prior to
the second-dimension separation. Iodoacetamide alkylates the thiol groups to prevent
the reduced proteins from reoxidizing.
continues on following page
77
Table 28. Troubleshooting 2-D results (continued)
Symptom
Possible cause
Remedy
(Vertical gel format) IPG strip
is not placed properly.
Ensure that the plastic backing of the IPG
strip is against the glass plate on the seconddimension gel.
(Vertical gel format) The top
surface of the seconddimension gel is not flat.
Immediately after pouring the gel, overlay
the surface with water-saturated butanol.
Spots are vertically doubled,
or “twinned”
Distortion of 2-D pattern
○
○
○
○
○
○
○
○
○
○
○
○
(Vertical gel format) Uneven
polymerization of gel due to
incomplete polymerization,
too rapid polymerization,
or leakage during gel casting.
○
○
○
○
○
○
○
○
○
○
○
○
○
○
○
○
○
○
○
○
○
○
○
○
○
○
Degas the gel solution.
Polymerization can be accelerated by
increasing by 50% the amount of ammonium
persulfate and TEMED used. Polymerization
can be slowed by decreasing by 33% the
amount of ammonium persufhate and
TEMED used.
Ensure that there is no leakage during
gel casting.
○
○
○
○
○
○
○
○
○
○
○
○
(Flatbed gel format) Moisture
on the surface of the seconddimension gel.
○
○
○
○
○
○
○
○
○
○
○
○
(Flatbed gel format) IPG strip
not removed during
electrophoresis.
○
○
○
○
○
○
○
○
○
○
○
○
○
○
○
○
○
○
○
○
○
(Flatbed gel format) Water
drops or pieces of buffer strip
on the surface of the second
dimension gel.
continues on following page
78
○
○
○
○
○
○
○
○
○
○
○
○
○
○
○
○
○
○
○
○
○
○
○
○
○
○
○
○
○
○
○
Remove the IPG strip and application pieces
from the second-dimension gel when the
bromophenol blue dye from has moved away
from the IPG strip by 4–6 mm.
○
(Flatbed gel format) Air
bubbles under the seconddimension gel cause uneven
migration due to poor
heat transfer.
○
○
Allow ExcelGel to dry for about 5 min after
removing plastic cover and before applying
buffer strips and IPG strip.
○
○
○
○
○
○
○
○
○
○
○
○
○
○
○
○
Ensure that no bubbles are trapped under
the second-dimension gel during placement
on the cooling plate.
○
○
○
○
○
○
○
○
○
○
○
○
○
○
○
○
○
Take care that nothing is dropped or splashed
onto the surface of the second-dimension gel.
Table 28. Troubleshooting 2-D results (continued)
Symptom
Possible cause
Remedy
Sample not completely
solubilized prior to
application.
Be sure that the sample is completely and
stably solubilized.
Note: Repeated precipitation-resolubilization
cycles produce or increase horizontal
streaking.
Horizontal streaking or incompletely
focused spots
See section 1.5, ‘Composition of the sample
solution,’ for general guidelines for sample
solubilization.
○
○
○
○
○
○
○
○
○
○
○
○
Sample is poorly soluble in
rehydration solution.
○
○
○
○
○
○
○
○
○
○
○
○
○
○
○
○
○
○
○
○
○
○
Increase the concentration of the solubilizing
components in the rehydration solution. (See
section 2.4, ‘IPG strip rehydration solution.’)
Increase concentration of IPG Buffer.
○
○
○
○
○
○
○
○
○
○
○
○
○
○
○
○
○
○
○
○
○
○
○
○
○
○
○
○
Interfering substances.
Modify sample preparation to limit these
Non-protein impurities in the
contaminants. (See section 1.4, ‘Removal of
sample can interfere with IEF,
contaminants that affect 2-D results.’)
causing horizontal streaking in
the final 2-D result, particularly
toward the acidic side of the gel.
○
○
○
○
○
○
○
○
○
○
○
○
Ionic impurities in sample.
○
○
○
○
○
○
○
○
○
○
○
○
○
○
○
○
Reduce salt concentration to below 10 mm
by dilution or desalt the sample by dialysis.
Precipitation with TCA and acetone and
subsequent resuspension is another effective
desalting technique that removes lipids,
nucleotides, and other small molecules.
Note: Specific and non-specific losses of
proteins can occur with dialysis, gel
chromatography, and precipitation/
resuspension of samples.
If the sample preparation cannot be modified,
the effect of ionic impurities can be reduced
by modifying the IEF protocol. Limit the
voltage to 100–150 V for 2 h, then resume a
normal voltage step program. This pre-step
allows the ions in the sample to move to the
ends of the IPG strip.
○
○
○
○
○
○
○
○
○
○
○
○
Ionic detergent in sample.
○
○
○
○
○
○
○
High sample load.
○
○
○
○
○
○
○
○
○
○
○
○
○
○
○
○
○
○
○
○
○
○
○
If the ionic detergent SDS is used in sample
preparation, the final concentration must
not exceed 0.25% after dilution into the
rehydration solution. Additionally, the
concentration of the non-ionic detergent
present must be at least 8 times higher than
the concentration of any ionic detergent to
ensure complete removal of SDS from the
proteins.
○
○
○
○
○
○
○
○
○
○
○
○
○
○
○
○
○
○
Load less sample.
Micropreparative separations require clean
sample. Modify sample preparation to limit
contaminants. (See section 1.4, ‘Removal of
contaminants that affect 2-D results.’)
Program a low initial voltage and increase
voltage gradually. Extend focusing time.
continues on following page
79
Table 28. Troubleshooting 2-D results (continued)
Symptom
Possible cause
Remedy
Underfocusing. Focusing time
was not long enough to achieve
steady state focusing.
Prolong focusing time.
Horizontal streaking or incompletely
focused spots (continued)
○
○
○
○
○
○
○
○
○
○
○
○
○
○
○
○
○
○
○
○
○
○
○
○
○
○
Overfocusing. Extended
focusing times (over
100 000 Vh) may result in
electroendosmotic water and
protein movement, which can
produce horizontal smearing.
Reduce focusing time.
Impurities in agarose overlay
or equilibration solution.
Prepare fresh agarose overlay and
equilibration solution.
(Flatbed gel format) Sample
aggregation or precipitation.
Dilute the sample and apply as a larger
volume.
○
○
○
○
○
○
○
Horizontal stripes across gel
Prominent vertical streak at the point
of sample application (when loading
IPG strips using sample cups)
Program a low initial voltage and increase
voltage gradually.
Vertical streaking
Insufficient equilibration.
○
○
○
○
○
○
○
○
○
Prolong equilibration time.
○
○
○
(Flatbed gel format)
Electroendosmosis.
○
○
○
○
○
○
○
○
○
○
○
○
○
○
○
Add 30% glycerol and 6 M urea to the
SDS equilibration buffer.
Place application pieces at the end of the
strips during second-dimension electrophoresis to absorb excess water.
○
○
○
○
○
○
○
○
○
○
○
○
Second-dimension buffer
solutions prepared incorrectly.
○
○
○
○
○
○
○
○
○
Insufficient SDS in SDS
electrophoresis buffer.
continues on following page
80
○
○
○
○
○
○
○
○
○
○
○
○
○
○
○
○
○
○
○
○
○
○
○
○
○
○
○
○
○
Prepare fresh solutions.
○
○
○
○
○
○
○
○
Use 0.1% w/v SDS.
○
○
Table 28. Troubleshooting 2-D results (continued)
Symptom
Possible cause
Remedy
Impurities in sample.
Modify sample preparation. (See section 1.4,
‘Removal of contaminants that affect 2-D
results.’)
Vertical gap in 2-D pattern
○
○
○
○
○
○
○
○
○
○
○
○
Impurities in rehydration
solution components.
○
○
○
○
○
○
○
○
○
○
○
○
○
○
○
○
○
○
○
○
○
○
○
○
○
○
○
○
○
Use only high-quality reagents.
De-ionize urea solutions.
○
○
○
○
○
○
○
○
○
○
○
○
Bubble between IPG strip
and top surface of seconddimension gel.
○
○
○
○
○
○
○
○
○
○
○
○
(Flatbed gel format) Urea
crystals on the surface of the
IPG strip.
○
○
○
○
○
○
○
○
○
○
○
○
○
○
○
○
○
○
○
○
○
Ensure that no bubbles are trapped between
the IPG strip and the top surface of the
second-dimension gel.
○
○
○
○
○
○
○
○
○
○
○
○
○
○
○
○
○
Allow residual equilibration solution to drain
from the IPG strip before placing the strip on
the second-dimension gel.
○
○
○
○
○
○
○
○
○
○
○
○
○
○
○
○
○
(Flatbed gel format) Bubbles
under the IPG strip.
Ensure that the IPG strip is placed firmly on
the gel with no air bubbles trapped underneath. Stroke the plastic backing of the IPG
strip gently with a pair of forceps to remove
trapped bubbles.
The IPG strip was not fully
rehydrated.
Ensure that the IPG strips are rehydrated
with a sufficient volume of rehydration
solution.
Vertical regions of poor focusing
Remove any large bubbles trapped under the
IPG strip after rehydration solution is applied.
Check that the rehydration solution is evenly
spread along the entire length of the IPG strip.
Poor representation of higher
molecular weight proteins
Proteolysis of sample.
○
○
○
○
○
○
○
○
Prepare sample in a manner that limits
proteolysis and/or use protease inhibitors.
(See section 1.2, ‘Protection against
proteolysis.’)
○
○
○
○
Insufficient equilibration.
○
○
○
○
○
○
○
○
○
○
○
○
Poor transfer of protein
from IPGstrip to seconddimension gel.
○
○
○
○
○
○
○
○
○
○
○
○
○
○
○
○
○
○
○
○
○
○
○
○
○
○
○
○
○
○
○
○
○
○
○
○
○
Prolong equilibration time.
○
○
○
○
○
○
○
○
○
○
Employ a low current sample entry phase
in the second-dimension electrophoresis run.
○
○
Poor entry of sample protein
during rehydration.
○
○
○
○
○
○
○
○
○
○
○
○
○
○
○
○
○
Use recommended volume of rehydration
solution. (See Table 10, page 35.)
continues on following page
81
Table 28. Troubleshooting 2-D results (continued)
Symptom
Possible cause
Remedy
(Silver staining). Dirty plates
used to cast gel or particulate
material on the surface of
the gel. DTT and other thiol
reducing agents exacerbate
this effect.
Properly wash glass plates. Scavenge any
excess or residual thiol reducing agent with
iodoacetamide before loading the IPG strips
onto the second-dimension gel.
Point streaking
Background smear toward bottom of gel (Silver or Coomassie blue
staining) Staining of carrier
ampholytes.
Use IPG Buffer as carrier ampholyte mixture.
Reduce concentration if necessary.
Background smear toward top of gel
(Silver staining) Nucleic acids
in sample.
Add DNase and RNase to hydrolyze nucleic
acids.
Note: The proteins DNase and RNase may
appear on the 2-D map.
Protein contaminant in SDS
electrophoresis buffer or
dirty electrophoresis unit.
Make fresh SDS electrophoresis buffer.
High background in top region of gel
82
Clean electrophoresis unit.
Appendix I
Solutions
The acrylamide, N,N'-methylenebisacrylamide, TEMED, ammonium persulfate, and SDS in
this appendix are extremely hazardous. You should have a manufacturer's safety data sheet
(MSDS) detailing the properties and precautions for all chemicals in your lab. The safety
sheets should be reviewed prior to starting the procedures in this manual. General handling
procedures for hazardous chemicals include using double latex gloves for all protocols.
Hazardous materials should be weighed in a fume hood while wearing a disposable dust mask.
A. Lysis solution
(8 M urea, 4% CHAPS, 2% Pharmalyte 3–10)
Final concentration
Amount
Urea (FW 60.06)
8 M*
19.2 g
CHAPS†
4% (w/v)
1.6 g
Pharmalyte 3–10
2%
800 µl
Double distilled H2O
to 40 ml
* If necessary, the concentration of urea can be increased to 9 or 9.8 M.
†
Other detergents (Triton X-100, NP-40, and other non-ionic or zwitterionic detergents) can be used instead of CHAPS.
Note: Protease inhibitors may be added if necessary.
B. Rehydration stock solution without IPG Buffer*
(8 M urea, 2% CHAPS, 0.002% bromophenol blue)
Final concentration
Amount
Urea (FW 60.06)
8M
†
12 g
CHAPS‡
2% (w/v)
0.5 g
Bromophenol blue
0.002% (w/v)
Double distilled H2O
50 µl
to 25 ml
* DTT and IPG Buffer or Pharmalyte are added just prior to use: Add 7 mg DTT per 2.5 ml aliquot of rehydration
stock solution. See Table 9, page 34 for the appropriate volume of IPG Buffer or Pharmalyte to use. For rehydration
loading, sample is also added to the 2.5 ml aliquot of rehydration solution just prior to use.
†
If necessary, the concentration of urea can be increased to 9 or 9.8 M.
‡
Other detergents (Triton X-100, NP-40, and other non-ionic or zwitterionic detergents) can be used instead of CHAPS.
Store in 2.5 ml aliquots at -20 °C.
Bromophenol blue stock solution
Final concentration
Amount
Bromophenol blue
1%
100 mg
Tris-base
50 mM
Double distilled H2O
60 mg
to 10 ml
83
C. Rehydration stock solution with IPG Buffer*
(8 M urea, 2% CHAPS, 0.5% or 2% IPG Buffer†, 0.002% bromophenol blue, 25 ml)
Final concentration
Amount
Urea (FW 60.06)
8M
‡
12 g
CHAPS¶
2% (w/v)
0.5 g
IPG Buffer or Pharmalyte††
(same range as the IPG strip)
0.5% (v/v) or 2% (v/v)†
125 µl or 500 µl **
Bromophenol blue
0.002%
Double distilled H2O
50 µl 1% solution
to 25 ml
* DTT is added just prior to use: 7 mg DTT per 2.5 ml aliquot of rehydration stock solution. For rehydration loading,
sample is also added to the 2.5-ml aliquot of rehydration solution just prior to use.
An IPG Buffer/Pharmalyte concentration of 0.5% is recommended with the IPGphor and an IPG Buffer / Pharmalyte
concentration of 2% is recommended with the Multiphor II and Immobiline DryStrip Kit system.
†
‡
If necessary, the concentration of urea can be increased to 9 or 9.8 M.
Other detergents (Triton X-100, NP-40, and other non-ionic or zwitterionic detergents) can be used instead of
CHAPS.
¶
** Use 125 µl IPG Buffer for a 0.5% concentration and 500 µl IPG Buffer for a 2% concentration.
††
Use Pharmalyte 3–10 for Immobiline DryStrip 3–10 or 3–10 NL, Pharmalyte 5–8 for Immobiline DryStrip 4–7.
Store in 2.5 ml aliquots at -20 °C.
D. SDS equilibration buffer*
(50 mM Tris-HCl, pH 8.8, 6 M urea, 30% glycerol, 2% SDS, bromophenol blue, 200 ml)
Final concentration
Amount
Tris-HCl, pH 8.8 (see solution F)
50 mM
10.0 ml
Urea (FW 60.06)
6M
72.07 g
Glycerol (87% v/v)
30% (v/v)
69 ml
SDS (FW 288.38)
2% (w/v)
4.0 g
Bromophenol blue
0.002% (w/v)
400 µl of 1% solution
Double distilled H2O
to 200 ml
* This is a stock solution. Prior to use DTT or iodoacetamide are added. See section 3.2.2.
Store at -20 °C.
E. 30% T, 2.6% C monomer stock solution
(30% acrylamide, 0.8% N,N'-methylenebisacrylamide, 200 ml)
Final concentration
Acrylamide (FW 71.08)
30%
60.0 g
N,N'-methylenebisacrylamide (FW 154.17)
0.8%
1.6 g
Double distilled H2O
Filter solution through a 0.45 µm filter. Store at 4 °C in the dark.
84
Amount
to 200 ml
F. 4× resolving gel buffer
(1.5 M Tris-HCl, pH 8.8, 1 l)
Tris base (FW 121.1)
Final concentration
Amount
1.5 M
181.7 g
Double distilled H2O
750 ml
HCl (FW 36.46)
adjust to pH 8.8
Double distilled H2O
to 1 l
Filter solution through a 0.45 µm filter. Store at 4 °C.
G. 10% SDS
SDS (FW 288.38)
Final concentration
Amount
10% (w/v)
5.0 g
Double distilled H2O
to 50 ml
Filter solution through a 0.45 µm filter. Store at room temperature.
H. 10% ammonium persulfate
Ammonium persulfate (FW 228.20)
Final concentration
Amount
10% (w/v)
0.1 g
Double distilled H2O
to 1 ml
Fresh ammonium persulfate "crackles" when water is added. If it does not, replace it with
fresh stock. Prepare just prior to use.
I. Gel storage solution
(0.375 M Tris-HCl, pH 8.8, 0.1% SDS 200 ml)
Final concentration
Amount
4× Resolving gel buffer (see solution F above)
1×
50 ml
10% SDS (see above)
0.1%
Double distilled H2O
2 ml
to 200 ml
Store at 4 °C.
J. SDS electrophoresis buffer*
(25 mM Tris-HCl, pH 8.3, 192 mM glycine, 0.1% SDS, 10 l)
Final concentration
Amount
Tris-base (FW 121.1)
25 mM
30.3 g
Glycine (FW 75.07)
192 mM
144.0 g
SDS (FW 288.38)
0.1% (w/v)
Double distilled H2O
10.0 g
to 10 l
* Because the pH of this solution need not be checked, it can be made up directly in large reagent bottles marked at 10 l.
Store at room temperature.
85
K. Agarose sealing solution
Final concentration
Amount
Agarose (NA or M)
0.5%
0.5 g
Bromophenol blue
0.002% (w/v)
200 µl
SDS Electrophoresis buffer (see solution J)
100 ml
Add all ingredients into a 500 ml Erlenmeyer flask. Swirl to disperse. Heat in a microwave
oven on low or a heating stirrer until the agarose is completely dissolved. Do not allow the
solution to boil over. Dispense 2 ml aliquots into screw-cap tubes and store at room
temperature.
86
Appendix II
Optimized silver staining of Ettan DALT gels using PlusOne
Silver Staining Kit, Protein
Prepare staining reagents (250 ml per gel) according to the PlusOne Silver Staining Kit,
Protein instructions with the following exceptions:
1. Prepare twice the volume of fixing solution as indicated in the Kit instructions (i.e. 500 ml
per gel rather than 250 ml).
2. Prepare the developing solution with twice the volume of formaldehyde solution as
indicated in the kit instructions (i.e. 100 µl per 250 ml rather than 50 µl per 200 ml).
3. Stain the gels according to the following protocol*:
Step
Solutions
Amount
Time
Fixation
Ethanol
Acetic acid, glacial
Make up to 500 ml with distilled water
200 ml
50 ml
2 × 60* min
Sensitizing
Ethanol
Glutardialdehyde† (25% w/v)
75 ml
1.25 ml
60 min
Sodium thiosulfate (5% w/v)
Sodium acetate (17 g)
Make up to 250 ml with distilled water
10 ml
1 packet
Washing
Distilled water
Silver reaction
Silver nitrate solution (2.5% w/v)
Formaldehyde† (37% w/v)
Make up to 250 ml with distilled water
Washing
Distilled water
Developing
Sodium carbonate (6.25 g)
Formaldehyde‡ (37%)
Make up to 250 ml with distilled water
5 × 8 min
25 ml
0.1 ml
60 min
4 × 1 min
1 packet
100 µl‡
5 min¶
1 packet
45 min
25 ml
20 min
Stir vigorously to dissolve sodium carbonate
Stop
EDTA-Na2 × H2O (3.65 g)
Make up to 250 ml with distilled water
Washing
Distilled water
Preservation†
Glycerol (87%)
Make up to 250 ml with distilled water
2 × 30 min
* The first fixation may be prolonged up to 3 days if desired for convenience.
† By omitting glutardialdehyde from the sensitizer and formaldehyde from the silver nitrate solution, as well as omitting
the "preservative step", the method becomes compatible with mass spectroscopy analysis, although sensitivity is
reduced. If glutardialdehyde and formaldehyde are to be used, add them just before staining.
‡ The volume of the formaldehyde in the developing solution can be varied between 100 µl up to 250 µl, depending on
the amount of protein and the number of spots since formaldehyde is consumed in the developing reaction by proteins.
Add the formaldehyde directly before use.
¶ Approximate time, this step may be visually monitored. The gels should be transferred to stop solution when the spots
have reached the desired intensity and before the staining background becomes too dark.
87
88
References
1. O'Farrell, P.H. High resolution two-dimensional electrophoresis of proteins. J. Biol. Chem. 250,
4007–4021 (1975).
2. Klose, J. Protein mapping by combined isoelectric focusing and electrophoresis of mouse tissues.
A novel approach to testing for induced point mutation in mammals.
Humangenetik 26, 231–243 (1975).
3. Bjellqvist, B., Ek, K., Righetti, P.G., Gianazza, E., Görg, A., Westermeier, R., Postel, W. Isoelectric
focusing in immobilized pH gradients: principle, methodology and some applications.
J. Biochem. Biophys. Methods 6, 317–339 (1982).
4. Görg, A., Postel, W., Günther, S., Weser, J. Improved horizontal two-dimensional electrophoresis
with hybrid isoelectric focusing in immobilized pH gradients in the first dimension and laying-on
transfer to the second dimension. Electrophoresis 6, 599–604 (1985).
5. Görg, A., Postel, W., Günther, S. The current state of two-dimensional electrophoresis with
immobilized pH gradients. Electrophoresis 9, 531–546 (1988).
6. Wilkins, M.R., Pasquali, C., Appel, R.D., Ou, K., Golaz, O., Sanchez. J.-C., Yan, J.X., Gooley, A.A.,
Hughes, G., Humphrey-Smith, I., Williams, K.L., Hochstrasser, D.F. From proteins to proteomes:
Large scale protein identification by two-dimensional electrophoresis and amino acid analysis.
BioTechnology 14, 61–65 (1996).
7. Pennington, S.R., Wilkins, M.R., Hochstrasser, D.F., Dunn, M.J. Proteome analysis: From protein
characterization to biological function. Trends in Cell Biology 7, 168–173 (1997).
8. Görg, A., Boguth, G., Obermaier, C., Posch, A., Weiss, W. Two-dimensional polyacrylamide gel
electrophoresis with immobilized pH gradients in the first dimension (IPG-Dalt): The state of the
art and the controversy of vertical versus horizontal systems. Electrophoresis 16, 1079–1086 (1995).
9. Lenstra, J.A., Bloemendal, H. Topography of the total protein population from cultured cells upon
fractionation by chemical extractions. Eur. J. Biochem. 135, 413–423 (1983).
10. Molloy, M.P., Herbert, B.R., Walsh, B.J., Tyler, M.I., Traini, M., Sanchez, J.-C., Hochstrasser, D.F.,
Williams, K.L., Gooley, A.A. Extraction of membrane proteins by differential solubilization for
separation using two-dimensional gel electrophoresis. Electrophoresis 19, 837–844, (1998).
11. Ramsby, M.L., Makowski, G.S., and Khairallah, E.A. Differential detergent fractionation of
isolated hepatocytes: Biochemical, immunochemical and two-dimensional gel electrophoresis
characterization of cytoskeletal and noncytoskeletal compartments.
Electrophoresis 15, 265–277, (1994).
12. Taylor, R.S., Wu, C.C., Hays, L.G., Eng, J.K., Yates, J.R.I., and Howell, K.E. Proteomics of rat
liver Golgi complex: Minor proteins are identified through sequential fractionation.
Electrophoresis 21, 3441–3459, (2000).
13. Deutscher, M.P. ed. Guide to Protein Purification. Methods Enzymol. 182, 1–894 (1990).
14. Dunn, M.J., Corbett, J.M. 2-dimensional polyacrylamide gel electrophoresis.
Methods Enzymol. 271, 177–203 (1996).
15. Rabilloud, T. Solubilization of proteins for electrophoretic analysis.
Electrophoresis 17, 813–829 (1996).
16. Rabilloud, T., Adessi, C., Giraudel, A., Lunardi, J. Improvement of the solubilization of proteins
in two-dimensional electrophoresis with immobilized pH gradients.
Electrophoresis 18, 307–316 (1997).
89
17. Bollag, D.M., Edelstein, S.J. Protein Methods. Chapter 2: Protein Extraction, Wiley-Liss, NY, NY.
(1991).
18. Scopes, R.K. Protein purification: Principles and practice, 2nd Ed., Chapter 2: Making an Extract,
Springer Verlag, NY. (1987).
19. Dignam, J.D. Preparation of extracts from higher eukaryotes. Methods Enzymol 182, 194–203 (1990).
20. Toda, T., Ishijima, Y., Matsushita, H., Yoshida, M., Kimura, N. Detection of thymopoietinresponsive proteins in nude mouse spleen cells by two-dimensional polyacrylamide gel
electrophoresis and image processing. Electrophoresis 15, 984–987 (1994).
21. Sanchez, J.-C., Appel, R.D., Golaz, O., Pasquali, C., Ravier, F., Bairoch, A., Hochstrasser, D.F.
Inside SWISS-2DPAGE database. Electrophoresis 16, 1131–1151 (1995).
22. Portig, I., Pankuweit, S., Lottspeich, F., Maisch, B. Identification of stress proteins in endothelial
cells. Electrophoresis 17, 803–808 (1996).
23. Cull, M., McHenry C.S. Preparation of extracts from prokaryotes.
Methods Enzymol. 182, 147–153 (1990).
24. Jazwinski, S.M. Preparation of extracts from yeast. Methods Enzymol. 182, 154–174 (1990).
25. Kawaguchi, S.-I., Kuramitsu, S. Separation of heat-stable proteins from Thermus thermophilus
HB8 by two-dimensional electrophoresis. Electrophoresis 16, 1060–1066 (1995).
26. Teixeira-Gomes, A.P., Cloeckaert, A., Bezard, G., Dubray, G., Zygmunt, M.S. Mapping and
identification of Brucella melitensis proteins by two-dimensional electrophoresis and
microsequencing. Electrophoresis 18, 156–162 (1997).
27. Ames, G.F.-L., Nikaido, K. Two-dimensional gel electrophoresis of membrane proteins.
Biochemistry 15, 616–623 (1976).
28. Görg, A., Postel, W., Domscheit, A., Günther, S. Two-dimensional electrophoresis with immobilized
pH gradients of leaf proteins from barley (Hordeum vulgare): Method, reproducibility and genetic
aspects. Electrophoresis 9, 681–692 (1988).
29. Posch, A., van den Berg, B.M., Burg, H.C.J., Görg, A. Genetic variability of carrot seed proteins
analyzed by one-and two-dimensional electrophoresis with immobilized pH gradients.
Electrophoresis 16, 1312–1316 (1995).
30. Geigenheimer, P. Preparation of extracts from plants. Methods Enzymol. 182, 174–193 (1990).
31. Theillet, C., Delpeyroux, F., Fiszman, M., Reigner, P., Esnault, R. Influence of the excision shock
on the protein metabolism of Vicia faba L. meristematic root cells. Planta 155, 478–485 (1982).
32. Wolpert, T.J., Dunkle, L.D. Alternations in gene expression in sorghum induced by the hostspecific toxin from Periconia circinata. Proc. Natl. Acad. Sci. USA 80, 6576–6580 (1983).
33. Blomberg, A., Blomberg, L., Norbeck, J., Fey, S.J., Larsen, P.M., Larsen, M., Roepstorff, P.,
Degand, H., Boutry, M., Posch, A., Görg, A. Interlaboratory reproducibility of yeast protein
patterns analyzed by immobilized pH gradient two-dimensional gel electrophoresis.
Electrophoresis 16, 1935–1945 (1995).
34. Damerval, C., de Vienne, D., Zivy, M., Thiellement, H. Technical improvements in two-dimensional
electrophoresis increase the level of genetic variation detected in wheat-seedling proteins.
Electrophoresis 7, 52–54 (1986).
35. Wu, F.-S., Wang, M.-Y. Extraction of proteins for sodium dodecyl sulfate-polyacrylamide gel
electrophoresis from protease-rich plant tissues. Anal. Biochem. 139, 100–103 (1984).
90
36. Harrison, P.A., Black, C.C. Two-dimensional electrophoretic mapping of proteins of bundle sheath
and mesophyll cells of the C4 grass Digitaria sanguinalis. Plant Physiol. 70, 1359–1366 (1982).
37. Granzier, H.L.M., Wang, K. Gel electrophoresis of giant proteins solubilization and silver-staining
of titin and nebulin from single muscle fiber segments. Electrophoresis 14, 56–64 (1993).
38. Colas des Francs, C., Thiellement, H., de Vienne, D. Analysis of leaf proteins by two-dimensional
gel electrophoresis. Plant Physiol. 78, 178–182 (1985).
39. Barret, A.J., Salversen, G. Proteinase Inhibitors, Elsevier Press, Amsterdam (1986).
40. North, M.J. Prevention of unwanted proteolysis. In Proteolytic Enzymes: A Practical Approach,
(Beynon, R.J., Bond, J.S., eds.) pp 105–124, IRL Press, Oxford (1989).
41. Salvesen, G., Nagase, H. Inhibition of proteolytic enzymes. In: Proteolytic Enzymes: A Practical
Approach, (Beynon, R.J., Bond, J.S., eds.), pp 83–104, IRL Press, Oxford (1989).
42. Hurkman, W.J., Tanaka, C.K. Solubilization of plant membrane proteins for analysis by twodimensional gel electrophoresis. Plant Physiol. 81, 802–806 (1986).
43. Granier, F. Extraction of plant proteins for two-dimensional electrophoresis. Electrophoresis 9,
712–718 (1988).
44. Englard, S., Seifter, S. Precipitation techniques. Methods Enzymol. 182, 285–300 (1990).
45. Cremer, F., Van de Walle, C. Method for extraction of proteins from green plant tissues for twodimensional polyacrylamide gel electrophoresis. Anal. Biochem. 147, 22–26 (1985).
46. Guy, G.R., Philip, R., Tan, Y.H. Analysis of cellular phosphoproteins by two-dimensional gel
electrophoresis: Applications for cell signaling in normal and cancer cells. Electrophoresis 15,
417–440 (1994).
47. Meyer, Y., Grosset, J., Chartier, Y., Cleyet-Marel, J.-C. Preparation by two-dimensional
electrophoresis of proteins for antibody production: Antibodies against proteins whose synthesis
is reduced by auxin in tobacco mesophyll protoplasts. Electrophoresis 9, 704–712 (1988).
48. Halloway, P., Arundel, P. High-resolution two-dimensional electrophoreisis of plant proteins.
Anal. Biochem. 172, 8–15 (1988).
49. Flengsrud, R., Kobro, G. A method for two-dimensional electrophoreisis of proteins from green
plant tissues. Anal. Biochem. 177, 33–36 (1989).
50. Matsui, N.M., Smith, D.M., Clauser, K.R., Fichmann, J., Andrews, L.E., Sullivan, C.M.,
Burlingame, A.L., Epstein, L.B. Immobilized pH gradient two-dimensional gel electrophoresis and
mass spectrometric identification of cytokine-regulated proteins in ME-180 cervical carcinoma
cells. Electrophoresis 18, 409–417 (1997).
51. Tsugita, A., Kamo, M., Kawakami, T., Ohki, Y. Two-dimensional electrophoresis of plant proteins
and standardization of gel patterns. Electrophoresis 17, 855–865 (1996).
52. Görg, A., Obermaier, C., Boguth, G., Csordas, A., Diaz, J.J., Madjar, J.J. Very alkaline
immobilized pH gradients for two-dimensional electrophoresis of ribosomal and nuclear proteins.
Electrophoresis 18, 328–337 (1997).
53. Usuda, H., Shimogawara, K. Phosphate deficiency in maize. VI. Changes in the two-dimensional
electrophoretic patterns of soluble proteins from second leaf blades associated with induced
senescence. Plant Cell Physiol. 36, 1149–1155 (1995).
54. Musante, L., Candiano, G., Ghiggeri, G.M. Resolution of fibronectin and other uncharacterized
proteins by two-dimensional polyacryamide electrophoresis with thiourea. J. Chromat. 705,
351–356 (1997).
91
55. Pasquali, C., Fialka, I., Huber, L.A. Preparative two-dimensional gel electrophoresis of membrane
proteins. Electrophoresis 18, 2573–2581 (1997).
56. Rabilloud, T. Use of thiourea to increase the solubility of membrane proteins in two-dimensional
electrophoresis. Electrophoresis 19, 758–760 (1998).
57. Perdew, G.H., Schaup, H.W., Selivonchick, D.P. The use of a zwitterionic detergent in twodimensional gel electrophoresis of trout liver microsomes. Anal. Biochem. 135, 453–455 (1983).
58. Rabilloud, T., Blisnick, T., Heller, M., Luche, S., Aebersold, R., Lunardi, J., Braun-Breton, C.
Analysis of membrane proteins by two-dimensional electrophoresis: Comparison of the proteins
extracted from normal or Plasmodium falciparum-infected erythrocyte ghosts. Electrophoresis 20,
3603–3610 (1999).
59. Santoni, V., Molloy, M., Rabilloud, T. Membrane proteins and proteomics: Un amour impossible?
Electrophoresis 21, 1054–1070 (2000).
60. Wilson, D.L., Hall, M.E., Stone, G.C., Rubin, R.W. Some improvements in two-dimensional gel
electrophoresis of proteins. Anal. Biochem. 83, 33–44 (1977).
61. Marshall, T., Williams, K.M. Artifacts associated with 2-mercaptoethanol upon high resolution
two-dimensional electrophoresis. Anal. Biochem. 139, 502–505 (1984).
62. Herbert, B.R., Molloy, M.P., Gooley, A.A., Walsh, B.J., Bryson, W.G., Williams, K.L. Improved
protein solubility in two-dimensional electrophoresis using tributyl phosphine as reducing agent.
Electrophoresis 19, 845–851 (1998).
63. Görg, A., Obermaier, C., Boguth, G., Harder, A., Scheibe, B., Wildgruber, R., Weiss, W.
The current state of two-dimensional electrophoresis with immobilized pH gradients.
Electrophoresis 21, 1037–1053 (2000).
64. Bjellqvist, B., Sanchez, J-C., Pasquali, C., Ravier, F., Paquet, N., Frutiger, S., Hughes, G.J.,
Hochstrasser, D. Micropreparative two-dimensional electrophoresis allowing the separation of
samples containing milligram amounts of proteins. Electrophoresis 14, 1375–1378 (1993).
65. Sanchez, J.-C., Rouge, V., Pisteur, M., Ravier, F., Tonella, L., Moosmayer, M., Wilkins, M.R.,
Hochstrasser, D.F. Improved and simplified in-gel sample application using reswelling of dry
immobilized pH gradients. Electrophoresis 18, 324–327 (1997).
66. Rabilloud, T., Valette, C., Lawrence, J.J. Sample application by in-gel rehydration improves the
resolution of two-dimensional electrophoresis with immobilized pH gradients in the first dimension.
Electrophoresis 15, 1552–1558 (1994).
67. Westermeier, R. Electrophoresis In Practice, 3 rd Ed., WILEY-VCH, Weinheim, (2001).
68. Sabounchi-Schütt, F., Aström, J., Olsson, I., Eklund, A., Grunewald, J., Bjellqvist, B. An Immobiline
DryStrip application method enabling high-capacity two-dimensional gel electrophoresis.
Electrophoresis 21, 3649–3656 (2000).
69. Bjellqvist, B., Pasquali, Ch., Ravier, F., Sanchez, J.-Ch., Hochstrasser, D.F. A nonlinear wide-range
immobilized pH gradient for two-dimensional electrophoresis and its definition in a relevant pH
scale. Electrophoresis 14, 1357–1365 (1993).
70. Görg, A., Boguth, G., Obermaier, C., Harder, A., Weiss,W. 2-D electrophoresis with immobilized
pH gradients using IPGphor isoelectric focusing system. Life Science News 1, 4–6 (1998).
71. Ibel, K., May, R.P., Kirschner, K., Szadkowski, H., Mascher, E., Lundahl, P. Protein-decorated
micelle structure of sodium-dodecyl-sulfate protein complexes as determined by neutron scattering.
Eur. J. Biochem. 190, 311–318 (1990).
92
72. Laemmli, U.K. Cleavage of structural proteins during the assembly of the head of bacteriophage T4.
Nature 227, 680–685 (1970).
73. Schägger, H., von Jagow, G. Tricine-sodium dodecyl sulfate-polyacrylamide gel electrophoresis for
the separation of proteins in the range from 1 to 100 kDa. Anal. Biochem. 166, 368–379 (1987).
74. Görg, A., Postel, W., Weser, J., Günther, S., Strahler, J.R., Hanash, S.M., Somerlot, L. Elimination
of point streaking on silver stained two-dimensional gels by addition of iodoacetamide to the
equilibration buffer. Electrophoresis 8, 122–124 (1987).
75. Shevchenko, A., Wilm, M., Vorm, O., Mann, M. Mass spectrometric sequencing of proteins from
silver stained polyacrylamide gels. Anal. Chem. 68, 850–858 (1996).
76. Neuhoff, V., Stamm, R., Eibl, H. Clear background and highly sensitive protein staining with
Coomassie Blue dyes in polyacrylamide gels: A systematic analysis. Electrophoresis 6,
427–448 (1985).
77. Yan, J.X., Wait, R., Berkelman, T., Harry, R.A., Westbrook, J.A., Wheeler, C.H., Dunn, M.J.
A modified silver staining protocol for visualization of proteins compatible with matrix-assisted
laser desorption/ionization and electrospray ionization-mass spectrometry. Electrophoresis 21,
3666–3672 (2000).
78. Fernandez-Patron, C., Castellanos-Serra, L., Hardy, E., Guerra, M., Estevez, E., Mehl, E.,
Frank, R.W. Understanding the mechanism of the zinc-ion stains of biomacromolecules in
electrophoreseis gels: Generalization of the reverse-staining technique. Electrophoresis 19,
2398–2406 (1998).
79. Ünlü, M., Morgan, M.E., Minden, J.S. Difference gel electrophoresis: A single gel method for
detecting changes in protein extracts. Electrophoresis 18, 2071–2077 (1997).
80. Steinberg, T.H., Hangland, R.P., Singer, V.I. Applications of SYPRO Orange and SYPRO Red
protein gel stains. Anal. Biochem. 239, 238–245 (1996).
81. Steinberg,T.H., Lauber, W.M., Berggren, K., Kemper, C., Yue, S., Patton, W. Fluorescence detection
of proteins in sodium dodecylsulphate-polyacrylamide gels using environmental benign, nonfixative
saline solution. Electrophoresis 21, 497–508 (2000).
82. Patton, W. Detecting proteins in polyacrylamide gels and on electroblot membranes. In Proteomics:
from protein sequence to function. (Pennington, S.R., Dunn, M.J., eds.) pp 65–86, Bios Scientific
Publishers Ltd. (2001).
83. Yan, J.X., Harry, R.A., Spilbey, C., Dunn, M.J. Postelectrophoretic staining of proteins separated
by two-dimensional gel electrophoresis using SYPRO dyes. Electrophoresis 21, 3657–3665 (2000).
93
Additional reading and reference material
Code No.
Application Note: Multiple mini-format 2-D electrophoresis using precast ExcelGel
and Multiphor II flatbed electrophoresis system.
80-6443-47
Application Note: Multiple mini-format 2-D electrophoresis using Hoefer standard
vertical electrophoresis system.
80-6445-94
Data file: Immobiline DryStrip visualization of pH gradients.
18-1140-60
Handbook: Sample Preparation for Electrophoresis. IEF, SDS-PAGE and
2-D Electrophoresis. Principles & Methods
80-6429-60
Technical Manual: Blot processing with Processor Plus.
80-6447-27
Technical Manual: Automated silver and Coomassie staining with Processor Plus.
80-6343-34
Technical Manual: Fluorescence Imaging: principles and methods.
63-0035-28
Many of these items can be downloaded from www.amershambiosciences.com
Recommended additional consumables
94
Iodoacetamide
Fluka
Thiourea
Fluka
Sulfobetains
Calbiochem
PefaBloc
Merck
SYPRO Ruby
Molecular Probes
Ordering information
Product
Quantity
Code No.
Sample Grinding Kit
50 samples
80-6483-37
2-D Quant Kit
500 assays
80-6483-56
2-D Clean-Up Kit
50 samples
80-6484-51
SDS-PAGE Clean-Up Kit
50 samples
80-6484-70
Mini Dialysis Kit, 1 kDa cut-off, up to 250 µl
50 samples
80-6483-75
Sample Preparation
Mini Dialysis Kit, 1 kDa cut-off, up to 2 ml
50 samples
80-6483-94
Mini Dialysis Kit, 8 kDa cut-off, up to 250 µl
50 samples
80-6484-13
Mini Dialysis Kit, 8 kDa cut-off, up to 2 ml
50 samples
80-6484-32
Tris
500 g
17-1321-01
Urea
500 g
17-1319-01
CHAPS
1g
17-1314-01
Triton X-100
500 ml
17-1315-01
Dithiothreitol (DTT)
1g
17-1318-01
Bromophenol Blue
10 g
17-1329-01
DryStrip Cover Fluid
1l
17-1335-01
First-dimension
Immobiline DryStrip Reswelling Tray,
for 7–18 cm IPG strips
80-6371-84
Immobiline DryStrip Reswelling Tray,
for 7–24 cm IPG strips
80-6465-32
Multiphor II/Immobiline DryStrip Kit focusing system and accessories
Multiphor II Electrophoresis Unit
18-1018-06
MultiTemp III Thermostatic Circulator, 115 V
18-1102-77
MultiTemp III Thermostatic Circulator, 230 V
18-1102-78
Immobiline DryStrip Kit
Sample cups
18-1004-30
60/pk
18-1004-35
IEF electrode strips
100/pk
18-1004-40
CleanGel electrode strips
12/pk
18-1035-33
EPS 3501 XL Power Supply
19-3500-01
Ettan IPGphor Isoelectric Focusing Unit and accessories
Ettan IPGphor Isoelectric Focusing Unit
(Order Strip Holders separately)
80-6414-02
Ettan IPGphor Protocol Guide
IEF electrode strips
80-6415-73
(100/pk)
18-1004-40
Strip Holders for use with Immobiline DryStrip and Ettan IPGphor Isoelectric Focusing Unit
7 cm
1/pk
6/pk
80-6416-87
80-6416-11
11 cm
1/pk
6/pk
80-6417-06
80-6416-30
13 cm
1/pk
6/pk
80-6417-25
80-6416-49
18 cm
1/pk
6/pk
80-6417-44
80-6416-68
24 cm
1/pk
6/pk
80-6470-07
80-6469-88
Ettan IPGphor Cup loading Strip Holder 7–24cm
3/pk
80-6459-43
Electrode, Cup Loading Strip Holder
6/pk
80-6464-94
95
Product
Quantity
Code No.
Strip Holders for use with Immobiline DryStrip and Ettan IPGphor Isoelectric Focusing Unit (continued)
Sample Cup, Ettan IPGphor Cup Loading Strip Holder
50/pk
80-6459-81
Cleaning solution, Ettan IPGphor Strip Holder
950 ml
80-6452-78
12/pk
17-6001-11
Immobiline DryStrip gels
7 cm
pH 3–10 L
pH 3–10 NL
17-6001-12
pH 4–7
17-6001-10
pH 6–11
11 cm
pH 3–10 L
17-6001-34
12/pk
pH 4–7
18-1016-60
pH 6–11
13 cm
pH 3–10 L
17-6001-35
12/pk
17-6001-15
pH 4–7
17-6001-13
pH 3–10 L
17-6001-96
12/pk
17-1234-01
pH 3–10 NL
17-1235-01
pH 4–7
17-1233-01
pH 6–11
17-6001-97
pH 6–9
17-6001-88
pH 3.5–4.5
17-6001-83
pH 4.0–5.0
17-6001-84
pH 4.5–5.5
17-6001-85
pH 5.0–6.0
17-6001-86
pH 5.5–6.7
24 cm
17-6001-14
pH 3–10 NL
pH 6–11
18 cm
18-1016-61
pH 3–10 L
17-6001-87
12/pk
17-6002-44
pH 3–10 NL
17-6002-45
pH 4–7
17-6002-46
pH 6–9
17-6002-47
pH 3–7 NL
17-6002-43
pH 3.5–4.5
17-6002-38
pH 4.0–5.0
17-6002-39
pH 4.5–5.5
17-6002-40
pH 5.0–6.0
17-6002-41
pH 5.5–6.7
Equilibration Tube Set for up to
24 cm IPG strips
17-6002-42
12/pk
80-6467-79
IPG Buffer, 1 ml
96
pH 3.5–5.0
17-6002-02
pH 4.5–5.5
17-6002-04
pH 5.0–6.0
17-6002-05
pH 5.5–6.7
17-6002-06
pH 4–7
17-6000-86
pH 6–11
17-6001-78
pH 3–10
17-6000-87
pH 3–10 NL
17-6000-88
Product
Quantity
Code No.
Pharmalyte, 25 ml
pH 3–10
17-0456-01
pH 5–8
17-0453-01
pH 8–10.5
17-0455-01
Second dimension
2-D Electrophoresis brochure
18-1124-82
Hoefer mini vertical units and accessories
Hoefer miniVE complete, includes basic unit,
two 10-well 1.0 mm combs, and two pairs of
1.0 mm spacers for up to 2 gels
(glass plate size: 10×10.5 cm)
80-6418-77
Spacer, 1.0 mm
2/pk
Spacer, 1.5 mm
2/pk
80-6150-11
80-6150-30
SE 260 Mighty Small II Vertical Unit,
complete, for 2 slab gels
80-6149-35
SE 235 Mighty Small 4-Gel Caster,
complete
80-6146-12
SE 245 Mighty Small Dual Gel Caster
Thin fluorescent rulers
80-6146-50
2/pk
Hoefer Wonder Wedge plate separation tool
80-6223-83
80-6127-88
Hoefer SE 600 vertical units and accessories
SE 600 Dual Cooled Vertical Slab Unit for
up to 4 gels (glass plate size: 18×16 cm)
80-6171-58
Spacer, 1.0 mm, 1 cm wide
2/pk
80-6179-94
Spacer, 1.0 mm, 2 cm wide
2/pk
80-6180-70
Spacer, 1.5 mm, 1 cm wide
2/pk
80-6180-13
Spacer, 1.5 mm, 2 cm wide
2/pk
80-6180-89
Divider glass plate, 18×16 cm, notched
80-6179-18
SE 615 Multiple Gel Caster for 2 to 10 gels
(glass plate size: 18×16 cm)
80-6182-79
Glass plates, 18×8 cm
2/pk
Divider glass plate, 18×8 cm, notched
80-6186-59
80-6186-78
Clamp assembly, 8 cm
2/pk
80-6187-35
Spacer, 1.0 mm, 1 cm wide, 8 cm long
2/pk
80-6443-09
Spacer, 1.5 mm, 1 cm wide, 8 cm long
2/pk
80-6443-28
Ettan DALTtwelve Large Vertical System and accessories
Ettan DALTtwelve Separation Unit and
Power Supply/Control Unit, 115 VAC
80-6466-46
Ettan DALTtwelve Separation Unit and
Power Supply/Control Unit, 230 VAC
80-6466-27
Includes:
Ettan DALT Cassette Removal Tool
2/pk
80-6474-82
Ettan DALT Buffer Seal Removal Tool
2/pk
80-6474-63
Order accessories separately
Ettan DALT Precast Gel Cassette
80-6466-65
Ettan DALT Gel Casting Cassette, 1.0 mm
80-6466-84
Ettan DALT Blank Cassette Insert
80-6467-03
Roller (needed for precast)
80-1106-79
97
Product
Quantity
Code No.
Order accessories separately (continued)
Wonder wedge (needed for lab-cast)
80-6127-88
Ettan DALTtwelve Gel Caster Complete
Includes: 80-6467-41 and 80-6467-60
80-6467-22
Ettan DALT Separator Sheets 0.5 mm
16/pk
80-6467-41
Ettan DALT Filler Sheets 1.0 mm
6/pk
80-6467-60
Ettan DALT Cassette Rack
2/pk
Ettan DALT Buffer Seal Remover Tool
80-6467-98
80-6474-63
Ettan DALT Cassette Removal Tool
80-6474-82
Ettan DALT Glass Set
2/p
80-6475-39
Ettan DALT LF Glass Set
1 set (2 pieces)
80-6475-58
Hoefer DALT Gradient Maker with
peristaltic pump, 115 V
80-6067-65
Same as above, 230 V
80-6067-84
Ettan DALT gels and buffer kit
Ettan DALT Gel 12.5% homogeneous
6/pk
Ettan DALT Buffer Kit
17-6002-36
17-6002-50
Gradient makers
SG 30 Gradient Maker
30 ml total volume
SG 50 Gradient Maker
50 ml total volume
80-6197-80
80-6197-99
SG 100 Gradient Maker
100 ml total volume
80-6196-09
SG 500 Gradient Maker
500 ml total volume
80-6198-18
Multiphor II
Multiphor II Electrophoresis Unit
18-1018-06
Multiphor II Buffer Strip Positioner
80-6442-90
Film remover for electrophoretic transfer
IEF sample application pieces
18-1013-75
200/pk
80-1129-46
Power supplies
EPS 3501 Power Supply, 3500 V,
150 mA, 100 W
18-1130-04
EPS 3501 XL Power Supply, 3500 V,
400 mA, 200 W
18-1130-05
EPS 2A200 Power Supply, 200 V,
2000 mA, 200 W
80-6406-99
EPS 301 Power Supply, 300 V,
400 mA, 80 W
18-1130-01
EPS 601 Power Supply, 600 V,
400 mA, 100 W
18-1130-02
EPS 1001 Power Supply, 1000 V,
400 mA, 100 W
18-1130-03
Thermostatic circulator
MultiTemp III Thermostatic Circulator, 115 V
18-1102-77
MultiTemp III Thermostatic Circulator, 230 V
18-1102-78
ExcelGel SDS gels
98
ExcelGel SDS 2-D homogeneous
6/pk
ExcelGel SDS XL 12-14
3/pk
80-6002-21
17-1236-01
ExcelGel SDS Buffer Strips,
anode and cathode
6 each/pk
17-1342-01
Product
Quantity
Code No.
PlusOne gel casting chemicals and buffers
Acrylamide PAGE (acrylic acid < 0.05%)
250 g
17-1302-01
Acrylamide PAGE (acrylic acid < 0.05%)
1 kg
17-1302-02
Acrylamide IEF (acrylic acid < 0.002%)
250 g
17-1300-01
Acrylamide IEF (acrylic acid < 0.002%)
1 kg
17-1300-02
Acrylamide IEF, 40% solution
1l
17-1301-01
Acrylamide PAGE, 40% solution
1l
17-1303-01
N,N' methylenebisacrylamide
25 g
17-1304-01
N,N' methylenebisacrylamide, 2% solution
1l
17-1306-01
Agaraose M
10 g
17-0422-01
Agarose NA
10 g
17-0554-01
Glycine
500 g
17-1323-01
Ammonium persulfate
25 g
17-1311-01
TEMED
25 ml
17-1312-01
Tris
500 g
17-1321-01
Urea
500 g
17-1319-01
Glycerol, 87%
1l
17-1325-01
SDS
100 g
17-1313-01
Dithiothreitol (DTT)
1g
17-1318-01
Bromophenol Blue
10 g
17-1329-01
Deoxyribonuclease I (DNase I)
20 mg
27-0516-01
Ribonuclease I (RNase A and RNase B)
1g
27-0330-02
Ribonuclease I "A" (RNase A)
100 mg
27-0323-01
PlusOne equilibration chemicals
Enzymes
Molecular Weight Markers
Mr range 2 512–16 949
80-1129-83
Mr range 14 400–94 000
IEF sample application pieces
17-0446-01
200/pk
80-1129-46
pI Calibration Kits
Broad pI Kit, pH 3.5–9.3
17-0471-01
Low pI Kit, pH 2.5–6.5
17-0472-01
High pI kit, pH 5–10.5
17-0473-01
Carbamylyte Calibration Kit
17-0582-01
Automated and Multiple Gel Staining
Silver Staining Kit, Protein
17-1150-01
Hoefer Processor Plus Base Unit
80-6444-04
PTFE coated stainless steel tray, 19×29 cm.
Accepts gels up to 16×26 cm.
80-6444-80
99
Product
Quantity
Code No.
Automated and Multiple Gel Staining (continued)
PTFE coated stainless steel tray, 29×35 cm.
Accepts gels up to 28×26 cm.
80-6445-18
Blot Processing Tray Pack
80-6444-23
Protocol Guide, Hoefer Automated Gel Stainer
80-6343-34
Staining Tray Set
80-6468-17
Coomassie tablets, PhastGel Blue R-350
17-0518-01
SYPRO Orange Protein Gel Stain
500 µl
RPN5801
SYPRO Orange Protein Gel Stain
10×50 µl
RPN5802
SYPRO Red Protein Gel Stain
500 µl
RPN5803
SYPRO Red Protein Gel Stain
10×50 µl
RPN5804
SYPRO Tangerine Protein Gel Stain
500 µl
RPN5805
SYPRO Gel Stain Starter Kit, 1×50 µl of
each plus Photographic Filter and
Protein Molecular Weight Markers
RPN5811
Gel driers
Hoefer SE 1200 Easy Breeze™ Air Gel Drier, 115V
80-6121-61
Hoefer SE 1200 Easy Breeze Air Gel Drier, 115V
80-6121-80
Gel Loading Platform for gels up to 25×21 cm
80-6429-41
Gel Frame for gels up to 25×21 cm
Cellophane Sheets, 33×38 cm
80-6429-22
50/pk
Gel Loading Platform for gels up to 20×20 cm
80-6429-22
Gel Frame for gels up to 20×20 cm
Cellophane Sheets, 33×33 cm
80-6430-17
80-6429-22
50/pk
80-6121-99
Hoefer GD 2000 Vacuum Gel Drier for gels
up to 33×44 cm, 115 V
80-6428-84
Hoefer GD 2000 Vacuum Gel Drier for gels
up to 33×44 cm, 230 V
80-6429-03
Cellophane Sheets
80-6117-81
ImageMaster Image Analysis System
ImageScanner
18-1134-45
Typhoon 8600
63-0027-96
Typhoon 9200
Inquire
Typhoon 9400
Inquire
Ettan Progenesis Software, 1.0
18-1154-43
ImageMaster 2D Elite Software
80-6350-56
ImageMaster 2D Database Software
80-6351-13
Spot Handling
Ettan Spot Picker
18-1145-28
Ettan Digester
Inquire
Ettan Spot Handling Workstation
Inquire
Mass Spectrometry
100
Ettan MALDI-ToF, 120 V
18-1145-00
Ettan MALDI-ToF, 230 V
18-1142-33
Handbooks
from Amersham Biosciences
Antibody Purification
Handbook
18-1037-46
The Recombinant Protein Handbook
Protein Amplification and Simple Purification
18-1142-75
Protein Purification
Reversed Phase Chromatography
Handbook
18-1132-29
Principles and Methods
18-1134-16
Ion Exchange Chromatography
Expanded Bed Adsorption
Principles and Methods
18-1114-21
Principles and Methods
18-1124-26
Affinity Chromatography
Chromatofocusing
Principles and Methods
18-1022-29
with Polybuffer and PBE
50-01-022PB
Hydrophobic Interaction Chromatography
Microcarrier cell culture
Principles and Methods
18-1020-90
Principles and Methods
18-1140-62
Gel Filtration
Percoll
using immobilized pH gradients
Principles and Methods
18-1022-18
Methodology and Applications
18-1115-69
Principles and Methods
80-6429-60
Ficoll-Paque Plus
For in vitro isolation of lymphocytes
18-1152-69
GST Gene Fusion System
Handbook
18-1157-58
2-D Electrophoresis
CleanGel, Ettan, Eazy Breeze, ExcelGel, Hoefer, ImageMaster, ImageScanner, Immobiline,
IPGphor Multiphor, MultiTemp, Pharmalyte, PlusOne and Typhoon are trademarks of the
Amersham Biosciences group.
Amersham and Amersham Biosciences are trademarks of Amersham plc.
Coomassie is a trademark of ICI plc.
SYPRO is a trademark of Molecular Probes Inc.
Tris and Triton X-100 are trademarks of Rohm & Haas.
Tween is a trademark of ICI Americas Inc.
All goods and services are sold subject to the terms and conditions of sale of the company
within the Amersham Biosciences group that supplies them. A copy of these terms and
conditions is available on request. © Amersham Biosciences AB 2001 - All rights reserved.
Amersham Biosciences AB
AB Björkgatan 30, SE-751 84 Uppsala, Sweden
Amersham Biosciences
Amersham Place, Little Chalfont, Buckinghamshire HP7 9NA, England
Amersham Biosciences Corp
800 Centennial Avenue, PO Box 1327, Piscataway, NJ 08855 USA
Amersham Biosciences Europe GmbH
Munzinger Strasse 9, D-79111 Freiburg, Germany
Amersham Biosciences
Sanken Building, 3-25-1, Shinjuku-ku, Tokyo 169-0073, Japan
Production: RAK Design AB
2-D Electrophoresis – Principles and Methods
2-D Electrophoresis
using immobilized pH gradients
Principles and Methods
www.amershambiosciences.com
80-6429-60
Edition AB