1
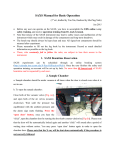
Diamond Light Source Ltd Rutherford Appleton Laboratory Chilton, Didcot Oxfordshire OX11 0QX United Kingdom www.diamond.ac.uk SCI-SAD-0008 Computing Services for Diamond Users Prepared by: Nick Rees Diamond Light Source Ltd. Issue: Date of issue: 6 16 May 2014 Abstract: This document provides an outline of the services provided to Diamond Users who have been allocated time. Page 1 of 40 Issue 1.12 1 Purpose.............................................................................................................................3 2 Glossary ............................................................................................................................3 3 Data access from Diamond Linux workstation ...................................................................8 4 Data Access from Diamond Windows workstation ...........................................................10 5 From the visitors network ................................................................................................11 4.1.1 Data access from Linux .......................................................................................................... 11 Using samba (smbclient)............................................................................................................. 11 Using sftp (Linux/Mac) ................................................................................................................ 13 4.1.2 Data access from Windows .................................................................................................... 16 Alternative: sftp ........................................................................................................................... 18 4.1.3 Data access from Mac............................................................................................................ 19 Using samba/CIFS ...................................................................................................................... 19 Using sftp .................................................................................................................................... 21 6 Data Access from remote host ........................................................................................24 4.1.4 NX ........................................................................................................................................... 24 4.1.6 21 ............................................................................................................................................ 29 4.1.7 224.1.14.1.3FTP ..................................................................................................................... 29 7 ANNEX B: Using Diamond printers .................................................................................31 1.1.1 Printer names ......................................................................................................................... 31 1.1.2 Connecting from a Windows computer .................................................................................. 31 1.1.3 Connecting to the print server from a Linux computer or a Mac ............................................ 32 1.1.4 Information on printers, prints jobs plus CUPS user manual ................................................. 33 8 Using ICAT to retrieve data from the data archive ...........................................................33 1.8.1 Logging In ............................................................................................................................... 33 1.8.2 Retrieving Data ....................................................................................................................... 35 1.8.3 Getting data that has been retrieved previously..................................................................... 38 1.8.4 Searching for a visit ................................................................................................................ 39 1.8.5 Logging Out ............................................................................................................................ 40 Page 2 of 40 Issue 1.12 INTRODUCTION 1 Purpose This document describes the services provided to users who have been given beam time at Diamond, but who are not Diamond staff or have any other Diamond connection. 2 Glossary CDROM Compact Disk Read Only Media DLS Diamond Light Source Ltd. DVD Digital Video Disk or Digital Versatile Disk FedId Federal Identifier. A computer username unique across CLRC and DLS systems. ftp File Transfer Protocol Janet Joint Academic Network PBS Principal Beamline Scientist ssh Secure shell – a method of logging in securely across the network. sftp Secure File Transfer Protocol – an ecrypted form of ftp scp Secure copy – a methor of copying files securely across the network USB Universal Serial Bus eSATA External SATA – a way of connecting external disks, no longer widely used but still available on some beamlines. Page 3 of 40 Issue 1.12 COMPUTING SERVICES PROVIDED FOR DIAMOND USERS 1 Federal IDs and passwords A Federal ID (usually abbreviated to FedID) is a Diamond computer username which, together with an associated password, enables the user to access the Usernet, Proposal Manager website and all beamline computing systems including data storage. New users must complete a Registration form which ensures that the User Office hold relevant personal details. The following steps happen once the registration form is submitted: • • • User is automatically allocated a Fed ID User must acknowledge receipt of FedID and acceptance of Diamond IT policy User is allocated a password by the User Office together with details about the Quest Password Manager system If arriving at Diamond without their FedID and/or password the user will not be able to take the safety test on-line and is likely to experience significant delays in starting their experiment as staff in the User Office cannot immediately reset passwords. For your own benefit and to help the User Office team please ensure that you remember to bring your FedID and password when you come to Diamond for beamtime. 2 Quest Password Manager By registering a set of personal questions and answers you can change your password to make it more memorable or reset if you have forgotten it. This will save time for you and can ensure that you start your beamtime without delay. Please register with Quest Password Manager (http://access.stfc.ac.uk) so that you can quickly reset your password if forgotten 3. All usage of Diamond Computers by Diamond Users must be in accordance with all current laws and must be ethical and not interfere with the business mission, professional reputation or security of Diamond. In particular users must abide by the following policies: a. Janet Acceptable Use Policy b. STFC Information Systems Privacy and Security Policy 4. All users will initially be allocated 512 MByte of user space. This will appear as their home directory, as well as their Windows “U:” drive and “My Documents” folder. 5. The 512 MByte allocation will not be deleted, and will be backed up. If data is present in this area for a minimum of 24 hours, it should be recoverable. 6. Extensions beyond 512 MByte may be provided if resources permit and the extension is approved by the PBS of the beamline for which the user has allocated time. 7. Users will have access to science data collected on their beamline during their allocated time from any Diamond machine. Page 4 of 40 Issue 1.12 8. Science data collected on beamlines will only be guaranteed available from DLS for a limited period (presently one month) after it has been taken. Currently, DLS has no provision for keeping data for a longer period than this, and users are responsible for keeping copies of their data. 9. Data taken on previous https://icat.diamond.ac.uk visits is made available from the archive at 10. Users will be able to make copies of their data by: a. Copying the data to a personal disk using designated Data Dispenser hardware available on each beamline. b. Copying the data to DVD or CDROM using designated machines. c. Using outgoing ftp to copy the data to an external location. d. Using outgoing scp to copy the data to an external location. e. Using incoming scp to copy the data to a laptop connected to the Diamond visitor network. f. Mounting the Diamond data areas exported from data.diamond.ac.uk onto a machine on the visitor network and doing a normal file copy to their visitor machine. 11. Connection of users storage devices to other than designated connection points isnot allowed. 12. Users will be granted authorisation to log in on the console of machines on the DLS office network for a limited period around their allocated beam time (up to one month before and at least one month after). Outside this time they will be unable to log in unless authorised by the PBS (or their designate) of the beamline for which they had time. 13. Users will be granted authorisation to log in to machines on the DLS office network via ssh for a limited period around their allocated beam time. Outside this time they will be unable to log in unless authorised by the PBS of the beamline for which they had time. 14. Users will be granted authorisation to log in to machines on their allocated beamline during the days they have been allocated time to set up their experiment and take beam. Outside this time they will be unable to log in unless authorised by the PBS of the beamline for which they had time. 15. Users may bring their personal computing equipment to Diamond. However, it will normally only be allowed to be connected to the Diamond Visitor network. The only Diamond services available from the Diamond Visitor network will be access to their Diamond data, access to Diamond printers, and access to the external internet. Access to other Diamond services will only be available as an external, untrusted system. 16. A Beamline Visitor Instrumentation Network (BVIN) will be made available to host users' equipment that needs access to the beamline network, for instance specialist sample envrionments, PVs published by the beamline are also visible on this network. Users must indicate at least 2 weeks in advance if they require the use of this network. Page 5 of 40 Issue 1.12 17. Under exceptional circumstances the PBS of the beamline can make a case for beamline user’s personal computing equipment to be connected to a Diamond network other than the visitors network. This case must be made at least 2 weeks in advance of the visit, and DLS system administrators must be given root or administrator access to the computing equipment so it can be configured and scanned for potential problems. If the equipment is deemed to be acceptable, it will then be allowed to be connected to a designated Diamond network for a strictly limited period of time. 18. Diamond will provide some public computing systems on the visitor network to allow visitors to access the internet even without need for a FedId. 3 DATA TRANSFER SPEEDS Users should consider the volume of data that is expected to be collected. This will depend on length of experiment, complexity and detector type. For example, a typical MX user may expect to collect some hundreds of gigabytes in certain circumstances. Consideration should be given to transfer of data before the experiment has begun. Leaving the copy process until the end of the experiment may result in long delays. Diamond has developed a Data Dispenser which can be set up to transfer data continuously during an experiment to a user’s own disks, thereby reducing delays at the end of a visit due to data copying. Below is an indication of typical transfer speeds for different copy processes and media: eSATA disk Approximately 40-50MB/s USB disk: Approximately 25-35MB/s SSH over LAN: Approximately 20-40MB/s depending on protocol SMB/CIFS (Windows file share): Approximately 25-35MB/s Remote from Diamond: Approximately 10-30MB/s Users should remember that transfers to home institutes can be slow. SSH remote transfers are usually around 10MB/s but remote sites may have further limitations. Transfer to the Visitor network is limited by firewalls so is less suitable for large data volumes. For further information, please refer to the Usernet “Transferring Data” pages which can be found under the “While You are Here” section. Page 6 of 40 Issue 1.12 4 DOCUMENT HISTORY v0.1 2 Aug 2006 First draft (NPR) v0.2 16 Dec 2006 Second draft after review by IT, DAG, Linux system administrators and user office v0.3 11 Jan 2007 Third draft. Added incoming ssh from DLS visitor network and update glossary. v1.0 12 Jan 2007 First released version. Numbered items and added PBS designate to point 11. v1.1 1 Nov 2007 Added ability to data.diamond.ac.uk. v1.2 25 Mar 2008 Added instructions for copying data to the visitor network and printing, plus a couple of minor corrections from the User Office. v1.3 12 Aug 2008 Simplified instructions and added a few more pictures. v1.4 21 Jan 2009 changed instructions re data copying from being visitor network to general data copying instructions (visitor and beamline network) v1.5 23 Mar 2010 merged in data transfer speeds. v1.6 9th Nov 2010 Added more information about FedIDs and passwords v1.7 5th April 2011 minor cleanup and extra info about esata and data dispensers. v1.8 16th August 2011 Revision of Annex A, especially data copying instructions; added Data Dispensers; added instructions for Mac v1.9 21st October 2011 Revised section 3. Revised section 5 to remove out of date instructions for attaching external media to linux workstations. Added information on supported interface types. v1.10 7 March 2012 revised quota limits and added URI for password management suitable for printed version. v1.11 22 April 2014 updated most sections and added section on NX. v1.12 14 May 2014 implemented changes from documentation review. access data directly from ANNEX A: Guide to SOME common computing tasks DATA ACCESS AND DATA TRANSFER The recommended and fully supported way to make a copy of experimental data taken during a visit – especially for large data volumes – is copying the data to a USB or eSATA disk whilst Page 7 of 40 Issue 1.12 it is being acquired, using the designated Data Dispenser hardware available on each beamline. Beamline data dispensers can handle either ext3, ext4 or NTFS formatted hard drives. Note, drives formatted with FAT file systems are NOT recommended due to inherent limitations. Drives formatted with HFS+ (Apple) are NOT supported. Note also that the “Thunderbolt” interconnect is NOT supported. Users can bring their own disks. It is recommended that these are the “desktop” variety with external power supply rather than bus-powered. This is because bus-powered disks often require more power than the bus can provide when working flat out. This can lead to file system corruption and data loss. The Experimental Hall Coordinators (EHCs) have a small number of external hard drives for loan. These are formatted as either ext3 or NTFS. For smaller data volumes, it may be sufficient to copy it to a portable storage medium (DVD, USB flash drive, USB hard drive...) from a beamline workstation. All beamline workstations have CD/DVD writers. Blank media may be obtained from either the User Office or the EHCs. 3 Data access from Diamond Linux workstation All data taken during an experiment is saved in a directory /dls/BEAMLINE/data/YEAR/EXPERIMENT-VISIT i.e. for experiment mt9343 visit 1 in 2014 (that is proposal no. 9343 in “village” mt, 1st visit in 2014) on B16 data will be stored in /dls/b16/data/2009/mt9343-1: Figure 1: accessi ng data on a Diamon d Linux worksta tion using the comma nd line interfac e Altern atively, any file browser (e.g. Konqueror, Nautilus) can be used to navigate to the relevant directory: Nautilus (gnome) Konqueror (KDE) Page 8 of 40 Issue 1.12 Page 9 of 40 Issue 1.12 Figure 2: access to data from a Diamond Linux workstation using Nautilus or Konqueror These directories are automatically available on all Diamond Linux workstations. Note: data will only be readable to users registered for this visit — to access your data this way, you will have to be logged in to a workstation using your FedId 4 Data Access from Diamond Windows workstation On any Diamond Windows workstation, the beamline data directories are available as \\BEAMLINE-storage\BEAMLINE\ Experimental data will be in the directory data. This directory contains a subdirectory named after the year of the experiment (e.g. 2009) which in turn should contain a directory named after your proposal number (see Figure 3 for an example). The subdirectory named after your proposal contains your experimental data. For example, for experiment mt767 visit 1 in 2009 (that is proposal no. 767 in “village” mt, 1st visit in 2009) on B16 data will be stored on \\b16-storage\b16\data\2009\mt767-1. Note: data will only be readable to users registered for this visit — to access your data this way, you will have to be logged in to the workstation using your FedId (or at least connect to the share using your FedId). Page 10 of 40 Issue 1.12 Figure 3: access to data from a Diamond Windows workstation On beamline Windows workstations, the network drive might already be connected as the X: drive. 5 From the visitors network The beamline data directories are available read only on the visitor network. The files are visible on the server data.diamond.ac.uk and can be accessed using either smb (Windows Explorer) or sftp. You can connect to the visitor network either using the wireless network or using the dedicated wired connections on every beamline. 4.1.1 Data access from Linux Using samba (smbclient) The Nautilus Linux file manager and the Konqueror browser can be used to browse the data directories by typing smb://data.diamond.ac.uk Page 11 of 40 Issue 1.12 into the address bar. If you try to connect to the directories you will be asked for username and password. Note that you will have to enter your username as CLRC\yourFedID (see Figure 4 for Konqueror and Figure 5 for Nautilus). Figure 4: Connecting from Linux using Konqueror Page 12 of 40 Issue 1.12 Figure 5: Connecting from Linux using Nautilus You can also use the command line utility ‘smbclient’ to connect to the data directores. smbclient -U "CLRC\yourFedID" -L data.diamond.a.cuk will show you the list of available directories on data.diamond.ac.uk. Note: you need to put quotes around ‘CLRC\yourFedID’! Connect with the following command: smbclient -U "CLRC\yourFedID" //data.diamond.ac.uk/ typing ‘help’ in an smbclient session will give you a command overview; typing ‘help command’ will give help on that command. Using sftp (Linux/Mac) data.diamond.ac.uk can also be directly reached via sftp from the visitors network, i.e. data can also be transferred using sftp. Using sftp, you can also write to the directories (given you have write access to them – e.g. your home directory). Under Linux you can simply use the sftp command on the command line, or use the sftp features of Konqueror or Nautilus (sftp://data.diamond.ac.uk in Konqueror; File -> Open Location -> sftp://data.diamond.ac.uk in Nautilus). You will likely have to log in using your FedId (maybe as CLRC\FedId as described above) if you are not logged in to your computer with your FedId. Note: this will probably drop you into your home directory, from where you Page 13 of 40 Issue 1.12 will have to navigate into the data directory you want to go to (the directory will be called /dls/BEAMLINE/data/YEAR/EXPERIMENT-VISIT as described in section Error: Reference source not found.) Using the command line sftp, connect by entering "sftp [email protected]" in a terminal window; in sftp, "help" will show all available commands: Figure 6: sftp access to data.di amond. ac.uk from Linux comma nd line (first figure) "pwd" will show you your curren t direct ory, "ls" list its conte nts, and "cd" change the directory : Figure 7: sftp accesss to data.diam Page 14 of 40 Issue 1.12 ond.ac.uk from Linux command line (second figure) “Get” will download a file or directory from the server (into the directory you are currently in on your computer, as shown by “lpwd”). “Put” can be used to upload files to the current working directory on the server (provided you have write access to it). Using one of the file browsers, the connection can be opened like: Nautilus (gnome) Konqueror (KDE) Figure 8: sftp to data using Nautilus or Konqueror on Linux then browse to the correct directory (/dls/BEAMLINE/data/YEAR/EXPERIMENT-VISIT). 4.1.2 Data access from Windows The beamline data directories are visible on the server data.diamond.ac.uk and can be accessed using Windows Explorer. Open an Explorer window (e.g. “My Computer” or “My Network Places”) and enter \\data.diamond.ac.uk\ into the address bar. Note that – if you are not logged in to your workstation using your FedId – you will have to log in before being able to see any files. You will probably have to enter your username as CLRC\yourFedID (see Figure 9 - note the CLRC), and use your normal Diamond password. Page 15 of 40 Issue 1.12 Figure 9: Logging in to data.diamond.ac.uk on Windows Once you have logged in, it will show all beamline data directories, plus your Diamond home directory (see Figure 10). Figure 10: View after connecting to data.diamond.ac.uk from Windows Page 16 of 40 Issue 1.12 Select the directory you need. For beamline directories this will then show you the data directories on that beamline (see Figure 11 for an example). Figure 11: An example Beamline directory Experimental data will be in the directory data. This directory contains a subdirectory named after the year of the experiment (e.g. 2007) which in turn should contain a directory named after your proposal number (see Figure 12 for an example). The subdirectory named after your proposal contains your experimental data. Page 17 of 40 Issue 1.12 Figure 12: An example Beamline experimental data directory Please remember that the directories are read only. You can copy this data to your own computer but you will not be able to write back to the file server. This is also true for your home directory. Alternative: sftp data.diamond.ac.uk can also be directly reached via sftp from the visitors network, i.e. data can also be transferred using sftp. Using sftp, you can also write to the directories (given you have write access to them – e.g. your home directory). On Windows, a possible sftp client is WinSCP; Diamond IT helpdesk might be able to help you set this up. You will have to log in using your FedId (maybe as CLRC\FedId as described above). Note: this will probably drop you into your home directory (/home/yourFedId), from where you will have to navigate into the data directory you want to go to. The data directory can be found as /dls/BEAMLINE/data/YEAR/EXPERIMENT-VISIT. This is described in more detail on page 13 in section 4.1.1 – the instructions given for Linux / Linux sftp access apply to Windows sftp access, as well. Page 18 of 40 Issue 1.12 4.1.3 Data access from Mac Using samba/CIFS In the main menu (Finder), select "Go → Connect to Server": Figur e 13: data access from Mac - connect to server Enter smb://data.diamond.ac.uk as the server to connect to and press "Connect": Figure 14: connect to server "data.diamond.ac.uk" Enter CLRC\FedID as your id and your FedID password as your password: Page 19 of 40 Issue 1.12 Figure 15: enter your FedID and password This will give you a share with the list of beamlines; select the correct beamline and click OK: Figure 16: select beamline as volume to mount Your data directory can be found as in a subdirectory data → year → proposal number: Page 20 of 40 Issue 1.12 Figure 17: navigate to visit data directory Data can then be dragged and dropped on to your machine. Using sftp The instructions for command line data access via sftp from Linux (4.1.1, page 13) apply to Mac as well. Alternatively, a graphical tools for sftp access can be used. The following example is using "Cyberduck". Open the software and choose "SFTP" as protocol: Page 21 of 40 Issue 1.12 Figure 18: connect via SFTP using Cyberduck Connect to data.diamond.ac.uk using your FedID/password: Page 22 of 40 Issue 1.12 Figure 19: enter FedID/password in Cyberduck This will drop you into your home (/home/FedID) directory, from where you will have to navigate to the beamline data directory. You need to choose the top level directory (/) and then find /dls/BEAMLINE/data/YEAR/EXPERIMENT-VISIT: Page 23 of 40 Issue 1.12 Figure 20: nagivate to visit directory in Cyberduck 6 Data Access from remote host Remote access to DLS is provided using NoMachine software. The client software is available free from www.nomachine.com for Linux, Microsoft and Apple clients. Unless your data sets are small, it is recommended that you analyse your data at DLS rather than trying to transfer it over the WAN. The following instructions and screenshots were created using v4.2.21 of the NoMachine software. 4.1.4 NX Start the NX client nxplayer - this should give you a "Recent connections" screen. Either choose (double click) an existing session (if you already have one for a Diamond NX server), or click the "New" button: Page 24 of 40 Issue 1.12 Illustration 1: choose an existing connection or create a new one. Page 25 of 40 Issue 1.12 Illustration 2: Select the SSH protocol to connect to v3.5 servers Illustration 3: Set the hostname, the port number will be 22 by default if you have selected the SSH protocol in the last screen Page 26 of 40 Issue 1.12 Illustration 4: Select the "NoMachine login" option to connect to a v3.5 server Use defaults for the following screens. Page 27 of 40 Issue 1.12 Illustration 5: the first time you connect, you will need to accept the host key Illustration 6: login with your FedID and password. It is recommended that you do NOT save these credentials in the connection file. Page 28 of 40 Issue 1.12 Illustration 7: Select the type of connection You should now have a full DLS desktop environment with access to your home directory and data directories as if you were using a DLS workstation. The hardware that you are using is more powerful than a standard desktop and has fast access to the beamline data areas. This is an ideal environment for you to perform data processing. 4.1.5 4.1.6 21 4.1.7 224.1.14.1.3FTP DLS provide an FTP service for remote transfer at ftp://fedecks.diamond.ac.uk. This system requires client software that can use “explicit encryption” or ftpes. This is to protect your credentials. The server is compatible with clients that can negotiate parallel transfers. Page 29 of 40 Issue 1.12 Other clients are availa ble and compa tible such as Filezill a. Illustration 8: Secure ftpes server accessed using lftp client Page 30 of 40 Issue 1.12 7 ANNEX B: Using Diamond printers Diamond's print server is called print.diamond.ac.uk. It is available from the Visitor Network, i.e. visitors bringing their own computers and connecting them to Diamond's Visitor Network should be able to install Diamond printers following these instructions. 1.1.1 Printer names All printer names in Diamond follow a naming scheme. Additionally, all printers should have a name tag. A printer name will contain the building, the room the printer is in, the printer type, and a printer number. Thus, Diamond House printers will be called dh.floor.room.type.no, in the synchrotron building s.floor.room.zone.type.no and beamline printers beamline.room.type.no, e.g. dh.g.51.bw.1: Diamond House: black/white printer, room G.51 (ground floor) s.1.13.z02.co.1: Synchrotron building: colour printer, room 1.13, zone 02 (1st floor) b.i16.cc4.col.1: Beamline I06: colour printer in CC4 1.1.2 Connecting from a Windows computer The quickest way to find all shared printers is to directly connect to the print server using Windows Explorer. Open an Explorer window and enter \\print.diamond.ac.uk in the address bar (see Figure 23). That will bring up a list of all available printers. Select the required printer, right-click on it and choose ''Connect...'' (see Figure 23). Figure 23: Connecting to a printer on print.diamond.ac.uk The driver will be automatically installed and the printer made available on the system. Page 31 of 40 Issue 1.12 Alternatively, open the ''Printers and Faxes'' dialogue box (Start Settings Printers and Faxes). Double click ''Add Printer'' to open the add printer wizard. Choose ''A network printer, or a printer attached to another computer'' in the second step (which type of printer to use) and click next. In step three (Specify a Printer), select ''Connect to this printer (or to browse for a printer, select this option and click Next):'' and type \\print.diamond.ac.uk\name of printer (e.g. for printer dh.g.51.col.1, type \\print.diamond.ac.uk\dh.g.51.col.1). Click next. Windows should now install the printer driver (see Figure 24). Figure 24: Connecting to a Diamond printer using the Add Printer wizard 1.1.3 Connecting to the print server from a Linux computer or a Mac On Diamond Linux workstations, all printers should be automatically available. However, in case they are not, or you want to connect a non-Diamond workstation (e.g. a Mac from the Visitor network), there are different ways of connecting to the print server: 1. for all users on that computer - requires root access You need to have a local cups server running on the computer. Simply - as root add the following line to /etc/cups/cupsd.conf: BrowsePoll print.diamond.ac.uk Then restart CUPS (service cups restart). The printers should now appear (try lpstat -p). 2. per user - does not require root access As user, in your home directory, add a file .cupsrc with the entry: ServerName print.diamond.ac.uk That user should now see all printers when doing lpstat -p. Note that this is not system-wide and each user would have to do it him/herself. Page 32 of 40 Issue 1.12 A default printer can be set with the command lpoptions -d printer (e.g. lpoptions -d dh.g.51.bw.1 to set the default printer to the black and white printer in the ground floor print room in Diamond House). Note that this is user specific unless the command is called as root. 1.1.4 Information on printers, prints jobs plus CUPS user manual Connect to print.diamond.ac.uk:631 from any web browser for access to a list of printers and print jobs (can also be cancelled or restarted). The CUPS user manual (with information on command line print tools and options) can also be found there. 8 Using ICAT to retrieve data from the data archive 1.8.1 Logging In • • • • • Open a web browser and navigate to “https://icat.diamond.ac.uk”. You will see an Authentication Type pop up box. If this is not shown please check if your browser disables pop ups. If you still do not see the login Authentication type dialogue box click login in the top right hand corner. Select Username/Password from the Authentication Type box Enter your FEDID, password and click log in. Page 33 of 40 Issue 1.12 • • Once logged in you will see the “My Data” home page. You can always navigate back to this point by using the tabs below the Diamond logo. Page 34 of 40 Issue 1.12 1.8.2 Retrieving Data • Double click on the visit you wish to retrieve data from, in the “My Data” window. • Click on the visit and select the files individually or tick the box at the top of the table to select all data sets. • Click the “View” button and the download window will appear. Page 35 of 40 Issue 1.12 • Select one or more files in the file view, the tick box at the top of the table will select all files in the view. • Click on Download • Enter a file name for the compressed file that will be prepared and presented for download to your local machine. Page 36 of 40 Issue 1.12 • • You will see the following message when the retrieve from archive begins. This retrieves it from the archive and prepares it for download to your local machine. This may take a long time. • You do not have to be logged in for this process to complete. • Progress of the download will be shown in the “My Downloads” tab. This is found in Page 37 of 40 Issue 1.12 the same line as the “My Data” button. • If you wait in an active session you will be presented with a save dialogue box where you can download the file to the local machine. 1.8.3 Getting data that has been retrieved previously • If you close the session and want to get data that has already been retrieved navigate to the “My Downloads” tab in the same row as “My Data”. • Click the “Download or “Re-download” button on the right hand side of the line showing the retrieved visit. • This will open up the save dialogue box and there you can download your data from the archive to your local machine. Page 38 of 40 Issue 1.12 1.8.4 Searching for a visit • If the visit is not shown in the “My Data” view there is a Search utility available. • Click on “Search” in the tabs that you see “My Data” in. • Expand the Facilities Search field. • In Visit Id type the visit number all in capitals and click search. • Do not click on any Beamline, if something is selected press CTRL and click on the one selected. Page 39 of 40 Issue 1.12 1.8.5 Logging Out • To log out of icat select the “Logout” button in the top right of the screen. Page 40 of 40