1
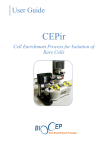
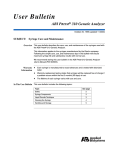
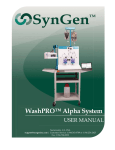
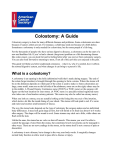
OSTO INNOVATIONS Change Your Life US Patent Number 8,454,568 OstomyVacTM User’s Manual DOC001R03 THIRD EDITION MANUFACTURED BY: OSTO INNOVATIONS 2633 LANTANA RD BUILDING 1301 / SUITE 46 LANTANA FL 33462 PHONE: 561-601-8838 [email protected] IMPORTANT: READ MANUAL BEFORE USE OstomyVacTMUser’s Manual OSTO INNOVATIONS Change Your Life US Patent Number 8,454,568 Table of Contents 1.0 INTRODUCTION ............................................................... 1 2.0 WARNINGS ...................................................................... 2 3.0 OstomyVacTM KIT COMPONENTS..................................... 3 3.1 BREAKDOWN OF OstomyVacTM KIT ............................. 4 4.0 OstomyVacTM OVERVIEW ................................................ 5 5.0 OVACTM OVERVIEW .......................................................... 9 5.7 OVACTM LOGIC ........................................................... 11 5.7.1 OVACTM ON/OFF .............................................. 11 5.7.2 VACUUM PUMP CONTROLS .............................. 11 5.7.3 VIBRATION MOTOR CONTROLS ......................... 11 5.7.4 HEARTBEAT ........................................................ 12 6.0 INSTRUCTIONS FOR USE ................................................ 13 6.1 PREPARATION AND ATTACHMENT OF YOUR OSTOMYVACTM....................................................................... 13 6.2 DAILY BATTERY REPLACEMENT ................................. 14 6.3 BATTERY CHARGING .................................................. 14 6.4 CONNECTING YOUR TETHER FOR BATHING .............. 15 6.5 CONNECTING YOUR DRYBOX FOR SHOWERING AND SWIMMING ............................................................................ 15 7.0 DAILY ACTIVITIES ........................................................... 16 7.1 SHOWERING .............................................................. 16 7.2 BATHING .................................................................... 16 7.3 SWIMMING ................................................................ 16 7.4 SLEEPING ................................................................... 17 8.0 SECURING YOUR OVACTM .............................................. 18 8.1 POUCH COVER ........................................................... 18 8.2 BELT ........................................................................... 18 9.0 TROUBLESHOOTING ...................................................... 19 10.0 WARRANTY STATEMENT ............................................... 20 OstomyVacTMUser’s Manual OSTO INNOVATIONS Change Your Life US Patent Number 8,454,568 1.0 INTRODUCTION Osto Innovations LLC has developed and patented an ostomy appliance that utilizes vacuum to supplement the attachment of Coloplast ostomy pouches to the body. The OstomyVac™ appliance is made of soft, highly flexible, medical grade silicone which provides an interface between a Coloplast ostomy pouch and the user’s stoma. The vacuum that supplements attachment to skin is provided by a fully automated, OvacTM vacuum pump module. The OstomyVacTM appliance and OvacTM vacuum pump operate as a single system and must not be used independent of each other. OstomyVacTMUser’s Manual 1 | Page OSTO INNOVATIONS Change Your Life US Patent Number 8,454,568 2.0 WARNINGS It is important that the following warnings are carefully read and understood prior to using the OstomyVac™ appliance. PLEASE READ CAREFULLY Discontinue the use of product in the event of skin irritation. Do not apply this appliance to peristomal skin that is irritated or ulcerated. Osto Innovations LLC is not liable for any injury or loss that occurs if this product is used other than is intended or without consultation with a medical professional. Consult doctor or stoma nurse (WOCN) prior to using a convex product. Do not put batteries in direct contact with each other. Do not put more than one battery in a single plastic baggie. OvacTM (vacuum pump) shall not be immersed or in direct contact with water (refer to Section 7 “Proper Usage: Shower & Bathing” contained herein). Components shall not be stored at temperatures above 120oF (i.e. in a closed automobile during summer months). The OstomyVacTM must not be used without proper installation of both an adhesive disc and cotton membrane. OstomyVacTMUser’s Manual 2 | Page OSTO INNOVATIONS Change Your Life US Patent Number 8,454,568 3.0 OstomyVacTM KIT COMPONENTS The OstomyVacTM is comprised of a soft, highly flexible appliance integrated with an adhesive disk and cotton membrane as illustrated below. The OstomyVacTM shall not be used unless all three components are properly assembled. OSTOMYVACTM COMPONENTS Adhesive Disc Cotton Membrane Appliance OstomyVac TM Vacuum Pump Components Battery Extraction Tool OvacTM Vacuum Pump Rechargeable Battery Battery Charger Liquid Separator ANCILLARY COMPONENTS Drybox Ostomy Belt 6’ Extension Tube (Tether) Cotton Membrane Application Tool FIGURE 1: OSTOMYVACTM, OVACTM & ANCILLARY COMPONENTS OstomyVacTMUser’s Manual 3 | Page OSTO INNOVATIONS Change Your Life 3.1 US Patent Number 8,454,568 BREAKDOWN OF OstomyVacTM KIT EXCEPT FOR DISPOSABLES, each kit contains components that are designed to provide reliable performance for a period of one year. The kit is delivered with two months’ worth of disposables (adhesive and membranes). Disposables should be reordered monthly. COMPONENT TYPE KIT QUANTITY # OF SPARES Adhesive Disc Disposable 40 Cotton Membrane Disposable 40 Maintain a reserve stock of 5 sets at all times. Appliance Reusable 2 1 Reusable 2 1 Standalone 1 0 Battery Rechargeable/ Reusable 4 3 Liquid Separator Standalone 2 0 Battery Charger Standalone 1 0 Drybox Standalone 1 0 Ostomy Belt Standalone 2 0 Standalone 1 0 Standalone 1 0 OvacTM Vacuum Pump Battery Extraction Tool Extension Tube (Tether) Cotton Membrane Application Tool TABLE 1: OstomyVacTM KIT BREAKDOWN COMPONENTS THAT ARE NOT IN USE SHALL BE STORED IN THEIR ORIGINAL PLASTIC PACKAGAING OstomyVacTMUser’s Manual 4 | Page OSTO INNOVATIONS Change Your Life US Patent Number 8,454,568 4.0 OstomyVacTM OVERVIEW 4.4) CONNECTOR 4.1) APPLIANCE SIZING (STOMA INTERFACE) 4.2) RING 4.3) TUBING FIGURE 2: APPLIANCE DIAGRAM (Shown without Adhesive Disc or Cotton Membrane) The appliance is the device that is the interface between the stoma and the pouch. The appliance is attached to the user’s body using adhesive and vacuum. The vacuum does not assist with, or effect stoma output. The appliance is made of soft, highly flexible, medical grade silicone and is configured for optimizing comfort while minimizing adhesive contact area with peristomal skin. APPLIANCE FEATURES: 4.1) APPLIANCE SIZING: The OstomyVacTM is available in thirteen standard sizes and shapes to accommodate most stoma configurations, as listed in Table 2. OstomyVac™ is also available as a custom-made appliance that precisely conforms to each individual user’s unique stoma. For added comfort all edges and surfaces that contact the peristomal skin area are soft and complaint (no sharp edges or rigid surfaces). OstomyVacTMUser’s Manual 5 | Page OSTO INNOVATIONS Change Your Life US Patent Number 8,454,568 CIRCULAR CONFIG # D 1 2 3 4 5 6 7 8 9 10 INCHES 0.50” 0.625” 0.75” 0.875” 1.00” 1.125” 1.25” 1.375” 1.50” 1.625 OVAL MM 13mm 16mm 19mm 22mm 25mm 29mm 32mm 35mm 38mm 41mm COLOPLAST SIZE* INCHES MM COLOR H 1.5” X 0.75” 38mm x 19mm 11 Red 1.5” x 1.0” 38mm x 25mm 12 Red 2.25” x 1.25” 57mm x 32mm 13 Yellow* TABLE 2: APPLIANCE SIZE STANDARD CONFIGURATIONS CONFIG # L COLOPLAST SIZE* COLOR Green Green Green Green Green Red* Red* Red* Red Red DIAMETER (D) LENGTH (L) x HEIGHT (H) * It is important to note that OstomyVacTM sizing is inconsistent with Coloplast sizing. Please follow the chart above. 4.2) RING: The OstomyVacTM is designed to be used exclusively with standard, “Click to Lock”, Coloplast Ostomy pouches. 4.3) TUBING: The vacuum line between the OstomyVacTM and the OvacTM is comprised of medical grade tubing. It is through this tubing that the vacuum level is drawn. OstomyVacTMUser’s Manual 6 | Page OSTO INNOVATIONS Change Your Life US Patent Number 8,454,568 Note 1: If moisture does happen to collect in this line, IGNORE IT. Moisture is potentially caused by perspiration forming under the OstomyVacTM and then traveling down into the vacuum line. A liquid separator is provided to prevent liquid from reaching the pump. Liquid that may accumulate in the OstomyVacTM Tubing (Ref. Figure 2, Item 4.3) poses no problem as long as a liquid separator is in use. When changing out the OstomyVacTM, any moisture that may have accumulated in the vacuum line can be removed using the syring provided in every kit. The pamphlet “OstomyVacTM Service Procedure” provides instructions on how to use the syringe to remove the moisture. 4.4) CONNECTOR: The connector is the joint to connect the OstomyVacTM to the Liquid Separator. Ensure that the two pieces are fully engaged by twisting clockwise until firmly connected (HAND TIGHT ONLY). A loose connection could cause a vacuum leak (not good). OstomyVacTMUser’s Manual 7 | Page OSTO INNOVATIONS Change Your Life US Patent Number 8,454,568 4.5) ADHESIVE DISC COVERED WITH COTTON MEMBRANE FIGURE 3: OSTOMYVACTM DIAGRAM 4.5) ADHESIVE DISC: The primary purpose of the adhesive disc is to secure the OstomyVacTM device to the body. The appliance cannot be worn without the adhesive disc and cotton membrane. The adhesive disc and cotton membrane should be changed every three days. COTTON MEMBRANE: The purpose of the cotton membrane is to distribute vacuum over the peristomal skin for adhesion enhancement. The OstomyVacTM will not work properly if the adhesive disc and cotton membrane are not installed. Detailed step-by-step instructions for installing the adhesive disc and cotton membrane are provided in the “OstomyVacTM Service Procedure”. This pamphlet is contained in the shipping box. DISCONTINUE THE USE OF PRODUCT IN THE EVENT OF ANY SKIN IRRITATION. OstomyVacTMUser’s Manual 8 | Page OSTO INNOVATIONS Change Your Life 5.0 OVACTM OVERVIEW 5.2) CONNECTOR US Patent Number 8,454,568 5.3) TUBING 5.4) BATTERY *Small side facing upward 5.1) PUMP HOUSING 5.5) ACCESS DOOR 5.6) VENT HOLE FIGURE 4: OVACTM VACUUM PUMP MODULE The primary function of the OvacTM is to maintain the vacuum level over the peristomal skin. The OvacTM is merely a ‘black box’ autonomously controlled by the internal electronics. The only interaction required with the OvacTM is opening the access door to replace the battery. Besides the access door, the OvacTM enclosure shall NOT be opened to avoid damage. OVACTM FEATURES: 5.1) OVACTM HOUSING: The OvacTM housing is a black plastic enclosure that is NOT water tight. Putting in water will damage the OvacTM, voiding warranty. 5.2) CONNECTOR: The connector is the joint to connect the OvacTM to the Liquid Separator. Ensure that the two matching pieces are fully engaged by twisting clockwise (hand tight only) until firmly connected. A loose connection could cause a vacuum leak (not good). OstomyVacTMUser’s Manual 9 | Page OSTO INNOVATIONS Change Your Life US Patent Number 8,454,568 5.3) TUBING: The OvacTM vacuum tubing is comprised of medical grade tubing. It is through this line that the vacuum level is drawn. Note: If Moisture happens to accumulate in this tube, ignore it. DO NOT attach a syringe to this section of tubing as it will damage the OvacTM. 5.4) BATTERY: A lithiom ion battery (3.6 Volts) powers the OvacTM. The battery is sized to last for three days before replacement is necessary. In spite of that, it is highly recommended to change the battery daily to avoid the possibility of low battery charge. See Section 6.3 for the battery replacement procedure. The OvacTM has the ability confirm a full battery charge at start-up (the moment when battery is installed). If the inserted battery is fully charged, a lamp inside the OvacTM will illuminate for 2-seconds at start-up. If the battery is installed and the lamp does not illuminate for 2-seconds, the battery is not fully charged and requires replacement. NOTE: As shown in Figure 4, the smaller side of the battery faces upward. The side marked with an “+” faces downward. BATTERIES NOT IN USE, SHALL BE STORED IN THEIR OWN INDIVIDUAL PLASTIC CONTAINER 5.5) ACCESS DOOR: This is a sliding door that provides access to the battery compartment at the time of battery replacement. 5.6) VENT HOLE: The vacuum pump outlet is vented to the outside of the OvacTM case through this hole. OstomyVacTMUser’s Manual 10 | Page OSTO INNOVATIONS Change Your Life TM 5.7 OVAC US Patent Number 8,454,568 LOGIC TM The Ovac vacuum pump module is a rather simple device that controls the operation of the vacuum pump, vibration motor, and heartbeat. 5.7.1 OVACTM ON/OFF The ON/OFF function is controlled by installing and removing the battery. There is no ON/OFF switch, only the battery. When the battery is INSTALLED the vacuum pump turns ON. When the battery is REMOVED the vacuum pump turns OFF. You can expect the vacuum pump to turn ON as soon as the battery is installed. The OvacTM has a built-in safety feature that will automatically shut the unit OFF in a safe manner, in the event the battery is inadvertently left installed. 5.7.2 VACUUM PUMP CONTROLS The OvacTM uses a vacuum sensor to precisely measure vacuum level over the peristomal skin area. A micro-vacuum pump is automatically turned on and off to precisely maintain the proper vacuum level. The pump is typically on for less than half a second (0.5 second) when vacuum is needed to maintain normal adhesion. This is consistent for every user. The time interval between pump ON can range from every fifteen minutes to hours depending on the user. 5.7.3 VIBRATION MOTOR CONTROLS The OvacTM incorporates a feature for detecting leakage of the OstomyVacTM. In the event the vacuum pump runs for more than two seconds (consistent with a leak), a vibration motor will turn on. It will shake the OvacTM box, similar to a cell OstomyVacTMUser’s Manual 11 | Page OSTO INNOVATIONS Change Your Life US Patent Number 8,454,568 phone vibration mechanism. Once the vacuum is restored (depressing the appliance onto the body), the vibration motor will turn off. The vibration motor will run until the leak has been restored. Note – When a battery is installed in the OvacTM, the unit will continue to run until sufficient vacuum level is attained in the OstomyVacTM. So as to maximize battery life after charging, the battery should not be installed until all vacuum lines are connected and the OstomyVacTM is fully attached to the body. Under this condition, the vacuum pump will normally run less than two seconds to establish adequate vacuum level. If vacuum is not established within two seconds after inserting the battery, you can expect the vibration motor to start vibrating and continue to run until adequate vacuum level has been established. 5.7.4 HEARTBEAT The OstomyVacTM has a built-in ‘heartbeat’. The ‘heartbeat’ is a blinking light that illuminates every ~12 seconds assuring normal operation. If the ‘heartbeat’ ceases to blink, the unit is not operating and the user should replace the battery. OstomyVacTMUser’s Manual 12 | Page OSTO INNOVATIONS Change Your Life US Patent Number 8,454,568 6.0 INSTRUCTIONS FOR USE PREPARATION AND ATTACHMENT OF YOUR OSTOMYVACTM STEP 1 LAYOUT COMPONENTS ON A CLEAN SURFACE STEP 2 INSTALL LIQUID SEPARATOR STEP 3 6.1 PREPARE A FRESH OSTOMYVACTM COMPONENTS INCLUDE: OstomyVacTM Apliance Ovac Cotton Membrane Battery Adhesive Disc Ostomy Belt Cotton Membrane Application Tool Liquid Separator Install liquid separator into Ostomy Belt pocket No connections are made at this time Elbow fitting is positioned on the top of the Ostomy Belt Reference Material: OstomyVacTM Service Procedure brochure End Result is a silicone appliance with a new adhesive disc and cotton membrane ****NEW USERS GO TO STEP 5 **** STEP 4 REMOVE OSTOMYVACTM FROM THE BODY STEP 5 CLEAN PERISTOMAL SKIN AREA STEP 6 ATTACH OSTOMYVACTM TO BODY STEP 7 PUT ON OSTOMY BELT STEP 8 CONNECT LIQUID SEPERATOR STEP 9 INSTALL BATTERY STEP 10 SECURE OVAC IN OSTOMY BELT POCKET Remove Belt and Disconnect Liquid Separator from OstomyVacTM Peel back silicone appliance from body Users may wish to use an adhesive remover Put items aside and remove battery for later charging Inspect peristomal skin and discontinue use if irritation or ulceration is present Clean peristomal skin area using an anti-microbial cleanser and then pat dry Some users may choose to apply a no-sting skin barrier (Cavilon or equivalent) Vacuum tube orientation shall be horizontal to body, facing towards belly button Align OstomyVacTM opening with stoma and lightly press device against body Align OstomyVacTM with center of hole in Ostomy Belt Ensure pockets are accessible from the outside Tighten velcro strap First, connect OsomtyVacTM to liquid separator Second, connect Ovac to liquid separator Connectors shall be twisted clockwise until hand tight Assure lamp illuminates for 2 seconds, confirming full battery charge Depress inner and outer edges of OstomyVacTM until Ovac ceases to vibrate confirming vacuum seal integrity Slide Ovac into belt pocket OstomyVacTMUser’s Manual 13 | Page OSTO INNOVATIONS Change Your Life STEP 1 OPEN ACCESS DOOR ON OVAC STEP 2 REMOVE BATTERY STEP 3 DAILY BATTERY REPLACEMENT INSTALL FULLY CHARGED BATTERY Reference Section 6.3 for battery charging Verify POSITIVE “+” side is facing down! Very Important! STEP 4 6.2 REINSTALL ACCESS DOOR Push in door until an audible ‘click’ is heard Make sure door is completely closed 6.3 US Patent Number 8,454,568 Holding Ovac in one hand Using battery extraction tool Pry battery out of battery holder using extraction tool BATTERY CHARGING GENERAL CHARGING INFORMATION STEP 1 PLUG CHARGER INTO WALL OUTLET STEP 2 PLACE ‘EMPTY’ BATTERY INTO CHARGER OstomyVacTM kit includes 4 batteries: From left to right: Ovac, Charger, Spare*, Spare* Two batteries in use, rotating between the Ovac & charger *SPARE: Properly dispose of battery when battery life is significantly reduced and replenish with spare battery. STEP 3 REMOVE FULLY CHARGED BATTERY & INSTALL IN OVAC Flip up plug-in terminals on charger and plug charger into a 115 volt receptacle Green POWER light on charger is ON (STATUS light will be OFF) VERY IMPORTANT: Insert battery with Positive (+) side up While the battery is charging the yellow STATUS light is ON Battery Full = STATUS light is OFF and green POWER lights is ON To remove the battery, pry the metal clip holding the battery away from the battery and battery will pop out of charger Battery is ready for use in Ovac OstomyVacTMUser’s Manual 14 | Page OSTO INNOVATIONS Change Your Life US Patent Number 8,454,568 GENERAL EXTENSION TUBE FUNCTIONALITY STEP 1 DISCONNECT VACUUM LINE BETWEEN OVAC AND OSTOMYVACTM STEP 2 CONNECT OSTOMYVACTM TO TETHER STEP 3 6.4 CONNECTING YOUR TETHER FOR BATHING CONNECT TETHER TO OVAC Provides for greater distance between the OstomyVacTM and Ovac Box Do not remove OstomyVacTM from body to install tether Untwist connector to separate OstomyVacTM and Ovac. *Note: Ovac will run (including vibration motor) while the tubes are disconnected. Ovac will turn off once connectors are reconnected and the vacuum level has been restored. Connect end of tether to corresponding OstomyVacTM connector Connect free end of tether to Ovac Now the Ovac can be remotely located up to 6 feet away from the user 6.5 CONNECTING YOUR DRYBOX FOR SHOWERING AND SWIMMING GENERAL DRYBOX FUNCTIONALITY Allows users to shower, swim and scuba dive while wearing their OstomyVacTM. Box is modified specifically for Ovac integration. Can be used in water up to 100 feet. Refer to Users Instructions contained within the drybox. Do not remove OstomyVacTM from body to install drybox HELPFUL TIP: Pinching off Ovac vacuum line will keep the Ovac from running during this operation. STEP 1 STEP 2 Connect end of tether to corresponding OstomyVacTM connector CONNECT TETHER TO DRYBOX Connect free end of tether to Drybox connector. * Unpinch vacuum line if it has been pinched off. Place Ovac inside of drybox. Connect Ovac to drybox connector. Place connectors on top of Ovac and close drybox. Snap shut to lock. Verify the tubes are not pinched in the inside the drybox. STEP 4 CONNECT OSTOMYVACTM TO TETHER STEP 3 Untwist connector to separate OstomyVacTM and Ovac. *Note: Ovac will run (including vibration motor) while the tubes are disconnected. Ovac will turn off once connectors are reconnected and the vacuum level has been restored. DISCONNECT VACUUM LINE BETWEEN OVAC AND OSTOMYVACTM CONNECT DRYBOX TO OVAC OstomyVacTMUser’s Manual 15 | Page OSTO INNOVATIONS Change Your Life US Patent Number 8,454,568 7.0 DAILY ACTIVITIES 7.1 SHOWERING There are two options available for protecting the OvacTM from water damage during showering. The first option is to hang the OvacTM by its tether out of direct contact with water (refer to Section 6.4 for tether installation instructions). The second option is to enclose the OvacTM in the water-tight Drybox and let it lay on the shower floor (refer to Section 6.5 for Drybox installation instructions). This option allows the user more mobility during showering. After showering is an ideal time to do the daily battery replacement to maximize battery life. 7.2 BATHING While bathing, the user should connect the tether so as to keep the OvacTM out of direct contact with water. Refer to Section 6.4 for tether installation instructions. After bathing is an ideal time to do the daily battery replacement to maximize battery life. 7.3 SWIMMING The Drybox shall be used whenever the user is swimming so as to protect the OvacTM from water damage. Refer to Section 6.5 for Drybox installation instructions. Before swimming in public pools, confirm below, to maintain hygiene at pool, protecting all. 1.) Correct Battery use, Section 5.4. 2.) OstomyVacTM has a good seal against the body. If a good seal has not been achieved, the user can expect the vibration motor to turn on. Section 6.7.3 OstomyVacTMUser’s Manual 16 | Page OSTO INNOVATIONS Change Your Life US Patent Number 8,454,568 If while swimming, the user notices a breach in the seal, the user should place their hand on the OstomyVacTM (securing it in place) and exit the pool. Osto Innovations is not liable for any contamination to a public or private swimming pool. 7.4 SLEEPING The user will determine their individual preference as to what the best configuration is for sleeping. A pouch cover or belt is preferred since they provide secure attachment of the OvacTM to the body. The user may also allow the OvacTM to merely reside in bed since damage will not occur to the plastic case if slept on top of. There is slight risk of pulling the OstomyVacTM from the body using this configuration which would result in leakage. OstomyVacTMUser’s Manual 17 | Page OSTO INNOVATIONS Change Your Life US Patent Number 8,454,568 8.0 SECURING YOUR OVACTM There are several options available for securing your OvacTM during bathing, showering, swimming, along with normal use. Accessories such as pouch covers, belts and a drybox allow for use of the OstomyVacTM during these activities. 8.1 POUCH COVER The pouch cover is made from high quality, durable fabrics and serves the dual purpose of adding stylish accent while securing the OvacTM. The pouch cover can be purchased from C&S Ostomy Pouch Covers. Upon ordering, be sure to order the pouch cover designated for Osto Innovations. C&S Ostomy Pouch Covers www.cspouchcovers.com 941-429-8030 8.2 BELT A large-width cotton-spandex belt is available to enhance OstomyVacTM security while providing a pocket to hold the OvacTM. The large width helps to prevent skin folds and is not visible through loose-fitting clothing. Belts can be purchased directly from Osto Innovations. OstomyVacTMUser’s Manual 18 | Page OSTO INNOVATIONS Change Your Life US Patent Number 8,454,568 FIX FIX FIX FIX FIX FIX BREAKDOWN OF ADHESIVE COMPROMISES VACUUM SEAL OVAC VACUUM LINE HAS BEEN YANKED OUT OF OVAC BLACK BOX. OstomyVacTMUser’s Manual FIX OVAC HAS BEEN PERMANENTLY DAMAGED REQUEST RMA # FROM OSTO INNOVATIONS. RETURN DAMAGED UNIT FOR REPLACEMENT. IN THE MEANTIME, OPERATION IS WITH ONLY 1 OVAC. CAUSE REMOVE OVAC AND REPLACE WITH SPARE. ALLOW WET UNIT TO DRY OUT FOR 24hrs CAUSE MOISTURE (WATER) HAS ENTERED THE OVAC CAUSE BATTERY IS ‘EMPTY’ REMOVE ‘EMPTY’ BATTERY AND PUT IN CHARGER. REPLACE WITH FULLY CHARGED BATTERY CAUSE CAUSE VACUUM LINE HAS DISENGAGED FROM OVAC REMOVE OSTOMYVACTM AND REPLACE WITH A FRESHLY PREPARED UNIT CAUSE OVAC DOES NOT START UP, EVEN WITH A NEW BATTERY REMOVE ADHESIVE DISC AND COTTON MEMBRANE AND REPLACE WITH NEW VACUUM IS NOT ESTABLISHED B/C ADHSIVE DISC & COTTON MEMBRANE ARE INSTALLED INCORRECTLY FIX 7 OVAC MAKES A ‘SPITTING’ OR ‘SPUTTERING’ NOISE PRESS DOWN, AROUND THE INNER & OUTER SEALS UNTIL VIBE MOTOR TURNS OFF INNER or OUTER SEALS ARE NOT PROPERLY SEALED AGAINST THE SKIN CAUSE 1 HEARTBEAT (LAMP ON OVAC) IS NOT BLINKING EVERY 10 SECONDS REMOVE ‘EMPTY’ BATTERY AND PUT IN CHARGER. REPLACE WITH FULLY CHARGED BATTERY BATTERY IS NOT FULL AND DOES NOT MEET REQUIREMENT FOR OPERATION CAUSE 6 SYMPTON 5 SYMPTON 1 SYMPTON 4 ONCE IN OPERATION, THE PUMP (OVAC) TURNS ON FREQUENTLY OR CONTINUOUSLY SYMPTON 3 PUMP AND VIBE MOTOR RUN CONTINOUSLY ON START UP SYMPTON 2 LAMP (OVAC) DOES NOT ILLUMINATE FOR 2 SECONDS UPON START UP SYMPTON 1 SYMPTON 9.0 TROUBLESHOOTING FIRMLY PUSH OVAC VACUUM LINE BACK INTO THE PLASTIC BOX. 19 | Page OSTO INNOVATIONS Change Your Life US Patent Number 8,454,568 10.0 WARRANTY STATEMENT Osto Innovations LLC warrants all products to be free of defects in material and workmanship of OstomyVac™ (Appliance) and/or OvacTM (Vacuum Pump) for a period of one year commencing from date of shipment. Osto Innovations will issue a Return Material Authorization (RMA) Number to any user who wishes to return defective products for warranty consideration. An RMA number must be issued before any materials are returned. Warranty consideration is subject to review of returned items (see Limitations and Exclusions) and application of warranty is to be determined by Osto Innovations, LLC, in its sole discretion. Osto Innovations, LLC, reserves the right to make design changes in appliance and accessories, without incurring obligation to incorporate these changes in products previously shipped. At original purchaser’s discretion items determined to be defective will be subject to either: 1. A refund of the purchase price (minus a 10% restocking fee) or, 2. Replacement of defective parts with new materials (the original warranty expiration date will remain in force). Replacements are shipped at the expense of Osto Innovations, LLC. SATISFACTION GUARANTEE Osto Innovations, LLC, guarantees customer satisfaction. If for any reason (see Limitations and Exclusions) the user is not completely satisfied with our products: OstomyVacTMUser’s Manual 20 | Page OSTO INNOVATIONS Change Your Life US Patent Number 8,454,568 OstomyVac™ (Appliance) and/or OvacTM (Vacuum Pump), they may be returned within 60 days of the date of shipment for a full refund (minus a 10% restocking fee). LIMIATIONAS AND EXCLUSIONS User neglect, user modification, and mishandling nullify any consideration for refund. LIABILITY WAIVER Osto Innovations, LLC is not liable for any injury or loss that occurs because this product is used other than is intended or without consultation with a medical professional. RETURN INSTRUCTIONS 1. For safety and health reasons please return all used OstomyVac™ appliances in sealed zip lock bags. 2. For warranty consideration or refund, please ship items in original boxes (if possible) to: Osto Innovations, LLC. 2633 Lantana Road, Building 1301 /Suite 46 Lantana, Florida 33462. 3. Shipping costs of returned materials are the customer’s responsibility. We recommend returns be shipped via UPS or Fed Ex, with an assigned tracking number, to validate receipt. Ensure RMA number is documented somewhere ON or IN the package. Please allow 5 business days for warranty consideration and notification (by phone, email, or mail). OstomyVacTMUser’s Manual 21 | Page