1
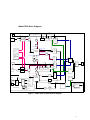
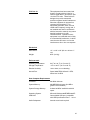
MODEL 3540 VERSION 2 TELEPHONE NETWORK EMULATOR AND VOICEBAND ANALYZER User's Manual Revision 2.1 May 2004 © 2004 Rochelle Communications, Inc. P.O. Box 141189, Austin, Texas, 78714 USA Telephone: 512.339.8188 Web Site: www.rochelle.com E-mail: [email protected] Document Number 3750121 TABLE OF CONTENTS Table of Contents................................................................................................................ 2 Shipping Box Contents ....................................................................................................... 3 Model 3540 Product Information........................................................................................ 3 Safety Instructions .......................................................................................................... 3 Product Warranty ............................................................................................................ 4 Warranty Service ............................................................................................................ 4 Calibration Service.......................................................................................................... 5 Customer Service Contact Information .......................................................................... 5 Model 3540 Hardware Description..................................................................................... 6 Hardware Introduction ................................................................................................ 6 Power .......................................................................................................................... 6 Computer Connection ................................................................................................. 6 Front Panel Description .............................................................................................. 6 Rear Panel Description ............................................................................................... 6 Model 3540 Block Diagram........................................................................................ 7 Model 3540 Software Description ...................................................................................... 8 Software Introduction ..................................................................................................... 8 Application Software Installation ................................................................................... 8 Software Driver Installation............................................................................................ 9 Running the win3540 application ................................................................................. 12 CO / Caller ID Configuration ................................................................................... 13 Function Tabs............................................................................................................ 15 CO / Caller ID Setup................................................................................................. 15 SMS .......................................................................................................................... 18 Measurements ........................................................................................................... 21 Network Emulation................................................................................................... 31 Monitor ..................................................................................................................... 33 Script ......................................................................................................................... 34 System....................................................................................................................... 35 Script Commands.......................................................................................................... 36 Model 3540 Specifications ........................................................................................... 44 Appendix 1: SMS Timing Parameters .......................................................................... 49 Appendix 2: Options ..................................................................................................... 51 Handset Emulation Option........................................................................................ 51 PESQ......................................................................................................................... 52 2 SHIPPING BOX CONTENTS Each Model 3540 Telephone Network Emulator and Voiceband Analyzer includes: • Model 3540 • User’s Manual • CD with the Win3540 Application Software • Power Cable • Two Telephone Cables with RJ-11 connectors • One USB Cable (A Male to B Male) • Certificate of Calibration • Warranty Registration Form MODEL 3540 PRODUCT INFORMATION Safety Instructions 1. Read and follow all warning notices and instructions marked on the product or packaging and included in this manual. 2. The Model 3540 should not be operated in environments where the ambient temperature exceeds 50° C (122° F). Care should also be given to ensure that adequate air circulation is available for the Model 3540. 3. The Model 3540 is designed for indoor use only. Extreme temperature or other outdoor conditions (rain and moisture) can damage the system. 4. Input AC power to the Model 3540 must be within 100 Vac to 250 Vac, and 50 Hz to 60 Hz. Higher voltages will damage the unit. 5. Equipment grounding is vital to ensure safe operation of the Model 3540. Do not connect the power cord to an AC receptacle that is not properly grounded. 6. The Model 3540 is designed to test standard telephone voltages and currents. Do not connect Channel A or Channel B to higher voltages or currents. 7. The case should not be opened for any reason. The Model 3540 contains no customer serviceable parts. Refer all servicing to Rochelle Communications or an Authorized Rochelle Distributor, Dealer, or Agent. 3 Product Warranty • Rochelle Communications, Inc. warrants that the Model 3540 Telephone Network Emulator and Voiceband Analyzer will be free from defects in material and workmanship under normal installation for a period of one year from the original date of purchase. • The obligation of Rochelle under this warranty shall be limited to repair or replacement (at our option) during the warranty period. Any part, which proves to be defective in material workmanship under normal installation, use, or service, is covered under the warranty, provided the product is returned to an Authorized Rochelle Distributor, Dealer, or Agent. Note: Transportation or Shipping Charges are not the responsibility of Rochelle Communications, Inc. • The above warranty shall not apply to defects resulting from misuse, neglect, accident, destruction, alteration of the serial number, operation outside of the product environmental specifications, improper electrical voltages or currents, unauthorized modifications, or repair, alteration, or maintenance by any person other than Rochelle or an Authorized Rochelle Distributor, Dealer, or Agent. • This warranty is in lieu of all other expressed warranties, obligations, or liabilities. Rochelle makes no expressed or implied warranties regarding the quality, merchantability, or fitness for a particular purpose beyond those that appear in this manual. • In no event will Rochelle be liable for any special, incidental, consequential or punitive damages for breach of this warranty, expressed or implied, including, but not limited to, loss of profits or damages to business or business relations. Warranty Service • The Model 3540 must be returned to Rochelle or to an Authorized Rochelle Distributor, Dealer, or Agent for warranty service. • A Return Material Authorization (RMA) number must be obtained from our Product Service Department at [email protected] before returning the Model 3540. • Customer shall prepay shipping charges for products returned to Rochelle for warranty service. Rochelle shall pay shipping charges for the return of the serviced products to the customer. However, Rochelle cannot assume liability for duties and taxes for products returned to customers located outside the USA. • Ship all product returns to: Rochelle Communications, Inc. Attn: Product Service Department 8906 Wall Street, Suite 205 Austin, Texas 78754 USA • Out-of-Warranty repair rates are available from our Product Service Department. Repair charges are based on the repair rate at the time of the return. • Rochelle will either repair or replace (at its option) a defective product not covered under warranty. 4 • The warranty on a serviced product is 90 days, starting at the date of service. Calibration Service • Rochelle Communications, Inc. recommends that the Model 3540 be calibrated on a regular interval of one year. Please refer to the Certificate of Calibration to determine the recommended date of the next calibration. • When the Model 3540 is due for calibration, please contact Rochelle or an Authorized Rochelle Distributor, Dealer, or Agent. Calibration charges are available upon request from the Product Service Department. Customer Service Contact Information Telephone +1 512.339.8188 (8:30AM to 5:30PM CST Monday - Friday) Fax +1 512.339.1299 E-mail [email protected] 5 MODEL 3540 HARDWARE DESCRIPTION Hardware Introduction The Model 3540 is a desktop instrument to be used in laboratory and production areas for testing Caller ID and SMS-based network equipment and terminal equipment. Power The Model 3540 is powered by 100 Vac to 240 Vac (50 Hz to 60 Hz) input. Use the appropriate power cable and follow standard safety procedures for connecting the Model 3540 to an AC receptacle. Computer Connection The Model 3540 connects to a host computer running by WindowsTM 98SE/2000/ME/XP via a USB connection. A USB cable is included with the product. Front Panel Description • Two RJ-11 Modular Jacks: Referred to as Channel A and Channel B. These are the access ports to devices under test. • Volume Control Knob: Used to set the volume of the monitored audio on the speaker or on the headphone jack. • Headphone Jack: Used for external headphones. Inserting a headphone jack will mute the speaker audio. • Power On LED: Indicates the Model 3540 is turned on. • USB Link LED: Indicates the USB link is active. Rear Panel Description • The AC Power Receptacle: To be connected only to 100 Vac to 240 VAC (50 Hz to 60 Hz). • Power Switch: Turns the Model 3540 on and off. • Fan: Keep the area behind the fan clear for at least 4 inches (10 cm). • USB Port: Connects to the host computer. 6 Model 3540 Block Diagram CH. A HI-Z CH. A TX Hi-Z TE (FXO) CH. A TX Channel A DTMF RCV 2/4 FSK RCV DSP DELAY CO (FXS) CH. A RX USB AUDIO IN (LEFT) ATTN LOCAL ECHO FSK, 4 TONE GEN. CO BATTERY (-15V TO -48VDC) CH. A RX NOISE SUMMING AMPLIFIER WHITE NOISE GEN. ATTN USB AUDIO (L) ATTN RINGING GENERATOR (15V TO 100V RMS) FAR END ECHO CH. B TX ATTN DELAY USB AUDIO OUT (LEFT) ATTN CH. B HI-Z Hi-Z CO (FXS) Channel B CH. B TX DELAY 2/4 DTMF RCV FSK RCV USB UART ATTN CH. B RX NEAR END ECHO USB AUDIO (R) CH. B RX VOL. CTRL ATTN SPKR CH. A TX CH. A HI-Z USB UART NOISE CH. A RX ATTN CH. A TX ATTN CH. B TX CH. B HI-Z USB AUDIO OUT (R) MUTE 5V CONTROLLER USB AUDIO OUT (L) AUDIO MONITOR USB AUDIO OUT (RIGHT) SUMMING AMPLIFIER MUX USB PORT DSP FSK, 4 TONE GEN. TE (FXO) AGC AND AMP. 4-PORT USB HUB USB AUDIO IN (RIGHT) CH. B TX H.P. USB AUDIO PROCESSOR FAR END ECHO ATTN 12V -12V SWITCHING PSU AC IN 100V - 240V DELAY POWER SUPPLY UNIT Figure 1 - Model 3540 Functional Block Diagram 7 MODEL 3540 SOFTWARE DESCRIPTION Software Introduction The Model 3540 ships with Win3540, a Windows-based application program, that provides menu-driven access to all Model 3540 functions. Win3540 is designed for operation under WindowsTM 98SE, XP, ME, and 2000. We recommend a computer with 500 MHz (or better) and a minimum of 256 MB RAM Application Software Installation Before installing the win3540 application, we recommend that you first save all work and close all other applications. We also recommend you install win3540 on your PC before you connect the Model 3540 to the host computer. Please follow the following steps in the order given below: • Insert the win3540 CD into the CD-Rom drive of the host computer. • The win3540 installation will start automatically if Autoplay is enabled on the computer, • If Autoplay is not enabled, click on the Start button, then select Run and type x:\setup.exe, where "x" is the letter for the CD drive ("D" on most computers). • The Setup program will then display the following InstallShield Wizard (note: your screen may appear slightly different depending on your version Windows). • Check the appropriate boxes and click the Finish button to complete the win3540 installation. • Leave the CD in the CD-drive for the installation of the software drivers. 8 Software Driver Installation The Model 3540 requires two software drivers for proper operation. Please follow the following steps in the order given below: • The win3540 CD should still be in the CD drive from the Software Application Installation. If not, insert the win3540 CD in the CD-ROM drive. • Using proper safety procedures, connect the power cable from the Model 3540 to an AC power outlet with 100 to 250 Vac. • Connect the USB cable from the Model 3540 to the host computer. • Turn on the Model 3540. A Green LED should illuminate on the front panel. • Click on the Windows • Select Settings, Control Panel, and System. You should see the following screen (or a similar screen, depending on your operating system): • Click on Device Manager. You should see the following screen (or a similar screen, depending on your operating system): button. 9 • Right Click on Universal Serial Bus Controllers and select Scan for hardware changes. You should see the following (or a similar) screen: • Select Install the software automatically (Recommended) and click on the Next button. Click on Next and then Finish on the following screens: 10 This completes the installation of the FTDI FT8U2XX Device driver. • The New Hardware Wizard should now display the following screen: 11 • Select Install the software automatically (Recommended) and click on the Next button. Click Next on the two screens while the New Hardware Wizard finds and installs the driver, then click Finish on the last screen: This completes the installation of the FTDI FT8U2XX Device driver. Note: Advanced users may elect to find the software drivers manually. They are located in the \Temp\drivers directory on the Model 3540 CD. Please contact Rochelle Technical Service at [email protected] if you have any difficulty installing the win3540 software. Running the win3540 application To run the win3540 application program, double-click the “Rochelle win3540” icon on the computer desktop, or click on the Windows Start button, then select Run and type in Rochelle win3540. The first time you run the program, you will see the following screen: Once the Model 3540 completes its initialization, you will see the CO /Caller ID Setup screen on the following page and will be ready to use your Model. Note: The Model 3540 initially defaults to Australia as the country. Set the Country option appropriately. The Model 3540 will then default to the selected country. 12 CO / Caller ID Configuration The Model 3540 software defaults to the following CO / Caller ID Configuration screen: CO Setup Screen Note there are eight tabs at the top of the screen. These tabs represent the primary functions of the Model 3540 and will be discussed below in greater detail. Note there are five groups of icons at the bottom of the screen. These groups of icons represent configurations that are common to all Model 3540 functions. These icons remain visible at all times. Following is a description of each configuration: Channel A and Channel B FXS: Click on the Channel A or B FXS icon to select FXS (Central Office), and to set the source impedance as 600 Ohms or CTR21 . FXO: Click on the Channel A or B FXO icon to select FXO (Terminal Equipment) and go on-hook or off-hook . If the FXO port is off-hook, you may enter a number and click . Note: The FXO impedance is fixed as 600 Ohms. Handset Emulation Option: You will see the icon if your Model 3540 is configured with the Handset Emulation option on either or both FXO channels. See Appendix 2: Options for more information on the Handset Emulation Option. 13 USB Port The USB Port icons indicate the status of the USB connection to the host computer. USP Port Active USP Port Inactive Clicking on either icon will bring up a screen that lists of all Model 3540's that are connected to the USB port. Click OK to connect to the Model 3540 listed. Device ID Screen Speaker The Speaker icons indicate the status of the front panel speaker and headphone jack. Click on the speaker icon to mute and un-mute the speaker. Speaker On Speaker Off Click on the pull-down menu to change the source of the audio for the speaker. Monitor Audio Screen Quick Record Quick Record allows you to quickly record audio from any Model 3540 screen. Click the button to start recording to the file specified under the Audio function tab. Recording will stop after the duration specified under the Audio function tab, or Click the button to stop recording earlier. See more information under the Audio function tab description. 14 Function Tabs There are seven function tabs in the Model 3540. These functions are discussed in detail on the following pages. CO / Caller ID Config. SMS Measurements Audio Network Emulation Monitor Script System Allows setup of the Central Office simulator (and Caller ID) Allows setup of the SMS function Allows access to the test and measurement functions Allows recording and/or playback of audio Allows analog network emulation between channels A & B Allows monitoring of key Model 3540 events Allows loading, editing, running, and saving of scripts Shows the Model 3540 system configuration CO / Caller ID Setup The CO / Caller ID Setup function tab allows configuration from the following screen of the Model 3540's internal Central Office (CO) simulator and Caller ID generator: CO / Caller ID Function The Country pull-down menu allows selection of countries that are pre-defined in the Model 3540. Selecting a specific county will set all CO and Caller ID configurations accordingly. The last option under the pull-down menu is User-Defined which lets you save and/or load a file with user-defined CO and Caller ID settings. The CO / Caller ID Configuration directory tree allows viewing and modifying of to access the specific CO and Caller ID parameters. Click the Folder icons parameters (the above screen shows the folders opened). For directory items with an , double click on the desired selection. Type in the desired value for other Arrow icon directory items. Appropriate limits may apply to the range of input values. Note: Units of Measurement allows changing the Units from dBm to dBV and back. These units are then used in all Model 3540 functions. 15 dBm means "dBm across a termination impedance of 600 Ohms." Use dBm when channel A or B is set to FXS: 600 Ohms or when channel A or B is set to FXO. dBV means "dB in relation to 1 Vrms" and is not dependant on termination impedance. Use dBV when channel A or B is set to FXS: CTR21. Changes in the directory tree will immediately affect CO / Caller ID settings, though to save those settings for future use, click the Save Settings button, and create a UserDefined .xml file. The country-specific .xml files are read only and cannot be changed. For the Caller ID Type section: Select Type I or Type II Caller ID Select Single Message or Multiple Message For the Caller ID Data section: Enter the appropriate Date and Time. Enter the appropriate Calling Number: You may also check the Reason for Number Absence box and select the appropriate reason for no number. Enter the appropriate Calling Name: You may also check the Reason for Number Absence box and select the appropriate reason for no name. For DTMF Caller ID, enter the appropriate Start Character and Stop Character. For the Advanced Parameters section, the parameters vary depending on the country and the type of Caller ID that is selected. Select the appropriate parameter from the pulldown menus. Enter an appropriate value to the right of each parameter. The parameters and their values are based on appropriate international and national Caller ID standards. The Message box displays the characters that are generated by the Model 3540 after clicking the Send Chan A or Send Chan B button. Characters displayed within angle brackets, e.g. <5E>, are hex values. Other characters are alphanumeric. Click the Save Settings button to save the displayed CO and Caller ID configuration to a User-Defined file. The User-Defined file is then accessible under the country menu. If the channel is configured as FXS, click the Send Channel A or Send Channel B button to send a Caller ID signal to the appropriate channel with the configuration specified on the CO Setup screen. If the channel is configured as FXO, click the Receive Channel A or Receive Channel B button to receive Caller ID signal on the appropriate channel with the configuration specified on the CO Setup screen. You will see a Script Executing screen while the Caller ID message is transmitted. The software converts the information on the CO Setup screen to a Rochelle script and then executes the script. Go to the Script function tab to look at the executed script. If you select a country with FSK Caller ID, then checking the FSK Impairments box and clicking the FSK Impairments button will bring up the following screen. 16 FSK Impairments Screen Select and enter the appropriate FSK impairments. Note: Twist type refers to three methods of defining twist. See the appropriate telephony standard for more information (or use the default twist setting). Note: Delay and Attenuation will create a copy of the transmitted FSK signal that is shifted in time and amplitude. The delay of the second Echo is in reference to the first. Click on the OK button to accept the changes and return to the previous screen, or click on the Cancel button to return to the previous screen without accepting the changes. DTMF Impairments If you select a country with DTMF Caller ID, then checking the DTMF Impairments box and clicking the DTMF Impairments button will bring up a screen (not shown) that allows you to change the levels of the DTMF tones. Enter the levels for the upper lower tones of each DTMF digit. Enter the deviation in Hertz for each DTMF digit from its standard value. Click on the OK button to accept the changes and return to the previous screen, or click on the Cancel button to return to the previous screen without accepting the changes. Click Reset to Defaults to reset the DTMF levels to their default values. 17 SMS The SMS function tab allows configuration of the SMS function from the following screen: SMS Function Tab Note: All of the CO and Caller ID configurations from the CO/ Caller ID Configuration screen are still in effect while sending or receiving SMS. The Country pull-down menu allows selection of countries that are predefined for SMS in the Model 3540. Selecting a specific county will set all SMS configurations accordingly, but will not change the country-specific configurations in the CO/Caller ID screen. Select Send Messages or Receive Messages to send or receive SMS messages. For the Country Setup section: Enter the appropriate number in the Number SC to TE message box from the SC (SMS Service Center) to the TE (Terminal Equipment). Enter the appropriate number in the Number TE to SC message box from the TE (Terminal Equipment) to the SC (SMS Service Center). Click the Set Numbers as Defaults button to save the Country Setup numbers as the defaults for the SMS country selected. For the Service Center (SC) section: Enter the appropriate Type of address Enter the appropriate Sender Number. This number is used instead of the Calling Number selected on the CO Setup screen. 18 Enter the appropriate Sub or Sub-address for a Short Message (SM) to a Short Message Entity (SME) connected to the line. Enter the appropriate Delivery Mode. Acceptable values are 0 to 9 as follows: 0: The TE will accept the call, but return an error message 1: The TE will accept the call, but not return an error message 2-9: The TE will not accept the call For the Timestamp section, enter the appropriate time and date stamp. For the Advanced Parameters section, the parameters vary depending on the country and the type of Caller ID that is selected. Select the appropriate parameter from the pulldown menus. Enter an appropriate value to the right of each parameter. The parameters and their values are based on appropriate international and national SMS standards. The SMS Message box displays the characters that are generated by the Model 3540 after pressing the Send Channel A or Send Channel B button. Characters displayed within angle brackets, e.g. <5E>, are hex values; other characters are alphanumeric. The Chars box displays the number of characters in the SMS Message (and associated SMS Header bits). The number will be displayed in red if the total number of characters exceeds 255 Octets. For the Timing section, the parameters vary depending on whether Sending Messages or Receiving Messages is selected. The parameters also vary depending on the country that is selected. Enter an appropriate value to the right of each parameter. See Appendix: SMS Parameters in this manual for a list of SMS parameters and their permissible values. Click the Send Channel A or Send Channel B button to send an SMS signal to the appropriate channel with the configuration specified on the CO Setup screen. Click the Receive Channel A or Receive Channel B button to receive an SMS signal to the appropriate channel with the configuration specified on the CO Setup screen. Check the FSK Impairments box and click the FSK Impairments button to impair the SMS signal generated by the Model 3540. See the section on FSK Impairments under the CO / Caller ID Setup function tab for more information on FSK Impairments. You will see a Script Executing screen while the Caller ID message is transmitted. The Model 3540 converts the information on the CO Setup screen to a Rochelle script and then executes the script. Go to the Script function tab to look at the executed script. Click the Call Progress button to display the Call Progress screen: 19 Call Progress Screen The Call Progress screen displays the sequence of events during the SMS transmission. The left-hand column lists timestamps in milliseconds for each event, where 0000 is the time the Send Channel A or Send Channel B button was pressed. The right-hand column displays the event that corresponds to the timestamp. If the event is a recognized SMS message, then the type of message is displayed. If the event is DTMF or FSK data, the <hex> and alphanumeric data is displayed. Click the Save button to save the call progress to a default file based on the date and time. The file name will then appear at the top of the Call Progress screen. Click on the X in the title bar to close the Call Progress screen 20 Measurements The Measurements function tab allows access to the test and measurement functions in the Model 3540. Each measurement screen displays a set of radio buttons for all the measurements on the left side of the screen. Each screen displays the selected measurement on the right side of the screen. Receive Signal Level Measurements Function Tab with Receive Signal Level This measurement calculates the RMS value of all signals within the bandwidth selected and displays the results in dBm. Select Channel A or Channel B for the measurement channel. Select 0 to 10000 Hz or Notch Filter for the measurement bandwidth. If you select Notch Filter, then enter the desired center frequency of the filter. Note the 3 dB points of the Notch filter are + 125 Hz. The Units of Measurement are based on the Country configuration. You may also select dBm (in relation to 600 Ohms), dBV or mV to display readings accordingly. The LED shows the measurement is continuous. 21 Speech Level Speech Level Screen This measurement calculates the Activity Level, Active Level, and Long-Term Level as per the ITU P.56 specification and displays the results with the appropriate units. Select Channel A or Channel B for the measurement channel. Enter the duration (in seconds) of the measurement. The Units of Measurement are based on the Country configuration. You may also select dBm (in relation to 600 Ohms), dBV or mV to display readings accordingly. to start the measurement. The Click progress. LED shows the measurement is in Click stopped. LED shows the measurement has to stop the measurement. The Once the measurement time has elapsed or the measurement is stopped, the screen will show: the % of the time duration that speech was detected, the short-term speech level, and the average speech level over the duration of the measurement. 22 Idle Channel Noise Level Idle Channel Noise Screen This measurement calculates the Idle Channel Noise in accordance with IEEE Standard 743-1995 and displays the results with the appropriate units. Select Channel A or Channel B for the measurement channel. Enter C-Message or D Filter as the noise filter type. Check the Enable 1010 Hz Holding Tone box and on Channel A or on Channel B to transmit a Holding Tone while measuring Noise. The Noise measurement will filter out the 1010 Hz filter before calculating the Noise level. Note: The speaker must be muted when measuring Noise with Holding Tone. The Units of Measurement are dBrnC if the C-message filter is selected, or dBrnD if the D-filter is selected The LED shows the measurement is continuous. 23 DTMF Analysis DTMF Analysis Screen This measurement decodes and analyzes the frequency, level, duration, and twist of received DTMF digits. A Pass/Fail condition for each analyzed digit is also determined. Select Channel A or Channel B for the measurement channel. Enter the appropriate Minimum and Maximum values for level, duration, timing, and twist. The following table displays the DTMF analysis results: DTMF Digit Low Freq Level High Freq Level Duration Interdigit Pass/Fail The received DTMF digit The frequency of the low tone in the DTMF digit The level of the low tone in the DTMF digit The frequency of the high tone in the DTMF digit The level of the high tone in the DTMF digit The duration of the DTMF digit The time in milliseconds since the last DTMF digit. Note: Interdigit time >4000 mS will be displayed as >4000. The Pass/Fail condition for the DTFM digit based on the Min/Max values set above the table The measurement is updated once per second. The Status box shows the progress. The Units of Measurement are based on the Country configuration. You may also select dBm (in relation to 600 Ohms), dBV or mV to display readings accordingly. The LED shows the measurement is continuous. Click analysis to a file. to save the DTMF 24 FSK and DTMF Decoding FSK Decoding Screen DTMF Decoding Screen These measurements decode and display the incoming FSK data or DTMF digits. Select Channel A or Channel B for the measurement channel. For FSK Decode, Select Hex or ASCII data display. Click the Clear button to clear the results boxes. The are continuous. LED shows the measurements 25 Frequency Sweep Frequency Sweep This function generates a sequence of reference tones on one channel and measures the receive level on the other channel. Select Channel A to Channel B or select Channel B to Channel A. Enter the Start and Stop frequency of the transmitted tone. Enter the Step size between tones. Enter the Level of the transmitted tone. The Units of Measurement are based on the Country configuration. You may also select dBm (in relation to 600 Ohms)or dBV (but not mV) to display readings accordingly. to start the measurement. The Click progress. LED shows the measurement is in Click stopped. LED shows the measurement has to stop the measurement. The Once the sweep has completed (or the measurement has been stopped), the screen will display a graph of the relative difference between the transmit and receive signal in dB. Move the cursor over the trace in the graph to see actual measured values. 26 Single Frequency Response Single Frequency Response The function generates a reference tone on one channel and measures the receive level on the other channel. Select Channel A to Channel B or select Channel B to Channel A. Enter the Frequency and Level of the transmitted tone. Enter the desired center frequency of the filter. Note the 3-dB points of the Notch filter are + 125 Hz, and the 10-dB points + 500 Hz Note: You may set the receive frequency different than the transmit frequency. The Units of Measurement are based on the Country configuration. You may also select dBm (in relation to 600 Ohms) or dBV (but not mV) to display readings accordingly. to start the measurement. The Click progress. LED shows the measurement is in Click stopped. LED shows the measurement has to stop the measurement. The 27 Generate DTMF or MF Generate DTMF of MF Screen This function generates DTMF or MF tones. Select Channel A or Channel B for the generation channel. Select DTMF, MF Type 1, MF Type 2 (Forward), or MF Type 2 (Backwards) Enter the appropriate levels for the high and low tone of each digit. Enter the appropriate digit duration, interdigit timing, and pause duration. Check White Noise to generate noise. Enter the appropriate level noise. Click on the keypad on the screen, or enter numbers in the message box. Check Repeat String to repeat the numbers in the message box The Units of Measurement are based on the Country configuration. You may also select dBm (in relation to 600 Ohms), dBV or mV to display readings accordingly. Click to send DTMF or MF. The Click to stop sending. The LED shows sending is in progress. LED shows sending has stopped. 28 Programmable Tones Programmable Tones Screen This function generates tones from either or both of two internal tone generators. Select Channel A or Channel B for the generation channel. Check the Tone Generator 1 box to generate the first tone. Enter the appropriate frequency and level for the first tone. Check the Tone Generator 2 box to generate the second tone. Enter the appropriate frequency and level for the second tone. Check the White Noise box to generate noise. Enter the appropriate level for the noise. Select Tone 1 + Tone 2 to sum the two tones. Select Tone 1 x Tones to modulate tone one with tone two. Check the Duration box to set the duration of the tones. Enter the appropriate duration in milliseconds. The Units of Measurement are based on the Country configuration. You may also select dBm (in relation to 600 Ohms), dBV or mV to display readings accordingly. to start the measurement. The Click progress. LED shows the measurement is in Click stopped. LED shows the measurement has to stop the measurement. The 29 Audio Audio Function Tab The Audio Record function permits recording of audio on either Channel A or Channel B, and saving the audio in a .wav file on the host computer. The Audio Playback function uses the sound card in the host computer to generate a .wav file that is then played over Channel A or Channel B of the Model 3540. To Record audio, select the source for the Left Stereo Channel, and the source for the Right Stereo Channel. Select the appropriate sampling rate, where the sampling rate is twice the highest frequency of interest. Enter the appropriate name for the audio file, or click on the Browse button to locate a directory and file. Enter the appropriate length of the recording. Press the button to start recording. The LED shows recording is in progress. ______________________________________________________________________ To play audio enter the appropriate name for the audio file, or click on the Browse button to locate a directory and file. Click Channel A to direct the Left Stereo Channel to the Model 3540 Channel A. Enter the appropriate level of the audio from the Model 3540 Channel A. Click Channel B to direct the Left Stereo Channel to the Model 3540 Channel B. Enter the appropriate level of the audio from the Model 3540 Channel B. Press the the button to start playing. The button to stop. The LED shows playback is in progress. Press LED shows playback has stopped. You may also play audio on one Model 3540 channel and simultaneously record audio on the other Model 3540 channel. Configure the record and playback channels and press the progress. button to start. The LED shows recording and playback is in 30 Network Emulation Network Emulation Function Tab The Network Emulation function allows the Model 3540 to act as a four-wire telephone network with the extension numbers defined in the port configurations. Check the Attenuation Ch A TX to Ch B RX or Attenuation Ch A TX to Ch B RX box to set the one-way attenuation from one channel to the other. Enter the appropriate value of attenuation. If the box is not checked, then the attenuation will be >50 dB. is signal reflected back into a channel by an impedance mismatch. Return Loss Check the Return Loss box to set return loss on Channel A or B, and then enter the appropriate value. is noise heard on the selected channel. Check the Noise box on channel A Noise or B, and then enter the appropriate value of Noise. is echo on the same channel as the transmitted signal. Check the Talker Echo Talker Echo box to set the talker echo on Channel A or B, and then enter the appropriate value of talker echo. Listener Echo is echo on the opposite channel as the transmitted signal. Check the Listener Echo box to set the listener echo on Channel A or B, and then enter the 31 appropriate value of listener echo. If an Echo is selected, then enter the Echo Delay. Note the same delay applies to all the echoes. Note: Network Simulation is only designed to work with both channels configured as FXS and with the same impedance (either 600 Ohms or CTR21). Network Simulation is also designed to work with Terminal Equipment (e.g. Modems or telephones) that are off-hook. Using the Network Simulation on an unterminated channel or with TE devices that are on-hook may cause "singing echo" between the two channels. Extension Numbers: Channel A has a default extension number of 101. Channel B has a default extension number of 102. You may change either extension number by typing a new number in the appropriate box. If you connect a telephone to Channel A and another telephone to Channel B, you may dial from channel A to channel B by picking up telephone A and dialing the extension number of telephone B. You may not dial from Channel B to Channel A. An example of using the Network Emulation function for testing a telephone set with "Golden Telephone" (a unit that has been tested and calibrated) is as follows: Configure the CO / Caller ID function tab as desired. Set up the Network Simulation function tab as desired. Connect a "Telephone Under Test" to Channel A and the "Golden Telephone" to Channel B. Using the Telephone Under Test, dial the Extension (Ext.) listed for Channel B. The Golden Telephone connected to channel B should now ring. Go off hook with the Golden Telephone and verify it can receive signals from the Telephone Under Test. Select different network impairments, and verify the two telephones can still communicate under impaired network condition. Note: The Network Simulation settings are disabled when leaving the Network Simulation screen and before going to any other screen (e.g. Measurements). 32 Monitor Monitor Function Tab The Monitor function allows monitoring events in the Model 3540. Click the Clear button to clear the screen. Click the Save As button to save the displayed script with a new file name. Click the Filter button to filter the monitored events as follows: . Make the appropriate selections and Click the OK button to filter the selected events. 33 Script Script Function Tab The Script function allows loading, editing, running, and saving of Rochelle scripts. Click the Load button to load an existing script file. Click the New button to clear the existing screen and create a new script file. Click the Save button to save the displayed script with the current file name. Click the Save As button to save the displayed script with a new file name. Click the Run button to run the displayed script. Click the Checksum button to calculate the Checksum for the displayed script. The checksum in helpful in comparing two script files. Anytime you press the Send Channel A or Send Channel B button on the CO Setup or SMS function tab, a script is automatically created and displayed on the Script screen. See the Script Command section of this manual for a listing of script commands. 34 System System Function Tab The System function tab shows all current hardware and software information for the Model 3540. 35 Script Commands General Syntax 9 9 9 9 9 Only one command per line Blank lines are allowed Tabs and additional spaces are ignored Text following a ‘*’ is a comment Command are case-insensitive Setting and Control commands chan_seizure Description: Specifies the number of channel seizure bits (alternating 1’s and 0’s) preceding the mark bits of an FSK message. Default is 300. Default: 300 Range: 0 to 999 Example: chan_seizure 250 *specifies 250 channel seizure bits channeltype Description: Specifies the type of channel for channel a or channel b: CO: specifies a central office connection on the active channel The active channel is specified by the port command. Example: port a colevel Description: Specifies the absolute value of the DC voltage of the CO simulator. The actual voltage is negative in respect of tip to ring. Range: 10 to 48 Default: 48 Example: colevel 48 *applies a CO voltage of -48Vdc to the active channel cpu Description: Sends a command directly to the 3540 cpu. Example: cpu AT_S10=0 *this will send an “AT_S10=0” command to the cpu delay 36 Description: Delays a specified number of milliseconds. Range: 0 to 65000 milliseconds Example: delay 300 * delay script execution for 300 milliseconds detect, nodetect Description: These commands enable and disable detection of the events specified by the parameter. Note that CAS detection and FSK detection are mutually exclusive when enables with this command. (Enabling CAS disables FSK detection, and enabling FSK disables CAS detection). Parameters: fska – fsk detection on channel a fskb – fsk detection on channel b casa or casa_onhook – on hook CAS tone detection on channel a casb or casb_onhook – on hook CAS tone detection on channel b casa_offhook – off hook CAS tone detection on channel a casb_offhook – off hook CAS tone detection on channel b ringa – ring detect on channel a ringb – ring detect on channel b dtmfa – dtmf tone detection on channel a dtmfb – dtmf tone detection on channel b Example: detect fska *enable fsk detection nodetect ringa *disable ring detection on channel a dsp Description: Sends a command to the 3540 DSP. Comment is not allowed on the line. Example: * sends “bitrate 1150” to the 3540 DSP, impedance Description: Specify the impedance for the active channel. Parameters: CTR21: impedance for terminal equipment in Europe 600ohms (North America) BRIDGE: high impedance bridge Default: 600ohms Example: impedance ctr21 goonhook Description: Goes on-hook if the channel is configured as FXO. gooffhook Description: Goes off-hook if the channel is configured as FXO. 37 markbits Description: Default: Range: Example: Specify the number of mark bits that will precede any sent FSK messages. 300 0 to 999 markbits 80 markfreq Description: Specify the FSK frequency for a mark bit (1). Range: 1100 to 1400 (Hz) Example: markfreq 1300 marklevel Description: Range: Example: Example: Specify the level of a mark bit in dBm. -50 to 4 (-50dbv to 4dbv) marklevel 0 *mark bit signal will be 0 dBm. marklevel 0dbv *mark bit signal will be 0 dBV. markout Description: Range: Default: Example: Specify the number of mark bits that will follow and FSK transmission. 0 to 999 0 markout 10 markstuff Description: Range: Default: Example: Specify number of mark stuffing bits. 0 to 150 0 markstuff 1 polarity Description: Used to reverse the polarity on the active channel Parameters: reverse or normal Example: polarity reverse ring Description: Turns the ringer on or off for the active channel. Parameters: ON or OFF Example: Ring ON ringfreq Description: Specify the ring frequency in Hz. 38 Range: Default: Example: 5 to 90 25 ringfreq 20 ringlevel Description: Default: Range: Example: Specify the amplitude for the ringing signal. 65 10 to 90 Ringlevel 50 * specify 50 Vrms ring level send Description: Sends an FSK stream defined by data in quotations. The data can contain ASCII characters and/or any 8 bit hex values enclosed in angle brackets. spacefreq Description: Specify the frequency of a space bit (0) for an outgoing FSK message. Range: 2000 to 2300 (Hz) Example: spacefreq 2100 spacelevel Description: Range: Example: Example: Specify the level of the signal for a space bit in dBm. -50 to 4 (-50dbv to 4dbv) spacelevel 0 * 0 dBm for space bits spacelevel 0dbv * 0 dBV for space bits tone1 Description: Turns tone generator #1 on or off. Example: tone1 on tone1freq Description: Specify frequency for tone generator #1. Range 10 to 10000 (Hz) Example: tone1freq 1200 tone1level Description: Range: Example: Example: Specify amplitude for tone generator #1 -50 to 4 dBm (-50dbv to 4 dbv) tone1level 0 tone1level 0dbv tone2 Description: Turns tone generator #2 on or off. 39 Example: tone2 on tone2freq Description: Specify frequency for tone generator #2. Range 10 to 10000 Hz Example: tone2freq 1200 tone2level Description: Range: Example: Example: Specify amplitude for tone generator #2 -50 to 4 dBm. (-50dbv to 4 dbv) tone2level 0 tone2level 0dbv Logical Script Flow commands breakrepeat Description: When encountered, the execution will jump ahead to the command following the endrepeat command for the current repeat loop. Example: <see repeat, endrepeat> call Description: calls a procedure previously defined by proc/endproc Example: <see proc, endproc> cleartimer1 Description: Clears the timer previously started by starttimer1 or startimer2 such that the timer expiration will not generate an event. if, else, endif Description: If the condition following the “if” statement is met, the commands that follow will be executed. Otherwise, the commands that follow an optional “else” statement will be executed. The if statement must be followed at some point by an “endif” statement. The condition is a predefined variable (currently “fsk” and “dtmf” are the only predefined variable), followed by an optional index in parenthesis (0 by default), followed by either an = or a !=, followed by a hexadecimal value. The index specifies which byte in the array to compare to the hexadecimal value. Example: if fsk(0) = 93 *DLL_SMS_EST received - 93 hex 40 *now send message delay 800 nodetect fska *disable fsk detection send “text omitted for example” else pause "unrecognized ACK" goto FAIL endif goto, label Description: The goto statement immediately takes the script execution to the line identified by a “label” command and the matching label. Example: * a goto FAIL statement will take the execution here… LABEL FAIL result fail stop pause Description: This will display a popup window with the string specified in double quotes. The script execution will continue when the user clicks OK in the popup window. Example: pause “unrecognized ACK” port Description: Specifies the active channel. The commands that follow will be applied to either channel A or channel B. Parameters: A or B Example: port a proc, endproc Description: defines a procedure that can be called elsewhere in the script Example: proc sendcas tone1freq 2130 tone2freq 2750 tone1 on tone2 on delay 100 tone1 off tone2 off endproc call sendcas 41 repeat, endrepeat, breakrepeat Description: The commands in between the “repeat” and the “endrepeat” commands are executed until either a breakrepeat is encountered, or the number of iterations specified by the repeat command has been completed. Example: * this will apply 20 rings to the active port repeat 20 ring on delay 2000 ring off delay 4000 endrepeat starttimer1, starttimer2 Description: Starts a timer. Parameter: number of milliseconds. Example: <see wait, on> stop Description: Aborts script execution. wait, endwait, on, endon Description: A wait/endwait block suspends script execution until one of the events specified by an on command occurs. The on/endon blocks inside the wait/endwait blocks contain the script commands to be executed if a specified event occurs. The events allowed are: a_idle – device connected to port a goes on hook a_offhook – device connected to port a goes off hook a_dtmf_detected – DTMF tone detected on channel a a_cas_detected – cas tone detected on channel a a_reverse_polarity – polarity reversal detected on channel a a_fsk_received – and fsk string is detected on channel a All these events are available for channel b by replacing the above a_ prefix with a b_ prefix timer Description: timer1 – timer started by starttimer1 has expired timer2 – timer started by starttimer2 has expired Example: 42 ******************************************* *RECEIVE DLL_SMS_ACK, SEND DLL_SMS_REL ******************************************* starttimer1 5000 detect fska *enable fsk detection wait on a_fsk_received cleartimer1 if fsk(0) = 95 *sign-off received nodetect fska delay 800 send "<94><00>l" else pause "unrecognized ACK" result fail stop endif endon on timer1 pause "ack timeout" result fail stop endon endwait 43 Model 3540 Specifications Note: Accuracy is given in (parenthesis) unless otherwise noted. Central Office Simulation Type: 2-wire, loop start AC Impedance: 600 (+/- 25 ) Ohms or CTR21 complex [270 Ohms + (750 ohms // 150nF)] DC Voltage: Programmable -15 VDC to -48 VDC (+/1 V), Software-controlled polarity Line Current Feed: Limited to 30 mA Ringer: Programmable 10 to 90 VAC RMS (+/2V for 20 to 80 Hz); Frequency: 10 Hz to 100 Hz (+/- 1 Hz); Cadence in mS. Call Progress Tones: Worldwide Idle Channel Noise: < 10 dBrnC FSK Generator Standards: Bell 202 or ITU V.23 Modes Simplex or half-duplex Dynamic Range (TX): -50 dBm to +4 dBm (+/-0.5 dBm) Receiver Sensitivity: -30 dBm with SNR >14 dB FSK Impairments FSK Mark Frequency: 1100 Hz to 1400 Hz (+/- 1 Hz) FSK Space Frequency: 2000 Hz to 2300 Hz (+/- 1 Hz) FSK Mark / Space Twist: -10 dB to +10 dB (+/- 0.5 dB) Bit Rate: 1150 to 1250 bps (+/- 0.2 bps) Stuffed Mark Bits: 0 to 150 bits (+/- 1 bit) Trailing Mark Bits: 0 to 999 (+/- 1 bit) Echoes: 2 independent echoes. Delay: 0.0 to 20.0 ms (+/- 0.3 ms); Attenuation: 0 to 48 dB (+/- 0.5 dB) White Noise: 10 dBrnC to 80 dBrnC (+/- 1 dBrnC) Interfering Tone: 10 Hz to 10,000 Hz (+/- 1 Hz). -48 to +2 dBm (+/- 0.5 dBm, 300 to 4000 Hz.) DTMF Receivers Frequency Deviation Accept: +/- 1.5% +2 Hz nominal Frequency Deviation Reject: +/- 3.5% +2 Hz nominal Amplitude for Detection: -30 dBm to 0 dBm per tone 44 Maximum Twist Allowed: 8 dB Minimum ON Duration: 40 ms or greater Minimum OFF Duration: 40 ms or greater USB Digital Audio Processor Controller: Philips UDA1325H/104 with integrated 16-bit CODEC Type: Full-duplex stereo record and playback Frequency Characteristics: Flat, 20 Hz – 10 kHz (+/- 0.5 dB for 300 to 4000 Hz.) Audio Format: 16-bit PCM, 22 kHz sampling rate, .WAV format compatible Audio Record Sources: Left: Ch. A RX, TX, or Bridge Right: Ch. B RX, TX, or Bridge Audio Playback (Outputs): Left: Channel A Right: Channel B Audio Monitor Speaker and Headphone Port Audio Monitor Sources: Ch. A RX, Ch. A TX, Ch. A Bridge (default), Ch. B TX, Ch. B Bridge, USB Audio Output (Left), and USB Audio Output (Right); Software-selectable. Audio Monitor Level: Manual volume control knob on front panel with software mute function. Speaker: Hi-Fi Micro-Speaker, 1 watt max output, 8 ohms impedance, full-range audio response. Speaker is muted when headphone is connected. Headphone Jack: 3.5 mm, mono Caller ID Simulation and Decoding Types: Type I (on-hook) and Type II (off-hook) Signaling: Bell 202 FSK, ITU V.23 FSK, and DTMF Standards Support: Telcordia GR-30 and SR-3004, TIA 716, ETSI ETS300 778-1/2, NTT, and various national standards Fixed-Line SMS Service Center (SC) Emulation Signaling: ITU V.23 half-duplex Protocols: Protocols 1 and 2 Standards Support: Simple SC simulation based on ETSI ES-201-912 V.1.1.1 standard. 45 Measurements Signal Conversion: Calibrated 16-bit A/D Converter and a 14-Bit CODEC; True RMS readings. Receive Signal Level: 10 to 10000 Hz (default) or Notch Filter. ( +/- 0.5 dB, 300-4000 Hz.) Speech Level: As per ITU P.56 standard, method B. (+/- 0.5 dB.) Idle Channel Noise: C-Message and D filters with 1010Hz notch option, as per IEEE 743-1995. (+/- 1.0 dB.) DTMF Analysis: Level Accuracy: +/- 0.5 dB, Twist Accuracy: +/- 1 dB, Duration Accuracy +/- 2 ms Programmable Tones: 10 Hz to 10000 Hz (+/- 0.5 Hz) -50 dBm to +4 dBm (+/- 0.5 dBm from 300 to 4000 Hz) Pseudo-random white noise, 10 to 80 dBrnC (+/- 1 dBrnC) Noise Generation: Network Emulation Attenuation: 0 to 50 dB (+/- 1 dB, 300-4000 Hz.) Return Loss: 12 to 34 dB (+/- 2 dB, 300-4000 Hz.) Echo: -50 to 6 dB (+/- 2 dB, 300-4000 Hz.), 5 to 1000 mS (+/- 0.3 mS) USB Interface to Host PC Type: Full-speed (12 MHz) function device. Compatible with USB Specifications, Rev. 1.1 and 2.0 Topology: Self-powered embedded 4-port hub with one upstream and four downstream ports. One downstream port connected to one full-speed USB digital audio controller and two downstream ports to two full-speed USB serial UARTs. Power AC Input Range: Universal input (100 - 240 VAC / 50 - 60 Hz), 1.5A maximum Safety CSA (Level 3), CE (73/23/EEC), VDE (IEC950), UL (1950), NEMKO (EN60950). Rated for indoor use only. 46 FCC Part 15: This equipment has been tested and found to comply with the limits for a Class A digital device, pursuant to part 15 of the FCC rules. These limits are designed to provide reasonable protection against harmful interference when the equipment is operated in a commercial environment. This equipment generates, uses, and can radiate radio frequency energy and, if not installed and used in accordance with the instruction manual, may cause harmful interference to radio communications. Operation of this equipment in a residential area is likely to cause harmful interference, in which case the user will have to correct the interference at his or her own expense. Mechanical Dimensions: 10” x 12.6” x 2.6” (25 cm x 33 cm x 7 cm) Weight: 8 lbs. (3.6 kg) Environmental Operating Temperature: 50 °F to 104 °F (10 °C to 40 °C) Storage Temperature: -4 °F to 149 °F (-20 °C to 65 °C) Relative Humidity: 10% to 90%, non-condensing Internal Fan: Speed 4800 RPM; Airflow 5.7 CFM; Noise level 19 dB-A Host Computer Requirements Processor: 500 MHz minimum System Memory: 256 MB RAM minimum (512 MB or greater recommended) System Storage Memory: At least 20 MB of available hard disk space. Operating System: Microsoft Windows 98SE/ME/2000/XP USB Host: One available USB port, compatible with USB Specifications Rev. 1.1 or 2.0. Audio Subsystem: Internal sound card required 47 48 Appendix 1: SMS Timing Parameters The following SMS Timing Parameters are reproduced from the ETSI specification ES 201 912 for Fixed Line Caller ID. The specification may be downloaded free of charged from http://www.etsi.org/services_products/freestandard/home.htm 49 Please consult the ETSI specification and the national specifications of specific countries for further information on applicable Fixed Line SMS timing parameters. 50 Appendix 2: Options The following Options are only available if purchased with the Model 3540. Please contact us at [email protected] if you are interested in purchasing these options. Handset Emulation Option The Handset Emulation option allows either or both FXO ports of the Model 3540 to emulate a corded or cordless telephone handset or headset. If the Handset Emulation option is available, you will see the icon in either or both Channel Configuration boxes at the bottom of each Model 3540 screen. If the Handset Emulation option is available, you will also see either two or four 3.5 mm stereo jacks installed on the back of the Model 3540. These jacks are marked “A” and/or “B” for the channel in use, and “M” for “Microphone, and “S” for Speaker. The “Microphone” jack provides audio out of tip and ring of the M jack on the rear of the Model 3540 and should be connected to the microphone circuit of the Device Under Test. The “Speaker” jack provides audio into tip and ring of the S jack on the rear of the Model 3540 and should be connected to the speaker circuit of the Device Under Test. The Microphone and Speaker impedances are set by dipswitches on the Handset Simulation board inside the Model 3540. Both boards default to 600 Ohms. Use the following procedure for changing the dipswitches. Refer to the following image of the board: • • • • • Turn off the Model 3540 and unplug the power and USB cables Wear a static-protection wrist strap that is properly grounded Remove the four screws from the Model 3540 front panel Slide the top cover off the Model 3540 Locate the Handset Emulation boards: Channel A is the board towards the front of the Model 3540, and Channel B is the board toward the rear Flip the dip switches according to the values printed on the board (shown • above) • Reinstall the top cover and the screws for the front cover • Reconnect the Model 3540 power and USB cables and turn the unit on. The Model 3540 Handset Emulation will now have the new microphone and speaker impedances. 51 PESQ PESQ (Perceptual Evaluation of Speech Quality) is a method defined by the ITU-T P.862 standard for measuring voice quality over a PSTN or VoIP network or telephone. The Model 3540 PESQ option automatically plays a reference audio file on one channel while simultaneously recording the audio from the network or telephone on a second channel. The PESQ algorithm then compares the two files and calculates and displays a PESQ score and other relevant parameters. Following is a screenshot of the Model 3540 PESQ function: Select Play Channel A – Record Channel B or Play Channel B – Record Channel A to set the play and record paths for the measurement. Enter the name of the Reference File to be played, or click on the Browse button to locate a directory and file. This is the file that is played to the network or telephone. You may also set the level of the played file. Note: This level is set inside the Model 3540 and does not affect the PC sound card audio level set by the WindowsTM Volume Control. It is recommended that the WindowsTM Volume Control be set to maximum. Enter the name of the Degraded File to be recorded, or click on the Browse button to locate a directory and file. This is the file that is recorded from the network or telephone. Note: It is recommended that the WindowsTM Recording Level be set to maximum. to start playing and recording. The software will calculate and display the Click PESQ score and other parameters when playing and recording has stopped. 52 to stop playing and recording before the played file ends. The Click shows recording and playback is in progress. LED You may also calculate the PESQ score of two files without playing and recording the files. Simply enter the two file names, and click . The PESQ Calculation returns the following parameters based on the audio on the reference file and the degraded file. Note: dBov means “dB overload” where the point of reference is the theoretical system overload point, which will vary depending on the sound card in the host computer. Reference Level: This is the average level of the played file. Note this is not the same as the level of the electrical signal on the transmit port. Degraded Level: This is the average level of the recorded file. Note this is not the same as the level of the electrical signal on the receive port. Attenuation: This is the difference in the average level of the played file and the recorded file. Note: this value of attenuation should be the same as the attenuation of the electrical signals on the transmit and receive ports. PESQ: This is the score calculated by the PESQ algorithm in accordance with the ITU-T P.862 standard where 4.5 is a perfect score and 1.0 is the worst possible score. MOS: This is the old MOS score calculated in accordance with the ITU-T P.800 standard where 5.0 is a perfect score and 0.0 is the worst possible score. Noise: This is the average noise of the degraded file. Note: you can measure the average noise on the reference file by entering the reference file as both the Play and Record file and clicking the PESQ button. Take care not to click the Play & Record button, as this will overwrite the reference file (if not write-protected). Delay: This is the delay between the start of the Reference File and the start of the Degraded file. The total delay will include delays in the measurement system (PC sound card, USB connection, the model 3540, and reading and writing the .wav files). Note: It is recommended that a “calibration” of the Model 3540 be performed as follows: • • • • • Configure one channel as FXS (CO simulation) and the other as FXO (TE) Connect a jumper between Channel A and Channel B Select the appropriate Reference file and Degraded file name. Click the Play & Record button Note the Attenuation, Noise, and Delay of the measurement system. The Attenuation, Noise, and Delay of the measurement system can then be subtracted from the measured values to get the “calibrated” Attenuation, Noise, and Delay. ________________________________________________________________________________________________________________________________ © 2004 Rochelle Communications, Inc. P.O. Box 141189, Austin, Texas, 78714 USA Telephone: 512.339.8188 Web Site: www.rochelle.com E-mail: [email protected] 53