1
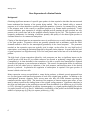
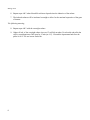
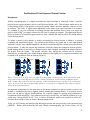
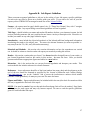
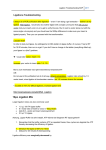
Biology 3210 Experimental Methods in Molecular and Cellular Biology Laboratory Manual Fall 2015 Quintin J. Steynen Department of Biological Sciences University of Lethbridge, Lethbridge, AB ©2015-2016 Biology 3210 Table of Contents Laboratory Schedule....................................................................................................................................3 Grade Composition......................................................................................................................................4 Safety...........................................................................................................................................................5 Safety Waiver...............................................................................................................................................8 Restriction Mapping of an Unknown Plasmid.............................................................................................1 OverExpression of a Fusion Protein...........................................................................................................6 Purification of OverExpressed Fusion Proteins..........................................................................................9 Western Blotting........................................................................................................................................12 Detection of Genetically Modified Maize.................................................................................................19 Appendix A : Preparation of a Lab Book..................................................................................................25 Appendix B: Lab Report Guidelines.........................................................................................................27 Appendix C: Agarose Gel Electrophoresis...............................................................................................28 Appendix D: DNA Quantification and Qualification...............................................................................31 2 Fall 2015 Laboratory Schedule Date: Laboratory Exercise Sept. 09-10 No Labs Sept. 16-17 Introduction Sept. 23-24 S.E.M. Training (meet in AWESB) Sept. 30 – Oct. 01 Restriction Mapping of an Unknown Plasmid (begin) Oct. 07-08 Restriction Mapping of an Unknown Plasmid (con't) Oct. 14-15 Restriction Mapping of an Unknown Plasmid (complete) & Over-Expression Oct. 21-22 Purification Oct. 28-30 SDS-PAGE & Transfer Nov. 04-05 Western Blotting & Intro to GMO Detection Nov. 11-12 No Labs (Remembrance Day) Nov. 18-19 Detection of Genetically Modified Maize (begin) Nov. 25-26 Detection of Genetically Modified Maize (con't) Dec. 02-03 Detection of Genetically Modified Maize (complete) Dec. 09-10 No Labs (Complete) 3 Biology 3210 Grade Composition The laboratory is worth 40% of your final grade. Your laboratory grade is broken down as follows; Lab Book (see Appendix A) • collected at random throughout the semester 10% Assignments and Lab Reports • Assignment: Restriction Mapping 5% - due Oct. 21-22 • Assignment: SEM 5% - due TBA • Lab Report: Western Blotting (all inclusive) 15% - due Nov 18-20 (see Appendix B) • Assignment: GMO Detection 5% - due Dec. 9-10 Note: Concepts and techniques covered in lab will also be subject to examination in the course final exam. Penalties for Late Assignments Any assignments or lab reports handed in late will be subject to the following penalties; Past specified due time but on the same calender day 1 calender day late 2 calender days late 3 or more calender days late 10% 25% 50% 100% Lab books need to be present during all laboratory sessions. If your lab book is not present for one of the random collections you will lose any marks assigned to that particular collection. Missed Laboratories Given the nature of the laboratory work, make up labs will not be offered. Single absences will be permissible without documentation. Additional, inexcusable absences will result in a failing lab grade. Determination of excusable absences is at the discretion of the laboratory instructor. Academic Offenses All students are expected to have read the Student Discipline Policy of the current academic Calendar (pg 73-75) and should understand what constitutes an academic offense as well as the penalties associated with committing an academic offense. There is a zero tolerance policy for academic offenses committed within the Biology 3210 labs. Protect your academic integrity, do not share your assignments or lab reports (particularly in an electronic form). Having your work copied and submitted by another can result in penalties for all parties involved, including the original author of the work. 4 Fall 2015 Safety Students enrolled in laboratories in the Biological Sciences should be aware that there are risks of personal injury through accidents (fire, explosion, exposure to biohazardous materials, corrosive chemicals, fumes, cuts, etc). The guidelines outlined below are designed to: a) minimize the risk of injury by emphasizing safety precautions and b) clarify emergency procedures should an accident occur. EMERGENCY NUMBERS: City Emergency Campus Emergency Campus Security Student Health Centre 911 2345 2603 2484 (Emergency - 2483) THE LABORATORY INSTRUCTOR MUST BE NOTIFIED AS SOON AS POSSIBLE AFTER THE INCIDENT OCCURS. EMERGENCY EQUIPMENT: Your lab instructor will indicate the location of the following items to you at the beginning of the first lab period. • • • • • • • Closest emergency exit Closest emergency telephone and emergency phone numbers Closest fire alarm Fire extinguisher and explanation of use Safety showers and explanation of operation Eyewash facilities and explanation of operation First aid kit GENERAL SAFETY REGULATIONS: • • • • • • • • Eating and drinking is prohibited in the laboratory. Keep pencils, fingers and other objects away from your mouth. These measures are to ensure your safety and prevent accidental ingestion of chemicals or microorganisms. Personal protective wear is mandatory. Lab coats, safety glasses and closed-toed shoes must be worn at all times during lab exercises which involve potential for chemical or biological spills. Coats, knapsacks, briefcases, etc. are to be hung on the hooks provided, stowed in the cupboards beneath the countertops, or placed along a side designated by your instructor. Take only the absolute essentials needed to complete the exercise* with you to your laboratory bench. (*e.g. Manual, pen or pencil) Mouth pipetting is NOT permitted; pipet pumps are provided and must be used. Always wash your hands prior to leaving the laboratory. Students are not allowed access to the central Biology Stores area for any reason. Consult your instructor if you require additional supplies. Report any equipment problems to instructor immediately. Do NOT attempt to fix any of the equipment that malfunctions during the course of the lab. Use caution when handling chemical solutions. Consult the lab instructor for instruction regarding the 5 Biology 3210 • • • • clean-up of corrosive or toxic chemicals. Contain and wipe up any spills immediately and notify your lab instructor (see SPILLS below). Heed any special instructions outlined in the lab manual, those given by the instructor or those written on reagent bottles. Long hair must be restrained to prevernt it from being caught in equipments, Bunsen burners, chemicals, etc. Dispose of broken glass, microscopes slides, coverslips, and glass pipets in the specially marked white and blue boxes. There will be NO disposal of glassware in the wastepaper baskets. You are responsible for leaving your lab bench clean and tidy. Glassware must be thoroughly rinsed and placed on paper toweling to dry. SPILLS: • Spill of SOLUTION/CHEMICAL: While wearing gloves, wipe up the spill using paper towels and a sponge as indicated by the lab instructor. • Spill of ACID/BASE/TOXIN: Contact instructor immediately. DO NOT TOUCH. • BACTERIA SPILLS: If necessary, remove any contaminated clothing. Prevent anyone from going near the spill. Cover the spill with 10% bleach and leave for 10 minutes before wiping up. Discard paper towels in biohazard bag. Discard contaminated broken glass in designated biohazard sharps container. DISPOSAL: • Broken glass, microscope slides, coverslips and Pasteur pipets are placed in the upright white ‘broken glass’ cardboard boxes. NO PAPER, CHEMICAL, BIOLOGICAL OR BACTERIAL WASTE MATERIALS should be placed in this container • Petri plates, microfuge tubes, pipet tips should be placed in the orange biohazard bags. The material in this bag will be autoclaved prior to disposal. • Bacterial cultures in tubes or flasks should be placed in marked trays for autoclaving. • Liquid chemicals should be disposed of as indicated by the instructor. DO NOT dispose of residual solution in the regent bottles. In case of any uncertainty in disposal please consult the lab instructor. • Slides of bacteria should be placed in the trays filled with 10% bleach that are located at the ends of the laboratory benches. HEALTH CONCERNS: Students who have allergies, are pregnant, or who may have other health concerns should inform their lab instructor so that appropriate precautions may be taken where necessary. 6 Fall 2015 Safety Waiver This form must be completed, signed, and submitted to the laboratory instructor before any laboratory work is begun. ******** I have read and I understand the safety rules that appear in this manual. I recognize that it is my responsibility to observe them, and agree to abide by them throughout this course. Name: _________________________________________(please print) Signature: ______________________________________ Date: _________________ Biology 3210 Fall 2015 7 Biology 3210 This page has been left blank intentionally. 8 Fall 2015 Restriction Mapping of an Unknown Plasmid Background Ever since the isolation of the first restriction endonuclease from Haemophilus influenzae in the 1970's, the use of these enzymes has been central to molecular biology. Today restriction enzymes are utilized for the creation of recombinant DNA molecules, genetic mapping through restriction fragment length polymorphism (RFLP) and small nucleotide polymorphism (SNP) analysis, clonal comparison, determination of evolutionary relationships, DNA fingerprinting, and even to diagnose disease. Type II restriction enzymes are the most used for applications in molecular biology. These enzymes have specific recognition sequences in double stranded DNA, usually palindromes of 4-8 bp, that they bind to and subsequently cleave the phosophodiester bond of both DNA strands. The site of cleavage varies for specific enzymes and can generate DNA fragments with blunt or overhanging ends (Figure 1). Figure 1. Recognition sequences and cleavage sites (arrows) for AvaI (left) and BsrBI (right). Notice that cleavage by AvaI will create overhanging ends while BsrBI will create blunt DNA ends. The objective of this exercise is to generate a restriction map of an unknown plasmid through a series of single and double restriction enzyme digests. Agarose gel electrophoresis will be used to analyze the DNA fragments produced from these digests in order to map the relative positions of the restriction sites of the unknown plasmid. Equipment & Supplies Student Freezer Box (x5) • 100 μL Unknown Plasmid • 10 μL AvaI • 10 μL BstAPI • 10 μL EcoRI-HF • 10 μL HincII • 100 μL CutSmart Buffer (10x) • 10x BSA • 1.0 mL d2H2O Agarose 1x TBE Ethidium bromide bath (5 μg/mL) Destain bath Loading dye Distilled water (carboy) Ice (4x large ice buckets) 4x Micropipettors w/ tips (0.5-10 μL, 10-100 μL) 0.5 mL mcts (sterile) 5x mct racks 2x Microcentrifuge 5x Floating racks 1x Water bath (37 ºC) 5x Gel rigs w/ 12-well combs 2x Power supplies 2x Tape Graduated cylinders (5x 50 mL) 5x 100 mL flasks 1x Analytical balance (w/ small weigh boats) 2x small spatulas 1x Microwave (w/ oven mitt) Parafilm Scissors 5x Sharpies (extra fine) UV transilluminator (in C770) 1 Biology 3210 Protocol – Week 1 1. Use Table 1 to set up the digests of the unknown plasmid for each of the supplied restriction enzymes in 0.5 mL microcentrifuge tubes (mcts). All reagents, except the restriction enzymes, should be completely thawed and stored on ice. All work should be carried out on ice. Note: Restriction enzymes are costly and heat labile and should therefore be handled with care. Every effort should be made to minimize the amount of time the enzymes are removed from -20 ºC storage. When in use they must be stored on ice at all times and should be returned to -20 ºC as quickly as possible. You should only handle the tops of the tubes containing the enzymes to prevent the heat from your hand transferring to the tubes. Table 1. Reagents and their respective volumes to be used for the restriction of the unknown plasmid in single digests. Reagents should be added in the same order as listed below. Reagent d2H2O Volume 12.0 μL* Unknown plasmid 5.0 μL Buffer (10x) 2.0 μL BSA (10x), if needed 2.0 μL Restriction Enzyme 1.0 μL Total Volume 20.0 μL * 2 The volume of d H2O indicated assumes that BSA is not required, if BSA is required the volume of d 2H2O should be adjusted accordingly (see manufacturer supplied info.). 2. Ensure the contents of your 0.5 mL mcts are well mixed and incubate the digests at 37 ºC for 1 hr. 3. Cast a 1.0% agarose gel in Tris-Borate-EDTA buffer (TBE) using the supplied casting apparatus. The casting procedure will be demonstrated by your instructor as needed. 4. Prepare your samples for electrophoresis by mixing 4 μL of each digested sample with 4 μL of 2x loading dye. You should also prepare an undigested sample for electrophoresis containing an equivalent amount of plasmid as is present in your 4 μL sample. Load all of your samples to the gel as well as the supplied DNA ladder (2-log DNA Ladder, NEB). 5. The gels will be run at 100 V for ~45 min. 6. Once the electrophoresis is complete, stain your gels in the ethidium bromide bath with gentle shaking for ~10 min. Caution: Ethidium bromide is a mutagen and suspected carcinogen, gloves must be worn at all 2 Fall 2015 times when working with ethidium bromide. Alternative: Ethidium bromide can be added to the molten agarose, prior to casting the gel, at a final concentration of 0.5 μg/mL. 7. Examine your gels on the UV transilluminator. Additional staining or destaining may be required to properly visualize any resulting bands. While photographs of the gel will be supplied, you should make detailed notes of your observations (especially of any faint bands as these may not show up well on the photograph). Caution: UV light is damaging to the naked eye and exposed skin. Always ensure the transilluminator shield is in place or cover bare skin and view through safety glasses that absorb harmful wavelengths. 8. You will need to generate a standard curve for each gel produced in order to accurately estimate DNA fragment size of any bands present. Protocol – Weeks 2 & 3 The remaining two laboratory periods are to be used to set up the appropriate digests and run the necessary gels to obtain the data required to generate the restriction map of the unknown plasmid. You are responsible for the planning and execution of the lab work needed. You have been given more than sufficient resources (plasmid DNA, buffers, enzymes, etc.) to successfully complete this exercise. However, errors in planning or poor technique may result in you running out of these resources. Should this happen you will be provided the opportunity to 'purchase' additional resources. Double Digests by Sequential Reactions In order to obtain the data needed, you will need to set up a series of double digests. This can be accomplished by sequentially digesting your DNA sample with different restriction enzymes, changing the reaction conditions as required for the second enzyme. This method is particularly useful when using two restriction enzymes that have incompatible reaction conditions, typically due to differences in the reaction buffers or incubation temperatures. Carrying out sequential digests usually requires additional time and effort but this is virtually eliminated in this exercise because you have the single digests from Week 1. However, failure to properly adjust the reaction buffer for the second enzyme may result in inefficient digestion or worse, complete failure. See the information provided by the manufacturer (NEB) for each restriction enzyme. Keep in mind that you will use your single digests as controls for your double digests, failure to properly plan may result in unusable data thereby wasting your assigned resources. Double Digests in a Single Reaction Alternatively, double digests can be carried out in a single reaction, provided the enzymes have compatible reaction buffers and incubation temperatures. It is often still possible to utilize this method even if one of the restriction enzymes has a reduced efficiency in a given reaction buffer simply adding 3 Biology 3210 more of that enzyme to the reaction to compensate (or increasing the incubation period). Performing a single reaction with two restriction enzymes generally requires less time and will not require altering the buffer conditions between subsequent digests. While there will be no time savings for this exercise as compared to utilizing sequential reactions, you will save the effort of having to adjust the reaction buffer for the second enzyme. Agarose Gel Electrophoresis Gels will be cast and run as performed in Week 1. You are welcome to vary the concentration of your agarose gels between 0.7 % and 2.0 %. Higher concentrations of agarose give better resolution of smaller DNA fragments but you will lose resolution for longer DNA fragments. Do not forget to load the DNA ladder or the gel will be unusable for mapping purposes. You will find it extremely valuable to load the single digests on the same gel as the double digests, preferably flanking their respective double digest. Keep this in mind when planning your experimental approach, particularly if you are generating double digests by sequential reactions. Unused portions of your single or double digests may be stored at -20 ºC to be re-run on later gels, if needed. Hints • • • • • • 4 plan ahead (Appendix C is good place for background information) make use of your lab book ensure all tubes are clearly labelled you may not need to perform all possible combinations of digests to generate the restriction map but certain specific combinations may be required (analyze your data and plan ahead) you may have to infer the presence of small DNA fragments as they will be difficult to visualize discuss your results with each other and your instructor, modifications to various aspects of the protocol may be carried out for a variety of reasons Fall 2015 Restriction Enzyme Product Information (as supplied by NEB) AvaI EcoRI-HF Concentration: 10,000 U/mL Heat Inactivation: 20 min @ 80 ºC Storage: -20 ºC Concentration: 20,000 U/mL Heat Inactivation: 20 min @ 65 ºC Storage: -20 ºC Recognition Site: Recognition Site: Activity in NEBuffers: NEBuffer 1.1: 10% NEBuffer 2.2: 100% NEBuffer 3.1: 25% CutSmart Buffer: 100% Activity in NEBuffers: NEBuffer 1.1: NEBuffer 2.2: NEBuffer 3.1: CutSmart Buffer: Reaction Conditions: 1X CutSmart Buffer • 50 mM potassium acetate • 20 mM Tris- acetate • 10 mM magnesium acetate • 100 μg/mL BSA • pH 7.9 @ 25 ºC Incubate at 37 ºC Reaction Conditions: 1X CutSmart Buffer • 50 mM potassium acetate • 20 mM Tris- acetate • 10 mM magnesium acetate • 100 μg/mL BSA • pH 7.9 @ 25 ºC Incubate at 37 ºC BstAPI HincII Concentration: 5,000 U/mL Heat Inactivation: 20 min @80 ºC Storage: -20 ºC Concentration: 10,000 U/mL Heat Inactivation: 20 min @ 65 ºC Storage: -20 ºC Recognition Site: Recognition Site: Activity in NEBuffers: NEBuffer 1.1: 50% NEBuffer 2.2: 100% NEBuffer 3.1: 25% CutSmart Buffer: 100% Activity in NEBuffers: NEBuffer 1.1: NEBuffer 2.2: NEBuffer 3.1: CutSmart Buffer: Reaction Conditions: 1X CutSmart Buffer • 50 mM potassium acetate • 20 mM Tris- acetate • 10 mM magnesium acetate • 100 μg/mL BSA • pH 7.9 @ 25 ºC Incubate at 60 ºC Reaction Conditions: 1X NEBuffer 3.1 • 100 mM NaCl • 50 mM Tris-HCl • 10 mM MgCl2 • 100 μg/mL BSA • pH 7.9 @ 25 ºC Incubate at 37 ºC 10% 100% 10% 100% 25% 100% 100% 100% 5 Biology 3210 Over-Expression of a Fusion Protein Background Obtaining significant amounts of a specific gene product is often required to elucidate the structure and better understand the function of the protein being studied. This is not limited solely to research purposes, as it is often desirable to produce significant quantities of protein for commercial (e.g. many of the enzymes used in this course) or medicinal purposes (e.g. human insulin production). Under normal conditions, gene expression is a highly regulated process ensuring the gene products are only present at the correct time and in the quantities actually required by the cell. This regulation can be extremely problematic for obtaining a sufficient quantity and quality of the desired gene product to facilitate research or for commercial enterprises. Cloning of the desired gene into an expression vector is an effective way to easily obtain large quantities of the gene product. Expression vectors are generally plasmids that at minimum, posses the DNA elements needed to allow for the transcription (promoters) of the cloned sequence. The promoters encoded on the expression vector are typically viral in origin, as they allow for very high levels of transcription, overcoming the limitations imposed by the genes native promoter. In some cases, the level of gene expression is so high that nearly 50% of the total protein mass of the host cell is the desired gene product. The high levels of gene expression offered by viral promoters can have a significant impact on the overall growth of the host cell, as cellular resources are diverted to producing a single gene product. Consequently, it is often desirable for the researcher to be able to control when transcription is initiated from the viral promoter, a process known as induction. This control of transcription allows for sufficient growth of the cell culture prior to induction of the viral promoter, and therefore more of the desired protein is produced. In particular this regulation of transcription is required if the gene product of interest is lethal to the host cells. Many expression vectors are specialized to create fusion products, a chimeric protein generated from two (or more) genes with functional properties of both of the original gene products. In addition to the transcriptional promoter elements, these vectors must also have the DNA elements encoding the translation initiator region (TIR). The insertion of the sequence of interest requires more effort, as care must be taken to preserve the reading frame of the original coding sequence. Significant reductions in the effort and time spent on the purification can result from the addition of an affinity tag (e.g. Poly-His or GST), allowing for purification by affinity chromatography, or a signal peptide targeting the protein for export from the cell (e.g. PhoA). Additionally, visualization of the protein can be aided through the addition of epitope tags (e.g. Myc) or reporter proteins (e.g. GFP). 6 Fall 2015 Supplies and Equipment: E. coli BL21 (DE3) with; - pRNB-Ec LB broth (8x 100 mL) Kanamycin stock (1000x) IPTG stock (1 M) 8x Bunsen burners w/ strikers 37 ºC shaking incubator 1.5 mL MCTs (sterile) 16x 15 mL Falcon tubes 4x Micropipettor sets w/ sterile tips 1x UV spec w/ semi-micro cuvettes 3x Microcentrifuges (RT) 4x Ice buckets (large) Protocol: Culture Inoculation (will be performed for you) 1. Start the cultures for over-expression by inoculating 100 mL LB broth (containing the appropriate antibiotic) with 2.0 mL of the assigned overnight culture of E. coli BL21(DE3) transformed with pRNB-Ec. In addition, one control culture will be setup by inoculation with E. coli BL21(DE3). 2. Incubate the cultues at 37 ºC with vigorous shaking (~200 rpm) and record the OD600 values (optical density @ 600 nm) at periodic intervals to follow the growth of the cultures. Over-expression induction and sample collection 3. When the OD600 value for the culture reaches ~0.6, induce expression with a final concentration of 1 mM IPTG. Quickly return the cultures to the 37 ºC incubator with vigorous shaking (~200 rpm). Note: PRIOR to induction, transfer the appropriate volume of the culture to a sterile 1.5 mL MCT to serve as a negative control and perform Step #5. In order to ensure that an equivalent number of cells is transferred at each of the selected time intervals, the volume used will be normalized to an OD600 value of 1.00 for 1.0 mL of culture (i.e. the number of cells that would be present in 1.0 mL of culture at an OD600 of 1.00). Use the following formula to determine this volume. 1.0 mL =volume of culture measured OD600 4. Thirty minutes post induction, measure the OD600 and use this value to determine the appropriate volume to transfer to a sterile 1.5 mL MCT (as above). Work quickly to minimize the time the culture flask is removed from the incubator. 5. Pellet the cells by centrifugation at 13,000 rpm for 10 min, remove as much of the supernatant as possible, and store the cell pellet on ice. The pellet will be stored at -80 ºC for analysis at a later date. 7 Biology 3210 6. Repeat steps 4 & 5 when 60 and 90 min have elapsed since the induction of the culture. 7. The induced cultures will be incubated overnight to allow for the maximal expression of the gene of interest. The following morning; 8. Repeat steps 4 & 5 with the overnight culture. 9. Aliquot 20 mL of the overnight culture into two 15 mL Falcon tubes (10 mL each) and pellet the cells by centrifugation at 5000 rpm for 15 min (at 4 ºC). Discard the supernatant and store the pellet at -80 ºC for use in next weeks lab. 8 Fall 2015 Purification of Over-Expressed Fusion Proteins Background Affinity chromatography is a simple and relatively rapid technique to effectively isolate a specific protein from a complex mixture, such as would be found within a cell. This technique makes use of the of the binding affinity of the protein for a specific ligand, which could be a substrate, cofactor, or even an inhibitor. The choice of ligand varies depending on the nature of the specific protein to be isolated. For example, if you were interested in isolating enzymes that modified nucleic acids, you might use nucleic acids or Mg2+ (a common cofactor for this class of enzyme) as a ligand. The ligand must also be able to be bound to an immobile support matrix in such a manner that does not affect its binding affinity for the desired protein. To isolate a protein in this manner, a solution containing the desired protein is added to a column containing the immobilized ligand. The desired protein binds to the ligand and is itself immobilized within the column. Any unbound impurities can then be washed through the column leaving the desired protein behind. To elute the protein, the conditions within the column are changed so that the proteinligand binding affinity is lowered (e.g. changes in pH or ionic strength), resulting in the disassociation of the protein from the ligand. The protein can then flow through the column and be collected. Alternatively, a compound with a higher binding affinity for the ligand (e.g. a competitive inhibitor) can be added to the column to elute the protein (Figure 3). desired protein impurities b) a) matrix wash elute c) ligand Figure 2: Overview of the steps involved in purification using affinity chromatography. a) An initial mixture of the desired protein and various impurities is loaded to a column containing the ligand bound to an immobile matrix. b) The column is then washed to remove the impurities. c) The bound protein is then eluted by use of a solution that either, 1) decreased the proteinligand binding affinity or, 2) contains an a compound which competes with the protein for the ligand (not shown). An important consideration is that there may be no known ligands for a specific protein or there is no method to immobilize any known ligands without altering their binding affinity. In scenarios such as these, one can add (or tag) the binding affinity for a specific ligand to a protein using techniques in recombinant DNA technology. One commonly used tag is the His-Tag, six histidine residues in a row, which have a strong affinity for Ni 2+ ions. A variety of immobile matrices are available in which Ni 2+ ions have been bound to serve as affinity chromatography resins. Today you will isolating and purifying the His-tagged protein that was previously over-expressed from pRNB-Ec. Rather than performing full-scale column chromatography, the fusion protein will be 9 Biology 3210 purified using a small spin column in which the protein will be bound, washed, and eluted directly, using a microcentrifuge. This method is commonly used for small scale purifications as it is rapid and eliminates the need for specialized liquid chromatography equipment. Supplies and Equipment: E. coli BL21 (DE3) frozen cells pellets - student samples from previous week 10 mL Lysis Buffer 10 mL Wash Buffer 10 mL Elution Buffer 4x Ni-NTA spin columns 8x Column collection tubes 1.5 mL MCTs (sterile) 4x MCT racks 4x Micropipettors (all sizes) w/ sterile tips 1x Wave Shaker 1x Tape 1x Centrifugre (w/ rotor for MCTs) 3x Microcentrifuges (RT) 4x Sharpies (extra fine) Protocol: Preparation of Cell Lysate 1. Obtain and completely thaw your cell pellets, this will take approximately 10-15 minutes at room temperature. 2. Resuspend the pellet in 800 uL of Lysis Buffer (8 M urea, 100 mM NaH2PO4, 10 mM Tris-Cl, pH 8.0) and transfer the suspension to a 1.5 mL MCT. Ensure that no visible cell clumps are visible before proceeding. 3. Incubate the cells for 1 hour at room temperature on the platform shaker. 4. Pellet the cellular debris by centrifugation of the lysate at 10,000 g for 30 min at 4 ºC. Transfer the cleared lysate (supernatant) to a new 1.5 mL MCT. Label and save the debris pellet. Purification of the Fusion Protein 5. Equilibrate the Ni-NTA spin column by adding 600 uL of Lysis Buffer and centrifuging at 700 g for 2 minutes. 6. Load 600 uL of the cleared lysate to the equilibrated column and centrifuge at 700 g for 2 minutes. The centrifugation time may have to be increased for more viscous lysates, up to 4 minutes. Note: The His-tagged protein binds to the Ni-NTA in the column and is retained. Exceeding 700 g will result in lowered protein yields as the lysate will flow too quickly through the column to allow for efficient binding. 10 Fall 2015 7. Transfer the entire volume in the collection tube to a new 1.5 mL MCT and label this as “flowthrough”. 8. Wash the column with 600 uL of Wash Buffer and centrifuge at 700 g for 2 minutes. Transfer the entire volume in the collection tube to a new 1.5 mL MCT and label this as “Wash 1”. Note: This step washes away any remaining, unbound, impurities that may have been left behind from the lysate. Furthermore, it is common for some naturally occurring proteins to be able to bind to the Ni-NTA resin. The Wash Buffer, while having the same chemical composition as the Lysis Buffer, has a lower pH (6.3) which will elute any proteins with a lower binding affinity to the Ni-NTA. 9. Repeat Step 8 but label the collected liquid as “Wash 2”. 10. Elute the protein with 200 uL of Elution Buffer and centrifugation at 700 g for 2 minutes. Transfer the volume in the collection tube to a new 1.5 mL MCT and label this as “Elute 1”. Note: The Elution Buffer is the same as the Lysis & Wash Buffer but with a pH of 4.5. This is sufficient to elute proteins with very high binding affinities for the Ni-NTA resin, including our His-tagged protein of interest. 11. Repeat Step 10 but label the collected liquid as “Elute 2”. 12. Ensure all tubes are properly labeled and store at 4 ºC until the next laboratory session. These samples will be analyzed by SDS-PAGE and transferred to a nitrocellulose membrane in preparation for Western Blotting during the next laboratory session. 11 Biology 3210 Western Blotting Background Western blotting (also known as immunoblotting) is a technique used to detect specific proteins. One significant advantage of this technique is its ability to detect specific proteins within a complex mixture of other proteins, such as a cell homogenate. Western blotting is routinely used to elucidate where in an organism a particular gene is expressed (and under what environmental/development conditions), ensuring a gene of interest is being expressed in a transgenic organism, and even medically, such as the detection of HIV-positive individuals. The first process in performing a Western blot, is the separation of proteins with a given sample. This is usually accomplished by SDS-PAGE but non-denaturing (native) PAGE or even 2-dimensional gel electrophoresis can also be used (Figure 3a). The separated proteins are then transferred out of the gel matrix to an immobile support with a high affinity for proteins, such as a nylon, nitrocellulose, or polyvinylidene difluoride (PVDF) membrane (Figure 3b). membrane protein mixtures 2º ab blocking protein e.g. BSA 1º ab target protein sample proteins gel a) b) c) nontarget protein d) Figure 3: Illustration for the concept of a Western blot. a) A sample containing a mixture of proteins is separated, commonly utilizing SDSPAGE, and b) transferred to a membrane support. c) The unoccupied sites on the membrane are blocked using an nonantigenic protein before d) detection with the 1º and 2º antibodies. Antibodies, that specifically recognize and bind to the protein of interest, are used to probe the membrane in order to detect the target protein. However, antibodies, being proteins themselves will bind non-specifically to any unoccupied sites on the membrane which would result in complete failure to detect the protein of interest. To prevent this from occurring, the unoccupied sites on the membrane must be blocked with a non-antigenic protein (BSA is commonly used) prior to detection of the target protein (Figure 3c). Detection is usually performed in two steps where the membrane is first incubated with antibodies specific for target protein (primary antibody) followed by an incubation with a secondary antibody which recognizes the primary. The secondary antibody is used for the actual visualization of the target protein as it is usually linked to a reporter enzyme (Figure 3d). 12 Fall 2015 Supplies and Equipment – Week 1: Purification fractions from previous week Induced cell pellets from 2 weeks prior Prestained molecular weight marker Low molecular weight marker 2x Reducing Sample Buffer (RSB) SDS-PAGE Running Buffer (3 L) 15 % resolving gel premix 5 % stacking gel premix APS (100 mg/mL) Temed 95% EtOH Coomassie stain Coomassie destain 3x PAGE electrophoresis apparatus (6 gels) Power Supply (200 V) Heat Block @ 95ºC 4x Micropipettor set w/ tips Gel loading tips 1.5 mL MCTs 8x MCT racks 4x disposal plastic containers (i.e. Ziploc) Latex gloves (all sizes) 4x Sharpies (extra fine) Scintillation vials Pasteur pipets w/ bulbs Filter paper (5 sheets) Scissors Orbital/platform shaker White light box Protocol – Week 1: Casting the SDS-PAGE Resolving Gel 1. Assemble the SDS-PAGE casting apparatus as shown by your instructor 2. In a scintillation vial (or small beaker), add 5 uL TEMED and 50 uL of 100 mg/mL ammonium persulfate (APS) to 10 mL of the resolving gel premix and mix by swirling. The volume is sufficient for 2 gels. Caution: Gloves must be worn at all times when working with unpolymerized acrylamide as it is a neurotoxin. 3. Using a Pasteur pipet, dispense the mixture between the glass plates by placing the tip of the pipet to one side and allowing the solution to run down the edge of the spacer. Fill the space between the plates until the level of the solution is approximately 5 mm below where the teeth of the comb will sit when inserted (determine this level prior to mixing the resolving gel). Note: Work quickly as you do not want the gel to polymerize while yo are still casting it. 4. Use a Pasteur pipet to overlay the top of the resolving with 95% ethanol (a couple of mm above the top of the gel is sufficient). The ethanol will disperse any air bubbles you may have introduced while pouring the resolving gel so do not worry about them prior to this point. 5. Wait ~20 min for the resolving gel to polymerize, do not disturb the casting stand while waiting. Note: You will be able to tell when the gel is polymerized by examining the unused resolving gel in your Pasteur pipet or scintillation vial. 13 Biology 3210 Casting the SDS-PAGE Stacking Gel 6. Once the resolving gel has polymerized, invert the gel (casting stand and all) to pour off the ethanol. Blot away any remaining ethanol with a kimwipe or a piece of filter paper. 7. In another scintillation vial, add 5uL TEMED and 25uL of 100 mg/mL APS to 5 mL of the stacking gel premix and mix by swirling (again, this is enough for 2 gels). 8. Use a Pasteur pipet to dispense this solution on top of the polymerized resolving gel until you just slightly overflow the short plate (this helps to flush out any residual ethanol and air bubbles). 9. If no air bubbles are present, gently insert the 15 well comb ensuring that the top of the comb sits flush with the top of the long plate (aka spacer plate). 10. Wait as before for the stacking gel to polymerize. Once polymerized, assemble the gel rig (as shown by your instructor), submerge the assembled rig in the buffer chamber and flush out the wells gently with running buffer using a micropipettor or a syringe. The gel is now ready to be loaded with samples. Preparing and Running the Samples Please read the following carefully as you will be treating your induced cell pellets from the overexpression lab (0, 30, 60, 90, & o/n) differently than the various fractions collected utilizing the batch purification performed last week (Flow-Through, Wash, & Elute). The induced cell pellets will be solely analyzed by SDS-PAGE whereas the purified fractions will be analyzed by Western Blotting (of which SDS-PAGE is only the first step). As a result these two sets of samples must be loaded to different gels. 1. Induced Cell Pellets: To each of your induced cell pellets add 50 μL of 2x reducing sample buffer (RSB). Note: Do not resuspend your cell pellet in the RSB, simply add the RSB to the top of the cell pellet. Purified Fractions: Prepare these samples by mixing 5 uL of each fraction with 5 uL d2H2O and 10 uL of 2x RSB in a 1.5 mL MCT. 2. Incubate both sets of samples at 95 ˚C for 10 min. 3. Briefly allow the samples to cool and then centrifuge them at 13,000 rpm for 30 sec. 4. Using a micropipettor, with a gel loading tip, load 15 μL from each sample to the gel previously prepared. You will need to coordinate with other groups to ensure that each of the samples is loaded. Note #1: Remember to load all the induced cell pellet samples and the purified fraction samples to separate gels. 14 Fall 2015 Note #2: For gels with the induced cell pellet samples, use the “low molecular weight marker” as a protein standard. For the purified fraction samples, use the “pre-stained marker” as a protein standard as it can be used to visually determine if the proteins have been transferred to the nitrocellulose membrane from the gels during next weeks lab. Note #3: Stagger the loading of the prestained molecular weight markers between the different gels so that they can be identified later. Coordinate with the other groups to accomplish this. 5. Run the gel at 200 V until the dye front, provided by the RSB, reaches the bottom of the gel (~45 min). Progress of electrophoresis can also be followed by the pre-stained marker as this will be visible during the run, for gels loaded with this protein standard. Staining and Destaining 6. Disassemble the gel rig and split the long and short plates apart using a plastic spatula. Work carefully so as not to tear your gel. Note: Make a unique nick in your gel so as to be able to identify it during staining and destaining. 7. Gels with the Induced Cell Pellets: Place your gel in the coomassie stain and shake gently on the orbital shaker for 10 min. Gels with the Purified Fractions: Go directly to step 10 and use the container specifically labeled for these gels. Note: Once stained with coomassie, the gels are unusable for Western Blotting purposes. DO NOT STAIN THESE GELS! The gels will be stored until the next lab in destain which will act as a fixative preventing diffusion of the proteins out of the gel during storage. Fixation, which prevents the difussion is only required if the gels will not be immediately used 8. Remove the gel from the stain and rinse excess stain away with water. 9. Place the gel into the destain and return to the orbital shaker. Blue bands of stained protein should be weakly visible within 15-30 min on a light box but complete destaining typically requires several hours (or even overnight). 10. The gels themselves will be saved for analysis next week (gels can be stored for weeks in destain with no degradation in quality). Digital images will also be provided. 15 Biology 3210 Supplies and Equipment – Week 1 (con't) SDS-PAGE gels from previous week Power Supply (25 V capable) Transfer Buffer 4x disposal plastic containers (i.e. Ziploc) - 48 mM Tris, 39 mM Glycine, 20% MetOH 1x Semi-Dry electrophoretic transfer cell Ponceau S Stain 3x Nitrocellulose sheets - 0.5% Ponceau S, 5% Acetic acid 10x Whatman filter paper Blocking Buffer Latex gloves (all sizes) - 2% milk powder, 0.15% Tween 20 in TBS 4x Sharpies (extra fine) d2H2O (10 mL) 3x Scissors 3x glass test tubes 3x forceps (flat) Protocol – Week 1 (con't) Transfer to Nitrocellulose (blotting) Gloves must be worn when handling the nitrocellulose membrane to prevent its contamination with proteins from your fingers. 1. Transfer the fixed gel to 25 mL of transfer buffer for at least 15 minutes, with gentle agitation. 2. Repeat step 1 in 25 mL of fresh transfer buffer. 3. For the blotting of a single gel you will need to pre-wet 5 sheets of Whatman filter paper and 1 nitrocellulose membrane (cut to the size of the gel) in transfer buffer. 4. A Western Blot “sandwich” will be prepared by adding the layers in the following order; 2 layers of wet Whatman filter paper wet nitrocellulose membrane polyacrylamide gel (equilibrated in transfer buffer) 3 layers of wet Whatman filter paper Each layer of the sandwich is added to the previous one directly on the transfer cell. After the addition of each layer, the sandwich should be rolled with a test tube to remove any trapped air bubbles from between the layers. Note: It is critical that no air is trapped between any of the layers and this will significantly affect the transfer of proteins from the gel to the nitrocellulose membrane. 5. Once the sandwich is assembled for all the gels, set up the transfer cell and apply 25 V for 45 minutes. Note: Extra care should be taken to ensure the polarity of the electrodes is correct before applying power as the semi-dry transfer cell can be damaged by reversing the polarity (in addition to the samples being transferred AWAY from the nitrocellulose membrane). 6. Use forceps to peel the layers from the nitrocellulose, the filter paper and the gel can be 16 Fall 2015 discarded (alternatively, the gel can be coomassie stained to detect any residual proteins). Incubate the nitrocellulose membrane in the Ponceau S stain for 5 minutes and destain in water. 7. Pictures of the Ponceau S stained membranes will be provided and the membranes will be completely destained prior to the actual detection of the His-tagged proteins (next lab). Note: Ponceau S staining is one method to determine if protein transfer to the membrane has occurred prior to continuing with the western blotting procedure, which is time consuming and uses expensive reagents. The use of a pre-stained protein marker will also demonstrate protein transfer making the use of the reversible Ponceau S stain optional. 17 Biology 3210 Supplies and Equipment – Week 2: Student nitrocellulose membranes (previous week) Blocking Buffer - 2% milk powder, 0.15% Tween 20 in TBS Mouse anti-His antibody (1º) Goat polyclonal anti-mouse antibody (2º) Alkaline Phosphatase Incubation Buffer (AP) - 100mM Tris (pH 9.5), 100mM NaCl, 5mM MgCl2 BCIP (5-bromo-4-chloro-3-indolyl phosphate) NBT (nitroblue tetrazolium) 1x Micropipettor Set w/ tips 1x MCT racks 4x disposal plastic containers (i.e. Ziploc) Latex gloves (all sizes) 4x Sharpies (extra fine) 4x forceps (flat) Protocol – Week 2: Blocking of the nitrocellulose membrane (Step 1) will be performed for you. 1. Submerge the nitrocellulose membrane in approximately 20 mL of Blocking buffer. Incubate at room temperature for at least 2 hours with gentle agitation. 2. Wash the membrane in fresh blocking buffer for 5-10 minutes. 3. Repeat step 2 two more times (3 washes in total). 4. For binding of the 1º antibody, add 5 uL of the mouse monoclonal anti-His antibody to ~15 mL of blocking buffer and incubate the membrane in this solution for at least 30 minutes, with gentle agitation. 5. Wash the membrane 3 times, as described in Step 2. 6. Bind the 2º antibody by adding 5 uL of the polyclonal anti-mouse antibody to ~15 mL of blocking buffer and incubate the membrane in this solution for at least 30 minutes, with gentle agitation. 7. Wash the membrane 3 times in AP buffer. 8. Begin the colour development by incubation of the membrane in 0.56 mM BCIP and 0.48 mM NBT. You must watch the membranes during this step as the colour development may occur rapidly. Once you are satisfied with the colour development, immediately transfer the membrane to a bath of d2H2O to quench the reaction. 18 Fall 2015 Detection of Genetically Modified Maize Background One of the predominant uses of restriction enzymes is to create recombinant DNA molecules, a single DNA molecule comprised of sequence information from two (or more) organisms. This has led to the creation of genetically modified organisms (GMOs), an organism which has had its genome modified by the addition of genetic material from another species. Typically the genetic material integrated into the GMOs genome is a gene conferring some favourable trait upon the host organism. Due to the near universality of the genetic code, genes from distantly related organisms can successfully be transferred and expressed by the GMO. One common commercial example of a GMO is Bt-corn (Bt-maize) in which the Cry1Ab gene from the bacterium Bacillus thuringiensis has been inserted into the genome of corn. This gene encodes a protein, δ-endotoxin, which is specifically toxic to Lepidopterans (moths and butterflies). Upon ingestion, the δ-endotoxin protein binds to, and breaks down, the gut wall of the Lepidopteran larvae resulting in death. The European corn borer, a Lepidopteran, is a common pest with a significant financial impact on a variety of crops, including soybeans, cotton, and corn. The introduction of genetically modified crops, such as Bt-corn, has resulted in higher crop yields and a reduction in the amount of insecticides applied. These benefits have not gone unnoticed, as nearly 50% of all corn planted in Canada was Bt-corn (2003). While the benefits have not gone unnoticed, neither have the concerns surrounding crops modified to produce the δ-endotoxin (and GMOs in general). Losey et. al (1999) in a preliminary study raised concerns that the Monarch butterfly might be negatively impacted by corn pollen being blown from crops to neighbouring areas. While subsequent studies have shown that this impact is negligible (Sears et. al, 2001), it demonstrates the difficulty in predicting all possible side effects from the intended use of a specific GMO. Other concerns include the impact upon human health and the use of selective markers (typically antibiotic or herbicide resistance genes) in the process of creating the GMO. Attitudes towards the use of GMOs differ significantly, both at an individual level and a national level. This has led to consumer calls for better labelling of foodstuffs made from GMOs and bitter trade disputes between countries over the export and import of genetically modified crops (most notably between the US and the European Union). The need for testing of products for the presence of genetically modified material has increased as a result. The objective of this exercise will be to test corn foodstuffs, commonly available, for evidence of genetic modification. DNA will be extracted from processed foods and subjected to the polymerase chain reaction (PCR) using Cry1Ab specific primers (designed to amplify a 184 bp region of the Cry1Ab gene). Primers for the CaMV 35S promoter and Nos terminator, DNA sequences commonly introduced in GMOs as a result of genetic engineering, will also be used (199 and 127 bp, respectively). Due to the potential difficulty in extracting DNA from processed foods, PCR will also be carried out using a set of primers specific to a region of the corn invertase gene (226 bp). 19 Biology 3210 Equipment & Supplies – Week 1 Corn foodstuffs (student supplied) EBA buffer EBB buffer 20% SDS 5 M potassium acetate (ice cold) 3 M sodium acetate (pH 5.2) (ice cold) Isopropanol (ice cold) 70% ethanol (ice cold) TE buffer 8x Micropipettor sets w/ sterile tips 2.0 mL mcts (sterile) 8x mct racks Tube pestles 2x Analytical balance small weigh boats 8x small spatulas 1x Microcentrifuge (RT) 1x Microcentrofuge (4 ºC) 1x Water bath (or heat block) (65 ºC) 5x Floating racks (discard if using heat block) Razor blades (clean) Glass slides 2x Vortex 5x Sharpies (extra fine) 5x ice buckets (large) UV spectrophotometer (w/ microcell) Mortar & pestles Protocol – Week 1 Plant DNA Isolation 1. Weigh out 0.3 g of plant tissue. The mass may vary depending on the type of sample being prepared, consult with the lab instructor as needed. 2. On a clean glass slide, finely chop up the sample using a razor blade. 3. Transfer the sample to a 2.0 mL mct and grind the sample into a paste (for wet material) or a fine powder (dry material) using a tube pestle. 4. Add 300 μL EBA, 900 μL EBB, and 100 μL 20% (w/v) SDS. 5. Vortex the sample until it is thoroughly mixed and incubate at 65 ºC for 10 min. 6. Transfer the tube to ice, add 410 μL of cold 5.0 M potassium acetate, mix by inversion, and incubate on ice for 3 min. 7. Centrifuge for 15 min at 13,200 rpm (15,300 g). Use of a refrigerated centrifuge (4 ºC) can increase the yield of DNA but is not necessary for our purposes. 8. Transfer 1.0 mL of the supernatant to a new 2.0 mL mct, add 540 μL if ice cold isopropanol and incubate on ice for 20 min. 20 Fall 2015 9. Centrifuge for 10 min at 10,200 rpm (9,600 g). 10. Discard the supernatant and wash the pellet with 500 μL of ice cold 70% ethanol. Remove as much of the ethanol as possible before proceeding. To accomplish this, pour off as much of the ethanol as possible and then pulse the tube in the centrifuge to force any remaining ethanol to the bottom of the tube. Remove the remaining liquid with a micropipettor (10 – 100 μL usually works best) but be careful not to disturb the DNA pellet. 11. Resuspend the DNA pellet in 600 μL of TE buffer and then add 60 μL 3 M sodium acetate (pH 5.2) and 360 μL cold ice cold isopropanol. Incubate on ice for 20 min. Pellet the DNA by centrifugation (see step 9) and remove as much as the liquid as possible. Note: If you are running out of time to complete the DNA isolation, you may store your preparation in isopropanol, at -20 ºC, until the next laboratory period. 12. Repeat step 10 & 11 at least once, preferably twice if time permits. 13. Wash the DNA pellet as described in step 10 and leave the mct open allowing the pellet to air dry for 10 - 15 min. 14. Resuspend the final pellet in 50 μL TE buffer. DNA preparations can be stored at 4 ºC (short term) or -20 ºC (long term). Quantification & Qualification of Isolated DNA Time permitting, use the UV spectrophotometer with the microcell to quantify (determine a concentration) and qualify (determine the purity) of your isolated DNA. Be sure to have read Appendix D prior to starting this procedure. Your instructor will help you with the operation of the UV spectrophotometer, when you are ready. The equipment and supplies needed to carry out this procedure will also be made available for the next 2 weeks. 21 Biology 3210 Equipment & Supplies – Week 2 Student DNA samples (previous week) PCR Stock Reagents • 1 mL Optima H2O aliquots • Primers (20 μM) – Cry1Ab (accatcaacagccgctacaacgacc) – Cry1As (tggggaacaggctcacgatgtccag) – Ivr1A (ccgctgtatcacaagggctggtacc) – Ivr1B (ggagcccgtgtagagcatgacgatc) – Camv1 (gaaggtggctcctacaaatgcc) – Camv2 (gtgggattgtgcgtcatccc) – Nos-A (gaatcctgttgccggtcttgcg) – Nos-D (gcgggactctaatcataaaaaccc) • dNTPs (8 mM) • Phusion w/ 5x GC buffer TE buffer (blank) 8x Micropipettor sets w/ sterile tips 8x mct racks 1.5 mL mcts 0.2 mL PCR tubes (w/ small racks) 2x Microcentrifuge (RT) 8x Sharpies (extra fine) 1x Thermocycler 8x ice buckets (large) UV spectrophotometer (w/ microcell) Protocol – Week 2 Polymerase Chain Reaction Setup 1. Transfer 1.0 μL of each DNA preparation into separate 0.2 mL PCR tubes and place them on ice. 2. Set up the PCRs as outlined in Table 2. It is a common practice to set up a “Master Mix” containing the reagents common to all the reactions which can then be aliquoted out when setting up the individual reactions. This practice increases accuracy, as pipetting of very small volumes is error prone, and ensures consistency between all reactions. Note #1: As with any enzyme, the DNA polymerase (Phusion) should be removed from -20 ºC storage only to obtain the volume needed and returned to -20 ºC as quickly as possible. The storage buffer contains 50% glycerol making the solution viscous and care should be taken when pipetting. Note #2: Ensure all stock reagents are completely thawed prior to starting. Once thawed, they should be kept on ice and the entire process of setting up the Master Mix should also be carried out on ice. 3. Ensure the Master Mix is mixed well and aliquot 19 μL to each of your 0.2 mL PCR tubes with your DNA sample. Mix by pipetting and be sure to use a fresh tip each time. 22 Fall 2015 Table 2. Working table to determine the volumes of stock reagents needed per a 20 μL PCR (3 rd column) and the volumes of common reagents to be used to make up the Master Mix (5 th column). Reagents should be added in the same order as listed below and checked off once added to the Master Mix. Stock Reagent Reaction Volume req'd # of rxns Master Mix Concentration per reaction (+10%) Optima H2O - GC Buffer (5x) 1x dNTPs (8 mM) 200 μM Forward Primer (20 μM) 0.5 μM Reverse Primer (20 μM) 0.5 μM Phusion (2 U/μL)* 0.4 U DNA Template - 1.0 μL Total Volume - 20.0 μL - * Phusion is the NEB trade name for a recombinant, thermostable DNA polymerase. It has been shown to have increased fidelity, increased reaction rate (i.e., shorter elongation times), and better success with difficult DNA templates as compared to standard Taq. 4. When all the reactions have been setup, transfer the tubes to the thermocycler and start the reactions. PCR Cycling Conditions: 1. Initial Denaturation – 90 sec at 98 ºC 2. Denaturation – 10 sec at 98 ºC 3. Annealing – 20 sec at 60 ºC 4. Elongation – 15 sec at 72 ºC Steps 2 - 4 will be cycled 40x 5. Final Elongation – 10 min at 72 ºC 6. Storage at 4 ºC 5. Reactions will be stored at -20 ºC until the next laboratory period. 23 Biology 3210 Equipment & Supplies – Week 3 PCR samples (from week 1) Agarose 1x TBE (3 L) Ethidium bromide bath (5 μg/mL) Destain bath Loading dye (10x w/ xylene cyanol) DNA ladder (2-log, NEB) 5x Micropipettors (0.5-10 μL) w/ sterile tips 8x mct racks (for 0.2 mL PCR tubes) 2x Microcentrifuge 6x Gel rigs w/ 12-well combs 2x Power supplies 2x Tape Graduated cylinders (6x 50 mL) 6x 100 mL flasks 1x Analytical balance 1x small weigh boat 1x small spatulas 1x Microwave oven mitt Parafilm Razor blade 4x Sharpies (extra fine) UV transilluminator Platform shaker Latex gloves (all sizes) 1.5 mL mcts Protocol – Week 3 Agarose Gel Electrophoresis 1. Cast a 2.0% agarose gel in TBE. Note: Pay close attention when heating higher concentrations of agarose as they are more likely boil over in the microwave. You are responsible for cleaning up should any boil over occur. 2. Load your PCR samples (don't forget the DNA ladder). 3. Run your gels at 100 V for approximately 40 min. Do not let the dye front run off the edge of the gel. 4. Stain your gels in the ethidium bromide bath with gentle shaking for ~10 min (disregard this step if the ethidium bromide was added when the gel was cast). Caution: Ethidium bromide is a mutagen and suspected carcinogen, gloves must be worn at all times when working with ethidium bromide. 5. Destain the gel as needed and examine your gels on the UV transilluminator. photographs will be made available. Digital Caution: UV light is damaging to the naked eye and exposed skin. Always ensure the transilluminator shield is in place or cover bare skin and view through safety glasses that absorb harmful wavelengths. 6. A standard curve for each gel should be generated to accurately determine the sizes of the DNA fragments present. 24 Fall 2015 Appendix A : Preparation of a Lab Book Your lab book provides you with a detailed record of your experiments performed. This record proves invaluable when preparing manuscripts for publication, or, more immediately, when preparing lab reports. This lab book, as with all of the reports and proposals is an individual effort. Choice of Lab Book Standard black lab books can be purchased from the book store but these are not required for this course. The only required features are; 1. Pages are non-removable (no spiral bindings) 2. All pages must be numbered in the top outer corner ➢ page numbers may be hand-written on EVERY page in INK In General ➢ all entries must be made in blue or black ink ➢ date EVERY entry ➢ never remove a page or use white-out • if an entry needs to be deleted, strike out the entry with a single straight line (the deleted entry must be readable) ➢ keep up to date, a lab book is meant to be filled out as the experiments are carried out and NOT after the fact ➢ record anything that may be useful to you when preparing your lab reports ➢ leave plenty of space throughout the lab book to add comments after the fact Table of Contents Designate the first 2 pages as the Table of Contents ➢ record information and pages numbers as you go Lab Entries For each lab session be sure to include the following; 1. Objective • state the purpose of the work you are about to carry out • keep it brief, no more than a sentence or two 2. Method Summary • do not rewrite the protocol from the lab manual • highlight any specific changes to the lab protocol • include times and dates for when work was performed 25 Biology 3210 record product names and manufacturers used - enzymes, chemicals, equipment (micropipettors, baths) • include incubation conditions for cultures and reactions 3. Observations & Results • record any observations, this goes beyond number results • include diagrams, gel pictures, and any other form of raw data • include calculations as appropriate 4. Conclusions • did you achieve your objective? Why or why not? • use your results to support your conclusions • if you created a new strain or DNA construct, you should provide it with a name and a description • Supply List You may find it helpful to reserve the last page or two of the lab book to be used as a supply list for materials utilized throughout the experiments. This can be particularly useful for bacterial strains, DNA, and enzymes utilized. Listing details such as the supplier, growth conditions, concentrations, etc. can save you a lot of time searching for this information at a later date. 26 Fall 2015 Appendix B: Lab Report Guidelines These are meant as general guidelines to aid you in the writing of your lab reports, specific guidelines for each topic may also be given out to further guide your work. If you wish to do well on your lab reports you are STRONGLY encouraged to make use of the Science Toolkit. Format – the reports must be typed, double spaced, size 12 “Times New Roman” font, with 1'' margins on 8.5 x 11'' paper. Any report failing to meet these guidelines will not be graded. Title Page – should include your name and student ID number, the date, your instructor's name, the lab section (including semester and year), and last but not least a concise yet descriptive title. Please do not include your name on any other page within the report. Introduction – must include the objective/hypothesis of the lab and sufficient background information introducing the reader to the subject area. You must cite relevant literature (as recent as possible i.e. stay away from the 70's, 80's, early 90's unless necessary). Materials and Methods – this section only contains information on how the experiment was carried out. It should be written so that the reader can repeat your results by reading this section. Results – this section contains what you found. You do not describe the significance of your results, or put forward hypothesis based on the results in this section. Just state the facts. Here you should generate and reference appropriate figures and tables in a neat fashion. Discussion – this is the section that you can put forward hypothesis and interpret your results. This section should also include references to relevant literature. References – in text references should be of the form (authors last name, date) and the references at the end of the text should be formated as specified by the Journal of Molecular and Cellular Biology (http://mcb.asm.org , use on the “Authors” link to access the instructions to authors which include reference format guidelines). As many as you want! The more the better. Figures and Tables – figures and tables may be included within the text (after their first mention within the text) or appended to the back of the report. NOTE: You must be concise! Any text beyond the allowed page limit will not be marked. Page limits will be given for each report and may vary between reports. Be sure to read the specific guidelines given for each individual lab report. 27 Biology 3210 Appendix C: Agarose Gel Electrophoresis Agarose = a linear polymer composed of alternating residues of D- and L-galactose joined by α(1-3) and β(1-4) glycosidic linkages. These residues form chains of helical fibres that then aggregate into supercoiled structures with a radius of 20-30 nm. When gelled, a meshwork of channels with 50 – 200 nm diameter channels is formed. Note that commercial preparations of agarose are not homogenous. They may contain salts, proteins, or other polysaccharides; for the recovery of DNA, it may be necessary to use special purified grades of agarose. Factors Determining Rate of Migration of DNA Through Agarose Size of DNA – double stranded DNA (dsDNA) migrates at a rate inversely proportional to the log 10 of molecular weight. Big particles move more slowly as they have more drag and cannot move as readily through agarose channels. Concentration of agarose – the higher the concentration, the slower the migration. Concentration of agarose will also affect separation and can be used to enhance separation of different sized fragments of DNA. For instance, the lower the concentration of agarose, the better the separation of larger sized DNA fragments. A table can be found at the following link to help you make your decision: http://www.promega.com/resources/articles/pubhub/enotes/what-percentage-agarose-is-needed-tosufficiently-resolve-my-dna-sample/ DNA conformation – the three forms of DNA: supercoiled (form I), nicked circular (form II) and linear (form III) migrate at different rates through agarose – please see the following web page for an explanation and animation of the three forms and of their migration: http://bio.classes.ucsc.edu/bio20L/info/animate/anim2/topo.htm Under the conditions we make use of, it is assumed that supercoiled migrates fastest through the gel while the other two forms may not be resolveable. When ethidium bromide is incorporated into agarose, the ethidium bromide intercalates and will slow down (stiffen) the linear DNA molecules. Applied voltage – For maximum resolution of DNA fragments >2Kb in size, agarose gels should be run at no more than 5-8 V/cm (note that cm refers to distance between the positive and negative electrodes). Types of agarose Standard – from 2 species of seaweed –: Gelidium and Gracilaria. Standard agarose can be used for separation of DNA fragments from 1-25 Kb. 28 Fall 2015 Low melting temperature – modified by hydroxyethylation and consequently melts at 65 oC – because of this, low melting temperature agarose can be used for recovery of DNA from the agarose. In terms of handling, this agarose is more delicate, and takes a longer time to set or gel. Buffer – ions are required for DNA migration. Different buffers may be used and it may not matter significantly which one is chosen. Although TBE has one of the higher buffering capacities of the buffers of choice (much greater than that of Tris Acetate EDTA (TAE) for instance), resolution of larger fragments is better in TAE, DNA will move faster in TAE than in TBE, and extraction of DNA from agarose may be more effective when performed on gels made with TAE. Other Aspects To Consider: Loading Dyes: In this laboratory, we make use of mixtures containing xylene cyanol FF. This dye migrates in 0.5x TBE at approximately the same rate as linear DNA of 4000 bp in size. Often, bromophenol blue is used in conjunction with xylene cyanol, or separately. Bromophenol blue migrates at approximately the same rate as linear DNA of 300 bp in size in 0.5x TBE (2.2 fold faster than xylene cyanol FF, independent of agarose concentration). Size Standards: There are different types of size standards used to help in determining sizes of fragments run on gels. For instance, known DNA molecules such as Lambda DNA may be digested with different enzymes (such as HindIII) resulting in a series of fragments of known sizes. Total Lambda DNA is usually purchased, then digested as needed. Another type of size standard is produced by ligating a monomer DNA fragment of known size into a ladder of polymeric forms. The 2-log DNA ladder from New England Biolabs consists of a mixture of a number of proprietary plasmids digested to completion with different restriction enzymes. Ladders tend to be purchased as commercial preparations. For an example please see: http://www.neb.com/nebecomm/products/productn3200.asp Size Determination: In order to determine sizes of unknown fragments, we can make use of the relationship between distance migrated (from the wells) and log 10 of molecular weight. By plotting log 10 of the nucleotide pairs vs distance migrated (in cm, mm, even pixels) of our known (for example, lambda cut with HindIII, 2-log DNA Ladder, etc.) we find that we end up with a curve that is linear for most of the relationship (beyond 1.5 cm migrated). To simplify, you can use semi-log graph paper where the y axis is logarithmic and the x axis is linear (this can also be carried out using Excel). Consequently, by measuring the distance that the unknown migrates, we can use the standard curve to determine size. Any time you are using agarose gels to view an unknown sample of DNA, you should plan to plot a standard curve to allow accurate size determination. 29 Biology 3210 An online exercise in plotting a curve is found at the following link. Take a look and use this information for construction of your own standard curves. http://www.digitalwebb.com/Downloads/LabBench/learning/molecular/standcur.html Additional References - in addition to the links above, a good reference for the theory of agarose and agarose gel electrophoresis is found in: Sambrook, J. and Russell, D. W. 2001. Molecular Cloning: A Laboratory Manual, Third Edition. Cold Spring Harbor Laboratory Press, Cold Spring Harbor. 30 Fall 2015 Appendix D: DNA Quantification and Qualification Using UV Spectrophotometry At a wavelength of 260 nm, nucleic acids (DNA or RNA) may be quantified based on the fact that an OD (optical density) of 1 corresponds to a concentration of approximately 50 μg/mL for dsDNA and approximately 40 μg/mL for ssDNA and RNA. For single-stranded oligonucleotides, an OD of 1 corresponds to approximately 33 μg/mL. Spectrophotometric assessment is also used to evaluate purity or quality of nucleic acid preparations. For this, a ratio of the OD260:OD280 is used. At 280 nm, aromatic amino acids absorb strongly. Absorbance values between 1.8 and 2.0 indicate that a preparation of DNA is relatively pure. For RNA, a value of greater than 2.0 is desirable. Anything below this value may suggest contamination with guanidinium thiocyanate (found in, for instance, the commercial solution Trizol™). Values lower than 1.8 indicate contamination with phenol or with proteins. Readings at 230 nm (close to the maximum absorbance of peptide bonds and of Tris, EDTA, and other buffer salts) may also be performed to indicate purity of a preparation. Unfortunately, although spectrophotometric quantification is fast, it cannot distinguish between RNA and DNA, and larger concentrations (at least 1 μg/mL) are required for reliable results. Using Comparative Intensities on an Agarose Gel If you have a very low concentration of DNA present in a solution, or you suspect contamination with RNA, quantification using ethidium bromide may be more accurate. In general, the greater the mass of DNA present, the greater the amount of ethidium bromide that will intercalate. Consequently, the intensity of fluorescence will reflect the mass of DNA present. The intensity of fluorescence of the unknown band of interest can be compared to a band for which the mass of DNA is known and therefore the mass of the unknown band can be estimated. Both the fragment sizes and masses are readily available for each band within many commercially available DNA marker preparations. It is also relatively easy (and cheaper) to prepare your own DNA marker and provided you know the fragment sizes and their respective mass, estimation of an unknowns size and mass is possible. Lambda genomic DNA digested with Hind III is commonly used as a 'homemade' DNA marker for agarose gel electrophoresis. For example, let’s say that 5 μL (excluding loading dye) of a solution containing an unknown band of DNA was loaded to an agarose gel. After electrophoresis, the intensity of fluorescence of the unknown band was equivalent to that of the 9.416 Kb band of lambda HindIII. If we have loaded 0.25 μg of Hind III digested lambda genomic DNA, we can determine the mass of the unknown band. First, we need to calculate the mass of DNA present for the 9.416 Kb band, size Kb proportion of genome comprised the 9.416 Kb fragment =fragment = 9.416 =0.1941 genome size 48.502 Kb therefore , mass of DNA comprising 9.416 Kb band =0.1941×0.25 μg=0.049 μg 31 Biology 3210 Since the intensity of the unknown band was equivalent to the 9.416 Kb, we know that we have approximately 0.049 μg of DNA present in our unknown band. Having loaded 5 μL of our solution, it is a simple calculation to determine the concentration of DNA in our original solution, mass μg concentration=fragment = 0.049 =9.8x10⁻³ μg / μL(or 9.8 ng/μL) volume loaded 5 μL References: Sambrook, J. and Russell, D. W. 2001. Molecular Cloning: A Laboratory Manual, Third Edition. Cold Spring Harbor Laboratory Press, Cold Spring Harbor. Ultrospec 211 pro UV/Visible Sprectrophotometer User Manual. Biochrom 32