1
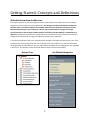
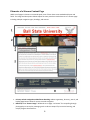
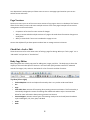
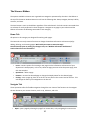
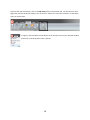
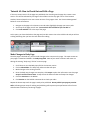
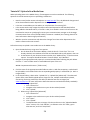
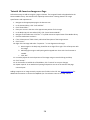
Sitecore Author Training Manual Division of Strategic Communications Ball State University www.bsu.edu/cms Introduction Managing the Ball State Website The Division of Strategic Communications is responsible for communicating the university's distinctiveness to stakeholders. We build affinity and preference for the Ball State brand through strategic, integrated marketing communications. Our efforts support the enrollment and development goals of the university and also encourage support among other influential audiences. The Ball State website is critical for the success of the strategic goals of the university and to our brand, which is why Strategic Communications is also responsible for the successful implementation and management of the university’s website. While multiple web systems are interconnected to make up www.bsu.edu, the Sitecore content management system (CMS) is an interactive marketing tool primarily used as a communications medium and information resource to external and internal audiences and is central to all public Ball State web content. All Ball State units are required to have their primary website presence in the CMS. As a Sitecore user, you are a part of a university-‐wide team of hundreds of authors making daily updates within the CMS. Most users are also a part of a smaller team within a college, department, or office that collaborates to update one or more web properties within Sitecore. That team may include multiple people with different roles including writers, web property managers, leadership stakeholders, and more. This model of collaborative website governance is often called “distributed authorship” and is necessary to maintain the large and complex landscape of content in www.bsu.edu. To align department and college goals with those of the university, Strategic Communications works directly with units across campus to coordinate integrated marketing communications and support the university’s goals and mission as outlined by the strategic plan. Many updates to the website affect important connections within a larger communications strategy, so it is important to work closely with your communications manager in Strategic Communications when updating the website (see “How to Get Help” below). How to Use this Manual This training manual is designed give you a framework for working as a part of the team that manages the Ball State website. It also provides instructions for core tasks that the typical Sitecore user must be familiar with, including editing and managing the assets (content) in your website. It is not a comprehensive user manual; however the concepts explained here are useful for new Sitecore users and as a reference guide for intermediate users. Functionality and user interface in Ball State’s implementation of Sitecore will change over time. If you choose to store a copy of this manual locally, make sure to check back periodically to www.bsu.edu/cms for revisions. 2 How to Get Help Resources for Sitecore users are available at www.bsu.edu/cms, including more extensive resources about communicating on the web and training schedules. For “how to” support and questions about making updates in Sitecore, the Technology HelpDesk is available. Submit a ticket for support at www.bsu.edu/helpdesk or call 765-‐285-‐1517. Since updating the website is part of a larger integrated communications strategy, it is important for your team to work closely with Strategic Communications when making significant updates to the website. Examples of significant updates include: • • • • • Adding video and multimedia Adding or removing information about a new or outdated program Changes to the information architecture (IA) including adding, deleting, renaming, and moving pages. Requests for new functionality including news, calendar, and the media gallery Adding or updating marketing URLs (i.e. http://www.bsu.edu/strategiccommunications) Contact your communications manager or the Strategic Communications main office (765-‐285-‐1560) to collaborate on any significant website changes. 3 Overview Getting Started: Concepts and Definitions (p. 5) The Getting Started section covers concepts and definitions that are foundational to working in Ball State’s Sitecore web content management system (CMS) environment. Pages, media, user interface, content fields, and terminology are explained in this section. Writing for the Ball State Website (p. 14) Copy and content are the most crucial assets for a website. Our approach includes assessment of audience wants and needs, crafting messages, use of calls to action, and measurement of results. Tutorials (p. 15) Included are 12 user tutorials that cover what you need to know from logging in to Sitecore to editing pages and updating media content. 4 Getting Started: Concepts and Definitions Website Information Architecture Information architecture (IA) is the page structure of your website. The IA determines the secondary navigation on the live website (see images below). Any changes to website information architecture, however minor, can affect navigation and usability experience and should be considered carefully. Before making changes to your website IA, contact your communications manager in Strategic Communications or the Strategic Communications front office (765-‐285-‐1560) for coordination and approval. Strategic Communications is responsible for the architecture of the website and ensuring an integrated communications strategy that addresses website visitor experience. In the initial consultations with your communications manager in Strategic Communications, your office or department went through the process of creating an IA for your website. This step was essential to the organization of information for your site and provided a valuable tool for keeping your site organized in the future. The IA helps us make informed decisions about structure and usability. Sitecore Tree Live Website Navigation 5 Elements of a Sitecore Content Page While not all pages in Sitecore are created equal, most of them have some standardized layout and fields. The image and descriptions below explain the most prevalent visual elements of a content page including multiple navigation types, headings, and content. 1. Primary website navigation and Ball State branding: audience gateways, directory, search, and landing page buttons allow for easier site-‐wide navigation. 2. Billboard, a.k.a. “banner image”: billboards act as page “real estate” for storytelling through photography to convey key messaging such as vibrant campus life, immersive learning, and unique program characteristics. 6 3. Breadcrumb navigation: a type of secondary navigation that traces the current page back to the Ball State homepage. This helps to create a sense of “place” for the current page. 4. Heading: in web standards, this H1 heading is important for search optimization as well as for a visual queue to website visitors for the current page. 5. Body Copy: most unique content for the page exists here. This is where the majority of updates in Sitecore are made by authors. 6. Vertical navigation: this “right-‐side” navigation is based on the information architecture and page relationships for the current web page. 7. News Footer: optional news and events “ticker” links to important news stories and can be customized for departments. It also includes links to the Ball State News Center and calendar of events. 8. Footer: standardized footer format with copyright, address, and important links including legal information. Content Tree The content tree is located in the left pane of the browser window when you log in to Sitecore. From there, you can view the information architecture for the Ball State website including your own department’s pages. Page Relationships Relationships are defined by the location of a page within the content tree. Sidebar navigation is constructed through these relationships (see “Elements of a Sitecore Content Page” below). The terms used for Sitecore are “parent page,” “child page,” and “sibling page.” In the above example, some relationships are described as follows: • • Academics is the parent page of Why Study at Ball State, therefore Why Study at Ball State is the child page of Academics. The Programs, The People, The Facilities, and The Experience are all sibling pages, and Why Study at Ball State is their parent page. Page Templates Page templates are used in Sitecore to provide standard formatting options based on content needs. Some examples of current templates include: • • • • • • Landing pages Content pages Link pages Video pages Staff listing pages Personnel profile pages 7 Your department’s web property will have access to one or more page types based on your current website access and needs. Page Versions Sitecore can store up to ten of the most recent versions of any page or item in its database. This feature allows for the ability to store and access multiple versions of the same page. Examples of how version management can be used include: • • • Comparison of versions for easier review of changes Ability to access and edit multiple versions of a page to be used when information changes on a timely basis Ability to revert back if errors are introduced to a page or item Contact the HelpDesk if you have questions about how to manage versions in Sitecore. Check Out = Lock = Edit These three terms refer to the same action of locking a page for editing. When you “lock a page” it is in “edit mode” and you have it “checked out.” Body Copy Editor Many templates have a body copy area for adding text, images, and links. The body copy is where the majority of the work takes place in Sitecore. A rich text editor (RTE) provides controls for advanced controls for images, links, and text. See below for a list of controls and their functions. Top Row (left to right) • Find and Replace: search and replace functionality that is very similar to Microsoft Word • Cut • Copy • Paste Plain Text: removes all formatting when pasting content into Sitecore. This functionality is intentionally designed to remove formatting that could break website styles. See tutorial #4 below for more information about pasting content into Sitecore. • Format Stripper: removes various types of formatting markup that can break/override website styles including All, CSS, Font, Span, and Word • Undo • Redo 8 • • • • • • • Insert Sitecore Link: creates an internal link to another Sitecore page or an item in the Media Library. This is the preferred linking method for Sitecore, since it is more resilient and will maintain links if content is moved, renamed, or otherwise updated. Insert Sitecore Media: inserts media that was previously uploaded via the Sitecore Media Library. Hyperlink Manager: creates/manages links to websites outside of Sitecore (including other web properties within www.bsu.edu), on the page links, and email Remove Link Horizontal Rule: inserts a horizontal line to divide content on lengthy pages Insert Table: creates a custom table by size or using the Table Wizard. Tables should be used sparingly for content in Sitecore. Insert Symbol: includes special characters for use in content. Bottom Row (left to right) • Apply CSS Class: currently unused • Paragraph Style: content and headings for formatting text. Headings should be used for search engine optimization and visual identification for website audiences • Bold • Italic • Underline • Align Left • Align Center • Align Right • Justify • Remove Alignment • Numbered List • Bulleted List • Indent • Outdent • Strikethrough • Subscript • Superscript • Select all • Show/hide Border: shows/hides table borders in the RTE • AJAX Spellchecker: spellchecks text in the body copy • XHTLM Validator: validates XHTML markup • Help: opens window with RTE function descriptions 9 The Sitecore Ribbon The options available in Sitecore are organized into categories represented by the tabs in the Ribbon at the top of the browser window. Most users will see the following tabs: Home, Navigate, Review, Publish, Versions, and View. The Save button is static on the Ribbon regardless of the tab selected. Each tab contains commands that are relevant for tasks performed in those categories. Navigate to any page in your website and the Ribbon will contain the following commands in each category. Home Tab All options in this category are designed for working with pages. The Home tab currently contains functions to change the website information architecture (IA) by adding, deleting, and renaming pages. Work with your team to contact Strategic Communications prior to making any changes to IA; see “Website Information Architecture” section above for more information. • • • • Insert: contains options for inserting a new page into the information architecture of your department’s web property. In the tree, select the page you want to be the parent page, then click the template. Operations: delete a page Rename: rename the selected page or change the Display Name for the selected page Sorting: move a page up, down or to the first or last place in the current level of the tree. This will change the order of the navigation on the live site. Navigate Tab These operations allow for flexible navigation through the tree. Some of the functions in the navigate tab are relative to your current location, such as Up, Subitems, and Links. • Open: open a page by selecting the page from recent edits, or by navigating the content tree 10 Back and Forward Buttons: for navigation in Sitecore (do not use the back and forward buttons in the browser) Up: Moves the cursor to the parent page in the tree Subitems: displays all of the children under the item that is currently selected. Home: selects the Ball State home page Favorites: allows you to add frequently accessed pages to your favorites for quick navigation (see “Adding Your Department’s Landing Page as a Sitecore Favorite” above) Links: displays a list of all current links to the page selected in the tree. • • • • • • Review Tab The operations on the Review tab are relative to the currently selected page in Sitecore. They include advanced review capabilities to ensure proper HTML and Spellcheck, along with Preview and ability to see your locked items. The most commonly used operations by users are Preview and My Items. • • • • • Spelling: runs spellcheck on the currently selected page Markup: provides W3C markup validation service Validation: checks key fields in the page template Subscribe: provides an RSS feed for subscription to version updates on the selected page Preview: opens a preview of the selected page in a new window Publish Tab The operations on the Publish tab are relative to the currently selected page in Sitecore. They are related to editing and publishing a version of the currently selected page in Sitecore. This tab also includes advanced publishing capabilities. Every time you make changes to a page, you are editing a version of that page. Multiple edits can be made to the same version prior to publishing. See the Version tab (below) for information about version management. 11 • • • • Change (restrictions): displays advanced publishing settings to control how versions of the selected page are published. Preview: opens a preview of the latest version of the selected page in a new window (same operation found in the Review tab) Workflow: displays the editing status of the current page version and operations for editing and publishing o Edit: available when the current version of the page is not checked out (locked) for editing o Check In: available when you have the current version of the page checked out o History: displays a list of recent activity of the current version of the page o Publish for Review: sends the current version of the page to the publishing queue Note: when clicking the Publish for Review button, the current version of the selected page is queued for publishing. The new version (with any changes) will typically go live within minutes depending on the current level of activity in the system. If you have issues with publishing a page, submit a ticket to the HelpDesk at www.bsu.edu/helpdesk or call 285-‐ 1517. Versions Tab The Versions tab is relative to the currently selected page in Sitecore. It contains operations for managing the version history of the page by comparing or removing versions. Every time you make changes to a page, you are editing a version of that page. Multiple edits can be made to the same version prior to publishing. See the Publish tab (above) for information about locking and publishing versions of a page. Note: To enhance system performance Sitecore currently limits pages to the 10 most recent versions and will automatically delete the 11th version and up. • • • • Reset (fields): opens a dialog screen with options to clear fields in the current version Versions: displays modification history of versions including date/time and user Compare: opens a window that allows for easy comparison of versions Remove: deletes the currently selected version of the page 12 The Media Library Similar to the structure of web pages in Sitecore, the media library has parent-‐child relationships. The main difference is that folders are used to store collections of individual media items. The media library is made up of several primary folders. Each web property has its own dedicated folder nested below the parent folder called “Departmental Content.” The folders are organized in alphabetical order for convenience. A best practice to use in the media library is to use sub-‐folders within the primary department folder. This allows you to keep related items grouped together and organize your media content in a way that will make it easier to retrieve or update later on. Callouts Sitecore’s Callouts are used to highlight a piece of content on a web page. They are managed and created separately from pages and require access to additional areas of Sitecore. Some types of callouts include: -‐ -‐ -‐ -‐ -‐ -‐ Announcements News Footer Link Blocks Feature Callouts Image Callouts Video Callouts To use callouts, your department will need to work with the Division of Strategic Communications on a communications strategy and to configure functionality in the content management system (CMS). Contact your communications manager or the Strategic Communications front office (765-‐285-‐1560) for assistance. See tutorials 10-‐12 for more information on using Announcements, the News Footer and Link Blocks. 13 Writing for the Ball State Website Copy and content (photos, videos, etc.) are the most important contributors to a successful user experience on our site. This content is also what search engines use to determine ranking. As you and your team plan, create, and maintain content on the Ball State website, keep the following guidelines in mind: • • • • Consider the audience the content is addressing and its persona. Consider the message being communicated and the purpose behind the content. Consider the action visitors need to take: apply, give, register, inquire, contact, etc. Consider how results will be measured based on key performance indicators (KPIs) that are business metrics for the university and your department or office. This isn't about just looking at analytics. This is about how you are going to maintain a useful presence on the website. Successful web writing is both an art and a science. Visit www.bsu.edu/cms for much more information about web writing including guidelines, audience persona templates, and other resources. 14 Tutorials Tutorial #1: Logging In and Logging Out of Sitecore Sitecore is a web application, so the only software that you need to have installed on your computer is a supported web browser. Ball State’s current version of Sitecore has cross-‐browser support, allowing for your choice in your personal browser preference. However, we recommend trying Firefox or Chrome for best results. Your log in information to Sitecore is your Ball State username and password. Never share your Ball State username and password with anyone. See www.bsu.edu/security/itpolicy for related information, including the Information Technology Users’ Privileges and Responsibilities. 1. Go to the log in URL for Sitecore: https://sitecorecms.bsu.edu/sitecore/login/ 2. Type in your Ball State username and password 3. Click the Login button On the login page you may see several options and information about Sitecore. Under User Interface, select “Content Editor” and leave User Interface Language as “Default.” 15 Any time that you exit Sitecore, click on the My Items button in the Review tab. You will see a list of all pages that you have locked for editing. You can click on “Unlock all” to check them back in so that other users can access them. To log out, click the Sitecore menu button at the top left corner of your browser window (red circle). In the drop-‐down menu, click Exit. 16 Tutorial #2: Adding Your Department’s Landing Page as a Favorite Add your department’s landing page to your favorites allows you to access the page quickly each time you log in to Sitecore. You can add any page in the tree that you navigate to on a regular basis to your favorites. 1. 2. 3. 4. 5. Navigate through the tree to the location of your department’s landing apge Click on the name (text) to select the page Click the Navigate tab on the ribbon Click the Favorites button Select “Add to Favorites” from the drop-‐down menu The next time you log in, click the Navigate tab and select the page from the drop-‐down list. 17 Tutorial #3: How to Check Out and Edit a Page If the most recent version of the page was published, then checking out the page also creates a new version. This will be indicated by a change in the number near the top right corner of the browser window. Sitecore keeps the ten most recent versions of any page or item. See “Version Management” below for more information. 1. Navigate to the page in the Sitecore tree and select (highlight) the page you want to edit. 2. At the top of the page you will see “You must lock this item before you can edit it.” 3. Click Lock and Edit icon at the top of the page. At this point, you have checked out the page and can edit content. Go to the Publish tab and you will see a dialog indicating that you have the item locked for editing. Make Changes to Body Copy Once the page is checked out, you can make changes to the content on the page. The main content on your page is created and edited in the Body Copy field. Most of your work in Sitecore will center on editing the existing “body copy” field of a content page. 1. 2. 3. 4. Scroll down to view the Body Copy field in the Content section Click on Show Editor. The body copy editor window will open. Make changes to the existing content. Once the body copy changes are complete, click Accept to place the information onto the page. Accept is not the same as Save. Accept closes the Editor window and keeps the changes. 5. Click the Save Icon on the Ribbon 6. Click Preview on the Publish or Review tab to check your edits Repeat the above steps until the page is ready to be published. Do not publish your page to preview edits. Following proper steps for editing and publishing will improve system performance for all users and eliminate unnecessary versioning of pages. 18 Tutorial #4: Pasting Text and Creating Links Sitecore has a function in its body copy rich text editor (RTE) called “Paste Plain Text” that removes formatting for pasted text. You will not want to do formatting for Sitecore content in Word or any other tool. Formatting must be completed within Sitecore using the RTE. This functionality is intentionally designed to remove formatting that could break website styles. Follow these steps to past text from another source, such as a Word document. 1. 2. 3. 4. 5. 6. 7. 8. 9. 10. Copy the text from your source. Navigate in the Sitecore tree to the page that you want to edit. Lock the page for editing. Click “Show Editor” in the Content Editor. Place the cursor where you want to paste in the body copy window. Click the “Paste as Plain Text” button (see image below). In the new dialog window, follow the instructions to paste text, and then click “Paste.” Use the editor to create all necessary formatting. Click “Accept.” Click “Save” in the Ribbon. Best practice is to save your work often to ensure that edits are completed and saved. You can make multiple edits to a page and save your work continuously before publishing a page. You can even check in a version of the page and allow someone else to edit it prior to publishing. After saving the page, try creating a link in the copy. You will need to know whether the link is within Sitecore or outside of Sitecore, even if the link is within www.bsu.edu. Currently, all Sitecore pages start with http://cms.bsu.edu/ so Sitecore web pages are easy to identify. Follow these steps to create an internal Sitecore link on the same page that you pasted text. These same steps are used for linking to a media item in Sitecore. 1. Locate the page that you would like to link to. For this tutorial, let’s try the Immersive Learning landing page: /Academics/UndergraduateStudy/BeyondtheClassroom/ImmersiveLearning. You do not need to copy the link to your clipboard to create an internal Sitecore link. 2. Click “Show Editor” in the Content Editor. 3. Highlight the content (text or image) that will serve as the anchor for the link. To make exact selections, use Shift + [arrow keys]. This will prevent any unwanted characters or spaces from being selected. 4. Click “Insert Sitecore Link” in the RTE. 5. Navigate to the page in the content tree and click to highlight, then click “Link.” If you are linking to a media item, first click the “Media Items” tab, and then navigate, highlight, and link. 6. The link will display in the body copy. Click “Accept.” 19 7. Click “Save” in the Ribbon. Follow these steps to create a link to content outside of Sitecore, even to other web properties at www.bsu.edu that do not “live” in Sitecore. 1. Locate the page that you would like to link to. For this tutorial, let’s link to my.bsu.edu. 2. Click “Show Editor” in the Content Editor. 3. Highlight the content (text or image) that will serve as the anchor for the link. To make exact selections, use Shift + [arrow keys]. This will prevent any unwanted characters or spaces from being selected. 4. Click “Hyperlink Manager.” 5. In the “URL” field, type or paste in my.bsu.edu so the complete entry is http://my.bsu.edu. 6. In the “Target” field, select “New Window” in the drop-‐down menu. 7. Click “OK.” 8. The link will display in the body copy. Click “Accept.” 9. Click “Save” in the Ribbon. To remove a link, simply highlight the anchor link text or place your cursor within the link text and click “Remove Link” in the RTE. 20 Tutorial #5: Create a New Page The two primary page templates most authors will create in Sitecore are Content Pages and Link Pages. Their purposes are different. • • Content pages are used to add text, links, and images to a new page. They are searchable and only contain unique content. Do not copy and paste content from another Ball State web page into a new or existing page. If you feel that you need content on your site that is available elsewhere, contact your communications manager in or the Strategic Communications front desk (765-‐285-‐1560) to coordinate website updates. Link pages reference existing web content. Links can go to content in Sitecore (pages or media items) or external to Sitecore, even if it exists at a web property within www.bsu.edu. If there is no existing content at www.bsu.edu, you will need to create a Content Page. In order to create a new content page you must have content drafted and approved before logging in to Sitecore to make the addition to your website. When starting the process of adding new content to Sitecore, core considerations include: • • • • • Does the same/similar content already exist on www.bsu.edu? If so, do additional changes need to be discussed with another department or Strategic Communications? How will the page affect usability and navigation for multiple audiences? Is the content presented best as a page, multimedia, PDF, or some combination of those elements? Is the content (text with links, media, etc.) web ready? Images should be resized and exported to web standards before being added to the Media Library. Who do I need to communicate with about the changes? Are there other departments who need to reference the new content? Always work with Strategic Communications when modifying your information architecture; see “Introduction: How to Get Help” for additional information. To create a new page, follow these steps. 1. Find the parent page of the new page in Sitecore tree. This is determined by your information architecture and chosen location of the new page. 2. Click the page name to highlight it. 3. To insert the page, there are two options. a. On the Home tab of the Ribbon, locate the “Insert” section. Select the type of page— Content Page or Link Page—from the list by clicking the appropriate template name. b. Right-‐click (or Control + click on Mac) the parent page. Click “Insert” to select the appropriate template. 4. Name the page. You should use only a few keywords that identify the page topic. Spaces are recommended. See www.bsu.edu/cms for more information about keyword and content strategy. 21 5. Click “OK.” The page will be created and locked for editing. For Content Pages, the Body Copy will need to be edited, adding text, links, and multimedia as needed. Additional fields that may need to be edited include the following. For more information see “ Getting Started: Concepts and Definitions” above. • • • • • Title Breadcrumbs: Title and show/hide options (title is usually the same as the page title/name) Secondary Navigation: title and show/hide options (title is usually the same as the page title/name) Department Contact Information: Show option (usually checked) Metadata: title, description and keywords (influence search results for the internal website search and for external engines such as www.google.com) For Link Pages, the following steps are added to the five from above. 6. In the “Link” section of the Content Editor, click “Insert Link” for an internal Sitecore page link, “Insert Media Link” for an internal Sitecore media link, or “Insert External Link” for links to content outside of Sitecore, even to web properties within www.bsu.edu that “live” outside of Sitecore. 7. In the “Link Description” field, you will need to give the link a name. This will determine what visitors to the website see. For PDFs, append the name with (PDF) to identify the link as a media item (i.e. “Program Requirements (PDF)”). Copy this title to your clipboard. 8. Locate the page or media item or type in the external URL 9. In the “Target Window” field select “New browser.” 10. Click “OK.” 11. Paste the link description into the “Secondary Navigation Title” field. 12. Click “Save” in the Sitecore Ribbon. 22 Tutorial #6: Create a Sub-‐folder in the Media Library Folders are useful to organize and manage media items. The media library should only contain content that is accessible through active links on the live website. Items that are unused should be deleted. If your department doesn’t already have them, it is recommended to create a folder for images and a folder for PDFs. Further organization can be created within those folders by creating additional sub-‐ folders by year or by topic depending on the amount of items and schedule of maintenance. Follow these steps to insert a new folder in your department’s media folder in Sitecore. 1. Open the Media Library using one of two options. a. On the View tab of the Sitecore Ribbon, check the box for “Entire Tree” if it is not already checked. Your window will refresh and the Media Library will appear in the tree. b. At the bottom of your Sitecore browser window, click “Media Library” in the three view options. That option should be between “Content Editor” and “Workbox.” 2. Navigate to the web property’s associated media folder following the path. Click the “+” next to folder names to view additional levels of the tree. WWW > DepartmentalContent > [folder name] 3. Click the name of the appropriate media folder. 4. In the Content Editor under “Options,” click the “New Folder” button. 5. Name your folder. Note: in previous versions of Sitecore, publishing of media folders was required. This is no longer the case in our current version. Media items are published automatically by Sitecore while publishing pages that reference them. All publishing operations now take place in the Content Editor. 23 Tutorial #7: Upload a New Media Item When uploading items to the Media Library, file management must be considered. The following questions should be answered prior to uploading a media item. • • • • Does the same/similar content already exist on www.bsu.edu? If so, do additional changes need to be discussed with another department or Strategic Communications? Is the item a new addition to the website or a replacement of an existing file? Is the content web ready? Images should be resized and exported to web standards before being added to the Media Library. If the file is a PDF, then should it remain in that format or be translated to content on a web page? Contact your communications manager or the Strategic Communications front office (765-‐285-‐1560) if assistance is needed. (See “Getting Started” for more information about image specifications) Who do I need to communicate with about the changes? Are there other departments who need to reference the new content? Follow these steps to upload a new media item to the Media Library. 1. Open the Media Library using one of two options. a. On the View tab of the Sitecore Ribbon, check the box for “Entire Tree” if it is not already checked. Your window will refresh and the Media Library will appear in the tree. b. At the bottom of your Sitecore browser window, click “Media Library” in the three view options. That option should be between “Content Editor” and “Workbox.” 2. Navigate to the appropriate web property’s associated media folder following the path below. Click the “+” next to folder names to view additional layers of the tree. WWW > DepartmentalContent > [folder name] 3. Click the name of the appropriate media folder to select it. With few exceptions, media should be uploaded to a sub-‐folder within the corresponding web property’s media folder (i.e. PDFs or Images folder). 4. In the Content Editor, select either “Upload File” or “Upload Files (Advanced).” The advanced option offers more flexible upload options: larger file size, multiple simultaneous uploads, overwriting of existing media files, and ability to add alternate text to images (see www.bsu.edu/cms for more information about alternate text and web accessibility standards). a. When using “Upload File” i. Click “Choose File.” ii. Navigate to the media item on your local machine/network. iii. Click “Upload.” b. When using “Upload Files (Advanced)” i. Click “Choose File.” ii. Navigate to the media item on your local machine/network. iii. Click “Open.” iv. Click “Upload.” v. To add alternate text to images, click the media item in the “Uploaded Media Items” section, click “Lock and Edit,” scroll down to the “Alt” field, type in alternate text, and click “Save/Close.” 24 vi. Click “Close.” 5. Confirm that the media item is now visible in the Media Library folder that you selected. 25 Tutorial #8: Insert an Image on a Page Follow these steps to add an image to a page in Sitecore. The image will need to be uploaded to the Sitecore Media Library. See tutorial #7 for upload process and see “Getting Started” for image specifications and requirements. 1. 2. 3. 4. 5. 6. 7. 8. 9. 10. 11. 12. 13. 14. Navigate to the appropriate page in the Sitecore tree. In the Content Editor, click “Lock and Edit.” Click “Show Editor.” Place your cursor in the text at the approximate position for the image. In the Body Copy rich text editor (RTE), click “Insert Sitecore Media.” Navigate to the media item. Click the “+” by folder names to expand areas of the Media Library. Click the media item to select it. If the “alternate text” field is blank, add a brief description of the image content. Click “Insert.” Right-‐click the image and select “Properties…” to set alignment and margin. a. Most images in the body copy should be set to align left or right. This will wrap text with the image. b. Add left/right margin to add spacing with wrapped text. Start with 5 and increase as needed. c. Click “OK.” In needed, adjust the vertical position of the image using a mouse click drag-‐and-‐drop. Click “Accept.” On the Review or Publish tab of the Ribbon, click “Preview” to see your changes. Repeat steps 10-‐12 as needed until spacing and position are set to the needs of the page content layout. Adding a caption to an image currently requires use of tables in the RTE. See www.bsu.edu/cms for additional information or contact the HelpDesk (see “Introduction: How to Get Help” above). 26 Tutorial #9: Replacing an Existing Media Item Sitecore makes it easy to update your current media items with new versions. A common scenario is a PDF document that exists in Sitecore, which has been updated offline. Rather than have two copies of the same PDF in the Media Library—making it difficult for visitors and other authors to know which one is correct—you can upload a new item and delete the old one seamlessly, while ensuring that links in Sitecore are also up to date. Follow these steps to replace an existing media item. The process will be slightly different depending on whether or not the replacement file has the same name as the existing one. 1. Open the Media Library. See tutorial #7 for options to access the Media Library. 2. Navigate to the appropriate web property’s associated media folder following the path below. Click the “+” next to folder names to view additional layers of the tree. WWW > DepartmentalContent > [folder name] 3. Click the name of the appropriate media folder to select it. With few exceptions, media should be uploaded to a sub-‐folder within the corresponding web property’s media folder (i.e. PDFs or Images folder). (see tutorial #6 for creating a media library folder) 4. In the Content Editor, select “Upload Files (Advanced).” 5. Click “Choose File.” 6. Navigate to the media item on your local machine/network. 7. Click “Open.” a. If your updated file has the same name as the file in Sitecore, Check the box for “Overwrite Existing Media Items.” b. If your updated file has a name that is different from the file in Sitecore, leave the box for “Overwrite Existing Media Items” unchecked. Additional steps will be required to update content in Sitecore (see below). 8. Click “Upload.” 9. To add alternate text to images, click the media item in the “Uploaded Media Items” section, click “Lock and Edit,” scroll down to the “Alt” field, type in alternate text, and click “Save/Close.” 10. Click “Close.” If you updated file has the same name as the file in Sitecore, then the replacement is complete at this point. The new media file may take several minutes to appear on the live website. If it does not show up within two hours, contact the HelpDesk for additional assistance. If your updated file has a different name from the file in Sitecore, then you will have two media files to reconcile at this point. Follow these additional steps to complete the replacement. 11. Right-‐click the existing (older) file and click “Delete.” 12. Confirm the deletion by clicking “OK” in the dialog window. 13. If there are any existing links to the media item, a “Breaking Links” dialog will display. Check the radio button for “Link to Another Item” then click “Continue.” 14. Navigate to the update file, click the name to select it, then click “Continue.” All existing links will be updated by Sitecore to the updated file. 27 Tutorial #10: Creating an Announcement Announcements are a useful feature in Sitecore for temporarily highlighting a piece of content (web page or PDF) that is timely such as an upcoming deadline or information about an important event. In order to use announcements, you will need to work with the Division of Strategic Communications on a communications strategy and to configure functionality in the content management system (CMS). Contact your communications manager or the Strategic Communications front office (765-‐285-‐1560) for assistance. Prior to creating an announcement in Sitecore you should be able to answer the following questions. Strategic Communications will assist with your initial communications strategy to help answer them. • • • What content needs to be highlighted? Is it new or existing in Sitecore? What is the call to action (register, attend, sign up, etc.)? When will the announcement go live and for how long? Follow these steps to create a new announcement in Sitecore. You will need to have existing content available in Sitecore, call to action text, and an Announcements Callout Folder in order to complete the steps. 1. In the Content Editor, navigate to the announcements callout folder for the appropriate web property: Home > Data > Callouts > Announcements > [web property name] 2. Click the name of the folder to select it. 3. Create the announcement using one of three options. a. On the Home tab of the Ribbon, locate the “Insert” section. Click “Announcement Callout” from the list. b. Right-‐click (or Control + click on Mac) the parent page. Click “Insert” and select “Announcement Callout.” c. In the Folder: Options area at right in the Content Editor, click “Announcement Callout.” 4. Name your announcement using a short, identifiable keyword phrase. Spaces should be used to separate words. 5. Click “Insert Link” when linking to a page or use “Insert Media Link” when linking to a media item. 6. Navigate to the content using the “+” next to content items to expand the tree. Click the name of the item to select it. Type in our predetermined call to action text in the “Link description” field. When linking to a PDF, append the name to indicate the media format (ex: “ Register for Sitecore Training (PDF)”). 7. Click “OK.” 8. Click “Save” on the Sitecore Ribbon. 9. Navigate to the page where the announcement will be added. Click the page name to select. 10. Click “Lock and Edit.” 28 11. In the Content Editor, scroll down to the Announcement section. Navigate to the announcement, click the name to highlight, and then click the right-‐arrow. The announcement name now appears under “Selected.” 12. On the Review or Publish tabs in the Sitecore Ribbon, click “Preview.” The announcement will appear on the right above the right-‐hand secondary navigation. 13. Make any necessary adjustments by repeating steps 1-‐8 as needed and using the “Preview” function on the page where the announcement is added. 14. Select the announcement in the tree. On the Publish tab click “Publish for Review.” 15. Select the page containing the announcement. On the Publish tab click “Publish for Review.” 29 Tutorial #11: Managing the News Footer The News Footer is a feature in Sitecore used to highlight upcoming news and events. It can be setup to reflect the same news and events found one the Ball State homepage (www.bsu.edu) or customized for your department. To setup a customized News Footer, you will need to work with the Division of Strategic Communications. The Division of Strategic Communications on a communications strategy and to configure functionality in the content management system (CMS). Contact your communications manager or the Strategic Communications front office (765-‐285-‐ 1560) for assistance. Follow these steps to setup the News Footer based on the Ball State homepage. 1. Navigate to the appropriate web property landing page in the tree. Use the “+” signs to expand additional layers of the tree. Click the page name to select it. 2. Click “Lock and Edit.” 3. In the Content Editor at right, scroll down to the News Footer section. Click the checkbox next to “Show News Footer.” 4. On the Review or Publish tabs in the Sitecore Ribbon, click “Preview.” In the window or tab that opens, scroll down to the bottom of the page. You will now see the university’s current news feed in the News Footer. 5. On the Publish tab of the Ribbon, click “Publish for Review.” Your web property may have a customized news feed and communications plan with Strategic Communications. Remember the following best practices when adding articles to a customized news feed. The News Footer is limited to four articles/links at a time. Follow these steps to add a news item to your customized news feed. 1. Navigate to the appropriate web property’s news articles folder. Home > News > News Footer > Articles > [web property name] 2. Locate the folder for the current year/month. If no such folder exists, create a new News Footer Folder using one of three options. a. On the Home tab of the Ribbon, locate the “Insert” section. Click “News Footer Folder” from the list. b. Right-‐click (or Control + click on Mac) the folder, click “Insert,” and select “News Footer Folder.” c. In the right pane of the Content Editor under Options, click “News Footer Folder.” 3. Click the name of the year/month folder to select it. 4. Create a Link Page using one of the three above options, and select “Link Page.” 5. Name the page using a short, identifiable keyword phrase. Spaces should be used to separate words. 6. Click “Insert Link.” 30 7. Navigate to the content using the “+” next to content items to expand the tree. When creating a link to an article in the Ball State News Center, follow the path below. 8. 9. 10. 11. 12. 13. Home > News > Articles > [year] > [month] > [article name] Click the name of the page to select it. Click “OK.” Click “Save” on the Sitecore Ribbon. Navigate to the page where the news item will be added. Click the page name to select. Click “Lock and Edit.” In the Content Editor, scroll down to the Footer Items in the News Footer section. Navigate to the article once again, click the name of the Link Page to select it, and click the blue right-‐arrow. The article link will now appear under “Selected.” a. If you have more than four articles under “Selected,” remove any extras. Click the name to highlight, and then click the left-‐arrow to remove from the list. Repeat until only the four most recent articles remain. 14. Use the blue up-‐ and down-‐arrows (at right) to reorder articles. The articles will appear in order from top to bottom. 15. Click “Save” in the Ribbon. 16. On the Review or Publish tabs in the Sitecore Ribbon, click “Preview.” The article will appear in the News Footer. 17. Make any necessary adjustments by working through steps 1-‐5 as needed. 18. Navigate to and select the article Link Page in the tree once again. On the Publish tab click “Publish for Review.” 19. Select the page containing the news article link. On the Publish tab click “Publish for Review.” 20. Validate the change on the live site, allowing for adequate publishing time. 31 Tutorial #12: Link Blocks Link Blocks are used with a specific template that is used for some web properties based on content strategy and the needs of website visitors. The template is used for areas with landing pages that quickly branch out to functional or topical areas of content within the respective property. The Link Block template requires a specific sub-‐set of management activities for maintaining these groups of links, and this tutorial explains the process for updating, adding, and removing links to Link Blocks. If you unsure whether your website has the Link Block feature, please contact the HelpDesk by submitting a ticket at www.bsu.edu/helpdesk or calling 765-‐285-‐1517. Location of Link Blocks Follow the path below in the Sitecore tree to locate the Link Blocks for a respective web property. Home > Data > Callouts > Link Blocks > [follow the path for the property] Update an Existing Link Block: Update a Link Follow these steps to update an existing Link Block link. 1. Locate the Link Block by following the path as explained above. The Link Block template icon looks like two blue arrows pointing to the right. Click the + to expand the tree and reveal the links. 2. Click “Lock and edit” to edit the page. 3. In the “Link” section of the Content Editor, click “Insert Link” for an internal Sitecore page link, “Insert Media Link” for an internal Sitecore media link, or “Insert External Link” for links to content outside of Sitecore, even to web properties within www.bsu.edu that “live” outside of Sitecore. 4. In the “Link Description” field, you will need to give the link a name. This will determine what visitors to the website see. For PDFs, append the name with (PDF) to identify the link as a media item (i.e. “Program Requirements (PDF)”). Copy this title to your clipboard. 5. Locate the page or media item or type in the external URL 6. In the “Target Window” field select “New browser.” 7. Click “OK.” 8. Click “Save” in the Sitecore Ribbon. 9. The “Preview” button in the “Review” tab will not work from a link page. To preview a link, go to the actual page the link directs to. 10. On the Publish tab of the Ribbon, click “Publish for Review.” Update an Existing Link Block: Add a Link Follow these steps to add a link to an existing link block. 1. Locate the Link Block by following the path as explained above. (the Link Block template looks like two blue arrows pointing to the right) 32 2. Add a new link block link using either of the following two options: a. On the Home tab of the Ribbon, locate the “Insert” section. Click “ Links Callout Link” from the list. b. Right-‐click (or Control + click on Mac) the folder, click “Insert,” and select “Links Callout Link.” 3. Name the Link Block link when prompted. 4. In the “Link” section of the Content Editor, click “Insert Link” for an internal Sitecore page link, “Insert Media Link” for an internal Sitecore media link, or “Insert External Link” for links to content outside of Sitecore, even to web properties within www.bsu.edu that “live” outside of Sitecore. 5. In the “Link Description” field, you will need to give the link a name. This will determine what visitors to the website see. For PDFs, append the name with (PDF) to identify the link as a media item (i.e. “Program Requirements (PDF)”). Copy this title to your clipboard. 6. Locate the page or media item or type in the external URL 7. In the “Target Window” field select “New browser.” 8. Click “OK.” 9. Paste the link description into the “Secondary Navigation Title” field. 10. Click “Save” in the Sitecore Ribbon. 11. The “Preview” button in the “Review” tab will not work from a link page. To preview a link, go to the actual page the link directs to. 12. On the Publish tab of the Ribbon, click “Publish for Review.” Create a New Link Block Follow these steps to create a new link block. 1. Locate the appropriate Links Callout Folder by following the path as explained above. 2. Add a new Link Block using either of the following options: a. On the Home tab of the Ribbon, locate the “Insert” section. Click “Links Callout” from the list. b. Right-‐click (or Control + click on Mac) the folder, click “Insert,” and select “Links Callout.” 3. Name the Link Block when prompted. 4. Add links to the Link Block by following the instructions above under “Update an Existing Link Block: Add a Link. “ 5. Click “Save” in the Sitecore Ribbon. 6. The “Preview” button in the “Review” tab will not work from a link page. To preview a link, go to the actual page the link directs to. 7. On the Publish tab of the Ribbon, click “Publish for Review.” 33